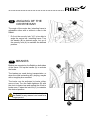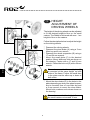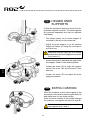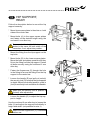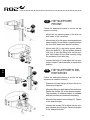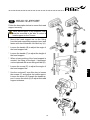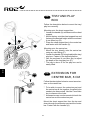
1
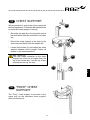
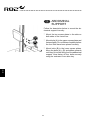
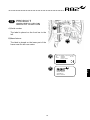
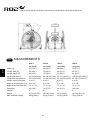
rabbit TM English user manual G B © 2010 R82 A/S. All rights reserved. The R82 logo and the Rabbit are trademarks of R82 A/S. 12.2012 - rev.007 GB G B Contents Safety................................................................................. 4 Warranty............................................................................. 4 Tools................................................................................... 4 T-tool.................................................................................. 5 Ready for use..................................................................... 6 Angling of the centre bar.................................................... 7 Brakes................................................................................ 7 Height adjustment of driving wheels................................... 8 Mounting and adjustment of the foot plate......................... 9 Mounting and adjustment of individual foot supports....... 10 Spoke protectors.............................................................. 10 Mounting of flip-up sandals / heel supports...................... 11 Knee supports.................................................................. 11 Hinged knee supports...................................................... 12 Extra cushion.................................................................... 12 Hip support, rear............................................................... 13 Hip support, front.............................................................. 14 Hip supports de-rotation................................................... 14 Head support.................................................................... 15 Tray and play box............................................................. 16 Extension for centre bar, 8 cm.......................................... 16 Chest support................................................................... 17 "Pony" chest support........................................................ 17 Abdominal support........................................................... 18 Product identification........................................................ 19 Measurements.................................................................. 20 Technical data.................................................................. 21 Producer........................................................................... 21 Distributor......................................................................... 21 Care and maintenance..................................................... 22 2 GB Rabbit The Rabbit is a mobile standing frame providing users the possibility of moving around and orientate oneself. The user will be in equal height as his or hers friends and will have a good view. Children with paresis or cerebral paralysis will find joy in using the Rabbit, and children in Support Cast can easily be placed in it. This user manual is a guide to assist in gaining the full benefits of the options offered by the Rabbit. Therefore, we recommend you read this manual before using the mobile standing frame. Please note! Rabbit is mainly for indoor use, but can be used outdoors. When used indoors and moved from one room to another it is important to be aware of the fact that obstacles e.g. doorsteps, may pose a risk of tilting. When used outdoors the surface must be flat and without obstacles, e.g. holes and drain traps, which may pose a risk of tilting. Never leave the user unattended in this product. 3 G B GB Safety The Rabbit has earned the CE-mark. This certifies that it meets all relevant European safety requirements. The durability of this product is 5 years when it is used on a daily basis. Hereafter the product must be renovated (by R82 personnel) to extend the lifetime. Remove the CE-mark, when re-building the product or when using other than original R82 spare parts and fittings. Check the strap before every use and replace any worn out parts before using this product. Never leave your child unattended in this product. Ensure constant supervision by an adult. Incorrect use of the product, may cause serious injury to the user. Ensure that the belt is securely fixed to the frame before every use. Use only when all 6 wheels are mounted. GB G B Warranty R82 offers a 2-year warranty against defects in workmanship and materials and a 5-year warranty on breakage of the metal frame caused by defects in welds. The warranty would be adversely affected if the customer’s responsibility of servicing and/or daily maintenance is not carried out according to the guidelines and intervals prescribed by the supplier and/or stated in the manual. For further information, we refer to the R82 homepage/download. The warranty can only be sustained if the R82 product is in use in the same country where it was purchased and if the product can be identified by the serial number. The warranty does not cover accidental damage, including damage caused by misuse or neglect. The warranty does not extend to non-durable parts, which are subject to normal wear and tear and need periodic replacement. The warranty is null and void if non-original R82 parts/accessories are used, or if the product is repaired or altered by anyone other than an authorised R82 representative or by trained personnel officially recognised by R82 for repair and maintenance of R82 products. R82 reserves the right to inspect the product being claimed for and the relevant documentation before agreeing to the warranty claim, and to decide upon whether to replace or repair the defective product. It is the customer’s responsibility to return the item being claimed for under warranty to the address of purchase. The warranty is given by R82 or, subsequently, an R82 dealer. GB Tools Tools are delivered with the Rabbit: 5 & 6 mm allenkeys and 2 pcs. T-tools. This key is used to perform some of the adjustments described in this manual. 4 GB T-tool A The T-tool (A) helps to maintain the square plates in the slot of the center bar, when mounting or adjusting eg. knee supports, hip support etc. Insert tool into slot, twist 90° and tip down to support the plate. G B 5 GB Ready for use The Rabbit is delivered without accessories to make it take up as little room as possible during transportation. To assemble your Rabbit ready for use, please follow the description below. * Remove the Rabbit from the packaging * Check if all tires run smoothly * Check if the brakes work correctly. See another page in this manual to adjust the brakes. The brake handles on both sides of the centre bar has to be removed to be able to mount various accessories. Follow the below description: *Loosen the screw (A) using the enclosed 5 mm Allen key. * Move the brake handles upwards and dismount from the centre bar. * Mount the desired accessories and remount the brake handles. Fasten with the Allen key. The Rabbit is now ready for use and to receive any accessories ordered. G B Do not place an user in the Rabbit if it has been standing in/exposed to sun. For the safety and comfort of the user the Rabbit must be moved away from the sun and chilled before use. A Before mounting the accessories, we advise removing the driving wheels. Do not use without the driving wheels. 6 GB Angling of the centre bar B A The angle of the centre bar / standing frame is adjustable either with or without a user in the Rabbit. * Pull out the security lock "(A)" to be able to angle the centre bar / standing frame. Turn the handle (B) to desired angle. Let go of the security lock (A) to maintain the desired position. GB Brakes A Brakes are mounted on the Rabbit on both sides of the frame. Pull up the handle (A) to activate the brake. G B The brakes are used during transportation or when the child is standing still - playing, maybe with a tray/play box mounted. The brake can be adjusted to brake either more or less. Turn the cable tightener (B) with the clock to brake less and against the clock to brake more. Fasten the lock-nut (C) to maintain the desired position. We recommend not to lock the wheels, if the Rabbit for any reason is not used for a longer period. C B 7 GB The height of the driving wheels can be adjusted to fit the desired height-to-floor on the small casters. The Rabbit is delivered with max. 1 cm height-to-floor on the casters. B Follow the description below to adjust the height on the driving wheels. A G B C Height adjustment of driving wheels * Dismount the driving wheels * Dismount the drum brake (A) using a 3 mm Allen key and 8 mm wrench. * Dismount the wheel suspention (B) using a 17 and 24 mm wrench. * Mount the small plate (C) in the desired position. Mount bolts and nuts as shown on the drawing. Fasten with a 17 and 24 mm wrench. Fasten the lock-nut (D) with a 24 mm wrench. Please be aware that the small plate (C) is mounted at the same height on both sides of the frame. Further the small dent in the plate must be either up or down in both sides. D E * Mount the drum brake (E) in the holes in the plate depending on where the wheel suspension is mounted. Use a 3 mm Allen key and a 8 mm wrench to mount the drum brake. Mount bolts, washers and nuts as shown on the drawing. Please be aware that the heigh-to-floor on the small casters not exceed 15 mm 8 GB Mounting and adjustment of the foot plate Follow the description below to mount the foot plate correctly. We recommend to dismount the square plates from the foot plate before mounting. B Tip! In general we recommend to mount all accessories from the top of the centre bar which is why the lower accessories must be mounted first. B * The square plates (A) from the foot plate is mounted in the slots on the centre bar. Let them slide all the way down. C * Mount the foot plate using the enclosed bolt (B) and the 6 mm Allen key. Turn the handle (C) to angle adjust the foot plate. Loosen the bolts (B) in both sides of the centre bar and height adjust the foot plate. Fasten the bolts in the desired position. A 9 G B GB A Mounting and adjustment of individual foot supports Follow the description below to mount the foot supports correctly. The foot supports are mounted seperately and can be adjusted individually. * The square plates mounted on the foot support, should be mounted in the slot on the centre bar as for the foot plate. * Adjust the height and fasten the screw (A) using the 6 mm Allen key. Tip! In general we recommend to mount all accessories from the top of the centre bar which is why the lower accessories must be mounted first. D G B 3 1 2 C Loosen the screws (B) to adjust the height and angle of the foot supports. Adjust the foot plate sidewise (C) and in depth (D). Loosen the screws (E) to adjust the angle of the foot plate. Make sure to fasten the screws (D) and (E) in the recommend order; 1, 2, 3. B E Make sure that all screws are fastened securely before use. GB Spoke protectors Follow the description below to mount spoke protectors on the Combi Frame: 1)Place the protector on the spokes 2)Mount the enclosed clips through the holes in the spoke protectors and click into place on the spokes. 10 GB Mounting of flipup sandals / heel supports A C Follow the description below to mount the flip-up sandals / heel supports correctly. * Place the enclosed bolt (A) in the slot from the top of the footplate/heel support and fasten with the fingerscrew (B). B * The flip-up sandal / heel support can be adjusted forward or/and backward depending on the desired placement (C). Fasten the screw beneath the foot plate in the desired position. GB A B Knee supports C G B Follow the description below to mount the knee supports correctly. The knee supports are mounted seperately and can be adjusted individually. A *The square plates on the knee support is mounted in the slot on the centre bar. * Adjust the knee support in too the desired height and fasten (A) using the enclosed 6 mm allen key. B Make sure that the fitting (B) is in the vertical position when the knee support is mounted. (not for size 1). * Loosen the screw (C) and adjust the angle of the foot support. Fasten in the desired position. C *Loosen the screw (D) and adjust the knee supports sidewise. 11 D GB Hinged knee supports Follow the description below to mount the hinged knee supports correctly. The knee supports are mounted seperately and can be adjusted individually. A *The square plates on the knee support is mounted in the slot on the centre bar. * Adjust the knee support in to the desired height and fasten (A) using the enclosed 6 mm allen key. Make sure that the fitting (B) is in vertical position when the knee support is mounted. (not for size 1). * Loosen the screw (C) and adjust the angle of the foot support. Fasten in the desired position. B D G B *Loosen the screw (D) to angle the support around the knee. Use the enclosed 5 mm allen key. C *Loosen the screw (E) and adjust the knee supports sidewise. E GB B Extra cushion Move the cushions on the chest support or the hip support to the side by loosening the bolts (A) and make room for the extra cushion. Place the extra cushion in the middle between the cushions, and tighten the bolts (A) and (B). Can be mounted on the chest support and hip supports size 2 and 3. A A 12 GB Hip support, rear Follow the description below to mount the hip support correctly: * Mount two square plates in the slots on both sides of the centre bar. A * Mount bolts (A) in the upper square plates and fasten at the desired height using the enclosed 6 mm allen key. B C Be aware that the height of the top square plates is the same on both sides of the centre bar. If not, adjust into position. * Mount the fitting from the hip support on the top bolts. * Mount bolts (B) in the lower square plates. Move the bolts and plates upwards until they fit into the fitting from the hip support. Fasten all bolts securely using the enclosed 6 mm allen key. H *Fasten the fingerscrew (C) through the hole in the fitting to secure the fitting from the hip support to the centre bar. G B G *Loosen the handle (E) and pull out (unlock) the security lock (D) to adjust the hip supports in depth. Adjust into desired position, push in (lock) the security lock and fasten the handle. Make sure the security lock is pushed in (locked) after adjustment. D *Loosen the handle (G) to adjust the hip support in height. Use the enclosed 6 mm allen key to loosen the bolts (H) and adjust the supports individually in height and width. (not possible for size 1) Make sure the fingerscrew (C) is fastened before use. 13 E GB A Hip support, front Follow the description below to mount the hip support correctly. B * Mount the two square plates in the slots on both sides of the centre bar. * Mount bolts (A) in the upper square plates and fasten slightly. Do not fasten completly before the four bolts have been placed correctly. * Mount bolts (B) in the lower square plates. Move the bolts (A) + (B) and plates upwards until they fit into the fitting from the hip support. Now fasten all four bolts securely using the enclosed 6 mm allen key. C *Loosen the bolts (C) and adjust the hip supports in depth. Fasten the bolts in the desired position. G B GB A C Hip supports derotation Follow the description below to mount the hip supports de-rotation correctly: B * Dismount the two fittings (A) from the de-rotational hip supports. *Mount the fittings on both sides of the centre bar. Fasten the screws (B) in the desired position. The possiblity of rotational adjust is available before the screws are fastened completely. D * Mount the hip support on the fitting (C). Fasten in the desired angle. *Loosen the screws (D) to adjust the hip support sidewise and in height. Fasten all screws in the desired position. 14 GB Head support Follow the description below to mount the head support correctly. Either back support or hip supports (rear) must be mounted to be able to mount a head support on the Toucan C * Mount the head support bar on the fitting from the back support/hip supports (rear) and fasten with the enclosed 4 mm Allen key (A). B E *Loosen the handle (B) to adjust the angle of the head support bar. D A *Loosen the handle (C) to adjust the height of the head support. * When a lower setting of the head support is needed, the fitting on the back- / hipsupport can be replaced with a new fitting and bar (D). *Loosen the screw (E) to adjust the angle of the head support bar. G B * Use the enclosed 5 mm Allen key to loosen the screws (F) and adjust the head support. Loosen the screw (G) to angle the head support. Loosen the screw (H) to adjust the head support sidewise. F G H 15 GB Tray and play box Follow the description below to mount the tray/ play box correctly. E Mounting onto the chest support bar: *Loosen the handle (A) and dismount the chest support. * Mount the tray onto the chest support bar and fasten at the desired height with the enclosed 4 mm Allen key (B). * Place the chest support bar in the centre bar and fasten with the handle (A). E A C D Mounting onto the centre bar: * Mount the tray directly onto the centre bar using an extra fitting (C). *Loosen the handle (D) to angle adjust the tray/ play box. Fasten in the desired position. * Use the enclosed 4 mm Allen key to adjust the depth of the tray/play box (E). * The tray is also a lit for the play box and is easily lifted. G B GB A Extension for centre bar, 8 cm Follow the description below to mount an extension on the centre bar. * To be able to mount the extension part and the centre bar all the together, the plast hubs needs to be dismounted. Use the 5 mm Allen key to dismount the hubs. * Accessories can now be mounted in both the centre bar and the extension part. A Mount the chest support bar from the top and down through the extension part and the centre bar. Fasten with the handles (A). 16 GB Chest support A We recommend to mount the chest support as the final equipment. Follow the description below to mount the chest support correctly: * Mount the top part (A) in the top of the centre bar and fasten with the enclosed 5 mm allen key. C *Mount the chest support in the hole in the centre bar and fasten with the handle (B). *Loosen the screws (C) and adjust the chest support sidewise and in height. Fasten all screws in the desired position. Max. height! (D) The max. height indication on the chest support bar must not go higher than the top of the centre bar - not the top of any extra bars from e.g. the tray. B D G B GB "Pony" chest support The "Pony" chest support is mounted in the same way as the standard chest support (Mentioned above). 17 GB Abdominal support Follow the description below to mount the abdominal support correctly. * Mount the two square plates in the slots on both sides of the centre bar. A * Mount bolts (A) in the upper square plates and fasten slightly. Do not fasten completly before the four bolts have been placed correctly. B * Mount bolts (B) in the lower square plates. Move the bolts (A) + (B) and plates upwards until they fit into the fitting from the abdominal support. Now fasten all four bolts securely using the enclosed 6 mm allen key. G B 18 GB Product identification B A)Serial number The label is placed on the front bar to the left. B)Manufacturer A The label is placed on the lower part of the frame near the left rear caster. A Date: YYYY-MM-DD Max.Load: XX KG SN: XXXXXX Ver.: XX Art.No: XXXXXX Product - Size X (01)0570729530134(21)256829 B Parallelvej 3 DK-8751 Gedved www.R82.com Made in Denmark 19 G B GB G B Measurements Size 1 Size 2 Size 3 Size 4 cm (inch) cm (inch) cm (inch) cm (inch) Width (G) 61½ (24") 68 (26½") 68 (26½") 70 (27½") Length, total (H) 62 (24¼") 75 (29¼") 80 (31¼") 90 (35") Length, frame (H) 62 (24¼") 75 (29¼") 75 (29¼") 85 (33¼") Height from floor (I) 67-100 (26¼-39") 85-118 (33¼-46") 99-131 (38½-51") Height from foot plate (I1) 55-74 (22¼-29") 75-108 (29¼-42") 83-119 (33½-46½") 96-142 (41¼-54¼") Height, floor to foot plate 6 (2½") 6 (2½") 6 (2½") 6 (2½") Angle of the centre bar (a1) 0 to +30° 0 til +30° 0 til +30° 0 til +30° Angle of the foot plate (a2) 15° to -10° 15° til -10° 15° til -10° 15° til -10° Centre bar 50 (19,5") 70 (27½") 80 (31¼") 100 (39") Camper 8° 6° 6° 4° Weight 3,5 kg (29,5 lb) 15,5 kg (34 lb) 16 kg (35 lb) 18,5 kg (40,5 lb) Max. load/user weight 40 kg (88 lb) 50 kg (110 lb) 60 kg (132 lb) 70 kg (154 lb) 20 120-153 (46¾-59¾") GB Technical data Frame: Powder laquered aluminium tubes Plastic parts:Fibre glass strengthened nylon Upholstery: PUR (Polyurethane) GB Producer GB Distributor R82 A/S Parallelvej 3 8751 Gedved Denmark Please find your distributor on www.R82.com G B 21 GB Care and maintenance PUR All parts made of PU material must be wiped off with a cloth frequently. WHEELS/BRAKES Ball bearings: The ball bearings require no maintenance. Clean the wheels frequently to make them run more smoothly and make the brakes function optimally. NO lubricating oil is required around the brakes. Wheels that are worn out must be replaced. Check the tyres regularly for air. Air presure: 110 PSI/7,5 bar/750 kPa - 36 PSI/3,5 bar/350 kPa. SPOKES Regularly the spokes need to be adjusted by an expert. For instance by your local bicycle engineer. HAND RIMS If a handrim should be damaged in such a way that it could lead to hand injury, it should be replaced. FRAME Tighten all screws on the frame on a regular basis, especially when the Rabbit has been adjusted. Also, it is important to keep the frame clean, both for the users comfort and the longevity of the standing frame. Wash the frame with car shampoo or dishwashing liquid. Do not use any cleaning materials containing chlorine or methylated spirit. If the Rabbit is especially dirty, a grease remover may be used. G B INSPECTION It is important to tighten all screws on the standing frame on a regular basis. All screws which secure the accessories must be checked, at least once a month. To avoid sharp edges, it is important to check all rail-ends have end caps. Also, it is important to be aware of any cracks or faults in the frame, PVC parts, etc. REPAIR If there is a problem with your Rabbit you should contact your dealer at once. Defective frames should not be used. If your standing frame need reconditioning or repair, only original R82 parts may be used. Accessories or available spare parts which are broken can be forwarded to R82 for repair. If there is a problem with any basic parts, the whole frame must be returned to R82 for repair. R82 will not be held responsible for damage or injury caused by use of nonoriginal parts or repairs made by a non-authorised R82 person. 22 G B 23 G B 24