1
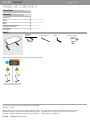
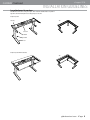
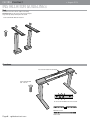
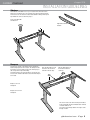
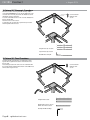
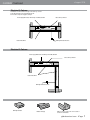
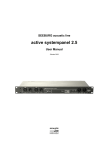
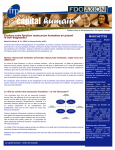
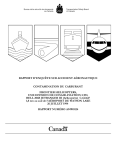
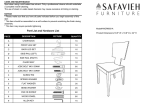
FreeFit
Installation Manual
OHSAS 18001:2007
ISO 9001:2008
ISO 14001:2004
2014
Global Contract Inc. 565 Petrolia Road
North York, Ontario, M3J 2X8
Visit us on the Internet at globalcontract.com • (416) 739-5000
GLOBALContract
Rubber Mallet
• AugustActuator
2014
TABLE OF CONTENTS
Pliers
Flathead Screw
driver
P.02
P.03
List of Tools
Assembly
Leg Attachment
Feet
Crossbars
Sidebar
Bumpers
3-Column 90º Telescopic Crossbars
3-Column 90º Fixed Crossbars
Electric 2 Column
Electric 3 Column
10 mm Hex Bit
Actuator
3
4
4
5
5
6
6
7
7
Phillips Bit
Pliers
T-25 Torx Bit
10 mm Hex Bit
Bit Adaptor /
Handle
Phillips Bit
bly FreeFit
Required Tools:
Required Tools
Safety Glasses
Robertson Screwdriver
Allenkeys
Safety Glasses
Socket Wrench
T-25
Drill with Roberson
Bit Torx Bit
Bit Adaptor /
Handle
13 mm
Socket
Adaptor
Rubber Mallet
Note: Chair can be disassembled in 5 minutes or less
Socket Wrench
VERSION 2 03/
Flathead Screw
driver
Warning leaflet and user manual should be left on the table after completed installation.
Actuator
13 mm Socket
Adaptor
Note: Chair can be disassembled in 5 minutes or less
VERSION
Pliers
10 mm Hex Bit
Phillips Bit
T-25 Torx Bit
Bit Adaptor /
Handle
Socket Wrench
13 mm Socket
Adaptor
5 minutes or less
VERSION 2 03/18/10
Please contact your Global Contract Service Representative at 416-739-5000 for
any questions or concerns.
NOTE: Any alterations to listed components will void the manufacturer’s warranty. turer’s specifications. In accordance with the manufacturer’s policy of continual
The manufacturer will not be responsible for any damage or bodily harm caused
product improvement, the product presented in this document is subject to
by alterations in accordance with national or local electrical codes and manufacchange without notice or obligation.24
Page 2 • globalcontract.com
GLOBALContract
• August 2014
INSTALLATION GUIDELINES
Leg attachment to surface
Note that these instructions show generic parts. Parts included in individual tables may differ in
appearance and functionality but the assembly principle is the same.
Complete product
Housing
90º
Crossbar
Sidebar
Column
Foot
Complete product with worksurface
90º
globalcontract.com •Page 3
GLOBALContract
• August 2014
INSTALLATION GUIDELINES
Feet
Assemble the feet on the columns. Tighten screws firmly.
IMPORTANT: Make sure the correct screws are used. Using too
long screws may destroy internal parts in the column.
Screw Socket Round UNC 5/16- 18x5/8” Zn
Crossbars
Loosen screws to adjust crossbar length.
Screw socket CSK UNC
5/16 - 18x1” Zn
Do not use the two middle holes of the crossbars.
Adjustable crossbar
Page 4 • globalcontract.com
Fixed crossbar
GLOBALContract
• August 2014
INSTALLATION GUIDELINES
Sidebars
Fasten sidebars in threaded holes on top of crossbars with countersunk screws.
Various types of sidebars exist, some of which can be placed in optional positions.
The holes closest to the ends of the sidebar are dedicated for fixing of work top but
any available hole can be used for this purpose.
Screw socket CSK UNC
1/4-20x5/8” Zn
Right Hand / Left Hand
Sidebars
Bumpers
The work top is resting on the sidebars and on self-adhesive
rubber bumpers placed on the crossbars. The bumpers should
be placed as close to the fixing screws for the work top as possible to keep the work top from bending.
The rubber bumpers come in two thicknesses. The thicker ones
are used on the C-channel. On fixed crossbars the thick bumpers
are not used.
Place the thin bumpers on the
tube next to the screw hole
and next to the tube edge.
Place the thick bumpers on
the C-channel next to the
screw hole.
Bumper ø 1/2”x 1/8”
Transparent
Bumper 1/2”x 1/2”x1/4”
Transparent
Two sizes of wood screws for the work top are included
in the assembly kit. Wood Screw Round 8x3/4” Zn Wood
screw CSK 10x2-3/8” Zn
The shorter screws through sidebars. The longer screws
through crossbars.
globalcontract.com •Page 5
GLOBALContract
• August 2014
3-Column 90° Telescopic Crossbars
Attach the crossbars on the long side of the housings. Tighten
screws firmly. IMPORTANT: Do not use the two middle holes of the
crossbars. Do not insert any object in the two middle holes as this
can damage electronic components.
Loosen the round headed screws on the cross-bars and adjust the
frame to desired width.
Fasten the screws on the crossbars.
3 regular telescopic crossbars and 1 special telescopic crossbar
with an angled C-channel are used.
Screw socket CSK
UNC 5/16-18x13/8” Zn
3 Regular telescopic crossbars.
1 Special Telescopic crossbar.
No additional assembly kit.
3-Column 90° Fixed Crossbars
3-Column 90º Table, Fixed Crossbars 3 regular fixed crossbars
together with 1 regular fixed crossbar 6” shorter than the other
three are used.
The assembly procedure is the same as for a 2-column table with
the exception that the angled C-channel mounts to the middle house
with one extra-long screw 1-3/8”.
Screw socket CSK
UNC 5/16-18x13/8” Zn
3 Regular fixed crossbar.
Regular fixed crossbar 6” shorter
than the other three crossbars.
Assembly Kit PR25 90º Angle
Page 6 • globalcontract.com
GLOBALContract
• August 2014
Electrical 2-Column
The handset is mounted at the front edge of the work top, screwed
to the underside with screws supplied with the unit.
Connect cables and power supply according to
Power Supply D04 35V/2, 12A AC input 110-240V, 50-60Hz
Cable LinBus iDrive
Cable USA 2-pol IEC C7
ASM Light Handed w/Screws
Electrical 3-Column
Power Supply D04 35V/2, 12A AC input 110-240V, 50-60Hz
Cable USA 2-pol IEC C7
Cable LinBus iDrive
ASM Light Handed w/Screws
ASM Light Handset
Handset w Display
Holder for power supply, hooks over crossbar or
screws into worksurface.
globalcontract.com •Page 7
GLOBALContract
• July 2012
THE GLOBAL GROUP SHOWROOM
1350 Flint Road, Toronto, Ontario, M3J 2J7
Sales & Marketing • TEL: 1-877-446-2251 • FAX: 416-667-0338
Customer Service • TEL: 416-739-5000 • FAX: 800-361-3182
VANCOUVER SHOWROOM
3823 Still Creek Avenue, Burnaby, BC, V5C 4E2 • TEL: 604-432-1701
EDMONTON SHOWROOM
17716 107 Avenue, Edmonton, AB, T5S 1G8 • TEL: 780-444-8922
CALGARY SHOWROOM
12-2010 30th Avenue NE, Calgary, AB, T2E 7K9 • TEL: 403-250-7770
WINNIPEG SHOWROOM
1-1080 Waverley Street N, Winnipeg, MB, R3T 5S4 • TEL: 204-925-3350
OTTAWA SHOWROOM
201-150 Isabella Street, Ottawa, ON, K1S 1V7 • TEL: 613-234-2881
MONTREAL SHOWROOM
980 St-Antoine Street Ouest, Montreal, Bureau 200, QC, H3C 1A8 • TEL: 514-866-4331
HALIFAX SHOWROOM
1310 Hollis Street, Suite 150, Halifax, NS, B3J 3P3 • TEL: 902-422-7434
QUEBEC SHOWROOM
Complex Lebourgneuf 2, 815, boul. Lebourgneuf, Suite 502, Quebec, QC, G2JOC1 • TEL: 418-653-6111
OHSAS 18001:2007
Visit us on the Internet at globalcontract.com
Page H.14 • globalcontract.com
ISO 9001:2008
ISO 14001:2004