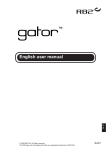
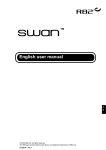
1
manatee
TM
English manual
G
B
© 2007 R82 A/S. All rights reserved.
The R82 logo and the bathing chair Manatee are registered trademarks of R82 A/S.
04.2007
GB
Contents
Safety................................................................................. 4
Guarantee.......................................................................... 4
Maintenance....................................................................... 4
Preparing for use................................................................ 5
Back angling....................................................................... 6
Leg support angling............................................................ 6
Seat depth.......................................................................... 7
Seat height......................................................................... 7
Seat angling....................................................................... 8
Head / sidesupport............................................................. 8
Hip support......................................................................... 9
Body support...................................................................... 9
Pommel with strap............................................................ 10
Straps for leg control........................................................ 10
Dismounting and mounting the cover............................... 11
Folding the chair .............................................................. 12
Product identification........................................................ 13
Measurements.................................................................. 14
Technical data.................................................................. 15
Producer........................................................................... 15
Distributor......................................................................... 15
Care and maintenance..................................................... 16
Troubleshooting................................................................ 16
G
B
Pat. pend.
GB
Manatee
Congratulations on your new Manatee bathing chair.
In choosing the Manatee, we are sure that you have got a bathing chair,
which will live up to any expectations one can have for a modern aid for
children. The Manatee is designed to be used in bathrooms, in which the
child can not ever be left alone.
The Manatee is a bathing chair for children between 2 and 11 years with
a lesser handicap. The Manatee is constructed to provide both caregivers
and users a wonderful bathing experience. The bathing chair is designed
to place the user in exactly the right sitting position. The depth of the seat
can be adjusted, allowing the bathing chair to "grow" with the child and
provide many years of use. The adjustments and accessories are logically
positioned, affording the caregiver proper working conditions.
This user manual is meant as a guide to assist the user in gaining the full
benefit of the many options offered by the Manatee. Therefore we recommend you to go through this manual before the Manatee is put into use.
G
B
GB
Safety
The Manatee has earned the CE-mark. This certifies that it meets all relevant European safety requirements. The durability of this product is 5 years when it is used on
a daily basis. Hereafter we recommend that the product should be renovated (by R82
personnel) to extend the lifetime.
Remove the CE-mark, when rebuilding the product or when using other than
original R82 spare parts.
Never leave your child unattended in this product. Ensure permanent supervision by an adult. Incorrect use of the Manatee, may cause serious injury to the
user. Take care that all the accessories and adjustments are placed and fitted
correctly and check it on a regular basis.
The user must be removed from the product, before angling the chair legs.
We recommend to remove the pressure load from the users body and legs, before
angling the back and leg support. Put a gentle back pressure on the back and
leg support to remove the pressure load.
Check the temperature of the water before the Manatee and the child is placed
in the bath.
The enclosed belts and accessories can not be used as long-term supports but
may only be used as an extra help when positioning the user.
Secure the chair when any adjustments have been made. Then place the user
on to the Manatee.
Check on the cover, belts and accessories and make sure that the velcro fastens
securely.
GB
Guarantee
Notification of defects will be received at R82 A/S within two years.
The Manatee is guaranteed for 12 months. The guarantee is only valid when using
original R82 spare parts and fittings. All special adjustments must be made by R82.
R82 will not be held responsible for damage or injury caused by use of non-original
parts or repairs made by a non-authorized R82 person.
GB
Maintenance
When the chair has been used in water containing chlorine it has to be washed
out with clean water and dried with a cloth. Make sure that all water is out of
the frame.
G
B
Do not use any cleaning materials containing chlorine or methylated spirit.
All screws on the chair have to be checked regularly to avoid unintended failures.
Adjustments which are not described in this manual, must only be made by
authorized R82 personnel.
GB
Preparing for use
We deliver the Manatee folded which means it
takes up as little space as possible during transport. Follow the instructions below to prepare
your bathing chair for use:
C
B
1) Press the release buttons (A) on both sides
and fold down the chair legs.
A
2)Press the release buttons (B) on both sides
and fold down the leg support.
3)Press the release buttons (C) on both sides
and pull up the back.
The Manatee is ready for use.
Please check that all release buttons mesh
into place after adjustment.
Never leave the user unattended in the
Manatee.
The user must be removed from the product, before angling the chair legs.
We recommend to remove the pressure
load from the users body and legs, before
angling the back and leg support. Put a
gentle back pressure on the back and leg
support to remove the pressure load.
G
B
GB
B
Back angling
The back on the Manatee angles individually.
Please follow the description below when angling the back:
1)Press the release buttons (A) in both sides.
2)Angle the back (B) into the required position.
3)Please check that both release buttons (A)
mesh into place after adjustment.
C
Further, the back also angles by pulling the strap
on the back of the chair.
A
Please take care not to get your fingers
caught between the rotary joint and the
back (C).
We recommend to remove the pressure
load from the users body and legs, before
angling the back and leg support. Put a
gentle back pressure on the back and leg
support to remove the pressure load.
Secure the chair when any adjustments
have been made. Then place the user into
the Manatee.
GB
Leg support angling
The leg support on the Manatee angles individually. Please follow the description below when
angling the back:
1)Press the release buttons (A) on both sides.
2)Angle the leg support (B) into the required
position.
3)Please check that both release buttons (A)
mesh into place after adjustment.
Further, the leg support also angles by pulling
the strap underneath the chair.
B
A
We recommend to remove the pressure
load from the users body and legs, before
angling the back and leg support. Put a
gentle back pressure on the back and leg
support to remove the pressure load.
G
B
Secure the chair when any adjustments
have been made. Then place the user into
the Manatee.
GB
Seat depth
The seat depth on Manatee (size 0) can be adjusted in two positions:
1)Dismount the screws (A) in both sides with a
4 mm Allan key.
2)Replace the short tubes with the long enclosed ones. Fasten the screws (A) securely.
A
Please follow the below to adjust the seat depth
of the Manatee (size 1+2):
1)Loosen the screws (A) in both sides with a 4
mm Allen key.
2)Adjust the depth into the required position by
pulling out the frame.
3)Fasten the screws (A) again.
Please check, on a regular basis, that the
screws are fastened safely. Make sure that
the screws mesh into the nuts.
B
The user must be removed from the product before adjustment.
Secure the chair when any adjustments
have been made. Then place the user into
the Manatee.
GB
Seat height
The seat height of the Manatee can be adjusted
by changing the position of the legs.
1)Press the release buttons (A) in both sides.
2)Angle the legs (B) into the wanted position.
3)Please check that all release buttons (A)
mesh into place after adjustment
A
The legs also adjusts when pulling out the strap
underneath the seat.
A
The user must be removed from the product, before angling the chair legs.
B
Secure the chair when any adjustments
have been made. Then place the user into
the Manatee.
B
G
B
GB
Seat angling
Please follow the instructions below to adjust
the seat angle on the Manatee:
1)Press the release buttons (A) on both sides.
2)Angle the front leg (B) into the required position.
3)Please check that both release buttons (A)
mesh into place after adjustment
The front leg also adjust when pulling out the
strap underneath the seat.
The user must be removed from the product, before angling the chair legs.
A
B
Secure the chair when any adjustments
have been made. Then place the user into
the Manatee.
GB
A
Head / sidesupport
As standard the Manatee is delivered with a
head / sidesupport. The support can be used
either as a head or as a sidesupport. Follow
the description below to mount the support in
the correct way:
1)Spread out the strap with the reverse up.
Place the wedges on the strap in the required
position (A).
2)Fold up the ends of the strap and fasten it to
the wedges (B) with the velcro.
3)Turn the strap around and it is ready to be
mounted on the chair (C).
B
Make sure that the wedges are well fastened to the velcro on the strap.
C
The head / sidesupport may not be used
as a long-term support. This support is
only designed to make it easier to place
the user in the chair.
G
B
Secure the chair when any adjustments
have been made. Then place the user.
GB
Hip support
As standard the Manatee is delivered with a hip
support. Follow the description below to mount
the support the correct way:
A
1)Fasten the strap in the fittings (A) on both
sides of the chair.
2)The hip belt is tightened with velcro and a
buckle (B).
The hip support may not be used as a
long-term support. This support is only
designed to make it easier to place the
user in the chair.
Secure the chair when any adjustments
have been made. Then place the user into
the Manatee.
B
GB
Body support
Please follow the description below to mount the
body support the correct way:
1)Fasten the strap with velcro around the back (A).
2)Place the user in the chair. Mount the strap
(B) around the body.
3)Tighten the body support with velcro and the
buckle (C).
A
The body support may not be used as a
long-term support. This support is only
designed to make it easier to place the
user in the chair.
B
C
Secure the chair when any adjustments
have been made. Then place the user into
the Manatee.
G
B
GB
Pommel with strap
Please follow the instructions below to mount the
pommel and the strap the correct way:
B
1)Fasten the strap with velcro underneath the
seat (A).
2)Adjust the pommel (B) sidewards to gain the
optimal position.
The pommel with strap may not be used
as a long-term support. This support is
only designed to make it easier to place
the user in the chair.
A
Secure the chair when any adjustments
have been made. Then place the user into
the Manatee.
GB
Straps for leg
control
Please follow the description below to mount the
straps the correct way:
1)Fasten the strap with velcro underneath the
leg support (A).
2)Adjust the straps (B) sidewards to gain the
optimal position. Fasten with velcro.
B
G
B
The straps may not be used as a long-term
support. This support is only designed
to make it easier to place the user in the
chair.
A
Secure the chair when any adjustments
have been made. Then place the user into
the Manatee.
10
GB
Dismounting and
mounting the cover
Follow the description below when the cover
needs to be dismounted and washed:
1)Unzip the cover on the back (A) and underneath the seat (B).
D
2)Open the velcro underneath the chair (C) and
the cover can be pulled up (D) and off the
chair.
A
Please look in the back of this manual regarding maintenance of the cover.
B
Follow the description below to remount the
cover on the chair:
C
C
1)Put the cover over the back and pull down
(D). Make sure that the foam cushions in the
cover are placed around the frame.
D
2)Zip the cover on the back of the chair (A).
3)Mount the small cover piece with the zipper
underneath the chair (B). Make sure that the
velcro is pointing downwards.
4)Tip up the leg support (E) and the velcro underneath the seat (C) and underneath the leg
support (C) can be closed. Make sure that the
foam cushions in the cover are placed around
the frame.
A
E
B
5)Tip down the leg support (E) and make sure
the velcro is fastened correctly.
C
C
G
B
Please check on a regular basis that the
zippers (A) + (B) are safely closed.
Please check on a regular basis that the
velcro fastens safely together.
11
GB
E
Folding the chair
The Manatee can easily be folded and stored
without taking up much space.
Follow the description below to fold the Manatee
correctly:
A
1)Press the release buttons (A) on both sides
and move the leg support up into the horizontal position.
B
D
2)Press the release buttons (B) and move down
the back into the horizontal position.
C
3) Press the release buttons (C) and tip up both
the front and rear legs into horizontal.
The Manatee is now folded.
The user must be removed from the product, before angling the chair legs.
We recommend to remove the pressure
load from the users body and legs, before
angling the back and leg support. Put a
gentle back pressure on the back and leg
support to remove the pressure load.
Please check that all release buttons mesh
into place after adjustment.
Please take care not to get your fingers
caught between the rotary joint and the
back (D). If desired, it is possible to pull out
the release strap with one hand and angle
the back with the other hand (E).
G
B
12
GB
Product
identification
Size 0
Size 0
A)Serial number
The label is placed on the right side of the
cross bar on the back.
B
B)Manufacturer
A
The label is placed on the right side of the
cross bar on the back.
Size 1+2
A)Serial number
Size 1+2
The label is placed on the inside of the frame
at the right side of the chair.
B
B)Manufacturer
A
The label is placed on the inside of the frame
at the left side of the chair.
Dato: 31-01-02 Belast: kg
SN: 0840-01-111878-001
Varenr: 880003
5707292
A
134158
G
B
B
Parallelvej 3
DK-8751 Gedved
13
BH
SW
SD
LUB
SH
HF
W
GB
LF
Measurements
Size 0
cm (inch)
Size 1
cm (inch)
Size 2
cm (inch)
Seat width (SW)
Seat depth (SD)
Seat height (SH)
Back height (BH)
Lower leg length (LUB)
Total width (W)
Length, folded (LF)
Height, folded (HF)
Weight
Max load/weight
33 (12¾")
21 & 25 (8-9¾")
13-43 (5-16¾")
43 (16¾")
28 (11")
42 (16½")
110-117 (43-45¾")
13 (5")
4¼ kg (9½ lb)
50 kg (110 lb)
33 (12¾")
25-32 (9¾-12½")
13-43 (5-16¾")
43 (16¾")
28 (11")
42 (16½")
110-117 (43-45¾")
13 (5")
4½ kg (10 lb)
50 kg (110 lb)
33 (12¾")
33-40 (12¾-15½")
13-43 (5-16¾")
58 (22½")
37 (14½")
42 (16½")
135-142 (52¾-55¾")
13 (5")
4¾ kg (10½ lb)
75 kg (165 lb)
G
B
14
GB
Technical data
Frame:��������������������������������
Powder lacquered ���������������
Aluminium tubes
ABS parts: Glass fibre strengthened Nylon
Cover:
GB
Fire-resistant, 100% polyester
Producer
GB
Distributor
R82 A/S
Parallelvej 3
8751 Gedved
Denmark
Please find your distributor on www.r82.com
G
B
15
GB
Care and maintenance
COVER
The cover is made of fire resistant fabric. The cover can easily be removed and can be machine washed at 50°.
FRAME
Make sure that all screws underneath the chair (A) are safely fastened, especially when the chair has been adjusted
from one depth to another. The screws (B) at the rotary joints have to be inspected on a regular basis.
It is important to keep the chair clean both considering your own well-being and the validity of the warranty. When the
chair has been used in water containing chlorine it has to be washed out with clean water and dried with a cloth. Make
sure that all water is out of the frame. Do not use any cleaning materials containing chlorine or methylated spirit.
INSPECTION
It is important to be aware of any indications of beginning faults on the frame, PVC parts and the like.
REPAIR
If there is a fault on your bathing chair you should contact your dealer at once. Defective chairs should not be used. If
your chair needs reconditioning or repair, only original R82 parts must be used. Accessories or available spare parts
which are broken can be forwarded to R82 for repair. If fault occurs in the fundamental parts, the whole chair needs
to be returned to R82 for repair. R82 will not be held responsible for damage or injury caused by use of non-original
parts or repairs made by a non-authorized R82 person.
A
GB
G
B
B
Troubleshooting
Problem*
Solution
The screws do not mesh into
the nuts after adjusting the
depth.
Slide the frame out to its longest length. Turn the seat over and slide the nut along
to the hole in the frame and the screw can then be fastened securely.
The release buttons do not
mesh into place.
Move the frame backwards and forwards slightly until the buttons mesh into
place.
The cover has become loose.
Tighten the cover with the velcro underneath the seat and leg support.
The chair slips on the bath
bottom.
The rubber cover may be damaged. Please contact R82 and replace the cover.
The velcro does not fasten
together
Remove any dirt from the velcro. If this do not work the cover or accessory has to
be replaced. Please contact R82.
* The user/helper may experience several of these problems in a bathing chair that is incorrectly adjusted or is being
incorrectly used.
16