1
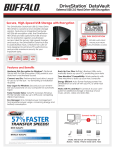
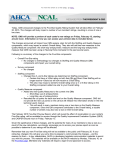
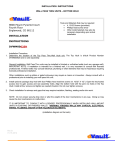
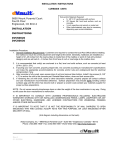
CREATIVE DATA TECHNOLOGIES, INC.
DATAVAULT
USER’S MANUAL
Florida AHCA Reporting Edition
Page 1
I. TABLE OF CONTENTS:
DATAVAULT .................................................................................................................................................................................. 1
I. TABLE OF CONTENTS:...................................................................................................................................................... 2
II. OVERVIEW OF THE DATAVAULT SYSTEM.................................................................................................................. 3
III. GETTING STARTED ........................................................................................................................................................ 4
IV. DATAVAULT DASHBOARD ........................................................................................................................................... 6
V. DATA VISUALIZATION (GRAPHS) ................................................................................................................................. 9
VII. MANAGE PHYSICIAN LIST......................................................................................................................................... 13
VIII. CHANGING THE CURRENTLY SELECTED QUARTER ........................................................................................... 14
IX. VIEW VISIT RECORDS FOR SELECTED QUARTER................................................................................................... 15
X. VIEW RECENTLY WORKED ON FORMS ..................................................................................................................... 17
XI. VISIT RECORD EDIT WINDOW ................................................................................................................................... 18
XII. DELETE ALL RECORDS FOR SELECTED QUARTER ............................................................................................... 21
XIII. IMPORT A DATA FILE................................................................................................................................................ 22
XIV. BACKUP DATA RECORDS FOR THE QUARTER ..................................................................................................... 23
XV. RESTORE DATA RECORDS FROM A BACKUP FILE ................................................................................................ 24
XVI. DATA STATISTICS ..................................................................................................................................................... 25
XVII. CREATE QUARTERLY AHCA REPORT ................................................................................................................... 26
XVIII. HELP AND TROUBLESHOOTING ........................................................................................................................... 28
Page 2
II. OVERVIEW OF THE DATAVAULT SYSTEM
The DataVault System is a web site that helps customers manage the process of reporting required
information to various jurisdictions (both state and federal level). The website currently has modules
for reporting Florida AHCA quarterly reports as well as Texas THCIC quarterly reports.
Future modules planned include cardiology reporting to the American College of Cardiology, as well
as cancer reporting to the Florida Cancer Data System. If you have others you would like to see
added, or if you are interested in using either the Cardiology or Cancer reporting module above,
please contact us at [email protected] and let us know.
The DataVault System is a web based solution. Since the web site contains confidential sensitive
medical information, it is protected by 128-bit SSL (Secure Sockets Layer) encryption. What this
means to you is that even though you are accessing the information over the Internet, your web
browser session is protected so that no one else can view or intercept the information. This 128-bit
encryption is required by HIPAA. At the time you set up your user account(s), you will be required to
sign a HIPAA Security Agreement with us.
Here is a list of the features of the new DataVault System:
• No installation required: All you need is a web browser, which already comes installed with
your computer.
• Location independence: You can use the system from any computer in the office, or even
from home.
• Multiple simultaneous users: Up to five user accounts can use the system simultaneously
entering data for your facility.
• No downloading updates: All of the program updates are centrally applied overnight to the
web site, as needed.
• Nimble and responsive to change: Fast to react to rule changes and bug fixes, as there is only
one computer to update – the web site!
• Data Security: Each facility’s data records are kept separately so that one facility can not look
at another facility’s data.
• Import capability: The DataVault System allows you to import your existing visit records
directly using several supported file formats (fixed records, tab delimited, or XML).
• Complete backup capability: The system allows and in fact encourages you to back up your
own data on a regular basis. The backup data file is downloaded to your computer, and can
be easily imported back into the DataVault system in the event of any data loss or corruption
of the system. We also maintain backups of the complete system as well.
• AHCA 2010 XML readiness: Our DataVault System is fully compliant with the new XML
Internet reporting to ACHA.
Page 3
III. GETTING STARTED
System Requirements:
The DataVault is a web-based solution, so the requirements on the hardware are minimal. You will
need at least a Pentium III class computer (or higher) running at 500 Mhz or faster, with at least
256Mb of RAM. The computer must be running Windows XP, Windows 7, or Windows 8, and you
must have Internet Explorer version 8.0 or higher. You can check your version of Internet Explorer
by selecting the Help menu item “About Internet Explorer”. Updates to Internet Explorer may be
downloaded from Microsoft directly at http://www.microsoft.com/windows/ie/default.asp
The DataVault web site is a 128-bit SSL encrypted web site. This is to ensure the privacy of the
information that is being managed. However, the SSL encryption adds some overhead to the
amount of actual information that must travel back and forth between your web browser and our web
server. Therefore, it is recommended that you get a reliable, fast Internet connection to use the
DataVault system. Examples of good Internet connections are DSL, Cable Modem, or ISDN. If you
are still using a modem to dial up to connect to the Internet, we would strongly recommend you to
upgrade to DSL at this time. You CAN use the DataVault System with a dial-up modem, but the
screens update slowly so it is not as pleasant of an experience as it should be.
Support for other Operating Systems and Browsers:
The DataVault web site was built using Microsoft’s technology called ASP.NET (Active Server
Pages). This technology utilizes DHTML features inside the Internet Explorer web browser. If our
web server detects that you are running some other browser besides Internet Explorer, it
downgrades the DHTML calls to standard HTML. However, this will run noticeably slower than the
Internet Explorer, and may not look and feel 100% the same as the Internet Explorer. Therefore, if
you wish to use some other operating system and/or web browser, you can, but we will not support
or troubleshoot any problems that are particular to using the non-standard browser and/or operating
system.
Obtaining a UserID and Password to access the DataVault system:
There is a user agreement form that includes HIPAA Security Agreement that must be filled out,
signed, and faxed or mailed back to us in order to set up your account. Only one signed agreement
per facility is required. Separate user accounts are set up for each person using the system. Up to
five user accounts can be created for each facility at no extra charge.
Logging into the DataVault system:
Direct your web browser to the following address (notice that it starts with https instead of http):
https://www.creativedatatech.com/dvault
You should see the following screen:
Page 4
Enter your UserID and Password in the fields provided, and click the “Login” button.
Note: The password is case sensitive.
If login is successful, you should see the AHCA Dashboard shown at the top of the next page:
Page 5
IV. DATAVAULT DASHBOARD
Top Toolbar:
The toolbar across the top of the page is something that will remain at the top for every screen
throughout the system. It contains the following features:
• Session Timeout – Counts down from 1 hour, and will automatically log your session off after
1 hour of inactivity.
• Logout – Link to quickly log out of the system.
Facility Information:
The Facility information section contains the following:
• Facility Name – Displays the name of your facility. This is helpful for those users who have
multiple AHCA Facilities that they are responsible for reporting on.
• Edit Facility Information and Default Values – Allows you to modify your facility address,
Medicare Number, and the default values that apply when you are creating new records.
• Manage Physician List – Use this screen to enter and maintain your list of physicians.
Selected Quarter:
The Selected Quarter contains a drop-down to let you select the current Calendar Quarter that you
would like to work on. When you change the quarter, all of the statistics and graphs on the screen
immediately refresh with the newly selected quarter’s information.
Page 6
Record Maintenance:
The Record Maintenance section contains the following:
• View Visit Records for Selected Quarter – Displays a window that lists all the records for the
selected quarter so you can work on them.
• View Recently Worked on Forms – Displays a window showing you the most recent 100
forms (visit records) that you have worked on. This can be a nice time-saving feature if you
want to go back to a record you recently worked on quickly.
• Add a New Visit Record – Lets you create a brand new AHCA Visit Record, populating the
default values selected on the Facility Edit Window.
• Delete all Records for Selected Quarter – This option allows you to delete all the records for
the selected quarter with a single button press. A confirmation window will be displayed first.
This is only used if you are importing records, and need to delete the records before importing
the records once again.
Data Import and Export:
The Data Import and Export section contains the following items:
• Import a Data File – Lets you import a data file. This includes standard tab-delimited files and
also custom-written import bridges created for your facility.
• Backup Data Records for this Quarter – Makes a backup file (compressed .ZIP file) containing
a backup copy of all your records for the selected quarter.
• Restore Data Records from a Backup File – Restores the records for the selected quarter
from a backup file created previously using the Backup option above. This would normally
never need to be used unless you are recovering your data in the event of data loss.
Data Statistics for the Quarter:
• Total Number of Records – Displays a link containing the total number of records in the
Quarter. Click on the link to display the records in another window.
• Number of Passing Records – Displays a link containing the number of passing records for
the quarter. Click on the link to display the passing records in another window.
• Number of Failing Records – Displays a link containing the number of failing records for the
quarter. Click on the link to display the failing records in another window.
• Number of Warning Records – Displays a link containing the number of warning records for
the quarter. Click on the link to display the warning records in another window.
• Pass/Fail Summary Graph – Displays a pie chart showing the number of passing, failing, and
warning records for the selected quarter.
• Race Demographics Graph – Displays a bar chart showing the spread of the Race values
among the patients for the quarter.
• Bottom Graph Selector (drop-down box) – Select which graph you would like to see displayed
on the bottom graph. There are several graphs available, including Race, Ethnicity, Insurance,
Sex, Hour of Arrival, and Doctors.
AHCA Reporting:
The AHCA Reporting section contains the following features that you will use when generating your
quarterly AHCA Report:
• Submission Deadlines – Contains a quick list of the deadline dates for each quarter’s report.
• Selected Quarter Status – Displays where you currently are with respect to the due date for
the currently selected quarter.
• Generate Quarterly AHCA Report – Displays a window that lets you perform final record
validations and generate your AHCA report for the selected quarter.
Page 7
•
Log into AHCA Data Submission Website – Takes you directly to the AHCA Submission
website so that you can submit your data file to them.
Help & Troubleshooting:
• View DataVault User’s Guide – Displays DataVault User’s Manual (PDF document).
• Upload a Troubleshooting File to CDT – Allows you to upload a file to us for troubleshooting
purposes. This may be used, for example, if you have a custom-written import bridge that is
giving you an error when you try to import your data file.
• View Creative Data Contact Info – Displays a window with our address, email, and phone
number.
• Florida Statutes, Chapter 59B-9 – Displays the Florida State laws concerning AHCA quarterly
submissions.
• AHCA Data Submission Resources – Displays the AHCA Resources Website concerning the
Ambulatory Data Submission.
• Quick Tips – Displays yellow boxes with helpful information. These tips will change from time
to time to offer additional helpful information.
You should see the Ambulatory Data Menu screen shown at the top of the next page:
Page 8
V. DATA VISUALIZATION (GRAPHS)
The following graphs are available for viewing on the Dashboard:
A. Pass/Fail Summary Chart:
B. Race Chart:
C. Sex Chart:
Page 9
D. Ethnicity Chart:
E. Insurance Chart:
F. Hour of Arrival Chart:
Page 10
G. Doctor Chart:
Page 11
VI. EDIT FACILITY INFORMATION AND DEFAULT VALUES
Your AHCA Facility # should already be filled out for you. If it is not, please contact us immediately
with your AHCA Facility ID so that we can correct it in our system (this is a read-only field).
Throughout the DataVault System, read-only fields are colored in a light gray background. This is
letting you know that you cannot change the value in those fields.
The “Ambulatory Data Default Values” section is fairly self-explanatory. Anything you fill in will be
automatically populated into a record when you create new records using this system. The Physician
ID Numbers should not be zero padded. For example, instead of entering ME004564, you should
enter ME4564.
The “Global Billing” option checkbox is explained by clicking on the hyperlink “What is Global
Billing?”
Once you are finished entering your facility info, don’t forget to click the “Save & Close” button, or
your changes will be lost.
Page 12
VII. MANAGE PHYSICIAN LIST
The next screen you will want to fill out is the Physician List. Access this screen by clicking on the
“Manage Physician List” link on the Dashboard. You will see a screen similar to the following,
without any physician records yet listed: (Note: Data below is fictitious)
Use the “Add Physician” button to add new physicians to the list. The License numbers must not be
zero padded.
Once you are finished entering your list of physicians, don’t forget to click the “Save & Close” button,
or your changes will be lost.
Page 13
VIII. CHANGING THE CURRENTLY SELECTED QUARTER
Use the Quarter drop-down on the Dashboard to change the quarter you want to work on.
This will immediately refresh all the statistics and graphs on the Dashboard to reflect the newly
selected Quarter.
Page 14
IX. VIEW VISIT RECORDS FOR SELECTED QUARTER
For privacy sake, the SSN’s have been blocked out for purposes of this user’s manual. The SSN’s
will appear for you as you enter your records into the system.
Notice that the blue banner reminds you again that you are working on “Records List Window – 1st
Qtr, 2014”.
This Visit Record List Window shows the Record ID, Visit Date, SSN, Primary Diagnosis Code, CPT
(primary), Total Charges, whether the record is valid (PASS, WARN or FAIL), Race, Sex, Ethnicity,
Insurance, Patient Status, and DataVault Record Number.
The default behavior for the system is to sort the records by Record ID. You can also sort the
displayed list by any one of the displayed columns by clicking on that column heading. In addition, if
you click the column heading a second time, it will sort the list in reverse order by that column.
Note that all of your records are displayed in the grid. There is a vertical scroll bar on the right side
provided so that you can scroll down to view the rest of the records.
Notice the checkboxes in the very first column of the list. This is your way to “select” records for
subsequent action. This action is only needed if you are selecting records to be deleted (“Delete
Selected” button), validating records (“Validate Selected” button), or changing patient status for the
selected records (“Change Patient Status for Selected” button).
Normally, the system validates each record as you are editing it. However, if you import data,
depending upon your method of importing, you will need to come to this window and use the “Select
All” button to select (check) all the records, then click on the “Validate Selected” button so that the
Page 15
system will inspect every one of the imported records to judge whether each one of them is PASS,
WARN or FAIL.
Notice that there are several ways to search (filter) the displayed list by using the search fields at the
top of the window (Record ID, SSN, and Record Status).
To edit an existing record, you simply need to click on the row for a record, and then click on the
“Edit Record” button. Alternatively, you can just double-click on the row. This will take you to the Visit
Record Edit Window.
To create a new record from scratch (manual input), click on the “Add Record” button. This will autopopulate all the default values you specified on the Edit Facility Information window.
Finally, notice at the bottom of the window that there is a button provided to “Export to Excel”. This
will generate an Excel Spreadsheet with the currently displayed list of records and allow you to
download it to your computer.
Page 16
X. VIEW RECENTLY WORKED ON FORMS
This window displays the most recent 200 forms (records) that you have worked on, sorted by the
most recent forms at the top. This is a great time-saving feature, and can be a life-saver if you
accidentally edit the wrong visit record and can’t remember which one it was that you changed.
To access one of the records, simply click on the hyperlink for the record.
Page 17
XI. VISIT RECORD EDIT WINDOW
The Visit Record Edit Window is divided into 3 tab pages: Patient Visit Information, Diagnosis &
Procedures, and Charges.
Notice that the Record ID and the SSN are displayed in the top of the screen (under the blue banner)
so that no matter what tab page you are on, you can quickly identify which patient you are entering
information for.
Notice on the screen shot above that one of the fields is painted with red background (SSN). This is
indicating that the system has found a problem with these particular fields, and you need to correct
the data. If you can not tell what the problem is, you can locate your mouse over the top of a red
field (without clicking on it), and a yellow help message will be displayed explaining why that
particular field is failing validation. In this case, it is saying that the SSN is invalid, as no real SSN’s
start with the digit 9.
Notice also that there are two fields highlighted in yellow (Visit Start Date & Visit End Date). Fields
are highlighted in Yellow when there is a situation where the system has detected that the data MAY
be in error, but it is not sure. You can hover your mouse over the field to see exactly what it thinks
the problem is, and then decide for yourself whether it needs to be corrected or not. In this case, the
Visit Date (March 2nd, 2014) is on a Sunday, so the system is trying to warn you that this may not be
right.
Normally, as you are entering a new data record, the system does not apply the validation rules until
you get done and either click “Save & Close” or “Validate”. Users usually like to use the “Validate”
button to see if the record is PASSing or FAILing before Saving & Closing. The “Edit Check”
(PASS/FAIL) box at the bottom will let you know whether the record passes or fails. The results of
the validation check are across all three tab pages of information. As you are working with the
record, you can freely visit all three tab pages without saving first, and then perform one single
validation when you are finished entering all of the fields.
Page 18
Here is a screen shot of the second tab page (Diagnosis & Procedures):
Keep in mind that only the Principal Diagnosis is required (Other Diagnosis codes are optional), and
only the first Procedure is required. (all the Other Procedure codes are optional).
Finally, here is a screen shot of the third tab page (Charges):
The system will add up the Total Charges for you as you use this tab page.
Please don’t forget to use the “Save & Close” button to save your changes after you finish working
with a record, or else you will lose your changes for that record.
It is best practice to click on the Validate button to make sure the record is passing all validations
before Saving & Closing the record.
Page 19
Note: It does not matter what tab page you are currently on when you click the “Save & Close” or
“Validate” buttons.
Page 20
XII. DELETE ALL RECORDS FOR SELECTED QUARTER
This window lets you delete all the records for the selected quarter with one button press. This would
never normally be having to do this unless you are importing your data, and are needing to import
your data for a second time for the same quarter and need to delete the records.
Please note that most import bridges automatically delete the records for the quarter before
importing, so this step may not be necessary for you.
Page 21
XIII. IMPORT A DATA FILE
Using this screen, you can import visit records from a data file. The data file MUST be in one of the
following three different formats:
• Tab delimited file, exactly 84 fields (File layout available upon request)
• 2010 AHCA XML File Format
• Custom-written import file
First, you need to use the “Browse” button to navigate to the data file from which you would like to
import records. When you are done, you should see the complete filename and path shown in the
box to the left of the Browse button.
Please Note: The data file must first be zipped up into a .ZIP file using WinZip.
Next, select which Import Bridge you would like to use with the drop-down box.
Finally, to start the actually Import process, click on the “Start Import” button.
Page 22
XIV. BACKUP DATA RECORDS FOR THE QUARTER
This window will make a backup of all the visit records for the currently selected quarter and package
them up into a .ZIP file for you to download. It is good practice to make a backup copy of your data in
case of disaster recovery. The backup ZIP file can be used to restore your data records into the
system, if needed.
You are responsible for backing up your data. We are not responsible, per the user
agreement, for any lost or corrupted data records. We will be performing nightly backups of
the system, and we will restore the system to the best of our ability. However, we want our
customers to take responsibility for managing their own backups, in the event of a system
failure. You can back up your data as often as you like or deem necessary.
In the event of a system failure, we will be restoring the system using our backups IF
POSSIBLE. However, in the unlikely event that we are unable to restore the records from our
backups, then you may be called upon to restore your own records from YOUR backups (we
will let you know).
Page 23
XV. RESTORE DATA RECORDS FROM A BACKUP FILE
Using this screen, you can import visit records from a backup data file previously created using the
backup option.
First, you need to use the “Browse” button to navigate to the data file from which you would like to
import records. When you are done, you should see the complete filename and path shown in the
box to the left of the Browse button.
Please Note: Restoring your records from the backup data file will automatically delete any
records that are currently in the DataVault Database for the selected quarter.
Notice that the Import Bridge type is automatically set to “Quarter Backup Data File previously
created using this website (DataVault)”. Leave this Bridge Type selected.
Page 24
XVI. DATA STATISTICS
In the Data Statistics section of the Dashboard, you will find the following features:
• Totals hyperlinks – Hyperlinks displaying a) Total Number of Records, b) # Passing Records,
c) # Failing Records, and d) # Warning Records. Simply click on any of the hyperlinks to
view the list of records.
• Pass/Fail Summary – This chart always displays on the dashboard, and gives a breakdown
of the Pass/Fail state of all the records in the quarter.
• Bottom Chart – Using the drop-down box, you can select one of Six different types of graphs
to be displayed on the bottom chart, including Race, Sex, Insurance, Ethnicity, Hour of
Arrival, and Doctor.
Page 25
XVII. CREATE QUARTERLY AHCA REPORT
When you are finished entering and correcting all your visit records for the quarter, you will need to
click on the hyperlink called “Generate Quarterly AHCA Report” to perform the final QA of the
records and generate the actual AHCA Report data file. When you click the button, you will see the
following screen:
FIRST AND MOST IMPORTANT: Make sure the top sentence agrees with what you think you are
doing. I have had customers accidentally send AHCA data for the wrong quarter. In the above
screen shot, the system is confirming my intent by stating “You have chosen to generate an AHCA
Report for the 2nd Qtr, 2014”.
Next, see if there are any “Quarter Level Edit Check Errors Found”. There are three levels of failures
possible with the reported data:
Field Level Validation Errors: When the problem is with a single field on one record (invalid CPT,
etc).
Record Level Validation Errors: When one field is in conflict with another field within the same
record (Date of Visit is before Date of Birth, etc).
Quarter Level Validation Errors: When information on one record is in conflict or duplication with
another record. For example, two records with the same SSN are reporting different Gender.
This window’s QA tests are concerned with the 3rd type of validation errors (Transmission Level). If
you see any problems listed, you can get detailed information about each problem by clicking on the
hyperlink for the error. This will pop up a window to display details about the error.
Page 26
Until all of the errors are resolved, the “Generate & Download Report” button will be disabled (as in
the screen shot above).
If you are working on corrections from a previously submitted AND ACCEPTED AHCA Report, don’t
forget to check the box called “Check this box if this is a Resubmittal of corrected data for AHCA”.
For normal resubmissions of files that were rejected by AHCA, please do not use this checkbox.
If you have an error listed, but you KNOW FOR SURE that it is not a real problem and wish to
generate the AHCA file anyway, use the checkbox called “Override the Errors listed above and let
me generate an AHCA Report anyway”.
Finally, when you are ready to generate the report data file, click on the “Generate & Download
Report” button. A dialog box will pop up from your browser and allow you to download and save the
file to your hard drive on your computer. Please take special note of where you are saving it on your
hard drive, as you will need to find the ZIP file for the next step below.
In order to complete your file submission to AHCA, use the hyperlink shown below that reads “Log
into AHCA Data Submission Website” on the dashboard.
AHCA Data Submission Website Note:
Many people get tripped up by this, so it is worth mentioning. On the AHCA Submission Website
screen below, please make sure and select “AS10-1” as the Data Type, or your upload will fail.
The Report Type should be set to “AS – Ambulatory/ED Data”.
Page 27
XVIII. HELP AND TROUBLESHOOTING
This section of the dashboard has very useful features, including the following:
•
•
View DataVault User’s Guide – Lets you view the PDF User’s Guide for the DataVault
System.
Upload a Troubleshooting File to CDT – Allows you to upload a data file to us for
troubleshooting purposes. Please ZIP the file up using WinZip before uploading it, if possible.
The screen looks like this:
Page 28
•
View Creative Data Contact Info – Displays the following screen with full contact information
for Creative Data Technologies, Inc.:
•
Florida Statutes, Chapter 59B-9 – Displays the State of Florida website containing the laws
pertinent to quarterly submissions to AHCA.
AHCA Data Submission Resources – Displays the AHCA Website with helpful information
and guidance with regard to quarterly submissions.
Yellow boxes containing Quick Tips – These will change from time to time, and contain helpful
tips on using the DataVault system.
•
•
End of User’s Manual.
Page 29