1
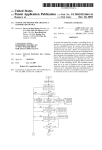
o Doc. # 021-44409-01 Rev. A November 1993 Trace® ADDENDUM COPYSTREAM AND COPYSET TRACER~T This addendum describes two new features for the Tracer/ST Model 200 and 300 duplicators. Copy Stream duplicates and compares multiple masters in a single job. CopySet allows you to group master images as a set on the hard disk (if installed), and use that set to create single, collated sets of diskettes. In addition, this addendum describes some new error messages associated with the new features. It also provides charts of the revised menu structure. This addendum is divided into the following sections: CopyStream CopySet Error Messages • Tracer/ST Menu Structure If you have any questions about CopySet and Copy Stream, contact Trace Customer Support. In the U.S. and Canada, call toll-free (800) GO-TRACE [(800) 468-7223]. For international customer support numbers, refer to your Tracer/ST user's manual. 1 Tracer/ST Addendum CopyStream and CopySet Section 1: CopyStream 1: CopyStream-continued The CopyStream feature allows you to copy or compare multiple masters in a single job by using specially prepared marker disks to separate masters from target diskettes. A utility to create these special marker disks is located under the option menu. To create marker disks, follow these instructions: During a CopyStream job, a diskette which follows a marker disk is recognized as a master, and is copied to or compared against all subsequent diskettes until the system encounters another marker disk. 1. Place any number of brightly colored blank diskettes in the input hopper. You will need one marker disk for every master in your stream job. 2. From the startup screen, press the OPTION button on the front panel. Press the softkey labeled [SetupJ. Then press the key labeled [SystemJ and then [Ini. tJ. This section contains instructions for creating the marker disks, and then using the marker disks to enable streamlined duplication or verification of multiple masters. 3. Use the -more- softkey to display additional options. Press the softkey labeled MARKERS. 1-1: Create Marker Disks 4. Press CONTINUE to begin making marker disks. The marker disks will be placed in the accept hopper. To stop making marker disks, press the CLRISTOP button or wait for the input hopper to be empty and press the QUIT softkey. Marker disks have a unique recording on track 0 which the Tracer/ST recognizes during CopyStream. When the Tracer/ST encounters a marker disk during a stream job, it immediately ejects it into the accept hopper and treats the next diskette in the input hopper as a master. 1-2: Copy or Compare Marker disks cannot be read or copied by the Tracer/ST or any other professional duplication system. If a marker disk is inserted during any operation other than CopyStream, it will be rejected. In order to stream copy or compare multiple masters, you need one marker disk for every master diskette in your job. If you have not made enough marker disks, refer back to Subsection 1-1. To stream copy or compare mUltiple masters, follow these instructions: NOTE Because marker disks are written with a strong write current, they should not be used for any other purpose. Trace strongly recommends that you use distinctive diskettes (such as brightly colored diskettes) as marker disks, so that you can easily identify the marker disks at your site and in the accept hopper. 2 1. If the system is not turned on, power up the system according to the instructions in Section 2-2 of the Tracer/ST user's manual. You should be viewing the Tracer/ST startup screen. 2. Place a marker disk in the input hopper. Place your first master diskette on top of the marker disk. 3 Tracer/ST Addendum CopyStream and CopySet 1: CopyStream-continued 1: CopyStream-continued ... WARNING You must place a marker disk before each master diskette, or the Tracer/ST may overwrite your master diskette. For additional protection, Trace recommends write-protecting your master diskettes. 3. Place blank diskettes or diskettes to be compared for the first master diskette in the input hopper on top of the master diskette. 4. Place another marker disk on top of the diskettes already in the hopper. Then place another master diskette in the hopper, and place the target diskettes for that master on top of the master diskette. 5. Repeat step 4 for all master diskettes you want to copy or compare. 6. Press COpy (or COMPARE). The system will display the copy options, as shown below. (If a hard disk is installed, the fourth soft key will be labeled SELECT.) 7. Press the softkey labeled [Batch]. Press STREAM to begin the stream job. I 8. To stop the job at any time, press the CLRISTOP key on the front panel. Pressing the CLRISTOP key once instructs the system to stop after 'finishing the current diskette. Pressing the CLRISTOP key twice stops the system immediately, and the current diskette is rejected. 9. Marker disks, masters, and accepted diskettes will be placed in the accept hopper, on the front of the Tracer/ST. Any rejected diskettes will be in the reject drawer, under the accept hopper. Jammed diskelles are also placed in the reject drawer, but are not counted as failed diskettes. I For more information, refer to your Tracer/ST user's manual. The Tracer/ST ejects the first marker disk, reads in the first master diskette, and copies or compares it to every diskette until the next marker disk. The Traccr/ST then reads the master diskette after the second marker disk and copies or compares it to all the diskettes following it, until all the the job is completed or canceled. 4 5 CopyStream and CopySet Tracer/ST Addendum 2: CopySet--continued Section 2: CopySet When your system is equipped with an internal hard disk, CopySet gives you the option of reading in several masters of the same format to be stored as a set. The image set can then be used to quickly duplicate diskette packages. Each set can contain up to 99 masters, depending on the amount of space available on the hard disk to store the master images. ) 3. Press the COpy button on the front panel. I 4. Press the softkey labeled [Batch] . From the [B ate h] menu, choose the softkey labeled READ SET. 5. The system will prompt you to enter a base name for the sel. The base name will be assigned to each master, with an additional suffix: -01, -02, -03, and so on. For example, if you name the set MASTER and load three master diskettes, the files on the hard disk will be named MASTER-Ol, MASTER-02, and MASTER-03. The master images in a set are assigned related names by the system, and are permanently linked on the hard disk. When you change the name of one of the images, the system changes the name of every image in the set. You can only delete the master images as a set. (Changing and deleting files is described in Subsection 5-2-1 of the Tracer/ST user's manual.) CopySet replaces the Tracer/STs batch read-in function, described in Subsection 5-1-1 of the Tracer/ST Model 200 & 300 User's Manual. Batch read-in allowed you to read masters in as a batch, but did not give you the option of duplicating the batch. 6. Enter a set name (7 characters maximum) using the up and down arrow soft keys to select each leiter, and the right arrow (-) to move to the next character. Refer to the user's manual for information on entering text. When you are finished entering the name, press the softkey labeled ACCEPT. This section is divided into two subsections: 7. The system will begin reading the master diskettes and creating master image files on the hard disk. While each master is being read, the LCD displays the format of the set (if it recognizes the format), or the size, density, and encoding type of an unrecognized format. Load Set to Hard Disk Copy or Compare a Sct 2-1: Load Set to Hard Disk 8. To load a set of master diskettes, follow these instructions: 1. If the system is not turned on, power up the system according to the instructions in Section 2-2 of the Tracer/ST user's manual. You should be viewing the Tracer/ST startup screen. 2. Place all the master diskettes in the input hopper. All the master diskettes must be the same format. 6 1 A final status screen tells you how many masters passed read-in. Masters which are read in successfully are placed in the accept hopper on the front of the Tracer/ST. If any masters fail read-in, the read-in is canceled, and the wholt se t must be read in again. If the read-in was successful, all the master images are now stored in separate fil es on the hard disk. 7 Tracer/ST Addendum 2: CopySet-continued CopyStream and CopySet 2: CopySet-continued 2-2: Copy or Compare a Set After you load a set of master images to the hard disk, you can copy a set of collated diskettes from that master set. Collated diskettes are duplicated one set at a time, so that you can remove each set from the input hopper before the next is duplicated. This gives you time to label the duplicated diskettes before they become confused with other disketles. NOTE Do not use preJabeJed diskettes for copying sets. If a diskette is rejected, the image will be copied to the next diskette in the input hopper. 5. Use the arrow softkeys (t and l) to scroll through the base names of the sets until you find the set you wish to copy or compare against. Press the soft key labeled ACCEPT. The system will begin the copy or compare job. 6. If a diskette is rejected during copy, that image will be copied to the next diskette in the input hopper. A reject during compare is more serious than a copy reject, because it means the whole diskette set is bad. The system will prompt the user to cancel the compare job after one To copy or compare against a set which is being stored on the internal hard disk, follow these instructions: 1. If the system is not turned on, power up the system according to the instructions in Section 2-2 of the Tracer/ST user's manual. You should be viewing the Tracer/ST startup screen. 2. Place blank diskettes or diskettes to be compared in the input hopper. Make sure diskettes to be compared arc in set order. with the copy of the first master on the bottom. 3. Press COpy (or CO MPARE). Then press the softkey labeled [Batch]. 4. Press the softkey labeled COPY SET (or cOMP SET). The diskette fails. Press QUI T to cancel the job, press CONTINUE to verify the remaining diskettes. 7. When the CopySet job is complete, the system will prompt: ~~~2~\\!~.:.: .'~~.~ .:'c~~7r1nt~~i:~<~ilbt~· <:~jt~5"t,~i~~ ,~~:~ L. If you wish to copy or compare another set, place the diskettes in the input hopper and press the CONTINUE softkey. If you are done, press the QUIT softkey. Press CLR/STOP to return to the startup screen. For more information, refer to your Tracer/ST user's manual. system wi ll display the nu mber of sets stored on the hard disk. Press the down arrow (~ ) to begin scrolling through a list of all the sets available on the hard disk, their formats, and the number of masters in each set. B 9 CopyStream and CopySet Tracer/ST Addendum Section 3: Error Messages Section 4: Tracer/ST Menu Structure The following error messages are new messages which the Tracer/ST may display during CopyStrcam or CopySet jobs. In addition, you may experience one of the standard messages documented in Chapter 7 of the Tracer/ST user's manual. The charts below show the tree structure of the software options under the TracerlST COPY and COMPARE buttons. The menu structure of the OPTION button is shown on the' next page. The number under each feature indicates the section of the user's manual or this addendum which describes correct usage of the feature. FIRST DISK MUST BE A MARKER DISK Meaning: You have chosen to copy or compare using CopyStream, but you did not insert a marker disk to identify the first master. New features are shown in bold. Features which are no longer available are shown in strik@tbrougb t<l*t. Options shown in italics are not available on all TracerlSTs. Solution: The first diskette in the input hopper for CopyStream must be a marker disk. Reload the input hopper and start the job again. See Section 2 for more information on -CopyStream. To copy or compare just one master at a time, choose NEW on the copy or compare menu. PREVIOUS 3-2 The set read-in failed, because the format of the current master diskette is different than the other diskettes in the sct. Solution: All master diskettes in a set must be in the same format. Make a new master in the correct format, or do not include this master in the sel. 3-1 I MASTER FORMAT DOES NOT MATCH SET FORMAT Meaning: NEW PREVIOUS 4--2 I [Botch] I READ SET Addendum COpy SET Addendum STREAM Addendum 2-1 2-Z l-Z [Botch] SELECT 5-1-3 READ SET Addendum COMP SET Addendum STREAM Addendum 2-1 Z-Z 1-2 NEW 4-1 I I 10 SELECT 5-1-2 l 11 N [Setup] I [Options) J, WRTPRT 2-4- 2 I I [UtH i ty) FOflMAT [l/arddisk] 3-3 I I QUALITY 1-4-3 I [Syst...) VIEW ~ 5-1-1 I I [IIetrtOrk] (Us",] _ I I REIWiE DELETE 5-1-1 5-Z-1 I [Syslnfo) [Init) I I IIININEr 6-1-1 GIIOOPMM 6-1-1 ~ CONTRAST 2-4 - 2 r-----~--L-------r_----_.----_, [Drive) (Looder) BEEPE~ 2-4-2 I ~INTLIMIT 8-1-1 SERIAL' ~INTLlMlT 7-3-4 &-1-1 SYllJPDAU [Horddisk] .--_+-1--', App. DISABLE! ENABLE D MARKERS Addendu", 1-1 SCA.~ INIT 5-1-1 5-1-1 5-2-1 [Test) [C\oan) I DRIVETEST I DRIVE 8-1 -Z 7-3-1 LOADER &-1 - 3 I ______ 7-3-2 I I [)!anual) [O\ogs) ,I'I INS'ERT ACCEPT REJECT CLEAR 7-3-3 7-3-3 7-3-3 REJECT ItOOISKS 7-3-3 8-1-1 -+._____-, r ~ 7-3-3 Italics indicate menu ilems associ. led wilh Ihe Model 300 or purchased options SYSTEST (Cycle) ACCEPT COUNTERS (Loader) I 7-3-3 7-3-3 PICK CYCLE SENSORS 7-3-3 POKE EJECT FORWARD BACKWARD -m(lI"e -more-1ftOr't 7-3-3 7-3-3 7-3-3