1
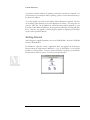
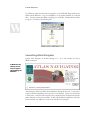
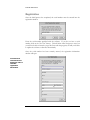
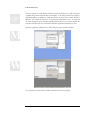
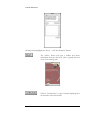
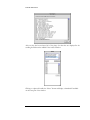
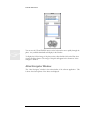
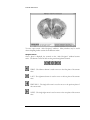
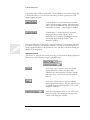
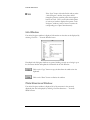
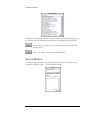
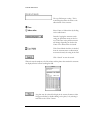
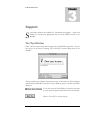
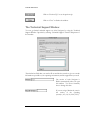
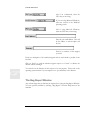
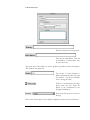
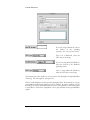
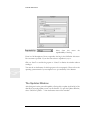
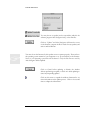
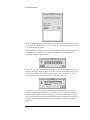
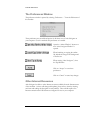
AT L A S N AV I G AT O R User Manual YTIG, Inc P.O. Box 721959 San Diego, CA 92172-1959 Table of Contents Introduction i I N T RO D U C T I O N - The Plate Structures Window 14 The Search Window 15 1 What Do I Need to Run Atlas Navigator? 1 S U P P O R T Getting Started 2 The Tips Window 17 Launching Atlas Navigator 3 The Technical Support Window 18 Registration 4 The Bug Report Window 19 Platform Differences 6 The Updates Window 22 Using the CD-ROMs 6 The Preferences Window 26 Other Internet Resources 26 N A VI G AT I N G - C H AP T E R The Atlases Window 2 7 The Atlas Navigator Window 10 The Info Window 14 - C H AP T E R 3 U S E R 1 M A N U A L Chapter Introduction A tlas Navigator is a software application written for both Apple Macintosh® and Windows based computer systems. It was designed to work with the supplied atlas CD-ROM disks from Elsevier Science. You do not need to use Atlas Navigator in order to use the files on the CD-ROM disks. However, Atlas Navigator is designed to make it easier to “navigate” through the many hundreds of files, and to offer one-click launching of the outline and imaging programs. Atlas Navigator also has built into it a database that knows the location of the structures for all of the various plates, sections, and atlases. You can search easily for structures and Atlas Navigator will show which sections contain those structures. Atlas Navigator is not meant to substitute for the outline programs that can open all of the lineart that is supplied on each atlas’ CD-ROMs. It also does not perform 3D display or analysis, circuitry, or sophisticated database operations. It is designed to simply be the first tool to use to “navigate” through the atlas files. Use Atlas Navigator to locate the plates you want to use, and then run other software applications to do more critical display or analysis. What Do I Need to Run Atlas Navigator? I C O N ! K E Y Important Tip ? Alert M Macintosh W Windows Atlas Navigator runs on all Apple Macintosh® and Windows-based computers running Windows 95, Windows 98, Windows NT, and Windows 2000. A minimum of a total of 32 – 64 MB of overall system RAM is recommanded for the computer. 5 MB of free memory is recommended for Macintosh computers. While Atlas Navigator itself does not require a CD-ROM drive when operating, the installation software and atlas data files are supplied on CD-ROMs. The total size of the files are very large, and it is recommended to leave the data files on the CD-ROM when using Atlas Navigator. Atlas Navigator will automatically locate the needed files on the CD-ROM and alert you if it cannot find them. There are no special requirements for video cards. The images are best displayed in thousands or millions of colors on the Macintosh, and high or true color on the Microsoft Windows computers. 1 U S E R M A N U A L To perform software and data file updating, an Internet connection is required. See your manual for your computer and its operating system to ensure that connectivity to the Internet is enabled. To see the original source files on the outlines, Adobe Illustrator is required. The files on the Mouse Atlas database are stored in Illustrator 8.0 format. The image files are stored as TIFF files. On the Macintosh, Adobe Photoshop will be launched to open these files. Under Microsoft Windows, the program associated with .TIF files will open them. However, any graphics software program capable of displaying TIFF images can be used to open them directly. Getting Started Atlas Navigator is supplied separately on its own CD-ROM disk. Insert the CD-ROM into the CD-ROM drive. For Macintosh: Open the volume “Application Disk” that appears on the desktop. Drag and drop the folder named “Macintosh - Copy To Hard Drive” to any desired location on your hard drive. You may rename this folder to anything you would like. Double click the folder to open it. You will see the following files: M 2 U S E R M A N U A L For Windows: Open the drive that is assigned to your CD-ROM. Drag and drop the folder named “Windows - Copy To Hard Drive” to any desired location on your hard drive. You may rename this folder to anything you would like. Double click the folder to open it. You will see the following files: W Launching Atlas Navigator Launch Atlas Navigator by double clicking on it. In a few seconds, the About Window will open. In Windows, the chasing arrows may not appear when bulding the database. Atlas Navigator will then build its internal database during this first run. It may take a couple of minutes depending on the speed of your computer. Please do not interrupt it at this point. Once this first run process has completed, Atlas Navigator will start up almost instantly on successive launches. It will only rebuild itself again when it detects that new atlases were added or if some of the data files have changed. 3 U S E R M A N U A L Registration Once the build process has completed, the serial number must be entered into the registration window. Enter the serial number provided with the software. If you do not have a serial number, click on the “Not Yet” button.. This will allow Atlas Navigator to start, but you will not be able to launch or copy files from with the program, nor will you be able to update the software or data files automatically. Once the serial number has been correctly entered, the registration information window will open. You need to be connected to the Internet in order to send this registration information. 4 U S E R M A N U A L Until you register your information and click on the Send button, you will not be able to update the software and data files automatically. Your name, institute or company, and email address are required. Until these fields are entered, the “Send” button is disabled. If you click on “Not Yet”, no registration information is sent. You can still use Atlas Navigator freely and copy and launch data files, but you cannot update the software or the data files over the Internet until the registration information is sent. After the registration windows close, Atlas Navigator opens its main windows. M W You will learn more about these windows and others in the next chapter. 5 U S E R M A N U A L Platform Differences Atlas Navigator was developed to support both the Apple Macintosh computer and all of the Microsoft Windows operating systems. The graphical user interface is, for the most part, completely similar when running on all of the different computers and operating systems. There are minor cosmetic differences that are in part due to incomplete specification of the programming libraries. For example, the Windows software will display a gray background on the text of some of the windows. None of these will affect the operation of the software. For more information, see the chapter on Technical. Using the CD-ROMs The atlas that this software is supplied with comes on several CD-ROMs. The CDROMs are ISO 9660 compliant and can be used in both Apple Macintosh and Microsoft Windows computer systems. Each CD-ROM has a subset or the whole atlas on it. Please refer to the documentation that came with the atlas to understand how the files are grouped on each CD-ROM. Typically, the CD-ROM containing the animal and type of file are inserted in the CD-ROM drive. Atlas Navigator will then do its best to locate the needed files from that CD-ROM disk when you launch or copy an outline or an art file. If Atlas Navigator can not find the file on any mounted CD-ROM, it will prompt you to locate it. You should then eject the current CD-ROM and insert the correct disk containing the file that is needed. If you have more than one CD-ROM drive, you can insert more than one CD-ROM disk at a time. Atlas Navigator will search all of the mounted CD-ROMs for the files that it needs. 6 U S E R 2 M A N U A L Chapter Navigating A tlas Navigator uses atlases that are installed in its database. It does not need the CD-ROMs until you Copy or Launch a plate section that is displayed in one of its main window. More information on Copy and Launch are below in the “Atlas Navigator Window” section. There is only one main window named “Atlas Navigator”. This window displays the atlas plate section that you select for viewing. You may have as many of these windows open as you want. To open another window, select “New Window…” from the File menu. Several other windows may be opened to control the selection, searching, and display of information of plates. These windows are sometimes called floating palette windows because they float above the main windows, and their actions affect the current or frontmost main “Atlas Navigator” window. The first palette window that opens when the program starts up is the “Atlases Window”. Atlases Window All of the atlases that have been installed are displayed in the top scrolling field of this window. You can toggle this window on and off by selecting the menu item “Atlases…” from the Window menu. 7 U S E R M A N U A L Selecting an atlas highlights the “About…” and “List Structures” buttons. The “About” button will open a window that shows information about the atlas itself. This is typically the front cover of the hardcopy atlas. Click on “List Structures” to open a window displaying all of the structures in the selected atlas. 8 U S E R M A N U A L After an atlas has been selected, all of the plates for that atlas are displayed in the scrolling list field near the middle of the Atlases Window. Clicking on a plate will enable the “Select” button and display a thumbnail if available on the lower part of the window. 9 U S E R M A N U A L You can use the UP and DOWN arrows on the keyboard to move quickly through the plates. Any available thumbnails will display in the window. To display the full size image of the plate section, either double click on the Plate item or press the Select button. The image of the plate will appear in the frontmost “Atlas Navigator” window. Atlas Navigator Window The “Atlas Navigator” window is the main window of the software application. This is where the selected plates of the atlases are displayed. 10 U S E R M A N U A L You may open several “Atlas Navigator” windows. Many windows may be useful when comparing similar sections from different strains. Navigation Controls Once a plate is displayed, the controls on the “Atlas Navigator” window become active. The buttons on the left side are the general navigational controls. FIRST - The leftmost button is used to move to the first plate of the current atlas. LAST - The rightmost button is used to move to the last plate of the current atlas. PREVIOUS - The single left arrow is used to move to the previous plate of the current atlas. NEXT - The single right arrow is used to move to the next plate of the current atlas 11 U S E R M A N U A L PREVIOUS FAST - The double left arrow is used to quickly move through all previous plates of the series. When the first one is reached, the display stops. Press and hold the mouse button on this navigational button. When the mouse button is released, the changing display will stop. NEXT FAST - The double right arrow is used to quickly move through all next plates of the series. When the last one is reached, the display stops. Press and hold the mouse button on this navigational button. When the mouse button is released, the changing display will stop. Under the Windows operating system, using the Previous Fast or the Previous Next buttons does not properly display the plate sections as they are being quickly moved back and forth. However, this does display properly on an Apple Macintosh. Source File Controls The buttons on the center control the copying and launching of the original files from the CD-ROM. “Copy Outline” is used to copy the original source data file containing the line art from the CD-ROM for the atlas plate section displayed on the current “Atlas Navigator” window to a local folder. “Copy Image” is used to copy the original source data file containing the image from the CD-ROM for the atlas plate section displayed on the current “Atlas Navigator” window to a local folder. Both copy procedures will search the mounted CD-ROM for the correct file. If Atlas Navigator cannot locate the correct file, an Open File dialog window will open asking you to locate the file. Copy Outline is affected by the preference setting for “Launch/Copy Outline with Image”. If this preference is on, the outline file will contain the image in the background layer will be copied. If this preference is off, only the line art file will be copied. On the Macintosh, the creator of these files is Adobe Illustrator. 12 U S E R M A N U A L Copy Image copies a TIFF formatted file. On the Macintosh, the creator of these files is Adobe Photoshop. If you don’t have Photoshop, it can be opened by any TIFF capable graphics program. “Launch Outline” is used to launch the associated outline software program, typically Adobe Illustrator, and to open in it the line art of the atlas section plate displayed in the current “Atlas Navigator” window. “Launch Image” is used to launch the associated imaging software program, typically Adobe Photoshop, and to open in it the image of the atlas section plate displayed in the current “Atlas Navigator” window. Note that if Illustrator or Photoshop is currently running on your computer, launching the outline or image may not bring that window to the front of other windows. If so, use the Application Menu on the Macintosh, or the Task Bar on Windows to bring the window to the foreground. Plate Memory Controls The buttons on the right side control the storage of the currently displayed plate into disk memory for later recall by using the pull down menu. Click on the “Store” button to store the currently displayed plate into memory. The plate will be available in all “Atlas Navigator” windows from the pull down menu. You may store as many plates as desired. Click on the “Clear” button to clear the currently displayed plate from memory. The plate will no longer be available from the pull down menu on the “Atlas Navigator” windows. Select from this pulldown menu to one of the stored plates in memory. This will display the plate in the current “Atlas Navigator” window. 13 U S E R M A N U A L If the “Sync” button is checked in this and any other “Atlas Navigator” window, these plates will be changed together in synchrony when the navigation buttons are used. This is useful when similar planes of section are in atlases displayed in separate “Atlas Navigator” windows, and you want to examine the correponding sets of plates simultaneously. Info Window If an Atlas Navigator window is displayed, information on the atlas can be displayed by selecting “Get Info…” from the Window menu. If multiple Atlas Navigator windows are opened, clicking on each one to bring it up as the frontmost window will update the information in the Info Window. Click on the “Copy” button to copy the data from the window into the clipboard. Click on the “Done” button to dismiss the window. Plate Structures Window If an Atlas Navigator window is displayed, all of the structures in the currently displayed plate can be displayed by selecting “Get Plate Structures…” from the Window menu. 14 U S E R M A N U A L If multiple Atlas Navigator windows are opened, clicking on each one to bring it up as the frontmost window will update the information in the Plate Structures Window. Click on the “Copy” button to copy selected data from the window into the clipboard. Click on the “Done” button to dismiss the window. Search Window If an Atlas Navigator window is displayed, the structures in all of the atlases can be searched by selecting “Search…” from the Window menu. 15 U S E R M A N U A L The top field accepts a string. This is matched against either the name or the abbreviation of the structure. Select Name or Abbreviation by clicking on the radio button. Instead of typing the structure search string, the pull down menu can also be used. The items in the pull down menu will change depending on whether the Name of the Abbrevation is selected. If the Exact Match checkbox is checked, then the structure name or abbreviation must match exactly the string in the field. Click “Search” to start the search. When the search completes, all of the atlases and the plates that contain this structure are displayed in the bottom scrolling list field. Any plate may be selected for display in the current, frontmost Atlas Navigator window by double-clicking on the plate, or by selecting it and Click on the “Show” button. 16 U S E R 3 M A N U A L Chapter Support S everal other windows are available for information and support.. Open each window by choosing the appropriate item from the Window menu in the Menubar. The Tips Window If this is the first time running Atlas Navigator, the Tips Window opens first. You can also open it at any time by selecting “Tip of the Day” from the Help menu of the menubar. The tips contain some valuable information on how to effectively use Atlas Navigator with the data CD-ROMs. Each time the Tips Window opens, a random tip will be displayed. If you don’t want the Tips Window to open the next time you start Atlas Navigator, uncheck the box in the window. Click on “Next Tip” to see the next tip. 17 U S E R M A N U A L Click on “Previous Tip” to see the previous tip. Click on “Close” to dismiss the window. The Technical Support Window You can get limited technical support on Atlas Navigator by using the Technical Support Window. Open this by selecting “Technical Support” from the Help menu of the menubar. The window has fields that you need to fill out and choices to make to give us as much information as possible as your operating environment, and the support that you need. The version of Atlas Navigator is filled in automatically when you open this window. You do not normally have to change this value. If you are using a Macintosh, enter in the version of the operating system(i.e., 8.5, 8.6, 9.0, 9.0.4, OS X). 18 U S E R M A N U A L Also if on a Macintosh, select the CPU that you are using. If you are using Microsoft Windows, select the version of the Windows operating system. Also if using Microsoft Windows, select the CPU that you are using. Enter in your email address. This will be the address to whom replies will be sent. Enter in a summary of the support you need. Enter in a description of the technical support with as much detail as possible in the last field. Click on “Send” to send the technical support request or “Cancel” to dismiss the window without sending it. You must be on the Internet for this request to be sent properly. Please refer to the operating system manual of your computer to set up connectivity to the Internet. The Bug Report Window Any software bugs that you find may be reported to us using the Bug Report Window. You can open this window by selecting “Bug Report” from the Help menu of the menubar. 19 U S E R M A N U A L Enter in a summary of the bug report. Enter in your email address. This will be the address to whom replies may be sent if necessary. The center part of the window is used to profile the product and the environment. The “Product” tab opens first. The version of Atlas Navigator is filled in automatically when you open this window. You do not normally have to change this value. If there is a workaround to this bug, please check this box. Enter the details of the workaround in the description field below. Select from this menu the severity of the bug. Click on the “Environment” tab to display configuration choices for the environment. 20 U S E R M A N U A L If you are using a Macintosh, enter in the version of the operating system(i.e., 8.5, 8.6, 9.0, 9.0.4, OS X). Also if on a Macintosh, select the CPU that you are using. If you are using Microsoft Windows, select the version of the Windows operating system. Also if using Microsoft Windows, select the CPU that you are using. The bottom part of the window is used to enter in the description and reproducibility of the bug. The “Description” tab opens first. Enter in a full description of the bug in the description field. Be as accurate as you can, giving additional information where you feel it is needed. In order to produce a fix for these bugs, we need to understand fully the nature of the problem, as well as being able to reproduce it. Click on the “Reproduce” tab to open the fields for the reproducibility aspects. 21 U S E R M A N U A L Select from this menu reproducibility of the bug. the Enter in a full description of how to reproduce the bug in the field below this menu. Be as accurate as possible. If you don’t know how to reproduce it, say so. Click on “Send” to send the bug report or “Cancel” to dismiss the window without sending it. You must be on the Internet for this bug report to be sent properly. Please refer to the operating system manual of your computer to set up connectivity to the Internet. The Updates Window Atlas Navigator has the powerful capability of being able to update itself and all of the data files by accessing update servers over the Internet. To open the Updates Window, select “Check for Updates…” from the Internet menu of the menubar. 22 U S E R M A N U A L You may choose to update just the executables (which is the software program Atlas Navigator itself), or the data files. Click on “Update” and Atlas Navigator will locate the server on the Internet, compare the files it needs for any updates, and retrieve and install them. You must be on the Internet for this update server to operate properly. Please refer to the operating system manual of your computer to set up connectivity to the Internet. None of your operating system files will be altered. Only the files that are used by Atlas Navigator will be updated. Click on Cancel before updating to dismiss the window without performing an update, or click on it while updating to cancel any impending updates. Click on this arrow to expand the window downward to see more information on the update process. Click on it a second time to collapse the information. 23 U S E R M A N U A L When the update process has concluded, a log is written to the folder named “Install Logs” inside the “Data” folder. If there are problems, you can copy and paste this log to a Technical Support report. If the executables are being updated, you will be asked to restart Atlas Navigator after the updating has concluded. Under Microsoft Windows, the old application is renamed to “Atlas Navigator.exe.bak”. If you click on Cancel, the following dialog appears. The original application will not have been changed. However, the new one that has been downloaded will be saved into the same folder as Atlas Navigator and named “Atlas Navigator.new” on the Macintosh, and “Atlas Navigator.exe.new” on Microsoft Windows. If you click on “OK” to quit the current application and launch the new one, any windows currently displaying plate sections will be closed. A new instance of Atlas Navigator will be launched from the beginning. Under Microsoft windows, there is also a DOS window that will opened briefly that controls the application switching. It will close automatically when the process control switches to the newly updated application. 24 U S E R M A N U A L The Preferences Window The preference window is opened by selecting “Preferences…” from the Edit menu of the menubar. These preferences are recorded and persist for all future uses of Atlas Navigator on your computer. Check or uncheck each preference as is needed. Open the “Atlases Window” whenever a new “Atlas Navigator Window” is opened. When launching or copying the outline file, include the image in the background of the line art. When starting “Atlas Navigator”, show the Tips Window. Click on “Accept” to store these preferences. Click on “Cancel” to cancel any changes. Other Internet Resources Atlas Navigator has links to other Internet resources available from the Internet menu of the menubar. As these will change with updates, please refer to them by selecting each item and reading the description in each window. These will all require a live Internet connection and a Web browser configured for use on your computer. 25 26