1
OFFICIAL USER'S MANUAL
VERSION
1.1
BY ELIJAH NEWMAN-GOMEZ
aka SM Sith Lord
TABLE OF CONTENTS
1. OVERVIEW, SETUP AND USE................................5
1.1 Overview.............................................................5
1.2 Setup...................................................................8
1.3 Use....................................................................11
2. DETAILS MENU......................................................16
2.1 Launch Page.....................................................16
2.2 Item Details Page..............................................19
2.3 App Basics Page...............................................20
2.4 App Details Page...............................................21
2.5 Configure Page.................................................22
2.6 Movie Scraping Mode.......................................23
2.7 Game Scraping Mode.......................................25
2.8 TV Scraping Mode............................................26
3. MODEL SELECTION..............................................28
3.1 Model Browser..................................................28
3.2 Model Orientation..............................................29
3.3 Model Auto-Selection........................................29
4. WEB SCRAPING.....................................................30
4.1 Importing Online Database Info........................31
4.2 Automatic Importing..........................................32
4.3 Identifying Media Titles......................................32
4.4 TV Episodes......................................................33
4.5 Online Databases..............................................33
4.6 Adding Online Database Entries.......................34
5. DISCOVER MODE..................................................35
6. ADD-ON CONTENT / DLC......................................36
2
6.1 DLCs vs Add-Ons..............................................36
6.2 Official 100% Free DLC Store...........................36
6.3 Loading Content From Other Games................37
6.4 Add-On Content Compatibility...........................39
6.5 Automatic Add-On ZIP Installation....................39
6.6 Manual Add-On Installation...............................40
7. CABINET ART.........................................................42
7.1 Automatic Artwork Download............................42
7.2 Locally Stored Artwork......................................42
7.3 Artwork URLs....................................................43
7.4 Overriding Artwork Images................................43
7.5 Refreshing Artwork............................................44
8. MULTIPLAYER ARCADES......................................44
8.1 Limited Customization.......................................45
8.2 Library vs Library Cache...................................45
8.3 File Transfers....................................................46
8.4 Joining a Multiplayer Arcade.............................47
8.5 Hosting a Multiplayer Arcade............................47
8.6 Router / Firewall Issues.....................................48
9. DOWNLOAD / PURCHASE LOCATIONS..............49
10. APPS.....................................................................50
10.1 Program Compatibility.....................................50
10.2 Command-Line Syntax....................................51
10.3 Basic App Profile.............................................52
10.4 Local Artwork Collections................................53
10.5 Importing Game Collections............................53
10.6 Apps in Multiplayer..........................................54
10.7 Add-On Apps...................................................54
3
11. MEDIA SOURCES.................................................55
12. CONSOLE COMMANDS......................................55
13. KEYVALUES.........................................................56
14. SEARCH PROVIDERS.........................................57
15. FILE TYPES..........................................................57
16. 2D USER INTERFACE..........................................58
17. KNOWN BUGS......................................................58
18. FREQUENTLY ASKED QUESTIONS...................60
19. TROUBLESHOOTING..........................................62
20. MOD HISTORY.....................................................63
20.1 BETA Version (10/19/2010).............................63
20.2 Version 2.0 (10/26/2011).................................63
20.3 Version 2.0b (12/30/2011)...............................65
20.4 Version 2.0c (2/1/2012)...................................66
20.5 Version 2.0d (2/15/2012).................................67
21. DOCUMENT HISTORY.........................................70
21.1 Version 1.0 (3/2/2012).....................................70
21.2 Version 1.1 (3/3/2012).....................................70
22. CREDITS...............................................................71
4
1. OVERVIEW, SETUP AND USE
1.1 Overview
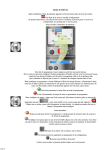
There are three (3) menu views that you must become
familiar with to use Source Media Arcade with ease:
3D View
This one is easy. It's the same as any FPS game
you've played in the past. Run around with W-A-S-D,
find the cabinet of an item you want to play, and then
press the USE button (E) to bring up the Details Menu.
5
Details Menu
Pressing USE on a cabinet will bring up the Details
Menu. Any time you want to launch an item, edit its
details, or edit an emulator's details, you will use the
Details Menu.
All of the underlined links and tool icons in the Details
Menu will perform specific functions. There are many
different pages that get displayed in the Details Menu.
Each page is fully explained in section 2 of this manual.
6
Library Browser
You use this to quickly find items in your media library
or on your hard drive when customizing your arcades.
Pressing the Create Shortcut button (MOUSE3) or
clicking a Change Item link will open the Library
Browser.
You can click the Browse button to pick a file from your
desktop, or use the powerful Filter and Search features
of the Library Browser to find items you have previously
used in Source Media Arcade.
7
1.2 Setup
It only takes a few seconds to setup Source Media
Arcade. You install it like any other Source engine mod,
except there is one additional step: you must set the
launch options for Source Media Arcade in Steam.
Requirements
1. Have Steam installed.
2. Own at least one of the following Source engine
games: Half-Life 2, Team Fortress 2, Left 4
Dead, Portal, Half-Life 2: Episode 1, CounterStrike: Source, Left 4 Dead 2, Portal 2, Half-Life
2: Episode 2, Day of Defeat: Source, Half-Life 2:
Deathmatch.
Source Media Arcade is completely free; however, you
must have access to the Source SDK Base by having
Steam installed and owning at least one of the Source
engine games listed above. I recommend Half-Life 2:
Death Match for $4.99 US.
8
Manual Installation
http://www.moddb.com/mods/
source-media-arcade/downloads/
source-media-arcade-2
1. Download the ZIP file from the link above.
2. Place the folder "smarcade2" into the
appropriate directory:
C:\Program Files (x86)\Steam\steamapps\sourcemods\
64-bit systems
C:\Program Files\Steam\steamapps\sourcemods\
32-bit systems
3. Restart Steam.
4. Go to the Library tab of Steam and find Source
Media Arcade 2 in your games list.
5. Right-click on it and choose Properties.
6. Click SET LAUNCH OPTIONS then cut & paste
the following line into the box:
-novid -window -noborder
7. Click OK to save your changes, then Close to
exit the Properties menu.
8. Double-click on Source Media Arcade 2 in your
games list to launch it.
9
Automatic Installation
http://www.moddb.com/mods/
source-media-arcade/play
1. Have Desura installed and linked to your Steam
account.
2. Use the link above to download & install Source
Media Arcade 2.
3. Double click on Source Media Arcade 2 in your
Desura games list to launch.
Note: Steam will automatically download any missing
resources the first time you launch Source Media
Arcade. This includes updating any Source
engine games you load resources from, as well
as downloading the Source SDK Base 2007. You
can monitor this by going to Steam's Downloads
tab.
10
1.3 Use
The objective is for you to build virtual arcades by
walking around your favorite maps spawning 3D
shortcuts to your games or movies. Doing this will
inherently build your media library, making it easier for
you to build your arcades in the future because you'll
be able to use the Library Browser to choose your
media instead of having to Browse for files when
creating 3D shortcuts.
While building your virtual arcade is a lot of fun in itself,
the main purpose of Source Media Arcade is to PLAY
the games and movies that you have in your arcade.
Play as you build! You can spawn 3D shortcuts or
play your media items at any time in Singleplayer
mode. Customizing your arcade is disabled while in
Multiplayer mode, but everybody can still play the
games and movies that are already placed.
11
To start a Singleplayer session, click Create Server at
the main menu. Select your favorite map, make sure
that Max Players is set to 1 in the Game tab, then click
Start.
The first time that you play, you won't have many items
in your media library. All of the Steam games that you
own will automatically be added, and they'll be some
DEMO items in it, but that's all. You have to start
spawning 3D shortcuts to build up your media
library. To spawn a 3D shortcut, you generally look at
an empty space on the ground and press the Create
Shortcut button (MOUSE3). This brings up the Library
Browser. If the game or movie file you're trying to
spawn is already in your media library, you can quickly
choose it with the Library Browser's filter and search
features. Otherwise, you can just click the Browse
button and choose the file you're looking for.
12
When adding a file to your media library for the first
time, you will be given a chance to specify what type of
media the file is. For example movies, pc, websites,
n64, etc. You can also specify if the file needs to be
opened with a specific application, such as an
emulator. Source Media Arcade will try to guess the
type of the item and which emulator to use, but this is
where you can manually specify these values if you
wish.
Adding a new media type is easy, you just manually
type its name into the box instead of selecting one from
the drop-down list.
Adding a new App, such as a new emulator, currently
requires some script editing.
You can also change which 3D model to use for the
shortcut at this point. Just click the Change button next
13
to the 3D model field. View section 3 of this manual to
learn how models get auto-selected for each item.
Click OK to spawn the 3D shortcut. It will appear
directly under your cross-hair. If it is the first time you
are spawning this item, it will be added to your media
library at this point. Source Media Arcade will also
search various online databases for screenshots and
box-art for certain kinds of item types. This is only
done automatically for the following types: movies, tv,
pc, arcade, snes, nes, n64, gameboy, genesis, saturn,
ds, 3ds, gamecube, wii, gba, and gameboycolor. View
section 4 of this manual to learn more about how your
media files are identified in the online databases.
Alternatively, Source Media Arcade can display your
local artwork files on the cabinets. View section 7 of
this manual to learn about cabinet art options.
After you have a 3D shortcut placed in the map, you
can walk up to it and press the USE button (E) to bring
up its Launch page. From there, just click LAUNCH to
play the game or movie. If the button says
CONFIGURE instead, clicking it will walk you through
the steps of getting the particular game or movie ready
to play on your computer; even if this means
downloading/purchasing it from the internet. View
section 9 of this manual for more info on where you are
sent to download/purchase media.
14
If you want to make your server Multiplayer and allow
people from all around the world to join it through the
Find Servers menu, just spawn the item from your
library entitled GoLive! and LAUNCH it. The server will
then be restarted in Multiplayer Mode. Alternatively, you
can start a Multiplayer server just like you do for any
other Source engine game. View section 8 of this
manual for the details on how Multiplayer Mode works.
15
2. DETAILS MENU
2.1 Launch Page
• Press the USE button on a cabinet to bring up
the Launch page.
• This shows you a quick overview of the item you
are about to play.
• Clicking the LAUNCH button will play the item.
• If the button says CONFIGURE instead, click it
to see why you can't launch the item yet.
• Clicking the logos under Import missing info
from: will attempt to identify your item on the
internet database and download posters,
screenshots, and descriptions for it.
• Clicking the Marquee or Screen artwork
thumbnails will allow you to view the image at its
full resolution.
16
• Clicking the Browse icon next to an artwork
thumbnail will allow you to change the image
used there.
• Clicking the Locate icon next to an artwork
thumbnail will open the folder that the image is
saved in.
• Clicking the Refresh icon next to an artwork
thumbnail will re-download the image (if needed)
and refresh it in-game.
• Clicking a link with a magnifying glass icon next
to it will search the specified site for the item you
are viewing.
• Clicking a link with a chain icon next to it will
open a user-defined download location for the
item you are viewing.
• If the item needs to launch with the help of an
emulator, the name of the emulator will be
shown as a link next to the words Opens With.
Clicking this link will take you to the App
Overview page for that emulator.
• Clicking the Change Item link will let you change
which item is assigned to the cabinet you're
standing in front of.
• Clicking the Remove Cabinet link will remove the
cabinet from the 3D world.
• Clicking the Change 3D Model link will let you
change what the cabinet looks like.
17
• Clicking the Import Siblings link will find any
other files that are of the same type and are in
the same folder as the current item and add
them to your media library.
• Clicking the name of the item at the very top of
the menu will bring up the Item Details page.
18
2.2 Item Details Page
• Click the name of an item on its Launch page to
bring up its Item Details page.
• This is where you can view and edit any of the
details stored for this item.
• Clicking the Show/Hide Help link on the top right
will toggle the in-line help for each field.
• Clicking the Edit icon next to a field will allow you
to change that field.
• Clicking the Browse icon next to a field will open
the File Browser for you to select a file (usually
an image file).
• Clicking the Refresh icon next to an image field
will re-download the image (if needed) and
refresh it in-game.
19
• Clicking the Locate icon next to an image field
will open the folder that the image is saved in.
• Some fields, like the Download URLs field, allow
you to add multiple entries. Clicking the Add icon
next will add a new entry to the field.
• Clicking the Delete icon next to an entry will
remove it from the field it was added to.
• Clicking the logos under Import missing info
from: will attempt to identify your item on the
internet database and download posters,
screenshots, and descriptions for it.
2.3 App Basics Page
• Clicking on the name of an App in the Opens
With field will show you the App Basics page.
• This page shows you only the basic information
about the App.
20
• To change the settings of the App, you have to
click again on the name of the App at the top of
this page. This will take you to the App Details
page.
2.4 App Details Page
• Clicking again on the name of the App from the
App Overview page will show you the App
Details page.
• This is where you can view and edit any of the
details stored for this App.
• It behaves exactly like the Item Details page.
• Clicking the Show/Hide Help link on the top right
will toggle the in-line help for each field.
• Clicking the Edit icon next to a field will allow you
to change that field.
• Clicking the Browse icon next to a field will open
the File Browser for you to select a file (usually
21
•
•
•
•
an image file).
Clicking the Refresh icon next to an image field
will re-download the image (if needed) and
refresh it in-game.
Clicking the Locate icon next to an image field
will open the folder that the image is saved in.
Some fields, like the Download URLs field, allow
you to add multiple entries. Clicking the Add icon
next will add a new entry to the field.
Clicking the Delete icon next to an entry will
remove it from the field it was added to.
2.5 Configure Page
• Clicking the CONFIGURE button on the Launch
page will bring up the Configure page.
• This button is only displayed if the item cannot
22
be immediately launched.
• Depending on the problem, the Configure page
will tell you what's wrong and how to fix it.
• Usually you see this page if Source Media
Arcade cannot find the file that the 3D shortcut
launches.
2.6 Movie Scraping Mode
• The first time that you spawn a file of type
movies, OR when you click the logo for
TheMovieDb.org under the Import missing info
from: heading, www.themoviedb.org will be
displayed in Movie Scraping mode.
• You can search and browse TheMovieDb's
complete website while in Movie Scraping Mode.
• Viewing the profile page for a movie will make
an Import Info button appear in the bottom right
23
corner of the screen.
• Clicking the Import Info button will save the
name, description, movie poster, and fan-art
from the profile you are viewing to the item you
are importing it to.
• If you only wish to import only fields that are
missing for the item, you can change the dropdown list on the bottom of the screen from ALL
INFO to MISSING INFO ONLY.
• You can specify which poster and fan-art image
to use by changing the Screen # and Marquee #
drop-down lists.
24
2.7 Game Scraping Mode
• www.AllGame.com is displayed in Game
Scraping mode the first time you spawn a file of
one of following types: pc, arcade, snes, nes,
n64, gameboy, genesis, saturn, ds, 3ds,
gamecube, wii, gba, and gameboycolor. Or
when you click the logo for AllGame.com under
the Import missing info from: heading.
• You can search and browse AllGame.com's
complete website while in Game Scraping mode.
• Viewing the profile page for a game will make an
Import Info button appear in the bottom right
corner of the screen.
• Clicking the Import Info button will save the
name, overview, box-art, and screenshot from
the profile you are viewing to the item you are
importing it to.
• If you only wish to import only fields that are
25
missing for the item, you can change the dropdown list on the bottom of the screen from ALL
INFO to MISSING INFO ONLY.
• You can specify which screenshot image to use
by changing the Screen # drop-down list.
2.8 TV Scraping Mode
• The first time that you spawn a file of type tv, OR
when you click the logo for TheTVDb.com under
the Import missing info from: heading, you will
gain access to their online database in TV
Scraping mode.
• The first time you spawn an episode from a new
TV show, it will ask you to enter the name of the
series into the Search box.
• If there are multiple search results for the TV
26
show name, you will then have to click on the
banner for the correct show.
• If there are multiple matches to the particular
episode file you are spawning, you will be shown
a Search Results page for you to select the
correct match. Suggested matches are on top,
while complete episode listings for the entire TV
show are listed on the bottom.
• Clicking on an episode name will save the name,
description, TV show poster, and fan-art for that
episode to the item you are importing it to. It will
also set the Group of the item to the name of the
TV show.
• Note that after you add the first episode from a
show, you should use the Import Siblings feature
to automatically import the rest of the files in the
folder as episodes of the same TV show.
27
3. MODEL SELECTION
Understanding how models are auto-selected for
specific items and how they are positioned will reduce
the amount of time you spend changing the models of
the 3D shortcuts you spawn.
3.1 Model Browser
This is the menu where you can select the 3D model to
use on the shortcut. Models are organized into
categories to make it easier to find the one you're
looking for. After you've selected a category, the model
drop-down list will show all the models that are in that
category. Finally, after you've selected a model name
from the list, the location of the actual MDL file will be
entered into the Model File Location box for you.
Sometimes advanced user might want to use the
28
Browse button to locate a MDL file manually instead. It
is a good idea to stand on the SIDE of a cabinet
when you're changing its model, that way you're
not standing in the way of a larger cabinet model
when it appears.
3.2 Model Orientation
Most model types are made to be spawned on the
ground. The bottom-rear of the cabinet will be placed
directly under the cross-hair when spawning new 3D
shortcuts on the ground. However, the models in the
Frames and Icons categories are meant to be spawned
on either walls or table tops. If you're spawning the
shortcut on a vertical surface, such as a wall, you'll
want to select a model that does NOT have the word
Ceiling as a prefix. For all other cases, such as
spawning the shortcut on a table top, the ceiling, or the
floor, you'll want to use one of the models with the
Ceiling prefix. You only have to worry about this
when using models from the Frames or Icons
categories.
3.3 Model Auto-Selection
When spawning an item, it will use the same 3D model
29
as it did the last time that you spawned that item. If
you've never spawned the item before, it will use the
same 3D model as the last shortcut that you spawned.
4. WEB SCRAPING
In Source Media Arcade, Web Scraping refers to
identifying matches (based on titles) of your local
media files with entries in various on-line databases.
When a match is found, the artwork images and other
details are extracted from the on-line database and
stored in your media library. An HTTP link to the
database entry's web page is also stored with the item.
This is especially helpful when hosting multiplayer
arcades because connecting players can download
artwork from the on-line database at high speeds
instead of transferring the images slowly from peer to
peer. See MULTIPLAYER ARCADES: IN-DEPTH to
learn more about how web scraping enhances
multiplayer
arcades.
Note that Source Media Arcade makes NO attempt
to keep any on-line record of your media collection.
Web scraping is about bringing information from
the on-line database INTO your media library, not
the other way around.
30
4.1 Importing Online Database Info
When you first spawn a 3D shortcut to a game or
movie file it will probably not have artwork images to
display on the cabinet. You can easily fix this by
importing the artwork images and other details from the
on-line databases.
Click on the appropriate database to search at the
item's Launch page under the Import missing info from:
heading.
A database search results page will then be displayed.
Feel free to refine your search by manually typing
keywords into the Search box.
If you're viewing the profile of a game or movie who's
info can be imported, an Import Item button will appear
at the bottom right corner of the screen. Click it to
import the database entry that you are currently
viewing and save it to your library item.
You can use the other drop-down lists that appear next
to the Import Item button to choose which movie poster
or screenshot to use (if available).
31
4.2 Automatic Importing
Automatic importing applies only to items of these
types: movies, tv, pc, arcade, snes, nes, n64,
gameboy, genesis, saturn, ds, 3ds, gamecube, wii,
gba, and gameboycolor. The very first time that you
spawn a file of these types, Source Media Arcade will
automatically search the appropriate on-line database
and attempt to find a match. If more than one result is
found, you will be asked to select which is the correct
match.
4.3 Identifying Media Titles
Matches to your game and movie files are found by
searching the online databases for the name of the file.
Extraneous information, such as the file extension or
anything between brackets or parentheses (other than
a 4 digit year) will be discarded before the database is
searched. If a single match is returned, its artwork
URLs and details will automatically be imported to your
media library if automatic importing is enabled.
Otherwise, you just have to click the Import Info button
at the bottom right corner of the screen when viewing a
database entry to import the information into your
library.
32
4.4 TV Episodes
Importing TV episode information from the on-line
database is a little different because you must match
the correct TV show AND episode. While in TV
Scraping mode, no Import Info button will appear.
Instead you click the name of the episode on the TV
show profile to import the information for that episode.
In addition to all the normal fields being imported from
the database, the Group of your library item will also be
changed to the title of the TV show it belongs to. This
makes it easier to find all the episodes from your
favorite TV show using the Library Browser's filtering
features. If this is the first file you are spawning
from this TV show, it is recommended that you use
the Import Siblings feature to bring the rest of the
episodes in that folder into your media library at
this point. This insures that their Group names will
be set, which makes finding episode matches in
the on-line database faster and more automated.
4.5 Online Databases
Source Media Arcade uses the following on-line
databases to retrieve artwork images and item details
for movies, tv shows, and games respectively:
www.themoviedb.org,
www.thetvdb.com,
33
www.allgame.com. Any time that information is
imported from an on-line database, a link to the
database's website is also stored with the item. Special
thanks to the people contributing to and operating
these websites for providing such a valuable resource
for free.
4.6 Adding Online Database Entries
TheTVDb.com and TheMovieDb.org are both
community-powered databases that allow any user to
add new information, much like Wikipedia. All you have
to do is sign-up for an account at their website to be
able to add new entries to the database. The entries
you add will not only be available for all Source
Media Arcade users, but by thousands and
thousands of users of other programs as well. You
are encouraged to contribute to these databases.
AllGame.com doesn't allow ALL users to add new
entries, but you can apply for permission to add new
entries there. See their site for more information.
34
5. DISCOVER MODE
Sometimes you'll want to spawn a game or movie that
you do not yet own, and therefor have no local file to
create a 3D shortcut to. In these cases, you just look
at an empty space on the ground and press the
Discover button (P) and browse the on-line databases
until you find the entry that you wish to create a 3D
shortcut to. The process is very similar to Web
Scraping, except that instead of an Import Info button
appearing in the bottom right corner, a Spawn Item
button appears. When this button is clicked, the
database entry you are currently viewing will be
created in your media library and its 3D shortcut will
be spawned under your cross-hair. Since you don't own
this media item, you won't be able to launch it yet.
However, download and purchase links will be
displayed on the item's Launch page to help you
acquire the media.
35
6. ADD-ON CONTENT / DLC
Source Media Arcade is set up to accept & use new
content in two different flavors: official DLCs and usercreated Add-Ons.
6.1 DLCs vs Add-Ons
DLCs refer to content that is offered through the official,
integrated, and totally free Downloadable Content
Store. All the content listed in the DLC store is original,
safe, and fully supported by Source Media Arcade.
Add-Ons refer to user-created content that is
downloaded from third party websites, such as
GameBanana.com or GarrysMod.org. Add-On content
is unofficial, untested, and should only be acquired
from trusted sources.
6.2 Official 100% Free DLC Store
To access the DLC Store, press the Discover button (P)
and choose “View Downloadable Content Store”.
DLC packs are grouped into categories: Cabinet
Models, Library Items, Apps, Search Providers,
Themed Packs, and Miscellaneous.
36
Each entry in the DLC store will have a “Install Now”
link that you can use to download & install the content
with a single mouse click.
If you already have a particular DLC installed, it will be
indicated as such in the DLC Store and the “Install
Now” link will be replaced with a “Re-Install Now” link.
Be patient after you click the “Install Now” link. There is
no progress bar for downloading/install DLCs and you'll
probably think that Source Media Arcade has crashed,
but just be patient and wait for installation to complete.
After the DLC has been installed, you will be shown a
detailed log that lists everything that was done. If
everything was successful, it should say “Finished
installing DLC!” at the bottom.
Note that some DLCs will require that you restart
Source Media Arcade before they take effect. Any DLC
that requires this will say so in its description.
6.3 Loading Content From Other Games
Source Media Arcade is fully capable of loading the
37
maps, models, textures, and other resources from the
following games: Counter-Strike: Source, Team
Fortress 2, Portal, Half-Life 2, Half-Life 2: Deathmatch,
Half-Life 2: Episode 1, Half-Life 2: Episode 2, Half-Life
2: Lost Cost, Half-Life Deathmatch Source.
YOU MUST MANUALLY ENABLE THE LOADING OF
RESOURCES FROM THESE GAMES!
To use the resources from the games listed above, you
must install the “Extra Resources” DLC from the DLC
Store.
1. Press the Discover button (P)
2. Click “View Downloadable Content Store”
3. Find the DLC named “Extra Resources”
4. Click “Install Now” and wait for confirmation
5. Restart Source Media Arcade
Now you will be able to load maps and use other
resources from any of the games you own from the list
above.
Note: Steam will automatically update any games that
you are loading content from. This means any
games that you own from the list above will be
updated. You can monitor this by going into
Steam's Downloads tab.
38
6.4 Add-On Content Compatibility
In addition to content made specifically for Source
Media Arcade, you may also use add-ons that were
originally intended for the following games: Gary's Mod,
Counter-Strike: Source, Team Fortress 2, Portal, HalfLife 2, Half-Life 2: Deathmatch, Half-Life 2: Episode 1,
Half-Life 2: Episode 2, Half-Life 2: Lost Cost, Half-Life
Deathmatch Source.
Cross-game add-on support is limited to maps, props,
and textures only. Advanced scripts, such as Gary's
Mod LUA weapons, will not function in Source Media
Arcade; however, you will be able to spawn the weapon
model as a Prop Item.
6.5 Automatic Add-On ZIP Installation
The easiest way to install a user-created add-on is to
place the add-on's ZIP file into your smarcade2/addons
folder, then restart Source Media Arcade.
Source Media Arcade will attempt to install the content
from each ZIP file in the addons folder. It does this by
analyzing the folder structure and file names contained
in the ZIP and then extracting the add-on's files to the
correct locations in your SM Arcade folder.
39
If the add-on is successfully installed, the details will be
displayed in the developer console and the ZIP file will
be removed from the addons folder.
If the add-on fails to install, the cause of the error will
be displayed in the developer console instead and the
ZIP file will remain untouched in the addons folder.
Library Items of type = maps will be created for any
BSP files that are installed.
Library Items of type = props will be created for any
MDL files that are installed.
6.6 Manual Add-On Installation
There are certain cases where advanced users may be
required to manually install add-on content. For
example, if the add-on they are trying to install is a
RAR or some other non-ZIP file format.
Manually installing add-on content for Source Media
Arcade is very much like installing add-on content for
Counter-Strike: Source or any other Source engine
game. The only difference is you will install things to
the smarcade2 folder instead of the cstrike folder (for
40
example).
The trick is to figure out the folder structure that the
add-on author is using. Once you figure out how they
want you to extract files to the intended game's folder,
it is an easy task to extract them to Source Media
Arcade's folder instead.
Go through this checklist when trying to figure out
where to install add-ons to:
- If there is a folder called “maps”, the add-on should
be extracted to the root smarcade2 folder.
- If there is a folder called “materials”, the add-on
should be extracted to the root smarcade2 folder.
- If there is a folder called “models”, the add-on
should be extracted to the root smarcade2 folder.
- If there is a BSP file, the add-on should be
extracted to the smarcade2/maps folder.
If you have gone through this checklist and still cannot
figure out where to install your add-on, leave a
message on the Community-Wide Chat located in the
Contact section of the official Source Media Arcade
website and ask for help.
41
7. CABINET ART
Each item in your media library has two images
associated with it. One screenshot image and one
marquee image. Source Media Arcade will first try to
locate the artwork images locally, but if they can't be
found, it will download the images from the two artwork
HTTP locations that are also stored with each item in
your library.
7.1 Automatic Artwork Download
Artwork image are always loaded from local files. If no
local file can be found, then the image is downloaded
from the Screenshot/Marquee URL fields of the item's
library entry and saved into your library folder. These
types of images are downloaded while you play and will
be set as the local artwork file for the item and
displayed on its cabinet as soon as the download
finishes.
7.2 Locally Stored Artwork
Local artwork images are either stored in the ./screens
and ./marquees sub-folders with the same name as file
that the 3D shortcut links to, or stored in your library
folder under an encoded version of the complete file
42
location that the 3D shortcut links to.
If an item opens with an App, such as an emulator,
then the App's Screen Path and Marquee Path will
also be searched for artwork associated with the
item. View section 10.4 of this manual for more details.
7.3 Artwork URLs
If no local artwork image can be found for an item, but
it does have artwork URLs in its library entry, then the
images will be downloaded from these URLs and
saved into your library folder. When ever possible, you
should include artwork URLs with your items. They are
especially useful in Multiplayer Arcades because the
people joining your server can download the artwork
images from the URLs instead of waiting for them to
slowly transfer from peer to peer.
Note that matching your items to entries in the online databases will automatically save artwork
image URLs for you.
7.4 Overriding Artwork Images
You can manually change either of the images used on
a cabinet at any time. Just go up to the item's cabinet
and press the USE button (E), then click the Browse
43
icon next to any artwork image and select the image
file you want to use.
Keep in mind that if you host a Multiplayer Arcade,
people will download the artwork images from the
artwork URLs instead of directly from you. This means
they might see different cabinet art than you if you have
overridden the artwork of items that also have artwork
URLs stored for them.
7.5 Refreshing Artwork
You can make an arcade cabinet re-evaluate which
image to use for its artwork by going up to the cabinet
and pressing the USE button (E), then clicking the
Refresh icon next to either of the artwork images. This
will cause Source Media Arcade to search for local
artwork images again or re-download the image from
the artwork URL again. This feature will also fix any
images which may have failed to load on the cabinet
initially for any reason.
8. MULTIPLAYER ARCADES
Multiplayer arcades are hosted by other SM Arcade
users, just like you. There are no dedicated servers.
44
When you host a Multiplayer server you are inviting
your peers in to browse your personal media
collection in the arcades you have built.
Any server with Max Players set greater than 1 will
be considered a MULTIPLAYER server. You should
be comfortable with Singleplayer mode before you
attempt to jump into Multiplayer.
8.1 Limited Customization
You cannot spawn new 3D shortcuts or change which
items are assigned to 3D shortcuts while in
Multiplayer mode. The arcade must be completely
setup on the map already before you enter Multiplayer
mode. The only type of customization allowed in
Multiplayer mode is item editing. You are free to edit
any of the fields on the Item Details page, such as its
file location, description, artwork images, etc.
8.2 Library vs Library Cache
All the items and artwork files downloaded from
Multiplayer servers will be stored separately from your
personal media library. They will all be saved into the
smarcade2/library_cache folder instead. This allows
45
you to safely purge items and artwork from your
computer that were downloaded during multiplayer
sessions.
When a media item is referenced in Multiplayer mode,
your personal media library is the first place that is
searched for a match. If the item is found in your
library, it will be referenced from there. Otherwise a
temporary version of the item will be used from your
library cache instead.
Any changes made to an item referenced from your
library will be saved to your library. And any changes
made to an item referenced from your library cache will
be saved to your library cache. This means that the
next time you connect to the same Multiplayer server
the changes you made to the items will still be there;
even if they only exist in your cache.
The items in your library cache do not appear in your
Library Browser, so you can never spawn items that
exist only in your cache. Soon there will be a feature to
import items from your cache into your library to correct
this issue.
8.3 File Transfers
When connecting to a Multiplayer Arcade, you do not
download the actual files that the media items link to.
Directly from the host you will download ITM files
46
(which contain text descriptions and image URLs for
media items), TBN files (which are actual artwork
images that do not have download URLs), APP files
(which contain text descriptions and URLs for
emulators or other helper apps), and PRO files (which
contain text descriptions and URLs for search
providers). All of these files must be downloaded
before the map loads.
Any artwork images that DO have download URLs
will be downloaded directly from those URLs after
the map has loaded and will appear on the cabinets
as the transfers finish.
8.4 Joining a Multiplayer Arcade
You join Multiplayer Arcades the same as you join
servers for any Source mod. Simply click Find Servers
at the main menu, then click Refresh List to see active
servers. Click on the one you want to join, then click
Connect. Alternatively, you could use the Steam
Friends interface to join a server that your friend is in.
8.5 Hosting a Multiplayer Arcade
The easiest way to host a Multiplayer Arcade is to load
up the map want in Singleplayer mode (Max Players =
47
1). Spawn the item from your library with the title
GoLive! anywhere in the map. Launch this item to issue
all of the commands needed to turn your arcade into a
public Multiplayer server. After the map has reloaded
you will be listed on the master server list.
Alternatively, you can start your multiplayer server just
like you do for any other Source engine mod; which is
not always a simple process.
8.6 Router / Firewall Issues
By default, Source engine games use port 27015 to
host multiplayer games and 27005 to join them. Your
router and firewall must be configured to allow these
ports through to the computer hosting the game.
Using multiple Steam accounts behind a single router
can also complicate things when it comes to hosting a
game. You must set each computer to use a different
host and client port to avoid conflicts with port
forwarding. The console variables “hostport” and
“clientport” can be used to control which ports Source
Media Arcade uses for multiplayer.
48
9. DOWNLOAD / PURCHASE
LOCATIONS
Source Media Arcade does not have any type of deal
with any on-line retailer tying the program to a single
store. Users are free to define the places that they want
to be sent to when buying or downloading media items.
If you don't have the file that a media item shortcuts to,
you can get it by following the web links under the
Don't have this item yet? heading in the item's Launch
page. The links displayed here are specific to the item
you are looking at and come in three (3) flavors. First,
there are explicit download locations which are
identified by the Chain Link icon and have been
manually entered into the item's profile by the server
operator. These types of links usually take you directly
to a download page for the specific item you want. The
second variety are the Search Provider links. These
links will search your favorite sites for the media item.
View SEARCH PROVIDERS: IN-DEPTH for more
information on how they work. In Multiplayer Arcades,
both your personal Search Providers as well as the
host's will be shown under the Don't have this item
yet? heading. The third and final type of link to appear
here are the Steam Store links. They are accompanied
by the word (automatic). This link only appears for
Steam games and will allow you to buy and download
49
the game directly and securely through the Steam
interface.
10. APPS
Any item that has Standalone as its Open With value
will allow Windows to decide how to launch the file. If
you need more control over how the file is opened, you
can set the item to Open With an App instead. Items
that open with Apps are handled differently depending
on the App profile that is referenced.
In Source Media Arcade, an App is an executable that
can be used to open other items. Apps could be
emulators or any other type of program that accepts
command-line launch options.
10.1 Program Compatibility
Any program that accepts command-line launch
options can be used as the Executable for an App.
Most programs, including all the popular emulators,
accept command-line options. Basically these can be
used to automatically open an item's file after its App
has been launched. The problem is that each program
has its own syntax for using these options. That means
50
you'll have to use Google to find the right syntax for the
program you're trying to use. The good news is that
App profiles for the most popular emulators are
included with Source Media Arcade, so you don't have
to hunt those down. Any Apps that you encounter in
Multiplayer will already have complete App profiles as
well. You only have to worry about finding commandline options when adding new Apps.
10.2 Command-Line Syntax
You define an App's launch options by editing its
Commands field. Most of the time you'll want to include
the file location that the item links to as a variable in the
command-line options. Just use the keyword $FILE in
your command syntax and it will be replaced with the
full file location associated with the item when it is
launched. Alternatively you could use $SHORTFILE to
have it replaced with only the file name (without the file
extension or path). The double quote symbol (") is a
reserved character and cannot be entered directly
when editing the Commands field of the App. If your
command syntax require a double quote, use the
keyword $QUOTE instead and it will be replaced with a
real double quote symbol when the item is launched.
Some
programs
(such
51
as
ZSNES
and
ClientServerMAME) support launch options specific to
JOINING or HOSTING multiplayer games. These can
be saved into the 2 appropriate fields in the App's
profile for Host/Join Commands. This allows for virtual
match making using the 3D arcade cabinet, just like in
a real arcade! The Join Commands accepts one
additional keyword $IP which is replaced with the IP of
the player hosting the multiplayer session on the
cabinet.
When a player presses the Host Game button on the
Launch page (which only appears for Apps that support
it) their IP will be bound to that 3D shortcut's arcade
cabinet. As long as there is an IP bound to the cabinet,
a Join Game button will appear for anybody else that
brings up the cabinet's Launch page. The Host or Join
Game buttons will execute the App's Host or Join
command-line launch options, respectively.
To UN-bind an IP from the cabinet, you must click the
Remove Host link which will appear in the cabinet's
Launch page only if one is bound.
10.3 Basic App Profile
Each App profile must have a Unique ID, an
Executable, and Launch Commands stored in it. When
an item's Open With field is set to the App's Unique ID,
Source Media Arcade will launch the App's Executable
52
using the syntax in its Commands field. App profiles are
saved as APP files in the smarcade2/apps folder. Any
APP file that is in this folder will automatically be loaded
when you start Source Media Arcade.
10.4 Local Artwork Collections
Source Media Arcade is capable of downloading
artwork from various internet databases automatically,
but there you can still use a local artwork collection
instead if you wish. All you have to do is set the App's
Screenshot and Marquee Paths to the folders that you
wish to use. Images in these folders that have the
same name as the file that the item links to will
automatically be displayed on the cabinet. If you would
like to expand the search to include images that have
similar names but are not exact matches, you can use
the console command quick_resolve 0. Note that using
this console command will increase the time it takes to
find artwork images for all items.
10.5 Importing Game Collections
If you keep all of your games for a specific App in a
single folder, you can add it as a Files Path (or ROMs
53
Path). It is not required that you set the Files Path for
your App, but setting it enables some extra features.
You can click the Scan For New Files link in the App's
Details page to import all the games in the folder at
once. Also, when adding files individually, Source
Media Arcade will be able to determine the type and
default App automatically for files in the App's Files
Path. Specifying a Files Path for your App will also
make more of your games work without needing any
configuring in Multiplayer Arcades.
10.6 Apps in Multiplayer
As host of a Multiplayer Arcade, any Apps that you
reference will have their profiles sent to all connecting
clients. If the client doesn't have their own copy of the
App profile, then your version will be used from the App
cache.
10.7 Add-On Apps
Just download the APP file and place it in your
smarcade2/apps folder. The next time that you start
54
Source Media Arcade, it will be listed with all of your
other Apps. Add-on Apps can be found in the official
forums.
11. MEDIA SOURCES
If you would like to import an entire folder of
Standalone files into your media library, you can use
the Media Sources page. Just hit the DISCOVER
button (P) and click on Media Sources. After you have
a media source setup, click Scan For New Files to
import the files into your library.
12. CONSOLE COMMANDS
You can type console commands into the developer's
console to issue engine commands. Press tilde (~) to
open the developer's console. Most of the new console
55
commands and variables are for internal use only, but
you can still use all of the standard commands and
variables that are included with the Source engine.
You can make items issue console commands
when they are launched! Intelligent use of this feature
will let you make items that create vehicles for you to
drive or change the map. Just set the Location of the
item to your console command prefixed with the word
console:. For example, to issue the console command
changelevel sm_garage when an item is launched,
you'd just set its Location to console:changelevel
sm_garage. The console command is executed exactly
as if you had typed it into the developer console
manually.
13. KEYVALUES
All library item profiles, App profiles, search providers,
model categories, and nearly every other record kept
by Source Media Arcade is stored in Valve's KeyValues
format. They can be opened in Notepad and contain
Key/Value pairs with sub-keys allowed. Click here to
read the Valve Developer Wiki on this subject. You
must have a basic understanding of the KeyValues
format before you will be able to manually edit any of
the record files.
56
14. SEARCH PROVIDERS
Search Providers are defined in PRO files and stored in
the smarcade2/searchproviders folder. Any PRO file in
this folder will be loaded when you start Source Media
Arcade. Search Providers display dynamic links that
will take users directly to the search results page of
your favorite sites. Adding or modifying Search
Providers requires that you manually edit KeyValues
files. A HOW TO on doing this will be added to this
manual soon.
15. FILE TYPES
Internal file types are defined in the text file
smarcade2/itemtypes.txt. Adding new or modifying
default file types requires that you manually edit
KeyValues files. The definitions in this file help Source
Media Arcade determine the default item type and
Open With App for files of various types. A HOW TO on
modifying this file will be added to this manual soon.
57
16. 2D USER INTERFACE
The
HTML-powered
menus
are
completely
customizable and generated using the HTML templates
in the smarcade2/resource/ui/html folder. Customizing
the HTML-powered UI requires that you manually edit
HTML files. There are many new XML tags that can be
used in these templates that are not standard HTML
tags. Soon this section of the manual will be expanded
to include an explanation of these new tags and their
use.
17. KNOWN BUGS
This section documents known bugs in the current
version of the mod. Some bugs are planned to be fixed
in the next patch, while other bugs cannot be fixed and
the supplied Workaround must be used to avoid them.
Cannot launch Source engine games
You cannot launch other Source engine games from
SM Arcade. Incompatible games include: Half-Life 2,
Half-Life 2: Deathmatch, Half-Life 2: Episode One,
Half-Life 2: Episode Two, Team Fortress 2, Counter58
Strike: Source, Garry's Mod, Dino D-Day, Portal, Portal
2, Left4Dead, Left4Dead 2, and Day of Defeat: Source.
Confirming changes with ENTER button
Pressing ENTER after modifying a field of an item will
CANCEL the changes instead of accepting them.
Workaround: Click the OK button instead.
Closing menus with ESC button
Pressing ESC to close menus will eventually cause SM
Arcade to crash (usually upon exit).
Workaround: Always click the Cancel or X buttons to
close menus.
Windows Start Menu and mouse focus
Pressing the WINDOWS key while looking around in
FPS mode will not free your mouse from the SM
Arcade interface.
Workaround A: Pause SM Arcade before you press
the WINDOWS key.
Workaround B: Tab out of SM Arcade before you use
the Start Menu.
59
Desktop shortcuts & the Windows Browse
Dialogue
This bug only affects the Windows Browse Dialogue. It
will give a File could not be found error for desktop
shortcuts that do not point to a local file. This includes
shortcuts to websites as well as shortcuts to your
Steam games because neither link to an actual file on
your computer.
Workaround A: UN-check the box next to Use
Windows Browse Dialogue before
you click Browse. This will cause SM
Arcade's browse dialogue to be used
instead and it is able to accept any
type of shortcut with no problems.
Workaround B: All of your Steam games will
automatically be in your library, so you can use the
Library Browser choose them instead of browsing for
files.
18. FREQUENTLY ASKED QUESTIONS
Q. Do I have to open SM Arcade every time I want to
launch a game?
60
A. No, you only have to launch SM Arcade once when
you start your computer. It stays open the rest of the
time.
Q. Does SM Arcade hog all my system resources when
I play other games?
A. No, SM Arcade will free its system resources so that
you can play your other games at maximum
performance. However, when you're done playing
the game and come back to SM Arcade, it will take a
moment for SM Arcade to reclaim its system
resources.
Q. Does it take a long time to "tab out" of SM Arcade?
A. No, tabbing out of SM Arcade is instantaneous
because it runs in a fullscreen window. Programs
that run in windowed mode tab instantly because
your computer doesn't have to change desktop
resolutions.
Q. Can I make my Start Menu be on top of SM Arcade?
A. No, there is no reliable way to make the Start Menu
always be on top of SM Arcade. You'll just have to
press the WINDOWS key to make it appear on top
61
when you need it.
19. TROUBLESHOOTING
Missing/purple textures and ERROR models.
Solution: You are probably trying to use a map that
requires resources from another game (such as
Counter-Strike: Source or Team Fortress 2). All you
have to do to fix this is follow the instructions in section
6.3 of this manual to install the Extra Resources DLC.
This will allow you to use resources from any Source
engine game that you own.
Crash before main menu with no error at all.
Solution: This can happen if you have recently changed
your desktop resolution to be smaller than the Source
Media Arcade window. To resolve this, change the
-window launch option for Source Media Arcade to
-fullscreen and start up the mod to reset its resolution.
Be sure to change it back to -window after the issue is
resolved.
Takes a long time to launch items.
62
Solution: Make sure that you have set the launch
options for Source Media Arcade to -novid -window
-noborder. Read section 1 of this manual for more
information.
20. MOD HISTORY
20.1 BETA Version (10/19/2010)
The BETA version of the mod was produced during the
Summer of 2010. It was built ontop of the Singleplayer
Source SDK Base and had powerful yet extremely
user-UN-friendly menus which prevented it from being
used casually. This BETA release served two purposes:
it functioned as a technical proof-of-concept and was
used to collect valuable feedback from testers and the
community alike.
Note that the design and feature set of the BETA
version was completely different than what is present in
the release version.
20.2 Version 2.0 (10/26/2011)
This first FULL version of Source Media Arcade was
planned during the life span of the BETA and produced
over the Summer of 2011. It was built ontop of the
63
Multipayer Source SDK Base and had the clear focus
of being a 3D media center frontend.
This version was a complete re-write of the original
BETA release. It was redesigned to make extensive
use of Valve's KeyValues data structure in maintaining
a user media library.
The most drastic design changes from BETA to
Release was the addition of various internet-connected
features.
PRIMARY ADDED FEATURES
➢ Multipayer mode
➢ Online media database integration
➢ Artwork image downloading
➢ Multiplayer-friendly personal media library
➢ HTML-powered 2D graphical user interface
It was decided to release this version as 2.0 as
opposed to 1.0 because of the signifiant design
changes that were implemented between public BETA
and Release.
64
20.3 Version 2.0b (12/30/2011)
ADDED
➢ a Source Media Arcade desktop shortcut icon
➢ a free DLC "store" with 8 downloadable add-ons
➢ a link to the DLC "store" on the Discover page
➢ auto-installation of DLC packs
➢ expand/collapse buttons for various sections of
the Launch Page
➢ in-line help to the Launch Page
➢ per-cabinet RANDOMIZE ITEM options to the
Launch Page
➢ support for DLC packs
FIXED
➢ HD posters and wallpapers from TheMovieDB.org
➢ a bug that would cause a couple of bogus Steam
apps to appear in your library
➢ the convar quick_resolve 0 to properly look for
artwork images in relative folders
➢ SEGA Genesis 32x games can now be imported
correctly from AllGame.com
CHANGED
➢ the App Basics page to include download
locations & search providers
65
REMOVED
➢ "Change Item", "Remove Cabinet", "3D Model",
and all "Random" links from the Launch Page
while in MULTIPLAYER mode
20.4 Version 2.0c (2/1/2012)
ADDED
➢ a Change Image URL button for artwork images
on the Launch page
➢ a DLC that enables the loading of content from
other Source engine games
➢ a Remove All Items From Folder to the Item
Details page
➢ a Remove Item link to the Item Details page
➢ the convar "exist_required" that will override the
file exists check
CHANGED
➢ auto-generated items to not be saved to your
library until you modify them
➢ modifying an artwork URL to now cause the
appropriate artwork image to refresh as well
➢ resources from other Source engine games to not
be loaded by default (for new users)
66
➢ the Launch page by removing the Open File
Location button for artwork images
FIXED
➢ a bug that could cause the mod to crash if Steam
was installed to a very short folder path
➢ a bug that prevented the mod from detecting
which Steam games new users owned
➢ a bug that would cause a crash when changing
an artwork image from the Launch page
➢ a bug that would cause a random item to spawn
even after you manually choose an item for the
cabinet
➢ a bug that would cause different items to be
randomly selected for each player in a MP server
20.5 Version 2.0d (2/15/2012)
ADDED
➢ 3D Model preview when using the Library
Browser for items of type = props
➢ Disable Physics link to the Physics Panel
➢ Save Position link to the Physics Panel
➢ New collapsible panel "Housekeeping" to the
Launch Page
➢ New collapsible panel "Physics" to the Launch
67
➢
➢
➢
➢
➢
➢
➢
➢
➢
Page
Enable Physics link to the Physics Panel
Enhanced compatibility with custom models in
multiplayer arcades
1/0 console variable "addons_automatic" 1. When
active, the mod will search for ZIPs in the addons
folder every time it starts.
1/0 console variable "addons_map_items" 1.
When active, any BSP files that are installed from
Add-On ZIP files will have library items generated
for them automatically.
1/0 console variable "addons_prop_items" 1.
When active, any MDL files that are installed from
Addon ZIP files will have library items generated
for them automatically.
1/0 console variable "hud_opt_count" 0. When
active, the number of times an item has been
launched will appear on the Launch Page.
1/0 console variable "maps_automatic" 1. When
active, the mod will search your MAPS folder for
new maps every time it starts.
Console command "installaddons" which will
search for and install any ZIP files in the
ADDONS folder
Console command "scanmaps" which will
generate Library Items for all the BSP files in your
MAPS folder
68
➢ Console command "scanmodels" which will
generate Library Items for all the MDL files in your
MODELS folder
CHANGED
➢ All 3D Models that fail to load to show up as the
default video screen model
➢ Items of type = props to use a valid "changelevel"
command as their File Location
➢ Items of type = props to use their File Location as
their 3D Model
➢ Remove Item and Remove ALL Item links to
appear in the Housekeeping Panel
FIXED
➢ An issue that caused minimal install people to see
texture errors on weapon models
➢ An issue that would cause the mod to crash when
you removed items
➢ Auto-detection of type = maps when spawning a
BSP file
➢ Auto-detection of type = props when spawning an
MDL file
69
21. DOCUMENT HISTORY
Periodically this document will be expanded and
improved upon. Use this section to see what has
changed in this document since last time.
21.1 Version 1.0 (3/2/2012)
The first printable version of this document. Converted
from the ModDB Feature with the same name. Moving
the user's manual into word processor form was done
to improve maintainability, printability, and
independence from the ModDB profile.
21.2 Version 1.1 (3/3/2012)
This revision fixed spelling errors, typos, and bad
references to outdated sections. The MOD HISTORY
and DOCUMENT HISTORY sections were also added.
70
22. CREDITS
Source Media Arcade was created by
Elijah Newman-Gomez
with some skinning contributions by:
Black_Stormy and Shred
Music by:
DjDTM and Jeff Lawhead
This document was created by
Elijah Newman-Gomez
71