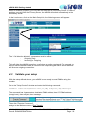
1
eWON 4000
Getting started
Rev 3.0
COOL INTERNET TELECONTROL SOLUTION
http://www.ewon.be
eWON 4000 Getting started
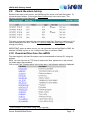
TABLE OF CONTENTS
1
First connection ........................................................................................................... 3
Overvierw ....................................................................................................3
Physical installation .....................................................................................3
Set-up TCP/IP configuration ........................................................................4
1.3.1
Choosing an IP address for the eWON under MS Windows ..............4
1.3.2
Assigning the address to the eWON..................................................6
1.3.3
Trouble shooting ...............................................................................8
1.4
Final check: use the explorer .......................................................................8
1.1
1.2
1.3
2
Basic eWON configuration ........................................................................................... 9
2.1
Introduction..................................................................................................9
2.2
Logon ..........................................................................................................9
2.3
Create your user account ..........................................................................10
2.4
Create tags and monitor values .................................................................11
2.5
Monitor your tags.......................................................................................13
2.6
Update an output .......................................................................................14
2.7
Build a graph .............................................................................................14
2.8
Monitor an alarm........................................................................................15
2.9
Check the alarm history .............................................................................17
2.10
Download files from the eWON ............................................................17
3
3.1
3.2
Using scripts .............................................................................................................. 18
Create as script .........................................................................................18
Run the program........................................................................................21
4.1
4.2
4.3
4.4
Send an EMail (with a modem) .................................................................................. 23
Collect information about your provider account ........................................23
Configure the eWON to send mail by modem ............................................25
Validate your setup....................................................................................26
Configure an alarm to send an EMail .........................................................27
4
5
Learn more ................................................................................................................ 30
eWON 4000® – Getting started – Rev. 3.0 – 7/31/2002
Docref: EW4000GSUK30.doc
©ACT’L sa
Page : 2
eWON 4000 Getting started
1
1.1
First connection
Overvierw
To configure and use the eWON, you will use a Web Browser like Internet Explorer.
Before you can connect to the eWON using your explorer, you will need to connect
and configure the Ethernet TCP/IP connection of the eWON (if you want to connect to
the eWON using a modem, please check the "User Manual").
The eWON set-up procedure includes the following steps:
1. Power up eWON and set-up physical connections
2. Assign an IP address to the eWON
1.2
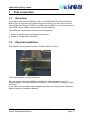
Physical installation
The eWON must be powered up with 110/240V (240 AC version).
The Power indicator must go solid green.
Now you must connect the eWON to your Ethernet LAN or directly to your PC
Ethernet adaptor. The eWON Ethernet interface is 10/100 BASE TX unsing an RJ45
connector.
If you want more information about straight connection and "through hub" connection
please check the "Installation Manual".
eWON 4000® – Getting started – Rev. 3.0 – 7/31/2002
Docref: EW4000GSUK30.doc
©ACT’L sa
Page : 3
eWON 4000 Getting started
The Ethernet interface is the rightmost connector.
As soon as the Ethernet network is connected successfully, the "ETH. Link" led should
go solid green, indicating that the eWON has sensed the network speed (10 or
100MBits).
1.3
Set-up TCP/IP configuration
Your must assign to the eWON an IP address compatible with your LAN configuration.
The eWON works with a fixed IP configuration (Different from DHCP or BOOTP
configuration, not available with the eWON).
You must select a valid IP address for the eWON. Usually, a network administrator
keeps track of fixed IP addresses on a LAN, but the following method can be used to
select an address.
1.3.1
1
Choosing an IP address for the eWON under MS
1
Windows
With Windows 95 use the WINIPCFG.EXE instead of IPCONFIG
eWON 4000® – Getting started – Rev. 3.0 – 7/31/2002
Docref: EW4000GSUK30.doc
©ACT’L sa
Page : 4
eWON 4000 Getting started
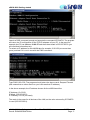
Launch a DOS command prompt and execute the command IPCONFIG. The program
will return the IP configuration of the TCP/IP adapters of your PC. In the previous
example the PC has address 10.0.0.57 and the subnet mask is 255.255.255.0 (you
will need that information too).
To select an IP address for the eWON take for example 10.0.0.58 (one more than
yours) and test if it is not in use with the PING command:
Type PING 10.0.0.58. The program should return the above result: Request Timeout
(this means that no other device on you LAN uses that IP address).
In the above example, the IP address chosen for the eWON would be
IP Address: 10.0.0.58
IP Mask: 255.255.255.0
IP Gateway: 0.0.0.0 (not used)
The mask is the same for all devices of the LAN, so the value returned by IPCONFIG
is used (255.255.255.0).
eWON 4000® – Getting started – Rev. 3.0 – 7/31/2002
Docref: EW4000GSUK30.doc
©ACT’L sa
Page : 5
eWON 4000 Getting started
1.3.2
Assigning the address to the eWON
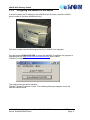
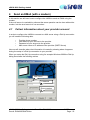
In order to assign the IP address to the eWON for the first time, check the eWON
serial number on its label (eWON left side)
The serial number has the following format: 0137-0008-81 (for example)
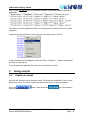
Run the program EWONCFG.EXE to assign the eWON's IP address, the program is
available from the http://www.ewon.be/SupDnlSft.htm and is called
"eWON IP configurator".
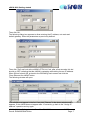
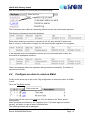
The program has the above interface.
Click the "Assign IP address" button. The following dialog box appears, enter the
eWON's serial number.
eWON 4000® – Getting started – Rev. 3.0 – 7/31/2002
Docref: EW4000GSUK30.doc
©ACT’L sa
Page : 6
eWON 4000 Getting started
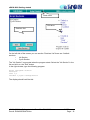
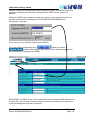
Then click OK.
The following dialog box appears to allow entering the IP address, net mask and
default gateway. Enter the parameters as previously defined.
Then click "Set" and look at the eWON's "ETH Link" led, after a few seconds, this led
should go OFF indicating that the eWON is restarting while taking its new IP address.
When the led is back ON, go back to the EWONCfg main screen and click the
"Scan Ethernet for eWON" button.
The following window will open:
Your eWON must appear in the list. If not click "Rescan" in the above window until it
appears. If the eWON does not appear after 15 seconds, go back to the "Assign IP
address" operation and try again.
eWON 4000® – Getting started – Rev. 3.0 – 7/31/2002
Docref: EW4000GSUK30.doc
©ACT’L sa
Page : 7
eWON 4000 Getting started
1.3.3
Trouble shooting
•
•
•
1.4
If the eWON "ETH Link" does not go OFF after "Set" is clicked, check
Ethernet connection between PC and eWON. Check the serial number of
the eWON (the "ETH Link" must be ON before starting assignment).
The eWON restarts ("ETH Link" goes OFF then ON) but when you click
"Scan…" your eWON is not listed. The eWON must be is the same
subnet to be visible with "Scan…". When you click "Scan…" the "ETH
Act." led of the eWON should blink. If the led does not blink, it means that
the eWON did not respond to the Scan request. There cannot be 2
devices with the same IP address on the LAN, use the PING command
when eWON is unconnected to check duplicate device (described in
"1.3.1 Choosing an IP address for the eWON under MS Windows. ").
PC configured using DHCP: if your PC is using an IP address allocated
by a DHCP server, you cannot disconnect your PC from the network, or
its IP address may change. Use IPCONFIG to check your IP address if
you think it has changed.
Final check: use the explorer
When the eWON has been configured and it responds to the "Scan…" command,
launch your preferred browser to try a connection.
Type the eWON IP address in the browser's address bar (example: 10.0.0.58) then
look at the eWON, you should see the "ETH Act" blink and the eWON's home page
will be displayed in the browser.
You have successfully configured the eWON IP address, and you may now configure
any of its features using the browser.
eWON 4000® – Getting started – Rev. 3.0 – 7/31/2002
Docref: EW4000GSUK30.doc
©ACT’L sa
Page : 8
eWON 4000 Getting started
2
2.1
Basic eWON configuration
Introduction
This chapter is not supposed to be a user manual for the eWON, it will rather describe
a simple configuration in order to quickly browse through the various eWON's screens
and features. This will provide you with an overview of the eWON's features.
2.2
Logon
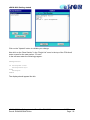
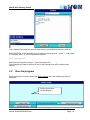
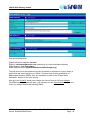
Launch your browser and type the eWON IP address in the address bar. In the eWON
logon screen that appears, enter the default administrator user name and password:
Username: adm
Password: adm
You will then see the Welcome screen with the eWON logo and identification, eWON
menu and main area.
eWON 4000® – Getting started – Rev. 3.0 – 7/31/2002
Docref: EW4000GSUK30.doc
©ACT’L sa
Page : 9
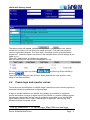
eWON 4000 Getting started
eWON logo and
identification
eWON main menu
eWON main screen
2.3
Create your user account
The eWON manages a list of users with their assigned rights. The first operation that
you will perform is to create your user account.
Click on the
menu:
menu. The following menu will replace the main
Select the Users Setup menu.
Local menu
The list of users defined appears, only the Administrator account is defined.
Select the Create New User in the local menu.
eWON 4000® – Getting started – Rev. 3.0 – 7/31/2002
Docref: EW4000GSUK30.doc
©ACT’L sa
Page : 10
eWON 4000 Getting started
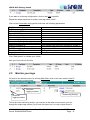
The above screen will appear (callback configuration is not displayed here, default
values can be used), you can enter your name and login. First and Last name are
used for information purpose. The "User login" is actually used in all authentication
procedures2. Leave the options as shown in the example above; this will assign all the
rights to you.
Then click "Add/Update" to validate your changes.
Now you can see your user account displayed in the list.
Go back to the user menu by clicking
and then log off the eWON by
.
clicking
Then logon again with your own account: Smith (password is case sensitive, user
name is not case sensitive).
2.4
Create tags and monitor values
This is the more important step in eWON usage it describes how to monitor physical or
computed values by creating and configuring tags.
A tag is a variable defined in the eWON, this variable is connected to a physical
source that makes it change (a digital input of the eWON or a remote modbus register
for example), the tag can also be used to update an output (like one of the eWON's
digital output relays). There is also a special type of tag called "memory tag" that
allows monitoring computed values.
2
Dial up connection, FTP server login, Main Web access login
eWON 4000® – Getting started – Rev. 3.0 – 7/31/2002
Docref: EW4000GSUK30.doc
©ACT’L sa
Page : 11
eWON 4000 Getting started
Let us create our tags.
Go back to the configuration menu:
and select Tag Setup.
We will create 2 tags:
•
1 tag connected to the digital relay 1 of the eWON
•
1 memory tag that we will use for a computed value later.
The list is currently empty; select the Create New Tag, to show the tag configuration
window:
In this window, enter the parameters of the tag connected to the eWON's relay Nr 1:
Tag Name: Light
Tag Description: My desk light
Server Name: EWON
Address: DO1
Type: Boolean
Historical Logging Enabled: Checked
Logging deadband: 0
Logging interval: 0
Click "Add/Update Only" to validate your changes.
REM: The IO server is the source of data. The integrated physical IO's of the eWON
are managed be the "EWON" IO server.
The Historical logging is used to save changes of a variable in the EWON flash file
system (non volatile flash memory). A deadband of 0 means that any change is
logged, interval time of 0 means that time based logging is disabled.
This tag will act directly on the eWON's relay number 1 and any action on the relay will
be logged.
Now you can see your new tag in the list:
eWON 4000® – Getting started – Rev. 3.0 – 7/31/2002
Docref: EW4000GSUK30.doc
©ACT’L sa
Page : 12
eWON 4000 Getting started
If you want to eit the tag configuration, click on the Light hyperlink.
Repeat the same sequence to create a new tag called "Level":
Click on the Create New tag hyperlink and enter the following parameters:
Tag Name: Level
Tag Description: Tank Level
Server Name: MEM
Type: ANALOG
Alarm Enabled: Checked
Alarm Level Low: -1
Alarm Level High: 100
Alarm Hint: Open the faucet
Historical Logging Enabled: Checked
Logging deadband: 2
Logging interval: 0
Real Time Logging Enabled: Checked
Time Span: 600
Logging Interval: 10
Alarm occurs if level goes above 100
Log change each time level changes by at least 2
Log level in eWON memory (volatile)
During 10 minutes
One point every 10 seconds
Click "Add update" to validate your edition.
Now your list must look like this
2.5
Monitor your tags
Go back to the welcome menu by clicking Main Menu then in the menu select View IO
and this is what you should see:
Real time
logging enabled
Validate tag change
Historical
logging enabled
This is the main monitoring screen, you can see all the take current values, you can
change the output tags values (if you have the right to do it in user's rights) there is
eWON 4000® – Getting started – Rev. 3.0 – 7/31/2002
Docref: EW4000GSUK30.doc
©ACT’L sa
Page : 13
eWON 4000 Getting started
also some control allowing to check if tag is in alarm condition and hyperlink for real
time graph display.
2.6
Update an output
Use the "Light" tag combo box and set value to
then click Update. You must
hear the relay clicking in the eWON and the "Relay 1" LED on the eWON front plate
must go solid green.
Repeat the operation and set the "Light" tag to 0.
2.7
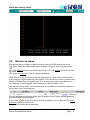
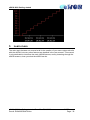
Build a graph
Now lets build a graph of this operation. Select the check box at the left of the "Light"
row and click Show Graph For Selection.
The graph window will open.
The default From To dates are: FROM current time minus 1 day, TO: current time.
Change this setting and set the FROM date to current time minus 5 minutes and leave
the TO time as is. Then click "update". The graph building operation takes about 10
second (depending also on the number of data logged) then the graph picture should
appear. Please be patient during that operation.
REM: in the latest eWON firmware the background is not black but light gray for better
printing result.
eWON 4000® – Getting started – Rev. 3.0 – 7/31/2002
Docref: EW4000GSUK30.doc
©ACT’L sa
Page : 14
eWON 4000 Getting started
2.8
Monitor an alarm
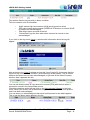
Now we are going to trigger an alarm and view how the eWON reports the event.
Tag "Level" has been defined with "alarm enabled", the alarm level is configured to
100.
Go to the View IO window and set the tag level to 110, click Update next to the "Level"
tag value.
Click again on View IO in order to refresh the window.
REM: The Level tag is a memory tag, this means that its value must be set manually
or by using the program features of the eWON. This can be very useful to combine the
values of different tags into another tag. The resulting tag has the same features as
any other tag, it can be logged, and monitored for alarm conditions, etc.
Now that the level is set to 110, the alarm level is reached and a small bell appears on
the left side of the "Level" tag row,
This bell appears as long as an alarm state is present (even if alarm has disappeared
but has not been acknowledged).
Click on the
sign to go to the alarm summary window. You can also click the Alarm
Summary item in the main menu.
The following window will be displayed:
eWON 4000® – Getting started – Rev. 3.0 – 7/31/2002
Docref: EW4000GSUK30.doc
©ACT’L sa
Page : 15
eWON 4000 Getting started
This window lists the tag currently in alarm condition.
This line contains a lot of information:
•
•
•
•
ALM+ means high level reached (ALM- would mean low level)
RED color means alarm present (GREEN is RTN-return to normal, BLUE
is present but acknowledged).
Date when alarm occurred at the left
"Action/Date" logs the time when alarm returned to normal or was
acknowledged.
If you click on the tag name (Level), a window with information about the tag will
appear:
Now go back to the View IO window and set the "Level" tag to 50, this means that the
tag is not any more in alarm condition, yet the bell sign is still present. This is normal
because the alarm has not been acknowledged, so go back to the Alarm Summary
window. Now it appears like this:
You can see that the alarm is now returned to normal (RTN) with the time when it
returned to normal in the Action/Date column.
Check the checkbox at the left and click on the Acknowledge Selected in the local
menu. When you do that, the list becomes empty because alarm is no more present
and it has been acknowledged.
You can also try to acknowledge an alarm that is still present to see what happens.
This is how the alarm would appear in the list.
eWON 4000® – Getting started – Rev. 3.0 – 7/31/2002
Docref: EW4000GSUK30.doc
©ACT’L sa
Page : 16
eWON 4000 Getting started
2.9
Check the alarm history
Each time an alarm event occurs, the eWON logs the event in its flash file system. To
review the alarm history, Click on the Alarm History entry in the main menu. The
following window will be displayed3:
The alarm events are listed with the more recent event first. There is a maximum of 20
events displayed at the time, use the << Previous Page and Next Page >> to browse
through the history.
IMPORTANT: when an alarm occurs, you can generate actions like EMail or SMS. An
example of EMail is given in 4.4 "Configure an alarm to send an EMail".
2.10 Download files from the eWON
The data logged in the flash file system can be downloaded to the host PC using the
browser.
REM: You can also use an FTP client to retrieve the files, please look in the manual
for details about the procedure.
Click on the Files Transfer option in the main menu, the following window is displayed:
3
Since revision 3.1 the alarm Level is also reported.
eWON 4000® – Getting started – Rev. 3.0 – 7/31/2002
Docref: EW4000GSUK30.doc
©ACT’L sa
Page : 17
eWON 4000 Getting started
Click on the hst_alm.txt item to download the alarm history we viewed in previous
paragraph:
The result is a coma-separated output; this format can be read by Excel or by other
programs.
Instead of clicking on the hst_alm.txt link you can right click on the link,
In the contextual menu displayed, select the "Save Target As…" option to download
the data in a special file.
You can repeat the operation for other files to check the content.
3
3.1
Using scripts
Create as script
Here we will discover how to create a script. The script will update the "Level" tag to
generate a ramp. The "level" tag will increase at the rate of 1 step per second.
Go to the
window will be displayed:
menu, then select the
eWON 4000® – Getting started – Rev. 3.0 – 7/31/2002
Docref: EW4000GSUK30.doc
item, the following
©ACT’L sa
Page : 18
eWON 4000 Getting started
Local menu
Edit area
Sections List
On the left side of the screen you can see the "Sections List" there are 2 default
sections:
•
Init Section
•
Cyclic Section
The "Init Section" is executed when the program starts. Select the "Init Section" in the
list and click on the "Edit" button.
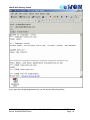
In the right window, type the following program:
Print "Program starts"
Level@=0
tset 1,1
ontimer 1,"goto ChangeLevel"
The display should look like this:
eWON 4000® – Getting started – Rev. 3.0 – 7/31/2002
Docref: EW4000GSUK30.doc
©ACT’L sa
Page : 19
eWON 4000 Getting started
Click on the "Update" button to validate your change.
Now click on the "New Section" in the "Script List" area. In the top of the "Edit Area"
enter a name for the new section: "CLevel".
In the edit area enter the following program:
ChangeLevel:
if Level@<80 then
Level@=Level@+1
else
Level@=0
endif
The display should appear like this:
eWON 4000® – Getting started – Rev. 3.0 – 7/31/2002
Docref: EW4000GSUK30.doc
©ACT’L sa
Page : 20
eWON 4000 Getting started
Click "Update" to create the section. Now there is one additional section in the list.
EXPLANATION: in this example, the Init section creates a timer – timer 1 – with a laps
of 1 second (tset 1,1), then it registers the action:
goto ChangeLevel
when the timer expires (ontimer 1,"goto ChangeLevel").
The ChangeLevel label is defined in the CLevel section and will be called every
second.
3.2
Run the program
From the Script local menu select the Script Control item, the following window is
displayed:
Script control area
(virtual display)
eWON 4000® – Getting started – Rev. 3.0 – 7/31/2002
Docref: EW4000GSUK30.doc
©ACT’L sa
Page : 21
eWON 4000 Getting started
Click on the Run (currently stopped) in the local menu, this will execute the "Init Section"
and will setup the 1 second timer.
If you click on the "Update Output" button, the window will display:
The first line of the "Init Section" generates the message "Program starts" using the
PRINT command. This shows how the "Script Control" area can be used to output
debugs information that can be read with your browser.
In the bottom of the script control screen, enter the CLS command:
CLS stands for "Clear Screen", the click the "Execute Command". Although the
program is running, you can insert a command manually (this can also be done when
the program is stopped).
Now click on the "Update Output" button, the "Program start" message has been
cleared.
REM: The "Script starts at eWON Boot" can be checked if you want to run the
program automatically when the eWON starts.
If you go the the View IO screen,
and you select the
link, the real time graph will be displayed in a separate window
The real time graph has been programmed on 10 minutes with a point every 10
seconds. After 10 minutes the older points will be erased. If the eWON is restarted, the
older points will be erased.
eWON 4000® – Getting started – Rev. 3.0 – 7/31/2002
Docref: EW4000GSUK30.doc
©ACT’L sa
Page : 22
eWON 4000 Getting started
4
Send an EMail (with a modem)
In this section we will learn how to configure the eWON to send an EMail using the
modem.
If the mail server is reachable by ethernet the same operation can be done without the
modem, but the usual case is to use a modem.
4.1
Collect information about your provider account
In order to configure the eWON to connect to a Mail server using a Dial Up connection
you will need the following data:
•
•
•
•
Provider phone number.
User Name of your account to the provider.
Password of your account to the provider.
Mail server name or IP address of the provider (SMTP Server)
Here we will describe where that information is located by showing where it appears
during the setup of a Dial Up connection to your provider.
When you setup the Dial Up connection using for example Windows 2000 the Dial Up
dialog box shows the following entries.
User name
Password
Phone number
eWON 4000® – Getting started – Rev. 3.0 – 7/31/2002
Docref: EW4000GSUK30.doc
©ACT’L sa
Page : 23
eWON 4000 Getting started
This are exactly the information we need to setup the eWON. The last item you must
provide to configure the "send mail" command is the SMTP server name or IP
address.
Usually the SMTP server address is given as a name by your internet provider, the
provider recommends to configure the OUTGOING and INCOMMING mail
configuration, example:
In our case we only need the Outgoing mail (SMTP).
Go to the eWON configuration menu
option and select
and then Main Setup. Fill the SMTP Server address case with the
value found in the Outgoing mail (STMP)
IMPORTANT: the EMail "From" User name field should contain the EMail address you
received from your provider. Some providers will check this address to authorize you
to send messages through their mail server.
eWON 4000® – Getting started – Rev. 3.0 – 7/31/2002
Docref: EW4000GSUK30.doc
©ACT’L sa
Page : 24
eWON 4000 Getting started
4.2
Configure the eWON to send mail by modem
In this section we will suppose the following parmeters collected in the previous
section:
Dial Up phone number
User Name
Password
SMTP server IP address
025970000
ewon-login
mypassword
smtp.swing.be
Go to the eWON configuration menu using
option, then select the
item, and then select the COM Setup in this local menu, the
following window will be displayed:
Server phone
number
User Name
User password
number
Enter the 3 parameters Server phone number, User Name, User password in this
window. Then click the "Upate COM setup" button.
eWON 4000® – Getting started – Rev. 3.0 – 7/31/2002
Docref: EW4000GSUK30.doc
©ACT’L sa
Page : 25
eWON 4000 Getting started
Note: for reliability purpose, you can redo this step with a Secondary Server. In case of
problem occurring with the Primary Server, the eWON will switch automaticely to the
Secondary server.
In the Local menu, click on the Main Setup link, the following screen will appear:
The “ Call direction allowed “ parameters must be either :
Outgoing Only
Incoming or Outgoing
This will allow the eWON to perform a call when an action requires it. For example, to
send a mail the eWON needs to connect to the smtp.swing.be SMTP server and that
will force an outgoing connection.
4.3
Validate your setup
With the setup defined above, your eWON is now ready to send EMails using the
modem.
Go to the "Script Control" window and enter the following command:
sendmail "[email protected]","","My Subject","My Message"
The command has 4 parameters, destinator EMail addres, then CC EMail address
(empty here), then subject, then message.
Then click "Execute Command".
and go to the Welcome menu, Files Transfer.
eWON 4000® – Getting started – Rev. 3.0 – 7/31/2002
Docref: EW4000GSUK30.doc
©ACT’L sa
Page : 26
eWON 4000 Getting started
With a PSTN modem you should hear the modem dialing.
Select this link
The file transfer menu offers an interesting feature to trace the mail transfer operation.
The following information should be displayed:
Each action requiring connection is reported in this list, only the last 20 actions are
kept in memory. In the above example, the list shows that the operation is in progress.
In the example above, the telephone line was not connected and after 3 reties, the
connection is reported as timed out.
Then in the example above the operation was processed successfully. The Status is
reported as Success.
4.4
Configure an alarm to send an EMail
Finally we will show how to set up the Tag configuration so that upon alarm, an EMail
is sent.
Go to the Tag Setup screen.
Click on the bell
link
Click on the bell link next to the Level link. This link leads to the "Alarm action"
configuration.
Alarm conditions are defined in the Tag setup (see "2.4 Create tags and monitor
values"), but action in case of alarm is defined here.
The following window will be displayed:
eWON 4000® – Getting started – Rev. 3.0 – 7/31/2002
Docref: EW4000GSUK30.doc
©ACT’L sa
Page : 27
eWON 4000 Getting started
Edit the following fields:
EMail notification enabled: checked
EMail to: [email protected] (replace by to correct destinator address)
EMail Subject: Tank level alarm
EMail Attachement(s): &[$dtRL$ftG$tnLevel$fnLGraph.png]
The last item will not be explained here but its shows an example on how to attach a
graph with real time logging to your EMail. There are lots of other possibilities of
attachments with this method, they are explained in detail in the "Export Block
Descriptor" section of the user manual.
Now go to the VIew IO screen and change the value of level to 120 then Update.
The EMail sending process will start, you can track it in the Files transfer window and
finally you should receive the following EMail:
eWON 4000® – Getting started – Rev. 3.0 – 7/31/2002
Docref: EW4000GSUK30.doc
©ACT’L sa
Page : 28
eWON 4000 Getting started
If you open the LGraph.png attachment, you will see the following picture:
eWON 4000® – Getting started – Rev. 3.0 – 7/31/2002
Docref: EW4000GSUK30.doc
©ACT’L sa
Page : 29
eWON 4000 Getting started
5
Learn more
The main topic that was not covered at all is the creation of your own custom web site
with the eWON, but many other features are detailed in the user manual. This manual
is only dedicated to introduce the main eWON features, and by browsing through the
eWON screens, show you what the eWON can do.
eWON 4000® – Getting started – Rev. 3.0 – 7/31/2002
Docref: EW4000GSUK30.doc
©ACT’L sa
Page : 30