1
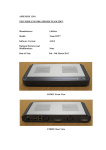
LIFESIZE Equipment Setup for CUR Conference Room NEVADA (LONE MOUNTAIN) HARDWARE INSTALLATION (Review All Photos for reference) 1. 12u Equipment Cabinet: (27Hx23Wx27D) Mount the Eaton UPS in the bottom of the cabinet (1u space) Mount the Lifesize Codec in the cabinet above the UPS (2u space) Mount the Rane Mixer above the Codec (1u space) Mount 19” Shelf above Rane Mixer for the Blu‐Ray player (2u space) Mount 19” Shelf above Blu‐Ray player for the USI Computer, HSS III Audio Sound Unit and HDMI Switch (2u space) Place the power strip behind the Cabinet for the LCD Display, Remote Hub, Remote Cradle 2. Wall Display and Camera Installation The bottom of the wall display PANEL should be set at 43 inches from the floor (See photo) The Power cable/Brick for the wall display should be plugged in and tied up behind the display The Camera shelf should be installed below and center of the display. The base of camera should be set at 37 inches from the floor 3. Phone Dish and Audio Microphone Location Place the one (1) Audio Microphone at the front of the desk ‐ 43 inches from the desk wall Place the Phone Dish at the front of the desk ‐ 30 inches from the desk wall Connect the 25ft Phone cable to the back of the dish phone and into the back of the Codec on the left side of the Green Audio inputs (See Photos) DEVICE/CABLE CONNECTIONS 4. (Refer to the attached wiring diagram for all device/cable installation connections) DOCUMENT CAMERA CONNECTIONS 5. Document Camera & Cable Installation – (Randy’s call on wire management to the Conference Table) Place the Document Camera on the furthest edge of the Conference Table for Conference users Run the Power Cord and HDMI cables from the Document Camera to the Cabinet – 10ft Cables 1 CAT5E NETWORK CONNECTION 6. CAT5E Network Data Connection Connect the Data Cable from the wall Data Jack output to the back of the Codec input AUDIO WIRING DETAILS 7. INPUTS and OUTPUTS One desk microphones into Rane Mixer via M‐XLR cables Input Two audio Outputs from the Rane Mixer into the Lifesize Codec Phoenix Inputs AUDIO VOLUME SETTINGS 8. Rane Mixer Volume Settings Line Input 1 o Set dial to position 5 Line Output A & B o Set both dials to position 5 LOGITECH HARMONY REMOTE INSTALLATION 9. Use the provided instructions found in the box for placing the Harmony Hub and two Mini Blasters in and around the equipment cabinet NOTE: George and Randy will sync the new remote with the remote that went to Nevada. The remote will be used for the following tasks: 1. Power on & off the wall display – We will need the model number on the side of the display during setup 2. Operate the volume control on the wall display 3. Power on & off the Blu‐ray player 4. Operate the Blu‐ray control functions (i.e. Play, Stop, fast fwd. etc.) 2 DISH TOUCH SCREEN DIRECTIONS 10. SLEEP Touch SLEEP to Activate the Camera for Video Conferences as well as to put to the Lifesize Codec to sleep when not in use 11. PLACING A CALL Select either RECENT or FAVORITES to place a Regional Conference call Select END to hang up when finished with a conference call 12. CAMERA PRESETS or MANUAL ZOOM Select VIEW Choose either Manual Zoom or 1 – 7 Presets o 0 = Full View of everyone attending conference o 1 = Left Side View of attendees o 2 = Center View for a personal one‐on‐one conference o 3 = Right Side View of attendees o 4 = Left Side of Desk Zoom for desktop objects o 5 = Center of Desk Zoom for desktop objects o 6 = Right Side of Desk Zoom for desktop objects o 7 = Full View of everyone attending conference 13. PRESENTATION MODES CHOOSE A PRESENTATON INPUT Touch the CHANGE button o TOP DVI 2 = Computer Presentations – Turn on the wireless Keyboard and Mouse o MIDDLE DVI 3 = Document Scanner – Turn on the Document Scanner (User Manual Provided) o BOTTOM DVI 4 = Disconnected ‐ Not in Use at this time Touch END to end presentations and return to Conference Call 14. BLU‐RAY PLAYER (Local Viewing Only) (At this time, the Blu‐ray will not function with the Lifesize Codec allowing other Regions to see it) Use Logitech Remote to turn on the Blu‐ray player NOTE: Blu‐ray player will automatically begin playing the disk and automatically put the Lifesize Codec into SLEEP mode. When you are finished viewing the disk or presentation, stop the Blu‐ray player and shut it off using the remote. This will automatically awaken the Lifesize Codec and put you back into Video Conference mode. 3