1
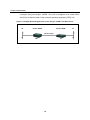
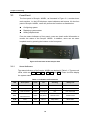
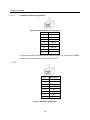
TAINET
Scorpio 1400RL
G.SHDSL Termination Unit
User's Manual
The Professional Partner
TAINET COMMUNICATION SYSTEM CORP.
Headquarters:
Beijing Branch:
No. 25, Alley 15, Lane 120,
Sec. 1. Nei-Hu Rd,
Taipei 114, Taiwan
TEL: 886-2-26583000
FAX: 886-2-26583232
3F, A Building, 113 Zhi Chun Lu,
HaiDian District, Beijing, China
Zip Code: 100086
TEL: 86-10-62522081~87
FAX: 86- 10-62522077
Copyright © 2002 TAINET COMMUNICATION SYSTEM CORP.
All right reserved
Printed in Taiwan R.O.C.
V1.1
07008-00081
2005/06/13
Scorpio 1400RL User’s Manual
Notice
This document is protected by the international copyright law. No part of this
publication may be reproduced by any means without the permission of Tainet
Communication System Corporation.
TAINET is a registered trademark, and Scorpio 1000, Scorpio 1400RL is a
trademark of Tainet Communication System Corporation.
Other product names mentioned in this manual are used for identification purposes
only and may be trademarks or trademarks of their respective companies.
The information provided from Tainet Communication System Corporation is
believed to be accurate. Any changes and enhancements to the product and to the
information thereof will be documented and issued as a new release to this manual.
Trademark
All products and services mentioned herein are the trademarks, service marks,
registered trademarks or registered service marks of their respective owners.
i
Scorpio 1400RL User’s Manual
ABOUT THIS MANUAL
This section guides you on how to use the manual effectively. The manual contains
information needed to install, configure, and operate TAINET’s Scorpio 1400RL
termination units. The summary of this manual is as follows:
Chapter 1:
INTRODUCTION
Describes Scorpio 1000 and how to use Scorpio 1400 in
several applications.
Chapter 2:
SPECIFICATIONS
Describes the features, specifications and applications of
Scorpio 1400RL.
Chapter 3:
INTERFACING
Introduces all the interfaces, including front panel and rear
pane of Scorpio 1400RL.
Chapter 4:
INSTALLATION
Assist user to install and verify the Scorpio 1400RL
Step-by-step.
Chapter 5:
OPERATION OF CID
Gives a description of the CID (Craft Interface Device).
Appendix A: ORDER INFORMATION
Describes all the Scorpio 1400RL series products.
Appendix B: MENU TREE
Describes the LCD and VT-100 menu tree.
Appendix C: PIN ASSIGNMENT
Describes all cables and connectors with pin definition.
Appendix D: TROUBLESHOOTING
Provides brief trouble shooting list.
Appendix E: TROUBLE REPORT
Trouble Report Form
ii
Scorpio 1400RL User’s Manual
SYMBOLS USED IN THIS MANUAL
3 types of symbols are used throughout this manual. These symbols are used to
advise the users when a special condition arises, such as a safety or operational
hazard, or to present extra information to the users. These symbols are explained
below:
Warning:
This symbol and associated text are used when death or
injury to the user may result if operating instructions are not
followed properly.
Caution:
This symbol and associated text are used when damages to
the equipment or impact to the operation may result if
operating instructions are not followed properly.
Note:
This symbol and associated text are used to provide the
users with extra information that may be helpful when
following the main instructions in this manual.
iii
Scorpio 1400RL User’s Manual
WARRANTY AND SERVICE
If there are any questions, contact your local sales
representative, service representative, or
distributor directly for any help needed. You might
use one of the following methods..
Contact:
Via the Internet: visit our World Wide Web site at http://www.tainet.net
Via the Sales Representatives:
HQ
No. 25, Alley 15, Lane 120, Sec. 1. N e i -H u Rd. Taipei, Taiwan, R.O.C.
Phone: (886) 2-2658-3000
E-mail: [email protected]
Fax:
(886) 2-2658-3232
URL:
http://www.tainet.net/
.
-
-
s
-
Moscow Branch
111024, Shosse Entuziastov Building 14, Room 425, Moscow, Russia
Phone: (7) 095-7850-377
URL:
http://www.tainet.ru
Fax:
(7) 095-7850-378
Beijing Branch
3F, A Building, 113 Zhi Chun Lu,
HaiDian District, Beijing, China
Zip Code: 100086
TEL: (86) 10-62522081~87
FAX: (86) 10-62522077
E-mail:
URL:
iv
[email protected]
http://www.tainet.com.cn
Scorpio 1400RL User’s Manual
CONTENTS
Chapter 1. Introduction ......................................................................................... 1
1.1
OVERVIEW ................................................................................................................... 2
1.2
APPLICATIONS ............................................................................................................. 2
Chapter 2. Specification........................................................................................ 5
2.1
MAIN FEATURES .......................................................................................................... 6
2.2
SHDSL INTERFACE ..................................................................................................... 6
2.3
NETWORK SIDE INTERFACE ......................................................................................... 7
2.3.1
ETHERNET INTERFACE ......................................................................................... 7
2.4
TIMING AND SYNCHRONIZATION ................................................................................. 7
2.5
OAM........................................................................................................................... 7
2.6
TECHNICAL SPECIFICATIONS ....................................................................................... 8
2.7
APPLICATIONS ............................................................................................................. 9
2.7.1
CAMPUS NETWORK .............................................................................................. 9
Chapter 3. Interfacing...........................................................................................11
3.1
FRONT PANEL ............................................................................................................ 12
3.1.1
STATUS INDICATORS .......................................................................................... 12
3.1.2
THE BUTTONS ................................................................................................... 13
Chapter 4. Installation ......................................................................................... 15
4.1
UNPACKING ............................................................................................................... 16
4.2
CONFIGURATION PROCEDURES .................................................................................. 16
4.2.1
ESTABLISH CONNECTION................................................................................... 16
4.2.2
LOCAL LOOPBACK TEST .................................................................................... 17
Chapter 5. Operation of CID................................................................................ 19
5.1
OVERVIEW ................................................................................................................. 20
5.2
MAIN MENU............................................................................................................... 21
5.3
QCONFIG ................................................................................................................... 22
5.3.1
QCONFIG–OPMODE .......................................................................................... 22
5.3.2
QCONFIG–LAN .................................................................................................. 22
5.3.3
QCONFIG–WAN ................................................................................................. 23
5.3.4
QCONFIG-ENDPOINTMODE ............................................................................... 23
5.4
CONFIG...................................................................................................................... 23
5.4.1
CONFIGURE-SYSTEM ......................................................................................... 24
5.4.2
CONFIGURE-INTERFACE .................................................................................... 24
5.4.3
CONFIG-SHDSL .................................................................................................. 24
5.4.4
CONFIG-PROTOCOL ........................................................................................... 25
v
Scorpio 1400RL User’s Manual
5.4.5
CONFIG-ROUTING ............................................................................................. 28
5.4.6
CONFIG-BRIDGE ................................................................................................ 28
5.4.7
CONFIG-ACCESSCONF ....................................................................................... 28
5.4.8
CONFIG-RESET2DFT ......................................................................................... 29
5.5
MAINTENANCE .......................................................................................................... 29
5.5.1
MAINTENANCE-SHDSL1(SHDSL2) ..................................................................... 29
5.5.2
MAINTENANCE-ROUTE ..................................................................................... 31
5.5.3
MAINTENANCE-BRIDGE .................................................................................... 31
5.5.4
MAINTENANCE–LANPKTSTATISTIC ................................................................... 31
5.5.5
MAINTENANCE-WANPKTSTATISTIC................................................................... 32
5.5.6
MAINTENANCE–TIME ........................................................................................ 32
5.6
SHOWCONF ............................................................................................................... 33
5.6.1
SHOWCONF-SYSINFO ........................................................................................ 34
5.6.2
SHOWCONF-INTERFACE .................................................................................... 34
5.6.3
SHOWCONF-SHDSL ........................................................................................... 34
5.6.4
SHOWCONF-DHCP ............................................................................................. 35
5.6.5
SHOWCONF-DNSPROXY.................................................................................... 35
5.6.6
SHOWCONF–IPSHARE ....................................................................................... 35
5.6.7
SHOWCONF–RIP................................................................................................ 36
5.6.8
SHOWCONF–ROUTE .......................................................................................... 36
5.6.9
SHOWCONF–BRIDGE ......................................................................................... 36
5.6.10 SHOWCONF–STP ............................................................................................... 37
5.6.11 SHOWCONF–ACCESSCONF................................................................................ 37
5.6.12 SHOWCONF–BERT ............................................................................................. 37
5.7
UTILITY ..................................................................................................................... 38
5.7.1
UTILITY-UPGRADE ............................................................................................ 38
5.7.2
UTILITY-PING .................................................................................................... 39
5.7.3
UTILITY-BERT ................................................................................................... 40
5.7.4
UTILITY-LOOPBACK .......................................................................................... 41
5.7.5
UTILITY-SETTIME ............................................................................................. 41
5.8
WRITE ....................................................................................................................... 42
5.9
REBOOT & EXIT ........................................................................................................ 43
Appendix A Ordering Information ........................................................................ 45
Appendix B Menu Tree .......................................................................................... 47
Appendix C Pins Assignment ............................................................................... 57
Appendix D Troubleshooting ................................................................................ 59
Appendix E Trouble Report................................................................................... 61
vi
Scorpio 1400RL User’s Manual
FIGURES
FIGURE 1-1
APPLICATION OF BACK-TO-BACK .......................................................................................... 3
FIGURE 1-2
APPLICATION OF S1000/S1400 SYSTEM .............................................................................. 3
FIGURE 1-3
POSSIBLE INTERFACE CONFIGURATION OF S1000/S1400 SYSTEM ........................................ 4
FIGURE 2-1
CAMPUS NETWORK APPLICATION OF THE SCORPIO 1400RL WITH ETHERNET I/F ................. 10
FIGURE 3-1
FRONT PANEL OF THE SCORPIO 1400 ................................................................................. 12
FIGURE 3-2
REAR PANEL OF THE SCORPIO 1400................................................................................... 13
FIGURE 3-3
G.SHDSL RJ-45 PIN ASSIGNMENT .................................................................................... 14
FIGURE 3-4
RJ-45 PIN ASSIGNMENT .................................................................................................... 14
FIGURE 5-1
STU-C SIDE ACTIVATED LOOPBACK................................................................................... 40
FIGURE 5-2
STU-R SIDE ACTIVATED LOOPBACK................................................................................... 41
FIGURE C-1
DB-9 INTERFACE ............................................................................................................... 57
FIGURE C-2
RJ-45 INTERFACE.............................................................................................................. 57
vii
Scorpio 1400RL User’s Manual
TABLES
TABLE 2-1
TIMING AND SYNCHRONIZATION ............................................................................................ 7
TABLE 2-2
TECHNICAL SPECIFICATIONS OF THE SCORPIO 1400RL......................................................... 8
TABLE 3-1
INDICATORS ON FRONT PANEL ............................................................................................ 12
TABLE 5-1
SHDSL ALARMS DESCRIPTION .......................................................................................... 32
TABLE A-1
ORDER INFORMATION ......................................................................................................... 45
TABLE B-1
LCD MENU TREE............................................................................................................... 47
TABLE B-2
VT-100 MENU TREE .......................................................................................................... 49
TABLE C-1
DB-9 CONNECTOR PIN DEFINITION..................................................................................... 57
TABLE C-2
DSL RJ-45 CONNECTOR PIN DEFINITION ........................................................................... 58
TABLE C-3
LAN RJ-45 CONNECTOR PIN DEFINITION ........................................................................... 58
viii
Chapter 1 Introduction
Chapter 1. Introduction
ABOUT THIS CHAPTER
This chapter begins with a general description of Scorpio 1000 (S1000), which is a
high-density universal rack mounted system. Then, the chapter describes how to use TAINET
Scorpio 1400 (S1400) in several applications and show the possible interface configurations
of S1000/S1400 System. There are two types of Scorpio 1400 series, one is S1400 and the
other is S1400RL. This user manual is focus on Scorpio 1400RL.
1
Chapter 1 Introduction
1.1
Overview
DSL (Digital Subscriber Loop) technologies increase the bandwidth capacity of
existing ubiquitous telephone line (the local copper loops). G.SHDSL is designed
for business applications, where high speed is required in both transmission
directions. It provides symmetrical data rates from 64Kbps to 2.304Mbps in
2-wire with a transmission distance up to 20Kft using SHDSL technology. The
data rates will be increased to 4.624Mbps in 4-wire link. The speeds obtainable
using DSL technologies are tied to the distance between the customer premise
and the Telco central office. Performance varies with loop characteristics, such
as line conditions, loop distance, wire gauge, noise, and the number and
locations of bridged taps and gauge changes. The G.SHDSL bit rate can be
configured (or rate adapted) to adapt to the line conditions.
The Scorpio 1000 (S1000) provides full coverage of the Last Mile with a variety of
technologies, rates, interfaces and media. The system supports standard
technologies such as G.SHDSL. Each card in the S1000 is in a point-to-point
configuration opposite to a remote unit with no connection to the adjacent cards.
This allows totally independent operation among the ports and cards on the
S1000. Three types of technologies will be provided in S1000: 2-wire G.SHDSL
modems, 4-wire G.SHDSL modems, and fiber optic modems.
S1000 is a high-density universal rack mounted system. The chassis has 14 slots
that accommodate up to 14 modems, or 28 modems if dual-port cards are used.
Using modular interface cards, S1000 can support SHDSL or fiber in the same
chassis under a single management system.
Its hot-swappable feature allows any card or cable to replaced or removed during
equipment operation, without causing interference to data transmission to / from
other cards in the chassis.
Modular data interfaces allow modem connectivity via a wide range of DTE
interfaces. These interfaces include T1, E1, DATA (V.35, V.36 / RS449, X.21,
RS-530), and Ethernet.
1.2
Applications
The SHDSL System consists of a central unit, STU-C (SHDSL Transceiver Unit Central), at central office, and a remote unit, STU-R (SHDSL Transceiver Unit Remote), at customer premises.
2
Chapter 1 Introduction
The services are extended through the ubiquitous copper wires or leased lines
with the technologies of G.SHDSL or fiber. Various interface extensions are
supported on S1400: E1, T1, DATA (V.35, V.36 / RS449, X.21, RS-530), and
S1400RL only supports Ethernet.
Figure 1-1 and Figure 1-2 show two typical applications. Figure 1-3 depicts the
possible interface configurations.
CID/Telnet
V.24/Ethernet
G.SHDSL
E1/T1/V35/
Ethernet
E1/T1/V35/
Ethernet
Scorpio 1400
(STU-R)
Scorpio 1400
(STU-C)
Figure 1-1 Application of Back-to-back
Telco Central Office
Remote Customer Premises
Scorpio 1000
ADM
G.SHDSL
ADM
Transport
Network
Scorpio 1400
E1/T1/V35/
Ethernet
Fiber
*
Fiber
*
4xE1/4xT1
Fiber
*
E3/T3/HSSI
V.24
CID
V.24
*
future release
Ethernet
Router
UNMS
DataBase
server
CID/
Telnet
TFTP server
Figure 1-2Application of S1000/S1400 System
3
E1/T1/V35/
Ethernet
CID
Chapter 1 Introduction
DS1
E1
DS1
E1
V.35
Ethernet
G.SHDSL
STU-C
G.SHDSL
STU-C
G.SHDSL
STU-C
G.SHDSL
STU-C
G.SHDSL
STU-C
G.SHDSL
STU-C
STU-R
STU-R
STU-R
STU-R
STU-R
STU-R
DS1
E1
V.35
V.35
V.35
Ethernet
Figure 1-3Possible Interface Configuration of S1000/S1400 System
Note that Scorpio 1400 (S1400) can be configured as STU-C or STU-R, whereas
S1400 should be an STU-R when connected with S1000. There are two types of
S1400 series, one is S1400 and the other is S1400RL. S1400RL only equipped
with Ethernet port, it could not carry any other DTE interface (T1/E1 or DATA
interface).
4
Chapter 2 Specification
Chapter 2. Specification
ABOUT THIS CHAPTER
To let the user understand the TAINET Scorpio 1400RL, this chapter begins with its main
features. Then, the chapter continues to present the SHDSL interface, the network side
interface, timing and synchronization, OAM (Operation, Administration and Maintenance) and
technical specifications. The last part of this chapter is devoted to the applications of TAINET
Scorpio 1400RL in campus network.
5
Chapter 2 Specification
2.1
Main Features
Listed below are the main features of the Scorpio 1400RL:
Support loop interface G.SHDSL.
S1400RL supports Ethernet interface.
Carrying symmetrical 2048 Kbps payload for up to 2.4 miles / 3.9 Km over
26-AWG single pair copper wire.
Carrying symmetrical 4096 Kbps payload for two pairs copper wires.
Automatic line rate selection.
Supports static route, RIP and RIPv2 (future).
Support SHDSL payload rates of n ×64Kbps, where n is 3 to 36 in 2 wires,
where n is 3 to 72 in 4 wires.
Support Timing and Synchronization: Local (internal) timing, Line timing
(loop received clock), DTE timing.
For test and diagnostic purpose the S1000 / S1400 system provides various
loopback paths and loopback code words for end-to-end loopback function.
Management by UNMS or CID.
Remote control / monitoring via Telnet and Ethernet.
Remote in-band control / monitoring CPE via G.SHDSL EOC.
Remote software upgrade via TFTP.
2.2
SHDSL Interface
Meet ITU-T G.991.2 relative requirements
Support Wetting Current function for feeding of a low current(between 1.0
mA and 20 mA)on the pair to mitigate the effect of corrosion of contacts.
Support power back off functions.
Data rate of 64K to 2.304M bps (2 wires) or 128k to 4.624M bps (4 wires),
(incrementing step: 64K bps).
Modulation Method: 16-TCPAM (16 levels Trellis Coded Pulse Amplitude
Modulation).
Physical Connection Type: Standard RJ-45 jack, 135 ohm balanced via 2
wires or 4 wires twisted pair.
Port enabled / disabled configurable.
6
Chapter 2 Specification
2.3
Network Side Interface
2.3.1
Ethernet Interface
Provide a 10/100 BaseTx auto sensing and half/full duplex configurable
Ethernet Interface.
Comply with the IEEE 802.3/ IEEE 802.3u.
Physical Connection Type: Standard RJ-45 connector.
Operate as a self-learning bridge specified in the IEEE 802.1d full protocol
transparent bridging function
Supporting up to 128 MAC learning addresses.
Supporting Bridge filter function based on source MAC addresses.
2.4
Timing and Synchronization
Table 2-1 shows three modes for S1400DL field selectable. But for S1400RL it
always uses local oscillator and no necessary to select others.
Table 2-1 Timing and Synchronization
Mode
STU-C Symbol
STU-R Symbol
Example
Number
Clock Reference
Clock Reference
Application
1
Local oscillator
Received symbol clock
"Classic" HDSL
Received symbol clock
Main application is
Mode
Plesiochronous
(internal timing)
2
Transmit data clock
(For 1400DL (DTE timing)
synchronous transport
only)
3
Synchronous
in both directions.
Hybrid Transmit data
Received symbol clock
(For 1400DL clock (Hybrid DTE timing)
Synchronous
Hybrid:
downstream transport downstream is
only)
and bit-stuffed
synchronous and
upstream is possible.
upstream is
Plesiochronous
2.5
OAM
OAM (Operation, Administration and Maintenance) of the Scorpio 1400RL is
listed below:
UNMS manages S1000 system via SNMP interface and provides a
user-friendly GUI-based operational interface under PC / Windows or HP
Open-View systems.
7
Chapter 2 Specification
CID Console: user-friendly menu-driven operation
SNMP management message interface
Remote control / monitoring S1400RL via Telnet and Ethernet
Remote in-band control/monitoring CPE via G.SHDSL EOC
Remote Software Upgrade: Remotely via Ethernet port with TFTP protocol,
Locally CID console terminal with XMODEM protocol.
Automatically and manually configuration backup and restoration to / from
local nonvolatile memory
Support default configuration setup
Support Alarm Surveillance function
Support Performance Monitoring function
For test and diagnostic purpose the S1000 / S1400 system provides various
loopback paths, which are depicted in Figure 5-1 and Figure 5-2
For each STU-C and STU-R, the built-in PRBS generation and detection are
provided for loopback performance test on per channel basis. Test results
are displayed. The supported PRBS patterns include 211-1, 215-1, 220-1,
223-1.
2.6
Technical Specifications
Table 2-2 gives the technical specifications of the Scorpio 1400RL.
Table 2-2 Technical Specifications of the Scorpio 1400RL
DSL
Modulation
PAM
Mode
Full duplex with echo cancellation
Number of loops
Single
Loop rate
N*64+8K(N=1~36) up to 2320Kbit/S (2 wire), (N=2~72) 4624kbit/S (4 wire)
Data rate
64K to 4608kbit/S
Loop impedance
135 ohms
Clock source
Internal clock
Clock accuracy
± 32 ppm
Interface
10/100BaseTx Auto sensing
Ethernet
IEEE 802.3/ IEEE 802.3u
IEEE 802.1d full protocol transparent bridging function
Half and full duplex
8
Chapter 2 Specification
Diagnostics
Loop test
Status Indicators
LL
: Local loop back
RL
: Remote Loop Back
PWR
: Power indicator
DSL
: DSL status indicator
LINK
: Ethernet link indicator
ACK
: Packet transmitted/received indicator
ALM
: Alarm indicator
TST
: Test status indicator
115200 BPS
8 bit data length
Craft port
None parity
1 stop bit
9-pin/D-sub/female connector
Ethernet port
10/100M BPS
RJ-45 jack
Power Requirement
AC Power adapter 110/220 VAC ± 10 %
Input
DC Power adapter 36~72 VDC
Power
Consumption
< 12 W
Environments
Temperature
Humidity
2.7
Operating +0℃ ~ +50℃
Storage
-40℃ ~ 70℃
Operating 10% ~ 80% non-condensing
Storage
5% ~ 90% non-condensing
Applications
This section describes how to apply TAINET Scorpio 1400RL in the network
systems.
2.7.1
Campus network
The Scorpio 1400RL is well suited to the campus applications. Figure 2-1 show
the general campus applications where remote routers are interconnected across
9
Chapter 2 Specification
a campus using two Scorpio 1400RL. One unit is configured as a central office
site (CO) unit and the other is the customer premise equipment (CPE) unit.
Figure 2-1Campus Network Application of the Scorpio 1400RL with Ethernet I/F
LA
Scorpio 1400RL
Scorpio 1400RL
2/4-wire copper
CPE
CO
10
LA
Chapter 3 Interfacing
Chapter 3. Interfacing
ABOUT THIS CHAPTER
In this chapter, we will focus our attention on the interfaces of the Scorpio 1400RL. First, the
front panel of the Scorpio 1400RL will be discussed. After that, we will examine in more
detail the rear panel of the Scorpio 1400RL.
11
Chapter 3 Interfacing
3.1
Front Panel
The front panel of Scorpio 1400RL, as illustrated in Figure 3-1, contains three
main sections, i.e. the LCD displayer, status indicators and buttons. Via the front
panel of Scorpio 1400RL, users can perform the functions as listed below:
Configuring system
Displaying system status
Setting loopback test
From the status indicators of front panel, users can obtain useful information to
monitor the status of the Scorpio 1400RL. In addition, users can set some
loopback tests by pressing the buttons on the front panel.
Figure 3-1Front Panel of the Scorpio 1400
3.1.1
Status Indicators
The status indicators of the Scorpio 1400RL are depicted in Table 3-1. There are six
LEDs, which are PWR, DSL, LINK, ACT, ALM and TST. These six LEDs display
the system status.
Table 3-1 Indicators on Front Panel
LED
Description
Color
Off
Flashing
Always On
PWR
Power
Green
No Power
N/A
Power OK
DSL
Loop
Green
Failure
Handshaking/Training
Connected
LINK
LAN connected
Green
Unequipped
N/A
Link connected
Green
No packet
Packets active
Packets active
Packet
ACT
transmit/receive
ALM
Alarm
Red
Normal
Major Alarm
Minor Alarm
TST
Testing
Amber
Normal
N/A
Loopback activated
12
Chapter 3 Interfacing
3.1.2
The Buttons
The buttons of Scorpio 1400RL are depicted. There are six keys, including HOME,
REM/LOC, ▲, ▼, ◄ and ►. By pressing these buttons, users may perform
configuration, testing for setting up and diagnostic purpose.
The default password for unlocking front panel is “14001400” if the front panel was
locking.
Rear Panel
Figure 3-2 illustrates the rear panel of the Scorpio 1400RL. Users may connect the
Scorpio 1400RL to other devices or equipments via these interfaces.
3
1
2
4
6
5
7
Figure 3-2Rear Panel of the Scorpio 1400
The following connectors/devices appear on the rear panel of the Scorpio 1400RL.
1 Power On/Off
: The Scorpio 1400RL’s power switch
2 Power Receptacle
: Power plug for a AC power cable
3 DC power connector : Power connector for DC power
4 Ground Terminal
: Ground output terminal, connect to earth
5 DSL Jack
: RJ-45 jack for SHDSL link
6 Craft Interface
: 9 pin female serial D-sub connector
7 LAN Interface
: LAN port interface
13
Chapter 3 Interfacing
3.1.2.1
G.SHDSL RJ-45 Pin Assignment
Figure 3-3G.SHDSL RJ-45 Pin Assignment
Pin
Description
1
-
2
-
3
Tip-(2)
4
Tip-(1)
5
Ring-(1)
6
Ring-(2)
7
-
8
-
The pin assignment of G.SHDSL line is shown in Figure 3-3. The Scorpio 1400RL
supports LAN interface port as shown in Figure 3-4.
3.1.2.2
Pin
Description
1
TX_+
2
TX_-
3
Rx_+
4
NC
5
NC
6
Rx_-
7
NC
8
NC
Figure 3-4RJ-45 Pin Assignment
14
Chapter 4 Installation
Chapter 4. Installation
ABOUT THIS CHAPTER
In this chapter, we will present the installation guide for the Scorpio 1400RL. It begins with a
checklist for unpacking the shipping package. The chapter continues with the configuration
procedures that includes “Loop Back Test” and “Establish Connection”.
15
Chapter 4 Installation
4.1
Unpacking
The Scorpio 1400RL’s shipping package includes the following items:
1 Scorpio 1400RL standalone unit
1 User’s manual CD Pack
1 Power cable
1 24-AWG RJ-45 cable
4.2
Configuration Procedures
This section guides the user through some basic operations on the front panel
and makes sure the Scorpio 1400RL unit is correctly configured. These
operations include Local Loop back Test, Establish Connection, System setup
and others. All detail menu tree of the system, please refer to Appendix A.
There are six buttons on the front panel- REM/LOC, HOME, ▲ up arrow, ▼ down
arrow, ◄ left arrow and ► right arrow.
The LCD will display the current S/W version of S1400RL in the beginning. Users
can enter the LCD configuration menu by pressing ▼ button.
Users can go to previous or next page by pressing ◄ or ► button respectively.
When the value is selected, users can press ▼ (it represents enter) button. If
users aim to escape current screen and return to previous screen, just press the
▲ button.
The HOME button is used to return to main menu screen.
Users may configure the S1400RL in remote side or local side by toggling the
REM/LOC button. Once it is set for remote side, an R character will be displayed
on the LCD screen. It will return to local configuration by pressing the REM/LOC
button again.
4.2.1
Establish Connection
1.
Connect all the necessary wires and turn on the Scorpio 1400RL.
2.
Wait for few seconds, press ▼ to enter the menu tree. Keep pressing ► or
◄ until LCD displayed “Configuration” then press ▼ to enter the
configuration menu. Repeat the same steps to enter the “Configuration==>
system==> OpMode” (Bridge or Router), “Configuration==> Modem==>
Modem Type”(CO or CPE), “Configuration==> Modem==> Rate Mode”,
16
Chapter 4 Installation
“Configuration==> Modem==> Max Data Rate”, “Configuration==>
Interface==> LAN IP Address”, “Configuration==> Interface==> LAN
NetMask”, ” Configuration ==> Interface ==> WAN==> WAN Enable”(router
mode only), “Configuration==> Interface==> WAN==> WAN IP Address”
(router mode only), “Configuration==> Interface==> WAN==>
Link Type”
and “Configuration==> Interface==> WAN==> WAN NetMask” (router mode
only) menu to set up the desirous value respectively. Please enter the “Write
Config” menu and enable it after all configurations are finished. Reboot the
system.
3.
Configure the Scorpio 1400RL CO side by pressing button on the front panel
in according to the LCD menu tree Table B-1. Note: One side must be
configured as CO and the other side as CPE in back to back connection.
4.
Configure the Scorpio 1400RL CPE side (Specify same data rate and Line
Type as CO side but different LAN/WAN IP address). Note: In back-to-back
connecting application, the “Modem==> Rate Mode” of one side must be set
to “Adaptive” and the other side is set on “Fixed”.
5.
Any user specified configurations are different from descriptions as above;
please configure them by pressing button on the front panel.
6.
Wait for several seconds, DSL LED will be ON, LCD displays “Connected”
and the data rate of connection, it shows SHDSL link having been
established.
4.2.2
Local Loopback Test
1.
Go to Test ==> Loopback menu by pressing the button on front panel.
2.
Press the button on front panel to configure the loop back test if users aim to
do it. For running the loop back test, please refer to Utility==> Loopback in
chapter 5, Figure 5-1 and Figure 5-2.
3.
Wait for several seconds, the Scorpio 1400RL will complete the test and the
TST LED will turn on.
4.
Return the setting value of loop back to normal by pressing the key button
on the front panel.
17
Chapter 5 Operation of CID
Chapter 5. Operation of CID
ABOUT THIS CHAPTER
In this chapter, you will be introduced to the CID (Craft Interface Device) VT-100 operation of
Scorpio 1400RL. The chapter starts with an overview of Scorpio 1400RL’s CID. In addition,
each main menu item of the Scorpio 1400RL’s CID, such as Configuration, Monitor and other
utility will be discussed.
19
Chapter 5 Operation of CID
5.1
Overview
The craft port for configuration is set to Speed: 115200, Data bit: 8, Parity: n, Stop
bit: 1, Flow control: n. When startup the S1400RL, the following messages will
appear before the screen displays the Application software code.
At startup of the AP, press Enter, the CID will prompt user to enter the password
for access into the system. The default username and password are tainet.
(Earlier version before V1.47 is root)
The CID offers user-friendly menu-driven user interface. The following figure
depicts the structure of the interface. The top tier command options include
QConfig, Config, Monitor, ShowConf, Utility, Write, Reboot and Exit.
Note:
There are some differences between LCD
and CID menu tree, ex: the Utility item, but
most of them are almost the same.
20
Chapter 5 Operation of CID
Product name
Software version
Command Tier1, 2, 3, 4 or description
Message
Input
Operational hint
Product Name: TAINET Scorpio 1400RL.
Software Version: the software version number.
Tier 2: The second tier of the current screen.
Tier 3: The next tier of the current screen.
Tier 4 or description: The fourth tier of the current screen and / or its
description.
Message: System prompt message.
Input: the values to be set by the user.
Operational hint: a hint for the user during operation. Some operation asks
to write the new configuration and reboot system for the new settings to take
effect.
5.2
Main menu
After the password checks out, the CID will bring up the top page or the main
menu. There are eight items on this page, QConfig, Config, Monitor,
ShowConf, Utility, Write, Reboot and Exit. The Qconfig is used to configure
the system very roughly. Users can configure the detail parameters in Config
menu. The Monitor menu is used to monitor status and check any alarm log of
system. Users can see all configurations of system through ShowConf menu.
Some useful tools for diagnostic or testing in Utility menu.
21
Chapter 5 Operation of CID
5.3
Qconfig
5.3.1
Qconfig–OpMode
There are two operation mode of Scorpio 1400RL, Bridge Router mode, for users
can specify the network mode through the menu. And need to write the new
configuration and reboot system for the new settings to take effect.
5.3.2
Qconfig–Lan
Users can specify the IP address/subnet mask of LAN interface.
22
Chapter 5 Operation of CID
5.3.3
Qconfig–Wan
State: There are two possible values for WAN state - Enable or Disable.
Address: Users can specify the IP address/subnet mask of WAN interface.
LinkType: Specify the Wan link type of PPP or Ethernet.
5.3.4
Qconfig-EndpointMode
Configure the system as a CO or CPE device.
5.4
Config
There are two interface types on the S1400RL, which are LAN and WAN
available for the S1400RL. In addition to the interfaces of LAN and WAN, the
SHDSL line interface should be configured in this menu.
23
Chapter 5 Operation of CID
5.4.1
Configure-System
OpMode: Set up the operation mode as Router or Bridge, as Qconfig menu
did.
HostName: Users can specify the name of the device, which can be
identified in the network.
PHYType: Specify the system interface as Full or Half duplex.
5.4.2
Configure-Interface
Lan: Set up the IP address/subnet mask of LAN interface.
Wan: Users can specify the following parameters of WAN interface.
5.4.3
•
State: set up the interface as Enable or Disable
•
Address: Set up the IP address/Subnet mask of WAN interface.
•
LinkType: Set up the link type as PPP or Ethernet.
Config-Shdsl
EndpointMode: Set up the SHDSL active mode as CO or CPE.
RateMode: Configure the bit rate mode as Adaptive or Fixed.
MinRate: Configure the minimum line rate (n*64Kbps); the possible value of
n is from 1 to 72.
24
Chapter 5 Operation of CID
MaxRate: Configure the maximum line rate (n*64Kbps); the possible value
of n is from 1 to 72.
Rate1544Eabled: Set the rate of 1544kbps to Enable or Disable.
PsdMode: Set the power spectral density to Symmetrical or Asymmetric.
Used to let SHDSL transceiver to use a symmetrical or asymmetrical power
spectral density mask as specified in G.991.2 standard.
TransmissionMode: Configure the transmission mode to Annex-A or
Annex-B. Which is specified in ITU-T G.991.2 standard.
PowerBackoff: The possible value is Enable or Disable. When enabled, the
transmit power from the other end of STU will be reduced in 1-dB step from
0 to 6dBs according to the received power.
4WireMode: The possible value is Enable or Disable.
PmThreshold: Set the PM threshold of 15-min and 1-day
15minFirst: set up the ES(0-900), SES(0-900) 15min threshold.
15minSecond: Set up the UAS(0-900),LOSWS(0-900) 15min threshold.
1dayFirst: set up the ES(0-86400), SES(0-86400) 1day threshold.
1daySecond: Set up the UAS(0-86400),LOSWS(0-86400) 1day threshold.
SNM_Att_Thr: Setup the SNR margin(0-900) and Loop Attenuation
threshold(0-900).
5.4.4
Config-Protocol
Dhcp: Set up DHCP parameters as follow:
• State: Enable or Disable the DHCP service.
• Generic: Set up the following parametersGateway: Specify the default gateway to all clients.
Netmask: Specify the subnet mask to all clients.
IpRange: Specify the range of assigned IP to all clients.
25
Chapter 5 Operation of CID
Dns1: Specify IP address of the first DNS to all clients
Dns2: Specify IP address of the second DNS to all clients
Dns3: Specify IP address of the third DNS to all clients
• Fixed:
Add: Add some fixed IP addresses to hosts. Users must enter a MAC
address and associated with an IP address.
Delete: Delete any host of fixed IP address (the number of host is from
1 to 10).
DnsProxy: Configure the IP address of DNS proxy (Dns1 to Dns3).
IpShare: Configure the NAT parameters as follow:
• State: Enable or Disable the NAT/PAT service.
• Nat: Configure NAT parameters as follow:
Local:
Range- NAT entry number<1 to 5>, Base address<IP>, number of
address<1 to 253>.
Delete- Delete entry number<1 to 5> defined in Range.
Global:
Range- NAT global address entry number<1 to 5>, Base address<IP>,
number of address<1 to 253>.
Interface- NAT global address entry number<1 to 5>, Active interface
number<Wan1/2>.
Delete- Delete NAT global entry number<1 to 5>.
Fixed:
Modify- fixed entry number<1 to 128>, local address<IP>, global
address<IP>.
Interface- Fixed NAT mapping entry number<1 to 128>, Active interface
number<Wan1/2>.
Delete- Delete fixed mapping entry number<1 to 128>.
• Pat: Configure PAT parameters as follow:
Add:
Name- Specify any service name<name>.
Protocol- configure the transmit protocol<TCP or UDP>.
26
Chapter 5 Operation of CID
Port- Specify a port number<1 to 65534>.
Interface- Active interface number <Wan1/2>.
Server- Specify a LAN host<IP>, port number<1 to 65534>
Modify: Modify virtual server entry number<1 to 10>:
Name- Specify any service name<name>.
Protocol- configure the transmit protocol<TCP or UDP>.
Port- Specify a port number<1 to 65534>.
Interface-Active interface number <Wan1/2>.
Server- Specify a LAN host<IP>, port number<1 to 65534>
Delete: Delete PAT entry number <1 to 10>.
Rip: Configure parameters of RIP protocol as follow:
• State: Enable or Disable the RIP protocol.
• Lan: Configure RIP LAN parameters as follow:
Version: configure the version of RIP<1 or 2 >
Attrib: RIP attribute as:
Rip mode- <Disable or Enable>
Poison reserve- <Disable or Enable>
• Wan: Configure RIP WAN parameters as follow:
Version: configure the version of RIP<1 or 2 >
Attrib: RIP attribute as:
Rip mode- <Disable or Enable>
Poison reserve-<Disable or Enable>
Stp: Configure Spanning tree protocol parameters:
• State: Enable or Disable the STP.
• Priority: Configure bridging priority<0 to 65535>
• LAN: Configure LAN port operation and priority.
Port operation: <Enable or Disable >
Port priority:
<number>
27
Chapter 5 Operation of CID
• Wan: Configure WAN port operation and priority.
Port operation: <Enable or Disable >
Port priority:
5.4.5
<number>
Config-Routing
Add: Configure the static route: network<IP>, Subnet mask<mask>, default
gateway<IP>.
Delete: Delete the static route entry <1 to 20>
5.4.6
Config-Bridge
Add: Add a static entry, the parameters are as follow:
• MacAddress: Specify the MAC address.
• Lan1Port: Specify the bridge type of LAN1<Filter, Forward, Dynamic>
• Wan1Port: Specify the bridge type of WAN1<Filter, Forward, Dynamic>
Modify: Modify one entry number <1 to 20>.
• MacAddress: Specify the MAC address.
• Lan1Port: Specify the bridge type of LAN1<Filter, Forward, Dynamic>
• Wan1Port: Specify the bridge type of WAN1<Filter, Forward, Dynamic>
Delete: Delete the entry number<1 to 20>
5.4.7
Config-AccessConf
MaxUser: Configure the maximum number of telnet users<1 to 5>
GuestName: Change a guest’s name. The default is “guest”.
GuestPwd: Change a guest’s password. The default is “guest”
28
Chapter 5 Operation of CID
SuName: Change superuser’s name. The default is “tainet”.
SuPwd: Change superuser’s password. The default is “tainet”
5.4.8
Config-Reset2Dft
Reset all configurations to factory default value. Users can enter y or n.
5.5
Maintenance
5.5.1
Maintenance-Shdsl1(Shdsl2)
None: Monitor the circuit status, Fault and Performance.
Cm: Monitor the circuit status.
Fm: Fault monitor
Pm: Performance monitor
29
Chapter 5 Operation of CID
30
Chapter 5 Operation of CID
There are four types of PM parameter thresholds for combination of 15 minutes,
and one day performance monitoring. A TCA will be issued whenever the
monitored value has crosses the threshold setting. The PM parameter count in
seconds of the current 15-minute/1 day period and stores up to the 96 of the
latest 15-minute PM parameter count records.
5.5.2
Maintenance-Route
Monitor the routing table of system.
5.5.3
Maintenance-Bridge
Monitor the MAC forwarding table of system.
5.5.4
Maintenance–LanPktStatistic
None: Show the number of total transmitted and received packets on LAN
interface.
Tx: Show the number of total transmitted packets on LAN interface.
31
Chapter 5 Operation of CID
Rx: Show the number of total received packets on LAN interface.
5.5.5
Maintenance-WanPktStatistic
None: Show the number of total transmitted and received packets on WAN
interface.
Tx: Show the number of total transmitted packets on WAN interface.
Rx: Show the number of total received packets on WAN interface.
5.5.6
Maintenance–Time
Monitor the time and date setting of the system.
All TCA (Threshold Crossing Alert) are classified as WARNING. Table 5-1 show all
SHDSL alarms.
Table 5-1 SHDSL Alarms Description
Alarm Type
SHDSL_LOSW
Severity Class
MAJOR
Description
Failure of LOSW
SHDSL_LOSWS_QTR_TRHD
WARNING
15-minute LOSW TCA
SHDSL_LOSWS_DAY_TRHD
WARNING
1-day LOSW TCA
SHDSL_ES_QTR_TRHD
WARNING
15-minute ES TCA
SHDSL_ES_DAY_TRHD
WARNING
1-day ES TCA
SHDSL_SES_QTR_TRHD
WARNING
15-minute SES TCA
SHDSL_SES_DAY_TRHD
WARNING
1-day SES TCA
SHDSL_UAS_QTR_TRHD
WARNING
15-minute UAS TCA
32
Chapter 5 Operation of CID
SHDSL_UAS_DAY_TRHD
WARNING
1-day UAS TCA
SHDSL_LOSWS_FE_QTR_TRHD
WARNING
15-minute FE LOSW TCA
SHDSL_LOSWS_FE_DAY_TRHD
WARNING
1-day FE LOSW TCA
SHDSL_ES_FE_QTR_TRHD
WARNING
15-minute FE ES TCA
SHDSL_ES_FE_DAY_TRHD
WARNING
1-day FE ES TCA
SHDSL_SES_FE_QTR_TRHD
WARNING
15-minute FE SES TCA
SHDSL_SES_FE_DAY_TRHD
WARNING
1-day FE SES TCA
SHDSL_UAS_FE_QTR_TRHD
WARNING
15-minute FE UAS TCA
SHDSL_UAS_FE_DAY_TRHD
WARNING
1-day FE UAS TCA
SHDSL_ATN_TRHD
WARNING
Attenuation TCA
SHDSL_FE_ATN_TRHD
WARNING
FE Attenuation TCA
SHDSL_SNM_TRHD
WARNING
SNR Margin TCA
SHDSL_FE_SNM_TRHD
WARNING
FE SNR Margin TCA
Up to 200 alarm records can be stored without the use UNMS. Many more can be
logged in Database if UNMS is used.
Line Status: The possible SHDSL operational states are “Idle_State",
"Handshaking", "Training", "Sync Hunting", "Connected", "Disconnect",
"Analog_Loopback", "Remote_Digital_Loopback", "Digital_Loopback",
"Analog_Loopback_fail", “Remote_Digital_Loopback_fail",
"Digital_Loopback_fail", "Port_disable", "Port_Has_Been_Reset",
"Unknown_State".
Users can view any historical performance by selecting ether port.
5.6
ShowConf
ShowConf menu is used to show all the configurations of entire equipment.
33
Chapter 5 Operation of CID
5.6.1
ShowConf-SysInfo
5.6.2
ShowConf-Interface
None: Show parameters of both LAN and WAN interface.
LAN: Show the parameter of LAN interface.
WAN: Show the parameter of WAN interface.
5.6.3
ShowConf-Shdsl
34
Chapter 5 Operation of CID
5.6.4
ShowConf-Dhcp
None: Show parameters of both Generic and Fixed DHCP settings.
Generic: Show the parameter of Generic DHCP parameter.
Fixed: Show the parameter of Fixed DHCP parameter.
5.6.5
ShowConf-DnsProxy
5.6.6
ShowConf–IpShare
35
Chapter 5 Operation of CID
5.6.7
ShowConf–Rip
5.6.8
ShowConf–Route
5.6.9
ShowConf–Bridge
36
Chapter 5 Operation of CID
5.6.10
ShowConf–Stp
5.6.11
ShowConf–AccessConf
5.6.12
ShowConf–Bert
37
Chapter 5 Operation of CID
5.7
Utility
5.7.1
Utility-Upgrade
TFTP software upgrade is supported. Users can specify the IP address of TFTP
server for downloading.
Tftpserver: Users must specify an IP address of TFTP server for
downloading.
ApImage:
•
TFTP server: <IP>.
•
Filename: <name>.
Bootstrap2:
•
TFTP server: <IP>.
•
Filename: <name>.
38
Chapter 5 Operation of CID
Users may press “Ctrl+C” to stop the download procedure if TFTP server got
problem to send codes.
5.7.2
Utility-Ping
Users can do the ping test between two equipments. Specify an IP address of
remote site, number of packets to send (- t means the ping test continue until
users press “Ctrl-C” to stop it.) and data size.
39
Chapter 5 Operation of CID
5.7.3
Utility-Bert
BertStart: Start or Stop the Bert test.
BertTP: Generate test pattern. Possible values are 10E11, 10E15, 10E20
and 10E23.
SetBertTimer: Set the test period. The possible value is from 1 to 1000000
seconds.
BertErrorInsert: Set the error rate, the possible value are 0~7. (0,1 is no
error, x=2~7: 10E-x).
ResetErrorCount: Reset Bert error count. The possible value is y or n.
BertMonitor: Monitor the Bert status. As shown below:
For test and diagnostic purpose the S1400RL system provides various Loopback
paths, which are depicted in Figure 5-1 and Figure 5-2. They are Local Loopback
and Remote Loopback.
STU-C
(a)
STU-R
(c)
(b)
(d)
G.SHDSL
Ethernet
Figure 5-1 STU-C Side Activated Loopback
40
Ethernet
Chapter 5 Operation of CID
STU-C
(d)
STU-R
(c)
(b)
G.SHDSL
Ethernet
(a)
Ethernet
Figure 5-2 STU-R Side Activated Loopback
5.7.4
Utility-Loopback
Lookback: The possible modes are Normal, Local and Remote.
Loopback_Status: To start or stop the test. Possible values are START and
STOP.
5.7.5
Utility-SetTime
The system provides RTC (Real Time Clock) and supports BCD coded century,
year, month, date, day, hours, minutes, and seconds with automatic leap year
compensation valid up to the year 2300. Set the Date/Time to correctly
time-stamping the alarm or PM data report. The date/time will be stored in
non-volatile memory, so data will not be lost even when powering off the system.
41
Chapter 5 Operation of CID
Time1: Configure the date of the system as the time stamp:
•
Year: <2000 to 2300>.
•
Month: <1 to 12>.
•
Day: <1 to 31>.
Time2: Configure the date of the system as the time stamp:
5.8
•
Hour: <0~24>.
•
Minute: <0~60>.
•
Second: <0~60>.
Write
Before reboot the system, any modified parameters users made must be written
into flash memory through “write” or they will be invalid for next time system
restart. As it wrote after several seconds, the system will show “write configuration
successful!!” if the new configurations are written into memory successfully.
42
Chapter 5 Operation of CID
5.9
Reboot & Exit
Reboot: Part of new parameters users configured will be effective after system
reboot. Especially for LAN, WAN and routing configuration. A “Write” action
should be done before reboot, otherwise it will loose current configuration.
Exit: The operator can log out through “Exit” menu. And console port also
support automatic logout ability (auto-exit) if user did not operate any key in
5 minutes.
43
Appendix A
Appendix A Ordering Information
Table A-1 is the order information for your reference.
Table A-1 Order Information
Ordering No.
Product Code
Description
Scorpio 1400 SHDSL Modem/ NTU/ Router with LCD Panel
000-101-0061
000-101-0062
000-101-0059
000-101-0060
000-101-0049
Scorpio 1400RL
/AC/?
Scorpio 1400RL
/DC
Scorpio 1400RL/4W
/AC/?
Scorpio 1400RL/4W
/DC
Scorpio 1400RL/4W
/AC+DC/?
/?
2-wire SHDSL standalone unit with LCD and
keypad operation panel, with Ethernet interface,
with built-in AC power module;
2-wire SHDSL standalone unit with LCD and
keypad operation panel, with Ethernet interface,
with built-in DC power module;
4-wire SHDSL standalone unit with LCD and
keypad operation panel, with Ethernet interface,
with built-in AC power module;
4-wire SHDSL standalone unit with LCD and
keypad operation panel, with Ethernet interface,
with built-in DC power module;
4-wire SHDSL standalone unit with LCD and
keypad operation panel, with Ethernet interface,
with built-in AC and DC power module;
Specify power cord
North American power cord, 3-pin, 10A/125V, 6
330-010-0001
/A
330-010-0002
/E
330-010-0003
/B
British power cord, 3-pin, 10A/250V, 13A fuse
330-010-0006
/I
India power cord, 3-pin, 6A/250V, 1.83M
330-010-0007
/C
China power cord, 3-pin, 10A/250V, 1.83M
feet
European power cord, 3-pin (round pin),
10A/250V, 1.83M
45
Appendix B
Appendix B
Menu Tree
The menu tree of LCD screen is shown in Table B-1. The default value of each parameter is
also listed for users’ reference.
Table B-1 LCD Menu Tree
Tier 1/ Tier 2
Configuration/System
Tier 3
OpMode
Tier 4
Tier 5
Bridge
Default Value
<
Router
LCD Backlight
Enable
<
Disable
Set2Dft
Disable
<
Enable
Configuration/Modem
Modem Type
CPE
<
CO
Rate Mode
Adaptive
<
Fixed
MAX Data Rate
<1,72>
36
MIN Data Rate
<1,72>
3
1544 Mode
Disable
<
Enable
Configuration/Interface
SHDSL
Power Backoff
Enable
<
Disable
PSD
Sym
<
Asym
4 WIRE
Off
<
On
TransmisMode
Annex_A
<
Bnnrx_B
LAN
WAN
LAN IP Address
0.0.0.0
LAN NetMask
0.0.0.0
WAN Enable
Enable
<
Disable
WAN IP Address
Link Type
0.0.0.0
Ethernet
<
PPP
WAN Netmask
V1.50
Status/SW Version
Status/Modem Status
0.0.0.0
DSL1 Snr Margin
0
47
Appendix B
Tier 1/ Tier 2
Test/Loopback
Tier 3
Tier 4
Tier 5
Default Value
DSL2 Snr Margin
0
Normal
<
CO LL
CO RL
CPE LL
CPE RL
Test/ Pattern test
Test Patten
2E23
<
2E11
2E15
2E20
Test Start
Stop
<
Start
Test Times
10
100
<
1000
10000
100000
Insert error
<0~7>
0
Reset Error
Disable
<
Enable
Test Status
Error Count
0
Bit Count
0
Elapse Time
0
14001400
Security/ Password Edit
Security/ Front Lock
Enable
<
Disable
Write Config
Disable
<
Enable
Reboot
Disable
<
Enable
48
Appendix B
In addition to LCD menu tree, there is a VT-100 menu tree for CID port used, as Table B-2.
Both of them are almost the same but a little bit different. As the detail descriptions for each
menu, please refer to the chapter 5. The tree structure is as follow for reference:
Table B-2 VT-100 Menu Tree
Tier 1
Tier 3
/ Tier 2
Tier 4
Tier 5
Tier 6
QConfig/OpMo
Bridge
de
Default
Tier 7
Value
<
Router
QConfig/ Lan
QConfig/ Wan
Address
State
IP Address
0.0.0.0
net Mask
0.0.0.0
Disable
<
Enable
Address
LinkType
IP Address
0.0.0.0
net Mask
0.0.0.0
Ethernet
<
PPP
QConfig/
EndpointMode
CPE
<
CO
Config/ System OpMode
Bridge
<
Router
HostName
(name)
SOHO
PHYType
Ful
<
Half
Config/
Interface
Lan <1~1>
Wan<1~1>
Lan1
Wan1
Address
State
IP Address
0.0.0.0
Subnet
Mask
0.0.0.0
Enable
<
Disable
Address
LinkType
Ethernet
IP Address
0.0.0.0
Subnet
Mask
0.0.0.0
<
PPP
Config/ Shdsl
EndpointMode CPE
<
CO
RateMode
Adaptive
<
Fixed
MinRate
<1~36>
3 (2Wire mode)
49
Appendix B
Tier 1
/ Tier 2
Tier 3
MaxRate
Tier 4
Tier 5
Tier 6
Default
Tier 7
Value
<2~72>
6 (4Wire mode)
<1~36>
6 (2Wire mode)
<2~72>
72 (4Wire mode)
Rate1544Enabl
Disable
e
<
Enable
PsdMode
Symmetrical
<
Asymmetrical
TransmissionM
Annex-A
ode
<
Annex-B
PowerBackoff
Enable
<
Disable
4WireMode
Disable
<
Enable
PmThreshold
15minFirst
15minSecond
1dayFirst
(ES)
<0~900>
60
(SES)
<0~900>
60
(UAS)
<0~900>
60
(LOSWS)
<0~900>
60
(ES 1 day)
<0~86400
>
300
<0~86400
(SES 1 day)
>
300
<0~86400
1daySecond
(UAS 1 day)
(LOSWS 1
day)
SNM_Att_Thr
Config/
Protocol
Dhcp
State
>
300
<0~86400
>
300
(SNR Margin) <0~900>
0
(Attenuator)
35
<0~900>
Disable
<
Enable
Generic
Gateway
(IP
Address)
192.168.1.1
Netmask
(net mask)
255.255.255.0
IpRange
(IP
Address)
140.92.64.130
(number)
20
(IP
Dns1
50
Address)
192.168.1.1
Appendix B
Tier 1
/ Tier 2
Tier 3
Tier 4
Tier 5
Tier 6
Default
Tier 7
Value
(IP
Dns2
Address)
(IP
Dns3
Fixed
Add
Address)
(MAC)
(IP
Address)
Delete
DnsProxy
IpShare
<1~10>
Dns1
(IP Address)
140.92.61.55
Dns2
(IP Address)
140.92.1.50
Dns3
(IP Address)
State
Disable
Enable
Nat
Local
Range
<1~5>
(IP Address) 172.16.1.10
<1~253>
Global
Delete
<1~5>
Range
<1~5>
10
(IP Address) 10.1.1.10
<1~253>
Interface
<1~5>
<2>
Fixed
Delete
<1~5>
Modify
<1~128>
2
(IP Address) 172.16.1.120
(IP Address) 10.1.1.120
Interface
<1~128>
<2>
Pat
Add
Delete
<1~128>
Name
(name)
Protocol
TCP
UDP
Port
<1~65534>
Interface
<2>
Server
(IP Address)
<1~65534>
Modify
<1~10>
<more…>
Delete
51
<1~10>
2
<
Appendix B
Tier 1
Tier 3
/ Tier 2
Rip
Tier 4
State
Tier 5
Tier 6
Default
Tier 7
Disable
Value
<
Enable
Lan
Version
<1,2>
2
Attrib
RIP Mode Disable
<
Enable
Poison
Reserve
Wan<1~1>
Enable
<
Disable
<
Version
<1,2>
2
Attrib
RIP Mode Disable
<
Enable
Poison
Reserve
Stp
State
Disable
Enable
<
Disable
<
<
Enable
Priority
<0~65535>
Lan<1~1>
Port
Operation
32768
Enable
<
Disable
Wan<1~1>
Port Priority
<number>
128
Port
Operation
Enable
<
Disable
Port Priority
Config/ Route
Add
<number>
128
(net mask)
(IP address)
(Gateway)
Config/ Bridge
Delete
<1~20>
Add
MacAddress
(MAC)
00:00:00:00:00:00
Lan1Port
Filter
<
Forward
Dynamic
Wan1Port
Filter
<
Forward
Dynamic
Modify
<1~20>
MacAddress
(MAC)
Lan1Port
Filter
Forward
Dynamic
52
Appendix B
Tier 1
Tier 3
/ Tier 2
Tier 4
Tier 5
Wan1Port
Tier 6
Default
Tier 7
Value
Filter
Forward
Dynamic
Config/
AccessConf
Config/
Reset2Dft
Delete
<1~20>
MaxUser
<1~5>
5
GuestName
(name)
user
GuestPwd
(pass_conf)
user
SuName
(name)
tainet
SuPwd
(pass_conf)
tainet
Disable
<
Enable
Maintenance/
Shdsl<loop1>
None
<
Cm
Fm
Pm
Maintenance /
Shdsl<loop2>
None
<
Cm
Fm
Pm
Maintenance /
Route
<CR>
Maintenance /
Bridge
<CR>
Maintenance /
None
LanPktStatistic
<
Tx
Rx
Maintenance /
None
WanPktStatistic
<
Tx
Rx
Maintenance /
Time
<CR>
Maintenance /
ClearPmCount
<CR>
ShowConf/
SysInfo
<CR>
ShowConf/
Interface
None
<
53
Appendix B
Tier 1
Tier 3
/ Tier 2
Tier 4
Tier 5
Tier 6
Default
Tier 7
Value
Lan
Wan
ShowConf/
Shdsl
<CR>
ShowConf/
Dhcp
None
<
Generic
Fixed
ShowConf/
DnsProxy
<CR>
ShowConf/
Ipshare
None
<
PAT
Local
Global
Fixed
ShowConf/
Rip
<CR>
ShowConf/
Route
<CR>
ShowConf/
Bridge
<CR>
ShowConf/
Stp
<CR>
ShowConf/
AccessConf
<CR>
ShowConf/
Bert
<CR>
Utility/
Upgrade
TftpServer
(IP address)
172.16.5.33
ApImage
(IP address)
172.16.5.33
(File name)
BootStrap2
(IP address)
172.16.5.33
(File name)
Utility/
Ping
Utility/
Bert
(IP address)
Bertstart
No. of ping
<1~65534,-t>
Data Size
<1~1399>
Stop
None
<
Start
BertTP
2E23
2E23-1
2E11
2E15
54
Appendix B
Tier 1
/ Tier 2
Tier 3
Tier 4
Tier 5
Tier 6
Default
Tier 7
Value
2E20
SetBertTimer
<1~1000000>
100
BertErrorInsert <0~7>
0
ResetErrorCou
Yes/No
nt
Utility/
Loopback
BertMonitor
<CR>
Loopback
Normal
<
Local
Remote
Loopback_stat
<CR>
us
Utility/
SetTime
Timer1
<2000~2300>
<1~12>
<1~31>
Timer2
<0~24>
<0~60>
<0~60>
Write
<Yes,No>
Reboot
<Yes,No>
Exit
<Yes,No>
55
Appendix C
Appendix C Pins Assignment
The pin assignment for different interface of Scorpio 1400RL is depicted in the following
sections.
DB-9 Interface
The DB-9 connector interface is shown as Figure C-1.
Figure C-1
DB-9 Interface
For the pin definition of DB-9 interface, see Table C-1.
Table C-1 DB-9 Connector Pin Definition
DB9 Female
Signal
Source
2
TXD
DCE
3
RXD
DTE
5
Signal Ground
7
CTS
DTE
8
RTS
DCE
RJ-45 Interface
Figure C-2 illustrates the RJ-45 interface.
8
1
Figure C-2
RJ-45 Interface
Refer to Table C-2, Table C-3, see the pin definition of DSL RJ-45 connector and LAN RJ-45
connector respectively.
57
Appendix C
Table C-2 DSL RJ-45 Connector Pin Definition
RJ-45
Signal
3
Tip-2
4
Tip-1
5
Ring-1
6
Ring-2
Table C-3 LAN RJ-45 Connector Pin Definition
RJ-45
10Base-T Signal
1
TxD Twist Pair +
2
TxD Twist Pair -
3
RxD Twist Pair +
6
RxD Twist Pair -
58
Appendix D
Appendix D Troubleshooting
Trouble Shooting Table
1
Configured parameter values are lost after equipment restart
When user modifies or changes the parameters, the user should “write” the configurations
into the flash memory by entering the “Enable” menu, and then reboot the system by entering
the “Reboot--Enable” menu.
2
Console / Telnet / Web User Name and Password
When accessing the device through Telnet or the Web, the user will be prompted to enter the
password. User can try the default user name “tainet” (or “root”) and password “tainet” (or
“root”) to login.
3
Access denied
There are several conditions that will disable user’s access to the device via Console, Telnet
or the Web.
Message
Solution
Incorrect user
The password entered is incorrect. Check the user name and
password again.
59
Appendix E
Appendix E Trouble Report
Company
Local Representation
Purchase Order No
Equipment Serial No
Software Version
Please describe:
1. Testing Network Structure
2. Configuration
3. Testing Network Equipment
4. Trouble Description
E-MAIL:
TEL:
FAX:
Signature:
Date:
TAINET COMMUNICATION SYSTEM CORP.
FAX: 886-2-2658-3232
E-MAIL: [email protected]
61
/
/