1
INSTRUCTIONS FOR USE (Version 1.2)
IntegraMouse Plus
including accessories
ENGLISH
EN
DEAR CUSTOMER,
Thank you for choosing a LIFEtool product and for choosing to use the IntegraMouse Plus as
a valuable input device for your computer. These instructions for use contain useful and
important information. Please read this manual carefully before using IntegraMouse Plus for
the first time. LIFEtool and your authorised IntegraMouse dealer will be happy to answer your
questions. We wish you every success with your IntegraMouse Plus.
2
Contents
1. Contact .............................................................................................................................. 4
2. Notes on the instructions for use ....................................................................................... 4
3. Product information and use as per regulations ................................................................ 5
4. Safety instructions ............................................................................................................. 6
5. Scope of supply ................................................................................................................. 7
6. Product Description ........................................................................................................... 8
6.1
Components and operating elements ......................................................................... 8
6.2
Accessories and spare parts .................................................................................... 10
7. Commissioning ................................................................................................................ 12
7.1
Short introduction to initial operation......................................................................... 12
7.2
General Installation notes ......................................................................................... 12
7.3
Switching on and activating ...................................................................................... 14
7.4
Calibration ................................................................................................................ 15
7.5
Using the IntegraMouse Plus silicon tube ................................................................. 16
8. Application and functionality ............................................................................................ 17
8.1
Switching on the IntegraMouse Plus......................................................................... 17
8.2
Three operating modes: Mouse – Joystick – Cursor................................................. 17
8.3
IntegraMouse Plus energy saving mode................................................................... 21
8.4
Switching off the IntegraMouse Plus......................................................................... 21
8.5
Wake on USB ........................................................................................................... 21
9. Hygiene, maintenance and testing .................................................................................. 22
9.1
Cleaning the mouthpiece and changing the membrane............................................ 22
9.2
Cleaning the device .................................................................................................. 25
9.3
Recharging the battery ............................................................................................. 26
9.4
Metrological testing ................................................................................................... 26
10.
Permissible system ...................................................................................................... 27
11.
Ambient conditions ....................................................................................................... 29
12.
Waste disposal............................................................................................................. 30
13.
Frequently asked questions and answers .................................................................... 30
14.
Key to the symbols....................................................................................................... 32
15.
Product and performance data..................................................................................... 33
16.
Electromagnetic compatibility....................................................................................... 35
17.
Declaration of Conformity............................................................................................. 39
3
1.
CONTACT
MANUFACTURER'S ADDRESS:
LIFEtool Solutions GmbH
Hafenstraße 47-51
A-4020 Linz
AUSTRIA
INTERNET: www.integramouse.com
2.
NOTES ON THE INSTRUCTIONS FOR USE
Please read these instructions for use completely before first use
and keep them for reference for later use.
The triangle symbol indicates warnings, i.e. when failure to follow the
instructions may result in hazardous situations.
The information symbol indicates general notes and information.
The symbol with the snake on a green star indicates subject-specific
information, e.g. for medical personnel or hospital visitors.
Instructions for use are valid for the "IntegraMouse Plus" device version and its specific
accessories.
Issue date: 2012-09. Technical changes reserved.
4
3.
PRODUCT INFORMATION AND USE AS PER REGULATIONS
IntegraMouse Plus is a medical product made using the latest technology. It complies with
European standards and harmonised norms that are based on the Medical Device Directive
and has therefore been awarded the CE mark. Details of this can be found in Chapter 17
"Declaration of Conformity".
IntegraMouse Plus is a fully adequate computer mouse that is operated with the mouth. For
the operation of computer games, a joystick mode and a cursor mode are provided. This
allows persons who are no longer able to operate a traditional mouse to use a computer.
According to the Medical Device Directive IntegraMouse Plus compensates for disabilities to
enable the operation of a computer.
Possible users are persons with high-level paraplegia, with arms amputated on both sides or
advanced diseases such as muscular dystrophy, amyotrophic lateral sclerosis or multiple
sclerosis.
IntegraMouse Plus is connected to the computer by a USB cable and is Plug-and-Play
capable, i.e. it is recognised and installed completely automatically as a Human Interface
Device (HID). Power is also supplied via the USB cable. Alternatively the IntegraMouse Plus
can communicate with the computer via a wireless radio link connection in the 2.4 GHz ISM
Band. With this option, the power is supplied from the inbuilt battery or the power pack
included.
IntegraMouse Plus is mainly designed to be used in dry rooms, in stationary settings on a PC
or laptop. These include living rooms, clinics, rehabilitation centres, institutes, schools,
universities and similar. However, usage in dry outside areas i.e. on patios, is also possible.
The ambient temperatures during application must be between 10°C and 40°C. Avoid direct
sunlight.
The placing and positioning of the IntegraMouse Plus must not be changed during use (tilt
etc.) Also, the IntegraMouse Plus must not be influenced by external forces (for example,
accelerations).
The mouthpiece can be changed. Cleaning is possible according to Chapter 9 "Hygiene,
maintenance and testing". In clinical areas, the one-time use of the mouthpiece is strongly
recommended. Through this, hygiene and cleanliness are guaranteed, also during use by
several users (for example in public institutions) or during use in clinics and rehabilitations
centres, where the risk of an infection by more resistant germs is present.
5
4.
SAFETY INSTRUCTIONS
As with every medical product, there are a few things that must be noted in
order to ensure the safe and smooth operation of the IntegraMouse Plus:
•
Use this product only for the intended purpose according to these instructions for use.
Any other use is improper and therefore dangerous. The manufacturer cannot be held
responsible for damages which are caused by inappropriate or improper use.
•
Good head control and mouth motor skills are required for the operation of the
IntegraMouse Plus. Therefore the IntegraMouse Plus must not be used by persons
who suffer from e.g. uncontrolled spasms, Tourette's syndrome or epilepsy.
•
Only connect the device to sources of power as described in the instructions for use.
Otherwise dangers may occur.
•
Do not expose the device to extreme temperatures and avoid direct sunlight. This can
cause damage, especially to the built-in battery. Do not expose the device to any
shaking (knocking, dropping) and protect it from dirt and damp. However, should the
device be exposed to these conditions, allow your contract partner to examine it in
order to ensure that it is safe and usable.
•
If you do not use the device for extended periods of time, switch the device off and
store it according to Chapter 11 "Ambient conditions".
•
Use within strong electromagnetic fields can cause the device to malfunction.
•
The device must not be opened by the user as this would invalidate the manufacturer's
guarantee. Repairs may only be carried out by the manufacturer or its authorised
partners. Incorrect handling of the internal battery can especially lead to hazards.
•
Persons who produce a large amount of saliva must not use the IntegraMouse Plus.
•
The IntegraMouse Plus may be used in combination with the attached IntegraMouse
Plus silicon tube, only by such persons that are not in danger of swallowing such
objects.
•
The IntegraMouse Plus must not be used on moving systems (e.g. wheelchairs) or on
systems with changes of position (e.g. changes of inclination).
•
The IntegraMouse Plus must not be used for the operation of life-supporting or safety
devices such as emergency call installations, medication-dosing apparatus, medical
expert systems, etc.
•
Children under 3 years of age are not permitted to operate the IntegraMouse Plus.
•
The IntegraMouse Plus must not be used in connection with HF surgical units or
defibrillators.
•
A combination with other devices than those described in Chapter 10 "Permissible
system" is not permissible. Any other combination with medical products or other
6
products leads to the system integrator becoming the system manufacturer and also
taking on responsibility for the product.
•
During highly infectious diseases, the mouthpiece must only be used once. The
interval between changes of the mouthpiece must be determined by a doctor or an
expert advisor.
•
Take regular breaks when you are working with computers. Physical signs of tiredness
include eye pain, neck stiffness and other accompanying signs. A ten-minute break
per hour of work is recommended.
•
The device must not be used in atmospheres enriched with oxygen or other
combustible gases.
5.
SCOPE OF SUPPLY
1
3
2
5
7
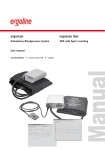
After opening the packaging, please check the
delivery for completeness and check whether the
IntegraMouse Plus or the accessories show any
sign of damage or defects. If this is the case,
contact your dealer immediately.
4
6
8
Figure 1: Scope of supply
7
No. LIFEtool
article number Quantity Description
1
11209
1
LIFEtool: IntegraMouse Plus
2
11210
1
LIFEtool: IntegraMouse Plus Connect (IM+Connect)
3
11211
2
LIFEtool: IntegraMouse Plus mouthpiece
4
11212
1
LIFEtool: IntegraMouse Plus USB cable
5
11213
12
LIFEtool: IntegraMouse Plus membrane
6
11214
1
LIFEtool: IntegraMouse Plus power pack
7
11218
1
LIFEtool: IntegraMouse Plus silicon tube
8
11225
1
Handbook/manual
6.
PRODUCT DESCRIPTION
6.1
Components and operating elements
1
2
1. IntegraMouse Plus
2. Mouthpiece with membrane
3. Silicon tube
3
4. IM+Connect
4
Figure 2: Components of the IntegraMouse Plus
8
5
2
6
3
4
1
Figure 3: Operating elements on the IntegraMouse (left) and IM+Connect (right)
1. ON/OFF key and calibration
2. Battery power display
3. Joystick mode display (J): Analogue joystick with key 1 and key 2
4. Cursor mode display (C): Cursor keys, space key and enter key
5. "Connect" key
6. Standby LED
7. USB port
8. Jack socket: enables connection of an external sensor (3.5 mm mono jack) for the
manual change between the three operating modes mouse - joystick - cursor
8
7
Figure 4: Reverse side of the IntegraMouse Plus
All operating elements are latex free and free from poisonous components.
9
6.2
Accessories and spare parts
An overview of the technical data can be found in Chapter 15 "Product and
performance data".
IntegraMouse Plus Connect (IM+Connect)
The IM+Connect is plugged into the USB port of the computer and serves as a radio receiver
in wireless mode.
IntegraMouse Plus mouthpiece
The mouthpiece is in direct contact with the user's lips and is therefore the applied part. The
mouthpiece is removable; therefore it can be replaced or cleaned separately.
The applied part "mouthpiece" is of type B.
IntegraMouse Plus power pack
The power pack is used for charging the battery and also for supplying the IntegraMouse
Plus with power in wireless mode. For safe operation, only use this power pack!
IntegraMouse Plus USB cable
The USB cable is used to connect the IntegraMouse Plus with the computer in cableconnected mode. The internal battery of the IntegraMouse Plus is also charged at the same
time. For safe operation, only use this USB cable!
IntegraMouse Plus membrane
The membrane is necessary for the sucking/blowing function of the IntegraMouse Plus and
also functions as a mechanical protective barrier to the electronics. The membrane should
regularly be checked for damage and replaced.
IntegraMouse Plus silicon tube
If you prefer a soft surface on the mouthpiece, the silicon tube can be placed over the
mouthpiece. This can make it more comfortable to use. Pay attention to the instructions for
safe use of the silicon tube in Chapter 7.5. "Using the IntegraMouse Plus silicon tube".
10
IntegraMouse Plus mounting system
The mounting system is used for flexible installation and securing of
the IntegraMouse Plus in the working position desired. The mounting
system can be set up, for example, on the table or on the bed.
Not included in the scope of delivery – Contact the manufacturer or
your dealer for further information.
Figure 5: Mounting system
Ensure that the IntegraMouse Plus cannot be installed with the mounting system
on moving systems, e.g. on wheelchairs. There is a danger of injury, e.g. when
driving over obstacles.
The following optional articles can be supplied on request as deliverable accessories:
LIFEtool
article number Description
11216
LIFEtool: IntegraMouse Plus membranes, 5 pack
11217
LIFEtool: IntegraMouse Plus mouthpiece, 5 pack
11218
LIFEtool: IntegraMouse Plus silicon tube
11224
LIFEtool: IntegraMouse Plus mounting system
The following optional articles can be obtained on request as spare parts:
LIFEtool
article number Description
11220
LIFEtool SPARE PART: IntegraMouse Plus Connect
11221
LIFEtool SPARE PART: IntegraMouse Plus USB cable
11222
LIFEtool SPARE PART: IntegraMouse Plus power pack
11
7.
COMMISSIONING
7.1
Short introduction to initial operation
•
Install the mounting system recommended by LIFEtool or by your LIFEtool dealer on
your desired workstation.
•
Carefully place the mouthpiece and membrane on the IntegraMouse Plus.
•
Position the IntegraMouse Plus on the stand. The bracket of the IntegraMouse Plus
has three openings for left, right and bottom mounting.
•
Move the device into a working position which is balanced and comfortable for the
user.
•
For initial use we recommend operation with the cable connected, in order to
guarantee the charging of the internal battery. For this, connect the IntegraMouse Plus
to your computer via the USB cable supplied.
•
The IntegraMouse Plus switches on automatically and the calibration process is shown
through the running LEDs.
Do not move the IntegraMouse Plus during calibration!
•
The operating system of your computer automatically recognises and installs the
IntegraMouse Plus as a standard mouse.
•
After the installation has been completed, the IntegraMouse Plus is ready for use.
Detailed instructions on initial operation and use can be found on the following pages. In
addition, you can watch training videos for operation at www.youtube.com (enter keyword
‘IntegraMouse’.
7.2
General Installation notes
The IntegraMouse Plus and also the IM+Connect are "Plug and Play" capable and function
with standard USB drives. This means that they are automatically recognised and installed by
common operating systems after being plugged in. The IntegraMouse Plus is thereby
automatically recognised as a standard mouse, standard joystick and keyboard.
The installation process usually runs in the background (dependant on the operating system).
Therefore the IntegraMouse Plus is ready to be used after only a short time.
During initial installation it takes a short time until the IntegraMouse Plus is
ready for use. When plugging in the IntegraMouse Plus to a computer that is
already known, the IntegraMouse Plus is ready for use straight away.
12
Installing the IntegraMouse Plus and components
Install the stand recommended by LIFEtool or by your LIFEtool dealer on your desired
workstation. The bracket of the IntegraMouse Plus has three openings for left, right and
bottom mounting. Secure the IntegraMouse Plus on the stand in the intended mounting place
with the locknut (Figure 7) and then bring the IntegraMouse Plus into the final desired
working position (Figure 6).
Figure 7: Installing the IntegraMouse Plus
Figure 6: Correct working position
Do not use the IntegraMouse Plus on mobile or moving systems. Ensure that the
IntegraMouse Plus is positioned away from your face so that no hazards can
arise, e.g. by a third person bumping into you. Be careful where you place the
available cable.
In order to avoid collisions with the IntegraMouse Plus, ensure that the user first
of all assumes an ergonomic sitting and working position in front of the screen
and that the IntegraMouse Plus is only then brought into the mouth of the user
in a fatigue-proof working position.
Ensure that you have enough space in which to work and a good view of the
screen. Pay attention to your position in relation to sources of disturbance, e.g.
dazzling sunlight through windows. Lack of ergonomics can lead to eye pain,
headaches or muscle tension.
The IntegraMouse Plus can also be used in an inclined or lying position. It is
important that the calibration, e.g. after plugging in the USB cable, only occurs
after setting up the workstation. You can recalibrate the position at any time by
quickly pressing the ON/OFF button.
13
7.3
Switching on and activating
Next you must decide in which operating mode you wish to operate the IntegraMouse Plus.
•
Connected by cable, i.e. directly connected to the computer via USB cable
•
Wireless transmission with battery powered operation of the IntegraMouse Plus
•
Wireless transmission with operation of the IntegraMouse Plus via the power pack
included
IntegraMouse Plus in cable-connected mode
1. Connect the IntegraMouse Plus to your computer via the USB cable supplied.
2. The IntegraMouse Plus switches on automatically and the calibration process is shown
through the running LEDs.
If the IntegraMouse Plus is in wireless mode, cable-connected operation can be
initiated during operation as described above. Wireless mode is then
automatically deactivated and the battery is charged.
IntegraMouse Plus in wireless mode with battery operation
In order to use wireless mode, IM+Connect is required.
1. Insert the IM+Connect into one of the computer's USB ports.
2. Switch the IntegraMouse Plus on by pressing the ON/OFF button. The calibration
process starts and will be shown by the running LEDs.
3. After successful connection, the green LED on the IM+Connect and the IntegraMouse
Plus is ready for use.
Ensure that the battery of the IntegraMouse Plus is charged enough when in
wireless mode. More information on the charging display can be found in
Chapter 9.3 "Recharging the battery".
The IntegraMouse Plus and IM+Connect must be coupled for use. This linking-up is carried
out as standard before delivery and need not be carried out by the user.
When replacing the IM+Connect or in case of problems with the wireless connection, the
linking procedure can be carried out manually as follows:
14
Linking up IntegraMouse Plus and IM+Connect
1. Disconnect the IntegraMouse Plus from the power pack or the USB cable.
2. Switch off the IntegraMouse Plus (see Chapter 8.4).
3. Insert the IM+Connect into one of the computer's USB ports.
4. Press the "Connect" button on the top of the IM+Connect with the help of a sharp
object (e.g. ballpoint pen, paper clip,...). The linking process starts. The green LED
on the IM+Connect flashes.
5. Switch on the IntegraMouse Plus by pressing the ON/OFF button and keep this
pressed down for about 3 seconds (Warning! The IntegraMouse must be switched
off and must not be connected to the power pack). After the running lights have
come on once, the blue LEDs on the IntegraMouse Plus begin to flash alternately.
6. After successful connection, the green LED on the IM+Connect and the IntegraMouse
Plus is ready for use.
IntegraMouse Plus in wireless mode with supply via the power pack
1. Insert the IM+Connect into one of the computer's USB ports.
2. Connect the IntegraMouse Plus to a plug using the power pack.
3. The IntegraMouse Plus switches on automatically and the calibration process is shown
through the running LEDs.
4. After successful connection, the green LED on the IM+Connect and the IntegraMouse
Plus is ready for use.
7.4
Calibration
Before use, the IntegraMouse Plus must be calibrated in its relevant location. As a rule, this
happens automatically directly after switching on and plugging in the IntegraMouse Plus.
Automatic calibration
Automatic calibration always occurs after plugging in and switching on the IntegraMouse
Plus.
Do not move the IntegraMouse Plus during the calibration process and do not
change its position or situation. This could lead to incorrect calibration and
therefore to malfunctioning of the IntegraMouse Plus and make recalibration
necessary.
15
Manual calibration
During long periods of work it can be necessary to begin a manual calibration, e.g. after
readjusting the device or weight changes in the mouthpiece due to the collection of moisture
or in strong changes in the light conditions (sunlight).
To begin manual calibration you have the following options:
By quickly pressing the ON/OFF button
By the following sucking/blowing combination: Blow for 3 seconds, suck for 3 seconds with
max. 1 second pause in between.
The calibration occurs automatically for the selected mode and is displayed by running LEDs
on the IntegraMouse Plus.
Sucking/blowing combination for calibration by the user:
Blow for 3 seconds - Suck for 3 seconds
Maximum pause between both actions: 1 second
7.5
Using the IntegraMouse Plus silicon tube
If you prefer a softer surface on the mouthpiece, push the
silicon tube included over the mouthpiece opening, up to
the second groove, see Figure 8. Carry out calibration
after putting on the silicon tube. Check regularly whether
the silicon tube is still completely pressed on and correct
the position if need be.
Figure 8: Correct placing of the
silicon tube.
Never use any other than the original silicon tube and always ensure that the
silicon tube is sitting securely on the mouthpiece. Only put the mouthpiece so
far into your mouth that you cannot extend your lips and teeth over the silicon
tube.
The silicon tube may only be used by persons that are not in danger of
swallowing such objects. Danger of suffocation!
16
8.
APPLICATION AND FUNCTIONALITY
The IntegraMouse Plus is an input device for your computer. The input device works as a
standard computer mouse (mouse mode) or optionally as a joystick (joystick mode) or as a
keyboard (cursor mode). Movements of the mouthpiece by the mouth are captured by a
sensor. A small deflection of the mouthpiece is enough to cause the controller to respond. As
well as movement, sucking and blowing on the mouthpiece are also used for input (e.g. left
and right mouse click).
Only put the mouthpiece so far into your mouth that your teeth reach the groove
on the mouthpiece. If you have put the silicon tube on, ensure that it is seated
securely and only put the mouthpiece so far into your mouth that you cannot
extend your lips and teeth over the silicon tube.
8.1
Switching on the IntegraMouse Plus
The IntegraMouse Plus can be switched on in the following ways:
•
Plug in the live USB cable or ensure a power supply via USB (switching on the
computer).
•
Plug in the power pack and connect to the mains.
•
Hold the ON/OFF button for at least 300 ms.
During switching on, the IntegraMouse Plus is calibrated; all LED displays light up one after
the other as running lights. The IntegraMouse Plus is then in mouse mode.
The IntegraMouse Plus must not be moved during calibration.
During the running light sequence you can also recognise possible defective
LEDs as these will not light up.
8.2
Three operating modes: Mouse – Joystick – Cursor
The active operation mode is shown by blue LEDs on the front of the IntegraMouse Plus (see
table 1). The display LED for joystick mode is marked with "J"; the one for cursor mode with
"C". If one of the two LEDs is lit, the relevant mode is active. If neither of the LEDs is
switched on, the mouse mode is active.
LED "J"
Off
blue
Off
LED "C"
Off
Off
blue
Mode
Mouse mode
Joystick mode
Cursor mode
Table 1: Diagram of the operating modes
17
After plugging in and activating, the IntegraMouse Plus is automatically in
mouse mode.
Mouse mode (mouse function)
Small movements of the mouthpiece cause the mouse pointer on the screen to move
correspondingly. In the same way as a normal computer mouse it can be moved across the
screen in a continuous and dynamic way, from very slowly to very quickly and placed
accurately to the pixel. To steer the mouse pointer, place the mouthpiece between your lips
and press it with lip movements in the desired direction in which the mouse pointer should
move across the screen.
The mouse buttons are activated by sucking and blowing. In the standard configuration the
left mouse button is activated by short sucking on the mouthpiece opening and the right
button is activated by short blowing on the mouthpiece opening.
Two short sucks equate to a double click of the left mouse button. A short suck and holding
the air in the mouthpiece enables objects to be moved across the screen ("drag & drop").
The characteristics of the mouse pointer, e.g. the speed, can be set individually
in the respective operating system. The assignments of left and right clicks can
also be changed there. For more information: see the help function of your
operating system.
If it is not possible for the user to activate the mouse clicks by sucking and
blowing, the clicks can be actioned through additional auto-click software. Your
LIFEtool dealer would be glad to advise you about this.
In some cases, other, external sensors can also be used. Your LIFEtool dealer
would be happy to advise you about the choice of suitable sensors and switch
interfaces.
18
Joystick mode (joystick configuration)
The joystick mode enables the operation of computer games, which can be played using a
Windows standard joystick with two buttons. The movement of the mouthpiece effects the
analogue deflection of the joystick. Movements can be carried out dynamically from slowly
(small displacement) to quickly (larger displacement). Sucking and blowing correspond to the
joystick keys 1 and 2. Activated joystick mode is indicated by the lighting-up of the
corresponding blue LED.
The basic calibration and further settings of the joystick can be carried out
individually in the settings menu of the respective operating system. For more
information see the help function of your operating system.
Cursor mode (keyboard function)
Cursor mode enables the operation of computer games and programmes that can be
controlled with the cursor keys (arrow keys), the space key and the enter key. The four/eight
directions are actuated by the movement of the mouthpiece. The space key and the enter
key are available through sucking and blowing. Activated cursor mode is indicated by the
lighting-up of the associated blue LED.
Additional notes (apply to all three operating modes)
Many games enable the adaptation of controls and the configuration of the keys
for operation. For this, use the instructions for your game.
In order to operate a complete keyboard, e.g. in order to enter letters or whole
texts, to compose e-mails, and so on, the operating system of your computer
usually makes an on-screen keyboard available. Your LIFEtool dealer will be
glad to advise you on more powerful on-screen keyboards that are available at
cost (with additional setting options).
Many applications, especially games, can be terminated using the ESC key. This
function is also available to users of the IntegraMouse Plus by means of the
following sucking/blowing combination:
In quick succession: blow for 3 seconds – briefly suck 2 x – briefly blow 1 x.
19
Switching between the modes
After plugging in and activating, the IntegraMouse Plus is in mouse mode as standard. In
order to switch between modes, you have the following options:
•
By connecting and using an external sensor.
•
By the following sucking/blowing combination: two quick blows, then two quick sucks
(within 2 seconds) and one quick blow (within 1 second).
Through this the modes are switched through in turn:
Mouse mode
Joystick mode
Cursor mode
Figure 9: Sequence of the operating modes
Sucking/blowing combination for a change of modes by the user:
In quick succession: 2 blows - 2 sucks - 1 blow.
The modes can only be used one after another, not at the same time. The
operation of programmes which require the use of several input devices (e.g.
games with keyboard and joystick) is only possible if the input devices are not
used at the same time.
Overview of the assignment of the actions in the relevant modes
The standard assignments in the relevant modes can be seen in this table:
Mouthpiece action
Mouse mode
Joystick mode
Cursor mode
Movement up
Movement down
Mouse pointer goes up
Mouse pointer goes
down
Mouse pointer goes left
Mouse pointer goes
right
Left mouse button
Right mouse button
Joystick up
Joystick down
Arrow up
Arrow down
Joystick left
Joystick right
Arrow left
Arrow right
Button 1
Button 2
Space key
Enter or Return
Movement left
Movement right
Sucking
Blowing
Table 2: Standard assignments in the relevant operating modes
Combined movements are also possible, e.g. diagonals.
20
8.3
IntegraMouse Plus energy saving mode
In order to save power during battery operation, the IntegraMouse Plus has an in-built
energy-saving mode. This begins automatically, when:
•
the device is not used for 30 seconds.
•
the computer to which the IntegraMouse Plus is connected goes into standby mode.
Energy-saving mode ends automatically, when:
•
the user moves the mouthpiece or quickly presses the ON/OFF button (do not hold
down).
•
a power-supplying USB cable is plugged in.
•
the computer to which the IntegraMouse Plus is connected wakes up from standby
mode again.
Energy-saving mode is basically not noticeable to the user, because the
IntegraMouse Plus activates again immediately on interaction. (Attention: only
with movement of the mouthpiece, but not sucking or blowing!
Energy saving mode also uses battery power. When you no longer need the
IntegraMouse Plus or will not use it for a longer time, switch it completely off.
8.4
Switching off the IntegraMouse Plus
The IntegraMouse Plus can only be switched off in active mode (LEDs for the battery power
display light up). If the IntegraMouse Plus is in energy-saving mode, this can be exited by a
short press of the ON/OFF key.
By pressing the ON/OFF key for at least 3 seconds the IntegraMouse Plus can be switched
off. All LEDs on the IntegraMouse Plus go out.
When battery power is low, the IntegraMouse Plus switches itself off
automatically. When it is switched off, no more energy is needed from the
battery.
8.5
Wake on USB
The "Wake on USB" function permits the inactive computer to activate the connected
IntegraMouse Plus on the USB port. This function must be supported by the hardware and by
the operating system. Further information can be found in the instructions for your computer
and in its operating system.
"Wake on USB" with the IntegraMouse Plus only works via the connected USB
cable (not in wireless mode) and only on the USB ports of the computer that are
directly on the mainboard.
21
9.
HYGIENE, MAINTENANCE AND TESTING
In order to guarantee the long and safe operation of the IntegraMouse Plus, the following
activities are necessary:
• Regular cleaning and regular changing of the mouthpiece.
• Regular changing of the membrane
• Regular cleaning of the device
• Regular, proper charging of the battery in wireless mode
• Regular metrological testing and maintenance
• General care when dealing with the individual components
The individual points are described below in more detail.
In the case of errors or problems with the IntegraMouse Plus, do not try to repair
the product or its accessories. This can invalidate the guarantee and severely
damage the device. Always contact the manufacturer or your dealer.
The life expectancy of the IntegraMouse Plus has been set by the manufacturer
at 5 years (from the date of manufacture - see the serial number of the device).
After this date, no service can be guaranteed.
9.1
Cleaning the mouthpiece and changing the membrane
Two mouthpieces are included with the IntegraMouse Plus in order to ensure regular
cleaning without interrupting use.
The replacement and subsequent cleaning of the mouthpiece should be carried
out in the home about once per week. In the case of higher levels of
contamination or in the case of illness, more frequent cleaning is
recommended.
If there is visible damage or there are signs of wear and tear on the mouthpiece,
use a new mouthpiece and dispose of the old mouthpiece.
22
For thorough cleaning, disinfection with boiling water (thermo disinfection) is
recommended. Then proceed as follows:
1. Pull the mouthpiece off forwards in a straight movement. Removal is very simple and
possible without using larger amounts of force (see Figure 10).
Figure 10: Removing the mouthpiece
2. Remove the membrane by pushing and dispose of it (see Figure 11)
Figure 11: Removing the membrane
3. Heat pure, clear water and bring it to the boil (100°C).
4. Place the mouthpiece carefully into the boiling water. In order to do this, use an aid,
e.g. a spoon.
5. When doing this, ensure that the mouthpiece is completely covered with water.
Possible air bubbles on the surface of the mouthpiece, also on the inner side, must
be removed (e.g. by stirring), so that the surface is completely covered with boiling
water.
6. Leave the mouthpiece for at least 3 minutes and ideally 5 minutes, in boiling water.
Ensure that the water temperature does not fall below 93°C.
7. Remove the mouthpiece with a tool (e.g. spoon) and leave the mouthpiece to drip and
dry on a clean surface.
8. Before you use the cleaned mouthpiece again, ensure that it is completely dry and has
cooled to room temperature.
23
9. Any limescale can be removed using a soft cloth.
10. After drying and cooling, place a new membrane on the mouthpiece (see figure 12).
Ensure that the membrane is properly placed on the mouthpiece (see figure 13).
Figure 12: Placing the membrane
Figure 13: Correct position of the
membrane
11. Carefully place the mouthpiece on the IntegraMouse Plus again. Pay attention to
the direction in which you placed it on and move the mouthpiece in a straight
movement without using force (see figure 14).
Figure 14: Placing the mouthpiece
Warning! Danger of scalding!
Disposal of the mouthpiece is recommended after no more than 6 months.
In the clinical sector the mouthpiece should be treated as a disposable product.
The interval between changes of the mouthpiece must be determined by a
doctor or by specialist staff (advisor, hygiene representative...). Special safety
precautions must especially be obeyed when there is suspicion of infectious
diseases.
24
The mouthpiece or other components of the IntegraMouse Plus are not intended
for any kind of sterilisation, not even e.g. for sterilisation with steam or gamma
sterilisation.
9.2
Cleaning the device
Clean the device regularly, about once a week. The parts of the IntegraMouse Plus,
mouthpiece, IM+ connect, power pack including cable and stand can be cleaned at any time
by wiping with a damp, lint-free cloth.
Never use sharp cleaning objects to clean the components as this could destroy
the surface. The IntegraMouse Plus and IM+Connect contain sensitive
electronics. Never immerse these components in water and also never use
running water to clean them, otherwise you could destroy the device.
In the clinical sector multiple use of the device by several users is forbidden.
The re-use of the mouthpiece, the membrane or the silicon tube is also
forbidden. Use these three components as disposable products and change
them regularly after use, e.g. once a day. The other components should be used
in accordance with the cleaning and disinfection plan.
Disinfection by wiping
In special environments, e.g. hospitals, it is necessary to carry out regular disinfection by
wiping the device. The IntegraMouse Plus can be disinfected with any surface disinfectant
product that is intended for the disinfection of LEXAN polycarbonate and aluminium. Under
no circumstances may any components of the IntegraMouse Plus be subjected to steam or
water sterilisation.
The following cleaning products can be used:
Mikrozid Sensitive liquid or Mikrozid Sensitive wipes from the company Schülke & Mayr
GmbH (www.schuelke.com).
Carry out the disinfection by wiping according to the manufacturer's instructions and ensure
that no moisture seeps into the IntegraMouse Plus.
25
9.3
Recharging the battery
Battery power display
On the front of the IntegraMouse Plus there is a display consisting of two light-emitting diodes
(LEDs) in the form of a battery, which displays the battery power and the charging progress.
LED 1
LED 2
Battery power
Note
green
green
flashing
orange
green
Off
Off
100% - 71%
70% - 21%
below 20%
Battery fully charged
Battery OK, charging not yet required
Low battery, please charge
Table 3: Battery power display
Charging
The charging of the battery occurs via the power pack included or by connection to the
computer via the USB cable. In both cases, use the mini USB socket on the reverse of the
IntegraMouse Plus. Plugging in is only possible in one direction. The charging process
begins immediately after plugging in and takes 2-3 hours. Progress is indicated on the battery
display:
LED 1
LED 2
Battery power
Note
orange
Off
green
green
Battery is
being charged
Battery fully
charged
Leave power pack plugged in until charging
process is completed.
Power pack can be unplugged
Table 4: Charging process display
Only use the power pack or the USB cable supplied to charge or operate the
mouse. Even when you have another power pack with mini USB available (e.g.
from a mobile telephone), do not use this to charge or operate the IntegraMouse
Plus. The power pack included is a special power pack for medical purposes.
Never change the battery yourself! If you suspect a problem with the battery,
contact the manufacturer or your dealer.
9.4
Metrological testing
Every medical product - especially when being used in a clinical environment - should
regularly be checked for safety. Regular safety testing - at the most every 24 months - can be
carried out by the operator, by authorised service personnel or by the manufacturer e.g. in
Austria and Germany according to the Medical Devices Operator Ordinance and the relevant
standards (e.g. EN 62353). Responsibility for compliance lies with the operator of the
IntegraMouse Plus.
26
10.
PERMISSIBLE SYSTEM
The IntegraMouse Plus is intended for use as an input device for a computer (PC or laptop).
Please only use the USB cable supplied, or work in wireless mode. Please ensure that your
computer or laptop and all other devices which are connected to it (printer etc.) comply with
the relevant regulations (EN 60950).
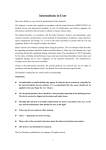
In rooms used for medical purposes, regulations to protect the patients'
area must be adhered to. The patients' area is defined as an area of 1.5
meters around the user (see figure 15). Within this area only medical
products may be used. The IntegraMouse Plus and its accessories are
medical products. The computer is usually office equipment; however, it can
also be a special Medical Computer. The following possibilities apply:
1. Computer within the patients' area
o Medical Computer according to EN 60601-1 and EN 60601-1-1
o Computer according to EN 60950, with an optional limit on touch current
through the application of an additional protective earthing or an isolating
transformer
2. Computer outside of the patients' area
o Use of wireless mode and ensuring observance of the patients' area
o Computer according to EN 60950, with an optional limit on touch current
through the application of an isolating transformer
2)
1)
Figure 15: Definition of the patients' area according to EN 60601-1. Computer within the patients' area (1) and
computer outside of the patients' area (2)
27
The operator who connects the IntegraMouse Plus to the computer must satisfy
the requirements of EN 60601-1-1 and the relevant laws and standards for
electrical installation. In the case of a connection with devices outside of the
same medical rooms, it may be necessary to install a means of isolation into the
data line.
A combination with other devices does not conform to the manufacturer's
intended use. The system integrator is responsible for reassessing conformity.
External sensor
A suitable sensor can be plugged into the built-in 3.5 mm mono jack socket and used for
switching between the operating modes (mouse, joystick, cursor mode).
Only potential-free external sensors may be used.
Ask the manufacturer or your dealer for further
information on this.
Figure 16: External sensor
Further medical products in the patients' area
Basically, the use of further medical products in the patients' area that are not directly
coupled with the IntegraMouse Plus (e.g. ECG, breathing apparatus) is possible. In doing
this, pay attention in every case to the instructions for use of the other medical product and
get orientation from the protective guidelines in Chapter 16.
Be aware that the simultaneous use of several medical products can lead to a
rise in leakage currents and to new risk potentials arising.
28
11.
AMBIENT CONDITIONS
Operating conditions
Ambient temperature:
Rel. humidity:
Atmospheric pressure:
Light intensity:
+10°C to +40°C
20% to 80% with no condensation
750 mbar to 1080 mbar
<5000 Lux
The room installation must comply with the relevant regulations (in Austria: ÖVE-EN1,
ÖVE/ÖNORM E8001, ÖVE EN7, ÖVE/ÖNORM E8007, as relevant)
Storage conditions
Ambient temperature:
Rel. humidity:
Atmospheric pressure:
-5°C to +45°C
20% to 80% with no condensation
750 mbar to 1080 mbar
Always keep the device in the undamaged original packaging. After storing for a long time it
may be necessary to recharge the battery and disinfect the device. Ensure that no
mechanical influences (weighing down by other objects, shaking etc.) occur during storage.
The maximum life expectancy for the membrane and silicon tube could expire
during storage. Always change this after having stored it for a long time.
Transport conditions
Ambient temperature:
Rel. humidity:
Atmospheric pressure:
-5°C to +55°C℃
20% to 80% with no condensation
750 mbar to 1080 mbar
Transport is carried out in the original packaging. Ensure that no mechanical influences
(weighing down by other objects, shaking etc.) occur during transportation.
29
12.
WASTE DISPOSAL
The IntegraMouse Plus is to be disposed of according to Directive 2002/96/EC WEEE
(Waste Electrical and Electronic Equipment) as an old electrical and electronic device (valid
in the European Union and other European countries with separate waste disposal systems).
This symbol on the product or on the packaging means that this product cannot
be treated as household waste. Instead, this product should be brought to the
designated disposal point for the recycling of electrical and electronic devices. If
the product is properly disposed of, you help to avoid negative influences on the
environment and harm to health, which could be caused by inappropriate
disposal. The recycling of material will preserve our natural resources. For further information
about recycling this product please contact your household refuse collectors, the
manufacturer or your dealer.
Individual non-electric components, including mouthpieces, silicon tubes and
individual membranes can be disposed of with household rubbish. Please pay
attention to hygienic aspects. Contact the responsible authorities for disposal
if necessary.
13.
FREQUENTLY ASKED QUESTIONS AND ANSWERS
Do I need specific drivers or software for installation?
No. The IntegraMouse Plus is automatically recognised as a standard mouse (or
standard joystick and standard keyboard) and installed on your operating system (plug & play
for the operating systems Windows XP, Windows Vista, Windows 7, Linux, Max OS X).
Can I also use the IntegraMouse Plus with Apple® or Linux?
Yes. The IntegraMouse Plus can be used with Mac OS X or higher versions. The
IntegraMouse Plus should work with all Linux operating systems that support USBs.
I do not have the strength required to operate the mouse buttons by sucking or
blowing. Can I change the sensitivity of the sucking/blowing stimuli?
The necessary sucking/blowing stimuli of the IntegraMouse Plus were set by the
factory at a particular range and cannot be altered. Exertion can be reduced by carefully
stretching the membrane with a suitable object (e.g. the top, round end of a ballpoint pen).
However, you have the option to connect auto-click software or external sensors via suitable
switch interfaces, in order to activate the left and/or right mouse button in an alternative way.
Your dealer will be happy to advise you about this.
30
Can I change the speed of the mouse pointer?
Yes. In the mouse settings options of your operating system.
Can I change or swap the assignment of the mouse buttons?
Yes. In the mouse settings options of your operating system.
Can I set the double-click speed?
Yes. In the mouse settings options of your operating system.
Can I write texts with the IntegraMouse Plus?
Yes. Windows 7, for example, offers a free on-screen keyboard under Start/All
Programs/Accessories/Windows Mobility Center. Recommendations for more convenient onscreen keyboards that are available to buy (e.g. with predictive text) can be obtained from
your dealer.
After changing the mouthpiece the mouse pointer can no longer be moved!
Ensure that the mouse is correctly connected and ready to be used (check the LEDs).
Check that the mouthpiece is in the correct position and recalibrate.
After changing the membrane the mouse buttons can no longer be activated!
Recalibrate. Check that the membrane is positioned securely and is not damaged.
After cleaning, the mouthpiece cannot be placed on the control unit, or is difficult to
put on.
Through warming (thermo disinfection) the mouthpiece bends and therefore no longer
fits optimally on the control unit. Before you use the cleaned mouthpiece again, please
ensure that the mouthpiece is completely dry and has cooled to room temperature.
The mouse pointer moves independently on the screen.
Recalibrate.
Can I set the IntegraMouse Plus to environmental control?
The IntegraMouse Plus is a computer mouse and may only be connected with those
environmental control systems that are designed for use with a computer mouse.
Unable to connect IM+Connect and IntegraMouse Plus.
Check that the IntegraMouse Plus battery is charged sufficiently. If necessary, connect
it to the power pack included. Follow the instructions as described in Chapter 7.3.
31
"Wake on USB" is not working, although everything on the computer is set correctly!
"Wake on USB" only works in cable-connected mode and only with USB ports that are
located directly on the mainboard. Connect the IntegraMouse Plus to a suitable USB port
with the help of a USB cable and change the USB connection if necessary.
14.
KEY TO THE SYMBOLS
Applied part type B
CE mark (Conformity with Medical Device Directive 2007/47/EC)
Disposal in accordance with WEEE Directive 2002/96/EC
HF transmission (radio)
Warning: Follow the instructions for use!
Information on use
Serial number in the format Components (M/C) Version - Year (2 digits) - 4-digit
continuous number, e.g. M1.0-11-0001
Manufacturer
Direct current
Protection class II (double insulation)
Use by: YYYY-MM
32
15.
PRODUCT AND PERFORMANCE DATA
IntegraMouse Plus
Voltage:
Current:
Radio:
Sensitivity:
Degree of protection:
Duration of operation
with battery:
Measurements:
Weight:
Compatibility:
5V
0.3 A
2.4 GHz ISM-Band, +1dBm, ~1.3 mW
Mouthpiece deflection max. 3 mm
Dynamic response characteristic
Movement from about 10 g displacement force
IP20
about 12 hours at continuous use
about 48 hours at average use
about 140 hours in standby mode
110 x 60 x 33 mm
75 g
From USB 2.0, Plug & Play for the operating systems
Windows XP, Windows Vista, Windows 7, Linux, Mac OS X
IntegraMouse Plus battery
Description:
Type:
Nominal voltage:
Max. charging current:
Max. discharge current:
Charging time:
Nominal capacity:
Fuse:
Measurements:
Weight:
EEMB LP552036
Lithium polymer
3.7 VDC
1C 300 mA
2C 600 mA
First time: at least 3 hours; usually 2 to 2.5 hours
360 mAh
PCM-Element (Over-discharge and short-circuit protection)
150 x 37 x 5.8 mm
7±1g
IntegraMouse Plus Connect
Description:
Voltage:
Current:
Compatibility:
Transmission:
Radio range:
Parallel operation:
Measurements:
Weight:
IM+Connect
5V
0.1 A
From USB 2.0, Plug & Play for the operating systems
Windows XP, Windows Vista, Windows 7, LINUX, Mac OS
2.4 GHz ISM-Band, +1dBm, ~1.3 mW
about 5 m, without obstruction
max. 5 IntegraMouse Plus systems (with 5 IM+Connect on 5
computers)
75 x 25 x 11 mm
11 g
33
Power pack
Description:
Input voltage:
Output voltage:
Input current:
Output current:
Output connection:
Protection class:
Adaptor kits for:
Measurements:
Weight:
GlobeTek Model GTM41076-605
230 VAC, 50 Hz
5 VDC
0.5A
1.2A
Mini-USB
II
North America (Japan) Blade, Q-EU(R)=European Blade,
Q-UK(R)=United Kingdom Blade, Q-SAA(R)=Australian Blade
74 x 43.5 x 36mm (without connector cap)
125 g (without connector cap)
USB cable
Description:
Colour:
Length:
Connections:
Qualtec USB cable: 3021009-06
Black
1.8 m
USB type standard A, USB type mini A
Mouthpiece
Description:
Material:
Application part:
Measurement:
Weight:
IntegraMouse Plus mouthpiece
SABIC Lexan HP3NREU
Type B
65 x 25 x 28 mm
7g
Membrane
Description:
Material:
Measurements:
Weight:
IntegraMouse Plus Membrane
Hard part: SABIC PP PCG H10; Soft part; TPE - TM3MED
Diameter: 17mm, height: 6 mm
<1 g
Silicon tube
Description:
Material:
Hardness:
Diameter:
Length:
Authorisations:
VERSILIC S60V34B
Silicon
Shore A 62±5
inner/outer 6/10 mm
19 ± 1.5 mm
European Pharmacopoeia §3.1.9, FDA 21CFR §177.2600
34
16.
ELECTROMAGNETIC COMPATIBILITY
The IntegraMouse Plus is a medical electrical device and is therefore subject to
special safety precautions with regard to electromagnetic compatibility. Therefore,
install and use the IntegraMouse Plus only for the purposes set out in these instructions for
use. The IntegraMouse Plus, along with the specified accessories which are also delivered
(cf. chapter 5 "Scope of supply") (cf. chapter 3 "Product information and use as per
regulations" and also chapter 4 "Safety instructions") fulfils the limit values prescribed. The
use of other apparatus or linking with other devices is not planned and can therefore lead to
increased emission of radiation or reduced interference immunity against electromagnetic
fields. Also consider that the radio waves of the IntegraMouse Plus and those of the
IM+Connect could influence other electrical devices.
Always keep a working clearance of at least 10 cm between IntegraMouse Plus
or IM+Connect and other medical electrical devices.
Note also the guidelines in the following tables.
Guidance and manufacturer’s declaration – electromagnetic emissions
The IntegraMouse Plus and its accessories are intended for use in the electromagnetic environment specified below. The customer or the
user of the IntegraMouse Plus and its accessories should assure that they are used in such an environment.
Emissions test
Compliance
Electromagnetic environment – guidance
RF emissions
CISPR 22
RF emissions
CISPR 11
Harmonic emissions
Class B
Class B
Class A
IEC 61000-3-2
Voltage fluctuations/
flicker emissions
IEC 61000-3-3
Complies
The IntegraMouse Plus and its accessories are
suitable for use in all establishments, including
domestic establishments and those directly
connected to the public low-voltage power supply
network that supplies buildings used for domestic
purposes.
35
Guidance and manufacturer’s declaration – electromagnetic immunity
The IntegraMouse Plus and its accessories are intended for use in the electromagnetic environment specified below. The customer or
the user of the IntegraMouse Plus and its accessories should assure that they are used in such an environment.
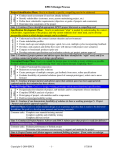
Immunity test
IEC 60601 test level
Compliance level
Electromagnetic environment –
guidance
Floors should be wood, concrete or
ceramic tile. If floors are covered with
synthetic material, the relative humidity
should be at least 30 %.
Electrostatic
discharge (ESD)
IEC 61000-4-2
±6 kV contact
±8 kV air
±6 kV contact
±8 kV air
Electrical fast transient/burst
IEC 61000-4-4
±2 kV for power supply lines
±1 kV for input/output lines
±2 kV for power supply lines
±1 kV for input/output lines
Surge
IEC 61000-4-5
±1 kV differential mode
±2 kV common mode
±1 kV differential mode
±2 kV common mode
<5 % UT
(>95 % dip in UT)
for 0,5 cycle
40 % UT
(60 % dip in UT)
for 5 cycles
70 % UT
(30 % dip in UT)
for 25 cycles
<5 % UT
(>95 % dip in UT)
for 5 s
<5 % UT
(>95 % dip in UT)
for 0.5 cycle
40 % UT
(60 % dip in UT)
for 5 cycles
70 % UT
(30 % dip in UT)
for 25 cycles
<5 % UT
(>95 % dip in UT)
for 5 s
Mains power quality should be that of a
typical commercial or hospital
environment. If the user of the
IntegraMouse Plus and its accessories
requires continued operation during
powermains interruptions, it is
recommended that the IntegraMouse
Plus and its accessories be powered
from an uninterruptible power supply or a
battery.
3 A/m
The power frequency magnetic field
should be measured in the intended
installation location to assure that it is
sufficiently low.
Voltage dips, short
interruptions and
voltage variations
on power supply
input lines
IEC 61000-4-11
Power frequency
(50/60 Hz)
magnetic field
IEC 61000-4-8
3 A/m
Mains power quality should be that of a
typical commercial or hospital
environment.
NOTE UT is the a.c. mains voltage prior to application of the test level.
36
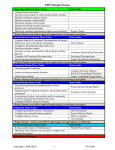
Guidance and manufacturer’s declaration – electromagnetic immunity
The IntegraMouse Plus and its accessories are intended for use in the electromagnetic environment specified below. The customer or the
user of the IntegraMouse Plus and its accessories should assure that they are used in such an electromagnetic environment.
Immunity test
IEC 60601 test level
Compliance level
Electromagnetic environment – guidance
Portable and mobile RF communications equipment
should be used no closer to any part of the IntegraMouse
Plus and its accessories, including cables, than the
recommended separation distance calculated from the
equation applicable to the frequency of the transmitter.
Recommended separation distance
d = 1,2√P 150 kHz to 80 MHz
Conducted RF
d = 1,2√P 80 MHz to 800 MHz
IEC 61000-4-6
3 V/m
80 MHz to 2,5 GHz
3 V/m
d = 2,3√P 800 MHz to 2,5 GHz
Radiated RF
IEC 61000-4-3
where P is the maximum output power rating of the
transmitter in watts (W) according to the transmitter
manufacturer and d is the recommended separation
distance in metres (m).
Field strengths from fixed RF transmitters, as determined
by an electromagnetic site survey, should be less than the
compliance level in each frequency range.
a
b
Interference may occur in the vicinity of equipment
marked with the following symbol:
NOTE 1 At 800 MHz, the higher frequency range applies.
NOTE 2 These guidelines may not apply in all situations. Electromagnetic propagation is affected by absorption and reflection from
structures, objects and people.
a
Field strengths from fixed transmitters, such as base stations for radio (cellular/cordless) telephones and land
mobile radios, amateur radio, AM and FM radio broadcast and TV broadcast cannot be predicted theoretically
with accuracy. To assess the electromagnetic environment due to fixed RF transmitters, an electromagnetic site
survey should be considered. If the measured field strength in the location in which the IntegraMouse Plus and its
accessories are used exceeds the applicable RF compliance level above, the IntegraMouse Plus and its accessories
should be observed to verify normal operation. If abnormal performance is observed, additional measures may be
necessary, such as re-orienting or relocating the IntegraMouse Plus and its accessories.
b
Over the frequency range 150 kHz to 80 MHz, field strengths should be less than 3 V/m.
37
Recommended separation distances between portable and mobile RF communications
equipment and the IntegraMouse Plus and its accessories
The IntegraMouse Plus and its accessories are intended for use in an electromagnetic environment in which radiated RF
disturbances are controlled.The customer or the user of the IntegraMouse Plus and its accessories can help prevent
electromagnetic interference by maintaining a minimum distance between portable and mobile RF communications equipment
(transmitters) and the IntegraMouse Plus and its accessories as recommended below, according to the maximum output power
of the communications equipment.
Separation distance according to frequency of transmitter
M
Rated maximum output
150 kHz to 80 MHz
80 MHz to 800 MHz
power of transmitter
800 MHz to 2,5 GHz
W
d = 2,3√P
d = 1,2√P
d = 1,2√P
0,01
0,12
0,12
0,23
0,1
0,38
0,38
0,73
1
1,2
1,2
2,3
10
3,8
3,8
7,3
100
12
12
23
For transmitters rated at a maximum output power not listed above, the recommended separation distance can be determined
using the equation applicable to the frequency of the transmitter, where P is the maximum outputpower rating of the transmitter
in watts (W) according to the transmitter manufacturer.
NOTE 1 An additional factor of 10/3 is used in calculating the recommended separation distance for transmitters in the ISM
frequency bands between 80 MHz and 2,5 GHz to decrease the likelihood that mobile/portable communications equipment
could cause interference if it is inadvertently brought into patient areas.
NOTE 2 These guidelines may not apply in all situations. Electromagnetic propagation is affected by absorption and reflection
from structures, objects and people.
38
17.
DECLARATION OF CONFORMITY
39