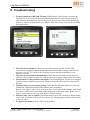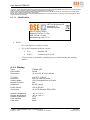
1
User Manual DSE4200 Document No.: 3702-011 Version: 02.01.00 13 August 2015 DSE Test Solutions A/S User Manual DSE4200 Contents 1. GENERAL DATA ................................................................................................................ 4 1.1 1.2 1.3 1.4 1.5 2. 3. INTRODUCTION ................................................................................................................. 5 HARDWARE ....................................................................................................................... 6 3.1 3.2 3.3 3.4 3.5 3.6 3.7 4. Purpose ......................................................................................................................................... 4 Scope ............................................................................................................................................. 4 Responsibility................................................................................................................................. 4 Manufacturer information ............................................................................................................... 4 Definitions ...................................................................................................................................... 4 Display Unit.................................................................................................................................... 6 TX Unit ........................................................................................................................................... 6 RX Unit .......................................................................................................................................... 6 External Trigger Sensor / Proximity Switch ................................................................................... 6 Cable set........................................................................................................................................ 6 DSE4200 USB memory stick......................................................................................................... 6 Installation and mounting ............................................................................................................... 7 FIRST TIME USE ................................................................................................................ 8 4.1 Language ....................................................................................................................................... 9 4.2 Set Bale Density ............................................................................................................................ 9 4.3 Zero Adjust .................................................................................................................................. 10 4.3.1 Set Bale Width ..................................................................................................................... 10 4.3.2 Is the Baler Empty? ............................................................................................................. 11 5. OPERATION ..................................................................................................................... 13 5.1 Moisture Measurement Main Window ......................................................................................... 13 5.1.1 Moisture ............................................................................................................................... 13 5.1.2 Average Moisture................................................................................................................. 14 5.1.3 Measurement. ...................................................................................................................... 14 5.1.4 View and Alarm.................................................................................................................... 14 5.1.5 Reset Average ..................................................................................................................... 15 5.1.6 Make Measure ..................................................................................................................... 15 5.1.7 Lightning / Menu .................................................................................................................. 15 5.2 Menu ............................................................................................................................................ 15 5.2.1 Language ............................................................................................................................. 16 5.2.2 Logging ................................................................................................................................ 16 5.2.3 Store data on USB ............................................................................................................... 17 5.2.4 Zero Adjust & Bale Width .................................................................................................... 18 5.2.5 System Check...................................................................................................................... 19 5.2.6 Density ................................................................................................................................. 19 5.2.7 Debug .................................................................................................................................. 20 5.2.8 System information .............................................................................................................. 20 5.2.9 Restore Defaults .................................................................................................................. 20 6. EVALUATION OF MEASUREMENTS .............................................................................. 21 7. SERVICE AND MAINTENANCE ....................................................................................... 21 8. TROUBLESHOOTING ...................................................................................................... 22 9. TECHNICAL DATA........................................................................................................... 24 9.1 Specifications............................................................................................................................... 24 9.1.1 Moisture Meters ................................................................................................................... 24 DSE Test Solutions A/S, 13 August 2015 Project no.: 3702 Document no.: 3702-011 2 2 of 27 Version: 02.01.00 User Manual DSE4200 9.1.2 Display ................................................................................................................................. 25 9.1.3 Proximity switch. .................................................................................................................. 27 9.2 Disposal of equipment. ................................................................................................................ 27 Version History Version 01.00.00 01.01.00 01.01.01 01.01.02 02.00.00 Date 071212 140314 100414 060514 2015.03.06 Prep. PP PP PP LP TT Status Closed Closed Closed Closed Closed 02.01.00 0215.08.12 PEN Closed App. PEN LP LP TT PDL/ LP Change Description English original manual First released version First full version Document number corrected Document number corrected Major update/rework of manual. Function description of Display SW V5.0 added. Review by PEN: Small changes in structure, and references. Trouble shooting extended, Density definition added. Updated with minor adjustments after review. Released Updated section 8 with new known possible failure. DSE Test Solutions A/S, 13 August 2015 Project no.: 3702 Document no.: 3702-011 3 3 of 27 Version: 02.01.00 User Manual DSE4200 1. General Data The English version of this document is the original User Manual and a base for translations to other languages. 1.1 Purpose This document should make it possible for the daily user to install and operate the DSE4200 moisture measuring equipment. 1.2 Scope Description and use of the DSE4200 Moisture Meter. 1.3 Responsibility This document is maintained and updated by DSE Test Solutions A/S. The daily user must perform the operation of DSE4200 according to this document. 1.4 Manufacturer information DSE Test Solutions A/S, www.dse.dk Sverigesvej 19, DK-8700 Horsens, Denmark Tel: +45 75 61 88 11 Fax: +45 75 61 58 95 For further information about DSE Test Solutions and DSE4200 resellers refer to: www.dse4200.com & www.dse.dk 1.5 Definitions “Bales”: As used in this manual is baled biomass, as traditional straw types, hay types and corn stover. DSE Test Solutions A/S, 13 August 2015 Project no.: 3702 Document no.: 3702-011 4 4 of 27 Version: 02.01.00 User Manual DSE4200 2. Introduction In DSE4200, microwaves are transmitted from the TX unit to the RX unit. The attenuation of the microwaves is measured and the moisture percentage of the bale is calculated. The microwaves are attenuated by the physical distance between the TX and RX units as well as the moisture content of the bale between the units. The “Zero adjust”, or the tare of the system, performed with only air between the TX and RX units, after mounting, is crucial for proper operation of the DSE4200. It determines the attenuation due to distance between TX and RX units as well as influence because of unwanted reflection of microwaves due to metals in the surroundings. It is the base for all moisture calculations. The DSE4200 software is designed to both measure and store moisture data. Measurements can be made manually, directly from the Display and automatically (triggered by the proximity sensor). Data is stored in the internal memory of the Display Unit if Log is activated and can be, copied to an external USB memory for storage and analyses. Although the moisture meters are built fairly robust, be aware that the contents are sophisticated and sensitive electronics, which should be treated accordingly. In the DSE4200 software there are different options which will be described in this document. It’s important to follow the guidelines in this manual, and to contact resellers or DSE Test Solutions A/S if any doubts occur. DSE Test Solutions A/S, 13 August 2015 Project no.: 3702 Document no.: 3702-011 5 5 of 27 Version: 02.01.00 User Manual DSE4200 3. Hardware A complete measuring system normally consists of the entities described below. 3.1 Display Unit The Display Unit can initiate measurements, processes data from the RX Unit, and display the moisture values on the screen. It communicates with the RX unit via CAN bus. The display can be setup to log and save the measured moisture content in internal memory. 3.2 TX Unit The Transmitter (TX) Unit generates and transmits a signal in the microwave range. It is controlled by the RX unit via CAN bus. The microwave signal strength is comparable to a mobile telephone signal, and is not harmful to humans or animals. 3.3 RX Unit The Receiver (RX) Unit receives the wireless signal sent by the TX Unit. It is controlled from the Display via CAN bus and normally triggered by the proximity switch to start a measurement. This unit measures the microwave attenuation, calculates the moisture content, and sends the data to the Display via CAN bus. 3.4 External Trigger Sensor / Proximity Switch The External Trigger Sensor initiates moisture measurements during baling. This sensor is a proximity sensor that gives a signal when close to metal. It can detect metal in a distance up to 8 millimeters. To secure a stable operation, distance to metal should be less than 5 millimeters. It should be mounted so it senses the star wheel of the baler, a code disc or similar metal part to generate an appropriate number of measurements for each bale. 3.5 Cable set The Cable set contains: One cable for mounting between RX and TX units and proximity switch, marked -W3, W4, -W5. One cable from Display to TX and Power source, marked -W1, -W2. These two cables are interconnected with a typical “trailer connector” and a “trailer socket”, J2 and J3, (Physical design according to standard ISO 1724). These cables and connectors are for DSE4200 use only, as the electrical connections are not compliant with the ISO standard. 3.6 DSE4200 USB memory stick The DSE4200 USB memory stick contains a specific file that must be present in order to download measurements from the Display Unit. DSE Test Solutions A/S, 13 August 2015 Project no.: 3702 Document no.: 3702-011 6 6 of 27 Version: 02.01.00 User Manual DSE4200 3.7 Installation and mounting The installation and mounting of the hardware is described in “DSE4200 Installation guide”. DSE Test Solutions A/S, 13 August 2015 Project no.: 3702 Document no.: 3702-011 7 7 of 27 Version: 02.01.00 User Manual DSE4200 4. First time use After Installation and mounting of the DSE4200, and before using it for the first time, several settings must be set, or confirmed. This includes selecting the preferred language on the Display and performing Zero adjustment or Tare of the system, inclusive setting the width and density of the bale. When power is turned on, the display will perform the “System Check” routine and try to connect to the RX and TX units. If this is not successful, the Display will try for 5 minutes, to get in touch with the RX and TX units giving the user the possibility to abort and shut down. If this is successful and this is the first time use, the “First time use” dialog will appear as shown below. For troubleshooting, refer to Chapter 8. Selections are made by pressing the corresponding push button below the “button” on the screen. If “Skip” is pressed, no initial setup will be performed, and the display jumps directly to the Moisture Measurement main window (5.1). DSE Test Solutions A/S, 13 August 2015 Project no.: 3702 Document no.: 3702-011 8 8 of 27 Version: 02.01.00 User Manual DSE4200 Next time power is applied the “First time use” routine will be run again to ensure proper setup of the system. Please note that system will not measure correctly if system setup is skipped. If Ok button is pressed, the first selection will appear on the screen. 4.1 Language Choose the desired language by pushing the vertical arrow buttons. After pressing the horizontal arrow button, to select the Language, and then the door symbol, the next setting will appear on the display screen. The door symbol indicates the “Exit” button. The display supports different languages. In Version 5.00, the following languages are supported. English German (Deutch) Danish (Dansk) Spanish (Español) More languages will be added in later versions. 4.2 Set Bale Density Density is a measure of the weight in kilogram per cubic meter [kg/m³], and used to calculate the moisture content. Default value is 145 [kg/m³]. Check the density specifications from the baler manufacturer, and apply this setting accordingly. If in doubt, the setting can be left at default as it in numerous applications and tests has been proven to be a good starting point. For further description of the Density parameter as used in DSE4200 refer to Chapter 5.2.6. DSE Test Solutions A/S, 13 August 2015 Project no.: 3702 Document no.: 3702-011 9 9 of 27 Version: 02.01.00 User Manual DSE4200 Set the correct Bale Density with the + and – buttons. Push the Ok button, for next setting. 4.3 Zero Adjust As the “Zero Adjust” measurement is used as a base for the following moisture measurements, it is crucial for the operation of the system that the baler is free of bales before proceeding (No bales in between the Moisture Meters or in the vicinity). Consider the Baler empty (free of bales) when no material is in between the TX/RX units and there is at least 50 cm from the edge of the TX/RX units to the next bale. 4.3.1 Set Bale Width The width of the bale is important for the moisture calculation. This system has two predetermined standard bale widths, 80 cm (31.5“) and 120 cm (47.25”). The setting must correspond to the width of the bale chamber to secure correct measurements. DSE Test Solutions A/S, 13 August 2015 1010 of 27 Project no.: 3702 Version: 02.01.00 Document no.: 3702-011 User Manual DSE4200 After choosing the Bale Width appropriate to the baler and pushing the Ok button, the next image will appear on the display screen. 4.3.2 Is the Baler Empty? “No” returns to the “Menu” window. After securing that the baler is empty, the Yes button is pressed. The system will now perform the initial measurement and the text on the display screen will be updated: Zero Adjust Succeeded Press Ok button, and then the DSE4200 moisture measuring system is ready for use! The main user interface will be shown. 4.3.2.1 Zero Adjust Failed If the display shows “Zero Adjust Failed”, then something is not working properly. DSE Test Solutions A/S, 13 August 2015 1111 of 27 Project no.: 3702 Version: 02.01.00 Document no.: 3702-011 User Manual DSE4200 The most likely source of error is missing connection to the TX or RX units, material in the baler or similar disturbance of the measurement. Try again after verifying that the cables are correctly connected, or refer to Section 8 Troubleshooting. If the operation is canceled at this point no initial setup will be performed, and the display jumps directly to the “Moisture Measurement” main window or the “Menu” window. DSE Test Solutions A/S, 13 August 2015 1212 of 27 Project no.: 3702 Version: 02.01.00 Document no.: 3702-011 User Manual DSE4200 5. Operation DSE4200 is ready for use few seconds after power is applied to the unit. If installation, mounting and Zero Adjustment has been performed successfully the system can be used to measure moisture during baling. In the following the functions of the system is described. 5.1 Moisture Measurement Main Window When power is turned on the display will perform the “System Check” routine and connect to the RX and TX units. The main user interface appears on the display shortly after power is applied. “Log Number” and “Memory used” is only present when logging is activated, see section 5.2.2 If no RX and TX units can be detected the Display will shut down after 5 minutes. The display can be turned on again by pressing any button. 5.1.1 Moisture The “Moisture” line shows the last measured Moisture value. It is updated for each measurement initiated by pressing the Make Measure button or by the External Trigger Sensor. The display can show moisture values in the range from 7 % to 40%. Values under and over are indicated with < and > signs. The system will display <7% moisture even though no bales are present between the TX and RX units. This due to the fact that the bales contains a natural minimum water (around 6%) that is bound in the inner structure of the material and does not react to microwaves in the same way as unbound water does. Hence the DSE4200 can’t see difference between extremely dry bales and air. DSE Test Solutions A/S, 13 August 2015 1313 of 27 Project no.: 3702 Version: 02.01.00 Document no.: 3702-011 User Manual DSE4200 The system is capable of detecting moisture in the range, 6% to 41%. The moisture values are logged (if enabled) and shown on the Display as described.. See specifications for further information on measuring range. 5.1.2 Average Moisture After each measurement the Average Moisture value is updated. Average value is calculated for all measurements since last time the Reset Average button was pressed. This is a “running” Average and only reset if the “Reset Average” button is pressed. 5.1.3 Measurement. Counts number of measurements since last time the “Reset Average” button was pressed. This information is used to calculate Average Moisture. This value is reset if the “Reset Average” button is pressed. 5.1.4 View and Alarm When the View button is pressed the Moisture value number is magnified to facilitate reading. 5.1.4.1 Setup Alarm If Setup Alarm is pressed, the screen changes to alarm setup view. This alarm gives a warning by changing the background color of the “Magnified View” to red, when the measured moisture percentage reaches or exceeds the preset value. This value can be set by pressing the + and – buttons, and the alarm can be turned On and off with the Alarm ON/OFF button. If View is pressed, the screen changes back to the display with magnified figures. If the View button is pressed again, the display goes back to standard view. The alarm function is only active in the Magnified View” window. Hence the color of the main view window will not change as a result of moisture measurements that exceed the Alarm Setup values. DSE Test Solutions A/S, 13 August 2015 1414 of 27 Project no.: 3702 Version: 02.01.00 Document no.: 3702-011 User Manual DSE4200 5.1.5 Reset Average Resets the running average and the measurement counter shown in the main window. Does not influence the average calculated and shown for separate Log numbers. 5.1.6 Make Measure With this button, it is possible to make a measurement from the Display. This button can be used to verify the basic functions of the system. During normal operation, the proximity switch triggers the measurements. 5.1.7 Lightning / Menu If the Lighting/Menu button is pressed shortly, brightness of the display and backlight of the buttons below the screen can be adjusted. Maximum brightness setting of the display ensures clear reading of the display in heavy sunlight. Rightmost button (open door) returns to previous view. 5.2 Menu If the Lighting/Menu button is pressed for about 2 seconds a menu appears. DSE Test Solutions A/S, 13 August 2015 1515 of 27 Project no.: 3702 Version: 02.01.00 Document no.: 3702-011 User Manual DSE4200 Vertical arrow buttons scrolls up and down in the menu. Horizontal arrow button selects the highlighted function, and switches between ON/OFF. Rightmost button (open door) Returns to previous view. 5.2.1 Language The preferred language can be changed. See description in section 4.1. 5.2.2 Logging If the measured data are for later use logging can be activated by selecting “ON”. When Logging is activated the “Log Number” and Memory Used information appears in the Main window as well as the “Statistic” button. The values logged can be in the detectable range 6% to 41% event though the accuracy can´t be guaranteed outside the specifications. 5.2.2.1 Log Number When logging is sat “ON” from the Menu, a track of the measurements is kept and saved to memory. The measurements are marked with a Log Number. It enables the possibility to distinguish between measurements from different fields or customers. The “Average Moisture” calculation is not influenced by this operation. The Log Number is incremented when “New Log” in the Statistic. window is pressed. Log Number is reset to 1 after clearing the internal memory in the Store data on USB procedure. After creating a new Log, it is not possible to go back and log measurements with an old log number. 5.2.2.2 Memory used This number in percentage shows the internal memory usage. DSE Test Solutions A/S, 13 August 2015 1616 of 27 Project no.: 3702 Version: 02.01.00 Document no.: 3702-011 User Manual DSE4200 The internal memory can store 16 Mbyte of data, which is approximately 2.5 million measurements, when only the moisture value and log number is logged. The internal memory must be cleared before this number reaches 100%. See Store data on USB section. 5.2.2.3 Statistics By pressing the “Statistics” button a page appears that shows the list of logs saved in the Display memory. The calculated average as well as minimum and maximum values are shown for each log number. If more than 4 logs are saved the page buttons can be used to scroll through. The New Log button adds a new log number to the list. As it is not possible to go back to an older Log and continue adding to it, the user is asked to confirm the creation of a new log number. 5.2.3 Store data on USB This function has two purposes, copy measured data to external USB memory and clear the internal memory (log). DSE Test Solutions A/S, 13 August 2015 1717 of 27 Project no.: 3702 Version: 02.01.00 Document no.: 3702-011 User Manual DSE4200 Follow the instructions on the display to store collected data on the DSE4200 USB memory stick. The USB socket is on the rear of the display. The DSE4200 USB stick contains a specific SW file that needs to be present on the USB memory stick prior to data transfer. A standard USB memory stick will not work. If a data file from earlier Data offload is already on the USB memory, it will be overwritten during data offload. It is therefore recommended to add a Date or similar to the data file name after it is created, during data offload. If a large amount of data is stored in the internal memory, the log should be cleared, during offload. If the Log is cleared, “Log Number” is set to 1 and Memory used to 0.00%. 5.2.3.1 Data File The data file is saved on the DSE4200 USB stick as a comma separated file. It can be read with a basic text editor or a spreadsheet program like Excel for further analyzing of the data. See Chapter 6. 5.2.4 Zero Adjust & Bale Width The “Zero Adjust” is usually made during first time use but can be done at any time. During the “Zero Adjust” measurement, the amplitude of the received signal is validated. It is recommended to execute “Zero Adjust” at least once a year in order to ensure correct function of the system. Follow the instructions on the display to Zero Adjust the system. See description in Chapter 4.3 DSE Test Solutions A/S, 13 August 2015 1818 of 27 Project no.: 3702 Version: 02.01.00 Document no.: 3702-011 User Manual DSE4200 5.2.5 System Check Data communication to the two measuring units, RX and TX, is checked. Both units should return a PASS! If connection cannot be established a “FAIL!” will be returned. Display will try for 5 minutes, to get in touch with the RX and TX units giving the user the possibility to find errors in the cabling or to abort and shut down. This feature facilitates troubleshooting in case of malfunction of the equipment. See also description in Chapter 4 5.2.6 Density DENSITY of a bale of straw, hay or other crops depends of several parameters, among others: baler settings, size of the bale, weight of the bale and type of baled material. The DENSITY dimension is defined as [kg/m³] = weight of 1m³ of material. The DENSITY in DSE4200 is defined as the dry matter density, or the weight of 1 [m³] baled material with zero water content. The default setting of the DSE4200 is pre-set to the density of 145 [kg/m³]. The density value can be adjusted manually via the menu in the display, ranging from 100 – 200 [kg/m³]. DENSITY calculation example: Hesston bale Bale size (L x H x W): 240 cm / 127 cm / 120 cm Bale volume: 240 cm * 127 cm * 120 cm = 3,66 m³ Default density setting DSE4200: 145 kg/m³ (dry matter density) Dry weight of the bale: 145 kg/m³* 3,66 m³ = 530 kg Weight of the bale with 10% moisture: 530 + (530/100*10) = 583 kg DSE Test Solutions A/S, 13 August 2015 1919 of 27 Project no.: 3702 Version: 02.01.00 Document no.: 3702-011 User Manual DSE4200 If the DENSITY of the bale is different from the DSE4200 settings, then it will affect the accuracy of the moisture readings. See description of setup in Chapter 4.2 5.2.7 Debug This function shows different numbers that will vary depending on the actual setup. These numbers are only for troubleshooting purposes. Zero Adjust range: 10000 to 31000 In case of malfunctioning or strange measuring results, you can send these numbers to DSE Test Solutions A/S, and we can guide you in the process of getting the equipment up and running again. 5.2.8 System information Contains information about display part number, as well as SW versions for Display and TX/RX units. 5.2.9 Restore Defaults If this function is activated, all settings are set back to factory default. All Measurements in the Display memory are deleted. After power cycling the, “First time use” procedure described in section 4 will be repeated. The “Restore Defaults” procedure is recommended if there is any doubt about the current settings. DSE Test Solutions A/S, 13 August 2015 2020 of 27 Project no.: 3702 Version: 02.01.00 Document no.: 3702-011 User Manual DSE4200 6. Evaluation of Measurements Data stored on the DSE4200 USB memory stick, can be transferred, to a PC for storage and/or analyses. The following data is available: Log No. Individual Moisture Percentages for all measurements Note that Excel has a maximum limit on number of lines (65.000 to 1.000.000 depending on version). If the plan is to use Excel for data analyses, this may be a practical limit on number of measurements, you want to have in one file. 65.000 measurements fill approximately 2% of the DSE4200 memory and 1.000.000 measurements approximately 40% of the memory. 7. Service and maintenance The DSE4200 contains no serviceable parts. However, the following minimum is recommended: Recommendations Weekly during use Control cables for wear and damage x Control that the brackets are not bent or deformed, so the angel between TX and RX has changed.* x Monthly during use Yearly Control the function of the proximity switch as described in the “DSE4200 Installation guide” x Zero Adjust** x “*” If the angel between TX and RX units are different from the one used during Zero adjust accuracy will be influenced. “**”Zero adjust should be made every time the baler is empty. DSE Test Solutions A/S, 13 August 2015 2121 of 27 Project no.: 3702 Version: 02.01.00 Document no.: 3702-011 User Manual DSE4200 8. Troubleshooting 1. Testing connection to RX and TX units! When System Check menu is selected the Display tries to connect to the RX unit and thereafter the RX unit connects to the TX unit. Message about PASS or FAIL is displayed. If the System Check fails the Display will try to connect to the RX unit for 5 minutes. This time can be used to control cabling and connections. 2. The units do not measure! Check for reversed connectors for RX and TX. The connectors are properly connected when the cable labeled RX is sitting in the RX unit and vice versa for TX. Check if the connector between the tractor and baler is put together correctly. 3. The units do not measure automatically! Check that the proximity switch works by running a metal surface in front of it. If it lits, then try to adjust it closer to the star wheel. 4. Measurement is only possible from display! Check that RX and TX unit isn’t swapped. Connector where cable from proximity sensor is mounted (-W5) must be connected to RX unit. 5. Moisture meters are measuring wrong! Check that the Moisture Meters are correctly mounted in a horizontal position and with the same orientation. Repeat "Zero adjust" and be very aware that there are no bales in the channel. Also check if you have selected the correct bale width and density in the menu setup. In this case, it may be a good idea to start over with "Restore factory settings". 6. Measures only once in a while! Check that the star wheel isn’t skewed so the proximity switch only sees some of the teeth. If necessary, try adjusting the proximity switch closer to the star wheel. 7. No light in the display! Check if the fuse has blown. DSE Test Solutions A/S, 13 August 2015 2222 of 27 Project no.: 3702 Version: 02.01.00 Document no.: 3702-011 User Manual DSE4200 If the DSE4200 does not work according to the descriptions in this manual, then contact the reseller or Manufacturer. Please inform about the results in the System Check (see section 0), and the numbers shown in Debug (see section 5.2.7). DSE Test Solutions A/S, 13 August 2015 2323 of 27 Project no.: 3702 Version: 02.01.00 Document no.: 3702-011 User Manual DSE4200 9. Technical Data The DSE4200 Moisture Meter System is compliant with CE directives as stated in the product CE declaration. 9.1 Specifications 9.1.1 Moisture Meters Type: PartNo: Dimensions: RX/TX Moisture Meters 45150 & 45151 (W x H x D): 150 x 80 x 80 mm Measuring range: Measuring accuracy: Measurement frequency: 6% - 35% relative moisture +/- 1% up to 30% relative moisture, hereafter +/- 2%. *1 2.4 GHz Communication: Trigger signal: Connection: CAN J1939 Via CAN or digital input (Measurement trigger/ Proximity Switch) Deutsch DT13-08 Ambient temperature: Storage temperature: Ingress Protection: -10˚C to +60˚C *2 -25˚C to +80˚C IP 65 Power Source: Max Power consumption: 10V-28V DC 6W (With display) EMC: o EN/ISO 14982:2009 - Agricultural and forestry machinery. Electromagnetic compatibility. Test methods and acceptance criteria o EN 55011:2009, Group 2, Class B *3 - Industrial, scientific and medical equipment. Radio-frequency disturbance characteristics. Limits and methods of measurement Safety o DS/EN ISO 4254-1 : 2009 Agricultural machinery -- Safety -- Part 1: General requirements CE declaration: In accordance with: DIRECTIVE 2004/108/EC OF THE EUROPEAN PARLIAMENT AND OF THE COUNCIL of 15 December 2004 - EMC – Electromagnetic Compatibility Directive. DIRECTIVE 2006/95/EC OF THE EUROPEAN PARLIAMENT AND OF THE COUNCIL of 12 December 2006. - Low voltage Directive. Directive 2011/65/EU of the European Parliament and of the Council of 8 June 2011 on the restriction of the use of certain hazardous substances in electrical and electronic equipment. - RoHS Directive Directive 2012/19/EU of the European Parliament and of the Council of 4 July 2012 on waste electrical and electronic equipment. - WEEE Directive *1 With reference to a Hesston bale width on 1,2 m. Dry weight density approx. 135 - 160 kg/m3. *2 It is estimated that constant direct sun on the units can increase the surface temperature with up to 35°C, with reference to the ambient temperature (with no wind) DSE Test Solutions A/S, 13 August 2015 2424 of 27 Project no.: 3702 Version: 02.01.00 Document no.: 3702-011 User Manual DSE4200 *3 Group 2- covers devices that intentionally generates RF energy in frequency range 9kHz-400GHz, that is used in form electromagnetic radiation, inductive coupling, capacitive coupling for material analysis or inspection. Class A- covers devices for usage in all establishments other than domestic and that are not directly connected to a low voltage power supply network, which supplies domestic environment. Class B- covers devices for usage in domestic establishments that are directly connected to a low voltage power supply network, which supplies domestic environment. 9.1.1.1 Identification DSE Test Solutions A/S Sverigesvej 19 DK-8700 Horsens Part no: 45150 / 45151 Model no: RX Zxx / TX Zyy DSE-TS S/N.: YYxxxx Manufacturing Year: YYYY Where o Zxx is the Receiver software version o Zyy is the Transmitter Software version Z=A; Standard SW Z=B,C… Customer specific SW o YYxxxx is the serial number containing year of manufacturing and running number. 9.1.2 Display Type: CANvu 355: Part number: Dimensions 93308 (W x H x D): 95 x 95 x 46 mm TFT LCD: Resolution: Viewing Angle: Number of colors: Brightness: a-Si TFT, LCD 3,5” 320 (H) x 240 (V) QVGA 130/110 degrees from 6 O’clock. 64K 50 NIT (cd/m²) Power Source: Connection: 10V to 32V DC (2) 12 Pin Deutsch DT04-12PA Ambient temperature: Storage temperature: Degree of protection: Case material: Case color: -20° to + 70° C -30° to + 80° C IP 67 ABS Black DSE Test Solutions A/S, 13 August 2015 2525 of 27 Project no.: 3702 Version: 02.01.00 Document no.: 3702-011 User Manual DSE4200 EMC: o EN 60954 - Maritime navigation and radiocommunication equipment and systems – General requirements – Methods of testing and required test results o J1113, (Class C, Region III) - Electromagnetic Compatibility Measurement Procedures and Limits for Components of Vehicles, Boats (up to 15 m), and Machines (Except Aircraft) (16.6 Hz to 18 GHz) Safety o ISO 8846 Small craft -- Electrical devices -- Protection against ignition of surrounding flammable gases CE declaration: In accordance with: DIRECTIVE 94/25/EC OF THE EUROPEAN PARLIAMENT AND OF THE COUNCIL of 16 June 1994 9.1.2.1 Identification Partno: 93308 DSE4200 Display S/N: YYXXXX DSE TEST SOLUTIONS A/S Part Number and SW versions via Software menu DSE Test Solutions A/S, 13 August 2015 2626 of 27 Project no.: 3702 Version: 02.01.00 Document no.: 3702-011 User Manual DSE4200 9.1.3 Type: Proximity switch. PFK1/AP-3H (Inductive Proximity Switch, M18x1) Part number: 93429 Switching distance: 8mm Output circuit: Digital PNP - NO Type of installation Connection type M12 connector, 4-pin (3 of them used) Ingress protection: IP68 / IP69K Operating temperature range: -40 - +80 °C 9.2 Disposal of equipment. This equipment is, at end of life, considered as electronic waste. This means that disposal needs to be handled in a proper way so that recycling is done correct. If site of installment does not have an organized program for disposal, the equipment should be returned to DSE Test Solutions Sverigesvej 19 DK-8700 Horsens which will take care of correct disposal. Contact DSE Test Solutions at email: [email protected] for further information. DSE Test Solutions A/S, 13 August 2015 2727 of 27 Project no.: 3702 Version: 02.01.00 Document no.: 3702-011