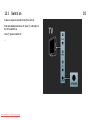
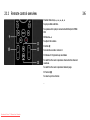
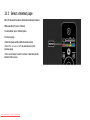
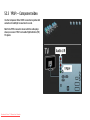
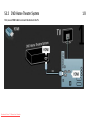
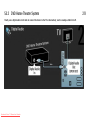
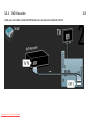
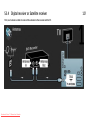
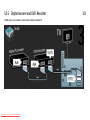
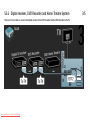
1
Downloaded From TV-Manual.com Manuals
Contact information
Type nr.
Product nr.
Luxembourg / Luxemburg
United Kingdom
Magyarország
078 250 145 - € 0.06 / min
40 6661 5644 - Ortsgespräch
0800 331 6015 - Free
06 80018 189 Ingyenes hívás
Danmark
Nederland
Estonia
Romānä
3525 8759 - Lokalt opkald
0800 023 0076 - gratis
6008600 - Local
0800 894 910 - gratuit
Deutschland
Norge
Lithuania
Россия
0800 000 7520 - Kostenlos
2270 8111 - Lokalsamtale
67228896 - Local
France
Österreich
Latvia
- Moсква
(495) 961-1111 - Местный звонок
- 8-800-200-0880 - Местный звонок
0805 025 510 - gratuit
0810 000 205 - € 0.07 / min
527 37691 - Local
Ελλάδα
Portugal
Kaзaкcтaн
Србија
0 0800 3122 1280 - Κλήση χωρίς
800 780 903 - gratis
007 727 250 66 17 - Local
+381 114 440 841 - Lokalni poziv
España
Suisse / Schweiz / Svizzera
Бълария
Slovakia
900 800 655 - gratuito
0844 800 544 - Ortsgespräch
+3592 489 99 96 - Местен
0800 004537 - Bezplatný hovor
Italia
Sverige
Hrvatska
Slovenija
800 088 774 - gratuito
08 5792 9100 - Lokalsamtal
01 6403 776 - Lokalni poziv
0821 611 655 - € 0., 0 9 / min
Ireland
Suomi
Česká republika
Türkiye
01 601 1777 - Free
Northern Ireland 0800 055 6882
09 2311 3 415 - paikallispuhelu
800 142840 - Bezplatný hovor
0800 261 3302 - Şehiriçi arama
Polska
Україна
België / Belgique
χρέωση
Appel local
Appel local
Chiamata locale
разговор
022 3491504 - połączenie
lokalne
Downloaded From TV-Manual.com Manuals
8-800-500-6970 - Мicцeвий виклик
1.1.1 Register your TV
Congratulations on your purchase and welcome to Philips.
Register your TV and enjoy a range of benefits including
full support (including downloads), privileged access to
information about new products, exclusive offers and
discounts, the chance to win prizes and even participate in
special surveys about new releases.
Go to www.philips.com/welcome
Downloaded From TV-Manual.com Manuals
1.1.2 Enjoy HD TV
This TV can display High Definition programmes, but to
enjoy HD TV you need to get programmes in HD first. If you
are not watching HD programmes, the picture quality will
be that of a normal TV.
1/2
You can receive programmes in High Definition from...
• a Blu-ray Disc player, connected with an HDMI cable,
with an HD Movie
• a digital HD receiver, connected with an HDMI cable, with
a subscription to HD channels from a cable or satellite
company
• an Over-the-air HD broadcaster (DVB-T MPEG4)
• an HD channel on your DVB-C network
• an HD Game console (Xbox 360 / PlayStation 3),
connected with an HDMI cable, with an HD game.
Downloaded From TV-Manual.com Manuals
1.1.2 Enjoy HD
Contact your dealer for more information. Go to
www.philips.com/support to find FAQ’s featuring the list of
HD channels or providers in your country.
Downloaded From TV-Manual.com Manuals
2/2
1.1.3 Safety
Make sure you have read and understood all instructions
before using your TV. The warranty becomes invalid if any
damage is caused by failure to follow instructions.
Risk of electric shock or fire!
• Never expose the TV or remote control to rain, water or
excessive heat.
Downloaded From TV-Manual.com Manuals
1/5
• Never place liquid containers, such as vases, near the TV.
If liquids are spilt on or into the TV, disconnect the TV from
the power outlet immediately. Contact Philips Consumer
Care to have the TV checked before use.
1.1.3 Safety
• Never place the TV, remote control or batteries near
naked flames or other heat sources, including direct
sunlight.
• Keep candles and other naked flames away from this
product at all times.
• Never insert objects into the ventilation slots or other
openings on the TV.
Downloaded From TV-Manual.com Manuals
2/5
• Ensure power plugs do not come under heavy force.
Loose power plugs can cause arcing and are a fire hazard.
• Never place the TV or any objects on the power cord.
• When disconnecting the power cord, always pull the
plug, never the cord.
...
1.1.3 Safety
Risk of injury or damage to the TV!
• Two people are required to lift and carry a TV that weighs
more than 25 kg.
• If you mount the TV on a stand, only use the supplied
stand. Secure the stand to the TV tightly. Place the TV on a
flat, level surface that can support the weight of the TV.
Downloaded From TV-Manual.com Manuals
3/5
• When mounting the TV on a wall, ensure that the
wall mount can safely bear the weight of the TV set.
Koninklijke Philips Electronics N.V. bears no responsibility
for improper wall mounting that results in accident, injury
or damage.
...
1.1.3 Safety
Risk of injury to children!
Follow these precautions to prevent the TV from toppling
over and causing injury to children:
• Never place the TV on a surface covered by a cloth or
other material that can be pulled away.
• Ensure that no part of the TV hangs over the edge of the
mounting surface.
Downloaded From TV-Manual.com Manuals
4/5
• Never place the TV on tall furniture, such as a bookcase,
without anchoring both the furniture and TV to the wall or a
suitable support.
• Educate children about the dangers of climbing on
furniture to reach the TV.
...
1.1.3 Safety
5/5
Risk of overheating!
Risk of hearing damage!
Always leave a space of at least 10cm around the TV for
ventilation. Ensure curtains or other objects never cover
the ventilation slots on the TV.
Avoid using earphones, headphones at high volumes or for
prolonged periods of time.
Lightning storms
Disconnect the TV from the power outlet and antenna
before lightning storms. During lightning storms, never
touch any part of the TV, power cord or antenna cable.
Downloaded From TV-Manual.com Manuals
Low temperatures
If the TV is transported in temperatures below 5°C, unpack
the TV and wait until the TV temperature matches the
room temperature before connecting the TV to the mains.
1.1.4 Position the TV
Carefully read the safety precautions before positioning
the TV.
• Position the TV where light does not shine directly on the
screen.
Downloaded From TV-Manual.com Manuals
1.1.5 Viewing distance
Position the TV at the ideal viewing distance. Benefit more
from HD TV picture or any picture without straining your
eyes. Find the 'sweet spot', right in front of the TV, for the
best possible TV experience and relaxed viewing.
The ideal distance to watch TV from is three times its
diagonal screen size. While seated, your eyes should be
level with the centre of the screen.
Downloaded From TV-Manual.com Manuals
1.1.6 Screen care
• Risk of damage to the TV screen! Never touch, push, rub
or strike the screen with any object.
• Unplug the TV before cleaning.
• Clean the TV and frame with a soft damp cloth. Never
use substances such as alcohol, chemicals or household
cleaners on the TV.
• To avoid deformations and colour fading, wipe off water
drops as soon as possible.
Downloaded From TV-Manual.com Manuals
• Avoid stationary images as much as possible. Stationary
images are images that remain onscreen for extended
periods of time. Stationary images include onscreen
menus, black bars, time displays, etc. If you must use
stationary images, reduce screen contrast and brightness
to avoid screen damage.
1.1.7 End of use
Disposal of your old product and batteries
Your product is designed and manufactured with high
quality materials and components, which can be recycled
and reused.
...
Downloaded From TV-Manual.com Manuals
1/4
1.1.7 End of use
When this crossed-out wheeled bin symbol is attached
to a product it means that the product is covered by the
European Directive 2002/96/EC.
...
Downloaded From TV-Manual.com Manuals
2/4
1.1.7 End of use
Please inform yourself about the local separate collection
system for electrical and electronic products.
3/4
Please act according to your local rules and do not dispose
of your old products with your normal household waste.
Correct disposal of your old product helps to prevent
potential negative consequences for the environment and
human health.
...
Downloaded From TV-Manual.com Manuals
1.1.7 End of use
Your product contains batteries covered by the European
Directive 2006/66/EC, which cannot be disposed with
normal household waste.
Please inform yourself about the local rules on separate
collection of batteries because correct disposal helps to
prevent negative consequences for the environmental and
human health.
Downloaded From TV-Manual.com Manuals
4/4
1.1.8 ECO - Green
This TV has features that contribute to energy-efficient
use.
This TV was awarded the European Ecolabel for its
environmental qualities.
1/4
Energy efficiency features
• Ambient light sensor
To save energy, the built-in Ambient light sensor lowers
the brightness of the TV screen when the surrounding light
darkens.
• Standard
The Standard setting of the TV combines several TV
settings that result in saving energy. See the Smart
settings in the Setup menu.
...
Downloaded From TV-Manual.com Manuals
1.1.8 ECO - Green
2/4
• Low standby power consumption
Power management
The class-leading and highly-advanced power circuitry
brings down the power consumption of the TV to an
extremely low level, without losing out on the constant
Standby functionality.
The advanced power management of this TV ensures the
most efficient use of its energy. You can check how your
personal TV settings, the level of brightness in current
onscreen pictures, and the surrounding light conditions
determine the relative power consumption.
Close this user manual and press Demo. Select
Active control and press OK. Your current TV setting is
highlighted. You can change to another setting to check
the corresponding values.
...
Downloaded From TV-Manual.com Manuals
1.1.8 ECO - Green
Ecolabel
Philips continuously focuses on lowering the
environmental impact of its innovative consumer
products. We aim our efforts towards environmental
improvements during manufacturing, reduction of
harmful substances, energy-efficient use, end-of-life
instructions and product recycling.
Downloaded From TV-Manual.com Manuals
3/4
1.1.8 ECO - Green
Thanks to our environmental effort, this TV has
been awarded the European Ecolabel —the flower(www.ecolabel.eu).
You can find detailed information on standby energy
consumption, warranty policy, spare parts and recycling
of this TV on the Philips website for your country at
www.philips.com
Downloaded From TV-Manual.com Manuals
4/4
End of use
To inform yourself on the correct disposal of the TV and
batteries, read chapter Getting started > Important > End of
use.
1.2.1 Switch on
It takes a couple of seconds for the TV to start up.
If the red standby indicator is off, press O at the right of
the TV to switch it on.
Press O again to switch off.
...
Downloaded From TV-Manual.com Manuals
1/2
1.2.1 Switch on
The white LED flashes during start-up and switches off
completely when the TV is ready for use.
You can set the white LED on permanently or set its
brightness. Press h> Setup > Installation > Preferences >
LightGuide brightness.
Downloaded From TV-Manual.com Manuals
2/2
Downloaded From TV-Manual.com Manuals
1.2.3 Programme P
The keys on the side of the TV allow basic TV control.
You can switch TV channels with Program + / - on the side
of the TV.
Downloaded From TV-Manual.com Manuals
1.2.4 Source key
The keys on the side of the TV allow basic TV control.
To open the Source list to select a connected device, press
Source s. Press Source s again to select a connected
device in the list. After a few seconds the TV switched to
the selected device.
Downloaded From TV-Manual.com Manuals
1.2.5 IR sensor
Always make sure to point the remote control at the
remote controlinfra red sensor on the front of the TV.
Downloaded From TV-Manual.com Manuals
1.3.1 VESA info
Your TV is prepared for VESA compliant wall mounting. A
VESA wall mount bracket is not included.
Use the following VESA code to purchase the bracket.
VESA MIS-F 300, 300, 6
When mounting the TV on a wall, always use all 4 fixing
points on the back of the TV. Use a screw length as shown
in the drawing.
Downloaded From TV-Manual.com Manuals
1.3.2 Unmount the stand
Lay the TV flat on a table before you unscrew the 2 stand screws on the back of the TV.
Downloaded From TV-Manual.com Manuals
1.4.1 Full High Definition display
This TV is equipped with a full High Definition (HD) display.
A full HD 1920x1080p, the highest resolution of HD sources.
This LED backlight display offers a brilliant flicker free
progressive scan picture with optimum brightness and
superb colours.
Downloaded From TV-Manual.com Manuals
To enjoy HD TV you need to get programmes in HD first. If
you are not watching HD programmes, the picture quality
will be that of a normal TV.
Read Get started > Important > Enjoy HD TV
Downloaded From TV-Manual.com Manuals
1.4.3 Programme guide
The Programme guide is an onscreen guide to scheduled
TV programmes. This guide is provided by digital
broadcasters or the Net TV online service. You can read the
programme summary, set a message to remind you when
the programme starts or select programmes by genre.
Read More on … > Programme guide.
Downloaded From TV-Manual.com Manuals
Downloaded From TV-Manual.com Manuals
1.4.5 USB and PC network connection
View or play your own multimedia files (photos, music,
videos, …) from the USB connection on the side of the TV.
Connect the TV to a home PC network and enjoy watching
multimedia files stored on your PC.
Downloaded From TV-Manual.com Manuals
1.4.6 Scenea
With Scenea, you can set a photo as a 'wallpaper' photo on
your screen. Use any photo from your collection and create
your own painting on the wall.
Read chapter More on ... > Scenea.
Downloaded From TV-Manual.com Manuals
1.5.1 Onscreen
You are reading the built in user manual.
This manual contains all of the information needed to
install and operate this TV.
You can open or close the user manual with the yellow key
on the remote control.
Before you carry out the instructions, close the manual
with the yellow key.
When you open the manual again, it opens on the same
page you left it.
Downloaded From TV-Manual.com Manuals
1.5.2 On the internet
A printable version of the user manual is available on the
internet.
View or print the user manual at www.philips.com/support
Downloaded From TV-Manual.com Manuals
Downloaded From TV-Manual.com Manuals
2.1.1 Remote control overview
2/6
5 Navigation key
To navigate up, down, left or right.
6 OK key
To open the channel overview.
To activate a selection.
7 Back b
To go back or exit a menu without changing a setting.
To go back to the previous TV channel or the previous
teletext page.
To go back to the previous Net TV page.
8 Info i
To show channel or programme information, if available.
...
Downloaded From TV-Manual.com Manuals
2.1.1 Remote control overview
3/6
9 Audio Video keys T, P, Q, S, R
To play multimedia files.
To operate a disc player connected with EasyLink HDMICEC.
10 Volume V
To adjust the volume.
11 Mute m
To mute the sound or restore it.
12 Channel / Programme up and down
To switch to the next or previous channel in the channel
overview.
To switch to the next or previous teletext page.
13 Format f
To select a picture format.
...
Downloaded From TV-Manual.com Manuals
2.1.1 Remote control overview
4/6
14 TV key
To set the remote control in TV mode.
15 Subtitle
To open or close the subtitle menu.
16 Teletext / MHEG
To open or close Teletext / MHEG.
17 Source s
To select a connected device from the Source list.
...
Downloaded From TV-Manual.com Manuals
2.1.1 Remote control overview
5/6
18 Red key / Demo
To open or close the Demo menu
Easy page selection in Teletext
19 Green key
Easy page selection in Teletext
20 Yellow key
To open or close the user manual
Easy page selection in Teletext
21 Blue key
Easy page selection in Teletext
...
Downloaded From TV-Manual.com Manuals
2.1.1 Remote control overview
6/6
22 Number keys
To select a TV channel or enter digits and text.
23 Picture A
To open or close the Picture menu.
24 Sound N
To open or close the Sound menu.
Downloaded From TV-Manual.com Manuals
2.1.2 Batteries
Open the battery cover on the back of the remote control
to insert the 2 batteries supplied (Type AAA-LR03-1.5V).
Make sure the + and - ends of the batteries line up
correctly (+ and - are marked inside).
Remove the batteries if you are not using the remote
control for a long time.
Dispose of batteries according to the end of use directives.
Read Get started > Important > End of use.
Downloaded From TV-Manual.com Manuals
2.2.1 Channel overview
While watching TV, press OK to open the Channel overview.
This overview shows the TV channels and possible radio
stations installed on your TV.
Navigate to a channel or station with the u or v, w or x
keys. Press OK to watch or listen to the selected channel or
station.
Press Back b to leave the channel overview without
changing the channel.
Downloaded From TV-Manual.com Manuals
1/5
2.2.1 Channel overview
With the Channel overview on screen you can press
Options o to access the following functions:
Select list
Select which channels are shown in the Channel overview.
When a filter is set in the Channel overview, press P+/- to
go through the channels of the filtered overview, while
watching TV.
Downloaded From TV-Manual.com Manuals
2/5
Mark as favourite
When a channel is highlighted in the Channel overview,
you can set it as a favourite channel.
Read More on ... > Favourite channels.
...
Downloaded From TV-Manual.com Manuals
2.2.1 Channel overview
4/5
Rename
Hide channel
You can rename a channel.
Select this option when you want to hide a channel in
the Channel overview. When you hide a channel, it will be
hidden next time you open the Channel overview.
1 In the channel overview, navigate to the channel you
want to rename.
2 Select Rename in the Options o menu.
3 Use the navigation keys to position the highlight. Press
Back b to delete a character. Use the remote control
number pad as you do for SMS/text messaging to select
a character. Use the 0 number key to select a special
character. Select Clear to clear all text.
4 Select Done and press OK to end Rename.
Downloaded From TV-Manual.com Manuals
To unhide hidden channels select the Show hidden
channels from the Options o menu.
...
2.2.1 Channel overview
Show hidden channels
You can show all channels, including all hidden channels.
You can unhide or hide channels.
1 Select Show hidden channels from the Options o
menu.
2 Navigate to a channel.
3 Press Options o and select Hide or Unhide channel.
You can navigate to another channel and do the same.
Downloaded From TV-Manual.com Manuals
5/5
To exit the Show hidden channels view, select Exit hidden
channels in the Options menu. The overview is adapted the
next time you open it.
2.2.2 Homeh
The Home menu lists the activities you can do with your
TV.
Press h to open the Home menu.
To start an activity, highlight the desired item with the
navigation keys and press OK.
You can add an activity, always linked to a device, with the
Add your devices item.
To exit the Home menu, press h again.
Downloaded From TV-Manual.com Manuals
2.2.3 Add your devices
When you have connected a device to the TV, always add
this device as an item in the Home menu. With this item
in the Home menu, you can easily switch the TV to this
device.
In the Home menu, select Add your devices and press OK.
Follow the instructions on screen.
The TV asks you to select the device and the connector to
which the device is connected.
From now on, this device is added to the Home menu.
Downloaded From TV-Manual.com Manuals
To remove a device item from the Home menu, select the
item, press Options o and select Remove device in the
list. Press OK.
2.2.4 Setup
The Setup item in the Home menu holds most TV settings.
In the Setup menu you can ...
• set picture and sound settings
• set some special features
• update or re-install TV channels
• connect to a network
• update the TV software
• ...
Downloaded From TV-Manual.com Manuals
In the Home menu, select Setup and press OK.
Select an item with the w or x, u or v keys and press OK.
To exit the Setup menu, press Back b.
2.2.5 Options o
The Options menu offers convenient settings related to
what is on screen.
Press Options o in any circumstance to see which
options are available.
To exit, press Options o again.
Downloaded From TV-Manual.com Manuals
2.2.6 Guide g
You can view a list of scheduled TV programmes with
the Guide menu (only for digital broadcast). Also, use the
Guide key to view the list of your photos, music or videos
from a connected PC network or USB memory device.
While watching TV, press Guide g to open the
Programme guide, if this information is available.
...
Downloaded From TV-Manual.com Manuals
1/2
2.2.6 Guide g
When browsing your PC network or a USB memory device,
press Guide g to show the content.
Read More on … > Programme guide or More on … >
Multimedia.
Downloaded From TV-Manual.com Manuals
2/2
2.3.1 Switch channels
To switch TV channels, press P + or — on the remote
control. You can use the number keys if you know the
channel number.
To switch back to the previous viewed channel, press Back
b.
If digital broadcasting is available, digital radio stations are
installed during installation. Switch to a radio channel as
you would do for TV channels. Radio stations usually start
from channel number 400 onwards.
Downloaded From TV-Manual.com Manuals
Channel overview
While watching TV, press OK to open the Channel overview.
Select the channel with the navigation keys and press OK
to switch to the channel.
To leave the channel overview without changing the
channel, press Back b.
Downloaded From TV-Manual.com Manuals
2.3.3 Switch to standby
If the TV is on, press O on the remote control to switch to
standby.
The red standby key indicator is on.
Although the TV consumes very little power when in
standby, energy continues to be consumed.
When the TV is not in use for an extended period of time,
we advise to switch the TV off with the O key on the TV
and to unplug the TV mains cord from the mains outlet.
Downloaded From TV-Manual.com Manuals
If you can not locate your remote control and you want to
switch the TV to Standby, press O on the side of the TV.
This switches off your TV.
To switch the TV back on, press O again.
2.3.4 Smart Settings
You can set the TV to the predefined setting that is best
for what you're watching at the moment. Each setting
combines picture and sound.
• Personal — Sets the TV to your personal preferences set
in the Picture and Sound menus in the Setup menu.
While watching TV, press Options o and select Picture
and sound. Press OK.
• Natural — Natural picture settings.
Select Smart settings and press OK.
Select a setting from the list and press OK.
Downloaded From TV-Manual.com Manuals
• Vivid — Rich and dynamic settings, ideal for daylight use.
• Cinema — Ideal settings for watching movies.
• Game — Ideal settings for gaming.
• Standard — The factory standard and most energy
conscious settings.
2.3.5 Picture format
1/2
If black bars appear in the screen, adjust the picture
format. Ideally change the picture format to a format that
fills the screen.
You can select the following picture format settings ...
While watching TV, press Format f to switch on the
Picture format menu, select an available picture format
and press OK.
Enlarges the picture automatically to fill the screen.
Minimal picture distortion, subtitles remain visible.
If subtitles are hidden in a programme, press u to shift the
picture upwards.
In the Setup > Picture > Auto format mode menu you can
select 2 Auto format settings ...
Auto format
Not fit for PC.
• Auto-fill, to fill the screen as much as possible.
• Autozoom, to keep the original picture format, black bars
may be visible.
...
Downloaded From TV-Manual.com Manuals
Downloaded From TV-Manual.com Manuals
2.4 Watch a DVD / BD movie
To watch a DVD or Blu-ray Disc movie using your disc
player, switch on your player, insert a disc and press Play
on the player. The DVD / BD picture automatically appears
on the screen.
If the DVD / BD picture does not appear, press h on the
remote control and select the item in the Home menu, and
press OK.
Wait a few seconds until the DVD / BD picture appears.
If the disc player is not yet in the Home menu, read Use
your TV > Menus > Add your devices.
Downloaded From TV-Manual.com Manuals
2.5 Watch TV using a digital receiver
When you watch TV using a digital receiver, with a
subscription from a cable or satellite company, connect
the receiver and add the receiver to the Home menu.
To add the receiver to the Home menu, read Use your TV >
Menus > Add your devices.
Downloaded From TV-Manual.com Manuals
To watch the receiver programme, switch on the receiver.
If the receiver programme does not appear automatically,
press h and select the receiver item in the Home menu.
Press OK.
Use the remote control of the digital receiver to select TV
channels.
Downloaded From TV-Manual.com Manuals
2.7.1 Net TV benefits
Net TV offers Internet services and websites tailored for
your TV. Use the TV remote control to browse the Net TV
Internet pages. You can play movies, view pictures or listen
to music, consult infotainment, play games and much
more, all set up for your TV screen.
Specifics
• Because Net TV is an online system, it can be modified
over time to better serve its purpose.
• Some Net TV services can be added, changed or stopped
after some time.
• Net TV shows pages full screen and 1 page at a time.
• You cannot download and save files nor install plug-ins.
Downloaded From TV-Manual.com Manuals
2.7.2 What you need
To enjoy Net TV, you need to connect the TV to a router
with a high speed connection to the Internet.
Read the chapter Setup > Network.
Once the connection is made, select Net TV in the Home
menu to start the Net TV onscreen setup.
Read the chapter Net TV > First use.
Downloaded From TV-Manual.com Manuals
2.7.3 First use
The first time you link up to Net TV, the TV asks you to
agree on the Terms of Use. When you agree on these
terms, the TV asks you to register for Net TV. After
registration, you can switch on the Parental control setting.
Downloaded From TV-Manual.com Manuals
1/3
Registration benefits
When you have registered for Net TV, the pages you select
as favourite pages or as locked pages are stored as backup. Also, the last 16 web addresses (URLs) you visited are
stored. You can share these same selections with another
Net TV television if you register that TV with the same
email address. When registered, you can restore these
same selections after an accidental reset of Net TV with
Clear history.
2.7.3 First use
How to register
To register, you need an email address and a PC connected
to the Internet. If you skip the registration at first use, you
can register from the Net TV start page later on.
To start the Net TV registration, you need to enter your
email address on the TV screen. Use the keypad on the
remote control as you do for SMS/text messaging to enter
the address. Select Register and press OK.
Downloaded From TV-Manual.com Manuals
2/3
A message will show if a registration email has been send
to your email address. Open the email on your PC and click
the link to the registration form. Complete the form and
click the button to submit.
On the TV, select OK and press OK to open the Net TV start
page.
...
2.7.3 First use
3/3
Parental control benefits
Switch on Parental control
With Parental control switched on ...
• some services unsuitable for children are locked from
the start but can be unlocked
The first time you open the Net TV start page, the TV asks
you to switch on the Parental control. If you switch on
Parental control, the TV asks you to enter a personal lock/
unlock code. Enter a 4 digit code as Net TV lock/unlock
code. Use the number keys on the remote control. Enter
the same code again to confirm.
Specifics
Net TV is ready to use.
• you can lock and unlock services and/or categories of
services
• Only services on the Net TV pages can be locked.
Advertisements and open Internet websites can not be
locked.
• Services are locked per country. Categories are locked for
all countries.
Downloaded From TV-Manual.com Manuals
2.7.4 Browse Net TV
To browse Net TV, close this user manual, press h on the
remote control, select Browse Net TV in the Home menu
and press OK. The TV links up to Net TV and opens the start
page.
To exit Net TV, press h and select another activity.
...
Downloaded From TV-Manual.com Manuals
1/6
2.7.4 Browse Net TV
2/6
The Net TV start page
The Browse all page
The Net TV start page shows your favourite services and
some recommended services. You can browse Net TV from
this page.
The Browse all page holds all services.
On the Browse all page, you can view the Net TV services
by category. Select a category and press OK.
Select a Net TV service with u or v, w or x keys. To open a
service, press OK.
Browse another country
Press Back b to go back one page.
On the Browse all page you can switch the Net TV country.
Another country might have different services.
Select Browse: ..., select another country and press OK.
...
Downloaded From TV-Manual.com Manuals
2.7.4 Browse Net TV
Mark favourites
You can mark up to 12 favourite services.
To mark a service as a favourite, select the service icon and
press Options o. Select Mark favourite and press OK.
All your favourite services are shown in the Net TV start
page. In the Browse all page favourite services are marked
with a star F.
Use the Options menu to unmark.
Downloaded From TV-Manual.com Manuals
3/6
To mark several services as favourites in one go, select
Mark favourites on the Net TV start page or Browse all page
and press OK. Now you can select services and mark them
one by one, with OK. You can switch to the Browse all page
if necessary. To end the Mark favourites mode, select Done
and press OK.
Only Net TV services can be marked as favourite.
Advertisements and open Internet websites can not be
marked.
...
2.7.4 Browse Net TV
4/6
Open Internet websites
Enter open Internet
With Net TV you can link up to the open Internet. You can
view any website you like but remember that most open
Internet websites are not tailored to be viewed on a TV
screen and certain necessary plug-ins (e.g. to view pages
or videos) are not available on your TV.
On the Browse all page, select Enter web address and
press OK. On the onscreen keyboard you can enter the web
address you like. Select a character and press OK to enter
the address.
Use the u or v, w or x keys to navigate to the available
links on a open Internet page, press OK to go to the link.
...
Downloaded From TV-Manual.com Manuals
2.7.4 Browse Net TV
Scrolling open Internet pages
Use the P - and + to scroll pages up or down.
Zoom open Internet pages
You can zoom open Internet in or out. Press Format f.
Use the arrows up or down to zoom in or out.
...
Downloaded From TV-Manual.com Manuals
5/6
2.7.4 Browse Net TV
Clear history
You can clear the Net TV memory.
To clear the Parental control code, passwords, cookies
and history, press h > Setup > Installation > Clear Net TV
memory.
Downloaded From TV-Manual.com Manuals
6/6
Koninklijke Philips Electronics N.V. bears no responsibility
regarding the content and the quality of the content
provided by the content service providers.
2.7.5 Net TV - TV guide
The moment you link up with Net TV, the TV programme
guide information comes from the Internet. However, you
can switch back to programme guide information from the
digital broadcaster.
Close this user manual and press h > Setup > Installation
> Preferences > Programme guide and select Broadcaster.
In both cases, Philips is not responsible for the
programme guide information.
Downloaded From TV-Manual.com Manuals
2.7.6 Parental control
With Net TV Parental control you can lock Net TV services
and service categories. When a service is locked, you need
to enter a code to open the service or category.
To lock a service, Parental control needs to be switched on.
Parental control is switched on when a lock icon appears
when you link up with Net TV.
1/3
Switch on Parental control
If you did not switch on Parental control yet, close this user
manual and press h > Browse Net TV. When the Net TV
start page is onscreen, press Options o and select Enable
parental control. The TV asks you to enter a personal lock/
unlock code. Enter a 4 digit code as lock/unlock code. Use
the number keys on the remote control. Enter the same
code again to confirm.
...
Downloaded From TV-Manual.com Manuals
2.7.6 Parental control
2/3
Lock a service or category
Specifics
On the Net TV start page or Browse all page, select a
service or category. Press Options o, select Lock service
and press OK. The service is locked when a lock symbol
appears on top of the service icon.
• Only services on the Net TV pages can be locked.
Advertisements and open Internet websites can not be
locked.
Unlock
To unlock a service or category, select the service and
press Options o and select Remove lock.
• Services are locked per country. Categories are locked for
all countries.
• The Net TV Parental control code and the Child lock code
of the TV are 2 different codes.
• When you have registered Net TV and you switch
off Parental control in the Options menu, all locks are
remembered and available again when you switch Parental
control back on.
...
Downloaded From TV-Manual.com Manuals
2.7.6 Parental control
Did you forget your code ?
If you forgot your Parental control code, you can clear the
Net TV memory and enter a new code.
Read the chapter Use your TV > Net TV > Clear history.
Downloaded From TV-Manual.com Manuals
3/3
2.7.7 Clear history
Warning
Clear history
If you clear the Net TV memory with Clear history, you need
to redo the first use registration when you link up to Net TV
again. If you have registered before, you can restore your
former favourite services and former locks.
You can clear the Net TV memory.
Downloaded From TV-Manual.com Manuals
To clear the Parental control code, passwords, cookies
and history, press h > Setup > Installation > Clear Net TV
memory.
3.1.1 Select a teletext page
Most TV channels broadcast information through teletext.
While watching TV, press Teletext.
To exit teletext, press Teletext again.
To select a page …
• Enter the page number with the number keys.
• Press P +/- or u or v or b to view the next or the
previous page.
• Press a colour key to select a colour-coded item at the
bottom of the screen.
Downloaded From TV-Manual.com Manuals
Downloaded From TV-Manual.com Manuals
Downloaded From TV-Manual.com Manuals
3.1.4 Select T.O.P. teletext
You can easily jump from one subject to another without
using page numbers with T.O.P. teletext.
Not all channels broadcast T.O.P. teletext.
Press Info i when teletext is switched on.
The T.O.P. overview appears.
Select a subject and press OK to view the page.
Downloaded From TV-Manual.com Manuals
3.1.5 Search teletext
In teletext, you can quickly jump to a subject linked to a
series of page numbers. Also, you can search for specific
words in teletext pages.
Switch on teletext and press OK. The first word or first
index number of the page is highlighted onscreen.
Jump to the next word or number on the page with w or x,
u or v.
Press OK to search for a page featuring the highlighted
word or number.
Downloaded From TV-Manual.com Manuals
Each time you press OK, the next page featuring the
highlighted word or number is shown.
To exit Search, press u until no word or number is
highlighted.
3.1.6 Teletext options
1/2
When in teletext, press Options o on the remote control
to reveal hidden info, let subpages cycle automatically,
change the character setting, freeze a teletext page, view
the TV channel and teletext simultaneously or show a
teletext page full screen again.
Dual screen / Full screen
Freeze page
Select the option Full screen to show full screen teletext
again.
Stop the automatic rotation of subpages or stop the page
counter when you have entered a wrong page number or
when the page is not available.
Not available for channels with Digital Text services.
Select Dual screen to view the TV channel and teletext
alongside each other.
Reveal
Hide or unhide hidden information on a page, such as
solutions to riddles or puzzles.
...
Downloaded From TV-Manual.com Manuals
3.1.6 Teletext options
2/2
Cycle subpages
Enlarge teletext page
If subpages are available for the selected page, you can
make subpages cycle automatically.
You can enlarge the teletext page for more comfortable
reading.
Language
In teletext, press f to enlarge the top part of the page
and f again to view the enlarged lower part of the page.
With u or v you can scroll through the enlarged page.
Some languages use a different set of characters. Switch
to the other character group to show the text correctly.
Press f again to return to the normal page size.
Downloaded From TV-Manual.com Manuals
3.1.7 Digital text (UK only)
Some digital TV broadcasters offer dedicated digital text
or interactive services on their digital TV channels, for
example BBC1. These services include normal teletext
with the number, colour and navigation keys to select and
navigate.
While watching TV, press Teletext and navigate to select or
highlight items.
Use the colour keys to select an option and press OK to
confirm or activate.
Press S to cancel Digital text or interactive services.
Downloaded From TV-Manual.com Manuals
Digital text services are blocked when subtitles are
broadcast and Subtitle On is set in the Features menu.
Read Subtitles and languages > Subtitles.
3.1.8 Teletext 2.5
Teletext 2.5 offers more colours and better graphics, if
broadcast by the TV channel.
Teletext 2.5 is activated as a standard factory setting.
To switch it off select h > Setup > Installation >
Preferences > Teletext 2.5.
Downloaded From TV-Manual.com Manuals
3.2 Favourite channels
After you have finished the installation, all TV and radio
channels are added to the Channel overview.
In this overview, you can mark channels as favourites and
set the Channel overview to only show these favourites.
While watching TV, press OK to open the Channel overview.
With a channel highlighted, press Options o. Select Mark
as favourite to make the highlighted channel a favourite
channel. Favourite channels are marked with a F. Unmark
the channel as favourite with Unmark favourite.
Downloaded From TV-Manual.com Manuals
Select list
With the Select list option in the Channel overview, you can
set the overview to show only your favourite channels.
Read Use your TV > Menus > Channel overview.
3.3.1 Programme guide
The Programme guide is an onscreen guide of
scheduled TV programmes. This guide is provided by the
broadcasters or Net TV. You can set a reminder to show a
message when a programme starts or select programmes
by genre.
While watching TV, press Guide g to open the
Programme guide. If available, a list of the current TV
programmes appears. It may take some time to load this
information.
To exit the Programme guide, press Guide g.
...
Downloaded From TV-Manual.com Manuals
1/3
3.3.1 Programme guide
2/3
Navigate through the list to select a programme.
Options o
Info i
In the Programme guide list, press Options o to select
the following ...
To open the programme details and summary, press Info
i.
• Set reminder
To show a message onscreen when the programme
starts, select Set reminder and press OK. The programme
is marked with ©. To cancel the message, select Clear
reminder and press OK. To switch to the TV channel of the
programme directly, select Watch channel and press OK.
If a reminder is set, the option Scheduled reminders is
available with a list of all reminders.
• Change day
View the previous or next day's programmes.
• More info
Opens the info screen with details and a summary of the
programme.
...
Downloaded From TV-Manual.com Manuals
3.3.1 Programme guide
3/3
• Search by genre
Specifics
View all programmes by genre. Select a programme and
press Info i for more info or to set a reminder.
If the Programme guide information comes from a
broadcaster/operator, the first 40 channels out of the
channel overview are shown in the Programme guide. You
can add 10 other channels yourself.
• List of preferred programmes
Set channels to appear in the Programme guide list (max.
50 channels).
Downloaded From TV-Manual.com Manuals
Some broadcasters/operators can show the first 170
channels and you can add another 10 channels. In this
case, the Programme guide schedules all programmes for
today and the next 3 days.
3.3.2 Setup
To select where the Programme guide information comes
from, press h > Setup > Installation > Preferences >
Programme guide.
From network
Until you link up with NetTV, guide information comes
from the broadcaster. From network will switch to the
Internet for guide information as soon as the TV is
connected to Net TV.
From broadcaster
Guide information comes from the broadcaster/operator.
Downloaded From TV-Manual.com Manuals
3.4.1 Sleeptimer
With Sleeptimer you can switch the TV to standby at a
specified time.
Close the user manual and press h > Setup > Features >
Sleeptimer.
With the Sleeptimer slider bar you can set the time up to
180 minutes in steps of 5 minutes.
If set to 0 minutes, Sleeptimer is switched off.
You can always switch off your TV earlier or reset the time
during countdown.
Downloaded From TV-Manual.com Manuals
3.4.2 Child lock
To prevent children from watching TV, you can lock the TV
or block age rated programmes.
Set your personal code
Before you set Child lock to lock the TV or set an age rating,
set your personal lock code in h > Setup > Features > Set
code.
Enter the four-number code with the number keys.
You can always change the code if necessary.
Downloaded From TV-Manual.com Manuals
1/2
Child lock
Select Lock as Child lock setting, to lock all TV channels
and the programmes from devices.
When Lock is set, you need to enter your personal code to
unlock the TV.
The lock is activated the moment you close the menu on
screen or set the TV in standby.
...
Downloaded From TV-Manual.com Manuals
3.4.3 Age rating
Some digital broadcasters, depending on your country,
have their programmes rated.
When the rating is equal or higher than the rating you have
set for your child’s age, the programme will be blocked.
To set an age rating, press h > Setup > Features > Child
lock and select Parental rating.
With Parental rating selected in Child lock go to h > Setup
> Features > Parental rating and select the age rating for
programmes that are allowed to be viewed.
Downloaded From TV-Manual.com Manuals
A programme with an equal or higher age rating will be
blocked and the TV will ask for the code to unblock the
programme. Some operators only block programmes with
a higher rating.
Age rating is activated the moment you close the onscreen
menu or set the TV to standby.
Read More on … > Timers and locks > Child lock.
3.5.1 Subtitles
Programme subtitles are available most of the time. You
can set subtitles to display constantly. Depending on
the channel, an analogue or digital channel, a different
method is used to set constant subtitles.
For digital channels, a preferred subtitle language can be
set.
1/3
For analogue channels
To have subtitles constantly onscreen, select an analogue
TV channel and press Teletext to switch on teletext.
Enter the three number page number of the subtitles
page, usually 888, and press Teletext again to switch off
teletext. Subtitles will show if available.
Each analogue channel needs to be set separately.
...
Downloaded From TV-Manual.com Manuals
3.5.1 Subtitles
Subtitle menu
To switch subtitles on constantly, press Subtitle.
Select Off, On or On during mute.
With On during mute, the TV displays subtitles only when
the sound is muted with m.
...
Downloaded From TV-Manual.com Manuals
2/3
3.5.1 Subtitles
Digital channel subtitle languages
If subtitles are available on digital channels, you can select
a preferred subtitle language from a list of broadcast
languages.
See h > Setup > Features > Subtitle language.
Select a subtitle language from the list of available
languages and press OK.
The preferred subtitle languages set in the Installation
menu are overruled temporarily.
Downloaded From TV-Manual.com Manuals
3/3
Downloaded From TV-Manual.com Manuals
3.6.1 Browse USB
Watch photos or play music and videos on TV from a USB
memory device.
Insert a USB device in the USB connector on the left hand
side of the TV while the TV is switched on.
The TV detects the device and opens a list showing the
content of the USB device onscreen.
If the content does not show, press h > Browse USB and
press OK.
1/2
While the USB content list is open onscreen, select the file
you want to play and press OK or play P.
A song, a slideshow of photos or a video starts playing.
To pause, press P again.
To jump to the next file, press x or P +.
To jump to the previous file, press w or P -.
To fast forward a music file, press Q.
Press Options o to Play once, Repeat, Shuffle, Rotate and
much more.
...
Downloaded From TV-Manual.com Manuals
3.6.1 Browse USB
Watch videos
Select a video in the Guide menu and press play P.
To pause the video, press pause P.
To fast forward, press Q once to go slow, press twice to go
fast. Press again for normal speed.
Press Options o to change to Full screen, Small screen,
Play once, etc.
Downloaded From TV-Manual.com Manuals
2/2
To exit Browse USB, press h and select another activity or
disconnect the USB memory device.
Downloaded From TV-Manual.com Manuals
3.6.2 Browse PC Network
2/2
To pause, press P again.
Watch videos
To jump to the next file, press x or P +.
Select a video in the Guide menu and press play P. To
pause the video, press pause P.
To jump to the previous file, press w or P -.
To fast forward a music file, press Q.
Press Options o to Play once, Repeat, Shuffle, Rotate and
much more.
To fast forward, press Q once to go slow, press twice to go
fast. Press again for normal speed.
Press Options o to change to Full screen, Small screen,
Play once, etc.
To exit the PC network, press h and select another
activity.
Downloaded From TV-Manual.com Manuals
3.7 Scenea
With Scenea, you can set a photo as a 'wallpaper' photo on
your screen. Use any photo from your collection.
Press h to open the Home menu, select Scenea and
press OK. The wallpaper photo is shown and there is no
sound.
To exit Scenea, press any key on the remote control.
...
Downloaded From TV-Manual.com Manuals
1/3
3.7 Scenea
We recommend setting the TV to the energy conscious
Standard settings before you switch on Scenea.
Press o and select Picture and sound > Smart settings >
Standard.
2/3
Select a new photo
1 Connect a USB device that holds your new photo to the
TV. This photo must be in a JPEG format.
2 Highlight the photo in the USB content list with the
navigation keys. If the content list does not appear
automatically, press h and select Browse USB.
3 With the new photo highlighted, press o and select Set
as Scenea. Agree to overwrite the current photo.
4 Disconnect the USB device and select Scenea in the
Home menu to view the new photo.
...
Downloaded From TV-Manual.com Manuals
3.7 Scenea
Limitations
When Scenea is on, the TV will automatically switch
to standby after 4 hours. The TV will show a message 1
minute before switching to Standby. The switching to
Standby prevents unnecessary energy use in case you
forget that Scenea is switched on.
If the Sleeptimer is set, the TV will also switch to standby
after the set time has elapsed.
Downloaded From TV-Manual.com Manuals
3/3
3.8.1 Hearing impaired
Some digital TV channels broadcast special audio and
subtitles adapted for people who are hearing impaired.
To switch on hearing impaired audio and subtitles, press
h > Setup > Installation > Languages > Hearing impaired.
Select On and press OK.
The TV switches to hearing impaired audio and subtitles, if
available.
Downloaded From TV-Manual.com Manuals
To verify whether a hearing impaired audio language is
available, press Options o and select Audio language and
look for an audio language with an ear icon.
3.8.2 Visually impaired
Some digital TV channels broadcast special audio adapted
for people who are visually impaired. The normal audio is
mixed with extra commentary.
To switch on visually impaired audio, press Options o
while watching the digital TV channel and select visually
impaired. Select On and press OK.
The TV switches to visually impaired audio, if available.
Downloaded From TV-Manual.com Manuals
In the Options menu, you can set the visually impaired
audio to be heard from the Speakers, the Headphones only
or from both Speakers and headphones.
Also in the Options menu, select Volume - Visually
impaired to change the volume of the extra commentary.
To verify whether a visually impaired audio language is
available, press Options o and select Audio language and
look for an audio language with an eye icon.
Downloaded From TV-Manual.com Manuals
4.1.2 Picture
In the Picture menu, you can adjust all picture settings
individually.
Close this user manual and press h > Setup > Picture.
Use w or x, u or v to select and adjust a setting.
Press OK to activate a setting.
1/4
• Settings assistant
Start the Settings assistant to guide you through basic
picture settings easily.
Follow the instructions on screen.
• Contrast
Changes the level of brightness in the picture but the level
of darkness remains the same.
• Brightness
Changes the level of light in the whole picture.
• Colour
Changes the level of saturation.
...
Downloaded From TV-Manual.com Manuals
4.1.2 Picture
2/4
• Hue
• Custom tint
If NTSC is broadcast, this level compensates the colour
variations.
Use a slider bar to change the colour temperature of the
picture …
• Sharpness
- R-WP red whitepoint
Changes the level of sharpness of fine details.
- G-WP green whitepoint
• Noise reduction
- B-WP blue whitepoint
Filters out and reduces the noise in the picture. Set levels
to Minimum, Medium, Maximum or Off.
- R-BL red blacklevel
• Tint
Sets the colours to Normal, Warm (reddish) or Cool
(bluish). Select Custom to make your own personal
settings in the Custom menu.
Downloaded From TV-Manual.com Manuals
- G-BL green blacklevel
...
4.1.2 Picture
3/4
• Pixel Precise HD
- Dynamic contrast
Controls the advanced settings of Pixel Precise HD.
Sets the level at which the TV automatically enhances the
details in the dark, middle and light areas of the picture.
- HD Natural Motion
Removes motion judder and reproduces smooth
movement, especially in movies.
- 100 Hz LCD
Offers a fast pixel response time for extreme motion
sharpness for all your movies and sports.
Downloaded From TV-Manual.com Manuals
- Dynamic backlight
Sets the level at which power consumption can be
reduced by dimming the brightness intensity of the
screen. Choose for the best power consumption or for the
picture with the best brightness intensity
...
4.1.2 Picture
4/4
- MPEG artefact reduction
• Light sensor
Smooths the digital transitions in the picture.
Adjusts the picture settings automatically to the lighting
conditions of the room. Switches the Light sensor on or off.
- Colour enhancement
Makes the colours more vivid and improves the resolution
of details in bright colours
• PC mode
Sets the TV to the ideal predefined computer setting in
case a computer has been connected.
Downloaded From TV-Manual.com Manuals
• Picture format / auto format mode
Read Use your TV > Watch TV > Adjust the picture format
• Picture shift
To shift the picture vertically on the screen with the
navigation keys.
4.1.3 Sound
In the Sound menu, you can adjust all sound settings
individually.
Close the user manual and press h > Setup > Sound.
Use w or x, u or v to select and adjust a setting.
Press OK to activate a setting.
1/3
• Bass
Changes the low tones of the sound. Select each bar to
change the setting.
• Treble
Changes the high tones of the sound. Use each slider bar
to change the setting.
• Volume
Changes the volume.
If you do not want the volume bar to appear, press h >
Setup > Installation > Preferences > Volume bar. Select Off
and press OK.
...
Downloaded From TV-Manual.com Manuals
4.1.3 Sound
2/3
• Volume — visually impaired
• Mono/stereo
Changes the volume of the selected visually impaired
audio language. (Only for UK.)
If stereo broadcasting is available, you can select Mono or
Stereo for each TV channel.
• Audio language
• TV speakers
Shows the list of broadcast audio languages of digital TV
channels.
If you have an audio system connected to your TV, you can
switch off the TV speakers.
You can set your preferred audio language in h > Setup >
Installation > Languages > Primary audio.
If your audio system supports EasyLink, read Connections
> Connection settings > EasyLink.
• Dual I/II
Select Automatic (EasyLink) to have the sound from your
TV automatically reproduced by your audio system.
If broadcast is available, you can choose between two
different languages.
Downloaded From TV-Manual.com Manuals
...
4.1.3 Sound
3/3
• Surround
• Balance
Switches the TV automatically to the best surround sound
mode dependant on the broadcast. Select On or Off.
Sets the balance of the left and right loudspeakers to best
fit your listening position.
• Headphones volume
• Auto volume levelling
Changes the volume of the headphones.
Reduces sudden volume differences like at the beginning
of commercials or when switching from one channel to
another. Select On or Off.
You can mute the TV speakers with m.
• Delta volume
Levels out volume differences between channels
or connected devices. First, switch to the channel or
device whose volume difference you want to level out.
Downloaded From TV-Manual.com Manuals
4.1.4 Factory settings
You can return to the original factory settings.
Only picture and sound settings will be reset.
Close the user manual and press h > Setup > Installation
> Factory reset and press OK.
Downloaded From TV-Manual.com Manuals
4.2.1 Reorder and rename
After the first installation, you might want to reorder or
rename installed channels. Organise TV channels in the
Channel overview according to your own preference or
give them a recognisable name.
While watching TV, press OK to open the Channel overview.
The Channel overview shows the TV channels and radio
stations installed on your TV.
To reorder or rename, press Options o and select the
option you need.
Downloaded From TV-Manual.com Manuals
1/2
Reorder
You can reposition channels within the overview.
1 Select Reorder in the Options o menu to start
reordering channels.
2 Highlight a channel and press OK.
...
4.2.1 Reorder and rename
3 Reposition the channel where you want it with the
navigation keys.
4 Press OK to confirm the position.
You can highlight another channel and do the same.
To stop Reorder, press Options o and select Exit reorder.
2/2
Rename
You can rename a channel.
1 In the channel overview, navigate to the channel you
want to rename.
2 Select Rename in the Options o menu.
3 Use the navigation keys to position the highlight. Press
Back b to delete a character. Use the remote control
number pad as you do for SMS/text messaging to select
a character. Use the 0 number key to select a special
character. Select Clear to clear all text.
4 Select Done and press OK to end Rename.
Downloaded From TV-Manual.com Manuals
4.2.2 Update channels
When the TV was switched on for the first time, a full
installation of channels was performed.
You can set the TV to add or remove digital channels
automatically. You can also manually start the channel
update.
1/2
Automatic update
To set the TV to update digital TV channels automatically,
leave the TV in standby mode. Once a day, at 6 AM, the TV
updates earlier found channels and stores new channels.
Empty channels are removed from the Channel overview.
If a channel update has been performed, a message shows
at TV start up.
If you do not want this message to appear, select No in
h > Setup > Installation > Channel installation > Channel
update message.
...
Downloaded From TV-Manual.com Manuals
4.2.2 Update channels
If you do not want the update during standby mode, select
No in h > Setup > Installation > Channel installation >
Channel update in standby.
2/2
Manual update
To update channels yourself at any time, press h > Setup
> Installation > Channel installation > Automatic installation
and press OK.
Start the update and select Update Channels.
The update may take a few minutes.
Downloaded From TV-Manual.com Manuals
4.2.3 Reinstall channels
When the TV was switched on for the first time, a full
installation of channels was performed.
You can redo this full installation all over again to set your
language, country and install all available TV channels.
Full installation
To reinstall the TV, press h > Setup > Installation >
Channel installation > Automatic installation and press OK.
Start the installation and select Reinstall channels.
The update may take a few minutes.
To reorder or rename found channels, read Setup >
Channels > Reorder and rename.
Downloaded From TV-Manual.com Manuals
4.2.4 Digital reception quality
If you receive digital TV broadcasting (DVB) from your
own antenna (DVB-T) or use the TV tuner to receive digital
cable channels (DVB-C), you can verify the quality and
signal strength of a channel.
If the reception is poor, you can reposition your antenna
to try to improve the reception. For best results, contact a
specialised antenna installer.
1/2
To verify the reception quality of such a digital channel,
select the channel, press h > Setup > Installation >
Channel installation > Reception test > Search and press
OK.
The digital frequency is shown for this channel.
If the reception is poor, you can reposition your antenna.
Select Search and press OK to verify the signal quality of
this frequency again.
...
Downloaded From TV-Manual.com Manuals
4.2.4 Digital reception quality
You can enter a specific digital frequency yourself.
Select the frequency, position the arrows on a number
with x and w and change the number with u and v. Press
Search to verify this frequency.
Downloaded From TV-Manual.com Manuals
2/2
If you receive the channel with DVB-C, the options Symbol
rate mode and Symbol rate are shown.
For Symbol rate mode, select Automatic unless your cable
provider supplies a specific symbol rate value. You can
enter this supplied value in Symbol rate using the number
keys.
4.2.5 Manual installation of analogue channels
Analogue TV channels can be manually tuned-in channel
by channel.
To start the manual installation of analogue channels,
press h > Setup > Installation > Channel installation >
Manual install - analogue.
Follow each step in this menu.
You can redo these steps until you have all available
analogue TV channels.
1 System — If you have your own antenna, you need
to select the country or part of the world where the TV
channel comes from. If you receive TV channels via a cable
system, you only need to select the country or part of the
world once.
2 Find channel — Search for an analogue TV channel. The
search starts automatically but you can manually enter a
frequency. If the channel reception is bad, select Search
next to search again. Select Done and press OK if you want
to store this TV channel.
...
Downloaded From TV-Manual.com Manuals
1/2
4.2.5 Manual installation of analogue channels
3 Fine tune — Fine tune the found channel with u and v.
Press Done once the channel is fine tuned.
4 Store — A found channel can be stored on the current
channel number with Store current channel or as a new
channel number with Store as new channel.
Downloaded From TV-Manual.com Manuals
2/2
4.2.6 Fine tune analogue channels
If the reception of an analogue TV channel is poor, you can
try to fine tune the TV channel.
To fine tune analogue channels, press h > Setup >
Installation > Channel installation > Manual install analogue > Fine tune.
Downloaded From TV-Manual.com Manuals
Fine tune the channel with u and v. Press Done once the
channel is fine tuned.
You can store this fine tuned channel on the current
channel number with Store current channel or as a new
channel number with Store as new channel.
Downloaded From TV-Manual.com Manuals
4.2.8 Clock settings
In some countries, digital TV broadcasts do not send UTC
— Coordinated Universal Time information. Therefore,
winter and summer time changes might be ignored. You
can correct this with the clock settings.
If the TV shows the incorrect time, press h > Setup >
Installation > Clock > Auto clock mode and select Manual.
In the Daylight saving menu, select Standard time (winter)
or Daylight saving time (summer) according to your local
time.
Downloaded From TV-Manual.com Manuals
4.3.1 Network benefits
PC network
Net TV
If the TV is connected to your PC network, you can play
photos, music and movies from a computer or storage
device in that network.
If the TV is connected to the PC network, which is
connected to the internet, you can link up your TV to Net
TV. The Net TV start page offers you movies, pictures,
music, infotainment, games and many more, all fit for
your TV screen.
Once the network is installed, select Browse PC network in
the Home menu to view the PC content.
Downloaded From TV-Manual.com Manuals
Once the network is installed, select Browse Net TV in the
Home menu to open the Net TV start page.
4.3.2 What you need
To connect the TV to a PC network and internet you need
a router in your PC network. The router needs to be set to
DHCP On.
To enjoy Net TV you need to connect the TV to a router with
a high speed connection to the internet.
To connect the router to the TV, you need a network
(Ethernet) cable.
...
Downloaded From TV-Manual.com Manuals
1/2
4.3.2 What you need
The PC network feature is DLNA 1.0 certified.
You can use Microsoft Windows XP or Vista,
Intel Mac OSX or Linux on your computer.
To share PC content on your TV, you need recent media
server software on your computer.
A Windows Media Player 11 or similar.
Some media server software needs to be set to share files
with the TV.
For the list of supported media server software, read
Technical data > Multimedia.
Downloaded From TV-Manual.com Manuals
2/2
4.3.3 Wired installation
The onscreen procedure helps you to install the wired
network.
Connect the router to the TV using a network cable
and switch on the router before you start the network
installation.
To start the wired network installation, close the user
manual, press h > Setup > Installation > Network >
Network installation and press OK.
Follow the instructions on screen.
Downloaded From TV-Manual.com Manuals
The TV constantly searches for a network connection.
If asked for, agree to the End User License Agreement.
Find the latest End User License Agreement at
www.philips.com.
4.3.4 Network settings
The TV's network settings that are used to connect to your
router are standard and set to automatic. This ensures easy
connection with any available network.
If you have problems with the network connection,
you might want to adjust the settings so that they are
appropriate for your home network.
If you are unsure, ask someone with knowledge of network
settings to help you.
To set specific network settings, press h > Setup >
Installation > Network > Network mode and/or … > IP
configuration.
Downloaded From TV-Manual.com Manuals
4.3.5
PC Media server
settings
Media servers need to be set for sharing their files and
folders. Follow the instructions closely to set your
specific server.
In the Media Sharing window, check the Share my
media box. Click OK.
1
2
Windows Media Player v11 on Windows Vista
Set for network sharing
In Windows Media Player select Library from the menu
and select Media sharing.
If no network connection was found, and you are
unable to check this box, click the Networking button
to show the Network and Sharing Center window, …
1
Downloaded From TV-Manual.com Manuals
2
Set Network discovery to On.
Set File sharing to On.
Go back to the Media Sharing window in Windows
Media Player and check the Share my media box.
Click OK.
Set folders for sharing
In Windows Media Player select Library from the menu
and select Add to Library.
When the TV is connected, by the router, to the PC and
everything is switched On, the Media sharing window
will show the TV as an Unkown Device.
Select the device and click Allow.
In the Add To Library window, select My folders and
those of others that I can access and click the
Advanced Options button. …
1
2
1
You can open the Settings window to change
particular settings on sharing.
When the device icon (the TV) is checked with a green
tick, click OK.
Downloaded From TV-Manual.com Manuals
2
With Advanced Options open, you can add specific
folders to the list to share. Click Add.
In the Add To Library window the newly added folder is
shown. You can add more folders to share.
Click the OK button to add the files to the library.
1
In the Add Folder window select a folder with music,
photos or videos you want to share with other devices
(your TV). Click OK.
1
Now everything is set to enjoy music, photos and
videos on your TV.
2
Downloaded From TV-Manual.com Manuals
Windows Media Player v11 on Windows XP
Set for network sharing
You can open the Settings window to change
particular settings on sharing.
When the device icon (the TV) is checked with a green
tick, click OK.
In Windows Media Player select Library from the menu
and select Media sharing …
Set folders for sharing
In Windows Media Player select Library from the menu
and select Add to Library.
In the Media Sharing window, check the Share my
media box.
When the TV is connected, by the router, to the PC and
everything is switched On, the Media sharing window
will show the TV as an Unkown Device. Select the
device and click Allow.
1
2
3
Downloaded From TV-Manual.com Manuals
In the Add To Library window, select My folders and
those of others that I can access and click the
Advanced Options button.
With Advanced Options open, you can add specific
folders to the list to share. Click Add.
In the Add To Library window the newly added folder is
shown. You can add more folders to share.
Click the OK button to add the files to the library.
1
In the Add Folder window select a folder with music,
photos or videos you want to share with other devices
(your TV). Click OK.
Now everything is set to enjoy music, photos and
videos on your TV.
Downloaded From TV-Manual.com Manuals
TVersity v.0.9.10.3 on Windows XP
Click the Sharing tab.
Set for network sharing
1
Click the Settings tab and click the Start Sharing
button.
1
2
Set folders for sharing
Click the green plus icon and select Add folder…
1
2
A pop-up window tells you that the media server
service is started. Click OK.
In the Add media pop-up window, click the Browse
button.
Downloaded From TV-Manual.com Manuals
Twonky Media v4.4.2 on Macintosh OS X
Set for network sharing
1
In Twonky Media click Basic Setup > First steps.
In this window you can change the server name that
appears on your TV.
In the Browse for Folder window select a folder with
music, photos or videos you want to share. Click OK.
1
Now everything is set to enjoy music, photos and
videos on your TV.
2
Click Basic Setup > Clients/Security.
Check the box next to Enable sharing for new clients
automatically.
Downloaded From TV-Manual.com Manuals
Downloaded From TV-Manual.com Manuals
4.4.1 From the Internet
In some cases, it might be necessary to update the TV
software. If your TV is connected to a router, which is
connected to the Internet, you can update the TV software
directly from the Internet. You need a high speed Internet
connection.
Close this user manual, press h > Setup > Software
update > Update now and press OK.
Select Internet and press OK.
Follow the instructions on screen.
Downloaded From TV-Manual.com Manuals
When the update is done, the TV switches off and back on
again automatically. Wait for the TV to switch back on; do
not use the Power switch O on the TV.
If the TV is connected to the Internet, the TV displays a
message about the availability of new software at start up.
Downloaded From TV-Manual.com Manuals
4.4.2 With a USB memory device
2/3
1 Identification
2 Download from PC to USB
Close this user manual, press h > Setup > Software
update > Update now and press OK.
Once the TV identification file is written to the USB device,
insert the USB into your PC that is connected to the
Internet. On the USB device, locate the file 'update.htm'
and double-click it. Click on Send ID. If new software is
available it will download to the USB device.
Select USB and press OK.
Follow the onscreen instructions.
The TV will ask to insert the USB device into the USB
connector at the side of the TV.
Downloaded From TV-Manual.com Manuals
...
Downloaded From TV-Manual.com Manuals
5.1.1 Power cable
Make sure the power cable is securely inserted in the
TV. Make sure that the power plug in the wall socket is
accessible at all times.
When disconnecting the power cable, always pull the plug,
never the cable.
Although this TV has a very low standby power
consumption, unplug the power cable to save energy if
you do not use the TV for a long time.
Downloaded From TV-Manual.com Manuals
5.1.2 Antenna cable
Locate the antenna connection at the back of the TV. Insert
the antenna cable securely in the Antenna a socket.
Downloaded From TV-Manual.com Manuals
5.2.1 Cable quality
Before you connect devices to the TV, verify which
connectors are available on the device. Connect the device
to the TV with the highest quality connection available.
Good quality cables ensure a good transfer of picture and
sound.
The connections shown in this user manual are
recommendations for the cases most used. Other
solutions are possible.
Read more on specific cable types and available
connections in About cables > HDMI … etc.
Downloaded From TV-Manual.com Manuals
Add your devices
When you have connected a device to the TV, always add
this device as an item in the Home menu. With this item
in the Home menu, you can easily switch the TV to this
device.
To add a new device, press h > Add your devices. Follow
the instructions on screen.
5.2.2 HDMI
An HDMI connection has the best picture and sound
quality.
One HDMI cable combines video and audio signals.
Use HDMI for High Definition (HD) TV signals.
An HDMI cable transfers picture and sound signals in only
one direction, the opposite to a scart cable.
Do not use an HDMI cable longer than 5 m.
...
Downloaded From TV-Manual.com Manuals
1/2
5.2.2 HDMI
HDMI supports HDCP (High-bandwidth Digital Contents
Protection). HDCP is a copy protection signal that comes
with HD content (DVD disc or Blu-ray Disc).
DVI to HDMI
Use a DVI to HDMI adaptor if your device has only a DVI
connection. Use one of the HDMI connectors and, for
sound, add an Audio L/R cable to Audio In Left / Right,
HDMI / DVI mini jack connector, on the back of the TV.
Downloaded From TV-Manual.com Manuals
2/2
EasyLink
HDMI with EasyLink offers easy operating of your
connected devices when these have the HDMI CEC
standard.
Read Connections > Connection settings > EasyLink HDMICEC.
5.2.3 YPbPr — Component video
Use the Component Video YPbPr connection together with
an Audio Left and Right connection for sound.
Match the YPbPr connector colours with the cable plugs
when you connect. YPbPr can handle High Definition (HD)
TV signals.
Downloaded From TV-Manual.com Manuals
5.2.4 Scart
A scart cable combines video and audio signals. Scart
connectors can handle RGB video signals but cannot
handle High Definition (HD) TV signals.
Downloaded From TV-Manual.com Manuals
Downloaded From TV-Manual.com Manuals
5.2.6 Video
Use a Video (cinch) cable together with an Audio Left and
Right (cinch) cable.
Match the Audio connectors’ colours with the cable plugs
when you connect.
Downloaded From TV-Manual.com Manuals
5.2.7 VGA
Use a VGA cable (DE15 connector) to connect a computer
to the TV. With this connection you can use the TV as a
computer monitor. You can add an Audio Left and Right
cable for sound.
Read Connections > Connect more devices > TV as PC
monitor.
Downloaded From TV-Manual.com Manuals
5.3.1 Blu-ray Disc / DVD player
Use an HDMI cable to connect the Blu-ray Disc / DVD player to an HDMI connector on the back of the TV.
Downloaded From TV-Manual.com Manuals
5.3.2 DVD Home Theatre System
First, use an HDMI cable to connect the device to the TV.
Downloaded From TV-Manual.com Manuals
1/3
5.3.2 DVD Home Theatre System
Finally, use a digital audio cinch cable to connect the device to the TV or alternatively, use the analogue Audio Out L/R.
Downloaded From TV-Manual.com Manuals
2/3
5.3.2 DVD Home Theatre System
3/3
Audio Out L/R
Audio and Video synchronisation (sync)
If there is no digital audio output on the Home Theatre
System, you can use the TV's analogue Audio Out L/R
connection.
If the sound does not match with the video on screen, you
can set a delay on most DVD Home Theatre Systems to
match the sound and video.
Do not connect the audio signal from a DVD player or other
device directly to the Home Theatre System. Always lead
the sound through the TV first.
Downloaded From TV-Manual.com Manuals
5.3.3 DVD Recorder
First, use 2 antenna cables to connect the antenna to the DVD Recorder and the TV.
Downloaded From TV-Manual.com Manuals
1/2
5.3.3 DVD Recorder
Finally, use a scart cable to connect the DVD Recorder to a scart connector on the back of the TV.
Downloaded From TV-Manual.com Manuals
2/2
5.3.4 Digital receiver or Satellite receiver
First, use 2 antenna cables to connect the antenna to the receiver and the TV.
Downloaded From TV-Manual.com Manuals
1/2
Downloaded From TV-Manual.com Manuals
5.3.5 Digital receiver and DVD Recorder
First, use 3 antenna cables to connect the digital receiver and the DVD Recorder to the TV.
Downloaded From TV-Manual.com Manuals
1/3
5.3.5 Digital receiver and DVD Recorder
Then use a scart cable to connect the digital receiver to the TV.
Downloaded From TV-Manual.com Manuals
2/3
5.3.5 Digital receiver and DVD Recorder
Finally, use 2 scart cables to connect the 2 devices and the TV.
Downloaded From TV-Manual.com Manuals
3/3
5.3.6 Digital receiver, DVD Recorder and Home Theatre System
First, use 3 antenna cables to connect the 2 devices and the TV.
Downloaded From TV-Manual.com Manuals
1/5
5.3.6 Digital receiver, DVD Recorder and Home Theatre System
Then use a scart cable to connect the digital receiver to the TV.
Downloaded From TV-Manual.com Manuals
2/5
5.3.6 Digital receiver, DVD Recorder and Home Theatre System
Then use 2 Scart cables to connect the Digital receiver to the DVD Recorder and the DVD Recorder to the TV.
Downloaded From TV-Manual.com Manuals
3/5
5.3.6 Digital receiver, DVD Recorder and Home Theatre System
Then use an HDMI cable to connect the Home Theatre System to the TV.
Downloaded From TV-Manual.com Manuals
4/5
Downloaded From TV-Manual.com Manuals
5.3.7 Digital HD receiver
First, use 2 antenna cables to connect the Digital HD receiver to the TV.
Downloaded From TV-Manual.com Manuals
1/2
5.3.7 Digital HD receiver
Use an HDMI cable to connect the Digital HD receiver to the TV.
Downloaded From TV-Manual.com Manuals
2/2
5.4.1 Game console
Connect a game console to the back of the TV. You can
use an HDMI, YPbPr, S-Video or a Video connection. Never
connect the S-Video and Video at the same time.
See the next pages for how to connect your games
console.
1/3
Picture delay
To prevent picture delay, set the TV to Game mode.
Close this user manual and press Options o and select
Picture and sound. Press OK.
Select Smart settings and press OK.
Select Game and press OK.
...
Downloaded From TV-Manual.com Manuals
5.4.1 Game console
Use an HDMI cable to connect the game console to the back of the TV.
Downloaded From TV-Manual.com Manuals
2/3
5.4.1 Game console
Or use a S-video or video cable together with an Audio L/R to connect the game console to the back of the TV.
Downloaded From TV-Manual.com Manuals
3/3
5.4.2 HD Game console
Use an HDMI cable or YPbPr cables to connect a High
Definition game console to the TV.
Read also Connections > Connect more devices > Game.
Downloaded From TV-Manual.com Manuals
Downloaded From TV-Manual.com Manuals
5.4.4 Camcorder
Connect a camcorder to the back of the TV. You can use
an HDMI, YPbPr, S-Video or a Video connection. Never
connect the S-Video and Video at the same time.
See the next pages for how to connect your camcorder.
...
Downloaded From TV-Manual.com Manuals
1/3
5.4.4 Camcorder
Use an HDMI cable to connect the camcorder to the back of the TV.
Downloaded From TV-Manual.com Manuals
2/3
5.4.4 Camcorder
Or use a S-video or video cable together with an Audio L/R to connect the camcorder to the back of the TV.
Downloaded From TV-Manual.com Manuals
3/3
5.4.5 TV as PC monitor
1/3
You can connect the TV to your computer as a PC monitor.
Ideal TV setting
Before connecting the PC, set the PC monitor refresh rate
to 60 Hz.
Set the TV Picture format to Unscaled for the sharpest
picture quality. While watching TV, press Options o,
select Picture format and select Unscaled.
See the next pages to connect your computer.
Supported PC resolutions
For a list of supported resolutions see Technical data >
Display resolutions.
...
Downloaded From TV-Manual.com Manuals
5.4.5 TV as PC monitor
Use a DVI to HDMI adapter to connect the PC to HDMI and an audio L/R cable to connect the Audio L/R to the back of the TV.
Downloaded From TV-Manual.com Manuals
2/3
Downloaded From TV-Manual.com Manuals
5.4.6 Decoder
Use a scart cable to connect a decoder which decodes
analogue antenna channels. Use the EXT1 or EXT2
connectors at the back of the TV.
You have to assign the TV channel as a channel to be
decoded. Then assign the connection where the decoder is
connected.
Close this user manual and press h > Setup > Installation
> Decoder. Select Channel to set the channel that you want
to decode. Select Status to set the connector you use for
the decoder.
Downloaded From TV-Manual.com Manuals
5.5.1 Conditional Access Module (CAM)
Scrambled digital TV channels can be decoded with a
Conditional Access Module (CAM). Digital TV service
operators provide the CAM when you subscribe to their
services. Contact a digital TV service operator for more
information and terms & conditions.
Insert a CAM
Switch off the TV before inserting a CAM.
Look on the CAM for the correct method of insertion.
Incorrect insertion can damage the CAM and the TV.
Look for the common interface slot on the back of the TV.
Gently insert the CAM as far as it will go and leave it in the
slot permanently.
It can take a few minutes before the CAM is activated.
Removing the CAM will deactivate the service on TV.
...
Downloaded From TV-Manual.com Manuals
1/2
5.5.1 Conditional Access Module
2/2
Watching a CAM service
If a CAM is inserted and subscription fees have been paid,
the TV shows the programme from the digital TV service
provider. The applications, their function, the content and
the onscreen messages all come from the CAM service.
CAM settings
To set passwords or PIN codes for the CAM service, press
h > Setup > Features > Common Interface. Select the CAM
provider and press OK.
Downloaded From TV-Manual.com Manuals
5.5.2 Common Interface Plus CI+
This TV can handle the CI+ conditional access.
CI+ allows service providers to offer premium HD digital
programmes with a high level of copy protection.
To insert a CI+ CAM, read the chapter CAM - Conditional
Access Module.
Downloaded From TV-Manual.com Manuals
5.6.1 Wired network connection
To set up the wired network connection, read all chapters
in Setup > Network.
Connect the router to the TV using a network cable
and switch on the router before you start the network
installation.
Downloaded From TV-Manual.com Manuals
5.7.1 EasyLink
If a device is equipped with the HDMI-CEC standard, the
device and the TV can work together.
Connect the TV to the device using an HDMI cable. The
TV comes with EasyLink set to On. To switch EasyLink off,
press h > Setup > Installation > Preferences > EasyLink.
1/2
With EasyLink, the following functions are available:
• One touch play
Insert a disc and press Play on the device. The TV switches
on from standby mode and shows the disc programme
automatically.
• System standby
Press O on the TV remote control for 2 seconds to switch
the connected devices into standby mode.
...
Downloaded From TV-Manual.com Manuals
5.7.1 EasyLink
2/2
• System audio control
Naming of HDMI-CEC on other brands
If you connect an audio system, you can listen to the audio
from the TV through the audio system. The TV speakers are
muted automatically.
The HDMI-CEC functionality has different names with
different brands. Some examples of name are: Anynet,
Aquos Link, Bravia Theatre Sync, Kuro Link, Simplink, Viera
Link, ...
The TV comes with the speakers set to EasyLink
(Automatic). To switch the TV speakers off or permanently
on, press h > Setup > Sound > TV speakers.
Make sure that all HDMI-CEC settings are properly set up
on the device . EasyLink might not work with devices from
other brands.
Downloaded From TV-Manual.com Manuals
Not all brands are fully compatible with EasyLink.
5.7.2 EasyLink Remote Control
First read Connections > Connection settings > EasyLink
HDMI-CEC, before you go on with EasyLink Remote
control.
With EasyLink Remote control, the TV remote control
commands are sent directly to the device you are watching
on TV. There is no need to select the device on the remote
control first.
Caution This is an advanced setting. Verify if all devices are
suited for this setting. Unsuited devices will not respond.
Try out this function first, before you switch on EasyLink
Remote control permanently.
Downloaded From TV-Manual.com Manuals
To switch EasyLink Remote control on, press h > Setup >
Installation > Preferences > EasyLink Remote control.
Except for the Home h key, all remote control commands
will try to operate the device. Some commands might not
work with the device.
To switch back to TV control, press h and select Watch TV
To control another device, press h and select the other
device.
5.7.3 Pixel Plus link
Some devices, DVD or Blu-ray Disc players, might have
their own picture quality processing. To avoid bad picture
quality from interference with the TV processing, the
picture processing of these devices should be discarded.
With Pixel Plus link you can discard this picture quality
processing.
Downloaded From TV-Manual.com Manuals
Close this user manual and press h and select Setup >
Installation > Preferences > Pixel Plus link. Select On to
discard the picture processing from connected devices.
Downloaded From TV-Manual.com Manuals
6.1 Contact information
Warning
Contact information — Consumer Care
If your TV breaks down, NEVER try to repair the TV yourself.
If the TV problem is not solved you can call the Philips
Consumer Care hotline in your country. Find the telephone
number on the printed documentation that came with the
TV.
If the advice and suggestions in Troubleshooting do not
help resolve the problem, try switching the TV off and back
on again.
Or consult our website www.philips.com/support
TV model number and serial number
Find these numbers on the packaging label or on the type
label on the back or bottom of the TV.
Downloaded From TV-Manual.com Manuals
6.2 TV and remote control
1/2
The TV does not switch on
The TV does not respond to the remote control
• Verify the power cable connection.
• Verify that the batteries of the remote control are not
empty or weak. Verify their + / - orientation.
• Verify that the batteries of the remote control are not
empty or weak. Verify their + / - orientation.
• Unplug the power cable, wait for a minute and plug it
back in. Try switching it on again.
• You can use the buttons on the TV to switch the TV on.
• Clean the remote control and TV sensor lens.
• Verify if EasyLink Remote control is set to Off
• During the warming-up time of the TV, which is about
two minutes, it is possible that the TV and some external
devices do not immediately respond to commands from
the remote control. The device is functioning normally and
is not broken.
...
Downloaded From TV-Manual.com Manuals
Downloaded From TV-Manual.com Manuals
6.3 TV channels
Some TV channels are gone
No digital channels found during installation
• Verify if the correct list for the Channel overview is
selected. Read Use your TV > Menus > Channel overview.
• Verify if the TV supports DVB-T or DVB-C in your country.
Check the 'Digital TV Country Compatibility' sticker on the
back of the TV.
• A channel could be hidden in the Channel overview. Read
Use your TV > Menus > Channel overview.
Downloaded From TV-Manual.com Manuals
6.4 Picture
1/3
No picture
The TV picture is poor
• Verify if the antenna is connected properly.
• Verify if the antenna is connected properly.
• Verify if the correct device is selected.
• Non-earthed audio devices, neon lights, high buildings
or mountains can influence the picture quality. Try to
improve the picture by changing the position of the
antenna or placing devices away from the TV.
The sound is on, but there is no picture
• Verify the contrast or brightness setting in the menu.
• Verify that the correct TV system is chosen in the Manual
installation menu.
• If only a certain channel is poor, try to fine tune this
channel with the Fine tune menu. Read Setup > Installation
> Analogue: manual installation.
...
Downloaded From TV-Manual.com Manuals
6.4 Picture
The picture has poor colour
• Verify the colour settings in the Picture menu. Select any
of the Smart settings in the Setup menu.
• Verify the connections and cables of the connected
devices.
Picture delay when a game console is connected
• To prevent picture delay, set the TV to game mode. Select
Game in the Smart settings in the Setup menu.
2/3
The TV does not remember my settings when I switch it
back on
• Check whether the TV is set to Home in the Home menu >
Setup > Installation > Preferences > Location menu.
The picture does not fit the screen; it is either too big or
too small
• Press f and select a more fitting picture format in the
Picture format menu.
...
Downloaded From TV-Manual.com Manuals
6.4 Picture
The picture position on screen is not correct
• Some picture signals from some devices do not fit the
screen properly. You can move the picture with the cursor
keys on the remote control. Check the signal output of the
device.
Downloaded From TV-Manual.com Manuals
3/3
6.5 Sound
There is a picture but no sound
The sound comes from one speaker only
• Verify the volume is not set to 0.
• Verify that the Balance is not set to extreme left or right.
• Verify the sound has not been muted with m.
• Verify that all cables are connected properly.
Sound delay when a DVD Home Theatre System device is
connected
• If no sound signal is detected, the TV automatically
switches off the sound. This is proper operation and is not
a malfunction.
• Read the user manual of the DVD device to adjust the
audio sync delay. If you cannot set a delay, switch off HD
Natural Motion in h > Setup > Picture > Perfect Pixel HD.
The sound is poor
• Verify that the sound is set to Stereo.
• Select any of the Smart settings in h > Setup > Smart
settings.
Downloaded From TV-Manual.com Manuals
6.6 Devices
HDMI connections
• The HDMI-HDCP procedure might take a few seconds
before the TV shows the picture from a device.
• If the TV does not recognise the device and the screen
shows no picture, try switching from one device to another
and back again to restart the HDCP procedure.
• If sound interruptions occur persistently, see the user
manual of the device to verify the output settings. If that
does not help, connect an additional audio cable.
1/2
• If a DVI to HDMI adaptor is used, verify that an additional
audio connection is in place to complete the DVI
connection.
HDMI with EasyLink
• Verify if the connected device supports the HDMI-CEC
standard and is properly set up. Read the user manual that
comes with the device.
• Verify if the HDMI cable is properly connected.
• Verify if EasyLink is activated in h >Setup > Installation >
Preferences > EasyLink.
Downloaded From TV-Manual.com Manuals
6.6 Devices
2/2
• Make sure that the System audio control in your HDMICEC audio devices is properly set up. Read the user manual
that comes with your audio device.
The PC display on my TV is not stable or is not
synchronised (with TV as PC monitor)
EasyLink Remote control
• Verify that the correct resolution mode is selected on
your PC. Read Technical data > Display resolutions.
• Some devices have identical functionality but do not
support the specific remote control commands. Read
Connections > EasyLink HDMI-CEC > EasyLink RC.
Downloaded From TV-Manual.com Manuals
• Set the refresh rate of your PC to 60Hz.
6.7 Multimedia
USB device content is not shown
PC files are not shown in the Browse PC network menu
• Set your device (camera) to ‘Mass Storage Class’
compliant.
• Verify that files have been added in the PC folder.
• The USB device may need specific driver software.
Unfortunately, this software cannot be downloaded to your
TV.
• Not all audio and picture files are supported. Read
Technical data.
USB device content does not play back smoothly
• The transfer performance of the USB device limits the
transfer rate.
Downloaded From TV-Manual.com Manuals
• Not all file formats are supported. Read Technical data >
Multimedia formats.
• You have to set the PC media server to share files with the
TV. Read Setup > Network > What you need.
PC files do not play
• Read Technical data > Multimedia formats.
6.8 Network
Home network not found
Net TV does not work
• Verify if the router is switched on and set to DHCP On.
• If the connection to the router is ok, verify the router
connection to the internet.
• Verify if the firewalls in your network allow the TV to
access the network.
• Your home network might require specific network
settings. If you are unsure, ask someone with knowledge
of network settings to help you.
To set specific network settings, press h > Setup >
Installation > Network > Network mode and/or ... > IP
Configuration.
Downloaded From TV-Manual.com Manuals
Net TV works slow
• You need a high speed internet connection for your
router.
7.1 Power and reception
Product specifications are subject to change without
notice.
For more specification details of this product see
www.philips.com/support.
Reception
• Antenna input : 75ohm coaxial (IEC75)
• TV system : DVB COFDM 2K/8K,
• Video playback : NTSC, SECAM, PAL
Power
• DVB : DVB-T, DVB-C, MHEG 4
• Mains power : AC220-240V +/-10%
(see selected countries on the TV typeplate)
• Ambient temperature : 5°C to 35°C
• Tunerbands : VHF, UHF, S-Channel, Hyperband
• Power and standby power consumption, see the
technical specification on www.philips.com
Downloaded From TV-Manual.com Manuals
Downloaded From TV-Manual.com Manuals
7.3 Supported display resolutions
Video formats
Computer formats
Resolution — Refresh rate
Resolution — Refresh rate
• 480i - 60 Hz
• 640 x 480 — 60 Hz
• 480p - 60 Hz
• 600 x 800 — 60 Hz
• 576i - 50 Hz
• 1024 x 768 — 60 Hz
• 576p - 50 Hz
• 1280 x 768 — 60 Hz
• 720p - 50 Hz, 60 Hz
• 1360 x 765 — 60 Hz
• 1080i - 50 Hz, 60 Hz
• 1360 x 768 — 60 Hz
• 1080p - 24 Hz, 25 Hz, 30 Hz
• 1280 x 1024 — 60 Hz
• 1080p - 50 Hz, 60 Hz
• 1920 x 1080 — 60 Hz
• 1920 x 1080 — 60 Hz
Downloaded From TV-Manual.com Manuals
7.4 Multimedia
1/2
Connections
Playback formats
• USB
• MP3
• Ethernet UTP5
• Still pictures : JPEG
Supported USB / memory device formats
• FAT 16, FAT 32, NTFS
• MPEG 1, MPEG 2, MPEG 4
• MPEG program stream PAL
• AVI
PC network link
• H.264 (MPEG-4 AVC)
- DLNA 1.0 Certified
• WMA v2 up to v9.2
• WMV9
...
Downloaded From TV-Manual.com Manuals
7.4 Multimedia
Supported media server software
• Windows Media Player 11 (for Microsoft Windows XP or
Vista)
• Google (for XP)
• Twonky Media — PacketVideo 4.4.9 (for PC and Intel
MacOX)
• Sony Vaio Media Server (for Microsoft Windows XP or
Vista)
• TVersity v.0.9.10.3 (for Microsoft Windows XP)
• Nero 8 — Nero MediaHome (for Microsoft Windows XP)
• DiXiM (for Microsoft Windows XP)
• Macrovision Network Media Server(for Microsoft
Windows XP)
• Fuppes (for Linux)
• uShare (for Linux)
Downloaded From TV-Manual.com Manuals
2/2
• Philips NAS SPD8020 (v. 1.2.9.47)
7.5 Connectivity
Rear
• HDMI side in
• EXT1 (scart): Audio L/R, CVBS in, RGB
• S-Video in (Y/C)
• EXT2 (scart): Audio L/R, CVBS in, RGB
• Video in (CVBS)
• EXT3:Y Pb Pr, Audio L/R
• Audio L/R in
• VGA, Audio L/R (mini jack 3.5 mm)
• Headphones (stereo mini jack 3.5mm)
• HDMI 1 in (HDMI 1.3a for all HDMI connections)
• Common interface slot
• HDMI 2 in
• HDMI 3 in
• Audio In L/R - DVI to HDMI (min jack 3.5 mm)
• Audio Out L/R — display synchronised
• Digital Audio out (coaxial-cinch-S/PDIF) display
synchronised
• Network — (RJ45)
Downloaded From TV-Manual.com Manuals
Side
• USB
7.6 Dimensions and weights
40PFL7664
Width 958 mm
Height 580 mm
Depth 40 mm
Weight ±15 kg
… with TV stand
Height 628 mm
Depth 220 mm
Weight ±18 kg
UMv 3104 327 0022.2 - 091001
Downloaded From TV-Manual.com Manuals
Safety
Risk of electric shock or fire!
• Never expose the TV or remote control to rain, water
or excessive heat.
• Never place liquid containers, such as vases, near
the TV. If liquids are spilt on or into the TV, disconnect
the TV from the power outlet immediately. Contact
Philips Consumer Care to have the TV checked before
use.
• Never place the TV, remote control or batteries near
naked flames or other heat sources, including direct
sunlight.
• Keep candles or other flames away from this product
at all times.
• Never insert objects into the ventilation slots or other
openings on the TV.
• Avoid force coming onto power plugs. Loose power
plugs can cause arcing or fire.
• Never place the TV or any objects on the power cord.
Risk of injury or damage to the TV!
• Two people are required to lift and carry a TV that
weighs more than 55 lbs.
• If you stand mount the TV, use only the supplied
stand. Secure the stand to the TV tightly. Place the TV
on a flat, level surface that can support the TVs weight.
• If you wall mount the TV, use suitable fixations on
a sturdy wall to safely mount the TV considering its
weight. Koninklijke Philips Electronics N.V. bears no
responsibility for improper wall mounting that results
in accident or injury.
Risk of injury to children!
Follow these precautions to prevent the TV from toppling over and causing injury to children.
• Never place the TV on a surface covered by a cloth or
other material that can be pulled away.
• Ensure that no part of the TV hangs over the edge of
the mounting surface.
• Never place the TV on tall furniture, such as a bookcase, without anchoring both the furniture and TV to
the wall or a suitable support.
• Educate children about the dangers of climbing on
furniture to reach the TV.
Risk of overheating!
• Always leave a space of at least 4 inches around the
TV for ventilation. Ensure curtains or other objects
never cover the ventilation slots on the TV.
Lightning storms
Disconnect the TV from the power outlet and antenna
before lightning storms. During lightning storms,
never touch any part of the TV, power cord or antenna
cable.
Risk of hearing damage!
Avoid using earphones or headphones at high volumes or for prolonged periods of time.
Low temperatures
If the TV is transported in temperatures below 5°C,
unpack the TV and wait till TV temperature matches
the room temperature to install the TV.
2009 © Koninklijke Philips Electronics N.V.
All rights reserved. Specifications are subject to change without
notice. Trademarks are the property of Koninklijke Philips Electronics
N.V. or their respective owners.
Philips reserves the right to change products at any time without being obliged to adjust earlier supplies accordingly. The material in the
user manual is believed adequate for the intended use of the system.
If the product, or its individual modules or procedures, are used for
purposes other than those specified herein, confirmation of their
validity and suitability must be obtained. Philips warrants that the
material itself does not infringe any United States patents. No further
warranty is expressed or implied.
Warranty
No components are user-serviceable. Never open or remove covers
and never insert objects in the ventilation slots or insert objects not
suitable for the specific connectors. Repairs may only be done by
Philips Service Centres and official repairshops. Failure to do so shall
void any warranty, stated or implied. Any operation expressly prohibited in this manual, any adjustments, or assembly procedures not
recommended or authorised in this manual shall void the warranty.
Pixel characteristics
This LCD product has a high number of colour pixels. Although it has
effective pixels of 99,999% or more, black dots or bright points of light
(red, green or blue) may appear constantly on the screen.This is a
structural property of the display (within common industry standards)
and is not a malfunction.
Open source software
This television contains open source software. Philips hereby offers
to deliver or make available, upon request, for a charge no more than
the cost of physically performing source distribution, a complete machinereadable copy of the corresponding source code on a medium
customarily used for software interchange. This offer is valid for a
period of 3 years after the date of purchase of this product. To obtain
the source code, write to
Philips Innovative Applications N.V.
Ass. to the Development Manager
Pathoekeweg 11
B-8000 Brugge
Belgium
Compliance with EMF
Koninklijke Philips Electronics N.V. manufactures and sells many
products targeted at consumers, which, like any electronic apparatus, in general have the ability to emit and receive electromagnetic
signals. One of Philips’ leading Business Principles is to take all
necessary health and safety measures for our products, to comply
with all applicable legal requirements and to stay well within the EMF
standards applicable at the time of producing the products. Philips is
committed to develop, produce and market products that cause no
adverse health effects. Philips confirms that if its products are handled properly for their intended use, they are safe to use according
Downloaded From TV-Manual.com Manuals
Europe — EC Declaration of Conformity
to scientific evidence available today. Philips plays an active role in
the development of international EMF and safety standards, enabling
Philips to anticipate further developments in standardisation for early
integration in its products.
English
Mains fuse (UK only)
This TV is fitted with an approved moulded plug. Should it become
necessary to replace the mains fuse, this must be replaced with a
fuse of the same value as indicated on the plug (example 10A).
1. Remove fuse cover and fuse.
2. The replacement fuse must comply with BS 1362 and have the ASTA
approval mark. If the fuse is lost, contact your dealer in order to verify
the correct type.
3. Refit the fuse cover.
In order to maintain conformity to the EMC directive, the mains plug
on this product must not be detached from the mains cord.
Deutsch
Copyrights
VESA, FDMI and the VESA Mounting Compliant logo are trademarks of
the Video Electronics Standards Association.
Manufactured under license from Dolby Laboratories. ‘Dolby’, ‘Pro
Logic’ and the double D symbol, are trademarks of Dolby Laboratories.
Manufactured under license from BBE Sound, Inc. Licensed by BBE,
Inc under one or more of the following US patents: 5510752, 5736897.
BBE and BBE symbol are registered trademarks of BBE Sound Inc.
Windows Media is either a registered trademark or trademark of
Microsoft Corporation in the United States and/or other countries.
Kensington and MicroSaver are registered US trademarks of ACCO
World Corporation with issued registrations and pending applications
in other countries throughout the world.
DLNA®, the DLNA logo and DNLA Certified™ are trademarks, service
marks, or certification marks of the Digital Living Network Alliance.
Nederlands
All other registered and unregistered
trademarks are the property of their
respective owners.
Hereby, Philips Innovative Applications N.V. declares
that this television is in compliance with the essential
requirements and other relevant provisions of Directive 1999/5/EC.
Hiermit erklärt Philips Innovative Applications N.V.
dass sich das Fernsehgerät in Übereinstimmung mit
den grundlegenden Anforderungen und den übrigen
einschlägigen Bestimmungen der Richtlinie 1999/5/
EG befindet.
Français
Par la présente Philips Innovative Applications N.V.
déclare que cet appareil de télévision est conforme
aux exigences essentielles et aux autres dispositions
pertinentes de la directive 1999/5/CE.
Hierbij verklaart Philips Innovative Applications N.V.
dat deze televisie in overeenstemming is met de essentiële eisen en de andere relevante bepalingen van
richtlijn 1999/5/EG.
Español
Por medio de la presente Philips Innovative Applications N.V. declara que el televisor cumple con los requisitos esenciales y cualesquiera otras disposiciones
aplicables o exigibles de la Directiva 1999/5/CE.
Italiano
Con la presente Philips Innovative Applications N.V.
dichiara che questo televisore è conforme ai requisiti
essenziali ed alle altre disposizioni pertinenti stabilite
dalla direttiva 1999/5/CE.
Português
Philips Innovative Applications N.V. declara que este
televisor está conforme com os requisitos essenciais
e outras disposições da Directiva 1999/5/CE.
Eλληνικά
ΜΕ ΤΗΝ ΠΑΡΟΥΣΑ Η Philips Innovative Applications
N.V. ΔΗΛΩΝΕΙ ΟΤΙ H ΤΗΛΕΌΡΑΣΗ ΣΥΜΜΟΡΦΩΝΕΤΑΙ
ΠΡΟΣ ΤΙΣ ΟΥΣΙΩΔΕΙΣ ΑΠΑΙΤΗΣΕΙΣ ΚΑΙ ΤΙΣ ΛΟΙΠΕΣ
ΣΧΕΤΙΚΕΣ ΔΙΑΤΑΞΕΙΣ ΤΗΣ ΟΔΗΓΙΑΣ 1999/5/ΕΚ.
Svenska
Härmed intygar Philips Innovative Applications N.V. att
denna TV står i överensstämmelse med de väsentliga
egenskapskrav och övriga relevanta bestämmelser
som framgår av direktiv 1999/5/EG.
Norsk
Philips Innovative Applications N.V. erklærer herved at
utstyret TV er i samsvar med de grunnleggende krav
og øvrige relevante krav i direktiv 1999/5/EF.
Downloaded From TV-Manual.com Manuals
Dansk
Undertegnede Philips Innovative Applications N.V.
erklærer herved, at dette TV overholder de væsentlige
krav og øvrige relevante krav i direktiv 1999/5/EF.
Suomi
Philips Innovative Applications N.V. vakuuttaa täten
että tämaä televisio on direktiivin 1999/5/EY oleellisten
vaatimusten ja sitä koskevien direktiivin muiden
ehtojen mukainen.
Malti
Hawnhekk, Philips Innovative Applications N.V., jiddikjara li dan ‘Television’ jikkonforma mal-ħtiġijiet essenzjali u ma provvedimenti oħrajn relevanti li hemm
fid-Dirrettiva 1999/5/EC.
Íslenska
Hér með lýsir Philips Innovative Applications N.V. yfir
því að ‘Television’ er í samræmi við grunnkröfur og
aðrar kröfur, sem gerðar eru í tilskipun 1999/5/EC.
Polski
Firma Philips Innovative Applications N.V. niniejszym
oświadcza, że ‘Telewizor’ jest zgodny z zasadniczymi
wymogami oraz pozostałymi stosownymi postanowieniami Dyrektywy 1999/5/EC.
A copy of the Declaration of Conformity is
available at :
http://www.philips.com/support
Magyar
Alulírott, Philips Innovative Applications N.V. nyilatkozom, hogy a televízió megfelel a vonatkozó alapvető
követelményeknek és az 1999/5/EC irányelv egyéb
előírásainak.
Česky
Philips Innovative Applications N.V. tímto prohlašuje,
že tento televizor je ve shodě se základními požadavky
a dalšími příslušnými ustanoveními směrnice 1999/5/
ES.
This equipment may be operated in the following European countries …
Slovensky
Philips Innovative Applications N.V. týmto vyhlasuje,
že tento televízor spĺňa základné požiadavky a všetky
príslušné ustanovenia Smernice 1999/5/ES.
Slovensko
Philips Innovative Applications N.V. izjavlja, da je ta
televizor v skladu z bistvenimi zahtevami in ostalimi
relevantnimi določili direktive 1999/5/ES.
Eesti
Käesolevaga kinnitab Philips Innovative Applications N.V. seadme Teler vastavust direktiivi 1999/5/EÜ
põhinõuetele ja nimetatud direktiivist tulenevatele
teistele asjakohastele sätetele.
Latviski
Ar šo Philips Innovative Applications N.V. deklarē, ka
‘Televizors’ atbilst Direktīvas 1999/5/EK būtiskajām
prasībām un citiem ar to saistītajiem noteikumiem.
Lietuvių
Šiuo Philips Innovative Applications N.V. deklaruoja,
kad šis ‘Televizorius’ atitinka esminius reikalavimus ir
kitas 1999/5/EB Direktyvos nuostatas.
This equipment can be operated in other nonEuropean countries.
Info for UK only.
Information about how to
re-tune your TV during the
digital TV switchover.
Digital UK, the body leading the digital TV
switchover, will advise you when you need to
re-tune during the switchover.
If you choose to connect your TV to satellite or
cable with a digital box then it will not be
affected by switchover, and you won’t need to
re-tune.
If you have any questions, please contact your
equipment supplier or call Digital UK on …
0845 6 50 50 50 or visit www.digitaluk.co.uk
How to re-tune:
To find out how to re-tune your TV, check
this user manual for details.
Go to section 6 Install channels.
If you do not re-tune your channels when
advised to do so by Digital UK, you may lose
some or all of your channels until you do
re-tune. You should re-tune your TV every
few months to check for any new channels.
If you are missing any channels, it may be
that they are not available in your area, or
that your aerial needs upgrading.
When does switchover happen?
*Copeland switches on October 17, 2007
Television in the UK is going digital, bringing us
all more choice and new services. Starting in
late 2007 and ending in 2012, television
services in the UK will go completely digital, TV
region by TV region.
Please see the next page to find out when your
area switches to digital.
Digital UK is the independent, non-profit
organisation leading the process of digital TV
switchover in the UK. Digital UK provides impartial information on what people need to do
to prepare for the move to digital, and when
they need to do it.
How the switchover affects
your TV equipment:
Your new TV has a digital tuner built in, which
means it is ready to receive the Freeview signal
by simply plugging it into your aerial socket
(check if you can get digital TV through your
aerial now, or whether you’ll have to wait until
switchover, at www.digitaluk.co.uk).
When the TV switchover happens in your area,
there are at least two occasions when you will
need to re-tune your TV in order to continue
receiving your existing TV channels, and also to
pick up new ones.
The exact date you switch
depends on the transmitter
you are served by. To check
when you switch, go to
Digital UK’s postcode
checker on
www.digitaluk.co.uk
Check your ITV news service
or look at Teletext page 106
to see what TV region you’re
in.
Visit us at digitaluk.co.uk
Call us on 0845 6 50 50 50†
† Calls charged at BT rate of 3p per minute daytime and
1p per minute evenings and weekends. Rates may vary
for calls from non-BT lines.
Downloaded From TV-Manual.com Manuals
Downloaded From TV-Manual.com Manuals
Diagramma elettronico / Electronic diagram
Flash
FPGA
DVB-T
DVB-C
CVBS
WiFi
LED DIMMING
HDMI MUX
Downloaded From TV-Manual.com Manuals
USB 2.0
Dimming
www.philips.com/tv
Non-contractual images. / Images non contractuelles. / Außervertragliche Bilder.
All registered and unregistered trademarks are property of their respective owners.
Specifications are subject to change without notice
Trademarks are the property of Koninklijke Philips Electronics N.V. or their respective owners
2009 © Koninklijke Philips Electronics N.V. All rights reserved
Downloaded From TV-Manual.com Manuals
www.philips.com