1
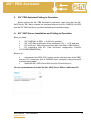
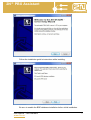
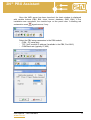
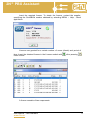
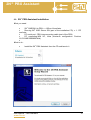
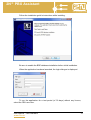
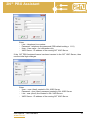
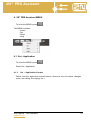
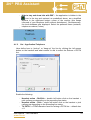
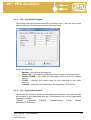
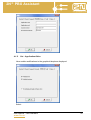
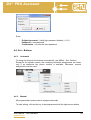
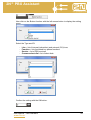
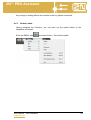
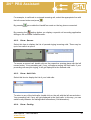
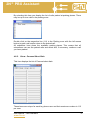
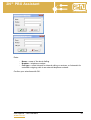
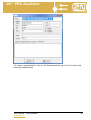
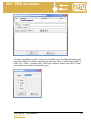
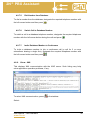
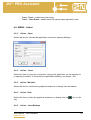
2N ® PBX Assistant USER MANUAL PBX Assistant Version 1.0 User Manual – PBX Assistant www.2n.cz 1 2N ® PBX Assistant Dear customer, let us congratulate you on having purchased the 2N OMEGA Lite system. This new product has been developed and produced in order to provide the maximum utility value, quality and reliability to the user. We hope you will be fully satisfied with the 2N OMEGA Lite for a long time. User Manual – PBX Assistant www.2n.cz 2 2N ® PBX Assistant CONTENTS 1. Introduction to 2N PBX Assistant ..................................................................5 2. 2N PBX Assistant Putting in Operation .........................................................6 2.1. 2N XAPI Server Installation and Putting in Operation ........................................................... 6 2.2. 2N PBX Assistant Installation............................................................................................. 12 3. 2N PBX Assistant Description ......................................................................16 3.1. 3.2. 3.3. 3.4. 3.5. 3.6. 3.7. 4. Display ................................................................................................................................ 16 Keypad................................................................................................................................ 18 Handset .............................................................................................................................. 18 + - Buttons .......................................................................................................................... 19 MENU Buttons .................................................................................................................... 19 Programmable Buttons with Active LEDs ............................................................................. 20 Hide, Minimise, Terminate Buttons ...................................................................................... 20 2N PBX Assistant MENU ...............................................................................21 4.1. Set - Application .................................................................................................................. 21 4.1.1. Set – Application-Contact .................................................................................................... 21 4.1.2. Set – Application-Telephone ................................................................................................. 23 4.1.3. Set – Application-Keypad ..................................................................................................... 24 4.1.4. Set – Application-Sounds ...................................................................................................... 24 4.1.5. Set – Application-Skins......................................................................................................... 25 4.1.6. Set – Application-Tariff ....................................................................................................... 26 4.1.7. Set – Application-Menu ........................................................................................................ 27 4.2. Set - Language.................................................................................................................... 27 4.3. Set - Passwords .................................................................................................................. 27 4.4. Set – Buttons ...................................................................................................................... 28 4.4.1. Automatic ............................................................................................................................. 28 4.4.2. Manual ................................................................................................................................. 28 4.4.3. Button Labels ....................................................................................................................... 30 4.5. Set – Call Forwarding .......................................................................................................... 32 4.6. Set – ME - MobilityExtension ............................................................................................... 33 4.7. Set – Volumes and Tones ................................................................................................... 34 4.8. MENU - Show ..................................................................................................................... 35 4.8.1. Show - History...................................................................................................................... 35 4.8.2. Show - Queues...................................................................................................................... 36 4.8.3. Show - Held Calls ................................................................................................................. 36 4.8.4. Show - Parking ..................................................................................................................... 36 4.8.5. Show - Personal Short Dials .................................................................................................. 37 4.8.6. Show - Common Short Dials................................................................................................. 38 4.8.6.1. Short Dial Setup .......................................................................................................... 38 4.8.7. Show - Databases.................................................................................................................. 40 4.8.7.1. Client Database Setup during Call ................................................................................ 41 4.8.7.2. Client Database Setup in Database Application ............................................................ 41 4.8.7.3. Database Search........................................................................................................... 44 4.8.7.4. Database Export and Import ......................................................................................... 44 4.8.7.5. Dial Number from Database......................................................................................... 45 4.8.7.6. Switch Call to Database Number .................................................................................. 45 4.8.7.7. Invite Database Member to Conference ........................................................................ 45 User Manual – PBX Assistant www.2n.cz 3 2N ® PBX Assistant 4.8.8. Show - XML......................................................................................................................... 45 4.9. MENU - Action .................................................................................................................... 47 4.9.1. Action – Open ...................................................................................................................... 47 4.9.2. Action – Close ...................................................................................................................... 47 4.9.3. Action - Minimise ................................................................................................................. 47 4.9.4. Action - Hide ........................................................................................................................ 47 4.9.5. Action – Load Desktop ......................................................................................................... 47 4.9.6. Action – Save Desktop .......................................................................................................... 48 4.9.7. Action – Print Button Labels ................................................................................................. 48 4.9.8. Action - Exit ......................................................................................................................... 48 User Manual – PBX Assistant www.2n.cz 4 2N ® PBX Assistant 1. Introduction to 2N PBX Assistant In combination with the 2N StarPoint digital key phone, the 2N PBX Assistant application provides the highest 2N OMEGA Lite user comfort. It gives you full control of your telephone line and access to all client settings. With your PC keyboard, you can control the basic telephone services such as: - Handset pick-up for HandsFree mode - Entering telephone numbers - Call switching - Hang-up - Call volume control User Manual – PBX Assistant www.2n.cz 5 2N ® PBX Assistant 2. 2N PBX Assistant Putting in Operation Before putting the 2N PBX Assistant in operation, make sure that the 2N XAPI Server SW, which creates the interface between the 2N OMEGA Lite PBX and the 2N PBX Assistant, has been installed and licensed properly. 2.1. 2N XAPI Server Installation and Putting in Operation What you need: • 2N OMEGA Lite PBX, v. 4.05rev14 and later • 2N XAPI Server SW (part of the installation CD), v. 1.17E and later • PC serial port - PBX interconnecting cable (included in PBX delivery) • PC supporting WIN XP, Vista (minimum configuration: Pentium III./512 MB RAM/800 MHz) What to do: • Interconnect the PBX (RJ12 socket on the left-hand side of the PBX) and your PC (serial port with a CANNON 9-pin connector) using the serial interconnecting cable. • Install the 2N XAPI Server SW from the CD and launch it. You are recommended to install the 2N XAPI Server SW to a dedicated PC. User Manual – PBX Assistant www.2n.cz 6 2N ® PBX Assistant Follow the installation guide’s instructions while installing. Be sure to enable the BDE database installation before initial installation. User Manual – PBX Assistant www.2n.cz 7 2N ® PBX Assistant Once the XAPI server has been launched, the basic window is displayed with module buttons (PBX, BIN, client, licence, database, SMS, XML). If the installation was successful, the module keys on the panel relax. A blinking red exclamation mark signals errors, if any. Select the PBX setup parameters in the PBX module: - COM – PC serial port - TCP (VoIP module IP address if available in the PBX, Port 6812) - COM Baud rate (typically 57,600) User Manual – PBX Assistant www.2n.cz 8 2N ® PBX Assistant Insert the required licence. To obtain the licence, contact the supplier, specifying the SrvId/BXId number obtained by selecting MENU – Help - About application. Licences are granted for a certain number of users (clients) and period of time. Insert the obtained licence in the Licence module with Enter licence. after pressing A licence consists of two components. User Manual – PBX Assistant www.2n.cz 9 2N ® PBX Assistant Upon confirmation, the licence is displayed in the list of licences. Now you can create users (clients) in the Users module by pressing then and . User Manual – PBX Assistant www.2n.cz 10 2N ® PBX Assistant Enter: - Name - Pass (Password) - Line - Rights -STS, CTI, CMD (in conformity with the licence granted) - Firm = application = O-Assistant User Manual – PBX Assistant www.2n.cz 11 2N ® PBX Assistant 2.2. 2N PBX Assistant Installation What you need: • 2N OMEGA Lite PBX, v. 4.05rev14 and later • Running 2N XAPI Server SW (part of the installation CD), v. 1.17E and later • PC serial port - PBX interconnecting cable (part of the PBX) • PC supporting WIN XP, Vista (minimum configuration: Pentium III./512 MB RAM/800 MHz) • What to do: • Install the 2N PBX Assistant from the CD and launch it. User Manual – PBX Assistant www.2n.cz 12 2N ® PBX Assistant Follow the installation guide’s instructions while installing. Be sure to enable the BDE database installation before initial installation. When the application has been launched, the login dialogue is displayed. To run the application for a test period (of 30 days) without any licence, select the PBX user item. User Manual – PBX Assistant www.2n.cz 13 2N ® PBX Assistant Enter: - Line – telephone line number - Password - telephone line password (PBX default setting = 1111) - User - User name – for information only - XAPI Server - IP address of the running 2N XAPI Server If the 2N PBX Assistant licence has been inserted in the 2N XAPI Server, then use the initial login dialogue. Enter: - User – user (client) created in 2N XAPI Server - Password - user (client) password created in 2N XAPI Server - Line - user (client) line created in 2N XAPI Server - XAPI Server - IP address of the running 2N XAPI Server User Manual – PBX Assistant www.2n.cz 14 2N ® PBX Assistant Upon login confirmation, your PC displays an image of the telephone set connected. This means that the installation has been completed successfully User Manual – PBX Assistant www.2n.cz 15 2N ® PBX Assistant 3. 2N PBX Assistant Description In combination with a telephone set, the 2N PBX Assistant is a convenient tool for making calls, setting telephone functions (assignment of functions to programmable buttons, printing out button labels, etc.) and activation/deactivation of complementary services (MobilityExtension, call forwarding, short dialling, etc.). The graphical telephone set is fully functional and can be controlled with a “mouse”. All the programmable buttons, including the signalling LEDs, are identical with the buttons on your physical telephone. 3.1. Display You can read the current “status” of the connected telephone any time on the display. Display information layout: PBX time - left-hand upper corner CLIP - middle upper section Text status - middle bottom section Graphical status - right-hand upper corner Call tariff metering - right-hand bottom corner The calling line identification/restriction (CLIP/CLIR) is displayed as a number. If a match is found in the PBX name list and/or in the short dialling list, if available, the respective name is displayed. The line is at relax (inactive). The line has been seized (active HandsFree or picked-up handset). The line is calling number 17. User Manual – PBX Assistant www.2n.cz 16 2N ® PBX Assistant The line is making call with number 17. The call has been terminated and the handset/HandsFree remains active. The showroom is calling you. You are holding line 17 and the handset/HandsFree remains active. User Manual – PBX Assistant www.2n.cz 17 2N ® PBX Assistant 3.2. Keypad The keypad is active and fully functional. To press a key, use the left mouse button. To correct your dialling, use the programmable ESCAPE button. 3.3. Handset Using the right mouse button, the handset activates/deactivates the HandsFree mode, or terminates the call as the current line status may be. Line at relax User Manual – PBX Assistant www.2n.cz 18 2N ® PBX Assistant Line in a status other than relax 3.4. + - Buttons The PLUS and MINUS buttons help increase or decrease the call or ringing volume according to the current line status. 3.5. MENU Buttons By pressing the button, you enter the MENU (application settings, ME, call forwarding, call status displaying, etc.). The buttons are inactive. User Manual – PBX Assistant www.2n.cz 19 2N ® PBX Assistant 3.6. Programmable Buttons with Active LEDs These buttons indicate the settings of your telephone set. Here you can select the settings that are the most convenient to you. Be careful while changing the settings. The default settings for the 2N StarPoint (BASIC, ECONOMY, STANDARD) telephones are as follows: 3.7. Hide, Minimise, Terminate Buttons These buttons are located in the right-hand upper corner of the graphical telephone and help hide, minimise and terminate the application. User Manual – PBX Assistant www.2n.cz 20 2N ® PBX Assistant 4. 2N PBX Assistant MENU To enter the MENU, press . The MENU includes: - Action - Set - Show - Help 4.1. Set - Application To enter the MENU, press . Select Set - Application. 4.1.1. Set – Application-Contact Define how the application should behave whenever the line status changes (relax, line calling, line ringing, etc.). User Manual – PBX Assistant www.2n.cz 21 2N ® PBX Assistant Enable the following: - Minimise at relax – the graphical telephone is minimised at relax into a taskbar. Window activation at incoming call – the graphical telephone gets enabled upon an incoming call ring. Window activation at other state than relax – the graphical telephone gets enabled whenever your line becomes active. Show called – displays the line to which an incoming call has been directed (a multi-company operator). Local database of contacts – displays local client contact databases (firm, representative, contacts, notes). Set minimisation and restoration: - Minimise to taskbar – the graphical telephone is minimised into a taskbar. - icon in Hide to tray and show skin – the application is hidden in the the tray and restored, as predefined above, in the form of the graphical telephone. - Hide to tray and show info – the application is hidden in the icon in the tray and restored, as predefined above, as a simplified window in the right-hand bottom corner of the monitor (to keep you informed of your telephone traffic without disturbance). User Manual – PBX Assistant www.2n.cz 22 2N ® PBX Assistant - Hide to tray and show info with DBF – the application is hidden in the icon in the tray and restored, as predefined above, as a simplified window in the right-hand bottom corner of the monitor (this keeps informed of your telephone traffic without disturbance). Simultaneously, the local database gets displayed. Select the preferred items (contacts, telephone numbers, notes). - 4.1.2. Set – Application-Telephone Here define how to “pick-up” or “hang-up” the line by clicking the left mouse button on the handset and what number to dial to select the Seizure of PSTN line. Enable the following: - Handset action - DblClick – double left button click on the handset = pick up/hang up depending on the preceding line status. Handset action - Click – single left button click on the handset = pick up/hang up depending on the preceding line status. To PSTN – a DTMFcharacter used for seizing a PSTN line – default char = 0. User Manual – PBX Assistant www.2n.cz 23 2N ® PBX Assistant 4.1.3. Set – Application-Keypad Here assign the most frequent functions to function keys. There are two control options (typically Function keys and free selection keys). Assign the following: 4.1.4. Speaker – line pick-up and hang-up. Volume UP – increase the call/ringing volume as the line status may be. Volume DOWN – turn down the call/ringing volume as the line status may be. FLASH – interrupt the current loop (for call switching or any other service). Transfer – terminate call switching on the key phone (TRF button). Set – Application-Sounds Here select the sound to announce the application start/end. Two basic sounds are included in the application and are in the directory tree on the application installation location. Typically: c:\Program Files\2N Telekomunikace a.s\2N Omega Assistant\1.00I\Sounds\. User Manual – PBX Assistant www.2n.cz 24 2N ® PBX Assistant 4.1.5. Set – Application-Skins Here enable modifications to the graphical telephone displayed. Select: User Manual – PBX Assistant www.2n.cz 25 2N ® PBX Assistant - - 4.1.6. Modify fonts – enable/disable to change the fonts used for messages on the shown graphical telephone or its display. To change the font (enter font editing), click on the item with the right mouse button. Modify functions – enable/disable to change the settings of the programmable buttons. Only display instead of phone skins – this selection shows the graphical telephone display instead of the whole apparatus. Set – Application-Tariff Here define whether, in which currency and with which delimiter the tariff metering data should be displayed during a call. Call tariffs are displayed for outgoing calls on lines that support receiving of tariff pulses (CO line with tariff metering, ISDN). User Manual – PBX Assistant www.2n.cz 26 2N ® PBX Assistant 4.1.7. Set – Application-Menu Here select which settings, except for the Application ones, may be selected (visible) in the MENU. 4.2. Set - Language Here select the language for communication (line statuses, settings, etc.). Select: - CZ – Czech ENG - English 4.3. Set - Passwords To log in as a PBX user, change the login password here to get access to the blocked PBX functions (line locking, etc.). User Manual – PBX Assistant www.2n.cz 27 2N ® PBX Assistant Enter: - Original password – initial login password (default = 1111). Password – new password. Confirmation – re-enter the new password. 4.4. Set – Buttons 4.4.1. Automatic To assign functions to the buttons automatically, use MENU – Set - Buttons. Except for the default version, the remaining automatic assignments are made only if an additional key phone module is available. Otherwise, manual assignment must be used. 4.4.2. Manual All programmable buttons can be assigned manually. To start setting, click on the key to be programmed with the right mouse button. User Manual – PBX Assistant www.2n.cz 28 2N ® PBX Assistant Now click on the Button function with the left mouse button to display the setting menu. Select the Type and ID: - Line – list of internal (subscriber) and external (CO) lines Function – list of selected key phone functions Service – list of PBX services Common short dial – list of short dials Confirm the setting with the OK button. User Manual – PBX Assistant www.2n.cz 29 2N ® PBX Assistant Any change in setting affects the function of the key phone connected. 4.4.3. Button Labels Having assigned the functions, you can print out the button labels of the telephone connected. Enter the MENU with User Manual – PBX Assistant www.2n.cz and select Action - Print button labels. 30 2N ® PBX Assistant Here you can modify the button label texts, preview the print output, or select the paper format. Press the Print button to print out the button labels. User Manual – PBX Assistant www.2n.cz 31 2N ® PBX Assistant 4.5. Set – Call Forwarding Here define whether and to which line your line should be forwarded. Set any of the following: - Always – immediate forwarding. Follow me – the selected line rings on my telephone. Busy – forward the call if my line is busy (I am calling). No answer – forward the call if I fail to answer. BabyCall – forward the call immediately upon pick-up to the selected line. To PSTN – enter the PSTN telephone number for call forwarding (outside the PBX). Calls may be forwarded to: - Another subscriber line – forward the call to an internal line number. ARS (0-3) – “I’m calling service ARS 0-3”. Enter the following number into the To PSTN column. Dept.1-8 – forward the call to department 1-8. OPER – forward the call to the operator. Trunk1-8 – forward the call via the CO line trunk. Enter the following number into the To PSTN column. PSTN – forward the call via the outgoing CO line trunk. Enter the following number into the To PSTN column. User Manual – PBX Assistant www.2n.cz 32 2N ® PBX Assistant 4.6. Set – ME - MobilityExtension If the MobilityExtension service is active in your PBX, you can make the following settings too. Enter: - Name – user name to which the ME call is directed. Number - user number to which the ME call is directed. Call at day – DAY calling mode (immediately, never, after xy rings on your line). Call at night – NIGHT calling mode (immediately, never, after xy rings on your line). Send SMS – define whether information SMS should be sent. SMS after received ME call – if a call was received on the ME number. SMS after non-received ME call – if the call was answered neither on the ME nor the original line number. SMS after non-received ME call every time – if the call was not answered on the ME number but could be received on the original line. User Manual – PBX Assistant www.2n.cz 33 2N ® PBX Assistant 4.7. Set – Volumes and Tones Here select the volumes and tones of your 2N StarPoint key phone for variable statuses. Select: - KeyClick Volume – acoustic signalling of the key phone button pressing. Handset volume – handset volume control. HandsFree volume – HandsFree volume control. Ring volume – ringing volume control. LCD Contrast - display contrast control. Internal call – subscriber line ringing type. External call – CO line ringing type. Alarm clock - alarm clock ringing type, if enabled. Door communicator – door communicator ringing type. User Manual – PBX Assistant www.2n.cz 34 2N ® PBX Assistant - Call return – call return ringing type. VIP call – ringing type for telephone numbers included in the personal key phone short dialling list. Back call – ringing type for lines that have blocked the call by Waiting for release. 4.8. MENU - Show 4.8.1. Show - History Select this item to display the history of your calls. Calls may be filtered according to direction (outgoing calls, answered incoming calls, missed incoming calls) or time (calls made throughout a day, week, month). For selection use the User Manual – PBX Assistant www.2n.cz and buttons. 35 2N ® PBX Assistant For example, to call back to a missed incoming call, select the appropriate line with the left mouse button and press By pressing . you enable the HandsFree mode on the key phone connected. By pressing the setting button you display a special call recording application dialogue, the so-called VisualRecorder. 4.8.2. Show - Queues Select this item to display the list of queued ringing incoming calls. There may be up to four calls in a queue. To answer a queued call, double click on the respective queuing place with the left mouse button. Your preceding call, if any, will appear among the Held calls. If your preceding call was just ringing, it will get displayed in the Queued calls. 4.8.3. Show - Held Calls Select this item to display the list of your held calls. To return to any of the held calls, double click on the call with the left mouse button. Your preceding call, if any, will get displayed in the Held calls. In this way, you can switch easily between the calling/called subscribers (Call alternation). 4.8.4. Show - Parking User Manual – PBX Assistant www.2n.cz 36 2N ® PBX Assistant By selecting this item you display the list of calls parked at parking places. There may be up to nine calls in the parking zone. Double click on the respective line (1-9) in the Parking zone with the left mouse button to park a call and/or return to the parked call. All subscriber lines share the available parking places. This means that all subscribers can see the parked calls and select and, if necessary, continue a call you have parked. 4.8.5. Show - Personal Short Dials This item displays the list of Personal short dials. These items are unique for each key phone user and their maximum number is 112 per user. User Manual – PBX Assistant www.2n.cz 37 2N ® PBX Assistant You can store any number to be dialled into an internal and/or external network. To dial any of the stored numbers, click on the appropriate item with the left mouse button and the number will be dialled automatically. 4.8.6. Show - Common Short Dials This selection displays the list of Common short dials. These dials are common to all users and their maximum number is 200. The common short dials are used for creating the list of the MobilityExtension numbers. Such numbers can be identified easily because they may be edited by the owner of the particular service only. To dial any of the stored numbers, click on the appropriate field in the list with the left mouse button and the number will be dialled automatically. 4.8.6.1. Short Dial Setup To create a personal short dial, click on the appropriate button in the Personal short dials or Common short dials with the right mouse button. This displays a dialogue for you to set up the short dial. User Manual – PBX Assistant www.2n.cz 38 2N ® PBX Assistant Enter: - Name – name of the short dialling. Number – telephone number. Call type – select Internal for internal calling or services, or Automatic for automatic outgoing calls to an external telephone network. Confirm your selections with OK. User Manual – PBX Assistant www.2n.cz 39 2N ® PBX Assistant 4.8.7. Show - Databases The application includes a client database of Firms and Contacts. If the calling/called party is included in the database, then its name is shown. Notes may be added to each contact. It is possible to dial numbers, switch calls and invite conference participants from the database using the database function keys. User Manual – PBX Assistant www.2n.cz 40 2N ® PBX Assistant 4.8.7.1. Client Database Setup during Call To create the client database during a currently made call, double click on the calling/called number on the graphical telephone display or in the application window. This displays an editing window for you to assign an existing firm to the contact, or create a new firm and then a new contact. 4.8.7.2. Client Database Setup in Database Application With the database displayed, use the following editing buttons to create new database “sentences”: insert sentence (create new firm, contact, representative, etc.) delete sentence (delete existing firm, contact, representative, etc.) edit sentence (modify existing firm, contact, representative, etc.) first sentence (return to first existing firm, contact, representative, etc.) last sentence (move to last existing firm, contact, representative, etc.) preceding sentence next sentence Create a new firm with the User Manual – PBX Assistant www.2n.cz button in the Firm field and enter the available data. 41 2N ® PBX Assistant To create a representative, click on the Representatives tag in the Firm field and enter the available data: User Manual – PBX Assistant www.2n.cz 42 2N ® PBX Assistant To insert a telephone number, click on the Numbers tag in the Representatives and enter the telephone number, specifying the call type (Local = internal call, Mobile = GSM, Fax, Fixed = external call). Enter the numbers without the PSTN codes, since these are included in the dialling type. User Manual – PBX Assistant www.2n.cz 43 2N ® PBX Assistant 4.8.7.3. Database Search To search a database, press . Enter the character string to be found and press the confirmation button. To re-search the database press 4.8.7.4. . Database Export and Import The created database can be exported and imported to another client. To export and import the database, click on MENU - Data in the taskbar and select DATA – Export/Import. The data are exported into the DBF directory and sorted out according to the database sections (Firms, Repres = Representatives, Nums = Numbers, Contacts). The file extension is .txt. User Manual – PBX Assistant www.2n.cz 44 2N ® PBX Assistant 4.8.7.5. Dial Number from Database To dial a number from the database, designate the required telephone number with the left mouse button and then press 4.8.7.6. . Switch Call to Database Number To switch a call to a database telephone number, designate the required telephone number with the left mouse button during the call and press 4.8.7.7. . Invite Database Member to Conference To invite a database member to join a conference call (a call for 3 or more subscribers sharing a single line), designate the required telephone number with the left mouse button and then press 4.8.8. . Show - XML This displays XML communication with the XAPI server. Such listing may help solve application operation problems, if any. To select XML communication, press in the taskbar. Select: User Manual – PBX Assistant www.2n.cz 45 2N ® PBX Assistant - TCP – XAPI server connection IP address, necessary for running the application. - Terminal – New line – define whether or not line feed should be made in the listing. Terminal – Show & write LIVE packets – here enable/disable displaying of the so-called LIVE inquiries, which the application sends during communication to keep the XAPI server connected. - User Manual – PBX Assistant www.2n.cz 46 2N ® PBX Assistant - Trace - Trace – enable trace file writing. Trace – Trace Erase – enable trace file erasure upon application start. 4.9. MENU - Action 4.9.1. Action – Open Select this item to activate the application connection opening dialogue. 4.9.2. Action – Close Select this item to close the connection, leaving the application on the desktop for re-opening if needed. To terminate the application definitely, use Action - Exit. 4.9.3. Action - Minimise Select this item to minimise the graphical telephone or display into the taskbar. 4.9.4. Action - Hide Select this item to hide the graphical telephone or display into the tray. 4.9.5. icon in the Action – Load Desktop User Manual – PBX Assistant www.2n.cz 47 2N ® PBX Assistant Select this item to load the pre-defined layout of open windows (queues, history, databases, etc.) including their position on the desktop. 4.9.6. Action – Save Desktop Select this item to save the currently open windows (queues, history, databases, etc.) and their positions on the desktop. 4.9.7. Action – Print Button Labels Select this item to print out the current telephone button assignments. For details see Subs. 4.4.3, Button Labels. 4.9.8. Action - Exit Select this item to exit the 2N® PBX – Assistant application. User Manual – PBX Assistant www.2n.cz 48 2N ® PBX Assistant The manufacturer reserves the right to change any of the parameters included in the documentation in the order to improve the product’s qualities. Use the product in compliance with the Instructions for Use and for the purposes mentioned therein only. When expired, the product should be disposed of in accordance with the applicable environmental control regulations. User Manual – PBX Assistant www.2n.cz 49