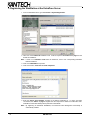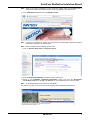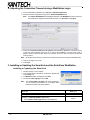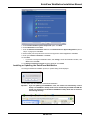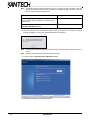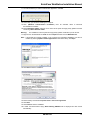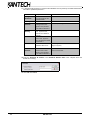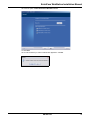
1
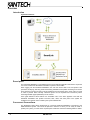
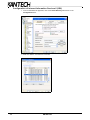
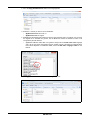
EntraPass WebStation
Installation Manual
DN1864-1011
EntraPass WebStation Installation Manual
Table of Contents
General Information ...........................................................................................................1
Copyright Info ....................................................................................................... 1
Technical Support ................................................................................................. 1
Overview ............................................................................................................................ 2
Introduction ........................................................................................ 2
Description ......................................................................................... 2
Concurrent Connections ..................................................................... 2
Card Management .............................................................................. 3
Definition ........................................................................................... 3
Users ................................................................................................. 3
Operations ......................................................................................... 3
WebViews .......................................................................................... 3
Reports .............................................................................................. 3
Session .............................................................................................. 3
Security ............................................................................................. 3
Multilingual ........................................................................................ 4
ResxEditor ......................................................................................... 4
Minimum Requirements ..................................................................................................... 4
Web End User Computer .................................................................... 4
Windows Web Server with SmartLink and WebStation ......................... 4
EntraPass Server ............................................................................... 4
EntraPass WebStation Documentation ................................................ 4
Related Documentation ...................................................................... 4
Task List ............................................................................................ 5
Optional Procedures ........................................................................... 5
Registering the WebStation at the EntraPass Server ........................................................ 6
Adjusting the Connection Timeout during a WebStation Login ......................................... 8
Installing or Updating the SmartLink and the EntraPass WebStation ................................ 8
Installing or Updating the SmartLink .................................................... 8
Installing or Updating the EntraPass WebStation ................................. 9
Configuration of Internet Information Services 6 (IIS6) ........................14
Registering the SmartLink with the EntraPass Server ..................................................... 15
Configuring the SmartLink Email Server Parameters (optional) ...................................... 16
Using the ResxEditor for Translation (optional) ............................................................... 16
DN1864-1011
iii
iv
DN1864-1011
EntraPass WebStation Installation Manual
General Information
Copyright Info
Copyright © 2010 Tyco International Ltd. and its Respective Companies. All Rights Reserved. All
specifications were current as of publication date and are subject to change without notice. EntraPass,
Kantech and the Kantech logo are trademarks of Tyco International Ltd. and its Respective
Companies.
Technical
Support
For technical assistance with the EntraPass WebStation and other Kantech products, contact technical
support, Monday to Friday:
Country/Region
Phone Numbers
Hours
Email
North America Toll Free +888 222 1560 (GMT -05:00)
US and Canada
Direct: +450 444 2030
Fax: +450 444 2029
8:00 to 20:00
[email protected]
Latin America (GMT -03:00)
Argentina
Direct: +5411 4711 8711
Fax: +5411 4711 8201
9:00 to 18:00
[email protected]
Asia (GMT +08:00)
Asia-Pacific
8:30 to 18:00
[email protected]
[email protected]
[email protected]
[email protected]
[email protected]
Europe Toll Free +800 CALL TYCO / +800 2255 8926 (GMT +01:00)
Bahrain
+800 04127
[email protected]
France
+33 04 72 79 14 83
Greece
+00 800 31 22 94 53
Russia
+8 10 800 2052 1031
Spain
+900 10 19 45
Turkey
+00 800 31 92 30 07
United Arab Emirates
+800 0 31 0 7123
United Kingdom
+44 08701 ADT SUP / 44 08701 238 787
Direct: +31 475 352 722
Fax: +31 475 352 725
8:00 to 18:00
DN1864-1011
1
Overview
Introduction
System Architecture
Description
The EntraPass WebStation is a simplified access to the EntraPass application that doesn’t require the
user to be located at the EntraPass workstation to perform various tasks.
When logging into the EntraPass WebStation, the end user will be able to see and perform card
operations, modifying, searching cards and selecting available access profiles according to his access
level. Operators can have access to manual operations such as elevator doors, doors, relays or inputs
in order to perform tasks manually. Historical reports can be requested and received by email.
Preconfigured Web pages (WebViews) can be viewed.
User rights determine which features are accessible. This is the same approach used with the
EntraPass workstation user profiles. Functions, sites, cards, and other parts of the system are
available to the operator when created by the system administrator.
Concurrent Connections
The EntraPass system allows simultaneous or concurrent EntraPass WebStation connections to the
same EntraPass system. This should be planned in advance so when you are ready to install or
update your system, you have all the required option certificates. Check the following table for details:
2
DN1864-1011
EntraPass WebStation Installation Manual
Table 1: Concurrent Connections
Part Number
Description
E-COR-WEB-1
1 WebStation Connection
E-COR-WEB-3
3 WebStation Connections
Maximum concurrent
connections
EntraPass Corporate Edition
4
EntraPass Global Edition
E-GLO-WEB-1
1 WebStation Connection
E-GLO-WEB-3
3 WebStation Connections
21
Note: Web connection limitations vary depending on the installed Operating System.
Card Management
The Card Management page allows you to easily manage the EntraPass cardholder database
remotely.
Here are the tasks that can be performed on the Card Management page:
•
•
•
•
•
•
•
•
•
Assign up to five (5) card numbers per user name
Assign card access groups
Assign access levels
Assign card types
Define and issue cards without any card number
Define and issue cards as well as perform card-related tasks (find, modify or delete existing cards)
View card information in drop-down lists
View card last transactions
Import pictures into cards
Definition
•
Schedules
•
Access Levels
Users
Operations
•
•
•
•
Door
Elevator
Input
Relay
WebViews
•
Display Web pages previously configured in EntraPass
•
Historical report request (previously created in EntraPass) sent to a specific email address
•
•
Password change
Password recovery
Reports
Session
Security
Security between the EntraPass WebStation and the EntraPass Server will be handled in the same
manner as any other connection.
Security at the EntraPass WebStation level is handled by the configuration of the Microsoft IIS Server.
The administrator determines the usage and restrictions related to IIS encryption and/or SSL
Certification.
DN1864-1011
3
Multilingual
The new EntraPass WebStation is available in two languages, English and French. The EntraPass
WebStation detects and automatically uses the language preference of the web browser.
For example, to change or view the current language in Microsoft® Internet Explorer, go to the Tools
menu > Internet Options > General tab, then click on the Languages button.
ResxEditor
This application helps you in the translation of the WebStation vocabulary into any language.
Important:
The ResxEditor is a 3rd party software not supported by Kantech. Always create a
backup of the files you are planning to translate. Translation of the EntraPass
WebStation vocabulary should be performed only by system administrators.
Minimum Requirements
Web End User Computer
•
•
•
•
Microsoft Internet Explorer 6.0 or higher, Mozilla Firefox 3.6, Google Chrome 6.0 or Safari 5.0.
Screen resolution: 1024 x 768
Adobe Flash Player 10.0 or higher
Microsoft Silverlight 4.0 or higher
Windows Web Server with SmartLink and WebStation
•
•
•
•
•
•
•
•
Operating systems: Windows XP Pro, Server 2003, Server 2008 (with SP2), Vista (with SP2) and
version 7 32-bit (see Note)
Latest Windows Service Packs and High Priority updates must be installed
Processor: Pentium IV at 1.8GHz or better
Minimum hard disk space: 10 GB
RAM: minimum 1.0GB
Microsoft Internet Information Services (IIS) version 5.0 or higher with the latest security updates
Microsoft .NET Framework 4 SP1 with the latest security updates
Hard disk space required for the EntraPass WebStation installation: 300 MB
Note: For Windows Vista and Windows 7, we highly recommend a dual core or higher processor with a
minimum of 2 GB of RAM. Actual requirements may vary based on your operating system and
configuration.
EntraPass Server
•
EntraPass Corporate Edition or Global Edition v4.04 and higher.
EntraPass WebStation Documentation
The EntraPass WebStation documentation is divided in two manuals:
•
•
One for the operations: EntraPass WebStation, User Manual, DN1709
One for the installation: EntraPass WebStation, Installation Manual, DN1864
Related Documentation
•
•
4
EntraPass Global Edition, Reference Manual, DN1316
EntraPass Corporate Edition, Reference Manual, DN1415
DN1864-1011
EntraPass WebStation Installation Manual
Task List
Table 2 lists the procedures required for the installation of EntraPass WebStation.
Table 2: Task list for the EntraPass WebStation installation
Task
Page
1- Registering the WebStation at the EntraPass Server
6
2- Adjusting the Connection Timeout during a WebStation Login
8
3- Installing or Updating the SmartLink and the EntraPass WebStation
8
4- Registering the SmartLink with the EntraPass Server
15
Optional Procedures
Table 3 lists the procedures that are not required for a typical installation but could be performed later
if necessary.
Table 3: Optional Procedures
Task
Page
5- Configuring the SmartLink Email Server Parameters (optional)
16
6- Using the ResxEditor for Translation (optional)
16
DN1864-1011
5
1- Registering the WebStation at the EntraPass Server
1. From the EntraPass Server, go to Connection > System Registration.
2. Take note of the SmartLink installation code. It will be required in Procedure 3 on page 8 for the
SmartLink installation.
Note: If there is no Installation Code listed for SmartLink, refer to the corresponding EntraPass
Reference Manual.
3. Click on the WebStation component.
4. Click on the button: Click here to install component.
5. Enter the Option Serial Number (located on the Option Certificate) for 1 or more concurrent
connections, see Table-1 on page 3. Register the new component to obtain the confirmation code.
Click OK. An automated backup will be performed. Click Close.
Note: By registering an EntraPass WebStation, the Enhanced User Management functionality is
automatically enabled.
6
DN1864-1011
EntraPass WebStation Installation Manual
Note: There are two ways of registering a new component; register online at www.kantech.com or
contact your local Kantech technical support to get the registration confirmation code.
6. Go to www.kantech.com and click on the Member Center.
Note: If you are not a member yet, submit your request and your membership confirmation should be
received by email within 1-2 business days.
Note: Please note that the first webstation license is free.
7. Click on Kantech Registration > Register Option.
8. Enter the System Serial Number and follow the online instructions.
9. Return to the EntraPass Component Registration screen and enter the Registration
Confirmation Code, then click OK. The OK button is only enabled when both codes are valid.
Note: An automated backup will be performed. Click Close.
The maximum number of concurrent connections (logins) will be displayed in parentheses.
DN1864-1011
7
2- Adjusting the Connection Timeout during a WebStation Login
1. From the EntraPass workstation, go to Devices > EntraPass Application.
2. Select the SmartLink application and go to the SmartLink WebStation tab.
Note: The SmartLink WebStation tab will only be displayed if the WebStation system component
has already been registered at the EntraPass Server, see Procedure 1 on page 6.
3. Choose the Connection timeout on idle (mm:ss) of the EntraPass WebStation. This is the amount
of time that will be allowed when there is no entry at the WebStation. The time range value is
between 00:30 to 20:00 minutes. When the connection timeout on idle has expired, the operator
must log back in.
Note: All changes will be lost if the operator hasn’t saved the data before leaving the WebStation idle.
4. Click on the floppy icon to save.
5. Click Close.
3- Installing or Updating the SmartLink and the EntraPass WebStation
Installing or Updating the SmartLink
1. Quit all programs on the computer.
2. Insert the EntraPass CD-ROM in the CD drive. Double-click
on the Setup icon.
3. The Welcome window is displayed. Click Next.
4. Choose the setup language and click OK.
Note: The Choose Setup Language will not be displayed if
you are installing the SmartLink on a computer where
EntraPass has previously been installed.
If you are
8
then go to
installing a new EntraPass v4.04 system
Step 5.
updating an existing EntraPass v4.0x system:
• Select Update installed applications. Click Next twice.
Step 12.
DN1864-1011
EntraPass WebStation Installation Manual
5. Select Install EntraPass system components option. Click Next.
6. Select SmartLink and click Next.
7. Enter the SmartLink Installation code from the EntraPass Server System Registration (refer to
step 2. on page 6) and click Next.
8. Read carefully and accept the terms of the license agreement. Select I agree then click Next.
9. Enter your customer information. Click Next.
10. Click Next.
• If you want to change the installation folder, click Change, choose the destination location, click
OK and then click Next.
11. The Ready to Install the Program window is displayed. Click Install.
Installing or Updating the EntraPass WebStation
12. During the SmartLink installation process, a question dialog will be displayed.
13. Click Yes to start the installation of EntraPass WebStation.
Important:
If you are updating from WebStation v4.0x, the installer will automatically create a
backup. The WebStation backup folder will be identified by the DATE and TIME the
update was performed. The EntraPass WebStation backup folder will be located in
the following directory:
DN1864-1011
9
Note: The Microsoft Internet Information Services (IIS) 5.0 or higher and .NET Framework 4 SP1 are
required and should have been already installed. The installation program will detect if they are
missing or below minimum requirements.
If you get
then go to
a warning message indicating that the Windows Web
Server is either missing components or below minimum
requirements
Step 14.
the Welcome to the InstallShield Wizard for the
EntraPass WebStation window
Step 21.
14. When the Microsoft Internet Information Services (IIS) 5.0 or higher is not installed, a warning
message is displayed. Contact your network administrator for assistance.
Note: The Windows CD-ROM is required to install Microsoft Internet Information Services (IIS) 5.0 or
higher.
Note: Necessary third party software will be installed at this step.
15. Check the option: Install SmartLink as Windows service.
16. Click Next to complete the SmartLink installation.
10
DN1864-1011
EntraPass WebStation Installation Manual
17. You will be asked if you want to install another application. Click No.
18. At this step, you should be restarting the computer.
19. WCF (Windows Cummunication Foundation) must be activated. Refer to Microsoft
documentation for details.
20. Repeat Windows Update until there are no more service packs and high priority updates to install
concerning .NET Framework 4 SP1.
Warning:
The installation of service packs and high priority updates could take up to 30 minutes.
21. Right-click on the EntraPass CD-ROM and select Explore. Double-click on WebInstall.exe.
Note: If the SmartLink is already installed on the computer, the EntraPass WebStation can also be
installed by selecting Update installed applications in EntraPass Setup, see Step 4.
22. Click Next to start the installation.
23. Read carefully and select I accept the terms in the license agreement.
24. Click Next.
25. Click Install to start the installation.
26. A black command window saying Start Installing ASP.NET will be displayed and then closed
automatically.
DN1864-1011
11
27. A diagnostic will be perform to verify that the installation went on perfectly. The table below draws a
list of all the operations performed.
Actions Description
Possible Causes of Failure Setting Permissions Ensure that the IIS User has the proper rights over the WebStation folder. IIS Settings Check for the IIS version
IIS ASPNET Check for Directory Activation Browsing feature of IIS. Applies to Vista, Windows Server 2008 and Windows 7
IIS Directory Check for ASPNET feature Browsing of IIS. Applies to Vista, Windows Server 2008 and Windows 7
IIS Static Content Check for Static Content feature of IIS. Applies to Vista, Windows Server 2008 and Windows 7
WCF Service Check HTTP and HTTPS WebStation WCF Service. WCF HTTP Activation Check for WCF HTTP Activation feature of IIS. Applies to Vista, Windows Server 2008 and Windows 7
N/A
No IIS is installed on the server The Directory Browsing feature is not activated. The ASPNET feature of IIS is not activated.
The Static Content feature of IIS is not activated. Some settings on IIS or on the network are not configured properly. The Windows Communication Foundation HTTP feature is not activated. 28. Enter the SmartLink IP address or the SmartLink Domain name of the computer where the
SmartLink is running.
29. Click OK. Click Finish.
12
DN1864-1011
EntraPass WebStation Installation Manual
30. Check the option: Install SmartLink as Windows service.
31. Click Next.
32. You will be asked if you want to install another application. Click No.
33. Restart the Windows Web Server.
DN1864-1011
13
Configuration of Internet Information Services 6 (IIS6)
1. From the EntraPass site properties, click on the Virtual Directory tab and then on the
Configuration button.
2. Make sure that the .svc extension is included.
14
DN1864-1011
EntraPass WebStation Installation Manual
If .svc is not among the extensions list, click on Add and enter the following data in Executable
(C:\WINDOWS\Microsoft.NET\Framework\v2.0.50727\aspnet_isapi.dll) and Limit to fields:
4- Registering the SmartLink with the EntraPass Server
After an EntraPass application has been installed on a computer, communication with the EntraPass
Server must be established between the two computers. The following steps will assist you in
configuring and establishing the first communication between the SmartLink and the EntraPass Server
using the proper protocol.
Note:
Before you proceed, make sure that the EntraPass Server is online. Otherwise, launch it
manually.
1. From the Windows® Start menu, click on Start > All Programs > EntraPass Global Edition or
Corporate Edition > SmartLink > SmartLink. You can also start the SmartLink from the shortcut
on the desktop.
Note: The system automatically launches the registration program when an application attempts to
connect to the EntraPass Server before it has been registered. The Server registration window
also appears when you launch an application before the EntraPass Server is online. When this
happens, simply start the EntraPass Server.
Select the communication protocol to be used between the EntraPass Server and the SmartLink.
•
•
•
TCP/IP: Enter the computer’s TCP/IP address where the EntraPass Server is installed. The
EntraPass Server’s TCP/IP address appears in the EntraPass Server status bar.
Domain Name: Enter the computer’s name or the workgroup from which the EntraPass
Server is a member.
Local: Enter Local when registering a component on the same computer as the EntraPass
Server. This option will take the address from the EntraPass Server.
DN1864-1011
15
2. Check the Provide local TCP/IP address button if the SmartLink connects to the EntraPass server
using a VPN (Virtual Private Network) connection. Type the IP address used by the VPN application.
This address is provided by the VPN application and is usually accessible by clicking on the
minimized VPN icon found in the system tray.
3. Enter the Authentication Password and click OK (default is Kantech).
•
•
If the server registration is successful, a confirmation is displayed.
If the server registration fails, a message is displayed. Contact your network administrator for
assistance.
4. Click Close.
5- Configuring the SmartLink Email Server Parameters (optional)
This procedure is required when you want to receive historical report requests by email.
1. From the EntraPass workstation, go to Devices > EntraPass Application.
2.
3.
4.
5.
6.
Select the SmartLink from the EntraPass Application list.
Click on the Email reports tab.
Enter the Email Server Parameters.
Click on Save.
Click on Close.
6- Using the ResxEditor for Translation (optional)
1. Make sure no EntraPass WebStation sessions are opened when you are ready to translate a
language.
16
DN1864-1011
2. Go to the App_GlobalResources folder for the language files.
3. Select the *.resx file you want to use for translation:
• AppResource.fr.resx for french, or
• AppResource.resx for english
4. Duplicate the selected file and rename it as per the new language code. For example, you are using
the english file to translate into german, the file MUST be named as followed in order to be
recognized by the web browser:
• AppResource.de.resx where .de. is for german. Always use the 2-letter lower case language
code, not the next upper case letters used for another purpose. See below an example taken
from Internet Explorer. For additional details, search for ISO 639-1 Language Codes on the
Internet.
5. The App_GlobalResources folder should now appear like this.
DN1864-1011
17
6. Go to the following folder for the ResxEditor.exe application.
7. Double-click on the ResxEditor.exe and open the *.resx file created in Step 4.
8. Double-click the cell to be translated.
Note: Be careful not to change designer comments such as Do Not Translate.
9. Save the file.
10. Change the language preference of the web browser accordingly.
11. The modifications will take effect on the next EntraPass WebStation login.
18
DN1864-1011
Copyright © 2010 Tyco International Ltd. and its Respective Companies. All
Rights Reserved.
www.kantech.com
DN1864-1011