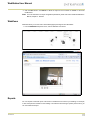
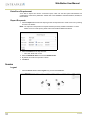
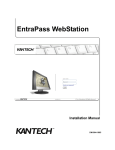
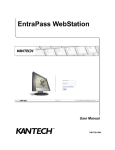
1
WebStation User Manual
DN1709-1107/ Version 5.00
Copyright © 2011 Tyco International Ltd. and its respective companies. All Rights Reserved. All specifications were current as of
publication date and are subject to change without notice. EntraPass, Kantech and the Kantech logo are trademarks of Tyco
International Ltd. and its Respective Companies.
WebStation User Manual
Table of Contents
General Information ...................................................................................................... 1
WebStation Parameters ............................................................................................... 2
Multi-Browser Support .................................................................................................. 2
EntraPass WebStation 5.00 ......................................................................................... 2
Welcome Page ............................................................................... 2
Password Recovery ........................................................................ 2
Login ............................................................................................. 3
Real-time Events .......................................................................................................... 4
Events Filters ................................................................................. 4
Card Management ........................................................................................................ 4
Adding a New Card ......................................................................... 4
Signature Pad .............................................................................. 10
Picture Capture ............................................................................ 12
CSV Export .................................................................................. 12
Card Last Transactions ................................................................. 13
Creating New Cards Using the “Save As” Feature .......................... 13
Editing a Card .............................................................................. 13
Searching for a Card .................................................................... 14
Card Status from Card List ........................................................... 15
Deleting a Card ............................................................................ 15
Deleting the Picture ...................................................................... 15
Access Level .............................................................................................................. 15
Display ......................................................................................... 16
Defining an Access Level .............................................................. 16
Definition .................................................................................................................... 17
Schedule ...................................................................................... 17
Operations .................................................................................................................. 18
Door Operation ............................................................................. 18
Elevator Operation ....................................................................... 20
Input Operation ............................................................................ 20
Relay Operation ........................................................................... 22
Improved Temporary Unlock on Doors ........................................... 23
Devices ....................................................................................................................... 23
Site .............................................................................................. 23
Controllers ................................................................................... 26
Doors ........................................................................................... 27
Relays ......................................................................................... 28
Inputs .......................................................................................... 29
Outputs ........................................................................................ 30
WebViews .................................................................................................................. 30
Reports ....................................................................................................................... 31
EntraPass Requirement ................................................................ 31
Report Requests .......................................................................... 31
Session ....................................................................................................................... 32
Logout ......................................................................................... 32
Changing Password ...................................................................... 32
About ........................................................................................... 33
iii
WebStation User Manual
iv
WebStation User Manual
General Information
Copyright
Information
Copyright © 2011 Tyco International Ltd. and its respective companies. All Rights Reserved. All
specifications were current as of publication date and are subject to change without notice. EntraPass,
Kantech and the Kantech logo are trademarks of Tyco International Ltd. and its respective companies.
WebStation
Documentation
The WebStation documentation is divided into two manuals:
• One for operations: WebStation, User Manual, DN1709
• One for installation: WebStation, Installation Manual, DN1864
Related
Documentation
•
•
Technical Support
EntraPass Global Edition, Reference Manual, DN1316
EntraPass Corporate Edition, Reference Manual, DN1415
For technical assistance with WebStation and other Kantech products, please contact our technical
support, from Monday to Friday:
Country/Region
Phone Numbers
Hours
Email
North America Toll Free +888 222 1560 (GMT -05:00)
US and Canada
Direct: +450 444 2030
Fax: +450 444 2029
8:00 to 20:00
[email protected]
Latin America (GMT -03:00)
Argentina
Direct: +5411 4711 8711
Fax: +5411 4711 8201
9:00 to 18:00
[email protected]
8:30 to 18:00
[email protected]
[email protected]
[email protected]
[email protected]
[email protected]
Asia (GMT +08:00)
Asia Pacific
Europe Toll Free +800 CALL TYCO / +800 2255 8926 (GMT +01:00)
Bahrain
+800 04127
France
+33 04 72 79 14 83
Greece
+00 800 31 22 94 53
Russia
+8 10 800 2052 1031
Spain
+900 10 19 45
Turkey
+00 800 31 92 30 07
United Arab Emirates
+800 0 31 0 7123
United Kingdom
+44 08701 ADT SUP / 44 08701 238 787
Direct: +31 475 352 722
Fax: +31 475 352 725
General Information
8:00 to 18:00
[email protected]
1
WebStation User Manual
WebStation Parameters
You may now limit the number of events per session, per operator. Once the maximum number of Web
messages is reached, the oldest events displayed will be overridden by the most recent ones coming in.
Note: The Allow messages to WebStation checkbox must be checked if you want messages to be sent
to the WebStation. Please refer to the EntraPass Reference Manual under Options for more
details.
By default, the Signature Pad Pen Width is set to 10.
Multi-Browser Support
WebStation now supports the following Web browsers: Internet Explorer 6-7-8, Mozilla Firefox
3.6,Google Chrome 6.0, Safari 5.0.
EntraPass WebStation 5.00
Welcome Page
The Welcome page introduces you to WebStation. From the Welcome page, you can select functions
through the pull-down menus or the rotating symbols.
Password Recovery
Important: In order to receive a random password, the operator must have an email address
assigned to their login credentials in EntraPass. Please refer to the EntraPass
Reference Manual under Options for more details.
The password recovery will generate a random password and send it to your email address. On your
next login to WebStation, you will be asked to change your password.
2
WebStation Parameters
WebStation User Manual
1. Click Forgot your password?. The password recovery page displays.
2. Enter your email address and click Submit. The email must be the same as the one in your EntraPass
credentials.
Login
1. Start a web browser on your computer.
2. Enter the IP address or the Web site name of the Windows Web Server and press Enter.
•
Example: http://192.168.1.1/EntraPassWebStation/
3. Enter the User Name and Password and click Login.
Note: The default timeout is 5 min. The connection timeout range is 30 sec. to 20 min. This parameter can
be configured only at the EntraPass workstation.
Warning:
EntraPass WebStation 5.00
Unsaved card information will be lost when the connection timeout is expired.
3
WebStation User Manual
Real-time Events
The Real-time Events feature allows you to view all the events displayed in real time, as they occur.
This option is accessible through the Events tab or the Events button at the bottom of the Welcome
page.
Note: Upon accessing the real-time events feature, please note that the events filters will not apply by
default; therefore should you want to filter your list of events, you will need to select your filter
manually.
Events Filters
•
•
•
•
•
•
•
•
Text Filter: the Contains, Begins with and Ends with filter types will all be considered when applying
filters to your search.
Event Filter: the Event filter lets you select only the upcoming messages, not the buffered messages,
from an existing workspace when a filter type is selected.
Auto-scroll delay (mm:ss): will automatically start scrolling the message list after a preset delay when
the operator selects an item in the list. By default, this option is turned on with a preset delay. You can
select to turn this option off, which means that the operator will have to click the Restart Scroll button
in the Messages List (this option is not available for Archived Messages Lists).
Last Event on top of the screen: when checked, this filter displays the most recent events first.
Show Event Colors: displays the colors for each event, as defined in the workstation parameters.
Character Size: allows you to set the character size to small, medium, large.
Apply: applies changes to filters.
Export: exports the displayed events either in an XML or a CSV format.
Note: Preventing users from modifying events filters is possible if you are configured as an operator.
4
Real-time Events
WebStation User Manual
Card Management
Adding a New Card
Users Menu
1. Click the Card symbol to access the Card Management menu or select Card Management from the
Users menu.
2. Click the Add Card icon located in the upper right side of the window to open the Card dialog.
3. Enter the User Name. You can enter up to 50 characters.
Card Management
5
WebStation User Manual
There is no error message if the same user name is entered twice without a card number but if the same
card number is used, a warning displays the following message: the card number already exists.
4. Select the Card state from the drop-down list.
•
•
•
•
•
Valid: the card is functional,
Invalid: the card is NOT functional,
Stolen \ Lost: the card is NOT functional,
Pending: the card is not yet functional (Note)
Expired: the card has reached its expiry date (Note).
Note: The Pending and Expired card states are directly related to the Start/End Date tab settings.
•
•
6
If the Start Date has not occurred, it will automatically change to Pending.
If the End Date has occurred, it will automatically change to Expired.
Card Management
WebStation User Manual
5. Select Card type (optional) from the drop-down list. The card type is used to group cardholders.
6. Select Badge Layout (optional) from the drop-down list.
7. Select Access Level Template from the drop-down list (optional). The access level template list will
display only the one(s) already configured in EntraPass (Users toolbar > Card access group). Preprogrammed access level templates allow quick selection of access levels for various sites of the
system.
8. Click the Card Number tab. Enter the number printed on the card, if available, in the Card Number
field. The card number must be between 7 and 16 digits, but if no card number is available, field must
remain empty.
•
If the card number already exists, the following warning message displays: “the card number
already exists”.
9. Check the Trace option if you want to monitor the use of a particular card. Selecting this option will
cause the EntraPass “Card traced” event to be generated each time this card is presented to a card
reader. For example, you can request and generate an EntraPass report containing the “Card traced”
event in order to verify user actions.
10. Click the Information tab. Fill in the Card information 1 to 10 fields or use the drop-down lists if
available.
•
For example, you could use Card Information 1 to store the employee number; Card Information
2, the gender; Card Information 3, the address. Card information fields may be used to index
reports, customize the cardholder lists and so on. You can enter up to 50 characters per field.
Note: All fields labels (Card Information 1 to 10) can be modified from the EntraPass Workstation.
11. Click the Access Level tab. Select the Access Level from the drop-down.
12. Select one of the Access Levels. If you want to use it as a temporary access level, check the Use
Date option and select the Expiration Date.
Card Management
7
WebStation User Manual
Important: The Secondary Access Level is only available when EntraPass WebStation is
connected to an EntraPass Global Edition system.
13. Click the magnifier to view the Access Level Details.
Note: The access levels can only be modified at the EntraPass workstation.
14. Click the Start/End Date tab.
15. Enter the start and end dates.
8
Card Management
WebStation User Manual
16. Check the Use end date box if applicable. When the end date is reached, the Card state field is set to
“Expired”.
Note: When creating a card with a limited access time of 24 hours of less, for example a Day Pass,
the card will expire at midnight. This expiration may take up to one minute to register in the
system.
17. Check the Delete when expired option (if applicable). This option can only be used with the Use end
date option. When selected, the card will automatically be deleted on the expiry date (using the end
date specified), otherwise the Card state field will be modified to “Expired”.
Note: A deleted card is a card that is not active in the system database. Even if a card was deleted,
previous events generated by this card are still stored in the EntraPass archive file.
18. Click on the Miscellaneous tab.
19. Check the Extended delay option if you are issuing a card for a cardholder with disabilities or special
needs. To enable this option in the system, you have to define appropriate delays in the EntraPass
Door definition. This option is also available when defining visitor cards.
20. Check the Disable passback option if you want the card to override the passback option when defined
in EntraPass.
21. Check the Wait for keypad option to force users to enter a PIN on keypad to access all doors. Then in
the editable PIN field, enter the PIN that users will be required to enter.
Note: Selecting Wait for keypad will delay access to a door for this card until the correct PIN has
been entered on a keypad. This only affects doors defined with both reader and keypad in
EntraPass (Devices toolbar > Doors). The keypad schedule must also be valid for this door.
22. Select a supervisor level or check the Privileged operation option. If you check this option, the
supervisor level is greyed out.
•
•
The privileged operation level allows a card holder to override security measures regarding doors in
all areas.
The supervisor level allows a card holder to override security measures regarding doors in areas
but only for areas where the supervisor level is equal or lower than its own level.
Important: The Privileged Operation option and the Supervisor Level selection are only
available when EntraPass WebStation is connected to an EntraPass Global Edition
system with a Global gateway or a KT-NCC.
Card Management
9
WebStation User Manual
23. Move to the Comments tab to enter any additional comments. You can enter up to 240 characters.
24. From the Signature tab, click the Browse button to assign a signature from a file.
25. Click the Browse button at the bottom of the window to locate and assign a picture from a file.
26. Click Save.
Signature Pad
The Signature Pad feature is used to enter an electronic signature directly onto a card via the Topaz
Systems signature pad. It allows for signature capture without having to import a signature file from a
10
Card Management
WebStation User Manual
specific folder.
•
•
•
Card Management
OK: Transfers the signature to the card without transferring the data to the server. You must click Save.
Clear: Deletes the previously entered signatures.
Cancel: Closes the signature pad interface.
11
WebStation User Manual
Picture Capture
Pictures can now be taken directly from a Webcam.
1. Ensure the camera is plugged.
2. Click the Start button to activate the camera.
3. When you are ready, click the Take Snapshot button. All the pictures will be displayed on the right
hand side of the window.
4. From the series of snapshots, select the one you want to apply to the card.
5. Click OK. By clicking the OK button, the picture you will have selected will be displayed and saved in
the Card window.
6. Clicking the Save button will transfer the picture to the server.
CSV Export
An export has been added which allows you to export the current list of cards in a CSV format.
12
Card Management
WebStation User Manual
Card Last Transactions
Look for the + sign next to the recycle bin. The card last transactions window will display.
Creating New Cards Using the “Save As” Feature
The Save as feature allows you to create a new card based on an existing card, only making changes to
specific information. For example: changing the user name, entering a card number and keeping all other
card information.
1. Click the Card symbol or select Card Management from the Users menu.
2. Click the Pencil icon next to the User name you wish to use.
3. Click the Save as button.
4. Enter the new card number.
5. Click OK.
6. A confirmation will display.
•
•
•
Click Yes, if you wish to create a NEW card. This will bring you to the New card page with all fields
empty.
Click No, if you wish to continue editing this card.
Click Back to list, if you wish to return to the Card management page.
Editing a Card
1. Click the Card symbol or select Card Management from the Users menu.
Card Management
13
WebStation User Manual
2. Click the Pencil icon next to the User name you wish to edit.
Searching for a Card
1. Click the Card symbol or select Card Management from the Users menu.
2. There are three different ways to find a card:
14
•
Click View all cards and navigate through the pages with the arrows at the bottom of the page.
•
•
Alphabetical quick search: click the first letter of the user name.
Use the Find user name field or Find card number with the Start with or the Contains field and
click GO.
Card Management
WebStation User Manual
Card Status from Card List
In the Card List window, a new column has been added to allow viewing the card state of the cards
from the list.
Deleting a Card
1. Click the Card symbol or select Card Management from the Users menu.
2. Click the Recycle bin icon next to the Card number you want to delete.
3. A confirmation will display. Click OK to delete.
Note: Although a deleted card is removed from the card database, it remains in the EntraPass card
history; all events involving that card remain in the EntraPass event messages database.
Deleting the Picture
1. Click the Pencil icon next to the User name you wish to edit.
2. Select the Picture tab.
3. Click the Delete picture button.
Warning:
The picture will be deleted as soon as you click the Delete picture button. There is no
warning message asking if you are sure you want to delete.
Access Level
Click the Users menu and select Access Level. You can also click the Access Level icon from the
Welcome screen.
Access Level
15
WebStation User Manual
Display
In Access Level, you can configure the system parameters using two different interfaces. The Classic
view, in which you select data from drop-down lists:
and the Graphic view, in which you use drag and drops to move doors from one schedule to another.
Note: The Classic view will be used in the following paragraphs to avoid replication.
Defining an Access Level
To create a new access level, click the Add Access Level button, enter a name and select a schedule
for each door controller you want to configure from the drop-down lists.
16
Access Level
WebStation User Manual
Single vs. Multiple Update Mode
You can choose to use the Single Update Mode or the Multiple Update Mode. In the Multiple Update
Mode, you can modify many items at a time by selecting the checkbox next to the items you want to
update.
Definition
Schedule
Click the Definition menu and select Schedule. You can also click the Schedule icon from the
Welcome screen.
To create a new schedule, click the Add Schedule button.
To edit the new schedule:
Definition
17
WebStation User Manual
1. Drag the sliders to set the interval period. Repeat for each interval (up to four).
2. Click the days of the week for which the schedule is applicable. Repeat for each interval.
You can also use the action menu by clicking the blue arrow.
3. Click the holidays that apply to the schedule for each interval.
The list of holidays corresponding to a specific type is displayed by hovering the mouse on holiday titles
(Hol1, Hol2, etc.):
Note: To be available, holidays must have been previously configured in EntraPass. Moreover, the
Enhanced schedule option must have been enabled in EntraPass.
4. Click the Save button.
Operations
Door Operation
1. From the Operation drop-down list (or the Operation icon from the Welcome screen), select Door
Operation.
18
Operations
WebStation User Manual
2. Click on the Gateway / Site from the list.
3. Click on the door and select the operation from the menu.
4. Click the Refresh button to confirm the operation. The two icons next to each door must correspond to
the selected operation.
Operations
19
WebStation User Manual
Elevator Operation
1. From the Operation drop-down menu, select Elevator Operation.
2. Click on the Gateway / Site from the list.
3. Click on the elevator and select the operation from the menu.
Input Operation
1. From the Operation drop-down menu (or the Operation icon from the Welcome screen), select Input
Operation.
2. Click on the Gateway / Site from the list.
20
Operations
WebStation User Manual
3. Click on the input and select the operation from the menu.
4. Click the Refresh button to confirm the operation. The animated icon behavior, next to the input, must
correspond to the selected operation.
5. The input status is shown in three colors.
Operations
21
WebStation User Manual
Relay Operation
1. From the Operation drop-down menu (or the Operation icon from the Welcome screen), select Relay
Operation.
2. Click on the Gateway / Site from the list.
3. Click on the relay and select the operation from the menu.
4. Click the Refresh button to confirm the operation. The icon must correspond to the selected operation.
22
Operations
WebStation User Manual
Improved Temporary Unlock on Doors
From the Operations window, new Temporary Unlock buttons were added for doors and elevator doors.
The Temporary Unlock feature asks for a custom delay, which will cause re locking upon the end of the
custom delay. One-time access: for all controllers, the door will unlock during the predefined unlock time in
the door definition. On elevator doors, only the lock output is triggered and it does not affect the expansion
modules controlling the floors.
Devices
Site
1. From the Devices drop-down list, select Site.
2. You can navigate through the different sites (and gateways) from the tree view on the left.
3. Click the Add New Site button to add a site.
4. Select a gateway from the list.
5. Enter the site name in the available language textboxes.
6. Click OK.
Site Parameters
1. Select the General tab.
Devices
23
WebStation User Manual
2. Enter a description for each language.
3. Select a time zone from the Time Zone drop-down list.
4. Enter a Postal or Zip code.
5. Select the Connector Type from the drop-down list.
24
Devices
WebStation User Manual
6. Select the IP Configuration tab.
7. Enter the IP parameters.
Note: For more information on site configuration parameters, please refer to the EntraPass Reference
Manual, Chapter 4 - Devices.
8. Click the Save button to save or the Cancel button to cancel the modifications.
Adding a New Controller
1. Click the Add Controller button.
2. From the General tab enter the new controller parameters.
Devices
25
WebStation User Manual
3. Select the Doors tab. Enter door descriptions and parameters.
Note: For more information on door and controller configuration parameters, please refer to the
EntraPass Reference Manual, Chapter 4 - Devices.
4. Click the Save button or Cancel to cancel the modifications.
5. The following message will be displayed if the creation has succeeded:
Controllers
1. From the Devices drop-down list, select Controller.
26
Devices
WebStation User Manual
2. You can navigate through the different controllers from the tree view on the left.
3. Modify the parameters according to your needs.
4. Click the Save button to save or the Cancel button to cancel the modifications.
Note: For more information on controller configuration parameters, please refer to the EntraPass
Reference Manual, Chapter 4 - Devices.
Doors
1. From the Devices drop-down list, select Door.
Devices
27
WebStation User Manual
2. You can navigate through the different doors from the tree view on the left.
3. Modify the door parameters according to your needs.
4. Click the Save button. Click Delete to delete the door for that controller or Cancel to cancel the
modifications.
Note: For more information on door configuration parameters, please refer to the EntraPass Reference
Manual, Chapter 4 - Devices.
28
Devices
WebStation User Manual
Relays
1. From the Devices drop-down list, select Relay.
2. You can navigate through the different relays from the tree view on the left.
3. Modify the relay parameters according to your needs.
4. Click the Save button. Click Delete to delete the relay for that controller or Cancel to cancel the
modifications.
Note: For more information on relay configuration parameters, please refer to the EntraPass Reference
Manual, Chapter 4 - Devices.
Inputs
1. From the Devices drop-down list, select Input.
Devices
29
WebStation User Manual
2. You can navigate through the different inputs from the tree view on the left.
3. Modify the input parameters according to your needs.
4. Click the Save button. Click Delete to delete the input for that controller or Cancel to cancel the
modifications.
Note: For more information on input configuration parameters, please refer to the EntraPass Reference
Manual, Chapter 4 - Devices.
Outputs
1. From the Devices drop-down list, select Output.
2. You can navigate through the different outputs from the tree view on the left.
3. Modify the output parameters according to your needs.
30
Devices
WebStation User Manual
4. Click the Save button. Click Delete to delete the output for that controller or Cancel to cancel the
modifications.
Note: For more information on output configuration parameters, please refer to the EntraPass Reference
Manual, Chapter 4 - Devices.
WebViews
WebViews allow you to view video camera Web pages preconfigured from EntraPass.
1. From the WebViews drop-down menu, select a WebView from the list.
Reports
You can request a historical report of all events or activities that occurred in your building. For example,
to see which persons entered into the building or accessed an area during a specific period of time, you
can view a historical report.
WebViews
31
WebStation User Manual
EntraPass Requirement
To be able to request and receive a historical report, make sure that the system administrator has
configured the email server parameters. Please refer to the WebStation Installation Manual, DN1864, for
further details.
Report Requests
1. Click the Report tab and select the report type from the drop-down list or create a new one by entering
its name in the textbox.
Note: The report list corresponds to the reports that were previously created in EntraPass. For more
details on how to create reports, please refer to the EntraPass Reference Manual.
2. Select the format from the drop-down list.
•
CSV, PDF, Excel, RTF or Text
3. Select the Start/End dates and enter the Start/End times.
4. By default, the email of the operator is shown.
5. Click Send.
Session
Logout
•
32
Click the Session tab and select Logout to log out from the WebStation.
Session
WebStation User Manual
Changing Password
•
Click the Session tab and select Change my password.
•
Click the Session tab and select About.
About
Session
33
WebStation User Manual
34
Session
© 2011 Tyco International Ltd. and its respective companies. All Rights Reserved.
www.kantech.com
DN1709-1107