1
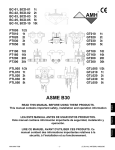
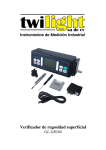
CustomArray™ 90K Microarray: Hybridization and Imaging Protocol (PTL020) Hybridization and Imaging of CustomArray™ 90K Workflow Target Preparation: RNA or DNA (user chooses kit): Biotin or Fluorochrome Labeling Pre-hybridization RNA Fragmentation (RNA targets only) 1-3 days 40 min (10-15 min hands on) Hybridization 4 – 16 hours (10 min hands on) Hybridization Washing 30 min Biotin-labeled Targets: 60 min Post-hybridization Blocking, (20 min Labeling, and Washing hands on) Final Washing Imaging Fluorochromelabeled Targets 15 min 10 min Protocol for CustomArray™ 90K Microarray Hybridization and Imaging (PTL020) – Rev 00 Page i www.combimatrix.com Hybridization and Imaging of CustomArray™ 90K Table of Contents Table of Contents ........................................................................................................................................ ii Introduction ................................................................................................................................................ 1 Materials and Equipment Provided................................................................................................................. 1 Materials and Equipment Required (not provided)........................................................................................... 1 CustomArray™ 90K Assembly ....................................................................................................................... 3 Handling of Assembled Microarrays ............................................................................................................... 4 Preparation for Hybridization......................................................................................................................... 5 Solutions Required for All Targets............................................................................................ 5 Solutions Required Only for Biotin-labeled Targets ........................................................................ 6 Pre-Hybridization ......................................................................................................................................... 7 RNA Fragmentation (RNA Target Samples Only) ............................................................................................. 8 Hybridization ............................................................................................................................................... 9 Hybridization Washing................................................................................................................................ 10 Post-hybridization Labeling for Biotin-labeled Samples................................................................................... 11 Final Washing............................................................................................................................................ 11 Imaging of CustomArray™ 90K ................................................................................................................... 12 Appendix A. Related Products Available from CombiMatrix............................................................................. 14 CombiMatrix Rotisserie Holders for CustomArray™ Microarrays ....................................................... 14 CombiMatrix CustomArray™ Stripping Kit and Clamp ................................................................... 14 Appendix B. CombiMatrix CustomArray™ Synthesizer.................................................................................... 15 Protocol for CustomArray™ 90K Microarray Hybridization and Imaging (PTL020) – Rev 00 Page ii www.combimatrix.com Hybridization and Imaging Protocol Introduction This manual describes how to hybridize labeled target samples to the CombiMatrix CustomArray™ 90K microarray, and how to prepare the microarray for imaging. DNA or RNA target samples can be labeled by incorporation of either biotin or a red-channel fluorochrome (Cy5®, or AlexaFluor® 647 fluorescent dyes). Preparation of labeled targets is the user’s responsibility. Hybridization is performed with 2 to 8 µg of labeled target sample per microarray. The hybridization conditions recommended in this protocol are designed for gene expression analysis. For other microarray applications, please refer to the Combimatrix Website (www.combimatrix.com), or contact customer support ([email protected]). Imaging of the CustomArray™ 90K must be performed using a high-resolution fluorescent scanner that is compatible with a 1”x3” slide format, with a minimum resolution of 5µm and an adjustable focus. The hybridized CustomArray™ 90K can be stripped of targets using the CombiMatrix Stripping Kit (see Appendix A), and then re-used according to the hybridization protocol described in this manual. Materials and Equipment Provided IMPORTANT! Do not touch the semiconductor microarray surface. Wear gloves when handling. CustomArray™ 90K microarrays can be stored in a cool dry place for up to 4 months. CustomArray™ 90K microarray Hybridization Cap (120 µl Volume) Clips for Hybridization Cap LifterSlip™ coverslip Imaging Solution Materials and Equipment Required (not provided) Target DNA or RNA samples labeled with biotin or fluorochrome dyes Rotisserie oven CombiMatrix CustomArray™ Holder for rotisserie oven (optional, see Appendix A) Standard, high-resolution fluorescent microarray scanner (CombiMatrix recommends the Axon Instruments Genepix® 4000B and 4200A microarray scanners, or the Perkin Elmer ScanArray® 4000, 5000, Lite and Express microarray scanners). 95ºC Heating Block Micropipettors and nuclease-free pipette tips Sterile plastic ware Gloves (powder-free) Adhesive tape: Scotch® Brand Magic® Transparent Tape is suitable for hybridization temperatures of 50oC or less; for extended incubations at higher temperatures use a PCR sealing tape such as Nunc Brand PN 232702 (clear polyolefin liner) or PN 276014 (aluminum liner) Nuclease-free water 50X Denhardt’s solution 0.5 M EDTA (pH 8.0) 10% Tween-20 20x SSPE Buffer Protocol for CustomArray™ 90K Microarray Hybridization and Imaging (PTL020) – Rev 00 Page 1 of 15 www.combimatrix.com 10 mg/ml Sonicated Salmon Sperm DNA (sheared), Ambion, Cat.#9680 1% SDS 10X Phosphate-buffered Saline (1.37M Sodium Chloride, 0.027M Potassium Chloride, 0.08M Sodium Phosphate dibasic, 0.02M Sodium Phosphate monobasic, pH 7.4; Ambion, Cat.# 9625) For RNA targets: Deionized (DI) Formamide RNA Fragmentation Reagents (see the section “RNA fragmentation” ) For Biotin-labeled targets: Acetylated Bovine Serum Albumin (BSA, 20 mg/ml solution), Ambion Cat.#2614, or 5X PBS-Casein Blocking Buffer, BioFX Laboratories, Cat.# PBSC-0100-01 Biotin detection reagent: Fluorolink™ Cy5®-labeled streptavidin, GE Healthcare/Amersham Biosciences Cat. # PA45001 Protocol for CustomArray™ 90K Microarray Hybridization and Imaging (PTL020) – Rev 00 Page 2 of 15 www.combimatrix.com CustomArray™ 90K Assembly IMPORTANT! The Hybridization Cap and Clips are intended for single use only. Dispose of these items upon completion of this protocol. 1. Align the Hybridization Cap over the slide so that the top edge of the slide is flush against the stop on the Hybridization Cap, and the Cap is centered over the semiconductor area. 2. Secure the Hybridization Cap in place with the Clips provided (see Fig. 1 and 2). The Clips can be attached only if the Hybridization Cap is positioned with the top edge of the slide at the stop of the Cap. Semiconductor Semiconductor Hybridization Hybridization Cap Cap Stop Clip Clip Figure 1. CustomArray™ 90K microarray, Hybridization Cap and Clips. Solution Portals Figure 2. Assembled CustomArray™ 90K microarray with Hybridization Cap and Clips. Protocol for CustomArray™ 90K Microarray Hybridization and Imaging (PTL020) – Rev 00 Page 3 of 15 www.combimatrix.com Handling of Assembled Microarrays 1. Wear gloves at all times when handling microarrays and reagents. 2. After a CustomArray™ 90K microarray is assembled and re-hydrated, keep the Hybridization Cap in place during all hybridization and wash steps. Do NOT allow the semiconductor microarray surface to become dry at any step in the protocol. 3. To add or remove solutions, hold the microarray with the assembled Hybridization Cap at a 45 degree angle. Use a 200 µl micropipettor with nuclease-free pipet tips to add or remove solutions through the lower solution portal of the Hybridization Cap (see Fig. 3). Figure 3. Pipetting of solutions into the hybridization chamber of the assembled CustomArray™ 90K microarray. 4. Proceed rapidly when changing solutions during the pre-hybridization, hybridization, and washing steps. Do not leave the hybridization chamber empty for any significant length of time. 5. For all incubations longer than 10 minutes, seal the solution portals of Hybridization Cap with nonpermeable adhesive tape to prevent evaporation. Use Scotch® Brand Magic® Transparent Tape for hybridization temperatures of 50oC or less; for higher temperatures use a PCR sealing tape such as Nunc Brand PN 232702 (clear polyolefin liner) or PN 276014 (aluminum liner). Wipe the surface clean with a lint-free tissue before sealing. 6. If you plan to strip and re-use a hybridized CustomArray™ 90K microarray (see Appendix A), do not allow the semiconductor surface to dry, as this will prevent any further use. Avoid prolonged storage of hybridized microarrays prior to stripping; instead, strip the microarrays, then store them wet in Imaging Solution or 1X PBS at 4oC for a maximum of 2 weeks. Protocol for CustomArray™ 90K Microarray Hybridization and Imaging (PTL020) – Rev 00 Page 4 of 15 www.combimatrix.com Preparation for Hybridization The following solutions can be prepared beforehand. All reagents used should be RNase and DNase-free. Solutions Required for All Targets 1. Prepare the 2X Hyb Solution Stock (see Table 1). This stock will be used for preparation of the Prehybridization and Hybridization Solutions. The 2X Hyb Solution Stock should be filter-sterilized and can be stored at room temperature for up to 6 months. Table 1. 2X Hyb Solution Stock Reagent a Volume for 10 ml Final Concentration 20X SSPE 6 ml 12X 10% Tween-20 100 µl 0.1% 0.5M EDTA 560 µl 40mMa Nuclease-free water 3.34 ml Total Volume 10 ml Final concentration includes the EDTA from the SSPE. 2. Prepare the Wash Solutions (see Table 2). The prepared solutions should be filter-sterilized and can be stored at room temperature for up to 6 months. Table 2. Wash Solutions Step Solution For 10 ml 3 ml 20X SSPE 6X SSPET Wash 6X SSPE, 0.05% Tween-20 50 µl 10% Tween-20 6.95 ml Nuclease-free water 1.5 ml 20X SSPE 3X SSPET Wash 3X SSPE, 0.05% Tween-20 50 µl 10% Tween-20, 8.45 ml Nuclease-free water 250 µl 20X SSPE 0.5X SSPET Wash 0.5X SSPE, 0.05% Tween-20 50 µl 10% Tween-20 9.7 ml Nuclease-free water 2 ml 10X PBS, PBST Wash 2X PBS, 0.1% Tween-20 100 µl 10% Tween-20, 7.9 ml Nuclease-free water PBS Wash 2X PBS 2 ml 10X PBS, 8 ml Nuclease-free water Protocol for CustomArray™ 90K Microarray Hybridization and Imaging (PTL020) – Rev 00 Page 5 of 15 www.combimatrix.com Solutions Required Only for Biotin-labeled Targets NOTE: If working with fluorochrome-labeled targets, skip this step. 1. Prepare the 1 mg/ml stock solution of the Fluorolink™ Cy5®-labeled streptavidin. This reagent is supplied as a lyophilized powder. Dissolve in 1.0 ml of nuclease-free water, dispense into 10-20 µl aliquots, freeze and store at -20oC. Avoid repeated freeze-thaw cycles. 2. Prepare the Biotin Blocking Solution (see Table 3). All reagents should be nuclease-free. The prepared Biotin Blocking Solution should be filter-sterilized and can be stored at 4oC for up to 1 month. Table 3. Biotin Blocking Solution Reagent NOTE: Volume for 1 ml Final Concentration 10X PBS 200 µl 2X 10% Tween-20 10 µl 0.1% BSA (20 mg/ml) 500 µl 1% Nuclease-free water 290 µl Total Volume 1 ml You can replace the Biotin Blocking Solution with the 5X PBS-Casein Blocking Buffer for both blocking and labeling steps. Protocol for CustomArray™ 90K Microarray Hybridization and Imaging (PTL020) – Rev 00 Page 6 of 15 www.combimatrix.com Pre-Hybridization NOTE: The CustomArray™ microarray must be re-hydrated prior to hybridization. A pre-hybridization step is then recommended to block non-specific binding of targets. 1. Pre-heat an incubator to 65oC. 2. Set a hybridization rotisserie oven to the desired hybridization temperature. See Table 4 for recommended hybridization temperatures. Table 4. Recommended Hybridization Temperatures Sample Hybridization Solution Hybridization Temperature (°C) RNA 25% Formamide 45 DNA No Formamide 50 IMPORTANT! The hybridization protocol has been optimized for standard oligonucleotide lengths (35-40mers), with a balanced melting temperature (Tm) of 72ºC. If non-standard oligonucleotide lengths are used, conditions such as hybridization temperature and hybridization buffer composition must be optimized empirically. 3. Prepare fresh Pre-hybridization Solution (see Table 5). Table 5. Pre-hybridization Solution Reagent a For 120 µl Volume Cap Final Concentration 2X Hyb Solution Stock 60 µl Nuclease-free water 41 µl 50X Denhardt’s solution 12 µl 5X Salmon sperm DNA (10mg/ml)a 1 µl 100 ng/µl 1% SDS 6 µl 0.05% Total Volume 120 µl 6X SSPE, 0.05% Tween-20, 20mM EDTA Heat the Salmon sperm DNA solution to 95°C for at least 5 minutes and then place on ice for at least 1 minute before use. 4. Fill the hybridization chamber with nuclease-free water. Avoid introducing air bubbles into the chamber. Cover the solution portals with adhesive tape to prevent evaporation. Incubate at 65oC for 10 minutes. Remove the microarray from the incubator and bring to room temperature. Remove the adhesive tape and aspirate the water out of the hybridization chamber. 5. Fill the hybridization chamber with the Pre-hybridization Solution. Mix gently by pipetting. A small air bubble can be introduced to improve the mixing process if the arrays are rotated during incubation. Cover the solution portals with adhesive tape. 6. Load the microarray onto the rotisserie in the hybridization oven and incubate at the desired hybridization temperature for 30 minutes with gentle rotation. Protocol for CustomArray™ 90K Microarray Hybridization and Imaging (PTL020) – Rev 00 Page 7 of 15 www.combimatrix.com RNA Fragmentation (RNA Target Samples Only) IMPORTANT! CombiMatrix recommends that RNA target samples be fragmented prior to hybridization. In general, 50 to 200-base fragments work best to maximize binding specificity and detection sensitivity. This step can be completed during the Prehybridization incubation. NOTE: Other established fragmentation protocols may be used in place of this protocol. Alternatively, the RNA Fragmentation Reagents from Ambion (Cat#8740) can be used according to the manufacturer’s protocol. 1. Prepare the 5X RNA Fragmentation Solution (see Table 6). The prepared solution should be filtersterilized and can be stored at room temperature for up to 6 months. Table 6. 5X RNA Fragmentation Solution (RNA samples only) Reagent Volume for 10 ml Final Concentration 1 M Tris Acetate pH 8.1 (adjust pH with glacial acetic acid) 2 ml 200 mM KOAc 0.49 g 500 mM MgOAc 0.32 g 150 mM Water To 10 ml Total volume 10 ml 2. Set up the RNA fragmentation reaction (see Table 7). Use 2 to 8 µg of the labeled RNA for each CustomArray™ 90K microarray. Table 7. RNA Fragmentation Reaction Reagent Volume for 120 µl Hybridization Cap Nuclease-free water to 19.2 µl 5X RNA Fragmentation Solution 4.8 µl Labeled RNA 2-8 µg per microarray Total Volume 24 µl 3. Incubate at 95oC for 20 minutes. Place on ice. 4. Add the entire Fragmentation Reaction volume to the Hybridization Solution. Protocol for CustomArray™ 90K Microarray Hybridization and Imaging (PTL020) – Rev 00 Page 8 of 15 www.combimatrix.com Hybridization 1. Prepare the Hybridization Solution (see Table 8) IMPORTANT! The hybridization buffer composition depends on the type of nucleic acids used as targets. For RNA (but not DNA) targets, it should include 25% formamide. Table 8. Hybridization Solution a b Reagent For 120 µl Volume Cap Final Concentration 2X Hyb Solution Stock 60 µl 6X SSPE, 0.05% Tween-20, 20mM EDTA DI Formamide (for RNA targets only)a 30 µl 25% Labeled targets: DNA or fragmented RNA 2 to 8 µg per sample Varies (up to 24 µl) 20-80 ng/µl recommended Salmon sperm DNA (10mg/ml)b 1 µl 100 ng/µl 1% SDS 5 µl 0.04% Nuclease-free water to 120 µl Total Volume 120 µl Replace formamide with water when working with the labeled DNA targets. Salmon sperm DNA solution should be heat-denatured (as for preparation of the pre-hybridization solution). 2. Denature the Hybridization Solution at 95oC for 3 minutes, and then cool for 1 minute on ice. 3. Spin down the solution in a microcentrifuge for 5 seconds at maximum speed to collect condensate. 4. Remove the adhesive tape from the microarray and pipet the Pre-hybridization Solution out of the hybridization chamber. 5. Fill the hybridization chamber with the Hybridization Solution and mix gently with repeated pipetting. A small air bubble can be introduced to improve the mixing process if the microarray is rotated during hybridization. 6. Carefully wipe excess solution from the surface of the Hybridization Cap with a lint-free tissue, and cover the solution portals with adhesive tape. 7. Load the microarray onto the rotisserie in the hybridization oven and incubate at the desired hybridization temperature for 4-16 hours with gentle rotation. NOTE: To improve microarray performance, use of a rotisserie oven or a rotating incubator is recommended to ensure mixing during hybridization. The CustomArray™ 90K can be attached to standard rotisseries using holders available from CombiMatrix (see Appendix A). Protocol for CustomArray™ 90K Microarray Hybridization and Imaging (PTL020) – Rev 00 Page 9 of 15 www.combimatrix.com Hybridization Washing IMPORTANT! Do not allow the microarray to become dry at any time. Proceed rapidly when changing solutions. Do not leave the hybridization chamber empty for any significant length of time. NOTE 1: For every wash step, we recommend rinsing the hybridization chamber with the corresponding Wash Solution prior to the wash incubation. Add the Wash Solution to the chamber, mix gently by pipetting, remove the solution, and fill the chamber again with the same solution. NOTE 2: If the microarray has been hybridized with fluorochrome-labeled targets, protect it from light by covering with aluminum foil during all incubations exceeding 5 minutes. NOTE 3: With the exception of the first wash step, microarrays should be incubated in the Hybridization Wash solutions for a minimum of 1 minute. However, if processing multiple microarrays, you can extend the wash incubation time until you rinse and fill all hybridization chambers. 1. Prior to starting the wash procedure, preheat the 6X SSPET Wash Solution to the hybridization temperature (45 or 50oC depending on the sample hybridized). 2. Remove the microarray from the hybridization oven. Remove the adhesive tape, and pipet the Hybridization Solution out of the chamber. 3. Using the pre-heated 6X SSPET Wash solution, rinse the hybridization chamber, fill the chamber, cover the portals with adhesive tape, and return the microarray to the hybridization oven for 5 minutes (with gentle rotation). Remove the 6X SSPET Wash Solution from the hybridization chamber. 4. Using the 3X SSPET Wash solution, rinse the hybridization chamber, fill the chamber, and incubate the microarray at room temperature for 1 minute (see NOTE 3). Remove the 3X SSPET Wash Solution from the hybridization chamber. 5. Using the 0.5X SSPET Wash solution, rinse the hybridization chamber, fill the chamber, and incubate the microarray at room temperature for 1 minute. Remove the 0.5X SSPET Wash Solution from the hybridization chamber. 6. Using the PBST Wash solution, rinse the hybridization chamber, fill the chamber, and incubate the microarray at room temperature for 1 minute. Remove the PBST Wash Solution from the hybridization chamber. 7. If the microarray has been hybridized with fluorochrome-labeled target samples, proceed to the final wash step. 8. If the microarray has been hybridized with biotin-labeled target samples, proceed to the Posthybridization Labeling Step. Retain the PBST Wash Solution in the hybridization chamber until you are ready to proceed to the Post-hybridization Blocking step. Protocol for CustomArray™ 90K Microarray Hybridization and Imaging (PTL020) – Rev 00 Page 10 of 15 www.combimatrix.com Post-hybridization Labeling for Biotin-labeled Samples NOTE: If working with fluorochrome-labeled targets, skip this step. 1. Prepare the Dye Labeling Solution using the 1 mg/ml stock solution of Fluorolink™ Cy5®-labeled streptavidin. Thaw an aliquot, and make a 1:1000 dilution (v/v, 1 µl per 1 ml) in the Biotin Blocking Solution (or 5X PBS-Casein Blocking Buffer). We recommend that you discard any unused Cy5®-labeled streptavidin. NOTE: Prepare the Dye Labeling Solution fresh each time you hybridize microarrays. 2. Remove the PBST Wash Solution from the hybridization chamber. 3. Add the Biotin Blocking Solution (or 5X PBS-Casein Blocking Buffer) to the hybridization chamber, mix gently by pipetting, and incubate the microarray at room temperature for 15 minutes. Remove the solution from the hybridization chamber. 4. Add the Dye Labeling Solution to the hybridization chamber, mix gently by pipetting, and cover the solution portals with adhesive tape. Incubate the microarray at room temperature for 30 minutes. Protect from light by covering with aluminum foil. Remove the Dye Labeling Solution from the hybridization chamber. 5. Using the PBST Wash solution, rinse the hybridization chamber, fill the chamber, and incubate the microarray at room temperature for 1 minute. Remove the PBST Wash Solution from the hybridization chamber. 6. Repeat the PBST washing one more time. Final Washing 1. Remove the PBST Wash Solution from the hybridization chamber. 2. Using the PBS Wash solution, rinse the hybridization chamber, fill the chamber, and incubate the microarray at room temperature for 1 minute. Remove the PBS Wash Solution from the hybridization chamber. Repeat a second time. 3. Retain the PBS Wash Solution in the hybridization chamber until you are ready to proceed to the Imaging step. Protocol for CustomArray™ 90K Microarray Hybridization and Imaging (PTL020) – Rev 00 Page 11 of 15 www.combimatrix.com Imaging of CustomArray™ 90K IMPORTANT! The CustomArray™ 90K must be scanned wet using the Imaging Solution supplied. The LifterSlip™ coverslip provided with the CustomArray™ has been specifically designed to retain the Imaging Solution without contacting the microarray surface. Do not use a standard coverslip with CustomArray™ 90K. NOTE: The Imaging Solution contains phosphate buffer, which may precipitate during shipping. If a precipitate is visible, heat the Imaging Solution at 60-70ºC for about 5 minutes until it dissolves. Allow the solution to cool to room temperature before applying it to the microarray. 1. Remove the PBS Wash Solution from the hybridization chamber. 2. Carefully remove the hybridization chamber from the microarray by removing the clips and lifting the Hybridization Cap off the slide surface. 3. Immediately cover the semiconductor microarray surface with the Imaging Solution. 4. Using thin-tipped forceps, pick up a fresh LifterSlip™ and hold it so that the raised edges face the microarray. The raised edges can be detected by gently rubbing an edge with the tip of the forceps – the raised edge will feel rougher than the glass surface. 5. Lay the LifterSlip™ at an angle onto the microarray so that it is centered over the semiconductor area (see Fig. 4). First touch the Imaging Solution with one side of the LifterSlip™, then slowly lower the slip down, taking care not to introduce air bubbles. If bubbles still form, lift one side of the LifterSlip™ with forceps (or a razor blade) to let the bubbles out, and lower it down again. Figure 4. CustomArray™ 90K with LifterSlip™ coverslip Protocol for CustomArray™ 90K Microarray Hybridization and Imaging (PTL020) – Rev 00 Page 12 of 15 www.combimatrix.com 6. Carefully remove any excess Imaging Solution from the edge of the LifterSlip™ using a lint-free tissue, until it is resting evenly over the microarray. 7. Load the CustomArray™ microarray into the scanner, taking care not to disturb the LifterSlip™ coverslip. Follow the manufacturer’s recommendations for loading the slide into the scanner. 8. After you complete the scan, save the image as a .tiff image file. The data can be extracted from the image using the CombiMatrix Microarray Imager Software. Please refer to the Quick Start Guide or the Microarray Imager User's Manual on our web site (https://webapps.combimatrix.com). 9. After imaging is completed, you can proceed to stripping of the CustomArray™ microarray for subsequent re-hybridization using the CombiMatrix CustomArray™ Stripping Kit (see Appendix A). Do not allow the semiconductor microarray surface to dry; keep the microarray wet, either in a tube or slide-holder containing 1X PBS, or in the Imaging Solution with the LifterSlip™ attached. Avoid prolonged storage of hybridized microarrays prior to stripping; instead, first strip the microarray, then store wet in Imaging Solution or 1X PBS at 4oC for a maximum of 2 weeks. Protocol for CustomArray™ 90K Microarray Hybridization and Imaging (PTL020) – Rev 00 Page 13 of 15 www.combimatrix.com Appendix A. Related Products Available from CombiMatrix CombiMatrix Rotisserie Holders for CustomArray™ Microarrays To improve microarray performance, use of a rotisserie oven or a rotating incubator is recommended to ensure mixing during hybridization. CustomArray™ 90K microarrays can be attached to standard rotisseries using the same holders that are available from CombiMatrix for CustomArray™ 12K microarrays. CombiMatrix 32 CustomArray™ Rotisserie for 12K, Product Number 610004. The 32 CustomArray™ Rotisserie for 12K allows the hybridization of 32 microarrays at a time. The unit has four plates, each with eight positions, using ball detent clamps to secure the microarray. The 32 CustomArray™ Rotisserie is supplied with a shaft that fits most Fisher Scientific Isotemp Hybridization Incubators. The Rotisserie can also be adapted to fit other incubation ovens. CombiMatrix 8 CustomArray™ Rotisserie for 12K: • Product Number for 3/8’’ diameter shaft is 610012, • Product Number for 3/4’’ diameter shaft is 610013. The 8 CustomArray™ Rotisserie for 12K allows the hybridization of 8 microarrays at a time. The Rotisserie will mount on a 3/8" or 3/4" diameter shaft of an incubation oven with simple spring clasps. The model can also be adapted to fit other incubation ovens. Please indicate the oven shaft diameter when ordering. CombiMatrix 3-Tray CustomArray™ for 12K, Product Number 610008. CustomArray™ 3-Tray for 12K is a three-position tray that fits in place of the standard Affymetrix tray/bucket in an Affymetrix oven. As many as eight trays can be loaded in one oven, allowing for 24 CustomArray™ 90K microarrays to be hybridized at a time. CombiMatrix CustomArray™ Stripping Kit and Clamp CombiMatrix CustomArray™ Stripping Kit for 90K, Product Number to be determined. The Stripping Kit enables re-hybridization of a CustomArray™ microarray three times, thus allowing the use of a single CustomArray™ up to four times. Each kit contains reagents for 25 stripping reactions, plus accessories for subsequent re-hybridizations. CombiMatrix CustomArray™ Stripping Clamp, Product Number 610010. The CombiMatrix Stripping Clamp is designed to be used with the CombiMatrix CustomArray™ Stripping Kit. The CustomArray™ Stripping Clamp is recommended for up to 100 stripping procedures. Protocol for CustomArray™ 90K Microarray Hybridization and Imaging (PTL020) – Rev 00 Page 14 of 15 www.combimatrix.com Appendix B. CombiMatrix CustomArray™ Synthesizer The CustomArray Synthesizer enables researchers to make custom microarrays to their exact specifications. While fulfilling their existing microarray requirements researchers can take microarrays to new frontiers by exploring unique and novel applications. The platform consists of the CustomArray™ DNA Synthesizer instrument and freely programmable CustomArray™ microarrays. The CustomArray™ technology utilizes a modified semiconductor adapted for biological applications. The integrated circuits built into CustomArray™ contain arrays of microelectrodes that are individually addressable using embedded logic circuitry on the chip. Placed in a specially-designed fluidic chamber, the chip (under direction from software) digitally directs the molecular assembly of oligonucleotides. During this process a chip can rapidly synthesize several thousand different oligonucleotide probes in parallel, each above a distinct electrode. Additionally, the platform utilizes standard phosphoramidite chemistry and the resultant DNA microarray slides can be read on common scanners. CustomArray™ Synthesizer, Product Number 610002 Production Efficiency: Manufacture eight 90K custom arrays in less than 24 hours. Versatility: Use the same design or different designs in a single run. CustomArray™ Synthesizer Specifications: Min/Max Oligo Length: Up to 50 ‘mer Min/Max Feature Capacity for Array: 2,240, 12,544, 94,500 Microarray Format: 1” x 3”, CustomArray™ slide Production Capacity: One to eight slides per run Protocol for CustomArray™ 90K Microarray Hybridization and Imaging (PTL020) – Rev 00 Page 15 of 15 www.combimatrix.com