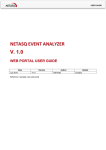
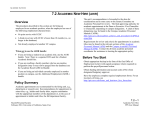
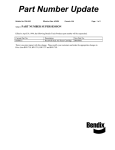
1
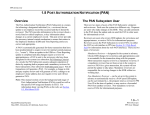
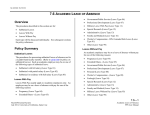
PPS OVERVIEW
1.5 USER NAVIGATION AND ENTRY/UPDATE COMMANDS
2. Enter your User ID.
Overview
Navigation consists of how to move within and between functions,
bundles, and subsystems. Entry/Update Commands include how
to enter data, and use the add, copy, delete, and goto commands.
3. Tab to the PASSWORD field, enter your password, and hit
Enter.
This brings up the Supersession Main Menu.
SUPERSESSION MAIN MENU
Logging On
To log onto PPS:
1. In the Program Manager window (PC) or on your Desktop
(Mac), double-click on the PPS icon.
This brings up the Entry Validation screen, with the cursor
positioned in the USER ID field.
ENTRY VALIDATION SCREEN
4. Select the PPS Production Data Base by typing an 'S' in the
entry field on the same line and hitting Enter.
The Main Menu appears.
1.5—1
Payroll/Personnel System
June 2004, University of California, Santa Cruz
Navigation and Special Commands
PPS User Manual
PPS OVERVIEW
Logging Off
When you wish to leave the system:
Locked screen. To return to the previous function and continue
working in PPS, enter your password.
EXAMPLE OF INVOKING THE KEYBOARD LOCK
1. Use F12 to go to the Supersession Main Menu.
2. Use F3 to bring up the Exit Menu.
SUPERSESSION MAIN MENU
TERMINAL IS LOCKED SCREEN
3. Type an 'X' on the Exit line, and press Enter .
Locking the Keyboard & Screen
When a user is interrupted or needs to leave their workstation for a
short period of time, instead of logging off they can lock the
keyboard and screen to prevent any unauthorized data entries to
the procedure presently open or to protect the information on the
screen.
To lock the keyboard, place the cursor in the Next Function field
and enter !L, then press Enter. NOTE: this will not work with the
keyboard’s caps lock on. This brings up the Terminal is
1.5—2
Payroll/Personnel System
June 2004, University of California, Santa Cruz
Navigation and Special Commands
PPS User Manual
PPS OVERVIEW
F9 - Jump Key
Cursor Movement & Navigation
The cursor is usually positioned at the first modifiable data field
when the function is first displayed. The cursor always moves
between entry fields first from left to right, then from top to
bottom. There are several methods of moving the cursor from one
field to another:
Tab/Shift Tab Keys
Pressing the Tab and Shift Tab keys positions the cursor in the
next or previous data entry field.
• The Tab key moves the cursor to the next modifiable data
field. If the cursor is currently at the last modifiable field, it
will move to the first modifiable field.
• The Shift Tab key moves the cursor to the previous
modifiable data field. If the cursor is currently at the first
modifiable field, it will move to the last modifiable field.
Other Keys
New Line Key
Pressing the Pause or F15 key positions the cursor in the next
Data Entry field below the current line. If a Data Entry field has
not been found below the current line, the cursor will move to the
first Data Entry field starting at the top of the screen.
Pressing the F9 Jump key moves the cursor from the current
position to the Next Func field or from the Next Func field to the
previous cursor position on the screen.
EAPP Jump Key
Pressing the F9 Jump key while in the EAPP function moves the
cursor from the body of the screen to the Command Line in
preparation for an add or copy command. If the employee record
has not been modified, the Jump function moves the cursor from
the body of the screen to the Next Func field.
Arrow Keys
The arrow keys move the cursor one space or line at a time to any
position on a screen.
Your terminal may jam if you use the arrow keys for navigation.
It can also be difficult to locate the first position in the Data Entry
field when arrow keys are used to navigate. The other cursor
movement options, e.g. Tab, Shift Tab, Pause, F15,
automatically position the cursor to the appropriate place for data
entry.
Automatic Movement (Autoskip)
If the data entered fills the field, the cursor moves to the next data
entry position automatically. If you do not complete the field, you
must use the Tab/Shift Tab keys or the Pause or F15 key to move
to the next desired field.
1.5—3
Payroll/Personnel System
June 2004, University of California, Santa Cruz
Navigation and Special Commands
PPS User Manual
PPS OVERVIEW
FUNCTION SELECTION
Function Selection
You may select an individual function by entering the function
code in the Next Func field. You should also specify a record key
before pressing Enter , or the Employee Browse function will
automatically appear. (Refer to subsection on Accessing
Employee Records later in this section.)
For example, to access the EPD1 Function for an employee whose
ID number is 790729143:
• In the Next Func field type EPD1.
• In the ID field, type 790729143.
• Press Enter .
EXAMPLE OF PAGE SCROLLING.
Scrolling Between Pages of a Function
Scrolling is the method used to display additional data when there
is more data than can fit on a single screen. Use F7 Backward
and F8 Forward to scroll among pages of the function to
display the full range of data. F7 Backward and/or F8 Forward
will appear in the footer if they are available for use.
• Press F7 Backward to display the previous page of available
data.
• Press F8 Forward to display the next page of available data.
For example, “Pg 01 of 03” is displayed on the right of the fourth
line indicating that there is additional appointment/distribution
information. To access it, use F8 Forward , which appears in the
footer.
1.5—4
Payroll/Personnel System
June 2004, University of California, Santa Cruz
Navigation and Special Commands
PPS User Manual
PPS OVERVIEW
BUNDLE SELECTION
Fastpath to a Function or Bundle
To reach a desired function or bundle directly, without going
through the menus, you may key in its function code in the Next
Function field on any function.
Navigating Within a Bundle
If a bundle has more than one function, you may use the F10
PrevFunc and F11 NextFunc keys to move from function to
function in the bundle order. F10 PrevFunc and/or F11 NextFunc
will appear in the footer if they are available for use.
Bundle Selection
To access the menu of bundle function codes, type BUND in the
Next Func field. Press Enter .
You may select a bundle (a set of related functions) by entering
the bundle’s function code in the Next Func field. For all bundles,
except hire and rehire bundles, you should also specify a record
key before pressing Enter . To select:
For example, to select an academic new hire bundle:
•
Press F10 PrevFunc to move to the previous function within
the bundle.
•
Press F11 NextFunc to move to the next function within the
bundle.
You may access any function within the bundle by typing the
function code, e.g., EAPP, in the Next Func field, regardless of the
bundle order. However, you cannot select a function that is not
included in the bundle.
You can exit a bundle only by successfully updating the system or
canceling the transaction. If the transaction is canceled, you must
initiate the entire bundle again; there is no mechanism to store
“work-in-progress.”
• In the Next Func field, type AHIR.
• Press Enter .
1.5—5
Payroll/Personnel System
June 2004, University of California, Santa Cruz
Navigation and Special Commands
PPS User Manual
PPS OVERVIEW
Accessing Employee Records
The system provides two methods to access employee
information:
• SSN − The nine-digit Social Security Number is entered
without hyphens or slashes (e.g., 987654321).
In order to display employee information on the desired data entry
function, it is necessary to enter a valid employee record key and
function.
1. Record Keys
2. Employee Browse function (WHO)
Using the record keys is the quickest way to access employee
information. However, you can also use the browse function to
locate employee information if you are unsure of the employee ID,
name, or Social Security number for the employee record you
want. Both record selection methods are described next.
Using the Employee Browse Screen (WHO)
The Employee Browse function (WHO) is provided to assist you
in locating employee record key data.
EMPLOYEE BROWSE (WHO) FUNCTION
Using Record Keys
You can easily select an employee record by entering a unique
key. There are three record keys for each employee:
• Employee ID
• Employee Name
• Social Security Number
To select an employee record, enter one of the above record keys
in the appropriate field, using the following formats:
• Employee ID − Enter the nine-digit ID.
(note: this is the fastest way to access the employee record.)
• Name − The Name is entered Last Name,(space)First
Name(space)Middle Initial (e.g., Doe, Jane Q) There must be a
comma after the last name, then a space after the comma. The
Employee Browse function will automatically appear if there is
no employee with the specified name, or if there is more than
one employee with that name.
The Employee Browse function may be accessed in several ways:
• By entering the function code WHO in the Next Func field on
any function.
• By entering a non-unique or incomplete employee record key.
• By selecting a function without entering an employee record
key.
1.5—6
Payroll/Personnel System
June 2004, University of California, Santa Cruz
Navigation and Special Commands
PPS User Manual
PPS OVERVIEW
When the Employee Browse function is displayed, there are two
methods to select the employee record to be viewed:
1. Ensure that the desired function has been entered in the Next
Func field. Position the cursor to the left of the employee
information on the list. Press Enter .
2. Ensure that the desired function has been entered in the Next
Func field. Enter the employee record key in the
corresponding key field. Press Enter .
Hints for Accessing Employee Records
• To display the same function for a different employee, enter a
new employee record key.
• To display a different function for the same employee, enter a
new function code.
IAPP FUNCTION WHILE “NESTING” IN ELVE FUNCTION
• To display a different function for a different employee, enter a
new function code and a new employee record key.
Nesting to Another On-line Subsystem
Nesting is the process of temporarily leaving the EDB Update
subsystem to access another on-line subsystem.
When using the EDB Entry/Update subsystem, you may view an
EDB inquiry function by typing the function code of an inquiry
function in the Next Func field. The message Upd in Prog ,
(update in progress), is displayed in the lower right corner of the
inquiry function. This serves as a reminder that you need to return
to the EDB Entry/Update subsystem and complete the update
function. To return to update, press F12 Exit .
For example, when entering leave of absence data for an employee
record on the ELVE function, you may wish to check the
employee’s appointment data before requesting the update. You
would enter IAPP in the Next Func field to go to Inquiry.
<Upd In Prog>
To return to On-line EDB Entry/Update, press F12 Exit on the
EAPP function and you will return to the ELVE function.
ELVE FUNCTION WITH IAPP IN NEXT FUNC FIELD
1.5—7
Payroll/Personnel System
June 2004, University of California, Santa Cruz
Navigation and Special Commands
PPS User Manual
PPS OVERVIEW
Entry/Update Commands
Overview
On each entry/update function, you may add new data, change
existing data, or delete existing data for an employee. You may
enter data in all the modifiable fields on the function, or only in
selected fields. To begin entry of data, first select the appropriate
function or bundle.
Procedure
1. When an entry function is displayed, the cursor will be
positioned on the first modifiable field. If no change is
desired for that particular field, move the cursor to the desired
field by using the Tab key, or by using the Pause or
F15 Newline key.
2. Enter data in the field, keying over any data that is currently
displayed. Each entry field allows space for the maximum
number of characters which may be entered.
3. If the data entered fills the field, the cursor will automatically
move to the next field. If the data entered does not fill the
field, press Tab to move to the next field to be entered. If
necessary, clear out any old data remaining in the field by
using the End key or by spacing over the data.
7. If in a bundle, press F11 NextFunc to move to the next
function, if desired.
8. Press F5 Update to proceed with the update, or F2 Cancel to
cancel the entry.
Notes and Tips
•
Data may be entered in either upper or lower case. It will be
converted to upper case.
•
If you key over existing data in a field, and the new data does
not completely overlay the old data, you must use the End key
or space over the unrelated data in the field. Pressing Tab
after the new data is entered will not erase the remaining
unrelated data in the field.
•
The user may delete existing data in a field by entering an
asterisk (*) in the first position of the field. When Enter is
pressed, the asterisk remains and the rest of the field is blank.
•
If you key over existing data in a field in error, the original
data can be restored by positioning the cursor on the first
position of the field, pressing the End key and then pressing
Enter.
•
If you are entering data in a function bundle, one or more
fields on each function may be highlighted. Highlighting
indicates that the field has been identified as critical to the
functional process associated with the bundle. Pay particular
attention to these fields; make sure that correct values have
been entered in all fields.
•
At any time after entering data in one or more fields, you may
press Enter to perform preliminary edits of the data entered
on that function.
•
Press Fl Help while the cursor is positioned on a field to get
Field Level Help for the data element. If the Field Level Help
4. If you enter data or a space in the last position of the entry
field, the cursor will automatically "jump" to the next field on
the function.
5. Press Enter after all desired changes have been made. This
causes preliminary edits to be performed on the entered data.
If there are range/value errors on one or more entered values,
the fields in error will be highlighted and the cursor will be
positioned on the first field with an error.
6. Correct any data which has caused an error.
1.5—8
Payroll/Personnel System
June 2004, University of California, Santa Cruz
Navigation and Special Commands
PPS User Manual
PPS OVERVIEW
text contains a list of values for the field, you may copy the
desired value back from the Help window to the function
screen by positioning the cursor at the desired value and
pressing F4 Copy.
•
Range/value edits are also performed and any errors are
highlighted when F5 Update, F10 PrevFunc, or F11
NextFunc is pressed. All range/value errors must be corrected
before continuing with the update or proceeding to another
function in a bundle.
EAPP Function -- Special Commands
On-line entry commands are available on the EAPP functions to
facilitate the on-line entry process.
Special commands are typed on the command line (==>).
Add Commands
The appointment and distribution Add Commands are used to
create a new appointment or distribution line. You may specify the
number of the appointment or distribution or you may indicate that
the system should assign the next available number. It is
recommended that you allow the system to assign the appointment
or distribution numbers. The appointment or distribution number
will be filled in on the screen and the remainder of the
appointment or distribution line information will be blank. The
cursor will be positioned at the first modifiable field for the new
appointment or distribution, enabling you to enter the rest of the
information.
•
“add nn,” where nn is an appointment or distribution number.
•
“add a,” where a indicates that the next available appointment
number should be used.
•
“add d,” where d indicates that the next available distribution
number for the displayed appointment should be used.
An error message is issued if the entered appointment or
distribution number already exists for the employee or is an
invalid number.
Copy Commands
These commands are used to copy information from an existing
appointment or distribution to a specified new appointment or
1.5—9
Payroll/Personnel System
June 2004, University of California, Santa Cruz
Navigation and Special Commands
PPS User Manual
PPS OVERVIEW
distribution line within one employee record. The new line will be
displayed with the specified appointment or distribution number
filled in; all other information will be identical to the copied line.
You may then change information on the new line as desired.
•
to remove from the record any future appointments or
distributions that will never take effect because a subsequent
personnel action has made them obsolete
•
to delete appointments/distributions that have been set up in
error and for which no payment has been generated.
The COPY command can be abbreviated C, as in C aa to bb.
•
“copy xx to yy,” where xx is an existing appointment or
distribution number and yy is the number of the appointment
or distribution to be added.
•
“copy xx to *,” where xx is an existing appointment or
distribution number and * indicates that the next available
appointment or distribution number should be used for the
new entry.
•
“copy aa to bb, cc to dd, ee to ff,”...where aa to bb is one
copy command, cc to dd is a second copy command, and ee to
ff is a third command, and so on.
An error message is issued if any of the following errors occur:
•
The appointment or distribution number to be copied FROM
does not exist for the employee or is an invalid number.
•
The appointment or distribution number to be copied TO
already exists for the employee or is an invalid number.
•
An appointment number is specified to be copied to a
distribution number.
•
A distribution number is specified to be copied to an
appointment number.
Delete Command
The DELETE command is only used in exceptional
circumstances:
Do not use the DELETE command to remove expired
appointments because this will affect the employee's record in
personnel history.
Using the DELETE Command
The associated line of information will be blanked out when this
command is entered. Note that the actual delete does not take
place until the update is requested; therefore the “blanked out"
information can be recovered by pressing F2 Cancel.
•
“delete nn,” where nn is an appointment or distribution
number.
•
“delete aa,bb,cc,” where aa is one appointment or distribution
number to delete, bb is a second number to delete, cc is a third
number to delete, and so on. This allows you to delete several
appointments and/or distributions with a single command.
•
An error message is issued if the entered appointment or
distribution number does not exist for the employee or is an
invalid number.
Example of Use of the DELETE Command
For example, you may use the DELETE command when entering
a separation to remove future distributions not yet in effect as of
the separation date.
First, enter the separation date on the appointment and enter an
asterisk (*) in the Duration field to delete the “I.” Next, delete the
future distribution line 22 which will never take place. The
1.5—10
Payroll/Personnel System
June 2004, University of California, Santa Cruz
Navigation and Special Commands
PPS User Manual
PPS OVERVIEW
changes to the appointment and distribution are underlined in the
illustration below:
EAPP IN THE SEPR BUNDLE: EXAMPLE OF USING DELETE COMMAND
GOTO Command
This command is used to move the cursor to the function which
contains information associated with the entered appointment or
distribution number.
•
“goto nn,” where nn is an appointment or distribution
number.
•
“Ann,” where nn is an appointment number.
•
“Dnn,” where nn is a distribution number.
An error message is issued if there is no matching appointment or
distribution number or if the entered number is not valid:
DO NOT CONFUSE GOTO COMMANDS ANN AND DNN
WITH THE ON-LINE ENTRY COMMANDS ADD AND
DELETE.
1.5—11
Payroll/Personnel System
June 2004, University of California, Santa Cruz
Navigation and Special Commands
PPS User Manual