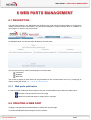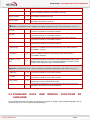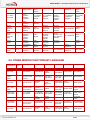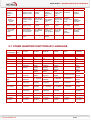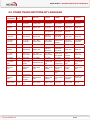
1
USER GUIDE
NETASQ EVENT ANALYZER V. 1.0
WEB PORTAL USER GUIDE Date
July 2010
Version
V1.0
Reference: naengde_nea-web-portal
Author
NETASQ
Details
Creation
USER GUIDE
Copyright © NETASQ 2010. All rights reserved.
Any reproduction, adaptation or translation of this current document without prior written permission is
prohibited, except where expressly allowed by copyright laws.
NETASQ applies a method of continual development and as such reserves the right to modify and improve
any product described in the document without prior notice.
Under no circumstances shall NETASQ be held liable for any loss of data or revenue, or any special damage
or incident, resulting from or indirectly caused by the use of the product and its associated documentation.
The contents of this document relate to the developments in NETASQ’s technology at the time of its writing.
With the exception of the mandatory applicable laws, no guarantee shall be made in any form whatsoever,
expressly or implied, including but not limited to implied warranties as to the merchantability or fitness for a
particular purpose, as to the accuracy, reliability or the contents of the document. NETASQ reserves the
right to revise this document, to remove sections or to remove this whole document at any moment without
prior notice.
To ensure the availability of products, which may vary according to your geographical locations, contact your
nearest NETASQ distributor.
Products concerned
U30, U70, U120, U250, U450, U1100, U1500 and U6000
NG1000, NG5000
VS5, VS10, V50, V100, V200, V500, VU.
Copyright NETASQ 2010
2/86
USER GUIDE: CONTENTS
CONTENTS
CONTENTS
3 FOREWORD
6 INTRODUCTION
7 1.1 WHO SHOULD READ THIS?
1.2 TYPOGRAPHICAL CONVENTIONS
1.2.1 ABBREVIATIONS
1.2.2 DISPLAY
1.2.3 INDICATIONS
1.2.4 MESSAGES
1.2.5 EXAMPLES
1.2.6 COMMAND LINES
1.2.7 REMINDERS
1.2.8 ACCESS TO FEATURES
1.3 GETTING HELP
1.4 TECHNICAL ASSISTANCE CENTER
1.5 GETTING FAMILIAR WITH THE WEB PORTAL
1.5.1 CONNECTION
1.5.2 GENERAL OVERVIEW
1.5.3 MODIFYING THE SIZE OF THE MENU PANEL
7 7 7 7 7 8 8 8 8 8 9 9 9 9 9 10 2 WEB PORTAL LOGIN
11 2.1 USER PROFILES
2.2 WEB PORTAL ACCESS
11 11 3 WEB PORTAL CONFIGURATION
13 3.1 DESCRIPTION
3.2 MANAGING THE HOME PAGE
3.2.1 ADDING A NEW HOME PAGE
3.2.2 MODIFYING A HOME PAGE
3.2.3 REMOVING A HOME PAGE
3.2.4 LOGGING OUT OF THE WEB PORTAL
13 14 14 16 17 17 4 RUNNING MENU ITEMS
19 4.1 DESCRIPTION
4.1.1 WORKING WITH REPORT PARAMETERS
4.1.2 WORKING WITH THE DATE
4.1.3 WORKING WITH REPORTS
4.1.4 RUNNING CUSTOMIZED REPORTS
4.1.5 EXPORT CUSTOMIZED REPORTS AND CUBE AS A FILE
4.1.6 SAVE TASK FOR CUSTOMIZED REPORTS AND CUBES
4.2 GENERATED REPORTS
4.3 CUSTOMIZED REPORTS
4.4 LOG ANALYSIS AND CUBES
4.4.1 SELECT THE LOG TYPE
19 20 20 21 23 23 23 26 28 31 32 Copyright NETASQ 2010
3/86
USER GUIDE: CONTENTS
4.4.2 SELECT THE LOG RECORDS
4.4.3 ANALYZING LOGS
4.4.4 MANAGING THE PRESENTATION AND THE CHART VIEW
4.4.5 MANAGING LOCAL CUBE STORAGE
4.5 WORKING WITH THE DATABASE UTILITIES
34 35 37 38 39 5 TASK SCHEDULING
43 5.1 DESCRIPTION
5.2 MANAGING THE TASKS
5.2.1 CREATING A REPORT GENERATION TASK
5.2.2 CREATING A SQL TASK
5.2.3 CREATING A GENERIC TASK
5.2.4 EDITING A TASK
5.2.5 DELETING A TASK
5.3 MANAGING TASK SCHEDULE
5.3.1 CREATING A TASK SCHEDULE
5.3.2 EDITING A TASK SCHEDULE
5.3.3 DELETING A TASK SCHEDULE
5.3.4 MANAGING THE TASK SCHEDULE FREQUENCY
43 44 44 48 50 51 52 53 54 55 56 57 6 WEB PARTS MANAGEMENT
59 6.1 DESCRIPTION
6.1.1 WEB PARTS PUBLICATION
6.2 CREATING A WEB PART
6.3 EDITING A WEB PART
6.3.1 CONFIGURING THE WEB PART DESIGN
6.4 PUBLISHING A WEB PART
6.5 DELETING A WEB PART
59 59 59 60 61 63 65 7 CONTENT BUILDER
67 7.1 DESCRIPTION
7.1.1 WORKING WITH THE PARAMETERS
7.1.2 PURGE CONTENTS
7.2 WORKING WITH THE INFORMATION FEED
7.2.1 CREATING AN INFORMATION FEED
7.2.2 EDITING AN INFORMATION FEED
7.2.3 DELETING AN INFORMATION FEED
7.3 WORKING WITH THE HIGHLIGHT FEED TABLE
7.3.1 CREATING A HIGHLIGHT FEED
7.3.2 EDITING A HIGHLIGHT FEED
7.3.3 DELETING AN INFORMATION FEED
7.4 WORKING WITH THE RSS FEED TABLE
7.4.1 SUBSCRIBING TO THE RSS FEED
7.4.2 CREATING AN RSS FEED RECORD
7.4.3 EDITING AN RSS FEED
7.4.4 DELETING AN RSS FEED
67 67 68 69 69 70 71 71 71 73 73 74 74 75 76 77 8 WEB SERVER ADMINISTRATION
78 9 WORKING WITH DATE KEYWORDS
79 9.1 INVARIANT PREDEFINED FUNCTIONS
9.2 STANDARD DAYS AND MONTHS FUNCTIONS BY LANGUAGE
9.3 OTHER HOUR FUNCTIONS BY LANGUAGE
79 80 82 Copyright NETASQ 2010
4/86
USER GUIDE: CONTENTS
9.4 9.5 9.6 9.7 9.8 82 83 84 85 86 OTHER DAY FUNCTIONS BY LANGUAGE
OTHER WEEK FUNCTIONS BY LANGUAGE
OTHER MONTH FUNCTIONS BY LANGUAGE
OTHER QUARTER FUNCTIONS BY LANGUAGE
OTHER YEAR FUNCTIONS BY LANGUAGE
Copyright NETASQ 2010
5/86
USER GUIDE: FOREWORD
FOREWORD
Copyright
© Copyright NETASQ 2010. All rights reserved. Under copyright law, any form of reproduction
whatsoever of this user manual without NETASQ's prior written approval is prohibited. NETASQ
rejects all liability arising from the use of the information contained in these works.
Liability
This manual has undergone several revisions to ensure that the information in it is as accurate as
possible. The descriptions and procedures herein are correct where NETASQ firewalls are
concerned. NETASQ rejects all liability directly or indirectly caused by errors or omissions in the
manual as well as for inconsistencies between the product and the manual.
Notice
WEEE Directive
All NETASQ products that are subject to the WEEE directive will be marked with the mandated
"crossed-out wheeled bin" symbol (as shown above) for items shipped on or after August 13,
2005. This symbol means that the product meets the requirements laid down by the WEEE
directive with regards to the destruction and reuse of waste electrical and electronic equipment.
For further details, please refer
http://www.netasq.com/recycling.html
Copyright NETASQ 2010
to
NETASQ's
website
at
this
address:
6/86
USER GUIDE: INTRODUCTION
INTRODUCTION
1.1 WHO SHOULD READ THIS?
This manual is intended for either system administrators or network and security administrators. The basic
technical knowledge required depends on the audience.
The system administrators should know the NEA product configuration and its specific features:
Task scheduling
Database maintenance
Network and security administrators should have basic knowledge of NETASQ UTM products and especially
regarding:
Threat management:antivirus, antispam and vulnerabilities
Firewalling: filter rules and IP services
Intrusion prevention system
Content filtering
SSL VPN
1.2 TYPOGRAPHICAL CONVENTIONS
1.2.1 Abbreviations
For the sake of clarity, the usual abbreviations have been kept.
Syndication). Other acronyms will be defined in the Glossary.
For example, RSS (Really Simple
1.2.2 Display
Names of windows, menus, sub-menus, buttons and options in the application will be represented in the
following fonts:
Example
Menu Interfaces
1.2.3 Indications
Indications in this manual provide important information and are intended to attract your attention. Among
these, you will find:
NOTE/REMARKS
These messages provide a more detailed explanation on a particular point.
Copyright NETASQ 2010
7/86
USER GUIDE: INTRODUCTION
WARNING/RECOMMENDATION
These messages warn you about the risks involved in performing a certain manipulation or about
how not to use your appliance.
TIP
This message gives you ingenious ideas on using the options on your product.
DEFINITION
Describes technical terms relating to NETASQ or networking. These terms will also be covered in
the glossary.
1.2.4 Messages
Messages that appear in the application are indicated in double quotes.
Example
"Delete this entry?"
1.2.5 Examples
Example
This allows you to have an example of a procedure explained earlier.
1.2.6 Command lines
Command lines
Indicates a command line (for example, an entry in the DOS command window).
1.2.7 Reminders
Reminders are indicated as follows:
Reminder.
1.2.8 Access to features
Access paths to features are indicated as follows:
Access the menu File\Firewall.
Copyright NETASQ 2010
8/86
USER GUIDE: INTRODUCTION
1.3 GETTING HELP
To obtain help regarding your product and the different applications in it:
website: www.netasq.com. Your secure-access area allows you to access a wide range of
documentation and other information.
user manuals: NETASQ UNIFIED MANAGER, NETASQ REAL-TIME MONITOR and NETASQ
EVENT REPORTER.
1.4 TECHNICAL ASSISTANCE CENTER
NETASQ provides several means and tools for resolving technical problems on your firewall.
A knowledge base.
A certified distribution network. As such, you will be able to call on your distributor.
Documents: these can be accessed from your client or partner area. You will need a client account in
order to access these documents.
For further information regarding technical assistance, please refer to the document "Standard NETASQ
support".
1.5 GETTING FAMILIAR WITH THE WEB PORTAL
The NETASQ Event Analyzer web portal provides services to allow end users to:
Access generated reports
Customize their own report parameters
Schedule tasks
Customize the web portal
Check database processes
1.5.1 Connection
Users can connect to the NETASQ Event Analyzer Web Portal installed on a server machine, inside or
outside your organization’s network. All you need is a web browser. If you wish to run items such as Cubes,
you will be prompted to install the Microsoft Office 2003 Web Components on your local computer.
NOTE/REMARKS
The cube technology allows an end user to perform thorough analyses of the logs that NETASQ
devices have sent.
The following browsers are supported:
Internet Explorer version 7 or greater,
Google Chrome and Mozilla Firefox (except for the cubes)
The services that the NETASQ Event Analyzer web portal provides depend on the user name used to log
into the application. User profiles are defined by the System Administrator via the NETASQ Event Analyzer
Administration Manager tool.
1.5.2 General overview
The NETASQ Event Analyzer web portal provides some menus to access specific features directly. Once
login is successful, the web portal menu will be displayed on the right side of the page.
Copyright NETASQ 2010
9/86
USER GUIDE: INTRODUCTION
.
The table below shows the association between the interface menu items and their contents:
Web server configuration
3 WEB PORTAL CONFIGURATION
Menus
4 RUNNING MENU ITEMS
Scheduled tasks & Tasks
5 TASK SCHEDULING
Web Part Configuration
6 WEB PARTS MANAGEMENT
Content Builder
7 CONTENT BUILDER
Web Server Administration
8 WEB SERVER ADMINISTRATION
1.5.3 Modifying the size of the menu panel
It is easy to widen or narrow the left menu panel according to your preference:
Increase the size of the right panel to display a report or a cube
Increase the size of the left panel to view a URL or a report name
To modify the size of the menu panel you need to be logged in.
From anywhere in the web portal, move the separator
according to your preference:
To make the left panel Menu narrower: click on the separator and drag it to the left.
To make the left panel Menu wider: select the separator and drag it to the right.
To hide the left panel Menu: double-click on the separator.
To show the left panel Menu: double-click on the separator.
Copyright NETASQ 2010
10/86
USER GUIDE: 2. WEB PORTAL LOGIN
2 WEB PORTAL LOGIN
2.1 USER PROFILES
Logging into the web portal allows end users to access the features NETASQ Event Analyzer offers
according to their profiles.
NETASQ Event Analyzer provides 4 different user names:
Admin is intended for managing the web portal and the solution
Analyzer is intended for performing forensic analyses on the stored logs
Viewer allows viewing the generated reports and customizing some reports
AdminDB is used for checking the database process status
The table below displays the services each login is allowed to access:
Services
User Admin
User Analyzer
User Viewer
User AdminDB
Access generated report
Report customization
Log forensic analysis
Database utilities
Task scheduling
Web part configuration
Content builder
Web server administration
2.2 WEB PORTAL ACCESS
To connect to the NETASQ Event Analyzer Web Portal, please follow the steps below:
Open your Internet browser and enter the following URL http://server_name/dvweb.
NOTE
“server_name” can be the hostname, the IP Address or the domain name of the server that runs the
NETASQ Event Analyzer solution.
Copyright NETASQ 2010
11/86
USER GUIDE: 2. WEB PORTAL LOGIN
The following screen will appear:
Set the fields "User Name" and "Password"
Click on the button "OK"
If the user name and the password match an allowed login, the following screen will appear:
NOTE
The displayed “User” field and the groups it belongs to depend on the user name set in the login
page.
Copyright NETASQ 2010
12/86
USER GUIDE: 3. WEB PORTAL CONFIGURATION
3 WEB PORTAL CONFIGURATION
3.1 DESCRIPTION
The “Web Server Configuration” enables any user, regardless of his profile, to perfom the following
actions:
Check the login credentials
Check the connection parameters
Modify the NETASQ Event Analyzer Web Portal’s home page.
Log out of the application
To access the web server configuration:
Click on the menu Web Server Configuration
The menu Web Server Configuration will be displayed:
User
User name used to connect to the application
Groups
Groups to which the user belongs
@IP
IP Address of the NETASQ Event Analyzer server
Theme
Select the skin you want from the drop-down list. By default a single theme is
available in this version of NETASQ Event Analyzer
Language
Click on the country flag for the language in which you wish the menus to be
displayed. The following languages are available: Spanish, German, English,
Catalan, French and Italian.
Copyright NETASQ 2010
13/86
USER GUIDE: 3. WEB PORTAL CONFIGURATION
Display Banner
Select or clear this check box to show or hide the header at the top of the page.
Add a Home Page
Enables you to display a customized home page.
Logout
Enables you to log out. You will be disconnected from the server, enabling another
user to login.
3.2 MANAGING THE HOME PAGE
The Home Page option enables end users to display a customized home page. For example, you could
display the results of a report in PDF format as a new home page in the right panel. It is possible to add up to
four home pages, which appear as tabs in the right panel.
3.2.1 Adding a new home page
To access the creation of a new home page:
Click on the menu Web Server Configuration\Add a home page
Copyright NETASQ 2010
14/86
USER GUIDE: 3. WEB PORTAL CONFIGURATION
The Web Server Configuration will be modified as displayed below:
Then follow the steps below to create a home page
Set the "title" field of the home page. This is the name that will be displayed in the home page tab
control.
Set the "URL" field with the web page to display as the home page
Click on the button "Add" to add the home page or click on the button "Finish" to finish creating the
home page
NOTE
You can add a home page using an existing web site (e.g. intranet.domainname.com) or using a
report. To add a generated or a customized report the end user just has to copy and paste the report
URL.
More information on copying the report URL will be available in the section 4.1.3 Working with
reports
IMPORTANT
In the URL copied to the clipboard, the server name is localhost. For a URL to work from a remote
computer connected to the Web Portal Server, you need to replace localhost with the Server’s IP
Address or Server Name, followed by the port number if its value is anything other than 80.
Copyright NETASQ 2010
15/86
USER GUIDE: 3. WEB PORTAL CONFIGURATION
3.2.2 Modifying a home page
To modify a home page
Click on the menu Web Server Configuration\ Home page section
Select the icon
to modify. The home page management section will be updated:
Modify the "Title" and/or "URL" fields according to the changes to be made
Click on the icon
Copyright NETASQ 2010
to save changes or on the icon
to discard changes.
16/86
USER GUIDE: 3. WEB PORTAL CONFIGURATION
3.2.3 Removing a home page
To remove a home page
Click on the menu Web Server Configuration\ Home page section
Select the icon
to remove.
The following screen will appear:
Click on the button "OK" to validate the home page removal.
The related control tab will be removed from the home page.
3.2.4 Logging out of the Web Portal
The number of users connected will depend on the license certificate which includes a number of concurrent
users. When you disconnect, another concurrent user will be able to connect in your place. Note that you will
be disconnected from IIS in the server after a time out (the default time out is 10 minutes).
Copyright NETASQ 2010
17/86
USER GUIDE: 3. WEB PORTAL CONFIGURATION
To log out of the NETASQ Event Analyzer web portal
Click on the menu Web Server Configuration
Click on the link "Logout".
You will be redirected to the NETASQ Event Analyzer web portal connection page.
Copyright NETASQ 2010
18/86
USER GUIDE: 4. RUNNING MENU ITEMS
4 RUNNING MENU ITEMS
4.1 DESCRIPTION
The menu items in the NETASQ Event Analyzer web portal allow end users to access the reports NETASQ
Event Analyzer may generate.
To run the menu items, 2 important things should be taken into account:
The navigation inside the menu (left part of the web portal)
The use of the reports or their configuration located in the central zone of the web portal
To access the menu items of NETASQ Event Analyzer web portal:
Click on the menu Menus
NOTE
The list of available menus depends on the user name used to login.
The table below provides an overall description of the menu entries:
Menu entry
Description
NETASQ Reports
This is a node to access either generated or customized reports
Generated reports
End users will use it to access the reports NETASQ Event Analyzer
generated
Customized reports
End users will use it to access report customization
NETASQ Detailed Analysis
This is a node to access log analysis
Cubes
End users will use it to perform thorough log analyses
NETASQ Utilities
This is a node to access database status checks
Database status
Administrators will use it to check the database process status
Copyright NETASQ 2010
19/86
USER GUIDE: 4. RUNNING MENU ITEMS
4.1.1 Working with report parameters
When browsing inside the menu items of the NETASQ Event Analyzer web portal, many screens require
certain parameters to be set (e.g. “Firewall” or “source IP address”). The parameters allow end
users to define the log selections they wish to work with. Most of these parameters may be set using a drop
down list associated with a check box.
By default the check box is disabled and the drop down list is set to IGNORE.
Click on the arrow icon
. The drop down list will be displayed
Select the value to set
TIP
Click on the appropriate value to select it
Click on the first value and Shift + Click on the last value to select contiguous values
Perform several Ctrl + Click on different values in the list to select non-contiguous values
Click on the button
to cancel the selection or click on the button
to confirm.
NOTE
By clicking on the cancel button
, the end user will discard all changes made. So regardless of
the value that has been set for this drop down list (IGNORE or specific values), the values will be
kept.
By clicking on the confirm button
, the drop down list will be closed, the checkbox will be enabled
and the list of values will be set in the field.
4.1.2 Working with the date
By default, cubes, customized reports or database status reports offer a default date (e.g. yesterday) to
select the logs that should be part of the reports the end user wants to work with.
The end user can obviously select his own period either by manually setting a date or by using the calendar
icon. In any case he has to first choose “Other” from the drop down list "Select the period or
Other for a Date”:
If the calendar icon is used, the end user should follow the steps below:
Click on the calendar icon
selected)”
Copyright NETASQ 2010
close to the parameters "Select
the
date
(if
20/86
Other
USER GUIDE: 4. RUNNING MENU ITEMS
From the displayed scheduler, select the customized date of the report you want to generate
Use the arrow buttons
and
to navigate from one month to another.
To manually set the date parameter, the end user has to use the format provided in chapter 9 WORKING
WITH DATE KEYWORDS.
4.1.3 Working with reports
Regardless of the type of reports the end user works with (generated, customized or database status) they
all look the same. They are PDF files displayed in the central zone of the NETASQ Event Analyzer web
portal. The contents of the reports depend on the type of report, but a report book generally contains:
A dashboard that provides a general overview of the events that occurred during the report period
A list of reports where several displays are used according to the information to show. You may
have histograms, pie charts or tables
The screenshot below shows the first page of a daily firewall report book: the dashboard.
Copyright NETASQ 2010
21/86
USER GUIDE: 4. RUNNING MENU ITEMS
Useful icons and buttons are explained in the table below
Sends you back to the previous report when a report displayed is the result
Home Page
of a drill-down link (for example, when using the HTML output format). In a
single report or in the last report obtained via a drill-down, the Home Page
icon will display the same report.
Question: Why do the Home Page
icon and the Go button both have the
same consequence – that is, sending the user back to the previous report?
Answer: because, when the generated drill-down reports only generate one
page, no navigation bar will appear and therefore there will be no Go button.
Go Back to Item List
Goes back to the item list.
NOTE
If you click on the menu branch previously used, the last item will be run
again without displaying the list.
Copy the URL to the
Clipboard
Copies the URL link to the current report or item to the clipboard. You will be
prompted to confirm this copy. This link can be used later when defining a
Home Page, a Shortcut on your desktop or a Web Part.
NOTE
A URL can end with:__e=0 if you wish to get the criteria parameter and
output format page before running the report. __e=1 if you wish to get the
report result directly.
Adobe reader tool bar
This is the standard Adobe reader tool bar that allows end users to save or
print generated reports
Use the arrow to change the date of the report. Allows end users to move to
the previous /next day or month depending on the report type.
NOTE
Copyright NETASQ 2010
22/86
USER GUIDE: 4. RUNNING MENU ITEMS
In the case of customized generated reports, these buttons may have no
effect.
These tab controls are only displayed for customized reports. They allow end
users to browse between the customization parameters and the generated
reports.
4.1.4 Running customized reports
Just after setting the parameters of customized reports or database status reports, the end user can run the
report generation.
By clicking on the button
, the report that the end user customized will be displayed as a standard
generated report. He will then be able to browse in the tabs “Parameters” and “Both” to modify the
parameters and view changes.
4.1.5 Export customized reports and cube as a file
Just after setting the parameters of cubes, customized reports or database status reports, the end user will
be able to export the generated report as a file.
By clicking on the icon
, the report that the end user customized will be available for local or shared
folder storage in PDF file format.
Once NETASQ Event Analyzer has built the report, he will be prompted to either save or open the generated
report.
NOTE
Depending on the browser policy the end user may be warned about downloading files before being
prompted to save.
4.1.6 Save task for customized reports and cubes
Just after setting parameters of cubes, customized reports or database status reports, the end user can save
these parameters to reuse them in a scheduled task.
By clicking on the icon
the end user has to set the task parameter for task scheduling purposes. For
more information about task scheduling, please refer to section 5 TASK SCHEDULING.
Copyright NETASQ 2010
23/86
USER GUIDE: 4. RUNNING MENU ITEMS
NOTE
The “Save” task button is only accessible on administrator accounts.
Fill in the task definition parameter according to the table below:
Field
Task name
Destination directory
Description
Set the name of the task. This field will help to identify the task when
you will use it in the task scheduler.
This is the directory that will store the customized report that will be
created by the task.
Click on the browse icon
Destination file
and select the directory.
Set a name for the report file that will be generated.
From the drop down list, choose a suffix to add to the report file
name.
Suffix
Copyright NETASQ 2010
TIP
If you plan to use this task periodically, we recommend that you
use a suffix that will allow the end user to identify the report by
its date.
24/86
USER GUIDE: 4. RUNNING MENU ITEMS
NOTE
Destination directory is one of the shared folders you can view in the Menus panel (see below).
By default these shared folders (and sub-directories) can be used because all new files created in
these directories can be accessed later via the Web portal Menu if you refresh the content using the
“Refresh”
icon.
You can ask the administrator to create another sub-directory located in the installation area. Once
this is done, you will be able to select this sub-directory as a destination directory
NOTE
Using the Suffix parameter will help the end user to identify customized reports generated through
a periodic task. The table below explains the different values available as suffixes to the file name
of the generated report:
Suffix
Description
None
No suffix will be added at the end of the report file name
YY
The suffix is the current year of the report coded with 2 digits
YY-1
The suffix is the previous year of the report generation date coded
with 2 digits
YYMM
The suffix is the current month of the report generation date coded
with 2 digits for the year and 2 digits for the month
YYMM-1
The suffix is the previous month of the report generation date coded
with 2 digits for the year and 2 digits for the month
YYMM-1D
The suffix is the previous day of the report generation date coded with
2 digits for the year and 2 digits for the month
YYMMDD
The suffix is the current day of the report generation date coded with
2 digits for the year, 2 digits for the month and 2 digits for the day
YYMMDD-1
The suffix is the previous day of the report generation date coded with
2 digits for the year, 2 digits for the month and 2 digits for the day
NNNN
The suffix is a number automatically incremented from 0000 up to
9999.
TIP
While report generation normally uses aggregated data, the reports are generally based either on
yesterday’s date or on the previous month. If so, we recommend the use of the YYMMDD-1 suffix
for daily reports and the YYMM-1 suffix for monthly reports.
Copyright NETASQ 2010
25/86
USER GUIDE: 4. RUNNING MENU ITEMS
Enable the checkbox "Send Alert” if there are any alerts and set the parameters according to the
table below:
Field
From
Description
Set a valid e-mail address as a mail sender.
Set the valid e-mail address(es) as destination. This is the list of
recipients that will receive the customized report by e-mail.
To
NOTE
The recipients of the list should be separated by a semi-colon.
Subject
Set the subject of the e-mail that will be sent
Text
Set the text of the e-mail that will be sent
Do not modify this parameter, as it is related to the report you have
just customized
Attachment
NOTE
The Attachment field can use the =Destination() function to
return the file name with the full path. Another function, called
=FileName() can sometimes be used to only return the file name
without the path.
NOTE
You can click on the “Generate VB Script” icon
to manage this task by customizing the visual
basic script. This feature is reserved for advanced users.
You will be prompted to copy the script in the clipboard.
Click on the button "Save” to save the task in the list that will be used to build a scheduled task.
4.2 GENERATED REPORTS
The menu item “Generated Reports” allows end users to access the reports NETASQ Event Analyzer
generated. The reports are generated according to the administrator’s configuration. The generated reports
are books that contain a dashboard and a list of specific reports.
Copyright NETASQ 2010
26/86
USER GUIDE: 4. RUNNING MENU ITEMS
To access the menu item “Generated Reports” in the NETASQ Event Analyzer web portal:
Click on the item Menus\NETASQ Reports\Generated Reports
Click on the type of reports you want to access according to the descriptions provided below:
Copyright NETASQ 2010
Report type
Description
Content Filtering
Contains report books about:
- General threats (antivirus, antispam) on HTTP, SMTP, POP3 and
FTP
- Antispam for SMTP and POP3
- URL filters for web browsing
Firewall
Contains report books that show the accepted and blocked services.
IPS
Contains report books on the raised alarms of the intrusion prevention
system
Mobility
Contains report books on SSL VPN activity
Proxy
Contains report books on web browsing and web user activities
Vulnerabilities
Contains report books that show the vulnerabilities SEISMO has detected
27/86
USER GUIDE: 4. RUNNING MENU ITEMS
By clicking on a type of report, the list of available report books will appear in the central zone of the web
portal as displayed in the following screenshot:
According to the data that have been treated, two types of reports may be displayed:
Daily report which shows hourly events that have been raised through NETASQ product logs
Monthly report which shows daily events that have been raised through NETASQ product logs
Click on the report book you want to view. It will appear in the central zone as displayed below:
4.3 CUSTOMIZED REPORTS
The customization of the NETASQ Event Analyzer reports helps the end user achieve two main goals:
To examine log information for the purpose of analysis
Copyright NETASQ 2010
28/86
USER GUIDE: 4. RUNNING MENU ITEMS
To prepare a report for automatic generation purposes through task scheduling
Regardless of the end user’s objective, the usage is the same. To access the item menu “Customized
Reports” in the NETASQ Event Analyzer web portal:
Click on the item Menus\NETASQ Reports\Customized Reports
Click on the type of reports you want to customize according to the descriptions provided below:
Report type
Copyright NETASQ 2010
Description
Daily
By selecting this type of report, the displayed events will be based on
daily data. It means you will get information on an hourly basis
Monthly
By selecting this type of report, the displayed events will be based on
monthly data. It means you will get information on an daily basis
Firewall
Contains reports relating to accepted and blocked services.
Intrusion Prevention
System
Contains reports on the raised alarms of the intrusion prevention
system
Content Filtering
Contains report books on general threats (antivirus, antispam) on
HTTP, SMTP, POP3 or FTP and on URL filters for web browsing
Mobility
Contains reports relating to SSL VPN activity
Vulnerabilities
Contains reports that show the vulnerabilities SEISMO has detected
Proxy
Contains reports relating to web browsing and web user activities
29/86
USER GUIDE: 4. RUNNING MENU ITEMS
Click on the type of information you want to work with according to the screen that allows you to select
the report:
NOTE
NETASQ Event Analyzer provides a large number of reports for customization purposes. This will
help the end user to work with the most suitable reports according to his needs.
Click on the report you want to customize to configure the parameters of the reports
NOTE
The list of parameters that may be configured depends on the selected report.
Copyright NETASQ 2010
30/86
USER GUIDE: 4. RUNNING MENU ITEMS
Set the values of the parameters to customize
Finish the customization according to your objective: run the report, export the report to a file or save the
report as a task.
4.4 LOG ANALYSIS AND CUBES
The log analysis on the NETASQ Event Analyzer helps the end user achieve two main goals:
To examine log information for the purpose of thorough analysis
To build specific charts in order to follow dedicated events
WARNING
The NETASQ Event Analyzer Cube requires the use of Internet Explorer, the component Microsoft
Office 2003 Web Components 11 version 12 and the related ActiveX component. If these software
components are not installed on the end user’s computer, he will be prompted to install them.
A cube may be viewed as a container that embeds the data to be analyzed. The principle of using log
analysis consists of:
1. Defining the type of logs you want to analyze
2. Defining the parameters to select the logs
3. Managing filters, order and cross table to analyze the logs
4. Managing the presentation and the chart view
5. Saving the chart view and the data for continuous analysis
Copyright NETASQ 2010
31/86
USER GUIDE: 4. RUNNING MENU ITEMS
To access the NETASQ Event Analyzer log analysis:
Click on the item Menus\NETASQ Reports\NETASQ Detailed Analysis
4.4.1 Select the log type
Click on the type of reports on which you wish to analyze logs according to the descriptions provided
below:
Report type
Description
Content Filtering
Cube
Analyzes logs on general threats (antivirus, antispam) on HTTP,
SMTP, POP3 or FTP and on URL filters for web browsing
Correlation Cube
Analyzes logs relating to firewall and proxy events.
Firewall
Analyzes logs relating to accepted and blocked services.
IPS
Analyzes logs on the raised alarms of the intrusion prevention system
Proxy
Analyzes logs relating to web browsing and web user activities
No matter what report type has been selected for the log analysis, the screen that will appear is quite similar
to the screenshot below:
Copyright NETASQ 2010
32/86
USER GUIDE: 4. RUNNING MENU ITEMS
Cube type
Description
Daily information
Use this cube type to analyze data that have been aggregated daily.
This means you won’t be able to investigate logs that have just been
received.
Detailed information
Use this cube type to analyze data that have been received.
Monthly information
Use this cube type to analyze data that have been aggregated
monthly. It means you won’t be able to investigate either logs that
have just been received or daily data.
Use this cube type to track events relating to specific fields (IP
source, IP destination …).
Forensic Traceability
Report
NOTE
This type of cube is only available by selecting “Correlation
Cube”.
NOTE
The selection of the cube type for proxy events is a little different from the others. The list of
available cube types is as follows:
Proxy Cube on Daily Information by IP source
Proxy Cube on Daily Information by user
Proxy Cube on Detailed Information by IP source
Proxy Cube on Detailed Information by user
Proxy Cube on Monthly Information by IP source
Proxy Cube on Monthly Information by user
Select the type of cube you want to work with.
Then you can continue by selecting the logs to analyze.
Copyright NETASQ 2010
33/86
USER GUIDE: 4. RUNNING MENU ITEMS
4.4.2 Select the log records
Once the cube type has been selected, the end user has to select the log records he wants to analyze. By
clicking on the cube type the end user wants to work with, the following screen will appear:
NOTE
The list of available parameters depends on the report type the user has chosen.
Set the parameter values used in selecting the log records
RECOMMENDATION
Logs may be difficult to analyze if a huge volume of log records has been selected. Moreover, in
order to save server performance, the selection is limited to 100 000 records.
So, we strongly recommend that you define the selection parameters specifically.
Finish selecting logs for the cube according to your objective: run the cube, export the cube to a file or
save it as a task.
Copyright NETASQ 2010
34/86
USER GUIDE: 4. RUNNING MENU ITEMS
The table below explains the use of the different types of cube results:
Cube result
Usage
Run cube
The end user will be able to analyze logs through the web portal. He
may also save the result on his local disk.
Exported file
The selected log records are put in a pdf file without any formatting.
Saved task
The administrator can create a task for further log analyses with 2
main reasons:
The cube result may be published in the web portal for other
users
The cube log records may be attached in an e-mail and used
with a presentation previously done
NOTE
More information about cube presentation will be provided in the
section 4.4.3 Analyzing logs.
4.4.3 Analyzing logs
After running the log record selection, the data for the cube will be available for analysis purposes and the
following screen will appear:
NOTE
The screen to manage the organization of log attributes may be not displayed.
To manage the attributes of the logs, click on the button
Copyright NETASQ 2010
.
35/86
USER GUIDE: 4. RUNNING MENU ITEMS
The log attribute management screen will appear:
Add as many attributes as required according to the necessary log analyses. Just select one attribute or
a group and drag and drop it to the right area. This action may also be done by using the appropriate value
in the drop down list.
The cross table used for analyzing the logs is divided into 4 areas as described below
Place here fields for filtering purpose
Place the fields for the lines
Place here the fields for the columns
Place here the fields for details and total values
Analyze logs using the following features:
Change the filter value
Collapse line to group or ungroup values
Collapse column to group or ungroup values
Copyright NETASQ 2010
36/86
USER GUIDE: 4. RUNNING MENU ITEMS
The screen below shows how the end user can arrange a cube to analyze logs:
By clicking on the “Chart” tab, the end user will be able to create a chart view to illustrate the analysis.
4.4.4 Managing the presentation and the chart view
Besides log analysis, the NETASQ Event Analyzer cube module provides a lot of features. For instance, the
end user is able to manipulate logs through different views and save them for further tracking analyses.
To access the services that the NETASQ Event Analyzer cube module offers:
Click the down-arrow in the top left corner of the screen
The following contextual menu appears:
Copyright NETASQ 2010
New grid view…
Creates a new Cube tab to get another presentation to have another
dimension and measure on the selected log records.
New Chart View…
Creates a new Chart tab to get another graph presentation. A Chart
can be linked to a Cube View or can be standalone.
37/86
USER GUIDE: 4. RUNNING MENU ITEMS
Rename View
Allows the end user to rename a Cube View or Chart View. First
select the View to be renamed before using this command.
Allows the end user to remove a Cube View or Chart View. First
select the View to be removed before using this command.
Remove View…
WARNING
If you are removing a Cube View linked to a Chart View, a
message will appear explaining that the Chart View is linked to
the Cube View and that you will also lose these views.
Click OK only if you accept losing both views.
Allows the end user to save log records (the data) and the created
grid and chart to keep the dimension and measure organization.
Save Data and
Presentation As…
NOTE
More information about the use of saved presentations and data
will be provided in the section 4.4.5 Managing local cube
storage.
Allows the end user to only save log records and use it with a
previously saved presentation.
Save Data As…
Print…
NOTE
More information about the usage of saved presentation and data will
be provided in the section 4.4.5 Managing local cube storage.
Allows the end user to print the analysis he performed
.
4.4.5 Managing local cube storage
Once the end user has performed his log analysis, he can save it on his own hard disk. Then he will be able
to either transmit the file to his manager or to reuse it to perform the same analysis on other log records. It
helps the end user to keep the presentation he made in the log record selection.
4.4.5.1 Save presentation and data
To save cube presentation and data:
From a cube with log records, click the down-arrow in the top left corner of the screen
Select “Save Data and Presentation As…” from the contextual menu
The following screen will appear:
Copyright NETASQ 2010
38/86
USER GUIDE: 4. RUNNING MENU ITEMS
Set a filename for the cube to save locally and then click on the button “Save”.
NOTE
You can now access this cube offline, without needing to connect to the Web Portal. Just go to the
destination directory and double-click on the *.hta file (in this example, the file “mycube1.hta”).
4.4.5.2 Update presentation data
Once the end user has saved the presentation and the data he selected for his analysis, he can reuse the
presentation with other log records. This will help him to track differences between 2 log records.
To reuse a presentation with another log record, follow the steps below:
Run another cube by using the same type but by modifying the log record selection (e.g. changing the
date)
From the down-arrow in the top left corner of the screen, select “Save Data As…”.
Set a filename to save the cube data locally by keeping the proposed file extension
RECOMMENDATION
In order to track differences between data with the same presentation, we recommend keeping the old
data file(s) and using a new filename for the current saving process.
NOTE
The file extension for the cube data is .cub.
From the local end user’s directory where files have been saved, change the filename of the previous
data.
Example
If the filename used to save the presentation and the data is “mycube.hta”, the log record data will be stored
in the file “mycube.cub”. Save this filename with another name (e.g. mycube.old.cub)
. From the local end user’s directory where files have been saved, change the name of the last saved
data file.
Example In our example, change the last saved data file (e.g. mynewcube.cub) with the filename used
during the presentation and data saving process: mycube.cub
Launch the local Cube application by double-clicking on the file “mycube.hta”.
4.5 WORKING WITH THE DATABASE UTILITIES
Using the NETASQ Event Analyzer reports helps the administrator to check the status of database
processes like insertion or aggregation.
Copyright NETASQ 2010
39/86
USER GUIDE: 4. RUNNING MENU ITEMS
To access the menu item “Customized Reports” in the NETASQ Event Analyzer web portal:
Click on the item Menus\NETASQ Utilities\Database Status
Click on the type of database reports you want to check according to the descriptions provided below:
Information type
Copyright NETASQ 2010
Description
Content Filtering
Utilities
Contains the database report status on the treatment of Content Filter
logs
Firewall Statistics
Utilities
Contains the database report status on the treatment of Firewall logs
Intrusion Prevention
System Statistics
Utilities
Contains the database report status on the treatment of intrusion
prevention system logs
NETASQ Audit
Contains general information on reports generated per device.
Proxy Statistics
Utilities
Contains the database report status on the treatment of web proxy
logs
40/86
USER GUIDE: 4. RUNNING MENU ITEMS
Click on the type of information you want to work with according to the following screen:
NOTE
The list of available reports depends on the selected report type.
The table below describes the different types of report:
Report type
Description
Selected Records
Details
Provides detailed information on the database records
Number of Records
for the Table
Indicates the number of records stored in the database for the
detailed, aggregated and dimensions data.
Aggregation Process
Status
Provides information on the aggregation process
Address Definition
Management
Indicates the naming used for network identication
Set the parameters for the database reports
NOTE
The list of parameters that may be configured depends on the selected report type.
Copyright NETASQ 2010
41/86
USER GUIDE: 4. RUNNING MENU ITEMS
Finish generating the database status report according to your objectives: run the report, export the
report to a file or save the report as a task
Copyright NETASQ 2010
42/86
USER GUIDE: 5. TASK SCHEDULING
5 TASK SCHEDULING
5.1 DESCRIPTION
The scheduled tasks feature on the NETASQ Event Analyzer web portal allows the administrator to manage
the scheduling of the following tasks:
Generation of standard reports
Database aggregation process
Database purge process
Generation of customized reports generation, if any
Generation of cubes, if any
NOTE
The task scheduling menu is only available for the user Admin and AdminDB.
To access task schedules on the NETASQ Event Analyzer web portal:
Click on the menu Scheduled Tasks & Tasks
The table below provides an overall description of the task scheduling entries:
Menu entry
Scheduled Tasks
Description
This node lists the scheduling that has been created either by the
administrator or through the NETASQ Event Analyzer Configurator wizard.
NOTE
After the configuration of NETASQ Event Analyzer, some scheduling
will automatically be created.
This node lists the tasks that have been created either by the administrator
or through the NETASQ Event Analyzer Configurator wizard.
Tasks
Copyright NETASQ 2010
NOTE
After the configuration of NETASQ Event Analyzer, some tasks will
automatically be created and inserted in scheduling.
43/86
USER GUIDE: 5. TASK SCHEDULING
5.2 MANAGING THE TASKS
Task management allows the administrator to perform the following actions:
Create a report generation task
Create a SQL task
Create a generic task
Edit a task
Delete a task
To access task management on the NETASQ Event Analyzer web portal:
Click on the menu Scheduled Tasks & Tasks\ Tasks
The following screen will appear:
5.2.1 Creating a report generation task
Report generation tasks are created from the customized report screen. After defining the parameters of the
report generation, the administrator may decide to save the report as a task.
For more explanations on creating tasks from a customized report please refer to 4.1.6 Save task for
customized reports and cube.
5.2.1.1 Working with the alerts
NETASQ Event Analyzer offers the possibility of associating alerts with a task. 4 kinds of alerts are available:
E-mail: E-mails are sent to e-mail recipients with the result file attached
Highlight: consists of adding a highlight in the web parts
Information: consists of adding an information feed in the web parts
RSS feed: consists of adding an RSS feed
NOTE
“Highlight” and “Information” are related to web parts that will relay the alert depending on the
administrator’s web portal configuration.
Copyright NETASQ 2010
44/86
USER GUIDE: 5. TASK SCHEDULING
To work with the alerts of the NETASQ Event Analyzer web portal:
Click on check box “Send an Alert” in the screen that allows defining the customization
parameters of a report (customized, database utilities or cubing selection)
The parameters to define depend on the kind of alert that the end user has selected.
For e-mail alerts, the screen is as follows:
Field
From
Description
Sets a valid e-mail address as a mail sender.
Sets the valid e-mail address(es) as destination. This is the list of
recipients that will receive the customized report by e-mail.
To
NOTE
The recipients of the list should be separated by a semi-colon.
Subject
Sets the subject of the e-mail that will be sent
Text
Sets the text of the e-mail that will be sent
Do not modify this parameter, as it is related to the report you have
just customized
Attachment
Copyright NETASQ 2010
NOTE
The Attachment field can use the =Destination() function to
return the file name with the full path. Another function, called
=FileName() can sometimes be used to only return the file name
without the path.
45/86
USER GUIDE: 5. TASK SCHEDULING
For “Highlight” alerts, the screen is as follows:
Field
Description
Enter 0, 1 or 2 corresponding to the default standard icons:
0 will display an Information icon.
Severity
1 will display a Warning icon.
2 will display an Error icon.
Enter the path and the file name for the icon you want to appear in
front of your highlight if you do not wish to use the default icons
above.
Icon
NOTE
The path should refer to the server machine, for example:
/dvweb/App_Themes/NETASQ/Images/ico_pdf.gif.
URL
The function =Hyperlink() will automatically generate the URL
corresponding to the report file created so that the end user can open
this report via the “Highlight” frame defined in the Web Parts.
Title
Enter the title to display in the “Highlight” frame
Text
Define the tool tip to display when the “Highlight” title is selected with
the mouse
User
Group
Copyright NETASQ 2010
Define the user who will be assigned to the highlight.
This parameter is optional and available for future use.
Define the group that will be assigned to the highlight.
This parameter is optional and available for future use.
46/86
USER GUIDE: 5. TASK SCHEDULING
For “Information” alerts, the screen is as follows:
Field
Category
Description
Define the category to use for information classification purposes.
This parameter is optional
Enter the path and the file name for the icon you want to appear in
front of your highlight if you do not wish to use the default icons
above.
Icon
NOTE
The path should refer to the server machine, for example:
/dvweb/App_Themes/NETASQ/Images/ico_pdf.gif.
If no icon is defined here, the default
be used.
URL
The function =Hyperlink() will automatically generate the URL
corresponding to the report file created so that the end user can open
this report via the Highlight frame defined in the Web Parts.
Title
Enter the title to display in the “Information” frame
Text
Define the tooltip to display when the “Information” title is selected the
with the mouse
User
Group
Copyright NETASQ 2010
Information icon will
Define the user who will be assigned to the information.
This parameter is optional and available for future use.
Define the group that will be assigned to the information.
This parameter is optional and available for future use.
47/86
USER GUIDE: 5. TASK SCHEDULING
For “RSS feed” alerts, the screen is as follows:
Field
Description
Title
Enter the title to display in the “RSS feed” title area
Description
Enter the description to display in the “RSS feed” description area
Link
The function =Hyperlink() will automatically generate the URL
corresponding to the report file created so that the end user can open
this report via the “Highlight” frame defined in the Web Parts.
Category
Define the category to use for information classification purposes.
This parameter is optional
User
This parameter is not relevant to RSS feeds.
Group
This parameter is not relevant to RSS feeds.
5.2.2 Creating a SQL task
Creating a SQL task allows an administrator to schedule it to send SQL commands to the NETASQ Event
Analyzer database.
RECOMMENDATION
The use of SQL tasks intends to directly manipulate data inside the database, so it is reserved for
expert administrators.
Copyright NETASQ 2010
48/86
USER GUIDE: 5. TASK SCHEDULING
To access the creation of a SQL task:
Click on the menu Scheduled Tasks & Tasks\ Tasks
In the right panel, click on the icon
New SQL Task
The following screen will appear in the right panel:
Set the parameters according to the explanations provided in the table below:
Field
Description
Task Name
Defines a name for the task. This name will be used to identify the
task for scheduling purposes.
Data Source
Sets the data source configured in the NETASQ Event Analyzer
Configurator.
User ID
Sets the login used to access the database.
Sets the password associated with the login used to access the
database
Password
NOTE
The password has to be set each time the task is edited
This is the SQL statement that will be run by the database engine.
SQL
Copyright NETASQ 2010
For example, the SQL statement used to purge the “infos” table in
the NETASQ Event Analyzer is :
exec
[datasetreport].[NETASQ].[purge_alert]
‘NETASQ.infos’ ‘[date], 10’
49/86
USER GUIDE: 5. TASK SCHEDULING
Click on the “Save” button. The task will be available in the task node for scheduling management
purposes.
5.2.3 Creating a generic task
Creating a generic task allows an administrator to schedule it to execute some specific commands.
RECOMMENDATION
The use of generic tasks requires specific knowledge of NETASQ Event Analyzer, so it is reserved for
expert administrators.
To access the creation of a generic task:
Click on the menu Scheduled Tasks & Tasks\ Tasks
In the right panel, click on the icon
New Generic Task
The following screen will appear in the right panel:
Set the parameters according to the explanations provided in the table below:
Field
Task Name
Description
Defines a name for the task. This name will be used to identify the
task for scheduling purposes.
Sets the pathname of the file that embeds the commands to be run.
Run Command
Copyright NETASQ 2010
NOTE
The file of run commands may be a VBS script, a .bat or an .exe
file.
50/86
USER GUIDE: 5. TASK SCHEDULING
Click on the “Save” button. The task will be available in the task node for scheduling management
purposes.
5.2.4 Editing a task
Editing a task allows an administrator to modify the task behavior.
To access the task edition:
Click on the menu Scheduled Tasks & Tasks\ Tasks
In the left menu, select the task to edit
Copyright NETASQ 2010
51/86
USER GUIDE: 5. TASK SCHEDULING
In the right panel, click on the icon
Edit Task
The following screen will appear in the right panel:
NOTE
The displayed screen depends on the kind of task previously selected. In the example below, the task
concerns the automatic generation of the daily firewall dashboard.
Update the parameters as needed.
Click on the “Save” button to finish updating the task.
5.2.5 Deleting a task
Deleting a task allows an administrator to remove a task from NETASQ Event Analyzer. Even if the task is
part of a task schedule, it will no longer be executed.
Copyright NETASQ 2010
52/86
USER GUIDE: 5. TASK SCHEDULING
To access the task deletion:
Click on the menu Scheduled Tasks & Tasks\ Tasks
In the left menu, select the task to remove
In the right panel, click on the icon
Delete Task
The administrator will be prompted to confirm the task deletion
Click on the “OK” button to confirm the task deletion.
5.3 MANAGING TASK SCHEDULE
Managing task schedules allows the administrator to perform the following actions:
Create a specific task schedule
Edit a task schedule to manage the scheduling of automatic treatments like report generation for
instance
Delete a task schedule
Copyright NETASQ 2010
53/86
USER GUIDE: 5. TASK SCHEDULING
To access the task schedule management of the NETASQ Event Analyzer web portal:
Click on the menu Scheduled Tasks & Tasks\ Tasks
The following screen will appear:
5.3.1 Creating a task schedule
Creating a schedule allows an administrator to schedule tasks that should be automatically run.
To access the task schedule management of the NETASQ Event Analyzer web portal:
Click on the menu Scheduled Tasks & Tasks\ Scheduled Tasks
In the right panel, click on the icon
New Scheduled Task
The following screen will appear in the right panel:
Define a name for the task schedule being created
Copyright NETASQ 2010
54/86
USER GUIDE: 5. TASK SCHEDULING
From the list “Available tasks”, select the task that should be part of the schedule and click on the
arrow to put it in the list “Tasks to be run”.
TIP
Click on the appropriate value to select it
Click on the first value and Shift + Click on the last value to select contiguous values
Perform several Ctrl + Click on different values in the list to select non-contiguous values
Manage the scheduling frequency
NOTE
The parameters to set for defining the frequency depend on the selected type. The frequency of
schedule management is described further in this section
Define the parameters for the schedule repetition, if any
5.3.2 Editing a task schedule
Modifying a schedule allows an administrator to modify the scheduled tasks that should be automatically run.
To access the management of scheduled tasks on the NETASQ Event Analyzer web portal:
Click on the menu Scheduled Tasks & Tasks\ Scheduled Tasks
In the Scheduled Tasks & Tasks\ Scheduled Tasks menu, select the scheduled tasks to edit
In the right panel, click on the icon
Copyright NETASQ 2010
Edit Scheduled Task
55/86
USER GUIDE: 5. TASK SCHEDULING
The following screen will appear in the right panel:
Update the task scheduling parameters
Click on the “Finish” button to save the task schedule.
5.3.3 Deleting a task schedule
Deleting a task schedule allows an administrator to remove a task schedule from NETASQ Event Analyzer.
NOTE
The tasks associated with the schedule will not be removed.
To access the task schedule deletion in the NETASQ Event Analyzer web portal:
Click on the menu Scheduled Tasks & Tasks\ Scheduled Tasks
In the Scheduled Tasks & Tasks\ Scheduled Tasks menu, select the task schedules to delete
In the right panel, Click on the icon
Delete Scheduled Task
The administrator will be prompted to confirm the task schedule deletion
Click on the “OK” button to confirm the task deletion.
Copyright NETASQ 2010
56/86
USER GUIDE: 5. TASK SCHEDULING
5.3.4 Managing the task schedule frequency
NETASQ Event Analyzer allows the administrator to define several frequencies: now, once, daily, weekly or
monthly.
The parameters used to define the frequency depend on the selected type.
5.3.4.1 Now
The task will run immediately within a minute maximum.
NOTE
Select the Delete Task when Done check box if you do not wish to keep this scheduled task.
5.3.4.2 Once
The task will run only once at the specified date and time.
Specify the Start Date and Time. The task will be saved until you decide to delete it later.
5.3.4.3 Daily
The task will run everyday starting at the specified date and time.
Specify the Start Date and Time
Specify an End Date if necessary.
Define whether the task must be run everyday or every X days via the field Run the Scheduled Task every
x Day(s).
Copyright NETASQ 2010
57/86
USER GUIDE: 5. TASK SCHEDULING
5.3.4.4 Weekly
The task will run each week starting at the specified day and time.
Specify the Start Date and Time.
Specify an End Date if necessary.
Define whether the task must be run every week or every X weeks via the field Run the Scheduled Task
every x Week(s).
Specify which day(s) of the Week you need to run this scheduled task by selecting the check boxes
representing the days of the week as appropriate.
5.3.4.5 Monthly
The task will run each month starting at the specified date and time.
In this example Monthly will be selected.
Specify the Start Date and Time.
Specify an End Date if necessary.
Select which day of the month the task must be run (between 1 and 31).
Select the day of the week (between Monday to Sunday) and the position of this week in the month (between
First, Second, Third, Fourth or Last).
Select the Run the Scheduled Task on the following Months check boxes as appropriate, by selecting the
required months of the year.
Copyright NETASQ 2010
58/86
USER GUIDE: 6. WEB PARTS MANAGEMENT
6 WEB PARTS MANAGEMENT
6.1 DESCRIPTION
The Web Parts feature in the NETASQ Event Analyzer web portal allows the administrator to configure the
display of different kinds of information. The web part is displayed in a right panel tab, alone or in addition to
home pages, as shown in the screen below:
As displayed below, the web part tab is divided into several areas:
The web part area may contain the following kind of information:
Information
Highlight
RSS feed
The content to display in these areas can be generated from the Content builder menu or by configuring an
alert for a task (see section 5.2.1.1 Working with the alert)
6.1.1 Web parts publication
In order to publish a NETASQ Event Analyzer web part, an administrator has to follow the steps below:
Associate a web part with an area in the page
Publish the created web parts to display them in the page
6.2 CREATING A WEB PART
Creating a web part allows the administrator to design the web part page.
To access the NETASQ Event Analyzer web part creation:
Copyright NETASQ 2010
59/86
USER GUIDE: 6. WEB PARTS MANAGEMENT
Click on the menu Web Part Configuration
Click on the “New” button. The following screen will appear in the right panel.
In the “WebParts catalog” select the content type to display in the web part page
From the drop down list “Add to”, choose select the display area.
Click on the “Add” button. The selected area will be updated according to the selected content type.
Add as many other web parts as needed
NOTE
You can modify the display configuration of each web part. To do so, please refer to the section 6.3.1
Configuring the web part design
In the “Web Part Configuration” menu, click on the “Finish” button to finish creating the web
parts
6.3 EDITING A WEB PART
Editing a web part allows the administrator to modify the display of the web part page.
To access the NETASQ Event Analyzer web part edition:
Click on the menu Web Part Configuration
Copyright NETASQ 2010
60/86
USER GUIDE: 6. WEB PARTS MANAGEMENT
Click on the “Edit” button. The following screen will appear in the right panel.
Modify the web part display by changing the zone of a web part or by configuring the appearance design.
NOTE
To modify the display appearance, please refer to the section 6.3.1 Configuring the web part design
In the “Web Part Configuration” menu, click on the “Finish” button to finish editing web parts.
6.3.1 Configuring the web part design
To configure the design of a web part:
From the menu Web Part Configuration/New or Web Part Configuration/Edit
Select the web part to design
Click on the black arrow to the right of the content area to modify
Click on the “Edit” command.
Copyright NETASQ 2010
61/86
USER GUIDE: 6. WEB PARTS MANAGEMENT
The Editor zone will appear in the right panel.
Set the parameters according to the explanations provided in the table below:
Field
Description
Sets the number of records to display in the web part content area.
Page Size
NOTE
This value is only relevant for the “Highlights” or “Information”
content areas. It is related to the number of records to display for
each page. If the contents to display exceed the specified
number, the web part content area will provide links to manage
several pages.
Title
Provides a title to the web part content area
Chrome Type
Selects the appearance of the web part content area by choosing one
of the following values: Default, Title and Border, Title Only, Border
Only or None.
Direction
Selects the direction of the web part content area by choosing one of
the following values: Not Set, Left to right or Right to left.
Sets a value for the height of the web part content area.
Height
Width
Copyright NETASQ 2010
NOTE
This value is only relevant for a Display content area. Indeed, for
“Highlights” and “Information” contents, the height of the web
part depends on the number of records to display.
Sets a value for the width of the web part content area.
62/86
USER GUIDE: 6. WEB PARTS MANAGEMENT
NOTE
For the Height and Width parameters, the pixel unit can be changed to other units by using the drop
down list displayed below:
Click on the “Apply” button to check the changes.
WARNING
In certain cases, the “Apply” button will not immediately display the new appearance. You must click
on “OK” and then “Finish” in order to see the result.
Click on the “OK” button to close the web part editor zone.
Click on the “Finish” button to finish editing the web part. The new Web Part will appear but then
needs to be published.
6.3.1.1 Specific design parameters
Some design parameters depend on the web part content type. The table below lists those parameters and
provides a description:
Field
Content type
Description
Highlight
Information
Defines the number of records to display per page in the
web part content area.
URL to display
Display
Sets the content URL that should be displayed in the
web part content area. For instance, paste the URL
copied from the report screen.
Optional URL for
Title
Display
Sets a URL that would be linked to the title of the web
part display area.
Information
This parameter is linked to the attribute “Category” set
during the “Information” content builder phase.
If “Information” contents have been created, choose
one, several or all categories that should be displayed in
the web part content area.
Page Size
Category
6.4 PUBLISHING A WEB PART
The web part publishing allows the administrator to display content in the web part tab.
To access the NETASQ Event Analyzer web part publication:
Click on the menu Web Part Configuration
Copyright NETASQ 2010
63/86
USER GUIDE: 6. WEB PARTS MANAGEMENT
Click on the “Publish” button. The following screen will appear in the right panel.
Click on the link “Add a Web Part to publish”. The following screen will appear in the right panel:
NOTE
The appearance depends on the number of web part areas created.
Select the web part content to publish.
Modify the “Title” or the “Link” parameters if needed.
NOTE
By default, everyone who logs into the web portal can view the content being published ( “Users” and
“Groups” parameters are for future use).
Click on the button “Add”. The following message will appear:
Click on the “Finish” button to finish publishing the web part. The list of published Web Parts appears in
the right panel.
Copyright NETASQ 2010
64/86
USER GUIDE: 6. WEB PARTS MANAGEMENT
Use the icons
content.
or
to either respectively modify the publication or remove published web part
NOTE
By removing a web part content publication, the administrator will be prompted to confirm the
removal of the publication.
Click on the “Finish” button to finish publishing the web part.
NOTE
By clicking on the
logo in the top left corner of the NETASQ Event Analyzer
Web Portal, you can go back to the Home Page and display the result. The Web Part appears in a
new Web Parts tab in the right panel.
6.5 DELETING A WEB PART
Deleting a web part allows the administrator to remove a web part object. The area will be permanently
removed from the web part tab.
To access the NETASQ Event Analyzer web part deletion:
Click on the menu Web Part Configuration
Click on the “Edit” button. The following screen will appear in the right panel.
NOTE
The web part area to be removed should be previously unpublished. To remove a web part area
from the publication, please refer to the section 6.4 Publishing a Web part.
Select the web part area to delete
Click on the black arrow to the right of the content area to delete
Click on the “Delete” command. The administrator will be prompted to confirm
Copyright NETASQ 2010
65/86
USER GUIDE: 6. WEB PARTS MANAGEMENT
. Click on “OK” to confirm the web part area deletion.
Click on “Finish” to finish deleting the the web part area
Copyright NETASQ 2010
66/86
USER GUIDE: 7. CONTENT BUILDER
7 CONTENT BUILDER
7.1 DESCRIPTION
The Content Builder feature in the NETASQ Event Analyzer web portal allows the administrator to manage
the contents to display either in the Web part component or in the NETASQ Event Analyzer RSS feed.
By using the Content Builder feature in the NETASQ Event Analyzer web portal, an administrator will be able
to:
Create “Information” or “Highlight” contents for web part display purposes
Create RSS content that will be carried in the NETASQ Event Analyzer RSS feed
Edit the created contents
Delete created contents
Purge the information displayed in the web part
Purge the information of the RSS feed
Some contents may be automatically generated by a scheduled task. The administrator can consult the
Content Builder to check if the expected record has been added successfully.
7.1.1 Working with the parameters
When creating or editing content, an administrator will have to set a date and a URL.
The Date field’s contents can be used by the “Purge” command later.
NOTE
For more information about the date, please refer to the section 4.1.2 Working with the date.
For more information about the purge command, please refer to the section 7.1.2 Purge contents.
The URL will help the administrator to provide access to a report from the contents of the web part tab. To
set the URL, the administrator has to copy the report URL in the clipboard and paste it in the appropriate
field.
NOTE
For more information on copying URLs in the clipboard, please refer to the section 4.1.3 Working
with reports.
Copyright NETASQ 2010
67/86
USER GUIDE: 7. CONTENT BUILDER
7.1.2 Purge contents
An administrator can purge obsolete content which is older than a specified number of days.
To access the “Purge Contents” feature
Go to the Content Builder menu and click on the kind of information to purge (Information
Feed or Highlights Feed)
The screen for managing the content will appear in the right panel.
At the top of the right panel, click on the link Purge existing Information feeds.
NOTE
Depending on the kind of content to manage, the name of the link may be different:
“Purge existing Information feeds” for Information feeds
“Purge existing Highlights feeds” for Highlight feeds
“Purge existing RSS feeds” for RSS feeds
The following screen will appear in the right panel:
Enter the Number of days to keep.
Click on the Purge button.
The right panel will display a message indicating the status of the command
Click on the Finish button.
Copyright NETASQ 2010
68/86
USER GUIDE: 7. CONTENT BUILDER
7.2 WORKING WITH THE INFORMATION FEED
To manage the information feed:
From the menu Content Builder/Information Feed
The information feeds appear in the right panel.
7.2.1 Creating an information feed
From the menu Content Builder/Information Feed, follow the steps below:
Click the link Add an Information feed to publish at the top of the information feed screen in the right
panel.
The following screen will appear in the right panel:
Set the parameters for the new information feed as appropriate.
Click on the ‘Add’ button.
The right panel will display a message indicating the status of the command.
Click on the ‘Finish’ button.
Copyright NETASQ 2010
69/86
USER GUIDE: 7. CONTENT BUILDER
To check the content display that an administrator has just created, he can click on the NETASQ icon in the
top left corner of the Web Portal to go back to the Home Page and click on the Web Part tab. The new
information feed will be displayed:
7.2.2 Editing an information feed
From the menu Content Builder/Information Feed, follow the steps below:
Click on the Edit icon
to the left of the information feed to edit.
The following screen will appear in the right panel:
Modify the fields as necessary.
Click the
Copyright NETASQ 2010
OK icon to confirm your modifications.
70/86
USER GUIDE: 7. CONTENT BUILDER
7.2.3 Deleting an information feed
From the menu Content Builder/Information Feed, follow the steps below:
Click the Remove icon
to the left of the information feed to delete.
The following screen will appear in the right panel:
Click on OK to continue.
7.3 WORKING WITH THE HIGHLIGHT FEED TABLE
To manage the information feed:
From the menu Content Builder/Highlight Feed
The highlight feeds appear in the right panel.
7.3.1 Creating a highlight feed
From the menu Content Builder/ Highlight Feed, follow the steps below:
Click on the link Add an Information feed to publish at the top of the information feed screen in the
right panel.
Copyright NETASQ 2010
71/86
USER GUIDE: 7. CONTENT BUILDER
The following screen will appear in the right panel:
Set the parameters for the new information feed as appropriate.
Click on the button ‘Add’.
The right panel will display a message indicating the status of the command.
Click on the ‘Finish’ button.
To check the content display that an administrator has just created, he can click on the NETASQ icon in the
top left corner of the Web Portal to go back to the Home Page and click on the Web Part tab. The new
information feed will be displayed:
Copyright NETASQ 2010
72/86
USER GUIDE: 7. CONTENT BUILDER
7.3.2 Editing a highlight feed
From the menu Content Builder/Highlight Feed, follow the steps below:
Click on the Edit icon
to the left of the highlight feed to edit.
The following screen will appear in the right panel:
Modify the fields as necessary.
Click on the
OK icon to confirm your modifications.
7.3.3 Deleting an information feed
From the menu Content Builder/Highlight Feed, follow the steps below:
Click on the Remove icon
to the left of the highlight feed to delete.
The following screen will appear in the right panel:
Click on OK to continue.
Copyright NETASQ 2010
73/86
USER GUIDE: 7. CONTENT BUILDER
7.4 WORKING WITH THE RSS FEED TABLE
The RSS feed feature in NETASQ Event Analyzer allows the end user to be aware of the content
publication. The use of NETASQ Event Analyzer RSS feed requires:
End user subscription to RSS feed
Content generation through RSS
7.4.1 Subscribing to the RSS feed
To subscribe to the NETASQ Event Analyzer RSS feed:
From your browser, set the URL http://servername/dvweb/dvrss.ashx
NOTE
“server_name” can be the hostname, the IP Address or the domain name of the server that runs
the NETASQ Event Analyzer solution.
NOTE
From the NETASQ Event Analyzer toolbar, you can click on the RSS feed icon.
The DataSet Report RSS feed appears.
Click on Subscribe to this feed if you want to add this RSS Feed to your Feed Headlines gadget.
The following screen will appear:
Copyright NETASQ 2010
74/86
USER GUIDE: 7. CONTENT BUILDER
Set the parameters of the RSS feed you want to create
Click on the ‘Subscribe’ button.
7.4.2 Creating an RSS feed record
From the menu Content Builder/RSS Feed, follow the steps below:
Click on the link Add an RSS feed to publish at the top of the RSS feed screen in the right panel.
The following screen will appear in the right panel:
Set the parameters for the new RSS feed as appropriate.
NOTE
The Category text box can remain empty (optional).
Copyright NETASQ 2010
75/86
USER GUIDE: 7. CONTENT BUILDER
Click on the button ‘Add’.
The right panel will display a message indicating the status of the command.
Click Finish.
7.4.3 Editing an RSS feed
From the menu Content Builder/Highlight Feed, follow the steps below:
Click on the Edit icon
to the left of the RSS Feed to edit.
The following screen will appear in the right panel:
Modify the fields as necessary.
Click on the
Copyright NETASQ 2010
OK icon to confirm your modifications.
76/86
USER GUIDE: 7. CONTENT BUILDER
7.4.4 Deleting an RSS feed
From the menu Content Builder/RSS Feed, follow the steps below:
Click on the Remove icon
to the left of the RSS Feed to delete.
The following screen will appear in the right panel:
Click on OK to continue.
Copyright NETASQ 2010
77/86
USER GUIDE: 8. WEB SERVER ADMINISTRATION
8 WEB SERVER ADMINISTRATION
The Web Server Administration feature in NETASQ Event Analyzer allows the administrator to check the
number and the type of connected users.
The Web Server Administration table displays the following:
License type
For NETASQ Event Analyzer, only “Concurrent Users” is displayed.
Product
For NETASQ Event Analyzer, only “Web portal” is displayed.
User Name
The connected user’s User ID.
IP Address
IP of the connected user computer. (IPV4 or IPV6).
Lifetime
This information gives the date and time when the user will be disconnected if there is
no activity on the Web Portal.
NOTE
After 10 minutes without activity, a concurrent user will be disconnected. The “Lifetime” displays the
last lifetime that was valid before the timeout.
The Administrator can disconnect any user from this screen using the
want to manage concurrent access on the web portal.
Remove icon. This is useful if you
At the top of this screen, the administrator can see how many concurrent user(s) are connected and the
maximum number of users authorized by the license certificate.
Copyright NETASQ 2010
78/86
USER GUIDE: 9. WORKING WITH DATE KEYWORDS
9 WORKING WITH DATE KEYWORDS
9.1 INVARIANT PREDEFINED FUNCTIONS
Invariant functions are keywords or expressions that can be understood by NETASQ Event Analyzer
regardless of your PC’s regional language settings.
Function
Range
for x
Comment
HOURS
NOTE: in INVARIANT mode, “hours” are always expressed in plural even if the value is x=0 or x=1.
x hours ago
0 - 12
The number of hours beginning from the time specified in the past from
XX:00:00 to XX:59:59.
in x hours
0 - 12
The number of hours to the time specified in the future from XX:00:00 to
XX:59:59.
since x hours
0 - 12
The period beginning from the time specified in the past at XX:00:00 up to
now.
until x hours
1 - 12
The interval from now to the end of the period specified in the future at
XX:59:59.
DAYS
NOTE: in INVARIANT mode, “days” are always expressed in plural even if the value is x=0 or x=1.
x days ago
0-7
The number of days in the past from 00:00:00 to 23:59:59.
in x days
0-7
The number of days in the future from 00:00:00 to 23:59:59.
since x days
0-7
The number of days beginning from the day specified in the past from
00:00:00 up to now.
until x days
1-7
The number of days from now up to the end of the period specified in the
future at 23:59:59.
WEEKS
NOTE: in INVARIANT mode, weeks are always expressed in plural even if the value is x=0 or x=1.
x weeks ago
0-7
The number of weeks beginning from the week specified in the past from
YYYYMMDD 00:00:00 to YYYYMMDD 23:59:59.
in x weeks
0-7
The number of weeks to the week specified in the future from YYYYMMDD
00:00:00 to YYYYMMDD 23:59:59.
since x weeks
0-7
The number of weeks beginning from the first day of the week specified in
the past at 00:00:00 up to now.
until x weeks
1-7
The number of weeks from now to the end of the last day of the week
specified in the future at 23:59:59.
MONTHS
NOTE: in INVARIANT mode, months are always expressed in plural even if the value is x=0 or x=1.
x months ago
Copyright NETASQ 2010
0 - 12
The number of months from the first day of the month specified in the past
79/86
USER GUIDE: 9. WORKING WITH DATE KEYWORDS
from YYYYMM01 00:00:00 to YYYYMM31 23:59:59.
in x months
0 - 12
The number of months to the first day of the month specified in the future
from YYYYMM01 00:00:00 to YYYYMM31 23:59:59.
since x months
0 - 12
The number of months beginning from the first day of the month specified
in the past at 00:00:00 up to now.
until x months
1 - 12
The number of months from now up to the end of the last day of the month
specified in the future at 23:59:59.
QUARTER
NOTE: in INVARIANT mode, “quarters” are always expressed in plural even if the value is x=0 or x=1.
q1 or Q1
Uses the date interval for the First Quarter of the current year from
YYYY0101 00:00:00 to YYYY0331 23:59:59.
q2 or Q2
Uses the date interval for the Second Quarter of the current year from
YYYY0401 00:00:00 to YYYY0630 23:59:59.
q3 or Q3
Uses the date interval for the Third Quarter of the current year from
YYYY0701 00:00:00 to YYYY0930 23:59:59.
q4 or Q4
Uses the date interval for the Fourth Quarter of the current year from
YYYY1001 00:00:00 to YYYY1231 23:59:59.
x quarters ago
1-4
The number of quarters from the first day of the quarter specified in the
past from YYYYMM01 00:00:00 to the last day of the same quarter at
YYYYMM31 23:59:59.
in x quarters
1-4
The number of quarters to the first day of the quarter specified in the future
from YYYYMM01 00:00:00 to the last day of the same quarter at
YYYYMM31 23:59:59.
1-4
Uses the date interval for the specified Quarter of the specified year from
YYYY0101 00:00:00 to YYYY0331 23:59:59. (Note that the year can be
between 2004 and 2013 in the current NETASQ Event Analyzer version
10.0.0 but will support any year in a future version).
qx 2004 <---> qx
2013
YEARS
NOTE: in INVARIANT mode, “years” are always expressed in plural even if the value is x=0 or x=1.
x years ago
0 - 10
The number of years from the first day of the year specified in the past at
YYYY0101 00:00:00 to YYYY1231 23:59:59.
in x years
0 - 10
The number of days to the first day of the year specified in the future at
YYYY0101 00:00:00 to YYYY1231 23:59:59.
since x years
0 - 10
The number of years beginning from the first day of the year specified in
the past at YYYY0101 00:00:00 up to now.
until x years
1 - 10
The number of years from now up to the end of the last day of the year
specified in the future at YYYY1231 23:59:59.
9.2 STANDARD
LANGUAGE
DAYS
AND
MONTHS
FUNCTIONS
BY
In the following table the first column is the same for Invariant or English, other available languages can be
used according to your PC’s regional language settings:
Copyright NETASQ 2010
80/86
USER GUIDE: 9. WORKING WITH DATE KEYWORDS
Invariant and
English
%s is a
French
German
Spanish
Catalan
Italian
Swedish
Jours
Tags
Dias
Dies
Giorni
Dagar
%s semaine
dernière
%s letzter
wochse
%s semana
pasada
%s setmana
passada
%s settimana
scorsa
%s förra
vecka
%s en huit
%s kommender
woche
%s semana
próxima
de %s en
vuit
%s settimana
prossima
%s nästa
vecka
%s prochain
nächster %s
próximo %s
proper %s
%s prossimo
nästa %s
Day
Name
%s dernier
letzter %s
%s pasado
%s passat
%s scorso
i %ss
Day
Name
depuis %s
seit %s
desde %s
des de %s
da %s
sedan %s
Day
Name
jusqu'a %s
bis %s
hasta %s
fins %s
fino a %s
till %s
Mois
Monaten
Meses
Mesos
Mesi
Månader
%s kommendes
Jahr
%s año
próximo
%s proper
any
%s anno
prossimo
%s nästa
året
%s année
dernière
%s letztes jahr
%s año
pasado
%s any
passat
%s anno
scorso
%s förra
året
%s prochain
nächster %s
próximo %s
proper %s
%s prossimo
nästa %s
%s dernier
letzter %s
%s pasado
%s passat
%s scorso
i %ss
depuis %s
seit %s
desde %s
des de %s
da %s
sedan %s
jusqu'a %s
bis %s
hasta %s
fins %s
fino a %s
till %s
Days
DAY FROM LAST WEEK
last %s
Day
name
DAY NEXT WEEK
next %s
Day
name
NEXT COMING DAY
coming %s
Day
Name
LAST MOST RECENT DAY
most recent
%s
SINCE A DAY
since %s
UNTIL A DAY
until %s
Months
NEXT MONTH IN NEXT YEAR
next %s
Month
Name
%s année
prochaine
MONTH OF PREVIOUS YEAR
last %s
Month
Name
NEXT COMING MONTH
coming %s
Month
Name
MOST RECENT MONTH
most recent
%s
Month
Name
SINCE A MONTH
since %s
Month
Name
UNTIL A MONTH
until %s
Copyright NETASQ 2010
Month
Name
81/86
USER GUIDE: 9. WORKING WITH DATE KEYWORDS
9.3 OTHER HOUR FUNCTIONS BY LANGUAGE
Invariant
and English
Range
for x
French
German
HOURS Spanish
Catalan
Italian
Swedish
HEURES STUNDEN
HORAS
HORES
ORE TIMMAR
last hour
dernière heure
Letzte Stunde
hora anterior
hora anterior
ultima ora
förra timmen
this hour
cette heure
Diese Stunde
esta hora
aquesta hora
quest ora
denna timme
next hour
prochaine
heure
Nächste
Stunde
hora siguiente
hora següent
prossima ora
nästa timme
0 hours ago
/ this hour
il y a 0 heures /
cette heure
Vor 0
Stunden /
Diese Stunde
hace 0 horas
/ esta hora
fa 0 hores /
aquesta hora
0 ore fa /
quest ora
0 timmar
sedan /
denna timme
1 hour ago /
last hour
il y a 1 heure /
dernière heure
Vor 1 Stunde
/ Letzte
Stunde
hace 1 hora /
hora anterior
fa 1 hora /
hora anterior
1 ora fa /
ultima ora
1 timme
sedan / förra
timme
il y a x heures
Vor x
Stunden
hace x horas
fa x hores
x ore fa
x timmar
sedan
in 0 hours /
this hour
dans 0 heures /
cette heure
In 0 Stunden /
Diese Stunde
en 0 horas /
esta hora
en 0 hores /
aquesta hora
in 0 ore /
quest ora
om 0 timmar /
denna timme
in 1 hour /
next hour
dans 1 heure /
prochaine
heure
In 1 Stunde /
Nächste
Stunde
en 1 hora /
hora siguiente
en 1 hora /
hora següent
in 1 ora /
prossima ora
om 1 timme /
nästa timme
dans x heures
In x Stunden
en x horas
en x hores
in x ore
om x timmar
since 0 hours
/ since this
hour
depuis 0
heures
Seit 0
Stunden
desde 0
horas
des de 0
hores
da 0 ore
sedan 0
timmar
since 1 hour
/ since last
hour
depuis 1 heure
/ depuis la
dernière heure
Seit einer
Stunde / Seit
1 Stunde
desde 1 hora
/ desde la
hora anterior
des d'1 hora
/ des de
l'hora
anterior
da ultima ora
/ da 1 ora
sedan sista
timme /
sedan 1
timme
depuis x
heures
Seit x
Stunden
desde x horas
des de x
hores
da x ore
sedan x
timmar
jusque dans 1
heure
Bis einer
Stunde / Bis 1
Stunde
hasta 1 hora /
hasta la hora
siguiente
fins 1 hora /
fins l'hora
següent
fino a 1 ora /
fino a ora
prossima
till 1 timme
jusque dans x
heures
Bis x Stunden
hasta x horas
fins x hores
fino a x ore
till x timmar
x hours ago
in x hours
last x hours
2 - 12
2 - 12
2 - 12
until 1 hour
until x hours
2 - 12
9.4 OTHER DAY FUNCTIONS BY LANGUAGE
Invariant and
English
Range
for x
French
German
DAYS Spanish
Catalan
Italian
Swedish
JOURS TAGS
DIAS
DIES
GIORNI DAGAR
yesterday
hier
Gestern
ayer
ahir
ieri
igår
today
aujourd'hui /
ce jour
Heute
hoy
avui
oggi
idag
tomorrow
demain
Morgen
mañana
demà
domani
imorgon
0 days ago /
il y a 0 jours /
aujourd'hui /
Vor 0 Tagen
hace 0 días /
fa 0 dies /
0 giorni fa /
0 dagar
Copyright NETASQ 2010
82/86
USER GUIDE: 9. WORKING WITH DATE KEYWORDS
today
ce jour
/ Heute
hoy
avui
oggi
sedan / idag
il y a 1 jour /
hier
Vor 1 Tag /
Gestern
hace 1 día /
ayer
fa 1 dia /
ahir
1 giorno fa /
ieri
1 dag sedan
/ igår
il y a x jours
Vor x Tagen
hace x días
fa x dies
x giorni fa
x dagar
sedan
in 0 days /
today
dans 0 jours /
aujourd'hui /
ce jour
In 0 Tagen /
Heute
en 0 días /
hoy
en 0 dies /
avui
in 0 giorni /
oggi
om 0 dagar /
idag
in 1 day /
tomorrow
dans 1 jour /
demain
In 1 Tag /
Morgen
en 1 día /
mañana
en 1 dia /
demà
in 1 giorno /
domani
om 1 dag /
imorgon
dans x jours
In x Tagen
en x días
en x dies
in x giorni
om x dagar
since 0 days
/ since today
depuis 0 jours /
depuis ce jour /
depuis aujourd'hui
Seit 0
Tagen / Seit
Heute
desde 0 días
/ desde hoy
des de 0
dies / des
d'avui
da 0 giorni /
da oggi
sedan 0
dagar /
sedan idag
since 1 day /
since
yesterday
depuis 1 jour /
depuis hier
Seit 1 Tag /
Seit Gestern
desde 1 día /
desde ayer
des d'1 dia /
des d'ahir
da 1 giorno /
da ieri
sedan 1 dag
/ sedan igår
depuis x jours
Seit x Tagen
desde x días
des de x
dies
da x giorni
sedan x
dagar
jusque dans 1 jour
/ jusqu'à demain
Bis 1 Tag /
Bis Morgen
hasta 1 día /
hasta
mañana
fins 1 dia /
fins demà
fino a 1
giorno / fino
a domani
till 1 dag / till
imorgon
jusque dans x jours
Bis x Tagen
hasta x días
fins x dies
fino a x
giorni
till x dagar
1 day ago
yesterday
/
x days ago
2-7
in x days
2-7
last x days
2-7
until 1 day /
until tomorrow
until x days
2-7
9.5 OTHER WEEK FUNCTIONS BY LANGUAGE
Invariant
and
English
Range
for x
French
German
WEEKS SEMAINES WOCHEN
Spanish
Catalan
Italian
Swedish
SEMANAS
SEMANES
SETTIMANE VECKOR
setmana
passada /
setmana
anterior
settimana
scorsa
förra vecka
last week
semaine
dernière
Letzte
Woche
semana
pasada /
semana
anterior
this week
cette semaine
Diese
Woche
esta semana /
semana actual
aquesta
setmana /
setmana actual
questa
settimana
denna
vecka
next week
semaine
prochaine
Nächste
Woche
semana
próxima /
semana
siguiente
propera
setmana /
setmana
següent
settimana
prossima
nästa vecka
0 weeks ago
/ this week
il y a 0
semaines /
cette semaine
Vor 0
Wochen /
Diese
Woche
hace 0
semanas /
esta semana
fa 0 setmanes /
esta setmana
0 settimane fa
/ questa
settimana
0 veckor
sedan /
denna
vecka
1 week ago
/ last week
il y a 1
semaine /
semaine
dernière
Vor 1
Woche /
Letzte
Woche
hace 1
semana /
semana
pasada
fa 1 setmana /
setmana
passada
1 settimana fa
/ settimana
scorsa
1 vecka
sedan /
förra vecka
il y a x
semaines
Vor x
Wochen
hace x
semanas
fa x setmanes
x settimane fa
x veckor
sedan
dans 0
In 0
en 0 semanas
en 0 setmanes
in 0 settimane
om 0
x weeks ago
in 0 weeks /
Copyright NETASQ 2010
2-7
83/86
USER GUIDE: 9. WORKING WITH DATE KEYWORDS
this week
semaines /
cette semaine
Wochen /
Diese
Woche
/ esta semana
/ esta setmana
dans 1
semaine /
semaine
prochaine
In 1 Woche
/ Nächste
Woche
en 1 semana /
semana
próxima
dans x
semaines
In x
Wochen
since 0
weeks /
since this
week
depuis 0
semaines /
depuis cette
semaine
since 1
week /
since last
week
in 1 week /
next week
in x weeks
since x
weeks
2-7
2-7
until 1 week
until x
weeks
2-7
/ questa
settimana
veckor /
denna
vecka
en 1 setmana /
propera
setmana /
setmana
següent
in 1 settimana
/ settimana
prossima
om 1 vecka
/ nästa
vecka
en x semanas
en x setmanes
in x settimane
om x veckor
Seit 0
Wochen
desde 0
semanas /
desde esta
semana
des de 0
setmanes / des
d'aquesta
setmana
da 0 settimane
sedan 0
veckor
depuis 1
semaine /
depuis la
semaine
dernière
Seit 1
Woche
desde 1
semana /
desde la
semana
pasada
des d'1
setmana / des
de la setmana
passada
da 1 settimana
sedan 1
vecka
depuis x
semaines
Seit x
Wochen
desde x
semanas
des de x
setmanes
da x settimane
sedan x
veckor
jusque dans 1
semaine
Bis 1
Woche
hasta 1
semana
fins 1 setmana
fino a 1
settimana
till 1 vecka
jusque dans x
semaines
Bis x
Wochen
hasta x
semanas
fins x setmanes
fino a x
settimane
till x veckor
9.6 OTHER MONTH FUNCTIONS BY LANGUAGE
Invariant
and English
Range
for x
French
German
MONTHS MOIS Spanish
Catalan
Italian
Swedish
MONATEN
MESES
MESOS
MESI MÅNADER
mes passat /
mes anterior
mese scorso
förra månad
last month
mois dernier
Letzter Monat
mes pasado
/ mes
anterior
this month /
current
month
ce mois / mois
en cours / mois
courant
Dieser Monat
este mes /
mes actual
aquest mes /
mes actual
questo mese
denna månad
next month
mois prochain
Nächster
Monat
mes próximo
/ mes
siguiente
proper mes /
mes següent
mese
prossimo
nästa månad
0 months
ago / this
month
il y a 0 mois /
mois en cours /
mois courant
Vor 0
Monaten /
Dieser Monat
hace 0
meses
fa 0 mesos /
aquest mes /
mes actual
0 mesi fa /
questo mese
0 månader
sedan / denna
månad
1 month ago
/ last month
il y a 1 mois /
mois dernier
Vor 1 Monat /
Letzter Monat
hace 1 mes /
mes pasado
fa 1 mes /
mes passat /
mes anterior
1 mese fa /
mese scorso
1 månad
sedan / förra
månad
il y a x mois
Vor x
Monaten
hace x
meses
fa x mesos
x mesi fa
x månader
sedan
in 0 months
/ this month
dans 0 mois /
mois en cours /
mois courant
In 0 Monaten /
Dieser Monat
en 0 meses
en 0 mesos /
aquest mes /
mes actual
in 0 mesi /
questo mese
om 0 månader
/ denna månad
in 1 month /
next month
dans 1 mois /
mois prochain
In 1 Monat /
Nächster
Monat
en 1 mes o
"mes
próximo"
en 1 mes /
proper mes /
mes següent
in 1 mese /
mese
prossimo
om 1 månad /
nästa månad
x months ago
Copyright NETASQ 2010
2 - 12
84/86
USER GUIDE: 9. WORKING WITH DATE KEYWORDS
in x months
2 - 12
since 0
months /
since this
month
since 1
month /
since last
month
last x months
2 - 12
until 1 month
/ until next
month
until x
months
2 - 12
dans x mois
In x Monaten
en x meses
en x mesos
in x mesi
om x månader
depuis 0 mois /
depuis ce mois
Letzte 0
Monate
desde 0
meses /
desde este
mes
des de 0
mesos / des
d'aquest
mes
da 0 mesi
sedan 0
månader
depuis le mois
dernier / depuis
1 mois
Seit Letztem
Monat / Seit 1
Monat
desde el
mes pasado
/ desde 1
mes
des del mes
passat / des
d'1 mes
da mese
scorso / da 1
mese
sedan 1
månad /
sedan förra
månaden
depuis x mois
Letzte x
Monate
desde x
meses
des de x
mesos
da x mesi
sedan x
månader
jusque dans 1
mois / jusqu'au
mois prochain
Bis 1 Monat /
Bis Nächster
Monat
hasta 1 mes
/ hasta el
mes próximo
fins 1 mes /
fins el mes
següent
fino a 1
mese / fino a
mese
prossimo
till 1 månad /
till nästa
månaden
jusque dans x
mois
Bis x Monate
hasta x
meses
fins x mesos
fino a x mesi
till x månader
9.7 OTHER QUARTER FUNCTIONS BY LANGUAGE
Invariant
and English
Range
for x
French
QUARTER German
Spanish
Catalan
Italian
Swedish
TRIMESTRES QUARTALE
TRIMESTRES
TRIMESTRES
TRIMESTRI KVARTAL
Q1
T1
Q1
T1
T1
T1
K1
Q2
T2
Q2
T2
T2
T2
K2
Q3
T3
Q3
T3
T3
T3
K3
Q4
T4
Q4
T4
T4
T4
K4
Last Quarter
trimestre
dernier
letztes
quartal
trimestre
anterior
trimestre
anterior
ultimo,trimestre
förra
kvartal
This Quarter
ce trimestre
dieses
quartal
trimestre
actual
trimestre
actual
questo,trimestre
detta
kvartal
Next Quarter
trimestre
prochain
nächstes
quartal
trimestre
siguiente
trimestre
següent
prossimo,trimestre
nästa
kvartal
1 quarter
ago
il y a 1
trimestre
vor 1 quartal
hace 1
trimestre
fa 1 trimestre
1 trimestre fa
1 kvartal
sedan
il y a x
trimestres
vor x
quartalen
hace x
trimestres
fa x
trimestres
x trimestri fa
x kvartaler
sedan
dans 1
trimestre
in 1
quartalen
en 1 trimestre
en 1 trimestre
in 1 trimestre
om 1
kvartal
x quarters
ago
2-4
In 1 quarter
In x quarters
2-4
dans x
trimestres
in x
quartalen
en x
trimestres
en x
trimestres
in x trimestri
om x
kvartaler
Last Qx
1-4
dernier Tx
letztes Qx
anterior Tx
anterior Tx
Tx scorso
förra Kx
Next Qx
1-4
prochain Tx
nächstes Qx
siguiente Tx
següent Tx
Tx prossimo
nästa Kx
Qx 2004 to
Qx 2013
1-4
Tx 2004 to
Tx 2013
Qx 2004 to
Qx 2013
Tx 2004 to
Tx 2013
Tx 2004 to
Tx 2013
Tx 2004 to
Tx 2013
Kx 2004 to
Kx 2013
Copyright NETASQ 2010
85/86
USER GUIDE: 9. WORKING WITH DATE KEYWORDS
9.8 OTHER YEAR FUNCTIONS BY LANGUAGE
Invariant
and English
Range
for x
French
German
YEARS ANNEES JAHREN
Spanish
Catalan
Italian
Swedish
AÑOS
ANYS
ANNI ÅR
any passat /
any anterior
anno scorso
förra året
last year
an dernier
Letztes Jahr
año pasado /
año anterior
this year
cette année
Dieses Jahr
este año /
año actual
aquest any /
any actual
quest anno
detta året
next year
an prochain
Nächstes Jahr
año próximo /
año siguiente
proper any /
any següent
anno
prossimo
nästa året
0 years ago
/ this year
il y a 0 ans /
cette année
Vor 0 Jahr /
Dieses Jahr
hace 0 años /
este año /
año actual
fa 0 anys /
aquest any /
any actual
0 anni fa /
quest anno
0 år sedan /
detta året
1 year ago /
last year
il y a 1 an /
an dernier
Vor 1 Jahr /
Letztes Jahr
hace 1 año /
año pasado
fa 1 any / any
passat / any
anterior
1 anno fa /
anno scorso
1 år sedan /
förra året
il y a x ans
Vor x Jahren
hace x años
fa x anys
x anni fa
x år sedan
dans 0 ans /
cette année
In 0 Jahren /
Dieses Jahr
en 0 años /
este año /
año actual
en 0 anys /
aquest any /
any actual
in 0 anni /
quest anno
om 0 år /
detta året
dans 1 an /
an prochain
In 1 Jahr /
Nächstes Jahr
en 1 año /
año próximo
en 1 any /
proper any /
any següent
in 1 anno /
anno
prossimo
om 1 år /
nästa året
dans x ans
In x Jahren
en x años
en x anys
in x anni
om x års
since 0 years
/ since this
year
depuis 0 ans /
depuis cette
année
Seit 0 Jahren /
Seit Dieses Jahr
desde 0 años
/ desde este
año
des de 0
anys / des
d'aquest any
da 0 anni /
da quest
anno
sedan 0 år /
sedan detta
året
since 1 year /
since last
year
depuis 1 an /
depuis l'an
dernier
Seit 1 Jahr /
Seit Letztes
Jahr
desde 1 año /
desde el año
pasado
des d'1 any /
des de l'any
passat
da 1 anno /
da anno
scorso
sedan 1 år /
sedan förra
året
depuis x ans
Seit x Jahren
desde x años
des de x
anys
da x anni
sedan x år
jusque dans 1
an /
jusqu'à l'an
prochain
Bis 1 Jahr /
Bis Nächstes
Jahr
hasta 1 año /
hasta el año
próximo
fins 1 any /
fins el proper
any
fino a 1 anno
/ fino a anno
prossimo
till 1 år / till
nästa året
jusque dans x
ans
Bis x Jahren
hasta x años
fins x anys
fino a x anni
till x år
x years ago
in 0 years
this year
2 - 10
/
in 1 year /
next year
in x years
last x years
2 - 10
2 - 10
until 1 year /
until next
year
until x years
Copyright NETASQ 2010
2 - 10
86/86