1
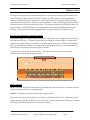
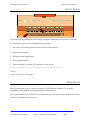
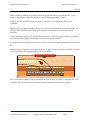
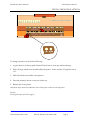
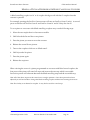
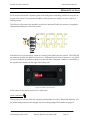
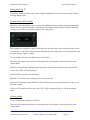
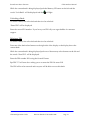
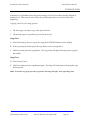
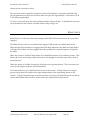
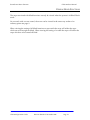
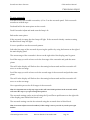
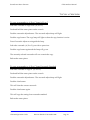
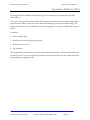
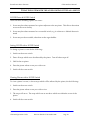
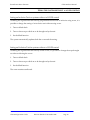
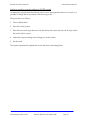
Capture For MultiSystem
Operation Guide
CFM-20/40/100/200/300
European Office:
Twickenham Avenue
Brandon
Suffolk
IP27 OPD
United Kingdom
Tel. +44 (0)842 814814
Fax. +44 (0)842 813802
North American Office:
4900 Seminary Road, Suite 560
Alexandria, VA 22311
USA
Toll Free: (800) 272-4775
Tel. (703) 933-0024
Fax. (703) 933-0025
Solid State Organ Systems
CFM-300 User Manual
Contents
INTRODUCTION ...................................................................................................................................................3
The Use of Combination Capture Systems. ...........................................................................................................3
Basic Controls. ......................................................................................................................................................3
BASIC FUNCTIONS ..............................................................................................................................................5
GENERAL CANCEL .....................................................................................................................................................5
SETTING PISTONS .......................................................................................................................................................6
USING PISTONS ..........................................................................................................................................................6
SCOPE ........................................................................................................................................................................7
SETTING THE SCOPE OF A PISTON ...............................................................................................................................8
VIEWING THE SCOPE OF A PISTON ..............................................................................................................................9
MAKING A PISTON A REVERSER .................................................................................................................................9
MAKING A PISTON A REVERSER WITH BLIND CANCELLING COUPLERS.....................................................................10
MEMORY FUNCTIONS .....................................................................................................................................11
Locking using a PIN number ...............................................................................................................................12
Locking a Bank ....................................................................................................................................................12
Unlocking a Bank. ...............................................................................................................................................13
Deleting a PIN .....................................................................................................................................................13
AUXILIARY CONTROLS...................................................................................................................................14
Dimming the Displays .........................................................................................................................................14
FUNCTIONS OF THE SET-UP PANEL. ...........................................................................................................................14
Blind Check. ........................................................................................................................................................15
Crescendo Adjust .................................................................................................................................................15
Clear ....................................................................................................................................................................15
Copy.....................................................................................................................................................................15
LOCKING AND UNLOCKING A LEVEL ........................................................................................................................16
CLEARING A LEVEL ..................................................................................................................................................16
To Clear a level: ..................................................................................................................................................16
RESTORING THE DEFAULT LEVEL.............................................................................................................................17
COPYING LEVELS .....................................................................................................................................................18
BLIND FUNCTIONS ............................................................................................................................................19
CRESCENDO .............................................................................................................................................................19
BLIND CHECK ..........................................................................................................................................................20
VIEWING BLIND FUNCTIONS.....................................................................................................................................21
CRESCENDO ADJUST ................................................................................................................................................22
To set a crescendo: ..............................................................................................................................................22
TO COPY A CRESCENDO ...........................................................................................................................................23
To copy a crescendo to A, B or C from A, B, or C...............................................................................................23
To copy a crescendo to A, B or C from Crescendo Standard ..............................................................................23
TO CLEAR A CRESCENDO .........................................................................................................................................24
TUTTIS .....................................................................................................................................................................24
Inclusive Tuttis.....................................................................................................................................................24
Exclusive Tuttis ....................................................................................................................................................25
Ventils ..................................................................................................................................................................25
SETTING AN INCLUSIVE TUTTI ..................................................................................................................................26
SETTING AN EXCLUSIVE TUTTI.................................................................................................................................26
SETTING A VENTIL ...................................................................................................................................................27
CHANGING A VENTIL TO A TUTTI .............................................................................................................................28
USING THE SYSTEM WITH THE SCOPE CONTROL FITTED AS A SWITCH ......................................29
SCOPE Piston & SCOPE Switch .........................................................................................................................29
CFM-300 Operation Guide
Revision Dated: 15 December 2009
Page 1
Solid State Organ Systems
CFM-300 User Manual
Setting SCOPE with a SCOPE Switch .................................................................................................................29
Viewing Pistons with a SCOPE Switch................................................................................................................29
USING THE SYSTEM WITHOUT A SCOPE CONTROL..............................................................................30
Setting an Inclusive Tutti on systems without a SCOPE control .........................................................................30
Setting an Exclusive Tutti in systems without a SCOPE control .........................................................................30
Setting a ventil on systems without a SCOPE control .........................................................................................31
CFM-300 Operation Guide
Revision Dated: 15 December 2009
Page 2
Solid State Organ Systems
CFM-300 User Manual
INTRODUCTION
This organ is equipped with a powerful but easy to use capture system from Solid State Logic
called Capture for MultiSystem. There are a variety of CFM systems for offering different
features for different styles of instruments. This system is the most sophisticated of all three
types and has a maximum of 300 levels of piston memory. Your system may be fitted with less
memory and this will be reflected in the name. This manual refers to the CFM-300 system. All
of the features for the CFM-100 series are identical but are loaded with different amounts of
memory. These systems are fully upgradeable by your organ technician with SSL parts.
The Use of Combination Capture Systems.
As the name suggests, capture systems are used to capture the stop settings on the console and
save them for later use. A capture system allows an organist to make simple or complicated
registration changes quickly, with little, or no interruption to the music. There are a number of
basic controls that are common to all capture systems, together with some more sophisticated
ones that vary in operation from one organ to another.
A simple view of a console is shown below. This picture will be used in the following
instructions to explain the setting procedure.
Basic Controls.
Stops. Tab stops are used on the picture to illustrate open and closed stops. Currently one stop
is open, drawstops follow the same principle.
Pistons. The pistons are used to operate the capture system.
Below each set of keys are grouped a set of pistons, usually marked 1,2,3,4... There may also be
similar groups of pistons in other parts of the console. In the example above there are 11 pistons
below the top manual and 14 below the bottom manual.
CFM-300 Operation Guide
Revision Dated: 15 December 2009
Page 3
Solid State Organ Systems
CFM-300 User Manual
There are 6 pistons situated centrally under each manual. These pistons are normally used to
control the stops associated with the manual above, and are called divisional or departmental
pistons.
There are 8 pistons at the left side, 4 under each manual. These pistons normally control all of
the stops on the instrument and are called General Pistons.
Each manual has a piston to the right of the 6 Divisional Pistons that is used to turn a Coupler
on and off. These are called Reversibles.
In the bottom left corner are two pistons, one marked Set and the other marked SCOPE. The
function of these and General Cancel (bottom right of the console) are described later in this
guide.
CFM-300 Operation Guide
Revision Dated: 15 December 2009
Page 4
Solid State Organ Systems
CFM-300 User Manual
BASIC FUNCTIONS
CFM supports all of the basic capture system functions. As well as set, general cancel,
programmable pistons and reversers, CFM introduces a new basic function called SCOPE.
SCOPE allows each piston on the console to control any group of stops from the whole
specification. This enables the capture system to be configured with the usual divisional,
general and reversible pistons. In addition SCOPE allows pistons to be reconfigured in the
following ways:-
♦ If extra general pistons are required divisional pistons can be configured as generals.
♦ Divisional pistons can be configured to affect or not affect certain couplers.
♦ Any piston can be turned into a reverser.
♦ Any reverser can be turned into a divisional or general piston.
Each memory level (see below) has its own SCOPE to allow maximum flexibility.
For more information on scope see:
Scope pages 7 - 9.
GENERAL CANCEL
General Cancel is used to turn off all the stops.
When General Cancel is pressed a number of events normally take place:-
♦ All stops which are drawn at the console will be moved to their off position.
♦ All reversible tuttis will be cancelled, and their lamps will go off.
♦ All reversible ventils will be cancelled, and their lamps will go off.
Some of the above functions may not cancel with General Cancel; this depends
on the configuration of your CFM-300.
CFM-300 Operation Guide
Revision Dated: 15 December 2009
Page 5
Solid State Organ Systems
CFM-300 User Manual
SETTING PISTONS
Set is used to program the pistons with their particular combination of stops in the CFM-300
If you wish to program a stop combination onto a piston:1. Set up the required registration on the console as shown above.
2. Hold in set (left hand).
3. Press the piston (right hand).
4. Press General Cancel.
5. Press the piston to confirm your selection is correctly set.
Hint: The set piston is not operational on a locked level.
See also:
Setting the Scope of a Piston page 8.
USING PISTONS
When a registration is set to a piston it remains in CFM-300 until changed. To recall the
registration, push the piston at the required time when playing.
If you push another piston CFM-300 will override the previous one and any stops not set as part
of the new registration will move off.
CFM-300 Operation Guide
Revision Dated: 15 December 2009
Page 6
Solid State Organ Systems
CFM-300 User Manual
SCOPE
When a piston is pushed, only the stops that the piston has control over are moved. Using
SCOPE it is possible to adjust the piston to control a different number of stops.
In short, you can 'teach' the piston its range of control, or if you prefer, the SCOPE of its
operation!
Returning to our console diagram, pistons 1-6 under the top manual have been allocated to the
12 stops of the Swell Division. Those pistons therefore have their SCOPE set to the Swell
Division.
Your instrument's pistons will already have their SCOPE set by your organ builder. If you wish,
you can adjust this quickly and simply with the following procedures.
If you do not have a SCOPE piston on your console contact your organ builder and he will inform
us.
Returning to our console for a moment there are 12 stops on the left side of the console, we wish
to use these on the divisional pistons for the top manual.
The SCOPE of the 6 pistons on the top manual needs to be set to cover the 12 stops shown. This
will allow the 6 pistons to have a SCOPE of operation limited to the 12 stops selected.
CFM-300 Operation Guide
Revision Dated: 15 December 2009
Page 7
Solid State Organ Systems
CFM-300 User Manual
SETTING THE SCOPE OF A PISTON
To change a piston's SCOPE do the following:1. A good check is to always push General Cancel first to clear any unnoticed stops.
2. Draw all stops which are to be affected by the piston. In this case the 12 stops shown as
“on”.
3. Hold in both the set and the SCOPE pistons.
4. Press the piston(s) whose SCOPE you wish to set.
5. Release the SCOPE piston.
Only those stops which are within the SCOPE of the piston can be set onto the piston.
See also:
Viewing the Scope of a Piston page 9.
CFM-300 Operation Guide
Revision Dated: 15 December 2009
Page 8
Solid State Organ Systems
CFM-300 User Manual
VIEWING THE SCOPE OF A PISTON
To view a piston’s SCOPE, i.e. those stops which will be affected by the piston:1. Hold in the SCOPE piston.
2. Press the piston whose SCOPE you wish to view.
3. The stops which move on are those which are within the SCOPE of the piston.
See also:
Setting the Scope of a Piston page 8.
MAKING A PISTON A REVERSER
Any pistons can be configured to become a reverser for any single stop. This is made possible
by the SCOPE facility.
Setting a piston as a reverser is similar to setting the SCOPE of a piston.
1. A good check is to always push General Cancel first to clear any unnoticed stops.
2. Select the stop that is to become reversible.
3. Hold in both the Set and the SCOPE pistons.
4. Press the piston you want to act as the reverser.
5. Release the set and SCOPE pistons.
Using the SCOPE feature in this way, any piston with a SCOPE of only one stop automatically acts
like a reverser.
When viewing the SCOPE of a piston programmed as a reverser, the first press of the piston will
cancel all stops and turn on the one stop which is reversible. Successive presses will reverse the
stop, confirming the fact that the piston has become a reverser.
CFM-300 Operation Guide
Revision Dated: 15 December 2009
Page 9
Solid State Organ Systems
CFM-300 User Manual
MAKING A PISTON A REVERSER WITH BLIND CANCELLING COUPLERS
A blind cancelling coupler is a 16’ or 4’ coupler which goes off with the 8’ coupler when the
reverser is pressed.
For example, pressing the Swell to Great reverser will turn on Swell to Great 8’ (only). A second
press would turn off Swell to Great 8’ and Swell to Great 16’ and 4’ if they also are on.
To set a piston to a reverser with blind cancelling couplers carry out the following steps.
1. Select the one coupler that is to become reversible.
2. Hold in both the Set and the SCOPE pistons.
3. Press the piston you want to act as the reverser.
4. Release the set and SCOPE pistons.
5. Turn on the couplers which are to ‘blind cancel’.
6. Hold in just the Set piston.
7. Press the piston again.
8. Release the set piston.
When viewing the SCOPE of a piston programmed as a reverser with blind cancel couplers, the
first press of the piston will cancel all stops and turn on the one stop which is reversible.
Successive presses will alternate between the blind cancelling stops and the reversible stop.
Hint: All of the above steps must be carried out as a single operation. Once other pistons have been
adjusted you will not be able to change the blind cancelling couplers without first resetting the reverser.
Hint: This facility is not limited to couplers. It may also be useful to cancel stops.
CFM-300 Operation Guide
Revision Dated: 15 December 2009
Page 10
Solid State Organ Systems
CFM-300 User Manual
MEMORY FUNCTIONS
So far we have discussed a capture system with each piston controlling whichever stops are set
as part of its SCOPE. To increase the flexibility of the system even further we use a system of
memory levels.
This allows each piston to be reusable for each level selected. Each level contains a completely
independent setting for each of the pistons.
Individual levels are selected by means of a control panel fitted onto the console. The CFM-300
has memory divided into banks for fast access. Each bank has 10 levels of memory A to J which
are access using the up and down buttons on the left side of the panel. Banks are controlled by
the up and down buttons on the right side of the panel.
Figure 1 The Master Control Panel
In the centre of the control panel are two indicators.
Lock Indicator
The top one is to indicate when the currently selected bank is locked. When this indicator is lit
the piston settings may not be changed. See also locking using a PIN number on page 12.
CFM-300 Operation Guide
Revision Dated: 15 December 2009
Page 11
Solid State Organ Systems
Setting Indicator
CFM-300 User Manual
S
The bottom indicator in the centre of the display flashes briefly to show when a piston memory
is being changed (set).
Locking using a PIN number
Bank One cannot be locked in this way but each additional memory bank can be independently
locked with a 4 digit PIN number. Each bank’s PIN number may be different and so retaining
security over sections of the piston memory for each player.
PIN numbers are required to open locked banks the first time they are accessed after the console
is switched on. After this, unless they are deliberately locked again they will stay unlocked until
the next time the organ is started.
To lock a bank, first select the bank that is to be locked.
Press one of the bank select buttons on the right side of the display so the display shows the
current bank.
While the current bank is being displayed push the memory Down button on the left and the
words “New PIN” will be displayed.
Enter the PIN using the General Pistons.
Rpt PIN ???? will now show asking you to re-enter the PIN.
If the two PIN numbers agree PIN OK will be displayed and access to this bank will only be via
this PIN number.
If the two PIN numbers are not the same “Fail” will be displayed and you will be prompted
again.
Locking a Bank
To lock a Bank that already has a PIN set.
Press one of the bank select buttons on the right side of the display so the display shows the
current bank.
CFM-300 Operation Guide
Revision Dated: 15 December 2009
Page 12
Solid State Organ Systems
CFM-300 User Manual
While the current bank is being displayed push the Memory UP button on the left and the
words “Lock Bank” will be displayed and the
will light.
Unlocking a Bank.
To unlock a bank, first select the bank that is to be unlocked.
“Enter PIN” will be displayed.
Enter the correct PIN number. If you loose your PIN call your organ builder for customer
support.
Deleting a PIN
To unlock a bank, first select the bank that is to be unlocked.
Press one of the bank select buttons on the right side of the display so the display shows the
current bank.
While the current bank is being displayed push one of the memory select buttons on the left and
the words “New PIN” will be displayed.
Enter the PIN number 2121 using the General Pistons.
Rpt PIN ???? will now show asking you to re-enter the PIN. Re-enter 2121
The PIN will now be removed and everyone will be able to access this bank.
CFM-300 Operation Guide
Revision Dated: 15 December 2009
Page 13
Solid State Organ Systems
CFM-300 User Manual
AUXILIARY CONTROLS
The CFM-300 has two further control panels, these may be fitted adjacent to the level display
shown above. Each panel has four push buttons and four lamps to report the status. Normally
these push buttons act like reversers, the first push will light the lamp and the second extinguish
it. However the CFM-300 will also control the settings when required and the current status
will be shown by the lamp.
Dimming the Displays
The display brightness may be adjusted at any time to suit local lighting conditions.
To increase the brightness, hold in "set" then use the top-right button of the master control panel
which is normally used to change memory banks.
To turn up the brightness, hold in "set" then use the bottom-right button of the master control
panel
This will change the brightness on the 4 button panel LED's, bargraph, setting and locked LED's
not the alpha-numeric digits.
FUNCTIONS OF THE SET-UP PANEL.
Figure 2 The set up panel.
CFM-300 Operation Guide
Revision Dated: 15 December 2009
Page 14
Solid State Organ Systems
CFM-300 User Manual
The set-up panel has four push buttons to control the set-up of the CFM-300, these controls are
not normally required during playing but are invaluable when setting up the console prior to a
performance.
Blind Check.
This control allows you to check blind functions on the console. A blind function is a stop or
group of stops that will sound in the organ independently of the stops being drawn on the
console. Typical examples being crescendo and tuttis, less obviously the blind check can also be
used to show blind cancels such as ventils which are described later in this book.
When the blind check function is engaged the small lamp adjacent to the label and push button
will light. In this mode all blind stops will move on the console to display their function, thus
allowing you to check them.
Blind Check will stay engaged until the push button is operated again to extinguish the lamp.
For a more detailed description see Blind Check on page 20
Crescendo Adjust
This control is used to set-up the crescendo. Select Crescendo A, B or C. Holding in SET and
pushing the button once will light the crescendo adjust lamp on the panel.
To set a crescendo please refer to the instructions on page 22
Clear
The clear function allows you to return a memory level to its default setting. This setting is
normally set by the organ builder with all pistons empty but may have some default settings for
tuttis etc. preset.
For a more detailed description see Clearing a Level on page 16
Copy
To those of you used to our earlier systems the copy function is new. As the name suggests this
control allows you to copy from one setting to another. It is possible to copy piston memories
and crescendos.
For a more detailed description see Copying a Level on page 18
CFM-300 Operation Guide
Revision Dated: 15 December 2009
Page 15
Solid State Organ Systems
CFM-300 User Manual
LOCKING AND UNLOCKING A LEVEL
The CFM 300 series system does not have a lock switch for individual levels, locking is
accomplished using PIN numbers as described on page 12.
CLEARING A LEVEL
If the piston settings on a level are no longer required, and you wish to use the level with
completely different settings it may be appropriate to clear the level.
Clearing a level removes all of the piston settings without changing their SCOPE. The settings
of blind functions (ventils, tuttis etc.) are not affected by clearing the level.
When a memory level is clear the indicator lamp adjacent to the push button will light. If you
wish to use this level you can return it to this setting by “clearing” the level after use, at which
point the lamp will again light.
A level may be cleared using the following procedure
To Clear a level:
Select the level to be cleared using the UP DOWN controls on the left side of the control panel.
Push and hold the setter piston on the console.
Push the Clear button.
Release the setter piston.
The clear indicator will light.
If a level has already been cleared then clearing it a second time has a different effect. See p.17.
See also:
Copying Levels p.18.
CFM-300 Operation Guide
Revision Dated: 15 December 2009
Page 16
Solid State Organ Systems
CFM-300 User Manual
RESTORING THE DEFAULT LEVEL
If the piston SCOPES on a level are no longer required, and you wish to use the level with
different settings and SCOPES it may be appropriate to restore the default level.
The default piston SCOPES are restored including the default settings of blind functions (ventils,
tuttis etc.) However restoring the default level removes all of the piston settings.
The default level may be restored using the following procedure.
Firstly the level must be cleared.
1. Select the level to be cleared.
2. Hold in set and press the clear button.
3. The clear lamp will light to indicate the level has been cleared.
Now the default level may be restored to the current level by:
4. Hold in set and press the clear button a second time.
The default scopes will be restored to the level. Pistons will be cleared. Blind functions will
have their default settings restored.
See also:
Copying Levels p.18.
CFM-300 Operation Guide
Revision Dated: 15 December 2009
Page 17
Solid State Organ Systems
CFM-300 User Manual
COPYING LEVELS
Sometimes it is desirable to base the piston settings of one level on those already defined on
another level. This can save a lot of time by avoiding the need to create a level from the
beginning.
Copying a level is a two stage process.
•
The first stage is to take a copy of the required level.
•
The second stage is to put that copy into the new level.
Stage One.
A. Select the memory level to copy from, using the UP DOWN buttons on the display.
B. If the copy lamp is lit then press the copy button once to extinguish it.
C. Hold in set and press the copy button. The copy lamp will light indicating that a copy has
been taken.
Stage Two.
D. Select the new level.
E. Hold in set and press the copy button again. The lamp will extinguish, indicating the copy
has been used.
HINT: To use the copy again press the copy button, the lamp will light. Now repeat Stage Two.
CFM-300 Operation Guide
Revision Dated: 15 December 2009
Page 18
Solid State Organ Systems
CFM-300 User Manual
BLIND FUNCTIONS
CFM supports numerous blind functions, all of which are programmable. Blind functions are
those which operate stops at the organ without moving them at the console. Blind functions
include:-
♦ Ventils
♦ Tuttis & Sforzandi
The CFM system has blind function pistons, these pistons may be programmed to operate as
desired. A full explanation of the setting procedure is given below.
If your console is equipped with a SCOPE piston or switch, you will be able to change which type
of blind function is associated with each switch or piston.
If your console is not equipped with a SCOPE control you will not be able to change the function
type of a blind function. However, you will be able to change the stops which are turned on or
off by the blind function.
For Example: you will not be able to change an inclusive tutti to an exclusive tutti, although you
will be able to change which stops the inclusive tutti brings on. Your organ builder will be able
to set this for you.
CRESCENDO
CFM-300 supports 3 programmable
crescendos and one pre-programmed
crescendo.
Crescendo Standard is set by the organ
builder and is the same for all banks and
memory levels. Crescendo A, B and C are
settable by the organist and can be set
differently for each of the banks available to
you.
The crescendo is an inclusive function
which adds stops to those already drawn at
the console.
Each crescendo has 60 stages. The current
stage of the crescendo is displayed in green
on the right of the master control panel
CFM-300 Operation Guide
Figure 3 The Crescendo Control panel.
Revision Dated: 15 December 2009
Page 19
Solid State Organ Systems
CFM-300 User Manual
whenever the crescendo is active.
The crescendo selector panel has 4 buttons with associated lamps. Crescendo Standard is the
pre-programmed crescendo and will have been set up by the organ builder. Crescendos A, B &
C are fully programmable.
To select a crescendo press the relevant button and the lamp will light. To disable the crescendo
press the button of the current crescendo and the lamp will go out.
BLIND CHECK
Blind check is a facility that allows the settings and SCOPE of blind functions to be viewed and
changed.
The Blind Check switch is a reversible which toggles CFM in and out of blind check mode.
When the blind check function is engaged the small lamp adjacent to the label and push button
will light. Blind Check will stay engaged until the push button is operated again to extinguish
the lamp.
When the system is in Blind Check mode, all of the blind functions act as ordinary pistons. This
allows the SCOPE and setting of blind functions to be changed in much the same way as that of
normal pistons.
When the system is in blind check mode, all pistons act as general pistons. This is necessary for
correctly viewing the stops set on blind functions.
This control allows you to check blind functions on the console. A blind function is a stop or
group of stops that will sound in the organ independently of the stops being drawn on the
console. Typical examples being crescendo and tuttis, less obviously the blind check can also be
used to show blind cancels such as ventils which are described later in this book.
CFM-300 Operation Guide
Revision Dated: 15 December 2009
Page 20
Solid State Organ Systems
CFM-300 User Manual
VIEWING BLIND FUNCTIONS
The stops associated with blind functions can only be viewed when the system is in Blind Check
mode
On a console with a SCOPE control, the SCOPE can be viewed in the same way as that of an
ordinary piston see page 9.
When viewing the setting of all blind functions except ventils the stops will reflect the stops
which are to be brought on blind. When viewing the setting of a ventil the stops will reflect the
stops which are to be turned off blind.
CFM-300 Operation Guide
Revision Dated: 15 December 2009
Page 21
Solid State Organ Systems
CFM-300 User Manual
CRESCENDO ADJUST
To set a crescendo:
First select one of the settable crescendos, A, B or C on the crescendo panel. Each crescendo
must be set with 60 steps.
Push and hold in the setter piston on the console.
Push Crescendo Adjust and make sure the lamp is lit.
Release the setter piston.
If the crescendo is empty the clear lamp will light. If the crescendo already contains a setting
the blind check lamp will light.
It is now possible to set the crescendo pattern.
Select the first stage of the crescendo by moving the pedal or by using the buttons on the right of
the main display panel.
The current stage of the crescendo is shown on the right side of the display panel in green.
Set all the stops you wish to have on for the first stage of the crescendo and push the setter
piston.
The red S in the display will flash to show the setting has been made and the crescendo will
move on to the next stage.
Set all the stops you wish to have on for the second stage of the crescendo and push the setter
piston.
The red S in the display will flash to show the setting has been made and the crescendo will
move on to the next stage.
Now repeat this process for all 60 stages of the crescendo.
Hint: It is important not to skip any stages as this will cause blank positions in the crescendo which
will cancel the stops as you pass through that position.
The crescendo settings can be reviewed using the Up and Down push buttons on the right side
of the display panel whilst blind check is on.
The crescendo settings can also be reviewed using the crescendo shoe in blind check.
Hint: You cannot adjust crescendo standard, if this setting is not as you wish it, consult your organ
builder.
CFM-300 Operation Guide
Revision Dated: 15 December 2009
Page 22
Solid State Organ Systems
CFM-300 User Manual
TO COPY A CRESCENDO
To copy a crescendo to A, B or C from A, B, or C
Select the crescendo to copy from (A, B or C).
Push and hold the setter piston on the console.
Push the crescendo adjust button. The crescendo adjust lamp will light.
Push the copy button. The copy lamp will light to show the copy function is active.
Press Crescendo Adjust to extinguish the lamp.
Select the crescendo (A, B or C) you wish to paste into.
Push the copy button again and the lamp will go out.
The currently selected crescendo will now contain the copy.
Release the setter piston.
To copy a crescendo to A, B or C from Crescendo Standard
Select the crescendo to copy to (A, B or C).
Push and hold the setter piston on the console.
Push the crescendo adjust button. The crescendo adjust lamp will light.
Push the clear button.
This will clear the current crescendo
Push the clear button again.
This will copy the setting from crescendo standard.
Release the setter piston.
CFM-300 Operation Guide
Revision Dated: 15 December 2009
Page 23
Solid State Organ Systems
CFM-300 User Manual
TO CLEAR A CRESCENDO
Select the crescendo to clear (A, B or C).
Push and hold the setter piston on the console.
Push the crescendo adjust button. The crescendo adjust lamp will light.
Push the clear button.
This will clear the current crescendo
Release the setter piston.
The crescendo will now contain no setting.
TUTTIS
Inclusive Tuttis
The SCOPE and setting of an inclusive tutti will be the same. The only stops it affects (its SCOPE)
are those which it will bring on blind (its setting).
CFM-300 Operation Guide
Revision Dated: 15 December 2009
Page 24
Solid State Organ Systems
CFM-300 User Manual
Exclusive Tuttis
The SCOPE of an exclusive tutti will show those stops which are affected by the tutti. The setting
will show which of those stops will be turned on. All stops which are within SCOPE, but aren't in
the setting will be forced off.
Ventils
Ventils operate in a similar way to other blind functions, with one difference. Ventils are
designed to cancel stops not add them. This is difficult to set on the console, so we reverse the
setting procedure to make it more simple!
To view the settings of a ventil
Select Blind Check.
Push a ventil piston.
The stops that come on (see picture above) are the stops set to cancel with a ventil.
CFM-300 Operation Guide
Revision Dated: 15 December 2009
Page 25
Solid State Organ Systems
CFM-300 User Manual
SETTING AN INCLUSIVE TUTTI
A blind function becomes an inclusive tutti when its SCOPE and setting are the same.
The only stops it affects (its SCOPE) are those which it will bring on blind (its setting).
Inclusive tuttis are set as follows:
1. Turn on blind check.
2. Turn on only those stops which are to be brought on by the tutti.
3. Set both the SCOPE of the piston, and the piston setting to the selected stop combination.
Hint: Once a blind function has become an inclusive tutti it may be more easily changed as described
on page 30 for systems without SCOPE.
SETTING AN EXCLUSIVE TUTTI
A blind function becomes an exclusive tutti when its SCOPE is broader than its setting.
It affects all stops within its SCOPE, turning those in its setting on, and the others off.
Exclusive tuttis are set as follows:
1. Turn on blind check.
2. Turn on those stops which are to be affected by the tutti.
3. Set the SCOPE.
4. Turn off those stops which are to be turned off by the tutti, leaving the others on.
5. Set the tutti.
Hint: Once the SCOPE of an exclusive tutti has been set, the stops it brings on may be changed as
described on page 30 for systems without SCOPE.
If you set all the stops off on an exclusive tutti, it will become a ventil. To get back to being an
exclusive tutti you will have to carry out the procedure described on page 28.
CFM-300 Operation Guide
Revision Dated: 15 December 2009
Page 26
Solid State Organ Systems
CFM-300 User Manual
SETTING A VENTIL
A blind function becomes a ventil when its setting is set to no stops. The only stops it affects (its
SCOPE) are those which it will take off (its empty setting).
Ventils are set as follows:
1. Turn on blind check.
2. Turn on those stops which are to be taken off by the ventil.
3. Set the SCOPE of the piston to the selected stop combination.
4. Turn all stops off (use general cancel).
5. Set the ventil.
Once set as a ventil, the stops it affects may be changed without carrying out steps 4 & 5.
Once a blind function has become a ventil it will not show its setting the same way other functions do. See Viewing
Blind Functions on page 21.
CFM-300 Operation Guide
Revision Dated: 15 December 2009
Page 27
Solid State Organ Systems
CFM-300 User Manual
CHANGING A VENTIL TO A TUTTI
To change a ventil to another blind function type it is necessary to carry out the procedure
which follows.
If you try to set stops into a ventil, CFM will interpret your actions as an attempt to change the
stops the ventil affects (really its SCOPE), and not an attempt to put stops into the setting. The
reason it would do this is to enable the ventil to be changed on consoles not fitted with a SCOPE
switch.
Procedure:
1. Turn on blind check.
2. Press/turn on SCOPE and press the piston.
3. Release/turn off SCOPE.
4. Set the piston.
This programs the stop memory to be the same as the SCOPE memory. This turns the piston into
an inclusive tutti. It may now be easily changed to the required tutti type and setting following
the procedures on pages 26 & 26.
CFM-300 Operation Guide
Revision Dated: 15 December 2009
Page 28
Solid State Organ Systems
CFM-300 User Manual
USING THE SYSTEM WITH THE SCOPE CONTROL FITTED AS A SWITCH
SCOPE Piston & SCOPE Switch
There are three mounting options for SCOPE:1. SCOPE may have been mounted as a piston adjacent to the set piston. This allows the easiest
access to the SCOPE facility.
2. SCOPE may have been mounted as a concealed switch, e.g. in a drawer or behind the music
stand.
3. SCOPE may not be accessible, other than to the organ builder.
Setting SCOPE with a SCOPE Switch
To change a piston’s SCOPE do the following:1. Switch on the SCOPE switch.
2. Draw all stops which are to be affected by the piston. Turn all other stops off.
3. Hold in the set piston.
4. Press the piston whose SCOPE you wish to set.
5. Switch off the SCOPE switch
Viewing Pistons with a SCOPE Switch
To view a piston’s SCOPE, i.e. those stops which will be affected by the piston, do the following:1. Switch on the SCOPE switch.
2. Press the piston whose SCOPE you wish to view.
3. The stops will move. The stops which are on are those which are within the SCOPE of the
piston.
4. Switch off the SCOPE switch
CFM-300 Operation Guide
Revision Dated: 15 December 2009
Page 29
Solid State Organ Systems
CFM-300 User Manual
USING THE SYSTEM WITHOUT A SCOPE CONTROL
Setting an Inclusive Tutti on systems without a SCOPE control
Assuming the organ builder has already programmed the function as inclusive using SCOPE, it is
possible to change the setting of an inclusive tutti without using SCOPE.
1. Turn on blind check.
2. Turn on those stops which are to be brought on by the tutti.
3. Set the blind function.
The system automatically updates both the SCOPE and the setting.
Setting an Exclusive Tutti in systems without a SCOPE control
Assuming the organ builder has already set the SCOPE, it is possible to change the stops brought
on without affecting the SCOPE.
1. Turn on blind check.
2. Turn on those stops which are to be brought on by the tutti.
3. Set the blind function.
The SCOPE remains unaffected.
CFM-300 Operation Guide
Revision Dated: 15 December 2009
Page 30
Solid State Organ Systems
CFM-300 User Manual
Setting a ventil on systems without a SCOPE control
Assuming the organ builder has already used SCOPE to program the function as a ventil, it is
possible to change the stops it affects without using SCOPE.
The procedure is as follows:
1. Turn on blind check.
2. Press the ventil’s piston.
3. This will turn on all stops that are to be affected by the ventil, and turn off all stops which
the ventil will not cancel.
4. Adjust the stops according to the change you want to make.
5. Set the ventil.
The system automatically updates the SCOPE and leaves the setting blank.
CFM-300 Operation Guide
Revision Dated: 15 December 2009
Page 31