1
CONTENTS
1.0
INTRODUCTION ………………………………………………
2
2.0
FEATURES …………………………………………………….
3
3.0
BLOCK DIAGRAM ……………………………………………
5
4.0
DESCRIPTION OF THE CIRCUIT……………………………
6
5.0
PACKING LIST …………………………………….………….
9
6.0
SYSTEM REQUIREMENTS …………………………………
9
7.0
INSTALLING THE HARDWARE AND
DRIVER SOFTWARE ………………………………………. 10
8.0
UNINSTALLING THE DRIVER ……………………………… 13
9.0
REGISTER STRUCTURE & FORMAT ………….………….
10.0
CALIBRATION ………………………………………………… 26
11.0
PROGRAMMING THE ESAPCIDAS CARD ……………….
27
12.0
DRIVER LIBRARIES DESCRIPTION……………………….
29
13.0
APPLICATION DEVELOPMENT USING DRIVERS………
56
14.0
APPLICATIONS FOR DATA ACQUISITION SYSTEM…… 67
14
Appendix
A: Schematics ………………………………..
70
Appendix
B: Specifications………………………………
80
Appendix
C: Component layout ………………………..
82
Appendix
D: Connector Details …………………………
83
ESA PCI DAS User Manual
Page 1 of 85
ESA PCI DAS
PCI DATA ACQUISITION CARD FOR PCs
1.0 INTRODUCTION:
Electro Systems Associates Pvt. Ltd. manufactures a variety of microprocessor
trainers, development/debugging tools and microcomputer development systems
useful for educational institutions and R&D labs.
ESA PCI DAS (Data Acquisition System) is a high speed PCI bus based data
acquisition add-on card for PC. It upgrades PC compatible computer system to highspeed data acquisition and process control workstation. The card has been designed
considering the trace impedance, inductive, capacitive coupling and noise. The design
also incorporate high frequency noise filtering and power supply decoupling in order to
filter out AC noise. Ground current has been minimized by careful circuit architecture.
The ESA PCI DAS Card can be used in various applications like Measurement and
Control, Industrial Automation, Supervisory Control and Scientific etc.
The ESA PCI DAS card consists of
1. One 16 Channel (16 single ended or 8 differential) 12-Bit ADC (10µs sampling).
2. Software Programmable Gain of 1, 2, 5, 10 for Analog input Channels.
3. Two 12-Bit DACs.
4. 24 Programmable Digital I/O lines (TTL compatible).
5. Three Programmable Timers/Counters.
ESA PCI DAS User Manual
Page 2 of 85
2.0
FEATURES
The ESA PCI DAS card has the following features:
ADC:
12-bit Analog to Digital (ADI1674 based) with the following features.
•
Conversion time of 10µs.
•
Unipolar or Bipolar range of operation:
0 to +10V, ±5V, ±10V.
•
16 Single Ended or 8 Differential mode of Analog input Channels.
•
Up to 100K samples per sec.
•
Four different modes of triggering the Conversion:
a. Polled mode (Conversion Triggered by polling the Channel).
b. Timer triggered mode (8254 timer generated Trigger).
c. External trigger mode (Conversion trigger by External signal).
d. Auto triggered mode (Conversion triggered by the end of conversion signal of
the previous ADC cycle).
•
Three different modes of Channel selection
a. Auto increment (Auto increment of all Channels).
b. Two Channels (Toggles between first and second channel).
c. Single Channel (The channel is selected by the software).
Note: In Bipolar ±10V range of operation, when differential mode is selected the
difference between the two inputs should not exceed 10V.
DAC:
•
Two 12 bit Digital to Analog (DAC) converters (AD7541)
•
Settling time of 500ns.
•
Unipolar or Bipolar Output: 0 to 10V, ±10V.
•
Data can be loaded at programmed interval.
ESA PCI DAS User Manual
Page 3 of 85
DIO:
24 Programmable Digital Input/Output lines using 8255 in the following configuration.
•
7 High Current Lines through Relay Driver – ULN2003
•
2 Opto Isolated Input Lines.
•
2 Opto Isolated Output Lines.
•
8 General-purpose I/O lines.
•
3 General-purpose Output lines.
•
2 General-purpose Input lines on Port A and Port B.
•
Pull-ups on all DIO lines.
•
8 Line Externally latched Digital Input Port.
TIMER:
Three 16 bit Programmable Timer / Counter using 8254.
ESA PCI DAS User Manual
Page 4 of 85
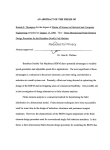
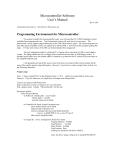
3.0 BLOCK DIAGRAM
_______________
Timer2
ADDRESS
DECODER
AND CONTROL
LOGIC
CLK0
Vcc
Timer 2
CLK2
Timer 1
TIMER1
ADDRESS AND
CONTROL BUS
OUT0
/4 CLK
/8 DIVIDER
/16
GATE 2
GATE 1
Timer 0
GATE 0
8254
CLK0
OPTO ISO O/P
OPTO ISO I/P
PCI
BRIDGE
OPTO ISO O/P
8255
PPI
LOCAL DATA BUS
OPTO ISO I/P
OPTO ISO O/P
RELAY DRIVER LINES
DIGITAL INPUT
ADC DATA
LATCH
EXTERNAL
LATCH
ADC STATUS
& CHANNEL
STROBE
SELECT
LOGIC
ADC
TRIGGER LOGIC
MUX
12-Bit
ADC
+
INSTRUMENTATION
AMPLIFIER
12-Bit
DAC
Latch
ESA PCI DAS User Manual
12-BIT
DACs
-
16-Single
Ended
Or
8-Differential
DAC1 OUTPUT
DAC2 OUTPUT
Page 5 of 85
EXTERNAL
TRIGGER
:
:
:
ANALOG INPUTS
:
:
:
4.0 GENERAL DESCRIPTION OF THE CIRCUIT:
The ESA PCI DAS add on card uses a popular PCI Bridge (U31) to communicate with
the PCI BUS. The PCI Bridge provides the address, data and control signals required
by the card.
The Analog & Digital devices on the card, an ADC (U33), two DACs (U7 & U8), one
8255 (U23) and one 8254 (U22) are interfaced to the PCI Bridge through glue logic.
The Glue logic consists of the address decoding and control circuitry to enable and
select the above-mentioned devices with user defined modes. The Glue Logic maps
and provides 8-bit registers to access the devices on the card. User can access the
registers through software programming. The addresses of the registers vary with
different offsets from the base address of the card. Please refer the section “Register
Structure Format” for more details on the different registers available to access the
card resources.
The card also uses analog circuits, to select the gain of the analog input voltages, to
select the reference voltages to ADC and DAC based on the modes of operation (i.e.
Unipolar or Bipolar) and to convert the DAC output current into voltage etc.
The 12-Bit ADC (AD1674) is configured in Stand-Alone mode for better operation. The
calibration of the ADC can be done using the trim pots provided on the card (For more
details, refer “Calibration Section”).
The Analog input channels and DAC outputs are terminated on the 25-Pin D-Type
Male Connector (J1), which can be connected to Junction Box through a Flat Ribbon
Cable (FRC) cable. The Analog inputs from the Connector are fed to ADC through
software selectable analog Muxs (U29 & U25) and Gain selectable Instrumentation
Amplifier. The triggering of ADC can be done in four different modes as mentioned.
The converted 12-Bit Data from the ADC can be read by software by selecting the
corresponding latches.
ESA PCI DAS User Manual
Page 6 of 85
The digital inputs to the 12-Bit DACs can be given by selecting the corresponding
latches. The analog outputs of the DACs are converted to voltage and available on the
25-Pin D-Type Connector J1.
The 8254 (U22) Programmable Interval Timer (PIT) consists of 3 Timers/Counters,
which can be programmed for different modes of operation using software. The clock
input to Timer0 is taken from PCI clock divider using Jumpers. The Jumper
connections are as follows.
JUMPER
CONNECTION
TIMER0 CLOCK (CLK0)
JP1
CLOSED
16.5MHz (i.e. 33MHz / 2)
JP2
CLOSED
8.25MHz (i.e. 33MHz / 4)
JP3
CLOSED
4.125MHz (i.e. 33MHz / 8)
Note: 33MHz is the PCI Bus standard Clock.
Clock input to Timer1 (CLK1) can be taken from output of Timer0 or externally (i.e.
from the connector J2) using jumpers JP7 & JP8. The Timer1 output can be used to
trigger the ADC and also to generate PCI interrupt using the jumpers JP6, JP9 &
JP10. The Gate inputs of the 3 Timers are pulled high in the Card. The clock inputs
and outputs of all the three Timers are available on the 50-pin berg strip J2 for
external interface.
JP6, JP7, JP8, JP9 and JP10 jumpers selection are as follows
JUMPER
JP6**
JP7*
JP8*
JP9**
CONNECTION
SELECTION
2–1
Timer1 output (T1) to Trigger ADC (Timer1).
2–3
Timer1 output (T1) to Connector J2 (TMR1).
2–1
Timer1 clock (C1) from Timer0 output (O0)
2–3
Timer1 clock (C1) from Connector J2.
2 –1
Timer0 output (O0) to Timer1 clock (C1).
2–3
Timer0 output (O0) to Connector J2 (OUT0).
2–1
Timer1 output from JP6 (Timer1) or ADCREQ
to PCI interrupt LINT1
2 –3
Timer1 output from JP6 (Timer1) or ADCREQ
to PCI interrupt LINT2
2–1
JP10**
2–3
ESA PCI DAS User Manual
ADCREQ to PCI interrupts (i.e. to LINT1 or 2)
Timer1 to PCI interrupts (i.e. to LINTT1 or 2)
Page 7 of 85
* While selecting the Clock input to Timer1 from the Timer0 output, user has to
connect both JP8 (2-1) and JP7 (2-1).
** While connecting the PCI interrupts (LINT1 or LINT2) to Timer1, the ADC
Trigger also should be from Timer1 i.e. JP6 (2-1) and JP10 (2-3).
Other wise the intrerrupt can be taken from ADCREQ.
The 24 I/O lines of 8255 (U23) PPI’s are available on the 50-Pin Berg strip J2 with
different I/O interfaces.
7 lines of PORT A (PA0 to PA6) are available as High Current Relay Driver lines
(RLY0…RLY6) through ULN2003. Please refer the Appendix “Data sheets” for
specifications of the ULN2003.
4 lines of PORT C, PC1, PC2, PC4, PC5 are available as opto-isolated lines, among
them, PC1 & PC2 are opto-isolataed input lines and PC4 & PC5 are opto-isolated
output lines. Opto-couplers MCT2E are used to provide opto isolation. Please refer the
Appendix Data Sheets for specifications of the MCT2E.
2 lines of PORT C, PC0 and PC3 can be used to generate the PCI interrupts (i.e.
LINT1 and LINT 2) using the Jumpers JP11 and JP12.
The remaining 11 Port lines of 8255 are available as general-purpose I/O lines i.e. 8
lines of Port B, 1 line of Port A and 2 lines of Port C. Apart from these I/O lines a Latch
provides 8 TTLdigital input lines (LINP0…LINP7) for external interface. The input lines
and latch enable (EXT LATCH) signal of the Latch are available on the 50-Pin Berg
strip J2. The user has to enable the Latch externally.
Please refer Schematics and Datasheets for information on the above-mentioned
devices and card.
ESA PCI DAS User Manual
Page 8 of 85
5.0 Packing List:
Before you begin installing ESA PCI DAS Hardware, please make sure that the
following materials have been shipped to you.
ESA PCI DAS Hardware.
Junction Box.
ADC and DAC Interface Cable.
DIO Cable
ESA PCI DAS Software CD containing Windows Driver Software & Sample
applications with source developed using VC++ 6.0 & Lab windows\CVI.
ESA PCI DAS User’s Manual.
6.0 System Requirements:
IBM Compatible Pentium machine or above.
Windows 98/Windows NT/Windows 2000/ Windows XP/Windows Me.
Microsoft Visual Studio / Lab Windows- CVI Development Environment.
64 MB of RAM.
Empty PCI Slot.
CD-ROM Drive.
NOTE:
To use the ESA PCI DAS card in Windows (98/NT/2000/XP) Environment user
need to install Windows driver software and library files available on the Driver
Software CD.
To use the card in DOS, please refer to chapter (DOS Application Development).
ESA PCI DAS can be plugged into any one of the free PCI slots of the system. This
card is accompanies by a Driver CD, which contains Drivers, supporting files and
Example Application source.
ESA PCI DAS User Manual
Page 9 of 85
7.0 Installing the Hardware & Driver Software:
1. Switch off, the PC.
2. Remove the power cable from the PC.
3. Plug the ESA PCI DAS Hardware in the free PCI slot available on the PC
Motherboard.
4. Plug the power cable to the PC.
5. Switch on, the PC.
6. Windows OS will detect a new hardware and asks for the Installation of Driver.
NOTE:
The user must have administrative privileges on the target computer in order
to install the driver for Windows 2000/XP/NT.
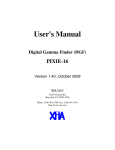
W
If user selects “Install the software automatically”, it will search for the suitable
drivers in local drives and external media. In Case it does not detect any suitable
driver select “Install from a list or specific location”, you should then see the
following window.
ESA PCI DAS User Manual
Page 10 of 85
ESA PCI DAS User Manual
Page 11 of 85
After Installation is completed, run the following command from the
Command Prompt.
(WindowsXP)
G:\Driver\wdreg –inf C:\windows\system32\drivers\windrvr6.inf install
(Windows 2000)
G:\Driver\wdreg –inf C:\winnt\system32\drivers\windrvr6.inf install
(Windows 98)
G:\Driver\wdreg16 –inf C:\windows\system32\drivers\windrvr6.inf install
NOTE: Windows 98 requires a reboot after Installation of the driver for proper
working of the ESA PCI DAS card.
Batch files for the above are provided in the Drivers CD, file names are reg98.bat
(Windows 98), reg2k.bat (Windows 2000) and regXP.bat (Windows XP). User has
to take care of the Drive letters in the batch file while running these batch files.
This Registering could be done for the reboot free installation of the Driver. This could
be done at the first time of installation; Next time onwards driver will be activated
automatically.
NOTE:
Windows NT Operating Systems doesn’t support Plug & Play feature. User
has to take care of the driver installation for the card.
Go to the WINNT folder in the Drivers CD.
Edit “install.bat”. Confirm the Directory Paths of WINDOWS NT instllation.
Edit “uninst.bat”. Confirm the Directory Paths.
For Instllaing the driver, Double click on “install.bat” or run “install.bat” from the
command window.
For Uninstalling the driver,Close all the applications which are using this
driver. Double click on “uninst.bat” or run “uninst.bat” from the command
windows.
ESA PCI DAS User Manual
Page 12 of 85
8.0 Uninstalling the Driver:
Delete the Devices listed in DeviceManager Under “ESA”(“Hardware” Tab From
“MyComputer” Properties) like “ESAPCIDAS” .
Delete “windrvr6.sys” & “windrvr6.inf” from “%windir%\system32\drivers”
Delete “esapdas.dll” from “%windir%” (Ex: C:\Windows or C:\winnt)
Delete “oemxx.inf” (Windows2k/XP) from “%windir%\inf” directory or “esa*.inf”
from “%windir%\inf\other” (Windows 98).
Restart the PC.
NOTE:
On Windows 2000/XP/NT, the inf files will be created with “oemXX.inf” under
“%windir%\inf”. To find the inf file corresponding to ESA PCI DAS card,user
can search the INF directory for the “ESA PCI DAS” as a search text.
ESA PCI DAS User Manual
Page 13 of 85
9.0 REGISTER STRUCTURE AND FORMAT
9.1 INPUT/OUTPUT ADDRESS MAP:
The I/O address offset of the Timer, DIO, ADC and DAC are shown below. The BADR
(Base Address) has to be added to offset to get the exact address. Run “Chkdas”,
which is available in the ESA PCI DAS Driver Software CD to get I/O address map.
This address map information will be useful when writing the applications under DOS
Environment (TURBO C) .
I/O
TYPE
REGISTER
DESCRIPTION
ADDRESS
BADR + E
Write
Master Register
Sets DAC & ADC Ranges
BADR + 0
Read/Write Timer0 of 8254
Write Data to Timer0
BADR + 1
Read/Write Timer1 of 8254
Write Data to Timer1
BADR + 2
Read/Write Timer2 of 8254
Write Data to Timer2
BADR + 3
Write
Command Port of 8254
Operating mode for 8254
BADR + 4
Read/Write Port A of 8255
Data to/from Port A
BADR + 5
Read/Write Port B of 8255
Data to/from Port B
BADR + 6
Read/Write Port C of 8255
Data to/from Port C
BADR + 7
Write
Command Port of 8255 Set Operating mode
BADR + 8
Read
8 lines digital input port
Data latched by an external
signal
BADR + 8
BADR + 9
Write
Write
ADC Load/Clear
Sets the channel number of
Channel Register
the ADC
ADC MODE Register
Sets Gain, ADC and
Channel Trigger
BADR + 9
Write
ADC Status Register
Indicates the ADC
Conversion status
BADR + A
Read
ADC Data
ADC Low Byte
BADR + B
Read
ADC Data
ADC High Byte
BADR + A
Write
DAC1 Data
DAC1 Low Byte
BADR + B
Write
DAC Common Data
DAC 1 & 2 High Byte
BADR + C
Write
DAC 2 Data
DAC 2 Low Byte
BADR + D
Write
POLLINIT Register
Initiate ADC Conversion
ESA PCI DAS User Manual
Page 14 of 85
9.2 ESA PCI DAS REGISTERS FUNCTIONAL DESCRIPTION
9.2.1 MASTER REGISTER
The ESA PCI DAS Card can be configured for different mode of operations such as
Range -- Bipolar/Unipolar, mode – Single-Ended / Differential by programming the
master register with the appropriate control word.
The Control Word definition is as follows:
BIT
7
6
5
4
3
FUNCTION
X
X
X
X
DAC
DAC (BIT 3)
2
RANGE
1
0
INP
POL
RANGE
0
0 – 10 V
1
±10V
ADC RANGE (BIT 2)
INPUT VOLTAGE
0
±10V
1
0 – 10 V, ±5V
INP (BIT 1)
TYPE OF INPUT
0
Single Ended
1
Differential
POLARITY (BIT 0)
INPUT POLARITY
0
±10V, ±5V
1
0 – 10 V
BITWISE DEFINITION OF THE MASTER REGISTER
1. DAC RANGE (BIT 3)
This selects the range of operation of both the DACs. A value of 0 sets it in the 0-10V
ranges, where as a value of 1 set in the ±10V range.
2. ADC RANGE (BIT 2)
This selects the range of operation of the ADC. A value of 0 selects the ±10V range,
where as a value of 1 selects the 0-10V or ±5V range.
ESA PCI DAS User Manual
Page 15 of 85
3. INPUT TYPE (BIT 1)
This selects the type of input to the ADC. A value of 1 sets it in the differential mode (8
channels), whereas a value of 0 sets it in the single ended mode (16 channels).
4. POLARITY (BIT 0)
This selects the polarity (Unipolar or Bipolar) of the applied input signal to ADC. A value
of 0 sets it in the bipolar (±10V, ±5V) mode, whereas a value of 1 sets it in the Unipolar(010V) mode.
9.2.2 ADC REGISTERS:
9.2.2.1 ADC MODE REGISTER
BIT
7
6
FUNCTION
X
X
5
4
GAIN
3
2
1
CHANNEL
0
MODE
GAIN
BIT5
BIT4
FUNCTION
0
0
GAIN X1
0
1
GAIN X2
1
0
GAIN X5
1
1
GAIN X10
CHANNEL
BIT3
BIT2
FUNCTION
0
0
AUTO INC
0
1
ONE CH
1
0
TWO CH
MODE
BIT1
BIT0
FUNCTION
0
0
POLLED MODE
0
1
TIMER MODE
1
0
EXTERNAL TRIG
1
1
AUTO TRIG
ESA PCI DAS User Manual
Page 16 of 85
BITWISE DEFINITION OF THE MODE REGISTER
1.MODE (Bits 0 & 1)
Four different mode of triggering the ADC conversion are supported:
POLLED MODE
Conversion is initiated as soon as the Pollinit register (BADR+D) is written. This mode
is useful when the data sampling is asynchronous or to initiate conversion when ever
system requires.
EXTERNAL TRIGGERED MODE
Conversion is initiated when the EXTCON signal (Pin 13 of connector J1) goes high.
This mode is useful when ADC conversion is to be synchronized with an external
event.
TIMER TRIGGERED MODE
Conversion is initiated by the output of Timer 1 of 8254. This mode can be used to
initiate single or multiple conversions at specified time intervals.
AUTO TRIGGERED MODE
The end of conversion signal of the previous ADC cycle triggers conversion. This
mode can be used for high-speed data acquisition with no delay.
In this mode, the user can transfer the data from the previous conversion cycle of the
ADC to memory during the current ADC conversion cycle, thus reducing the delay and
increasing the overall conversion speed.
The ADC mode control register should be programmed to select any one of the above
modes of triggering.
2. CHANNEL (Bits 2 & 3)
The various modes of channel selection are as follows:
ONE CHANNEL
In this mode any one channel which is written into the Load/Clear Channel register
(BADR+8) is set and the Mux address does not get incremented or decremented. For
example to continuously acquire the fifth channel, first select one channel mode in the
mode select register (BADR+9) and then write into the Load/Clear Channel register
with 05H. This selects the fifth channel.
Writing into the same register with the last bit high can clear the Channel register. For
example output (BADR+8) with FFH. This register has to be cleared before a new
value is loaded.
ESA PCI DAS User Manual
Page 17 of 85
TWO CHANNEL
In this mode the Mux address counter toggles between the first two channels. Initially
it will be at the first channel and at the end of conversion it increments the counter to
the next channel. At the next end of conversion, it returns to the first channel. This is
useful for sampling stereo signals.
AUTO INCREMENT
In this mode the channel address of the Mux gets incremented automatically i.e., from
0-15 in sequence. The end of conversion signal can do the increment. Once this mode
is set, the user does not have to program the Load / Clear Channel register.
3. GAIN (Bits 4 & 5)
The various gain options available on the software programmable gain amplifier are as
follows:
GAIN X1
This provides a gain of 1, i.e. the input and output signals are equal in amplitude.
GAIN X2
This provides a gain of 2 times, i.e. the output signal is twice the input signal.
GAIN X5
This provides a gain of 5 times, i.e. the output signal is 5 times the input signal.
GAIN X10
This provides a gain of 10 times, i.e. the output signal is 10 times the input signal.
NOTE: The gain can be pre-defined to any of four combinations by changing
the resistors R11 & R12 on the board.
9.2.2.2 ADC LOAD/CLEAR CHANNEL REGISTER
Before starting any ADC conversion the Channel register can be set to a pre
determined channel by writing into this register. The channel register has to be cleared
by setting the MSB high before selecting any channel. The channels are selected by
writing the channel number in the lower Nibble with the MSB set low.
LOAD / CLEAR CHANNEL REGISTER
BIT
7
FUNCTION LOAD/CLEAR
ESA PCI DAS User Manual
6
5
4
3
2
1
0
X
X
X
CH3
CH2
CH1
CH0
Page 18 of 85
LOAD/
CHANNEL NUMBER
CLEAR CH3 CH2
CH1
CH0
BIT
Single Ended
Differential
0
0
0
0
0
0
0
0
0
0
0
1
1
1
0
0
0
1
0
2
2
0
0
0
1
1
3
3
0
0
1
0
0
4
4
0
0
1
0
1
5
5
0
0
1
1
0
6
6
0
0
1
1
1
7
7
0
1
0
0
0
8
-
0
1
0
0
1
9
-
0
1
0
1
0
10
-
0
1
0
1
1
11
-
0
1
1
0
0
12
-
0
1
1
0
1
13
-
0
1
1
1
0
14
-
0
1
1
1
1
15
-
1
X
X
X
X
0
0
X = Don’t care bit
9.2.2.3 ADC STATUS REGISTER
The ADC Status Register can be read by the user to determine the ADC status as
shown below:
D7
D6
D5
D4
D3
D2
D1
D0
STS
X
X
X
X
X
X
X
X
= Unused bit
STS = 0 : End of Conversion.
1 : Conversion in progress.
ESA PCI DAS User Manual
Page 19 of 85
NOTE: In Bipolar ±10V operation and when differential mode is selected, the
difference between the two inputs should not exceed 10V. For e.g. the following
voltages can be applied at two different inputs: +5V & -5V, +8V & -2V, -9V &
+1V etc. The following voltages should not be applied: -6V & +6V, -8V & +8V,
+2V & -10V etc.
9.2.2.4 ADC DATA REGISTERS:
These are read only registers, which can be read in the standard LO/HI byte
sequence.
HIGH BYTE (BADR + B)
D7
D6
D5
D4
D3
D2
D1
D0
X
X
X
X
DB11
DB10
DB9
DB8
MSB
LOW BYTE (BADR + A)
D7
D6
D5
D4
D3
D2
D1
D0
DB7
DB6
DB5
DB4
DB3
DB2
DB1
DB0
LSB
9.2.3 DAC REGISTERS
9.2.3.1 DAC DATA REGISTER:
The DAC registers are write only and are in the HI/LO byte sequence, so that the
DAC’s are not updated till the LO byte is written.
HIGH BYTE (BADR + B)
D7
D6
D5
D4
D3
D2
D1
D0
X
X
X
X
DB11
DB10
DB9
DB8
MSB
LOW BYTE (BADR + A) & (BADR + C)
D7
D6
D5
D4
D3
D2
D1
D0
DB7
DB6
DB5
DB4
DB3
DB2
DB1
DB0
LSB
ESA PCI DAS User Manual
Page 20 of 85
9.2.4) 8254 TIMER REGISTERS:
The 8254 have three 16-bit timer/counter outputs. The clock input to the first time
(Timer 0) can be given through 74LS163(Down Counter). Close JP1 or JP2. This will
provide a clock to the timer 0 of 825 derived from 74LS163. The Timer 0 output can be
fed as clock input to the timer 1 by shoring JP8 and JP7 (2-3). The user can feed the
clock externally via J2 for timer 3. All the GATE outputs are pulled to Vcc through 4k7
resistances.
1. COMMAND REGISTER (BADR + 3): This register is used to set the modes of
operation of the Timer and to select which timer is to be loaded.
2. TIMER 0 (BADR + 0): This register is used to load the data to Timer 0 and also to
read-back the status of the timer.
3. TIMER 1 (BADR + 1): This register is used to load the data to Timer 1 and also to
read-back the status of the timer.
4. TIMER 2 (BADR + 2): This register is used to load the data to Timer 2 and also to
read-back the status of the timer.
The control word format for the timer is as shown below.
BIT
FUNCTION
7
6
5
4
3
2
1
0
SC1
SC0
RL1
RL0
M2
M1
M0
BCD
SELECT COUNTER
SC1
SC0
FUNCTION
0
0
Select Counter 0
0
1
Select Counter 1
1
0
Select Counter 2
1
1
Read Back Command
READ / WRITE
RL1
RL0
FUNCTION
0
0
Counter Latch Command
0
1
Read/Write LSB only
1
0
Read/Write MSB only
1
1
Read/Write LSB first, then MSB
ESA PCI DAS User Manual
Page 21 of 85
MODE
M2
M1
M0
FUNCTION
0
0
0
MODE 0
X
1
0
MODE 0
X
1
1
MODE 0
0
0
0
MODE 0
BCD
0
BINARY COUNTER 16 BITS.
1
BCD COUNTER (4 DECADES).
9.2.5 DIGITAL I/O REGISTERS:
The Digital I/O facility available on the card consists of 32 lines grouped below:
a. 8 Programmable Digital I/O lines.
b. 3 Digital Output lines.
c. 2 Digital Input lines.
d. 7 High Current line drivers.
e. 2 Opto Isolated Output lines
f. 2 Opto Isolated Input lines
g. 8 Externally Latched / Strobed inputs.
The group of DIO lines from a to f (24 lines) are available through a 8255 PPI, while
the Group g (8lines) is available through a 74LS374 latch.
1.COMMAND PORT OF 8255 (BADR + 7): This register is used to set the mode of
operation of the 8255 i.e. MODE 0, MODE 1 or MODE 2.
2. PORT A OF 8255 (BADR + 4): This register is used to write or read data from
PORT A of the 8255.
3. PORT B OF 8255 (BADR + 5): This register is used to write or read data from
PORT B of the 8255.
4. PORT C OF 8255 (BADR + 6): This register is used to write or read data from
PORT C of the 8255.
5. EXTERNAL LATCH (BADR + 8): This is a 8-bit read only port, which is connected
to the 74LS374. This latch has to be clocked using an external strobe signal, which is
connected to pin 35 of the connector J2.
ESA PCI DAS User Manual
Page 22 of 85
8255 LINES
GROUP
SYMBOL
8255 LINE
No. OF LINES
1
PB0 – PB7
PB0 – PB7
8
2
PA7, PC6, PC7
PA7, PC6, PC7
3
3
PC2 – PC3
PC2 – PC3
2
4
RLY0-RLY6
PA0 – PA6
7
5
IS0, IS1
PC4, PC5
2
6
IS2, IS3
PC1, PC2
2
74LS374 LINES
GROUP
7
SYMBOL
NUMBER OF LINES
LINP0 – LINP7
8
DISTRIBUTION OF DIO LINES
GROUP1
These 8 lines are general-purpose I/O lines available directly through Port B of 8255
(BADR+5). These lines are pulled up through 4K7 Resistors.
GROUP2
These 3 lines are general-purpose Input lines available directly through 8255. These
lines are pulled up through 4K7 Resistors.
GROUP3
These2 lines are general-purpose Input lines available directly through Port C of 8255
(BADR+6). These lines are pulled up through 4K7 Resistors.
GROUP4
These 7 High Current Lines (capable of sinking 500mA per line) are available from
Port A of 8255 (BADR+4) through ULN 2003 Relay Driver.
GROUP5
These are Opto-Isolated output lines available from Port C of 8255(BADR+6) through
MCT 2E/4N 37 OptoCouplers. The configuration is as shown below.
ESA PCI DAS User Manual
Page 23 of 85
PC4 / PC 5
IS0/IS1
OPTOCOUPLER
DGND
IS0R/IS1R
IS0S/IS1S
GROUP6
These are Opto – Isolated Input lines available from Port C of 8255 (BADR + 6)
through MCT2E/4N 37 OptoCouplers. The configuration is as shown below.
IS2/IS3
PC1 / PC2
OPTOCOUPLER
DGND
IS2R/IS3R
GROUP7
These 8 lines are general-purpose Input lines available from 74LS374 Latch
(BADR+8). These lines have to be latched by an external Latch Signal EXTLATCH
(rising edge), available on Pin 35 of the connector J2.
8255 REGISTERS
MODE SELECTION
The following are 3 basic modes of operation for the 8255:
a. MODE 0 -- Basic INPUT/OUTPUT
b. MODE 1 -- STROBED INPUT/OUTPUT
c. MODE 2 -- BI-DIRECTIONAL BUS
The control word definition is as follows:
BIT
7
6
5
4
3
2
1
0
FUNCTION
D7
D6
D5
D4
D3
D2
D1
D0
ESA PCI DAS User Manual
Page 24 of 85
I/O MODE CONTROL WORD
GROUP A
D3
D4
0
Port C (UPPER) Output
1
Port C (UPPER) Input
0
Port A Output
1
Port A Input
D5
0
0
Mode 0
D6
0
1
Mode 1
1
X
Mode 2
GROUP B
D0
D1
D2
0
Port C (LOWER) Output
1
Port C (LOWER) Input
0
Port B Output
1
Port B Input
0
Mode 0
1
Mode 1
MODE SET FLAG
1
--
ACTIVE
ESA PCI DAS User Manual
Page 25 of 85
10.0 CALIBRATION
10.1 CALIBRATING THE ADC:
The trimpots VR2, VR3, VR4, VR7 are used for calibrating the ADC.
a) UNIPOLAR OFFSET CALIBRATION
Trimpot VR3 is used for adjusting the Unipolar Offset. For this, apply an analog input
voltage of 100mv ± 2mv to the ADC input and adjust the Trimpot VR4 until the
converted digital output of the ADC is 100mv.
b) FULL SCALE CALIBRATION
VR2 and VR7 performs the Gain adjustment at Positive Full Scale Apply an input of
9V ± 2mV to the ADC input and adjust VR7 (coarse) and VR1 (fine) to get 9.000V on
the display.
c) BIPOLAR OFFSET CALIBRATION
Trimpot VR4 is used for adjusting the bipolar offset. For this, apply a lowest analog
input voltage of 0V ± 4mV in case of ±5V or ±10V range to the ADC input and adjust
the Trimpot VR2 until the converted digital output of the ADC is 0V.
10.2 CALIBRATING THE DAC:
The trimpots VR1, VR5 and VR6 are used for calibrating the DACs.
a) BIPOLAR OFFSET CALIBRATION
The trimpots VR6 and VR5 are used for offset calibration of DAC1 and DAC2
respectively. To do so, output a value 0V for analog output on the selected DAC and
measure the output (Pin12 for DAC1 and Pin24 for DAC2 on connector J1). Adjust the
trimpots(VR6 for DAC1 and VR5 for DAC2) until the analog output is exactly 0V. This
would complete the offset adjustment of the selected DAC.
ESA PCI DAS User Manual
Page 26 of 85
11.0 PROGRAMMING THE ESA PCI DAS CARD:
Example Programs are given in the ESA PCI DAS Driver CD.
11.1 PROGRAMMING THE ADC:
POLLED MODE DATA TRANSFER
The converted data can be transferred in polled mode
Here the application program continuously scans the status register to check if the
End Of Conversion (EOC) bit has gone low, after initiating the conversion. When the
End Of Conversion bit goes low it means that the converted data is ready to be read.
The application program then reads the two data ports and obtains the converted
data.
This mode of data transfer is used when the processor initiates the conversion and in
applications where the system is totally dedicated to the task of acquiring data. This
mode requires a dedicated system.
EXAMPLE:
To set up the ADC in 8 channel differential input, bipolar mode (±10 V) and polled
mode of data transfer.
1. Open the card handler by specifying the Card Number.
2. Program the master register with D8H or 08H setting the ADC in ±10 V range.
3. Programming the mode register with 04H sets the card in the polled mode, with
single channel acquisition.
4. Set the required channel by writing into the Load/Clear Channel register.
e.g.: Programming the register with 00H, selects the 1st channel.
5. Write into the pollinit register (baseaddress + D) to initiate conversion.
6. Read the ADC status register (Base Address + 9) and check whether the End Of
Conversion signal bit (Bit 7) has gone low.
7. If the End of conversion signal is high then repeat Step 6 else go to next step.
8. Read the converted data from the data ports – low byte from (baseaddress+A) and
high byte from the (baseaddress+B). The upper 4 bits of the higher byte are set to
0 always, as the output is 12 Bits only.
9. Now increment the channel number and repeat step 4. Repeat steps 5 to 8 till all 8
channels are covered.
ESA PCI DAS User Manual
Page 27 of 85
11.2 PROGRAMMING THE DAC:
Each of the DACs makes use of two independent write only registers. As result,
complete 12 bit data to each DAC can be updated in one shot.
Assuming that an output +5V is desired at DAC1, which is to be configured in Bipolar
mode (±10V), the following steps need to be followed.
1. The ESAPCIDAS card has to be configured for DAC’s in Bipolar mode. This has to
be done by programming the MasteRegister.
2. The digital equivalent of +5V in the ±10V range is 0C00H. Output the high byte
(0CH) on the high byte register (BADR+B). Output the low byte (00H) on the low
byte register (BADR+A).
3. At this point the value in the low byte register along with the lower nibble of the
high byte port will be latched to form a 12-bit DAC register. Now the DAC1 output
(Pin 12 of connector J1) would be at +5V.
4. For programming DAC2, output the digital equivalent of +5V in the ±10V range i.e.
0C00H. Output the high byte register (BADR+B). Output the low byte (00H) on the
low byte register (BADR+C).
5. The value in the low byte register along with the lower nibble of the high byte port
will be latched to form a 12-bit DAC register. One of the DAC2 output (Pin 24 of
connector J1) would be at +5V.
ESA PCI DAS User Manual
Page 28 of 85
12.0 DRIVER LIBRARIES DESCRIPTION:
Function Reference:
12. 1 PCIDAS FUNCTIONS:
1) ESAPCIDAS_Open()
-- Windows Version
PURPOSE
Provides Device Handle to access Driver kernel module. All other APIs use the handle
provided by this function, and therefore this function must be called before calling any
other API.
PROTOTYPE
int ESAPCIDAS_Open(int CardNo)
PARAMETERS
Name
Type
Input/Output
CardNo
Int
Input
DESCRIPTION
Name
Description
CardNo
Used for specifying the card number when
multiple ESA PCI DAS cards present on
the PC. If only one card present on the PC,
send ‘1’ as the card number. Card
Numbers will be known from the PCI slots
where ESA PCI DAS cards installed.
ESA PCI DAS User Manual
Page 29 of 85
RETURN VALUE
Returns 0 on success,
1 if CardNo is not matching with the Existing ESA PCI DAS cards.
2 if No ESA PCI DAS card existing.
EXAMPLE
int dwStatus;
dwStatus = ESAPCIDAS_Open(1);
if (dwStatus == 2)
{
MessageBox(NULL,”No ESAPCIDAS Cards Found”,”ERROR”,NULL);
Exit(0);
}
if (dwStatus == 1)
{
MessageBox(NULL,”Card No not matching with the existing
cards”,”ERROR”,NULL);
Exit(0);
}
if (dwStatus == 0)
{
MessageBox(NULL,”Card Found”,”INFO…”,NULL);
…………..
………….
}
ESA PCI DAS User Manual
Page 30 of 85
ESAPCIDAS_Open()
-- DOS Version
PURPOSE
Provides the address offsets for the ESA PCI DAS card resources. All other APIs
uses this addresses provided by this function, and therefore this function must be
called before performing any other operation.
PROTOTYPE
int ESAPCIDAS_Open(unsigned int BaseAddress)
PARAMETERS
Name
Type
Input/Output
BaseAddress
unsigned Int
Input
DESCRIPTION
Name
BaseAddress
Description
Used for specifying the Base Address of the
ESAPCIDAS card present in the PC.
RETURN VALUE
Returns 0.
EXAMPLE
int dwStatus;
dwStatus = ESAPCIDAS_Open(0xb800);
ESA PCI DAS User Manual
Page 31 of 85
2) ESAPCIDAS_Close()
PURPOSE
Closes the Device Handle and frees resources allocated for the Device which was
created by ESAPCIAS_Open() at start.
PROTOTYPE
void ESAPCIDAS_Close()
PARAMETERS
None
RETURN VALUE
None
EXAMPLE
ESAPCIDAS_Close();
ESA PCI DAS User Manual
Page 32 of 85
3) SetMasterReg()
PURPOSE
Sets the Operation Parameters. This function can be used to set the ranges of the
ADC and DAC.
PROTOTYPE
Int SetMasterReg(unsigned char DACPolar, unsigned char ADCPolar, unsigned
char ADCInpType, unsigned char ADCRange)
PARAMETERS
Name
Type
DACPolar
ADCPolar
ADCInpType
ADCRange
Input/Output
unsigned char
unsigned char
unsigned char
unsigned char
Input
Input
Input
Input
DESCRIPTION
Name
DACPolar
ADCPolar
Description
Specifies the range of the operation of the two DACs.
0
-0 to 10V
1
-(+/-) 10V
Selects the Polarity (Unipolar or Bipolar) of the applied
input signal to ADC.
0
1
---
Bipolar (+/- 10V, +/- 5V)
Unipolar ( 0 – 10 V)
ADCInpType
Selects the type of input to the ADC.
ADCRange
0
-Single Ended Mode
1
-Differential Mode
Selects the range of operation of the ADC.
0
1
---
(+/-) 10V
0 –10 V or (+/-) 5V
RETURN VALUE
Returns 0 if successful, else return 1.
EXAMPLE
SetMasterReg (0,1,1,1);
ESA PCI DAS User Manual
Page 33 of 85
12. 2 ADC FUNCTIONS:
1) SetMode()
PURPOSE
Sets the ADC Trigger Mode, Gain and the type of Channel Trigger.
PROTOTYPE
Int SetMode(unsigned char GainSel, unsigned char ChanTrig, unsigned char
ADCTrig)
PARAMETERS
Name
Type
GainSel
ChanTrig
ADCTrig
unsigned char
unsigned char
unsigned char
Input/Output
Input
Input
Input
DESCRIPTION
Name
Description
GainSel
Options available on the Software Programmable Gain
Amplifier.
0 -- Gain X1
1 -- Gain X2
2 -- Gain X5
3 -- Gain X10
Selects the Channel Triggering mode.
0 -- Auto Increment
1 -- One Channel
2 -- Two Channel
Selects the ADC Triggering mode.
0 -- Polled Mode
1 -- Timer Mode
2 -- External Mode
3 -- Auto Mode
ChanTrig
ADCTrig
RETURN VALUE
Returns 0 if successful, else return 1.
EXAMPLE
SetMode(0,1,0);
ESA PCI DAS User Manual
Page 34 of 85
2) StartConvert()
PURPOSE
Initiates Conversion in Polled or Auto Mode.
PROTOTYPE
void StartConvert(void)
PARAMETERS
NONE
RETURN VALUE
NONE
EXAMPLE
StartConvert();
ESA PCI DAS User Manual
Page 35 of 85
3) ClearChannel()
PURPOSE
Clears the Channel Count to zero.
PROTOTYPE
void ClearChannel(void)
PARAMETERS
NONE
RETURN VALUE
NONE
EXAMPLE
ClearChannel();
ESA PCI DAS User Manual
Page 36 of 85
4) SetChannel()
PURPOSE
Sets the Channel number for Data Acquisition.
PROTOTYPE
int SetChannel(unsigned char ChnNo)
PARAMETERS
Name
Type
Input/Output
ChnNo
unsigned char
Input
DESCRIPTION
Name
ChnNo
Description
Used for specifying the Channel No for
Data Acqisition.
Channel No [0..15]
RETURN VALUE
Returns 0 if successful, else return 1.
EXAMPLE
SetChannel(5);
ESA PCI DAS User Manual
Page 37 of 85
5) AdcStatusFlag()
PURPOSE
Indicates whether the ADC has finished conversion.
PROTOTYPE
Int AdcStatusFlag(void)
PARAMETERS
NONE
RETURN VALUE
Returns
0 -- Ready
1 -- Busy
EXAMPLE
AdcStatusFlag();
ESA PCI DAS User Manual
Page 38 of 85
6) ReadAdcRaw()
PURPOSE
Reads the converted data from the ADC.
PROTOTYPE
Unsigned short ReadADCRaw(void)
PARAMETERS
NONE
RETURN VALUE
Returns the High & Low bytes of the converted data(RAW).
EXAMPLE
Unsigned short ADCData;
ADCData = ReadADCRaw();
ESA PCI DAS User Manual
Page 39 of 85
12.3 DAC FUNCTIONS:
1) DacOutRaw()
PURPOSE
Outputs the data to DAC. The data is checked to be in the range of 0 – 4095
PROTOTYPE
Int DACOutRaw(float DACRaw,unsigned char DACNo)
PARAMETERS
Name
Type
Input/Output
DACRaw
unsigned short
Input
DACNo
unsigned char
Input
DESCRIPTION
Name
DACRaw
Description
Used for specifying the data to be placed on the
DAC. The data is checked to be in the rane of
0—4095.
DACNo
Used for speicifying the DAC Number where the
data should be out.
RETURN VALUE
Returns 0 if successful, else return 1.
EXAMPLE
DACOutRaw(2048,1);
ESA PCI DAS User Manual
Page 40 of 85
12.4 TIMER FUNCTIONS:
1) InitTimer()
PURPOSE
Sets operational mode for 8254 Timer.
PROTOTYPE
int InitTimer(unsigned char TimerNo, unsigned char RdLd, unsigned char
ModeSel, unsigned char BcdBin)
PARAMETERS
Name
Type
Input/Output
TimerNo
unsigned char
Input
RdLd
unsigned char
Input
ModeSel
unsigned char
Input
BcdBin
unsigned char
Input
DESCRIPTION
Name
TimerNo
RdLd
ModeSel
Description
Used for specifying the Timer Number to be configured.
0
--
Timer0
1
--
Timer1
2
--
Timer2
Used for specifying the Load Count operation type.
0
--
Counter Latch
1
--
R/W LSB only
2
--
R/W MSB only
3
--
R/W LSB first and then MSB
Used for specifying the Mode.
0 -- Mode 0 -- Interrupt on Terminal Count.
1 -- Mode 2 -- Rate Generator or Divide by N counter.
2 -- Mode 3 -- Square Wave Generator.
3 -- Mode 4 -- Software Triggered strobe.
BcdBin
Used for Specifying the type of the Counter.
ESA PCI DAS User Manual
0
--
Binary Counter
1
--
BCD Counter
Page 41 of 85
RETURN VALUE
Returns 0 if successful, else return 1.
EXAMPLE
int x;
x=Timer(0,3,1,0);
2) TimerRawLoad()
PURPOSE
Loads the data to the selected Timer. This data, which is to be loaded, is the divisor
for the Timers. The maximum value is 65535.
PROTOTYPE
int TimerRawLoad(unsigned char TimerNo, unsigned short TimerData)
PARAMETERS
Name
Type
Input/Output
TimerNo
unsigned char
Input
TimerData
unsigned short
Input
DESCRIPTION
Name
TimerNo
TimerData
Description
Used for specifying the Timer Number to be configured.
0
--
Timer0
1
--
Timer1
2
--
Timer2
Used for specifying the data to be loaded to the selected
Timer. The maximum value is 65535.
RETURN VALUE
Returns 0 if successful else return 1.
EXAMPLE
unsigned char x ;
Read_Timer2();
ESA PCI DAS User Manual
Page 42 of 85
3) ReadTimerStatus()
PURPOSE
Reads current count of selected Timer. Two types of read operation will be performed.
If type of data is ‘0’ then a plain read operation would be performed. This can be done
only if the count is static. If type if data is ‘1’ the a counter latching operation is
performed. This of read should be done if you want to read the counter on the “fly” i.e.
while it is counting. Neither type of read will affect the counter data or operation.
PROTOTYPE
unsigned short ReadTimerStatus(unsigned char TimerNo, unsigned char TypeofData)
PARAMETERS
Name
Type
Input/Output
TimerNo
unsigned char
Input
TypeofData
unsigned char
Input
DESCRIPTION
Name
TimerNo
TypeofData
Description
Used for specifying the Timer Number to be configured.
0
--
Timer0
1
--
Timer1
2
--
Timer2
Used for specifying the type of read operation to be
perofmed.
0
--
Static Data.
1
--
Counter Latch Operation.
RETURN VALUE
Returns the status of the counter of the selected timer.
EXAMPLE
unsigned char x ;
x = Read_Timer2();
ESA PCI DAS User Manual
Page 43 of 85
12.5 DIGITAL I/O FUNCTIONS:
1) DioInit()
PURPOSE
Initializes the 8255 Command Register and sets the 8255 Ports depending on the
configuration word.
PROTOTYPE
void DioInit(unsigned char ConfigWord)
PARAMETERS
Name
ConfigWord
Type
Input/Output
unsigned char
Input
DESCRIPTION
Name
ConfigWord
Description
Used for configuring the 8255 Ports of
ESAPCIDAS Card.
Ex: - 0x80 -- All ports output(Write)
0x9b -- All Ports Input(Read)
RETURN VALUE
NONE.
EXAMPLE
DioInit(0x80);
ESA PCI DAS User Manual
Page 44 of 85
2) Write_PortA()
PURPOSE
Writes the data to the 8255 PortA of ESA PCI DAS Hardware.
PROTOTYPE
void Write_PortA(unsigned char Data)
PARAMETERS
Name
Type
Input/Output
Data
unsigned char
Input
DESCRIPTION
Name
Data
Description
Used for specifying the data to be
written.
RETURN VALUE
NONE
EXAMPLE
Write_PortA(0x55);
ESA PCI DAS User Manual
Page 45 of 85
3) Write_PortB()
PURPOSE
Writes the data to the 8255 PortB of ESA PCI DAS Hardware.
PROTOTYPE
void Write_PortB(unsigned char Data)
PARAMETERS
Name
Type
Input/Output
Data
unsigned char
Input
DESCRIPTION
Name
Data
Description
Used for specifying the data to be
written.
RETURN VALUE
NONE
EXAMPLE
Write_PortB(0x55);
ESA PCI DAS User Manual
Page 46 of 85
4) Write_PortC()
PURPOSE
Writes the data to the 8255 PortC of ESA PCI DAS Hardware.
PROTOTYPE
void Write_PortC(unsigned char Data)
PARAMETERS
Name
Type
Input/Output
Data
unsigned char
Input
DESCRIPTION
Name
Data
Description
Used for specifying the data to be
written.
RETURN VALUE
NONE
EXAMPLE
Write_PortC(0x55);
ESA PCI DAS User Manual
Page 47 of 85
5) Read_PortA()
PURPOSE
Reads the data from the 8255 PortA of ESA PCI DAS Hardware.
PROTOTYPE
unsigned char Read_PortA(void)
PARAMETERS
NONE
RETURN VALUE
Returns the data read from the 8255 PortA of ESA PCI DAS Hardware.
EXAMPLE
unsigned char x ;
x= Read_PortA();
6) Read_PortB()
PURPOSE
Reads the data from the 8255 PortB of ESA PCI DAS Hardware.
PROTOTYPE
unsigned char Read_PortB(void)
PARAMETERS
NONE
RETURN VALUE
Returns the data read from the 8255PortB of ESA PCI DAS Hardware.
EXAMPLE
unsigned char x;
x=Read_PortB();
ESA PCI DAS User Manual
Page 48 of 85
7) Read_PortC()
PURPOSE
Reads the data from the 8255-2 PortC of ESA PCI DAS Hardware.
PROTOTYPE
unsigned char Read_82552PortC(void)
PARAMETERS
NONE
RETURN VALUE
Returns the data read from the 8255-2 PortC of ESA PCI DAS Hardware.
EXAMPLE
unsigned char x;
x=Read_82552PortC();
ESA PCI DAS User Manual
Page 49 of 85
8) SelectLineDrVr()
PURPOSE
Selects any of the 7 Line Drivers (ULN 2003). These lines are connected to PortA of
the 8255. The outputs of the line drivers are inverted. The PortA initialization was
taken care in this function itself.
PROTOTYPE
int SelectLineDrvr (unsigned char DrNo,unsigned char Switch)
PARAMETERS
Name
Type
Input/Output
DrNo
unsigned char
Input
Switch
unsigned char
Input
DESCRIPTION
Name
DrNo
Description
Used for Selecting the LineDriver
DrNo Should be in between [0..6]
Switch
Used for specifying the options for Transistor
Switch On or Off.
1 -- On
0 -- Off
RETURN VALUE
Returns 0 if successful, else return 1.
EXAMPLE
SelectLineDrVr(1,1);
ESA PCI DAS User Manual
Page 50 of 85
9) SetOptoOut()
PURPOSE
Selects Opto Isolated output lines. These two lines are on Upper PortC. (PC4 & PC5).
PROTOTYPE
int SetOptoOut (unsigned char DrNo,unsigned char Switch)
PARAMETERS
Name
Type
Input/Output
DrNo
unsigned char
Input
Switch
unsigned char
Input
DESCRIPTION
Name
DrNo
Description
Used for Selecting the LineDriver
DrNo Should be in between[0..1]
Switch
Used for specifying the options for Transistor
Switch On or Off.
1 -- On
0 -- Off
RETURN VALUE
Returns 0 if successful, else return 1.
EXAMPLE
SetOptoOut(1,1);
ESA PCI DAS User Manual
Page 51 of 85
10) SenseOptoIn()
PURPOSE
Reads Opto Isolated Input lines. These two lines are on Lower PortC. (PC1 & PC2).
PROTOTYPE
int SenseOptoIn (unsigned char DrNo,unsigned char Switch)
PARAMETERS
Name
Type
Input/Output
DrNo
unsigned char
Input
Switch
unsigned char
Input
DESCRIPTION
Name
DrNo
Description
Used for Selecting the LineDriver
DrNo Should be in between[0..1]
Switch
Used for specifying the options for Transistor
Switch On or Off.
1 -- On
0 -- Off
RETURN VALUE
Returns 0 if successful, else return 1.
EXAMPLE
SenseOptoIn(1,1);
ESA PCI DAS User Manual
Page 52 of 85
11) ReadExternalLatch()
PURPOSE
Reads data from externally latched Digital I/O Port. This data is read from the 74 LS
374 which requires an external clock signal to latch the data.
PROTOTYPE
unsigned char ReadExternalLatch(void)
PARAMETERS
NONE
RETURN VALUE
Returns the data read from the Latch.
EXAMPLE
Unsigned char LatchData;
LatchData = ReadExternalLatch();
ESA PCI DAS User Manual
Page 53 of 85
12.6 GENERAL PURPOSE FUNCTIONS:
1) outportb()
PURPOSE
Write the BYTE data to the specified address. This address should be in the address
range of Selected Card resources. Use “Chkdas” utility to know the Card resources.
PROTOTYPE
void outportb(unsigned int PortAddr, unsigned char Data)
PARAMETERS
Name
PortAddr
Data
Type
Unsigned int
Unsigned Char
Input/Output
Input
Input
RETURN VALUE
NONE
EXAMPLE
outportb(0xd803,0x80);
ESA PCI DAS User Manual
Page 54 of 85
2) inportb()
PURPOSE
Reads the BYTE data from the specified address. This address should be in the
address range of Selected Card resources. Use “Chkdas” utility to know the Card
resources.
PROTOTYPE
unsigned char inportb(unsigned int PortAddr)
PARAMETERS
Name
PortAddr
Type
Unsigned int
Input/Output
Input
RETURN VALUE
Returns the data read from the specified address of ESA PCI DAS Hardware.
EXAMPLE
Data = inportb(0x8000);
ESA PCI DAS User Manual
Page 55 of 85
13.0 APPLICATION DEVELOPMENT USING DRIVER LIBRARIES:
Section I describes about the application development in VC++ 6.0.
Section II describes about the application development in VB 6.0.
Section III describes about the application development in Labwindows/CVI.
Section IV describes about the application development in DOS environment
using Turbo C compiler (User can use any 16-bit native compilers).
13.1 Visual Studio 6.0 (VC++)
13.1.1 Creating a New Console Application Project in Visual C++ 6.0:
1. Start the Microsoft Developer Studio.
2. Choose New from the File Menu.
3. Select Projects Tab. You should then see the following Dialog Box.
4. Enter the Project name and location where project-working folder should be
created.
5. Click OK button.
6. You should then see the following Dialog Box.
ESA PCI DAS User Manual
Page 56 of 85
6. Select the Simple Application and click Finish.
7. Copy “esapdas.dll”,”esapdas.lib” & “esapdas.h” files from Lib->Windows
folder, which is available in Drivers CD to current working directory.
9. Open the Application cpp file and add “#include “esapdas.h” and
write the application using the Driver Libraries.
11.Select Project -> Settings. You should then see the following diaog box.
ESA PCI DAS User Manual
Page 57 of 85
13. Select Link Tab in the Dialog box.
14. Specify “Esapdas.lib” at Object/library modules Textbox.
15. Click OK button.
16. Build the Application From Build Menu.
17. Run the Application.
Example:
#include <stdafx.h>
#include “Esapdas.h”
int main(void)
{
unsigned int dwError;
dwError = ESAPCIDAS_Open();
Write_82551CR(0x80);
Write_82552CR(0x9b);
while(!kbhit())
{
Write_82551PortA(0x55);
Write_82551PortB(0xAA);
Write_82551PortB(0xFF);
if (Read_82552PortA() == 0x55)
printf(“\r\n PortA Good”);
Else
Printf(“\r\n PortA Bad”);
if (Read_82552PortB() == 0x55)
printf(“\r\n PortB Good”);
Else
Printf(“\r\n PortB Bad”);
if (Read_82552PortC() == 0x55)
printf(“\r\n PortC Good”);
Else
Printf(“\r\n PortC Bad”);
}
ESAPCIDAS_Close();
return 0;
}
ESA PCI DAS User Manual
Page 58 of 85
13.1. 2 Creating a MFC Application Project in Visual C++ 6.0:
1. Start the Microsoft Developer Studio.
2. Choose New from the File Menu.
3. Select Projects Tab. You should then see the following Dialog Box.
4. Enter the Project name and location where project-working folder should be
created.
5. Click OK button.
6. You should then see the following Dialog Box.
ESA PCI DAS User Manual
Page 59 of 85
7) Select Dialog based radio button and click Finish.
8) You should then see the following Dialog box with added classes
Information.
ESA PCI DAS User Manual
Page 60 of 85
9) Click OK Button.
10) You should then see the following windows.
11) Add the controls as per requirement.
12) Add Callback functions for the controls by using the driver libraries.
13) Copy “esapdas.dll”,”esapdas.lib” & “esapdas.h” files from Lib->Windows
folder , which is available in Drivers CD to current working directory.
14) Select Project -> Settings. Select Link Tab in the Dialog box.
15) Specify “Esapdas.lib” at Object/library modules Textbox.
16) Click OK button.
17) Build the application from Build Menu.
18) Run the application.
Example Source is given in the Driver software CD under ExampleApp.Source Folder.
ESA PCI DAS User Manual
Page 61 of 85
13.2 Visual Basic 6.0 (VB)
13.2.1 Creating a Application Project in Visual BASIC 6.0:
1) Start Microsoft Visual Basic 6.0 environment.
2) Choose New Project from the File menu. You should then see the following dialog.
3) Select Standard EXE and click OK Button.
4) copy “esapdas.bas” & “esapdas.dll” to the current project directory.
5) Add “esapdas.bas” module to the current project by right clicking on the project
window -> add module option.
6) Place the controls( command button, text boxes etc..,) in the form.
7)Use the Driver Libraries as per the application requirement.
8) Build the Project
9) Run the application.
Example Source is given in the Driver software CD under ExampleApp.Source Folder.
ESA PCI DAS User Manual
Page 62 of 85
13.3 LabWindows/CVI 6.0
13.3.1 Creating Project in LabWindows/CVI 6.0:
1. Start the LabWindows/CVI 6.0.
2. Create a new project in LabWindows/CVI 6.0.
3. You should then see the following window.
4. Save the project.
5. Copy “esapdas.dll”,”esapdas.lib” & “esapdas.h” files from Lib->Windows
folder, which is available in Drivers CD to current working directory.
6. Create a new uir file from File Menu.
7. You should then see the following window.
ESA PCI DAS User Manual
Page 63 of 85
8. Right Click on the Panel and add the controls required. Add callbacks to the
controls.
9. Create new “C” source file and write the code using driver libraries.
10. Add .uir, .c & .lib files to the project from the Edit Menu.
11. Build the Application.
12. Run the Application.
Example Source is given in Drivers CD under “ExampleApp.Source” Folder.
ESA PCI DAS User Manual
Page 64 of 85
13.4 TURBO C Compiler (DOS Environment)
13.4.1 Creating Application in TURBOC:
1) Run the “Chkdas” utility from Drivers CD to know the ESA PCI DAS card
resources. This utility gives
i)
ESA PCI DAS card resources address listing.
ii)
Number of ESA PCI DAS Cards Existing.
2) Open the Turbo C editor and create a new project under “Project” Menu. Copy the
“esapdas.obj” & “esapdas.h” files from “Lib -> Dos” Folder, which is available in the
ESA PCI DAS Driver CD to the current project directory.
Add “esapdas.obj “ to the current project using “Add Item” option from
“Project” Menu.
Write your “C” source file by including ”esapdas.h”.
Add your “C” source file to the current project using “Add Item” option from
“Project” menu.
Build the project & run.
Please refer the examples given in the ESA PCI DAS Drivers CD.
ESA PCI DAS User Manual
Page 65 of 85
DESCRIPTION:
A problem that plagues Windows NT/2000 and Windows XP is it'
s strict control over
I/O ports. Unlike Windows 9x & ME, Windows NT/2000/XP will cause an exception
(Privileged Instruction) if an attempt is made to access an IO port that a user mode
program is not privileged to talk too. Actually it'
s not Windows NT that does this, but
any 386 or higher processor running in protected mode.
Accessing I/O Ports in protected mode is governed by two events, The I/O privilege
level (IOPL) in the EFLAGS register and the I/O permission bit map of a Task State
Segment (TSS). Under Windows NT, there are only two I/O privilege levels used, level
0 & level 3. User mode programs will run in privilege level 3, while device drivers and
the kernel will run in privilege level 0, commonly referred to as ring 0. This allows the
trusted operating system and drivers running in kernel mode to access the ports, while
preventing less trusted user mode processes from touching the I/O ports and causing
conflicts. All user mode programs should talk to a device driver, which arbitrates
access. The I/O permission bitmap can be used to allow programs not privileged
enough (I.e. user mode programs) the ability to access certain I/O ports. When an I/O
instruction is executed, the processors will first check if the task is privileged enough
to access the ports. Should this be the case, the I/O instruction will be executed.
However if the task is not allowed to do I/O, the processor will then check the I/O
permission bitmap. The I/O permission bitmap, as the name suggests uses a single bit
to represent each I/O address. If the bit corresponding to a port is set, then the
instruction will generate an exception however if the bit is clear then the I/O operation
will proceed. This gives a means to allow certain processes to access certain ports.
There is one I/O permission bitmap per task.
ESA PCI DAS User Manual
Page 66 of 85
14.0 APPLICATIONS FOR DATA ACQUISITION SYSTEM
Today most Scientists and Engineers are using Personal Computers for laboratory
research, industrial control and test and measurement. The componenets of a typical
PC based data acquisition (DAS) system are:
1. The Personal Computer
2. Transducers
3. Signal conditioning
4. Data acquisition hardware.
5. Software.
The PC used in the DAS determines the overall processing speed. Applications
requiring real time processing of high frequency signals will need a high speed, 32 bit
processor with its accompanying coprocessor or a dedicated plug-in processor such
as a DSP. For lower end applications, PCs of lesser configuration (8/16 bit) are
adequate.
The transducers sense physical phenomena and provide electrical signals that the
DAS hardware can accept. Typical examples of transducers are Thermo Couples,
Strain Gages, Flow Transducers etc. in each case, the electrical signals produced are
proportional to the physical parameters they are monitoring.
The electrical signals generated by the transducers must be converted into a form that
the DAS board can accept. The most common type of conversion is amplification. For
a highest possible resolution the signal should be amplified so that the maximum
voltage swing exceeds the maximum input range of the A/D converter. Other Signal
conditioning processes include lineriazation, isolation, filtering of unwanted signals
etc.
Data acquisition hardware consists of the DAS board like the mode ESA PCI DAS
card. Data acquisition board specifications include the number of channels, sampling
rate, resolution, range, accompanying noise, and non-linearity, all of which affect the
quality of digitized signal. The number of analog channel inputs is specified by both
single ended and differential input on boards that have both types of inputs. Single
ended inputs are all referenced to a common ground point. These inputs are used
ESA PCI DAS User Manual
Page 67 of 85
when the input signals are high-ground point. These inputs are used when the input
signals are high-level (greater than 1V), the leads from the signal source to the analog
input hardware are short (less than 15 ft.) and the input signals share a common
ground reference. If the signals do not meet the criteria, differential inputs should be
used. With differential inputs, each input has its own ground reference. Noise is
eliminated because the common-mode noise picked up by the leads is canceled out.
Sampling rate determines how often conversions can take place. Multiplexing is a
common technique for increasing the number of channels by routing multiple channels
to a single ADC and the programmable switching between the channels that is
connected to the ADC. Resolution is the number of bits that the ADC uses to
represent the analog signal. The higher the resolution, the higher the number of
divisions the range is broken into, and therefore, the smaller the detectable voltage.
Range refers to the minimum and maximum voltage levels that the ADC can quantize.
The DAS normally supports multiple ranges to enable you to match the signal range to
that of the ADC to take best advantage of the resolution available to accurately
measure the signal. The range resolution and gain available on a Data Acquisition
board determine the smallest detectable change in voltage. Gain and offset error can
be calibrated by applying a known voltage to the input while adjusting the
potentiometers provided on the board until the scaled value is correct. Another error
that can affect the analog input is noise, which reduces the resolution of the ADC
because as the noise level approaches 1 LSB, the ADC can no longer distinguish
between a signal increase of one code width or equivalent level noise. Sampling at a
higher rate and averaging the data acquired can reduce the errors due to noise.
Analog output acquity (DAC) is often required to provide stimulus in a data
acquisition system. The specifications of DACs include settling time, slow rate and
resolution.
Digital I/O(DIO) interface on DAS are provided to control processes, generate
patterns for testing and communicate with peripheral equipment. The input parameters
are the number of digital lines available, the rate at which digital data can be input or
output on these lines and the driver capability of these lines.
Counter / Timer circuitry is useful for many applications including counting the
occurrences of a digital event, measuring digital pulse timing and generating square
ESA PCI DAS User Manual
Page 68 of 85
waves and pulses. The most significant specifications for the operation of a
counter/timer are the resolution and clock frequency. The resolution is the number of
bits the counter uses to count with. A higher resolution means that the counter can
count higher.
Software transforms the Pc and data acquisition hardware into a complete data
acquisition analysts and display system. Programming the board is the lowest level of
Data Acquisition Programming. Driver Software provided by the board manufacturer
simplifies. Data Acquisition Programming by taking care of the low level hardware
programming details and giving you high level function calls that can be used with
conventional programming languages.
The various types of applications are listed below:
MEASUREMENT & CONTROL:
MEASURE
- Pressure
- Moisture
- Temperature
- Flow
- Displacement
- Multi-channel Audio
SCIENTIFIC:
Chromatography
Speech Processing
Electro physiology
- Neuron stimulation
- Muscular stress test
Psychology
- Infant stimulation
- Stimulus control
- Response measurement
Vibration analysis
ESA PCI DAS User Manual
CONTROL
- XY plotters
- Recorders
- Stepper Motors
- Process Actuators
INDUSTRIAL:
Process Automation
- Analog Control loops
- PID loops
Test Measurement
- PC board test
- Component test
- Particle counting
Energy management
Environmental monitoring
Waveform generation
Page 69 of 85
Appendix A
Schematics
ESA PCI DAS User Manual
Page 70 of 85
ESA PCI DAS User Manual
Page 71 of 85
ESA PCI DAS User Manual
Page 72 of 85
ESA PCI DAS User Manual
Page 73 of 85
ESA PCI DAS User Manual
Page 74 of 85
ESA PCI DAS User Manual
Page 75 of 85
ESA PCI DAS User Manual
Page 76 of 85
ESA PCI DAS User Manual
Page 77 of 85
ESA PCI DAS User Manual
Page 78 of 85
ESA PCI DAS User Manual
Page 79 of 85
Appendix B
Specifications
SPECIFICATIONS
ELECTRICAL SPECIFICATIONS
a) ABSOLUTE MAX RATINGS
a. Maximum +ve input voltage
b. Maximum -ve input voltage
c. Maximum differential between
Digital and Analog grounds
d. Relay driver rating
: + 16.5V
: - 16.5V
: ± 10V
: 500mA
b) ANALOG INPUT
a.
b.
c.
d.
e.
f.
g.
h.
Number of input channels
Analog resolution
Type of ADC
Input type
Analog input
Ranges
Input Bias Current
Input impedance
:
:
:
:
:
:
:
:
16 single ended, 8 differential
12 bit,1 in 4096
Successive approximation
Unipolar, Bipolar
± 10V, ± 5V, 0 to +10V
Software selectable
± 200 pA
POWER ON < 1 T ohm
POWER OFF < 1 K ohm
I. Programmable gain Multiplexer
Rating : 1,2,5,10
j. Over Voltage Protection
: ± 30 V (Power ON condition)
k. Fault protection voltage
: ± 10 V (Power OFF condition)
C) DATA ACQUISITION
a. Sampling rate(Single channel)
: 100k sample / sec (Typical)
d) ANALOG OUTPUT
a.
b.
c.
d,
Number of DACs
Type of DAC
Out put Voltage Range
Current drive capability
:
:
:
:
2
12 bit multiplying
0-10v, ± 10V (Software selectable)
± 5 mA
e) DIGITAL I/0
a.
b.
c.
d.
e.
f.
g.
h.
Unbuffered driver lines ( 1 TTL load) :
I/O lines
:
Output lines
:
Input lines
:
High current Relay driver lines
:
Optically isolated
:
Externally latched lines
:
Compatibility (input)
:
ESA PCI DAS User Manual
13
8
3
2
7
2 Input & 2 Output
8
TTL Compatible
Page 80 of 85
f) TIMER CAPABILITY
a.
b.
c.
d.
Number of channels
Resolution
Base Clock
Compatibility
:
:
:
:
3
16 bits
1.7897725 M.Hz
TTL Compatibility
MECHANICAL SPECIFICATIONS
Length
Height
=
=
25.40 cms
10.82 cms (Including the height of the finger connectors)
INTERFACE SPECIFICATIONS
a. 25 pin D - Type Male connector : for ADC & DAC signals
b. 50 pin Berg Connector
: for DIO signals
ENVIRONMENTAL SPECIFICATIONS
a. Operating Temperature
: 0 to + 70 C
b. Storage Temperature
c. Relative humidity
d. Altitude
: 0 to + 50 C
: To 95% non condensing
: To 2286 Mts
ESA PCI DAS User Manual
Page 81 of 85
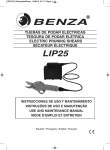
Appendix C
Component Layout
ADDDA JUNCTION BOX
25
26
J1
J2
J3 26 PIN FRC ST.MALE
CH0/CH0+
CH8/CH
JC0
JC8
CH1/CH1
CH9/CH
CH2/CH2
CH10/CH2-
JC7
CH3/CH3+
JC15
RC0
CH11/CH
CH12/CH4-
CH4/CH4
CH13/CH
CH5/CH5
CH14/CH6-
CH6/CH6
CH7/CH7
CH15/CH7-
GND
DAC1
GND
RC15
DAC2
GND
EXTCON
GND
GND
J4 25 PIN DTYPE ST.MALE
1
14
ESA PCI DAS User Manual
13
25
Page 82 of 85
Appendix D
Connector Details
CONNECTOR J2 : DIGITAL I/O 25 X 2 BERG
SIGNAL
PIN
SIGNAL
1
2
3
5
7
9
11
13
15
17
18
19
20
21
22
23
24
25
26
27
28
29
30
RLY0
FWD
RLY1
RLY2
RLY3
RLY4
RLY5
RLY6
PA7
PB0
PB1
PB2
PB3
PB4
PB5
PB6
PB7
TIMER2
CLOCK2
LINP0
LINP1
LINP2
LINP3
31
32
33
34
35
36
37
38
39
40
41
42
43
44
45
46
47
48
49
50
4,6,8
LINP4
LINP5
LINP6
LINP7
EXTLATCH
PC0
IS0S
IS1S
PC
PC3
PC6
PC7
IS2
IS2R
IS3
IS3R
IS0
IS0R
IS1
IS1R
DGND
RLXY
FWD
LINPX
EXTLATC
PXX
ISXX
TIMER2
CLOCK2
GND
:
:
:
:
:
:
:
:
:
PIN
Where
ESA PCI DAS User Manual
Relay output drivers (Line drivers)
Free wheel diode on the ULN 2003
External latch input
External latch enable (Active rising edge)
General purpose digital I/O
OPTO-Isolated signal
Timer2 output
Clock input for timer2
Digital Ground.
Page 83 of 85
DIO CABLE DETAILS
50 PIN BERG
CONNECTOR
1
2
3
4
5
6
7
8
9
10
11
12
13
14
15
16
17
18
19
20
21
22
23
24
25
ESA PCI DAS User Manual
25 PIN D
CONNECTOR 1
1
2
3
4
5
6
7
8
9
10
11
12
13
14
15
16
17
18
19
20
21
22
23
24
25
50 PIN BERG
CONNECTOR
26
27
28
29
30
31
32
33
34
35
36
37
38
39
40
41
42
43
44
45
46
47
48
49
50
25 PIN D
CONNECTOR 2
25
24
23
22
21
20
19
18
17
16
15
14
13
12
11
10
9
8
7
6
5
4
3
2
1
Page 84 of 85
CONNECTOR DETAILS OF AD/DA JUNCITON CARD
CONNECTOR J3: ANALOG I/O 26 PIN FRC MALE CONNECTOR
CONNECTOT J4: ANALOG I/O 25 PIN D TYPE MALE CONNECTOR
J3
FRC
1
2
3
4
5
6
7
8
9
10
11
12
13
J4
FRC
1
14
2
15
3
16
4
17
5
18
6
19
7
SIGNAL NAME
CH0 / CH0+
CH1 / CH1+
CH2 / CH2+
CH3 / CH3+
CH4 / CH4+
CH5 / CH5+
CH6 / CH6+
CH7 / CH7+
CH8 / CH0CH9 / CH1CH10 / CH2CH11 / CH3CH12 / CH4-
J3
FRC
14
15
16
17
18
19
20
21
22
23
24
25
26
J4
FRC
20
8
21
9
22
10
23
11
24
12
25
13
-
SIGNAL NAME
CH13 / CH5CH14 / CH6CH15 / CH7GND
GND
GND
GND
GND
DAC 1
DAC 2
GND
EXTCON
GND
NOTE : The DATA ACQUISITON CARD by default expects the input to be an voltage signal. If the
input is a current source then populate the resistor (250 E) at RCx and short the jumper JCy for
respective channels ( refer the table given below ) on the JUNCTION CARD.
CH
NO
0
1
2
3
4
5
6
7
Resistor
(RCx)
RC7
RC6
RC5
RC4
RC3
RC2
RC1
RC0
Jumper
(Jcy)
JC0
JC1
JC2
JC3
JC4
JC5
JC6
JC7
CH
NO
8
9
10
11
12
13
14
15
Resistor
(RCx)
RC8
RC9
RC10
RC11
RC12
RC13
RC14
RC15
Jumper
(Jcy)
JC8
JC9
JC10
JC11
JC12
JC13
JC14
JC15
NOTE : In the differential mode of operation, the differential analog inputs should be connected to
the pins marked CH+ and CH –
E.g : To connect the differential analog input to channel 3, connect the signal to Ch3+ and Ch3-
ESA PCI DAS User Manual
Page 85 of 85