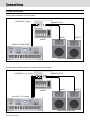
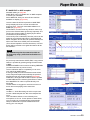
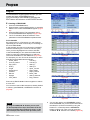
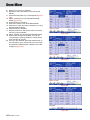
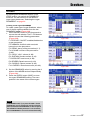
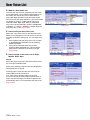
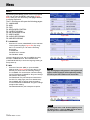
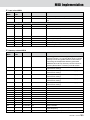
1
Audya Series USER MANUAL 2 KETRON • AUDYA IMPORTANT SAFETY PRECAUTIONS CAUTION: TO REDUCE THE RISK OF ELECTRIC SHOCK, DO NOT REMOVE COVER (OR BACK). NO USER-SERVICEABLE PARTS INSIDE. REFER SERVICING TO QUALIFIED SERVICE PERSONNEL. Warning sign, within equilateral triangle, is intended to alert the user to the presence of uninsulated “dangerous voltage” within the product’s enclosure that may be of sufficient magnitude to constitute a risk of electric shock to persons. The exclamation point within an equilateral triangle is intended to alert the user to the presence of important operating and maintenance (servicing) instructions in the literature accompanying the appliance. This appliance has a serial number located on the rear panel (Audya) or on the bottom panel (Audya 4, 5 and 8). Please record the model name and the serial number and retain them for your records. Model name Serial number WARNING: TO PREVENT FIRE OR SHOCK HAZARD, DO NOT EXPOSE THIS APPLIANCE TO RAIN OR MOISTURE. CE Marking Information a) Applicable electromagnetic environment: E4 b) Peak inrush current: 15 A 1 Read these instructions. 2 Keep these instructions. 3 Heed all warnings. 4 Follow all instructions. 5 Do not use this apparatus near water. 6 Clean only with dry cloth. 7Do not block any ventilation openings. Install in accordance by using the manufacturer’s instructions. 8Do not install near any heat sources such as radiators, heat registers, stoves, or other apparatus (including amplifiers) that produce heat. 9Do not defeat the safety purpose of the polarized or grounding-type plug. A polarized plug has two blades with one wider than the other. A grounding type plug has two blades and a third grounding prong. The wide blade or the third prong are provided for your safety. If the provided plug does not fit into your outlet, consult an electrician for replacement of the obsolete outlet. 10Protect the power cord from being walked on or pinched particularly at plugs, convenience receptacles, and the point where they exit from the apparatus. 11Only use attachments/accessories specified by the manufacturer. 12Use only by using the cart, stand, tripod, bracket, or table specified by the manufacturer, or sold by using the apparatus. When a cart is used, use caution when moving the cart/apparatus combination to avoid injury from tip-over. 13Unplug this apparatus during lightning storms or when unused for long periods of time. 14Refer all servicing to qualified service personnel. Servicing is required when the apparatus has been damaged in any way, such as power-supply cord or plug is damaged, liquid has been spilled or objects have fallen into the apparatus, the apparatus has been exposed to rain or moisture, does not operate normally, or has been dropped. • Do not expose this apparatus to drips or splashes. • Do not place any objects filled with liquids, such as vases, on the apparatus. • Do not install this apparatus in a confined space such as a book case or similar unit. • The apparatus should be located close enough to the AC outlet so that you can easily grasp the power cord plug at any time. • The main plug is used as the disconnect device; the disconnect device shall remain readily operable. • An apparatus with Class I construction shall be connected to an AC outlet with a protective grounding connection. • Excessive sound pressure from earphones and headphones can cause hearing loss. • The apparatus draws nominal non-operating power from the AC outlet with its STANDBY/ON in the Standby position. • No live flame, like candles lights, must be placed on this apparatus. For European Users Disposal of old appliance 1 When this crossed-out wheeled bin symbol is attached to a product it means the product is covered by the European Directive 2002/96/EC. 2 All electrical and electronic products should be disposed of separately from the municipal waste stream via designated collection facilities appointed by the government or the local authorities. 3 The correct disposal of your old appliance will help prevent potential negative consequences for the environment and human health. 4 For more detailed information about disposal of your old appliance, please contact your city office, waste disposal service or the shop where you purchased the product. KETRON • AUDYA 3 Table of contents Introduction............................................... 5 Main features................................................ 5 Top panel....................................................... 7 Rear panel..................................................... 8 USB connectors on the front side................ 8 The new panel on Audya 4 and 5................ 9 Connections............................................. 12 AUDIO connections..................................... 12 MIDI connection.......................................... 13 VIDEO connection....................................... 14 USB connection........................................... 14 Display and function keys...................... 16 Display......................................................... 16 F1, F2, F3, F9 and F10 function buttons..... 16 User buttons................................................ 17 Arranger Conductor buttons..................... 17 Selecting voices....................................... 18 Selecting the Style.................................. 21 Play Control............................................. 22 Mixer........................................................ 24 Player....................................................... 25 Enable Number File.................................... 32 Wave Sync................................................... 33 MIDI Remix.................................................. 34 Voicetron................................................. 37 Master...................................................... 39 Main View............................................... 40 Autoswitch Time......................................... 41 Main View description................................ 42 MIDI Player (MAIN VIEW)........................... 44 WAVE Player (MAIN VIEW)......................... 45 MP3/SFX Player (MAIN VIEW)..................... 46 DJ LOOP Player (MAIN VIEW)..................... 47 Program....................................................... 48 Program................................................... 48 Registration................................................. 60 Play List........................................................ 64 Key Tunes.................................................... 65 Double, Harmony........................................ 66 Style View............................................... 67 Audio Style Modeling................................. 69 The Audio Style Modeling sections........... 72 User Audio Drum........................................ 75 User Live Guitar........................................... 76 Edit Pattern................................................. 77 User Styles................................................... 81 Style Mode.................................................. 82 GM Part.................................................... 89 4 KETRON • AUDYA Drum Mixer................................................... 92 Drum Set........................................................ 95 Drawbars....................................................... 97 RAM Ins / Supersolo..................................... 98 MSP Function.............................................. 99 Voice List................................................ 101 User Voice List........................................... 102 Menu...................................................... 104 Voicetron................................................... 130 Search (Main View)................................... 138 Search........................................................ 139 User Assignable..................................... 140 Text scrolling......................................... 141 Disk........................................................ 142 USB drive................................................... 143 Technical Tables..................................... 144 GM Voices.................................................. 144 Drum Set.................................................... 146 Audio Drum............................................... 147 Groove Bank (Drum 2).............................. 149 Bass Bank................................................... 151 Arp & Licks................................................. 153 Live Guitar................................................. 155 AUDYA FACTORY STYLES......................... 156 Drum Set.................................................... 161 Voice Preset............................................... 182 MIDI Implementation............................ 184 Control Change......................................... 185 Non Registered Parameter Numbers....... 186 Specifications........................................ 201 Introduction Thank you for purchasing Ketron Audya Advanced Music Station. In this “User Manual” you can find the descriptions of all the main functions to get started by using the keyboard. Before using the unit, we strongly recommend you to read this manual thoroughly to ensure that you understand the operation of its many useful and convenient functions. After you have finished reading this manual, please keep it in a safe place for future reference. Playing the DEMO songs 1. Press the REGISTRATION and PLAY LIST buttons simultaneously. 2. By using the buttons from F1 to F10 (to the right and to left of the display) select one of the 10 demo songs displayed on the current page. 3. By using the DATA/VALUE wheel you can scroll various pages of demo songs. 4. Use the START/STOP button for start or stop the playback of the current song. F 5. Press either the REGISTRATION or the PLAY LIST buttons to exit the DEMO mode. F Main features Audya is the new state-of-the-art arranger keyboard by Ketron, featuring many advanced functions, designed for live entertainment and professional use. It offers a powerful audio multiplayer, a very high quality sound engine and an unique automatic accompaniment arranger. Audya includes a versatile video support, separate audio connections and three USB ports to connect to a computer and other storage devices. ▀▀ New sounds and Supersolo voices Following the Best Natural Sounds tradition by Ketron, Audya includes a new high quality sound engine: 360 MB stereo and multilayer sound library, including a new Stereo Grand Piano featuring an outstanding natural resonance. There are an additional 64 MB RAM for custom sounds that can be quickly loaded in memory from disk while playing. Audya also has a brand new DSP section, with Rotor, Distortion, Phaser, Flanger, Tremolo, Chorus, Reverb effects, and more. Audio Style Modeling ▀▀ For the first time ever, an arranger keyboard features real audio grooves of drums, percussions, basses, guitars, arpeggios and licks, all synchronized to MIDI clock. A rich audio recordings library played by famous drummers and musicians have been added to the project, and the live performances of the musicians have been recorded to match the styles and MIDI file playback with no distortion nor loss of quality. Moreover, also the live guitar grooves are synchronized perfectly to styles and MIDI files with no pitch shifting when the tempo is changed. ▀▀ Player The professional player can play up to five tracks simultaneously: that is two WAVE files, two MP3 files and one MIDI file, with prelisten feature on headphones, play list and crossfade functions. KETRON • AUDYA 5 Introduction ▀▀ Karaoke A wide range of lyric options to display the text within MIDI files or synchronized to audio files are available. ▀▀ MACRO RECORDING Global recording of the performance’s events (under Menu). Recording starts with Start Rec and stops by pressing the Record button. The file is memorized under the MIDI folder, with the .Msr extension (Macro Song Recording). To start the playback just select the file and press Enter (page 129). ▀▀ USER AUDIO DRUMS • New function that allows to replace the internal Audio Drum with custom Loops Wave of the user located into a new Audya folder called User Audio Drum. • The Wave Loops must be 44 KHz , 16 bit and their name must include the @ symbol followed by the precise BPM information. For example: [email protected]. • The Loops are automatically synchronized with MIDI and may be associated to each Style part such as 4 Arranger Variations, Fill In, Break, Intros, Endings. • Provided under Style Mode > Drum2/2 an option to skip the initial automatic loading for the User Audio Drum resources. ▀▀ ▀▀ ▀▀ ▀▀ MIDI and Audio Recording You can record and remix your songs within a complete audio/MIDI hard disk recording environment. Drawbars Audya includes a built-in professional organ with nine faders for digital Drawbars control. You can create in real time all the sonic power of a real tonewheel organ, featuring percussion, click, rotary speaker, distortion, vibrato and much more. USB Audya has an internal large hard disk accessed by USB connection from a computer. In this way, you can easily manage the musical content of the disk and make backup copies of your songs and settings. Moreover, two USB ports on the front side panel accept any USB storage device such as pendrives, external hard disks, CD and DVD players, and more. Voicetron The new Voicetron section features a vocalizer with a new five voices engine. The vocalizer has an effects library with many presets that can easily fit all the needs of the 6 KETRON • AUDYA singer. You can also edit the parameters to your needs, for example, to set the Vocalizer effects set to automatically follow the Arranger or the MIDI file playback. ▀▀ User interface The top panel is designed to help musicians especially during their live performances. Seventeen sliders (one slider is User assignable) allow powerful and efficient control over volumes and effects. There are also numberus buttons with a built-in LED showing their on/off status. A large colourful LCD display with TFT technology (320x240 pixels) and a multi-page system based on function buttons around the display allow an easy navigation in the menus and the settings pages. ▀▀ Key Tunes You can assign a song to each button of the keyboard. Every button tune has loop capabilities and can be played as a Dj. ▀▀ User Live Guitars New User LIVE GUITARS suitable on Ins-Ram memory. ▀▀ Edit Pattern New menu where create or edit your own styles. ▀▀ Wave Edit/Sampler New Menu for Wave track Sampler and MSP Edit. Introduction Top panel The front panel of Audya is divided in various operative sections. In the figure below, each number corresponds to its description. 3 5 NOTE Some buttons and controls on the front panel are marked by a blue serigraphy, meaning that a second function is available accordingly to the selected operative mode. 6 Ketron - Audya - frontale - COLORE - 03/07/2008 Ketron - Audya - frontale - NERO - 03/07/2008 TRANSPOSER – 1 2 PITCH OCTAVE – MODULATION SLOW ROTOR DATA / VALUE + PORTAMENTO AFTER TOUCH DRUM SET DRUM MIXER + MANUAL BASS TO LOWEST BASSIST MODE FAST SPLIT PIANIST LEFT VOICE USER ASSIGNABLE STYLE VIEW 7 SEARCH MIDI RESET ENTER USER AUX 3/4 PFL STYLE MASTER DRUM MIDIMIX BASS ORCHESTRA DRUM BASS CHORD LEAD LOWER EXIT LEFT 2ND RIGHT 9 8 USB VOICE 1 BALLAD 2 POP 3 DANCE PIANO EL.PIANO CHROM ORGAN ACCORDION GUITAR BASS STRINGS 4 PARTY 5 ROCK 6 COUNTRY CHOIR BRASS SAX FLUTE PAD SYNTH ETHNIC EFFECT SFX 7 SWING 8 LATIN 9 R&ROLL PROGRAM 2ND VOICE GM VOICE RAM INS * 0 FOLK PRESET USER SUPERSOLO WAVE DJ LOOP UNPLUGGED VOICES ARRANGER t STYLE GM PART MORPHING 4 e q PLAY CONTROL USER STYLE SAVE # BALLROOM DRAWBARS PLAYER MP3 SFX MIDI KEY TUNES DOUBLE HARMONY VOICETRON MASTER VOICE LIST MICRO VOCALIZER FADE CROSSFADE WAVE MP3 MIDI TALK BACK MENU EDIT PAUSE START REGISTRATION DISK PLAY LIST DEMO ARRANGER CONDUCTOR RECORD TAP 16’ 8’ 5 1/3’ 4’ 2 2/3’ 2’ 1 3/5’ 1 1/3’ 1’ 1 INTRO/ENDING 2 KEY START KEY STOP A B C 3 0 1 Pitch This wheel changes the pitch of the sound currently selected for the right hand. The default value is ±2 semitones, modifiable from MENU. 2Modulation This wheel changes the modulation of the sound currently selected for the right hand. The default value of sensitivity is 14, modifiable from MENU. 3Play Control Section for the main controls on sound: Transposer, Octave, Rotor, etc. (see on page 22). 4User / Arranger / Voices Mixer section for the Arranger parts, the right/left hand, the Style, etc. In DRAWBARS mode you can control the Drawbars parameters (see on page 20). 5Function buttons F1 - F5 The function buttons at left of the display allow the selection of voices, styles, controls, parameters, etc. that are shown on the left side of the display accordingly to the different operative modes. By pressing a function button, the name on the display is highlighted in blue colour. 6Function buttons F6 - F10 As above. Function buttons at right of the display. 7Display Colourful backlit liquid crystal display (LCD). See on page 16 the explanation on how to operate the display. 8Brightness Small knob for the display brightness adjustment. Turn clockwise/counter-clockwise in order to match the right brightness of the display accordingly to your needs and the environmental light conditions. D [RIFF] FILL IN BREAK TEMPO SLOW FAST HOLD COUNT IN STOP RESTART w STYLE REMIX MIDI 1 TRACK 2 S/PDIF - LINE IN ORIG. TEMPO r y u i 9User, Back and Forward buttons The five User buttons and two Back Ô and Forward Ô buttons below the display allow the selection of the functions that appear on the display accordingly to the operative modes (see on page 16). 0Arranger Conductor This section contains the buttons for real time control of the Arranger: Intro/Ending, button Start/ Key Stop, ABCD, Fill In, Break, Tempo, Hold (see on page 17). qData/Value This group is made of one wheel and four CURSOR buttons (Ó Á § ¶). By using the wheel and cursor buttons you can input data, change parameter values or navigate through the lists and menu items, accordingly to the operative modes (see on page 18). wTransport This section includes Start/Stop and Count In/ Restart controls in Arranger mode or Start/Stop and Pause for the song currently selected. eStyle This section is for the selection of the Arranger styles (see “Selecting the Styles” on page 21). rUser Style/Disk area This section is for the User Styles selection and the disk management (see on pages 81 and 142). tVoice Section dedicated to the selection of the voices (see “Selecting voices” on page 18). yPlayer Multimedia Player (see “Player” on page 25). uVoicetron Microphone and voice effects (see “Voicetron” on page 37). iMaster Main output control (see “Master” on page 39). KETRON • AUDYA 7 Introduction Rear panel All the connections to external devices are on the rear panel. In the Figure below, each number corresponds to its description. 1 2 3 4 5 6 7 8 9 1 Headphone Standard stereo jack for the headphone. The Master volume adjusts also the headphone output level. 2Gain 2 Gain adjustment of the signal input level of the Micro 2 jack. 3Micro 2 Standard combo mono jack for the connection of a dynamic microphone. 4Micro 1 Standard combo mono jack for the connection of a dynamic microphone. 5Gain 1 Gain adjustment of the signal input level of the Micro 1 jack. 6Main Out Two standard mono jacks for main right/left or mono (RIGHT, LEFT/MONO) outputs to be connected to a PA system. 7Aux Out Four standard mono jacks as auxiliary outputs to be connected to monitors, mixers, outboard effects, etc. 8S/PDIF Standard RCA connectors for stereo digital input and output with digital devices (CD Player, digital console, etc.) 0q w e r t y 9Line In Standard RCA connectors for line right/left input (RIGHT, LEFT) of stereo devices with line level signal (CD Player, etc.) 0Sustain Pedal Standard mono jack for the connection of one Sustain pedal (optional). qVolume Pedal Standard stereo jack for the connection of one Volume pedal (optional). wFoot Switch Standard multipolar connector for an optional pedal to control internal functions. eMIDI Standard MIDI IN/IN2 (KEYB), MIDI OUT and MIDI THRU jacks. rUSB Device Standard USB port (type-B) for the connection to a personal computer. tVideo Interface Standard VGA jack for the connection to an external video VGA monitor. yMain Switch/Fuse Standard AC power connection (220 V) with ON/ OFF switch and protection fuse. USB connectors on the front side On the front panel, there are two USB ports (type-A) for easy connection to USB devices such as pen drives, card readers, etc. For the connection to a computer, please use the USB connector on the rear panel. 1 SB connector 1 1 U USB connector for pen drives and other USB devices (card readers, players, hard disk, etc.) 2USB connector 2 The same of USB 1. 2 NOTE Please, do not use a USB cable longer than 30 cm. 8 KETRON • AUDYA Along the keyboard, from C3 to E6, you can find letters and numbers for easy input of names, when saving files on the hard disk, and for a quick file search. On Audya 4 and Audya 8 use arrows key. (Ó Á § ¶) Introduction The new panel on Audya 4 and 5 Multi-Tabs are made of a group of 16 buttons on the left side of the keyboard with which you can activate and control many of the functions provided by the instrument. In the various operating modes you can control the mute percussion sections, direct access to 16 shares of General Midi, control the playlist, change the pitch of the tempered scale. Moreover, the functions can be assigned directly to these keys by the user, who can customize the tool to suit his needs and his own way of playing. By default these buttons are set as printed on the panel as follows: 1. Audio reset: Resynchronization of style between MIDI and Audio. 2. Wave filter: It assigns the user filter wave to the slider. 3. Micro rev.: It assigns the reverb into the micro slider user. 4. Wha to pedal (page 59) 5. Bass to root (page 86) 6. Unplugg: switch off all style parts except Live Guitar, Arp&Lick or Chord (page 11) 7. Lead (page 25) 8. Lyric (page 25) 9. Juke-box (page 123) 10. Zoom (page 25) 11. Autocrash (page 85) 12. After fill (page 83) 13. Fill to arr. (page 83) 14. Auto fill (page 83) 15. Reintro (page 140) 16. Fill to end KETRON • AUDYA 9 Introduction ▀▀ MULTI-TABS MENU By pressing the MODE button, the menu management Multi-Tabs will open. By pressing the F1 .. F6 function keys you can activate various modes of operation which will be described in detail in the following section. F1) DRUM ON/OFF: (Figure 1) DRUM ON/OFF mode enables or quickly mute the percussive instrument sections. The correspondence between the multi-tabs and percussion group is as follows: Tab1 Kick Tab2 Snare (Snare, Rim Shot) Tab3 Hi Hat Tab4 Cymbals (Crash, Ride, Cup) Tab5 Toms/FX Tab6 Tamb Tab7 Latin 1 (Congas , Bongos, Tambora) Tab8 Latin 2 (Cowbell, Guiro, Claves) Tab9 Latin3/ (Maracas, Cabaza, Shaker, Guira, Whistle) Tab10 CLAP Figure 1 • When the LED is lit, the section is muted. The multi-tab #14 and #15 enable the solo function of the percussion group of the kicks and the hi-hats. Multi-Table #16 has the RESET function, that is, un-mute all the percussive sections currently in this state and restores the normal operation of the percussion part. F2) GM PAGE: (Figure 2) This mode allows to access to 16 parts of General Midi by only pressing the corresponding multi-tab. If you use a midi file, this mode is useful to fast access to all parameters of the various tracks of the midi file. For example you can change the program change of the bass and the drums inside a midi file, by pressing the multi-tab of the track and modify the parameters as explained in GM Part Chapter. Figure 2 F3) ARAB. SCALE: (Figure 3) By pressing multi-tab 1 to 12 you can set the alterations on the 12 notes of the musical scale. When the LED is lit, the note of the multi-tab is altered, when the LED is off, the note has no alterations. You can quickly restore the ordinary scale by pressing the multi-tab 16 (RESET). The amount of hundredths of a semitone about the alteration for each individual note can be set from the ARABIC SCALE menu on the MENU -> Keyboard control -> Arabic page. Figure 3 10 KETRON • AUDYA Introduction F4) ASSIGN.TABS: (Figure 4) This mode allows to assign functions called by each of the 16 multitabs. You can therefore customize the multi-tabs configuration and assign the desired function to them. In order to make the assignment, simply select the desired multi-tabs by pressing DATA CURSOR (Up and Down) and scroll through the available functions by pressing DATA CURSOR (Left and Right) or using the dial. The following table shows the available functions. Audio Reset Micro Rev. Autocrash Fill/Break Sustain Soft Sostenuto Arr. A Arr. B Arr. C Arr D Int./End 1 Int./End 2 Int./End 3 Fill 1 Fill 2 Fill 3 Fill 4 Fill In Break 1 Break 2 Break 3 Break 4 Break Start Stop FillToArr. Key Start Key Stop Hold Tempo+ TempoTranspTransp+ Voice To Arr. ReIntro Auto Fill After Fill Inter.Gtr. Manual Bass Bas Mono/Poly Swing Bass BassToRoot Bassist Bass Sust. BasToLowest Lower Mute Low.Off Stop Lower1 Hold Lower2 Hold Pianist PianistSustain Accordion Swell Left Drum Fade Out Manual Drum Crash Play Kick1 Play Kick2 Only Kick Drum&Bass Kick Off Snare Off HiHat Off Cymbal Off Tom/Fx Off Rimshot Off Latin1 Off Latin2 Off Latin3 Off ClapFx Off minor 7th F5) PLAYLIST: This mode allows you to drive the first 16 tracks of any loaded playlist. The first press on the button starts the corresponding track playback, and re-selecting the same button, while the LED is lit, the track playback is stopped. Figure 4 m7th 5+ dim 6th 7th+ Midi Reset Lead Mute Lyric On/Off. Zoom A.play On/Off Loop On/Off Text PageText Page+ Cross Fade Wha-Wha Reverb Chorus Echo/Delay Dist./Overdr. Voicetron Micro On/Off Micro Talk DryOnStop Voc. On/Off Voice Down Voice Up Regis Down Regis Up 2nd Voice Harmony Double Rotor On/Off Rotor Slow/Fast Arabic_1 Arabic_2 Arabic_3 Arabic_4 Arabic_5 Arabic_6 Arabic_7 Arabic_8 Arabic_9 Arabic_10 Arabic_11 Arabic_12 Arabic_13 Arabic_14 Arabic_15 Arabic_16 Right Boost Exit Style Stop Pause/Count In/Res. Program/Preset Aftertouch Portamento EndOnStop FillToEnd Left Voice Unplugged Glide Jukebox Wave Filter. Enter Back/Forward Tab File Up/Down Sub Reg. Up/Down Back/Forward Tab Enter File Up/Down Sub Reg Up/Down F6) FACTORY TABS: It sets the multi-tabs factory default. KETRON • AUDYA 11 Connections AUDIO connections Stereo jack connection to a PA system. LINE INPUT 1 and 2 MAIN OUT L/R INPUT L MIXER INPUT R MAIN OUT RIGHT/LEFT AMPLIFIED SPEAKERS Connecting 4 auxiliary outputs to a mixer and to a PA system. MAIN OUT L/R LINE INPUT 1, 2, 3 and 4 MIXER INPUT L INPUT R AUX OUT 1, 2, 3 and 4 AMPLIFIED SPEAKERS 12 KETRON • AUDYA Connections Connecting one or two microphones and one headphones. MICRO 2 MICRO 1 STEREO HEADPHONES MIDI connection MIDI connection to an external interface connected to a computer. AUDIO/MIDI USB INTERFACE (or FIREWIRE) MIDI IN MIDI OUT MIDI OUT USB MIDI IN COMPUTER WITH A DAW APPLICATION (Cubase, Pro Tools, SONAR, Logic, Reaper, Live, Reason, Fruity Loops, Sequel, etc.) KETRON • AUDYA 13 Connections VIDEO connection Connecting a VGA monitor. VGA MONITOR VIDEO PORT USB connection USB connection to a computer. COMPUTER CONNECTED VIA USB USB DEVICE 14 KETRON • AUDYA Connections ▀▀ USBconnection procedure 1. Connect the USB cable to the USB DEVICE port of Audya, and to the USB port of a computer. 2. After a while, “USB connected” will appear on the display of Audya (Figure A). All the functions on the front panel are disabled. 3. After a while, a screen like Figure B should appear on the screen of your computer. From this windows you should choose the “Open folder to view files using Windows Explorer” option (Figure B). Anyway, you will be able to open Audya drive from your local computer resources. You will see Audya drive as any ordinary “Removable Disk”. 4. After opening the Audya hard disk root folder, you can handle the files like any ordinary storage device (Figure C). 5. You can copy from and to the internal folders of Audya hard disk the following file types: • MP3 • MIDIFILE • STYLES • PLAYLIST • DJ_LOOPS • INSTRUMENTS • REGISTRATION • WAVE • SFX • ETC. 6. After you finished copying the files, please follow the USB hardware SAFE REMOVAL procedure and disconnect the USB cable from the rear panel of Audya and/or from the computer USB port. In Windows OS, you can click on the icon located on the task bar. A pop-up window will open allowing you to disconnect the USB device safely. 7. After a while, Audya will operate again. You do not need to restart Audya. Figure A Figure B For advanced file handling and/or file updating on the internal hard disk of Audya, please see “Disk” on page 142. Figure C KETRON • AUDYA 15 Display and function buttons Display The heart of Audya is the display. The F1-F5 function buttons to the left, the F6-F10 function buttons to the right and the five User buttons below the display allow you to select the items displayed in the various screens. 1 2 4 1 F1-F5 function buttons Press the five function buttons from F1 to F5 to select one voice (VOICE) or one STYLE or a menu displayed on the display, for example. 2F6-F10 function buttons The same as above. 3User buttons In Arranger mode, the five User buttons below the display will select five FILLS or five BREAKS. In the other operative modes they will select various functions, menus and user functions. 3 5 4 (Back) button It allows to display the previous five functions corresponding to the User 1/6, 2/7, 3/8, 4/8, 5/10 buttons (see User Assignable on page 140). 5 (Forward) button It allows to display the next five functions corresponding to the User 1/6, 2/7, 3/8, 4/8, 5/10 buttons (see User Assignable on page 140). NOTE The serigraphy below the User buttons has the following numbering: 1/6, 2/7, 3/8, 4/8, 5/10. In this manual we use USER 1, USER 2, etc., for short. F1, F2, F3, F9 and F10 function buttons Press the STYLE VIEW button and one of the following: F1 - Audio Drum (see groove list on page 147) Press F1 to set the AUDIO DRUM part. F2 - Groove Bank (see groove list on page 149) Press F2 to set the GROOVE BANK part. F3 - Bass Bank (see groove list on page 151) Press F3 to set the BASS BANK part. F9 - Arp & Lick (see groove list on page 153) Press F9 to set the ARP&LICK part. F10 - Live Guitar (see groove list on page 155) Press F10 to set the LIVE GUITAR part. 16 KETRON • AUDYA B The F1, F2, F3, F9 and F10 function buttons allow you to access the AUDIO STYLE MODELING when they are used in STYLE VIEW mode, in the PLAY CONTROL section (see details on page 67). B Display and function buttons User buttons In addition to the FILL and BREAK selection in Arranger mode and other assignable user functions (see User Assignable on page 140), the five User buttons can access many functions. For example, while in the different operative modes (MENU, DISK, PLAYLIST, STYLE VIEW, DRUM MIXER and so on), these five User buttons allow the selection of further pages that open their own settings menus. In the Figure you can see how the User buttons, in STYLE VIEW mode, allow the selection of the VOICE, EFFECT, PAN and MUTE SINGLE pages. By pressing one of the five User buttons, you can view the content of the corresponding page. Arranger Conductor buttons The buttons of the ARRANGER CONDUCTOR section allow real time control of the styles when the Arranger mode is selected. See the PLAY CONTROL settings to select the desired Arranger mode on page 22. FILL IN By pressing this button you can enable one FILL of the selected style and the Arranger will automatically start. If the Arranger is already playing, by pressing this button you will enable the same FILL. From left to right, here are the descriptions for each button: BREAK By pressing this button, you can enable one of the BREAK of the selected style and the Arranger will automatically start. If the Arranger is already playing, by pressing this button you will enable the same BREAK. INTRO/ENDING 1 2 3 When the Arranger is stopped, by pressing one of these three buttons you can enable one of the three “introductions” of the style. When the Arranger is playing, by pressing one of the three buttons you can enable one of the three “endings” of the style. KEY START/KEY STOP If button START is on, the Arranger will instantly start when you start playing the keyboard. If button STOP is on, the Arranger will instantly stop when you release all the buttons. ABCD Each button corresponds to a style variation. TEMPO SLOW/FAST By pressing these buttons you can slow down (SLOW) or speed up (FAST) the tempo of the Arranger. By pressing the two buttons simultaneously, you will set the T.Lock function, that is Tempo Lock. To restore the original tempo of the style, press the and buttons simultaneously in the RECORD section. HOLD By pressing the HOLD button, the accompaniment of the Arranger will play even if you release all the keys from the keyboard. If HOLD is disabled, when you release the keys from the keyboard, the accompaniment of the Arranger will stop playing, except the drum part. KETRON • AUDYA 17 Selecting voices Selecting voices You can find three rows of eight buttons each in the VOICE section on the front panel. The first two rows allow the selection of the voice families, ordered by a common use (see a full list of the voices at the end of this manual). B The third row contains the PROGRAM button and other voices selection buttons. Moreover, there are also the DOUBLE, HARMONY buttons. ▀▀ Selecting a basic voice 1. Select one voice family by pressing one of the 16 buttons on the first two rows in the VOICE section. For example, press the “PIANO” family button. The first page showing the first ten available voices of the PIANO family will appear. 2. By pressing one of the F1-F5 or F6-F10 buttons, select one of the ten voices shown on the display, corresponding to the name of the voice. For example, by pressing the F4 button, you will select the voice named “HONKY_TONK” (Figure 1). 3. Press the CURSOR Ó Á to select the various VOICE pages with further ten voices each (Figure 2). Note that you can access more than 2 pages for each voice family. B Figure 1 NOTE By turning the wheel clockwise/ counter-clockwise you can scroll the pages, just like the CURSOR Ó Á. Also, you can scroll the pages by pressing repeatedly the same VOICE family button (e.g. PIANO, EL.PIANO and so on.) F F Figure 2 18 KETRON • AUDYA Selecting voices ▀▀ Selecting a INS voice 1. Press the RAM INS / SUPERSOLO button of the third row in the VOICE section. The display will show a list of the SUPERSOLO voices stored on the hard disk (Figure 3). 2. Select one voice by using the CURSOR § ¶. 3. Press the ENTER button to load the INS voice into the selected memory location. The display will show the INS voice on the first free location. In the example, the APACHE_GUITAR voice is loaded onto the memory location corresponding to the F1 button (Figure 4). ▀▀ Selecting more INS voices 1. Press the RAM INS / SUPERSOLO button of the third row in the VOICE section. The display will show a list of the INS voices stored on the hard disk. 2. Select one voice by using the CURSOR § ¶. 3. Press the SELECT button that appears on the display next to the USER 5 button. A dot will appear before the name of the selected INS voice. Repeat the choice in order to select more INS voices by using the CURSOR § ¶ and the SELECT button (Figure 5). 4. Press the ENTER button to load in the memory location all the selected INS voices. In the example, five INS voices have been loaded in the first five memory locations corresponding to the F1-F5 buttons (Figure 6). B Figure 3 Figure 4 For advanced operations about the INS voices see on page 98. 1 Figure 5 NOTE The INS voices appear on the display with an asterisk. For example: DJIANGO.ins*. If you try to load one voice already loaded in memory, this will not be loaded twice. WARNING The RAM INS indication next to the SUPERSOLO button means that the INS voices will be loaded into memory temporarily. For this reason, when you power OFF, the INS voices will not be retained in memory. Figure 6 KETRON • AUDYA 19 Selecting voices dding a second voice to the right hand ▀▀ A (2nd VOICE) 1. Press the 2nd VOICE button on the third row in the VOICE section. 2. According to the PRESET or PROGRAM voice, you will add a second voice to the sound of the right hand. 3. Note that the 2nd VOICE voices can be freely programmed by the user in any PROGRAM. Press the EDIT button and the USER 2 button to open the 2nd VOICE page (Figure 7). For more details on how to create/edit a PROGRAM see on page 48. 1 Figure 7 ▀▀ Selecting the organ DRAWBARS 1. Press the DRAWBARS button on the third row in the VOICE section. The display will show the organ DRAWBARS screen (Figure 8). 2. Select one organ by using the F1-F10 buttons (ORGAN1, ORGAN2, etc.) Press the CURSOR button Ó to select the second page of DRAWBARS (ORGAN11, ORGAN12, etc.) 3. Press the USER 1 button (PedToRotor) below the display to control the ROTOR by using one external SUSTAIN pedal. By pressing the pedal repeatedly you can toggle ROTOR SLOW/ROTOR FAST. If “PedToRotor” is disabled, the SUSTAIN pedal returns to its ordinary function. 4. Use the fader controls in the MIXER section (page 24) to set the nine footages of the organ DRAWBARS: 16, 8’, 5 1/3’, 4’, 2 2/3’, 2’, 1 3/5’, 1 1/3’, 1 1 1 Figure 8 Figure 9 shows the exact correspondence of the nine faders of the mixer section and the nine DRAWBARS displayed on the screen. 5. Press the USER 5 button (Drw:Lock/Unlock) below the display to toggle Lock/Unlock function, so you can use the faders for mixing the Arranger parts or the MIDI file tracks instead of the DRAWBARS. For advanced operations about the DRAWBARS see on page 31. Figure 9 ▀▀ Selecting the GM (General MIDI) voices 1. Press the GM button on the third row in the VOICE section. The display will show a list of the GM voices (Figure 10). 2. Follow the same procedure for voices selection described on page 18. Figure 10 20 KETRON • AUDYA Selecting the styles Selecting styles The numeric keypad of the STYLE section allows the selection of twelve style families, divided into various musical genres. B ▀▀ Selecting a PRESET style 1. Select one style family by pressing one of the twelve buttons of the keypad in the STYLE section. For example, press the “POP” family button. 2. The display will show the first ten available styles Press one of the F1-F10 buttons to select one of the ten displayed styles. In the example, the F3 button selects the FUSION_FUNK style (Figure 11). 3. Press the CURSOR Ó Á to select further pages of STYLE containing ten styles each (Figure 12). Note that you can access more than two pages for each style family. B Figure 11 NOTE By turning the wheel clockwise/ counter-clockwise you can scroll the pages, just like the CURSOR Ó Á. Also, you can scroll the pages by pressing repeatedly the same STYLE family button (e.g. BALLAD, POP and so on.) F F Figure 12 NOTE Note that the styles which contain an audio part (AUDIO DRUM, GROOVES, LIVE GUITAR) have the symbol ^ before the style name. KETRON • AUDYA 21 Play Control Play Control The PLAY CONTROL section contains all the control functions so you can start playing the keyboard and modify the settings accordingly to your own way of playing. B ▀▀ TRANSPOSER By pressing the [-] and [+] buttons you can transpose the overall pitch in 24 semitones up or down (1 semitone step), including the Arranger (except the drum). The display shows the current TRANSPOSE value (Figure 13). Press the [+] and [-] buttons simultaneously to instantly reset the transpose value to 0. Figure 13 ▀▀ OCTAVE The [+] and [-] buttons allow the pitch of the RIGHT part to be shifted up or down by one octave. The display shows the current value of OCTAVE Up or Down (Figure 14). ▀▀ ROTOR The SLOW and FAST buttons allow to change the speed of Rotary Speaker, when you select DRAWBARS in the VOICE section and for the voices for which the ROTARY SPEAKER setting is set to ON. Figure 14 ▀▀ PORTAMENTO Turns the PORTAMENTO on and off, only the voices for which the portamento has been programmed. For example, the SYNTH family. ▀▀ AFTER TOUCH Turns the AFTER TOUCH on and off, only the voices for which the after touch has been programmed (GUITAR, SYNTH, etc.) ▀▀ DRUM SET Selects one of the 53 built-in DRUM SETS to play directly from the keyboard (Figure 15). For more details see DRUM SET section. 22 KETRON • AUDYA Figure 15 Play Control ▀▀ BASS The MANUAL, TO LOWEST and BASSIST buttons set the following modes, respectively. MANUAL: sets the manual bass for the left hand. TO LOWEST: sets the lowest note of the chord to the root. For example, when you want to play a bass pedal within a chord progression. BASSIST: allows to play free bass notes on a chord played by using the right hand. For example, when you play bass solos. ▀▀ SPLIT Holding the SPLIT button, a small keyboard at the bottom of the display appears. By pressing any key on the keyboard, you can set the split point for the Arranger. In the example, the SPLIT point has been set on F2 note (Figure 16). The SPLIT point is always set on C3 note, at startup. Figure 16 ▀▀ PIANIST The PIANIST button allow you to play on the entire keyboard. Basically, by pressing this button you remove the SPLIT point. If Arranger mode, the chords will be recognized on the entire keyboard. ▀▀ LEFT VOICE By pressing the LEFT VOICE button, this will flash until you choose the voice for the left hand (Figure 17). Once selected, press LEFT VOICE button again. Figure 17 NOTE For the detailed explanation of the PLAY CONTROL section, please see the following pages, corresponding to the namesake buttons: • DRUM MIXER page 92 • GM PART page 89 • STYLE MODE page 82 • STYLE VIEW page 67 • USER ASSIGNABLE page 140 • SEARCH page 138 KETRON • AUDYA 23 Mixer Mixer The Mixer section features nine vertical faders. The first fader at left allows to control the USER functions (see “User Assignable”). The remaining 5 faders control the volumes of the ARRANGER parts and 3 faders the volumes of the VOICES parts. NOTE When the DRAWBARS mode is on, the nine faders of the Mixer will adjust the footage of the organ. For details see on page 20 and on page 97. B ▀▀ USER This first fader at left allows to control the USER ASSIGNABLE functions described on page 140. The default value is the volume control for AUX 3/4 output. ▀▀ ARRANGER These five faders adjust the volumes of the Arranger parts of the style. Respectively: STYLE MASTER: main volume of the style. DRUM: drum part volume. BASS: bass part volume. CHORD: volume of the chords part. LOWER: volume of the left split. NOTE When a MIDI file is playing on the Player (see the details on page 25), the DRUM, BASS, CHORD and LOWER faders, marked by “MIDIMIX” in blue letters, adjust the volumes of the DRUM, BASS, ORCHESTRA and LEAD tracks, respectively, in the following way: • • • • DRUM: adjusts the volume of the drum track BASS: adjusts the volume of the bass track ORCHESTRA: adjusts all the other tracks LEAD: adjusts the volume of the melody track, usually on MIDI channel 4 ▀▀ VOICES These three faders adjust the volumes of the VOICES parts on the keyboard. Respectively: LEFT: volume of the voice on the left split. 2ND: volume of the second voice on the right split. RIGHT: volume of the voice on the right split. The volumes of the parts are shown on the display (Figure 18). In the upper part at left, the STYLE MASTER volume is shown. In the upper part at right, the RIGHT and 2ND volumes are shown. In the lower part at left, DRUM, BASS, CHORD and LOWER volumes are shown. 24 KETRON • AUDYA Figure 18 Player Player The Player section is a complete multimedia environment for live performances. It’s a mixer consisting of five faders allowing volume control over WAVE, DJ LOOP, MP3, SFX and MIDI file. The five buttons above the faders switch on/off in order to select the tracks for the mix. NOTE When a track of the Player is playing, the corresponding LED flashes. NOTE The Remix On/Off function works only when MIDIFILE is selected, even if it is shown on the WAVE and MP3 player screens. B Figure 19 ▀▀ WAVE The WAVE button enables the WAVE screen where you select the audio track to start playback (Figure 19). The fader below adjusts the volume of the track. To navigate in this screen, use the cursor buttons, the ENTER and EXIT buttons. • CURSOR § ¶ buttons (or the wheel): scrolls up/down the titles. • ENTER button: opens the selected folder. • EXIT button: exits from the selected folder • CURSOR Ó Á buttons: when the title is too long, scroll the letters of the titles. • The USER 5 button below the display enables the START function to start playback. Once the track is playing, the USER 4 and USER 2 buttons below the display enable the PAUSE and STOP functions, respectively. The F1-F10 buttons enable the following functions: • F1 - LEAD MUTE: mute the volume of the melody track. • F2 - LYRIC ON: shows the text (lyric). • F3 - ZOOM OFF: makes the text smaller. • F4 - MARKER: Marker view .Located when available on display side .Once available allow to jump from different song point . Select “Jump meas” by User 5/10 button to jump on the next marker as soon measure will be played or select “Jump Next” by User 5/10 button to jump on the next marker just only when marked phrase will be played. • F5 - MY FOLDERS: when enabled, by pressing one of the 0-9 numeric keypad in STYLE section, that folder is recalled. To store the position of a folder (WAVE, DJ LOOP, MP3, etc.) hold to 0-9 button of the keypad while the content of the folder is shown. ▀▀ Page 1 • F6 - GLOB./LOCAL VIEW: enables the global view or local view. In LOCAL VIEW mode, only the files by using the same extension (e.g. WAV) are shown. In GLOBAL VIEW mode, all the file types are shown. Note that the TXT files are always shown. • F7 - SONG TR.: shows the transpose value previously stored in the song. • F8 - TRANSP: transpose the track in the range of +/- 24 semitones. • F9 - Wave Edit: see next paragraph. • F10 - PREV/NEXT (1/3 NEXT: by pressing this button (NEXT) you can access to next pages. ▀▀ Page 2 • F6 - A.PLAY PAUSE ON SPACE 3s: In Autoplay position the player will automatically playback all the files in the folder. In PAUSE position, after the current track, the player moves to the next without starting. If set to SPACE 3s, instead, the player add a 3-second pause between the track. You can customize the waiting time by using the Dial. KETRON • AUDYA 25 Player • F7 - LOOP ON/OFF: enables/disables the loop playback of one track. • F8 - PFL ON/OFF: enables/disables the PFL. When PFL is active, the Player is routed to AUX3&4 and AUX3&4 outputs to headphones. This works only if the Player’s volume Fader is set to 0. If different from 0, the output signal is routed to MAIN. The headphones volume is adjusted by the PFL Fader from the USER panel. It doesn’t work with MIDI FILES. • F9 - LEAD (4): selects the channel of the melody from 1 to 16, in case of MIDI file. The default value is MIDI channel 4. 26 KETRON • AUDYA Player-Wave Edit On Wave Player menu a new WAVE EDIT feature located on F9 button. In order to operate with this new function firstly select the wave to edit than select WAVE EDIT button (Figure 20). Once Wave Edit button is pressed a pop up menu will show on display the Import progress activity. When this procedure will be completed the waveform will be displayed on Audya screen. Related at this new waveform screen Audya will show a tools palette to operate on this imported file (Figure 21). NOTE Figure 20 Stereo file will be shown on Audya display as a single waveform, however the editing and storing functions will maintain the properties of the current file. Beside the new imported waveform Audya will show three markable lines (see on Figure with arrows) to indicate a Start Point (Blue) Fade Start Point (Grey) End Point (Black) Here is on detail: • Zoom: allows to magnify (or reduce) waveform displayed. • Start: Set the Start Point of waveform. • End: Set the End Point of waveform. • Norm: Apply Normalize (or amplify) function on waveform (range 0%-200%). • Fade: Set the Fade Out time (showed on ms) related of the original waveform End (Max. 8 s). Figure 21 Once you’ll select a new Start (F2), End (F3) o Fade (U1/6) point, the Blue transport bar colour will be changed on red just to inform on new operating status point. All values are editable by alpha Dial (step by step) or by cursor (quickly edit). Arrows cursor pressed (Left & Right) at the same time will restore default value of Start / End point and will clear any previous Fade setting. Using up or down arrows will be useful to catch Zero crossing function automatically. As showed on Figure 22 when a new parameter will be selected a Preview, Restore e Save tab will appear on bottom of display. Figure 22 KETRON • AUDYA 27 Player-Wave Edit In detail: • Preview: Allows preview function of edited waveform with new assigned value • Restore: as Restore mean and useful as UNDO of preview use • Save: Just to Save an edited file. In order to hear NORM and FADE rendered feature user must select PREVIEW function. As probably know this feature needs a computing time (related of wave length) to elaborate final wave result. Rendering feature will not necessary in case of using START or END features. You ‘ll hear it immediately. If for instance you select NORM parameter at 100% your own waveform will be Normalized in order to gain all dynamic range available. However we suggest to use less (i.e. at 90%) is any sound source will be applied on this wave the whole amount could be overloaded even a properly distortion or overdrive is request. After that pre PREVIEW and when computing rendering will be completed you could hear and see the difference as showed of Figure 23. If you would catch the right START (or else) Point will be really useful manage with ZOOM feature Here is the ZOOM value to use: 1x, 8x, 16x, 32x, 1:8, 1:4, 1:2, 1:1. The first (1x, 8x, 16x, 32x,) set value allows to magnify waveform in a traditional way. The others will be useful as a Figure 23 Figure 24 Sample windows to analyze waveform as block of 1:8, 1:4, 1:2, 1:1. In detail: 1. Move a Start Point ahead just focused in a better way your waveform (i.e. put value to 24040). 2. Select ZOOM feature and assign 16x value. 3. Select START feature again. If everything will done as suggest display will show as in Figure 24. Display will show more detail with ZOOM feature (Figure 25) When ZOOM will be magnify display will inform you on Value related on point selected (Arrow will show value updated) 28 KETRON • AUDYA Figure 25 Player-Wave Edit ▀▀ WAVE EDIT on MSP template See MSP editing on page 99. WAVE EDIT menu is available also on MSP template to create your own MSP Select MSP Edit, load your wave file and it will be available on display (Figure 26). Once the wave file will be imported on WAVE EDIT Audya display will show a screen shot alike the previous issue . The main remarkable difference is LOOP (F4) (Figure 27). LOOP feature, as well name say, allows to set a Loop point on the selected wave (previously imported). The LOOP point will be notable on display by the Green horizontal line (as showed by). Once LOOP point is selected (F4 button) value can be edited by usual directional button or with Alpha Dial. When navigation arrows are both pressed LOOP point will be set at the same START point automatically (Thus caused repetition of whole waveform). If arrows button will be pressed once again this feature will be de activated. Figure 26 NOTE The SAMPLER recognizes the LOOP Point which can be assigned by using a professional Audio Editor on a computer. As previously mentioned a START, END, Loop preview feature is possible by pressing assigned wave button of MSP. NORM and FADE function need a rendering PREVIEW (as well mentioned on previous issue) Once modification will be completed you can save your edit file by SAVE feature. If during a SAVE procedure a different name will be used, Audya will replace automatically the previous file with the new one named assigned (Figure 28). If MSP file is arranged with several sounds to operate on MSP VIEW will be necessary press Enter to select than WAVE EDIT in order to operate directly on a Single file. On this feature we suggest to use SOLO function to avoid other wave playing at the same time Figure 27 Figure 28 Sampler On Menu-> Audio Recording we add a couple new function called Sampler Rec. Mic. And Sampler Rec Lin In. This new feature allows to record directly from microphone or Line in. If user operate in wave folder, once recording is completed Audya automatically swap on Wave Edit to operate modifications and saving your own sample. KETRON • AUDYA 29 Player ▀▀ DJ LOOP The DJ LOOP button enables the DJ LOOP screen where you start playback of the selected audio loop (Figure 29). The fader below adjusts the volume of the track. To navigate in this screen use the cursor buttons, the ENTER and EXIT buttons as described for the WAVE screen. The DJ LOOP song are a particular kind of looping tracks, prepared for several music genres. The USER 5 button allows the JUMP NORM/IMM function (normal/immediate jump). ▀▀ MP3 Figure 29 The MP3 button enables the MP3 screen where you start playback of the selected track (Figure 30). The fader below adjusts the volume of the track. To navigate in this screen use the cursor buttons, the ENTER and EXIT buttons as described for the WAVE screen. ▀▀ SFX The SFX button enables the SFX screen where you start playback of the selected track (Figure 31). The fader below adjusts the volume of the track. To navigate in this screen use the cursor buttons, the ENTER and EXIT buttons as described for the WAVE screen. The SFX tracks are particular tracks containing special effects to be used in different situations, including applause, orchestral hits, snare rolls and many more. This Player can play back MP3s with max 192 Kb/s bitrate e does not support joint-stereo formats. Figure 30 ▀▀ MIDI The MIDI button enables the MIDI screen where you start playback of the selected MIDI file (Figure 32). The fader below adjusts the volume of the MIDI file. To navigate in this screen use the cursor buttons, the ENTER and EXIT buttons as described for the WAVE screen. When a MIDI track is playing and the lyric is shown (because you pressed LYRIC ON), you can go back to the list of the MIDI files, by pressing the EXIT button or the F2 button (LYRIC OFF). Figure 31 Figure 32 30 KETRON • AUDYA Player In the lateral menus there are some items that were not present in the previous ones. ▀▀ Page 1/3 F9 - Remix: parameter that allows a MIDI remix (see page 34) ▀▀ Page 2/3 Wave Sync function that lets you synchronize your MIDI tracks with Wave files associated with the MIDI and accurately synced (see description on page 33). ▀▀ Page 3/3 F8 - S. Medley: Medley Sync function. If set to On, it starts the new MIDI file from the beat. F9 - Ch Quant. : Chord Quantization. It enables/ disables the quantization of the chords using Live Guitar in case of Midi Remix. NOTE If you want to create a MIX using all the five tracks, just press the ENTER button when you select the files. Be sure that the CROSSFADE LED is off. For example: 1. Press the WAVE button, select a file from the WAVE folder and press ENTER. 2. Press the DJ LOOP button, select a file from the WAVE folder and press ENTER. 3. Press the MP3 button, select a file from the folder MP3 and press ENTER. 4. Press the SFX button, select a file from the folder SFX and press ENTER. 5. Press the MIDI button, select a file from the folder MIDIFILE and press ENTER. In this way, all the tracks will be playing simultaneously, and you will be able to adjust the volume of each track by moving the corresponding fader, acting like a Dj player. ▀▀ Making a MIX The Player allows the single track playback or the MIX playback of two or more tracks at the same time, up to four audio tracks and one MIDI track simultaneously. MIX a WAVE file and one MP3 1. Press the WAVE button. 2. Select an audio file from the WAVE folder. 3. Press the START button (USER 5) or the ENTER button or the START button on the panel. 4. The WAVE track starts playback and its LED flashes. 5. Press the MP3 button. 6. Select one MP3 file from the list. 7. Press the START button (USER 5). Press the START button on the panel, the WAVE track stops and you must press START again in order to start playback the MP3 track. 8. The MP3 track starts playback and its LED flashes. The WAVE track stops and its LED turns off. 9. Instead, if you press the ENTER button, the MP3 track will start playback while the WAVE track is playing. The LED of the MP3 track flashes while the LED of the WAVE track lights steadily. In this case, you should lower manually the volume fader of the WAVE track and raise the volume fader of the MP3 track in order to make a sort of manual crossfade between the two tracks. MIX two WAVE files 1. 2. 3. 4. Press the WAVE button. Select an audio file from the WAVE folder. Press the ENTER button to start playback. Select another audio file from the same WAVE folder. Figure 33 Figure 34 5. Press the ENTER button to start playback. 6. Adjust the fader 1 and fader 2 of the Player in order to mix the two audio files (TRACK 1 and TRACK 2 in blue colour on the panel). KETRON • AUDYA 31 Player CROSSFADE If you want to execute an automatic crossfade between the two tracks while playing, press the CROSSFADE button on the panel and follow the procedure below. CROSSFADE between WAVE and MP3 files 1. Press the WAVE button. 2. Select an audio file from the WAVE folder (Figure 33). 3. Press the START button (USER 5) or the ENTER button or the START button on the panel. 4. The WAVE track starts playback and its LED flashes. 5. Press the MP3 button. 6. Select an MP3 file from the list (Figure 34). 7. Press the ENTER button. 8. The CROSSFADE button flashes while crossfading the two tracks, accordingly to the CROSSFADE settings (see MENU > keyboard CONTROL > UTILITY > NEXT PAGE) (Figure 35). 9. The volume of the WAVE track decreases while the MP3 track volume increases up to the level set by its fader. Both LEDs of the tracks will flash during the CROSSFADE. When the CROSSFADE is finished, the LED of the WAVE track lights steadily while the LED of the MP3 track flashes. 10. Note that you can apply the same procedure to any other tracks. Enabled Numb. Files Function By setting the Enabled Numb. Files parameter to ON on the MENU > Keyboard Control > Utility > Next Page, as illustrated in Figure 36, all the files in the Player are numbered. When they are numbered (Figure 39), they can be recalled in to numerical way, as for Registrations, using the numeric keypad. When this Function is active, by pressing twice the F10 button (3 NEXT) you can access to window similar to Figure 39 where adjust the following parameters: Figure 35 Figure 36 Figure 37 F6–Alphab./Numeric Sort: file sorting in alphabetical or numerical way. F7–Number Ass: it allows to assign permanently the numbers into files so that in future if you modify the folder, indexing of files remains the same. This option opens to pop-up where you can assign numbers only to files of the actual Player (F1) or to all file types (F2). In the lower part of the window a progress bar will appear during the file numbering of the folder. Instead, if a numbering is already assigned, a pop-up to remove numbering will appear. Figure 38 Figure 39 32 KETRON • AUDYA Wave Sync Wave Sync WAVE SYNC Environment allows to assign several wave tracks synchronized to MIDI track by MIDI clock. On this feature you can assign Starting /Stop / Repeat measure for each Wave track assigned. 1. WAVE and MIDI tracks must be located on the same folder. 2. Use F8 button to select WAVE SYNC feature .This action allows to Create or Edit your WAVE SYNC files. 3. Enter into the MIDI player and select the MIDI file to be edit and press Load MIDI (F10). Display will show a loading pop-up message. Once loading procedure will be completed PLAY and STOP function will be available on F10 button to listen the MIDI file. This function is also replicated by the Start button on Main layout (Figure 40). 4. Now add your own Wave on MIDI file. Use panel arrows to navigate on desiderated Waves and then press ADD LOOP (F8) button to assign (Figure 41). 5. Once Wave Loop will be assigned Audya’s display will show info and properties related to this file: • F1 - Wav: This value show the Wave’s progressive number. • F2 - Name: name of selected Wave. • F3 - Bpm: Beat per minute of selected Wave in case on a Drum Loop. This basically info will be used to sync your Audio file onto the MIDI clock. Correct BPM information is essential to define the best synchronization between Audio and MIDI. The BPM value can be modified also when Audio and MIDI are playing. • F4 – Start: Start information for the Wave file. User can define just only Audio Start bar as the Stop bar will be defined automatically according to Length and Repeat parameters. • F5 - Length: Length on bars for the Wave. This value will define the right length for the Wave performance. Pay attention when set this parameter to obtain the correct playing and stop point for your audio track.. • F6 - Repeat: This function select the number of repetitions for the Wave. When set to the Loop value (before the number 1) the Audio track will be repeated from it’s initial Start bar until the end of the MIDI file. • F7 - Remove Wav: allows to remove the selected Wave. • F8- Add Wav: this command permit to add the Wav to the MIDI file. • F9 - Play Wav: allow to Play the selected Wave (Figure 42). 6. Once all parameters are set properly the user can arrange a sort of preview of the final project simply by playing the MIDI file (F10). 7. In order to save the new MIDI + Audio Figure 40 Figure 41 Figure 42 combination it’s enough to press SAVE on the panel. Give a new name and confirm again with the button 5 / 10 – Save. 8. The playback is obtained by selecting the new MIDI file and starting with Enter. The Wave volume may be adjusted separately from MIDI by the slider Wave. 9. In order to add other tracks repeat carefully point from #5 to #7 . NOTE 1) No limitations to add same audio track on different points of MIDI file. 2) User can assign just one single Wave at a time. 3) If a Wave have the parameter Repeat set into Loop mode (before the value 1) then all the others Waves associates to the MIDI file having a subsequent Start bar will be ignored. KETRON • AUDYA 33 MIDI REMIX MIDI Remix Audya features the MIDI REMIX function which allows to replace original midi file drum track (usually on track #10) with a Drum part of Audya Style (Audio Drum or else). ere how create your own MIDI DRUM ▀▀ H REMIX: 1. Press MIDI button on Player Section than select your own Midi file. (As showed on Figure 1 we have select “Raindrops_Keep_Falli.mid” (metronome tempo as 123 BPM). 2. Press F9 button to activate REMIX ON feature (Figure 43). 3. Select your favourite Style with a same (more or less) metronome BPM of midi file previously select. If the BPM tempo will be too different between Style and midi file a warning message will inform you to select another style more suitable. On Figure 44 we select (i.e.) a “SWING_2”style. 4. By using STYLE VIEW menu and than F1 button will be possible replace Drum kit with your own Audio Drum. As well you can see on Figure 45 we select Audio Drum SWING2_120 (120 as 120 BPM). 5. Press USER 5 button (START) to activate REMIX Feature. 6. After a while START led button will flash and will be possible play midi file with your new own Audio Drum track (see next Automation paragraph). 7. While REMIX playing will be possible select A, B, C, D Variation and also Fill on style (as well showed on Figure 46). Moreover arranger variations will be recordable and playable automatically (see in detail Automation Issue). 8. Press Save to store your own REMIX file while midi file and Remix are running. 9. Digit a name for your own file than press Save again. (For further information please refer from Saving Section). Select REMIX file from disk list by using Alpha Dial or cursor button. Wait until RMX file will be loaded than press USER 5 (START). When led button will flashing press REMIX button. Figure 43 Figure 44 Figure 45 Figure 46 34 KETRON • AUDYA MIDI REMIX unctions of the Style and MIDI buttons ▀▀ F (User Style/Disk Area Figure 47). These buttons enable (or disable) style on REMIX while REMIX is running. Moreover REMIX function can be linked with a midi file while is playing. Firstly select your own midi file than activate REMIX function and add your favourite style. User could change your styles while REMIX play easily. Thus will be useful to catch the suitable style for your own midi file without stop playing (For further info please see Tips & Tricks on page 36). Figure 47 ▀▀ Automation In order to Save Arrange Variation sequence (plus Style and Midi button) while REMIX function is playing user must activate RECORD button. While user manage this procedure all data are saved on Midi file. To complete this procedure press SAVE while REMIX is still playing with RECORD button led active. By the way with this procedure will be possible record Chord change sequence coming from LEFT part. For further information please see LIVE GUITAR REMIX 2nd method. ▀▀ Saving Procedure We add a couple options in order to Save MIDI REMIX: F1–Start Bar F2–Stop Bar F6- Save As: Mid-Kmx F7- RmxGtr Figure 48 Start Bar and Stop Bar (Figure 48): These bar show respectively Beat Start (from) and Beat Stop (to) of Midi Remix plus Style which will play. Please notice: Outside these marker (Start and Stop bar) Midi File will play with original Drum part. Save As Allows to Save your work in a two different format file. The first one will be a traditional midi file which include Exclusive message to play it as Remix. The second one will be renamed as KMX file. This file format is a Ketron proprietary format which include all information to play a Remix plus Style, Transposer, tempo and so on. This file is really useful to export all information over another Audya keyboard and guarantee to play it properly. Of course all resources (Audiodrum, Live guitar,) must be installed on thus other Audya. RmxGtr Live Guitar setting to Save on File. KETRON • AUDYA 35 MIDI REMIX ▀▀ LIVE GUITAR REMIX On Midi Remix feature is also possible add Live Guitar (coming from selected style) beside drum part. Live Guitar could be played manually or automatically by Live Guitar REMIX which will extract harmony tune directly from midi file. Live Guitar Remix can be activate on Manual or Autoplay way directly form MENU->KEYBOARD CONTROL> UTILITY (Page #1) -> Remix Live Guitar. By Manual mode User can insert LIVE GUITAR on Midi Remix simply playing on Left part of Audya keyboard while midi file run. By Autoplay feature (as well term say) Live Guitar will be detected automatically from midi file while playing. Figure 49 ow to follow chord’s track to live guitar ▀▀ H remix: 1st method: If Chord (Txt format) track is built on Midi file thus will play automatically by simply press Menu-> KEYBOARD CONTROL->UTILITY(Page #1)->Remix Live Guitar = Autoplay (Figure 49). CH.QUANT: Here Mode Chord Quantize will be available. Chord Quantize is really useful to guarantee suitable synchronization for Chord playing on Live Guitar Remix feature (Figure 50). 2nd method: Here you could set your own midi track to assign on Left Part: 1. Set on Menu KEYBOARD CONTROL-> UTILITY (Page #1)->Remix Live Guitar = Autoplay. 2. On selected Midi File record or locate Chord Part. Set on GM PART “Chan TX”: Left. Save Song Set up with F3 flag Part & MIX to On. 3. Select your own Style with more suitable Live Guitar pattern built in to assign on current Midi file. 4. Insert REMIX function to ON (Midi Player page selection). Once Midi file will play press SAVE button to store Remix feature recorded. 5. Play again Midi file just saved. 3rd method: How to Record Chord Track: 1. Set on Menu KEYBOARD CONTROL-> UTILITY (Page #1)->RemixLiveGuitar = Manual 2. Activate Remix feature. 3. Press RECORD while midi file playing. 4. Play Chord on Left part of keyboard following harmony tune. Chord played will be record as is. 5. Press Save to store all data. 36 KETRON • AUDYA Figure 50 Tips & Tricks: In order to get the “Best Deal “ between Midi File and Style select firstly Midi File and play it. Now activate Remix feature than select style to link on ! Go ahead until the best Style will be catch! Please unaware if Live Guitar will be unsuitable during this procedure. You’ll replace it on next step. Once the Audio Drum will be selected (while Drum Remix is playing) you could assign your own Live Guitar on different arranger from Style View Menu and than Save it as usual. Accordingly Internal or User Style selection we suggest once Remix feature will be completed to Stop and Play it again in order to check procedure done. Of course you could create your own Remix by using User Audio Drum also specially designed for Remix feature purpose. Voicetron Voicetron The Voicetron section has one volume fader for MICRO and one volume fader for VOCALIZER, both with on/off LED button. Once you connect a microphone to the MICRO 1 connector and/or MICRO 2 connector, you can access to a wide range of options for the voice processing. NOTE To access the configuration menus of MICRO and VOICETRON, hold down few seconds the corresponding buttons. B ▀▀ MICRO The MICRO button enables both MICRO 1 and MICRO 2 inputs. Connect one or two dynamic microphones to the connectors on the rear panel and adjust the gain level by using the GAIN 1 and GAIN 2 small knobs on rear panel. ▀▀ VOCALIZER The VOCALIZER button enables the multiprocessor effects for harmonization and automatic pitch control only on MICRO 1 input. ▀▀ Setting a vocal effect 1. Press and hold for few seconds MICRO button. 2. The screen where to choose the MICRO PRESETS will appear (Figure 51). 3. Press the F1-F10 buttons to set one of the MICRO PRESETS, that is an effect for the microphone connected to MICRO 1 and/or MICRO 2 input. 4. Press the CURSOR Ó Á to scroll the MICRO PRESETS pages. Figure 51 By pressing the F1-F10 buttons you can access two pages with ten MICRO PRESETS each: PAGE 1 F1–DRY F2–REVERB SMALL F3–REVERB MEDIUM F4–REVERB LARGE F5–REVERB GATED F6–BOOST F7–ECHO REVERB F8–ECHO REVERB TAP F9–CORRECTION F10–BEAR PAGE 2 F1–GIRL F2–BABY F3–VIBRATO F4–PHONE F5–ANGEL F6–MICRO_01 F7–MICRO_02 F8–MICRO_03 F9–MICRO_04 F10–MICRO_05 NOTE Audya microphones input allows to use only Dynamic Microphones. KETRON • AUDYA 37 Voicetron ▀▀ Setting a VOCALIZER effect 1. Press the VOCALIZER button. 2. The screen where to choose the VOICETRON PRESETS will appear (Figure 52). 3. Press the F1-F10 buttons to set one of the VOICETRON PRESETS, that is an effect for the microphone connected to MICRO 1 input. 4. Press the CURSOR Ó Á to scroll the pages of VOICETRON PRESETS. By pressing the F1-F10 buttons you can access two pages with ten VOICETRON PRESETS each: PAGE 1 F1–VOCALIZER F2–AUTOTUNE VOCAL F3–BLUEGRASS DUET F4–COUNTRY DUET F5–CHAINED DUET F6–STANDARD TRIO F7–STANDARD TRIO 2 F8–CHAINED TRIO F9–STAND. QUARTET F10–JAZZ QUARTET PAGE 2 F1–USER 1 F2–USER 2 F3–USER 3 F4–USER 4 F5–USER 5 F6–USER 6 F7–USER 7 F8–USER 8 F9–USER 9 F10–MIDI MODE Figure 52 ▀▀ Editing a VOCALIZER effect 1. Select a VOCALIZER effect. 2. By pressing the EDIT button, a screen like the Figure 53 will appear. 3. Press the F1-F10 buttons to access the parameter settings of the VOCALIZER: F1 - DUET: duet effects (two voices). F2 - TRIO: trio effects (three voices). F3 - QUARTET: quartet effects (four voices). F4 - QUINTET: quintet effects (five voices). F5 - FIXED INTERV.: fixed interval effects. F6 - VOCODER: vocoder parameters. F7 - VOICES EDIT: parameters of the voice (up to five voices) Volume, Pan, Formant, Detune, Cutoff, Resonance. F8 - EQUALIZER: 10 bands graphic equalizer. F9 - EFFECTS: parameters of the effects. F10 - VOCAL TO ARR.: the vocalizer effect changes accordingly to the Arranger parts. For example, you can set a DUET effect for the START, a TRIO effect for the A variation of the Arranger, a VOCODER effect for the B variation of the Arranger and so on. For details see on page 137. 38 KETRON • AUDYA Figure 53 Master Master The Master fader is located at right of the Voicetron section and adjusts the global volume of the instrument. It features a FADE function which enables an automatic fade-out during playback, that is a gradual smooth volume reduction to zero. B Figure 54 ▀▀ FADE By pressing the FADE button, the LED flashes and the volume will be reduced gradually, accordingly to the CROSSFADE settings. Please see MENU > keyboard CONTROL > UTILITY > NEXT PAGE > Fade Time (Figure 54). Once the fade-out is over, the LED of the FADE button turns off. Note that the fade-out does not apply to the microphone output. In this way, you will be able to talk/sing during the fade-out. NOTE The FADE function works both as FADE Out and FADE In. Just press the FADE button while the Arranger or the Player are stopped. KETRON • AUDYA 39 Main View Main View The new MAIN VIEW interface allows to display all the items of the main screen in a more easyto-operate way. ▀▀ Activating the MAIN VIEW 1. Press the MENU button on the front panel to open the screen MENU as shown in Figure 55. 2. Press the F4 button corresponding to KEYBOARD CONTROL as shown by the arrow in Figure 55. 3. Press the F10 button corresponding to UTILITY as shown in Figure 56. 4. Press the USER button 5 (NEXT PAGE) as shown in Figure 57. 5. Press the F6 button to select MAIN VIEW as shown in Figure 58. 6. Now you can uIf the DATA/VALUE wheel or the CURSOR Ó Á to select the value OFF or ON as shown in Figure 58. 7. Press the EXIT button to go to the previous window of the MENU. 8. Press the MENU button to exit the MENU environment. Figure 55 Figure 56 ▀▀ Storing MAIN VIEW at start-up Once out of the MENU environment, you may want to store the new MAIN VIEW at start-up of the keyboard. Press the SAVE button on the front panel. A screen like Figure 59 will appear. Press the F6 button corresponding to CUSTOM STARTUP. At start-up the display will be set to the new MAIN VIEW. Figure 57 Figure 58 Figure 59 40 KETRON • AUDYA Main View Autoswitch Time Strictly pertaining to the new MAIN VIEW interface, the AUTOSWITCH TIME function allows to set the switching time up to 60 seconds before the MAIN VIEW switches from other environments. For example, after you choose a style or an instrument, the display switch automatically to the MAIN VIEW after the AUTOSWITCH TIME set by this parameter. ▀▀ Setting the AUTOSWITCH TIME 1. Press the MENU button on the front panel to open the MENU screen. 2. Press the F4 button corresponding to KEYBOARD CONTROL. 3. Press the F10 button corresponding to UTILITY. 4. Press the USER 5 button (NEXT PAGE). 5. Press the F7 button to select AUTOSWITCH TIME (sec) as shown in Figure 60. 6. Now you can uIf the DATA/VALUE wheel or the CURSOR Ó Á buttons to set the value in seconds from 1 to 60 seconds as shown in Figure 61. 7. Please set a time value between 3 and 5 seconds (even if you can set a higher value). 8. Press the EXIT button to go to the previous window of the MENU. 9. Press the MENU button to exit the MENU environment. Figure 60 NOTE If you set the AUTOSWITCH TIME (sec) to OFF, the AUTOSWITCH function will be switched off. In this case, if you want to return to the MAIN VIEW from other screens, you must press manually the EXIT button on the front panel. Figure 61 KETRON • AUDYA 41 Main View Main View description Hereunder, you can see the organization of the graphical layout of the MAIN VIEW window. 1 2 3 4 ▀▀ MAIN VIEW Window 1BPM Tempo It shows the BPM Tempo set for the style or the current filely loaded in the Player. When the Arranger or the Player are playing, the red and green LED light accordingly to the musical division. 2Transpose It shows the transpoIf value of the right hand or of the current filely loaded in the Player. 3Split It shows the split point currently set on the keyboard. 4Octave It shows the octave transpoIf value for the right hand. Figure 62 F1 – The F1 button opens the window for style selection. It shows also the value of the volume set from STYLE MASTER and the ABCD variation of the Arranger (Figure 62). F2 – The F2 button opens the window for the REGISTRATION selection (Figure 52). More details in the REGISTRATION section of this manual. Figure 63 42 KETRON • AUDYA Main View F3/F4 – The F3 button (or F4) opens the default window for MIDI files selection. It also shows the value of the volume set on the MIDI Player (Figure 64). More details on “MIDI Player (MAIN VIEW)” section of this manual. F5 – T he F5 button does not open any window. It indicates the MAIN VIEW section corresponding to the mixer parts of the Arranger. In this section the volume values of Drum, Bass, Chord and Lower (Figure 65) are displayed. F6 – The F6 button opens the window of VOICES selection for the right hand (RIGHT). It also shows the value of the volume set for the right hand and the type of VOICE, such as PRESET, PROGRAM, DRAWBARS or INSTRUMENT (SUPERSOLO). Figure 64 F7 – The F7 button opens the window for VOICES selection for the 2ND VOICE. It also shows the value of the volume set for the 2ND VOICE and the octave shift (set by PROGRAM). If you select an instrument from the MAIN VIEW window, the octave will be set to the standard 0 value and “—” will appear. F8 – The F8 button opens the window for VOICES selection for the left hand (LEFT VOICE). It also shows the value of the volume set for and octave shift. Figure 65 F9 – T he F9 button does not open any window. F10 – The F10 button opens the LYRIC window. If no MIDI file is selected or the MIDI file does not contain lyrics, the LYRIC section of this window will appear empty (Figure 66). To return to the MAIN VIEW display, press the F10 button again, or any other button (STYLE, VOICES, DRUM SET, PROGRAM or Player button). Figure 66 KETRON • AUDYA 43 Main View MIDI Player (MAIN VIEW) From the MAIN VIEW window you can select directly one of the MIDI files stored on disc and display the karaoke lyrics, if present. ▀▀ Selecting MIDI files from MAIN VIEW 1. In the MAIN VIEW window, press the F3 button (or F4). A list of MIDI files of the MIDIFILE folder will appear (Figure 67). 2. Select using the CURSOR § ¶ buttons or the DATA/VALUE wheel a MIDI file from the list. Our example is “JENNIFER.MID”. 3. Press the ENTER button to start MIDI file playback. 4. If the MIDI file contains lyrics, you will see them on the right section of the MAIN VIEW window, as illustrated in Figure 68. 5. The USER buttons from 1 to 4 under the MAIN VIEW window will work like this: USER 1: PAUSE/CONTINUE USER 2: STOP USER 3: LEAD ON/OFF (melody mute) USER 4: EXIT (exit from the Lyric or MAIN VIEW window). 6. While the MIDI file is playing back or paused, by pressing the F3 button (or F4) a second time, the MAIN VIEW window is divided in two sections (Figure 69): to the right, the section LYRIC. To the left, the list of the MIDI files on the disc. 7. In this way, while the current file is playing back, you can select the file from the list using the CURSOR § ¶ buttons or the DATA/VALUE wheel and start using the ENTER button. 8. Press the F3 button (or F4) again to dispaly the ordinary window. 9. Press the F10 button To switch the window LYRIC ON/OFF. Figure 67 Figure 68 ▀▀ HOME button of the MIDI Player By pressing the MIDI button of the Player you can enter the usual list of MIDI files on the disc. The window now shows the HOME function activated by the USER 3 button, as illustrated in Figure 70. The HOME function is useful when you want return to the MAIN VIEW and operate from the new functions. Figure 69 Figure 70 44 KETRON • AUDYA Main View WAVE Player (MAIN VIEW) From the MAIN VIEW window you can select directly the WAV file on disc. ▀▀ Selecting a WAV file from the MAIN VIEW 1. The default MAIN VIEW window allows the selection of MIDI files. For this reason it’s necessary to press the WAVE button of the Player. The list of the WAV file of the WAVE folder will appear (Figure 71). 2. Select a WAV file from the list using the CURSOR § ¶ buttons or the DATA/VALUE wheel. Our example is “Funky Tune.wav”. 3. Press the ENTER button to start playback of the WAV file. 4. Press the USER 3 (HOME) button to activate the MAIN VIEW window, as shown by the arrow of Figure 71. 5. The MAIN VIEW window will appear and, on the right side, the list of WAV files on the disc (Figure 72). 6. If the WAV file contains lyric, the LYRIC window will appear in place of the list, as illustrated in Figure 73. 7. The USER buttons from 1 to 4 in the MAIN VIEW window will have the following functions: USER 1: PAUSE/CONTINUE USER 2: STOP USER 3: LEAD ON/OFF (melody mute) USER 4: EXIT (exit from the Lyric or MAIN VIEW window). 8. By pressing the F3 button (or F4) a second time while the WAV file with lyric is playing back or paused, the MAIN VIEW window is divided into two sections (Figure 74): the section LYRIC on the right side. the list of the WAV files on the disc on the left side. 9. In this way, while the current file is playing back, you can select a file from the list by using the CURSOR § ¶ buttons or the DATA/VALUE wheel and start by using the button ENTER. 10. To return to the main window, press the F3 button (or F4) again. Figure 71 Figure 72 Figure 73 Figure 74 KETRON • AUDYA 45 Main View MP3/SFX Player (MAIN VIEW) From the MAIN VIEW window you can select directly the MP3 or SFX files on disc. ▀▀ Selecting an MP3/SFX file from MAIN VIEW 1. The default MAIN VIEW window allows the selection of MIDI files. For this reason it’s necessary to press the MP3 button or SFX button of the Player. A list of MP3 files of the MP3 folder (Figure 75) or SFX files of the SFX folder will appear (Figure 76). 2. Select an MP3 file or SFX from the list by using the CURSOR § ¶ buttons or the DATA/VALUE wheel. 3. Press the ENTER button to start playback of the MP3 file or SFX file. 4. Press the USER 3 (HOME) button to activate the MAIN VIEW window, as shown by the arrow of Figure 75 and Figure 76. 5. The MAIN VIEW window will appear and, on the right side, the list of MP3 files (Figure 77) or SFX files (Figure 78) on the disc. 6. If an MP3/SFX file contains lyric, the LYRIC window will appear in place of the list, as illustrated in Figure 78. 7. The USER from 1 to 4 buttons in the MAIN VIEW window will have the following functions: USER 1: PAUSE/CONTINUE USER 2: STOP USER 3: LEAD ON/OFF (melody mute) USER 4: EXIT (exit from the Lyric or MAIN VIEW window). 8. By pressing the F3 button (or F4) a second time while an MP3/SFX file with lyric is playing back or paused, the MAIN VIEW window is divided into two sections (Figure 79): the section LYRIC on the right side. the list of the MP3/SFX files on the disc on the left side. 9. In this way, while the current file is playing back, you can select a file from the list by using the CURSOR § ¶ buttons or the DATA/VALUE wheel and start with button ENTER. 10. To return to the ordinary window, press the F3 button (or F4) again. Figure 75 Figure 76 Figure 77 Figure 78 Figure 79 46 KETRON • AUDYA Main View DJ LOOP Player (MAIN VIEW) From the MAIN VIEW window you can select directly the DJ LOOP files on disc. ▀▀ Selecting a DJ LOOP from MAIN VIEW 1. The default MAIN VIEW window allows the selection of MIDI files. For this reason it’s necessary to press the DJ LOOP button of the Player. A list of DJ LOOP of the folder DJ_ LOOP will appear (Figure 80). 2. Select a DJ LOOP from the list by using the CURSOR § ¶ buttons or the DATA/VALUE wheel. Our example is “ArtOfSun.djl”. 3. Press the ENTER button for load the DJ LOOP into memory and the START button to start playback of the DJ LOOP. 4. Press the USER 3 (HOME) button to activate the MAIN VIEW window, as shown by the arrow of Figure 80. 5. By pressing the F3 button (or F4) the MAIN VIEW window will appear and, on the right side, the list of DJ LOOP (Figure 81). In this way, while the current file is playing back, you can select a file from the list using the CURSOR § ¶ buttons or the DATA/VALUE wheel and start with the ENTER button. 6. Select “Arranger conductor” section buttons to manage different pattern in your own ways. 7. The USER buttons from 1 to 4 in the MAIN VIEW window will have the following functions: USER 1: PAUSE/CONTINUE (Not Used) USER 2: STOP USER 3: LEAD ON/OFF (Not Used) USER 4: EXIT (exit from the Lyric or MAIN VIEW window). Figure 80 Figure 81 KETRON • AUDYA 47 Program Program For each button of the VOICES section you can create and store a PROGRAM sound. You can modify a PROGRAM by pressing the EDIT button and a button of the VOICES section. ▀▀ Creating a PROGRAM 1. Press the PROGRAM button. 2. Press a button of the VOICES section, for example PIANO. The current PROGRAM will appear (Figure 82). 3. Press the EDIT button. The parameters of the current PROGRAM will be displayed (Figure 83). 4. The F1-F10 buttons allow the selection of the parameters of the PROGRAM as explained later. F1/F6–VOICES By pressing the F1 or F6 buttons you will highlight repeatedly one of three voices that you can assign to the same PROGRAM. In the example, the first voice selected is CLAVINET while the reamaining two voices are inactive (OFF). Once you have highlighted one of three VOICES of the PROGRAM you can rotate the DATA/VALUE wheel or press the CURSOR buttons to select an instrument available from the GM banks (Figure 64). For example, you can choose an instrument for each VOICE from the PIANO bank as follows: • Concert_L • Grand_Piano Concert_Grand • Concert_R • • Grand_L • Pop_Piano • Grand_R • Honky • Open_concert • Jingle • Harps_Wide • Harpsichord Clavinet • Harps_Octave • Electric • Pulse_Clavi • • Grand_Hammer • Upright • Pop_hammer • Latin_Piano Figure 82 Figure 83 Figure 84 Press the CURSOR Ó Á buttons together to switch a voice OFF. You can also insert an INS instrument, already loaded in memory (see RAM INS / SUPERSOLO section on page 98) Figure 85 NOTE By using the CURSOR § ¶ buttons you can scroll all the instruments from top to the bottom of the list instead of scrolling them continuously. That is, in the above example, from Grand_Piano up to Pulse_Clavi. 48 KETRON • AUDYA 5. You can also assign one DRAWBARS voice to each PROGRAM, only for the third VOICE. Move the selection on the third VOICE by using the buttons F1 or F6 and press the DRAWBARS button to select one organ voice by using the CURSOR Ó Á buttons or the wheel (Figure 85). Program F2/F7–VOLUME By pressing the F2 or F7 buttons you will highlight repeatdly the voice of which you want adjust the volume. Use the DATA/VALUE wheel or the CURSOR Ó Á buttons to adjust the volume from 0 to 63 of three voices independently (Figure 86). Press the CURSOR Ó Á buttons together to automatically set the volume to zero. F3/F8–SHIFT By pressing the F3 or F8 buttons you will highlight repeatdly the voice of which you want adjust the pitch. Use the DATA/VALUE wheel or the CURSOR Ó Á buttons to adjust the pitch of three voices by +/24 semitones independently (Figure 87). Press the CURSOR Ó Á buttons together to set automatically the pitch to zero (—). Figure 86 F4/F9–TUNE By pressing the F4 or F9 buttons you will highlight repeatdly the voice of which you want adjust the fine pitch. Use the DATA/VALUE wheel or the CURSOR Ó Á buttons to adjust the fine pitch of three voices independently. The value from –63 to + 64 corresponds to +/- 100 cents, that is +/- 1 semitone (Figure 88). Press the CURSOR Ó Á buttons together to automatically set the fine pitch to zero (—). F5/F10–PAN By pressing the F5 or F10 buttons you will highlight repeatdly the voice of which you want adjust the panoramic position (PAN). Use the DATA/VALUE wheel or the CURSOR Ó Á buttons to adjust the PAN of three voices independently. The value from 63R to 64L corresponds to the right and to the left position, respectively (Figure 89). Press the CURSOR Ó Á buttons together to automatically set the PAN in the center position (>|<). Figure 87 Figure 88 Figure 89 KETRON • AUDYA 49 Program VOICE EDIT Press the USER 1 button to access the edit page of each VOICE of the PROGRAM. You will see a screen similar to Figure 90 where all the parameters of the VOICE of the PROGRAM will appear. By using the F1 to F10 buttons you can select a parameter and modify the value using the DATA/VALUE wheel or the CURSOR Ó Á buttons . Press the CURSOR Ó Á buttons together to set the default value (32). • F1–ATTACK: modifies the attack time of the envelope. Values from 0 to 63 (default 32) (Figure 91). • F2–DECAY: modifies the decay time of the envelope. Values from 0 to 63 (default 32). • F3–SUSTAIN: modifies the sustain time of the envelope. Values from 0 to 63 (default 32). • F4–RELEASE: modifies the release time of the envelope. Values from 0 to 63 (default 32). • F5–LEVEL: modifies the envelope level. Values from 26 to 63 (default 32). • F6–RESONANCE: modifies the resonance level. Values from 0 to 63 (default 32). • F7–CUTOFF: modifies the cutoff frequency. Values from 0 to 63 (default 32). • F8–DCA OFFSET: modifies the OFFSET of the DCA (Digital Controlled Amplifier) envelope. In other words, it raises/lowers the influence on the amplifier. Values from 0 to 63 (default 32). • F9–DCF OFFSET: modifies the OFFSET of the DCF (Digital Controlled Filter) envelope. In other words, it raises/lowers the influence on the filter. Values from 0 to 63 (default 32). • F10- LFO. The F10 button opens a further edit page to modify LFO parameters (Figure 92), that is the parameters of the Low Frequency Oscillator. Figure 90 Figure 91 Figure 92 50 KETRON • AUDYA Program You can access the LFO parameters by using the F1... F10 buttons. The selected parameter can be modified by using the DATA/VALUE wheel or the CURSOR Ó Á buttons. The value range for each parameter is from 0 to 63. Press the CURSOR Ó Á buttons together to set the default value (32). F1–VIBRATO RATE: vibrato frequency. F2–VIBRATO DEPTH: vibrato depth. F3–VIBRATO DELAY: vibrato delay. F6–LFO RATE: oscillator frequency. F7–LFO TVF: LFO amount on the filter. F8–LFO TVA: LFO amount on the amplifier. NOTE Press the USER 1 button (Progr. Edit) to return from the LFO page to the VOICE EDIT page. Press the USER 1 button (Progr. Edit) again to return to the initial PROGRAM EDIT page. NOTE If you set an organ DRAWBARS on the VOICE number 3 of the PROGRAM, the parameters of the VOICE EDIT page are visible but you cannot modify the organ voice parameters. After you have modified the parameters of each VOICE in the VOICE EDIT page, press the USER 1 button (Progr. Edit) to return to the previous page. Select a different VOICE by using the F1 or F6 buttons and press the USER 1 button (Voice Edit) to modify the voice parameters. KETRON • AUDYA 51 Program 2ND VOICE Press the USER 2 button (2nd Voice) to see a screen like Figure 93 by using the parameters for the second voice (2ND VOICE), that you can activate by pressing the 2ND VOICE button in the VOICES section. Press the F1... F10 buttons to access the parameters of the 2ND VOICE. Modify the values of the selected parameter by using the DATA/VALUE wheel or the CURSOR Ó Á buttons. • F1–2ND VOICE: you can assign an instrument from those of the GM banks. For example: Strings1 Strings2 Strings3 Symphonic Timpani Geige Contrabass Tremolos ... etc. • F2–VOLUME: you can adjust the volume of the 2ND VOICE. Press the CURSOR Ó Á buttons together to set the value to 0. • F3–OCTAVE: you can set +/- 2 octaves of the 2ND VOICE (Figure 94). Press the CURSOR Ó Á buttons together to set the value to zero (—). • F4–TUNE: you can adjust the fine pitch by +/100 cent of semitone (values from -63 to + 64). • F5–REVERB: you can adjust the send level to the reverb (Figure 95). Press the CURSOR Ó Á buttons together to set the value to 0. • F6–EFFECT ASSIGN: you can assign a second effect, such as CHORUS or ECHO. • F7–EFFECT SEND: you can adjust the send level of the second effect (CHORUS or ECHO). • F8–SUSTAIN: you can enable/disable the SUSTAIN pedal on the second voice. • F9–SPLIT: you can set the right split note for the second voice. • F10–CONTROLS: opens a further control page for the 2ND VOICE (Figure 96) where to switch the following parameters ON/OFF: F1–PORTAMENTO ON/OFF: enable/disable the Portamento control. F2–AFTERTOUCH ON/OFF: enable/disable the Aftertouch control. F3–PITCH BEND ON/OFF: enable/disable the Pitch Bend control. F4–MODULATION ON/OFF: enable/disable the Modulation Wheel control. F5–EXPRESSION ON/OFF: enable/disable the Expression control. Figure 93 Figure 94 Figure 95 Figure 96 52 KETRON • AUDYA Program EFF. MODE The USER 3 button opens a screen like Figure 97 where all the parameters for EFF. MODE will appear, that is the effects mode of the PROGRAM. Use the F1... F10 buttons to modify the parameters of the effects mode. Once you select a parameter, you can modify the value by using the DATA/VALUE wheel or the CURSOR Ó Á buttons. • F1/F6–VOICES: you can assign up to three VOICES to the same PROGRAM, as already seen in the first screen of PROGRAM EDIT page. • F2/F7–REV TYPE: you can choose a reverb type (Figure 98). For example: Studio1 Studio2 Club1 Club2 Hall1 Hall2 Theatre1 Theatre2 Stage1 Stage2 Church1 Church2 Hangar Galaxy Space User Rev1 (user reverb 1) User Rev2 (user reverb 2) User Rev3 (user reverb 3) User Rev4 (user reverb 4) User Rev5 (user reverb 5) Figure 97 Figure 98 Figure 99 • F3/F8–EFF. ASSIGN: you can assign an effect to each VOICE (Figure 99) as shown below: NONE: no effect CHORUS: Chorus effect ECHO: Echo effect ECHO+CHO: Echo + Chorus effect DIST: Distortion effect DIST+CHO: Distortion + Echo effect DIST+ECHO+CHO: Distortion + Echo + Chorus effect • F4/F9–EFF. TYPE: for each assigned effect you can set the effect type (Figure 100). E.g., for the CHORUS effect type you can choose: Chorus1, Chorus2, Chorus3... Chorus6 Tremolo1, Tremolo2, Tremolo3 Phaser1, Phaser2, Phaser3 Flanger1, Flanger2, Flanger3 User Cho1, User Cho2 ... User Cho5 Figure 100 NOTE By pressing the CURSOR Ó Á buttons together you set the default effect. WARNING If you select the DIST (Distortion) effect for one VOICE you cannot select an effect like CHORUS or ECHO for the remaining VOICES. You can select an effect like DIST for the three VOICES or any combination of DIST+CHO or DIST+ECHO+CHO effects. KETRON • AUDYA 53 Program For the ECHO effect (Figure 101) you can choose from the following types: Mono Echo1, Mono Echo2... Mono Echo5 Stereo Echo1, Stereo Echo2... Stereo Echo5 Triple Echo1, Triple Echo2... Triple Echo5 Mono User1 Stereo User1, Stereo User2 Triple User1, Triple User2 For the DIST effect (Figure 102) you can choose from the following types: Overdrive1, Overdrive2, Overdrive3 Tube 1, Tube 2 Distorsion1, Distorsion2, Distorsion3 Hyper Dist. Grunge Fuzz Hot British Org. Over.1, Org. Over.2, Org. Over.3 Over. User1, Over. User2 Dist. User1, Dist. User2, Dist. User3 When you set a distortion, please consider that the volume of the VOICE represents the volume to the distortion input and the DISTORSOR item in EFF SEND represents the output of the distortion. • F5–ROTOR ON/OFF: you can enable/disable the ROTOR effect (Figure 103). You can control the speed by using the SLOW and FAST buttons of the ROTOR section on the panel. • F10–SUST. PEDAL TO ROTOR ON/OFF: you can enable/disable the functionality of the ROTOR effect to the sustain pedal (Figure 104) connected to the SUSTAIN connector on the rear panel. Figure 101 Figure 102 Figure 103 EFF. SEND The USER 4 button will open a screen like Figure 105 where you can modify the effects send parameters. In this way you can hear the effects assigned in the EFF. MODE page. Once you select a parameter, you can modify its value by using the DATA/VALUE wheel or the CURSOR Ó Á buttons. Use the function F1/ F6 buttons to select one of three VOICES of the PROGRAM. Figure 104 WARNING The values of the parameters for EFF. ASSIGN and EFF. TYPE are strictly connected to the parameters of the EFF. SEND page. You coud not hear any effect until you adjust the sends in the EFF. SEND page, as explained later. 54 KETRON • AUDYA Figure 105 Program • F1/F6–VOICES: you can assign up to three VOICES to the same PROGRAM, as already seen in the first PROGRAM EDIT screen. • F2/F7–REVERB: you can adjust the reverb effect send. Values from 0 to 63 (Figure 106). By pressing together the CURSOR Ó Á buttons you set the reverb send to 0. NOTE If in the EFF. MODE page you choose an effect like DIST, DIST+CHO or DIST+ECHO+CHO, you cannot adjust the REVERB send independently for each voice. The parameter adjustment of the effect send is common to all three voices, so the adjustment of one effect send, affects all the effect sends. • F3/F8–CHORUS: you can adjust the Chorus effect send when you select the CHORUS effect type in the EFF. MODE page. Values from 0 to 63. By pressing the CURSOR Ó Á buttons together you set the effect CHORUS send to 0 (Figure 107). • F4/F9–ECHO: you can adjust the Echo effect send when you select the ECHO effect type in the EFF. MODE page. Values from 0 to 63. By pressing together the CURSOR Ó Á buttons together you set the effect ECHO send to 0 (Figure 108). • F5/F10–DISTORSOR: you can adjust the distortion effect send when you select the DIST effect type in the EFF. MODE page. Values from 0 to 63. By pressing together the CURSOR Ó Á buttons together you set the effect DISTORTION send to 0 (Figure 109). Figure 106 Figure 107 Figure 108 NOTE If you set an effect like DIST, DIST+CHO or DIST+ECHO+CHO in the EFF. MODE page, you cannot adjust the CHORUS, ECHO and DISTORSOR sends independently for each voice. The parameter adjustment of the effect send is common to all three voices, so the adjustment of one effect send, affects all the effect sends. CONTROL 1 Figure 109 The USER 5 button opens a screen like Figure 110 where you can modify the parameters of the CONTROL 1 page. You can access the parameters by using the F1... F10 buttons in order to program the VOICES in splits or dynamic layers on the keyboard. Once you select the parameter, you can modify the parameters by using the DATA/VALUE wheel or the CURSOR Ó Á buttons. Use the function F1/ F6 buttons to select one of three VOICES of the PROGRAM. Figure 110 KETRON • AUDYA 55 Program • F1/F6–VOICES: you can assign up to three VOICES to the same PROGRAM, as already seen in the first PROGRAM EDIT screen. • F2/F7–RANGE (Figure 111): you can set the split points of the three instruments. You can set the split points for each VOICE playing directly on the keyboard. For example: E0 (lower NOTE of the first VOICE) B1 (higher NOTE of the first VOICE) C2 (lower NOTE of the second VOICE) B3 (higher NOTE of the second VOICE) C4 (lower NOTE of the third VOICE) G6 (higher NOTE of the third VOICE) • F3/F8–VELOCITY (Figure 112): you can set the dynamic value for each VOICE (values from 0 to 127). For example: Minimum VELOCITY for the first VOICE: 1 Maximum VELOCITY for the first VOICE: 88 Minimum VELOCITY for the second VOICE: 89 Maximum VELOCITY for the second VOICE: 127 Minimum VELOCITY for the third VOICE: 1 Maximum VELOCITY for the third VOICE: 127 Figure 111 Figure 112 This means that if you play on the keyboard with a VELOCITY value (dynamic value) from 89 or above, the first VOICE will stop playing, while the second will play. Instead, the third VOICE will always play at any velocity value. By pressing together the CURSOR buttons you can set the value to 1 in the odd VELOCITY boxes and to 127 in the even boxes. • F4/F9–SUSTAIN (Figure 113): enable/disable the sustain pedal for each VOICE. • F5/F10–EXPR (Figure 114): enable/disable the expression control for each VOICE. Figure 113 CONTROL 2 You can open a second control page from the CONTROL 1 page where you can modify further parameters of the PROGRAM. By pressing the USER 5 button (Control 2) from the CONTROL 1 page you will see a screen like Figure 115. Once you select a parameter, you can modify the value by using the DATA/VALUE wheel or the CURSOR Ó Á buttons. Press the USER 5 button (Control 1) again to return to the CONTROL 1 page. You can choose the the parameters by using the F1... F10 buttons: • F1/F6–VOICES: you can assign up to three VOICES to the same PROGRAM, as already seen in the first PROGRAM EDIT screen. • F2/F7–PORT/MONO (Figure 116): you can set the PORTAMENTO time with choosing values from 5 to 127. By pressing the CURSOR Ó Á buttons together you set the value to OFF. Figure 114 Figure 115 56 KETRON • AUDYA Program • When the portamento is OFF you can set the MONO or POLY mode for the VOICE. When you set the portamento to any value between 5 and 127, the portamento can be set to LEGATO or POLY: on the first case the portamento acts on the sound in “legato” mode, until a note is released. In the second case, it acts in polyphonic manner, retriggering the portamento every time a note is played. If the PORTAMENTO effect is stored in one PROGRAM and enabled by the Aft&Port Autoswitch parameter (Menu > Keyboard Control > Aftertouch) you can activate it from the button on the front panel. • F3/F8–MORPHING (Figure 117): you can set the Morphing modes from one VOICE to another choosing one of the NORMAL, FIRST and SECOND parameters. The MORPHING will affect the sound by moving the Modulation Wheel, with the wording MORPHING in blue. You can set the MORPHING effect between two or three VOICES by changing the MODES to MORPHING or MORPH. COUPLING (see below). • F4–MODES: by using this parameter you can choose the interaction modes between the VOICES. For example, if you select MORPHING, you can move the Modulation Wheel and the sound of the (FIRST) VOICE will morph gradually to the (SECOND) VOICE. If the parameter is set to NORMAL no MORPHING will be applied to that VOICE. Further interaction parameters between the VOICES are: 3 Voice Layer Duet1,Duet2 Trio1, Trio2 Country Steel Morphing Morph. Coupling Double 2Hands Down1, Down2 3rd Down Bluegrass Down Country Down Up 1, Up 2 6th Up Bluegrass Up Country Up Full 1, Full 2 Jazz 1, Jazz 2 Folk 1, Folk 2 Aft. Morphing Aft.Morph. Coupl Ped.Morphing Ped.Morph. Coupl Sustain Switch Figure 116 Figure 117 Key off Key off time 1,2 Key off random 1,2 Duet1, 2 mode When you select DUET, you can set one VOICE to FIRST and the other to SECOND. If you play one single note only the VOICE set to FIRST will sound, while the SECOND will sound only if you play two or more notes. 1, 2 changes the speed of playing notes. Trio1, 2 mode As above but with three notes. Steel mode It’s a particular Pitch Bend control on the voices. The Pitch Bend acts only on the lower played note. Double and 2 Hands mode • They are the copy of the Double and Harmony-2 Hands buttons on the panel. By recalling one VOICE, you can automatically activate the functions stored in the VOICE. Down12.....Folk1-2: these options are harmonizations that can be assigned directly to program voice. KETRON • AUDYA 57 Program • • • • • • • • These parameters are of course linked to the Harmony parameter, which specifies the voice affected by harmonization. Aft.Morphing: it assigns the morphing to the aftertouch control. Aft.Morph.Coupl.: it assigns the additive morphing to the aftertouch control. Ped.Morphing: it assigns the morphing to the pedal control. Ped.Morph.Coupl.: it assigns the additive morphing to the volume pedal control. Sustain Switch: it switches sounds by using the sustain pedal. Key off: you can assign sounds on key off. Key off time 1,2: key off sound accordingly to the key pressure time. Key off random1,2: random key off sound. Figure 119 • F5–SPLIT -12 (ON/OFF) (Figure 118): you can enable/disable the SPLIT to -12 semitones function. That is, when SPLIT mode is set, the RIGHT hand will sound a -1 octave, instead, when PIANIST mode is set, the keyboard will sound the original octave. • F9–HARMONY (Figure 119): you can set the harmonization type choosing from the following parameters: Voice1 - set Harmony at voice 1 Voice2 - set Harmony at voice 2 Voice3 - set Harmony at voice 3 Off • F10–AFTER/WHEELS: opens a further window where you can set the Aftertouch and Modulation Wheel parameters. AFTER/WHEELS • From the AFTER/WHEELS window you can modify the parameters using the F1... F10 buttons. Once you have selected the parameter, the value can be modified by using the DATA/ VALUE wheel or the CURSOR Ó Á buttons. • F1/F6–VOICES: you can assign up to three VOICES to the same PROGRAM, as already seen in the first PROGRAM EDIT screen. • F2/F7–AFTERT. (Figure 120): you can assign an Aftertouch control to each instrument. If stored in the PROGRAM and then enabled in Aft&Port Autoswitch (Menu > Keyboard Control > Aftertouch) you can activate it from the button on the front panel. For example: Pitch1, Pitch2: changes the pitch Filter: changes the filter Amplitude: changes the amplitude 58 KETRON • AUDYA Figure 118 Figure 120 Program Cutoff: changes the cutoff of the filter Pit+Cutoff: changes pitch and cutoff Pitch+Filt: changes pitch and filter Pitch+Ampl: changes pitch and amplitude Pit+Fil+Amp: changes pitch, filter and amplitude Pi+Fi+Am+Cut: changes pitch, filter, amplitude and cutoff Slide 1, Slide 2, Slide 3, Slide 4: applies a slide effect Slide Bend: applies a note bending Soft Pitch: applies a slight untuning By pressing the CURSOR Ó Á buttons together you can switch the parameter OFF. • F3/F8–MOD/WHA (Figure 121): you can assign a Modulation wheel control to each VOICE. For example: Pitch: changes the pitch Filter: changes the filter Amplitude: changes the amplitude Cutoff: changes the cutoff of the filter Pit+Cutoff: changes pitch and cutoff Pitch+Filt: changes pitch and filter Pitch+Amp: changes pitch and amplitube Pit+Fil+Amp: changes pitch, filter and amplitude Wha To Pedal: applies a wha-wha effect to the pedal Wha To Wheel: applies a wha-wha effect to the wheel • F4/F9–BEND (Figure 122): you can assign a Bend control to each VOICE. For example: Pitch: changes the pitch Pit+Ampl.: changes the pitch and the amplitude Pit+Cutoff: changes pitch and cutoff Pit+Amp+Cutt: changes pitch, the amplitude and the cutoff Pit+TVF: changes pitch and the envelope of the filter Pit+LFO: changes pitch and LFO amount Figure 121 Figure 122 Preset Edit allows to modify and save on Program ( see Preset Edit ) ▀▀ Preset Edit You can edit presets and save again the Program (without altering the original presets). By using F1-F10 you can select the preset and hold the button for about 1 sec. Then edit the sound, name, choose the destination and SAVE the Program. NOTE You can activate wha-wha effect as User Assignable control. KETRON • AUDYA 59 Registration Registration Registration feature mean saving of complete panel setting. Audya allow two different Registration feature : SINGLE and BLOCK . By Registration button user can modify registration content. ▀▀ Creating a SINGLE REGISTRATION 1. After set on layout style tempo, volumes and all parameters related of own performance press SAVE and F1 REGISTRATION button ( Registration name is required ). 2. From this view will be allowed enable /disable of sections available on Registration ( see Picture 124) By press USER 1 ( Section off) view pages screen related will be allowed. Figure 123 Section available on first page ( Section page#1 ) are: F1 - AUTOPLAY: enables/disables the autoplay function of the Player. F2 - PLAYER: remembers the current folder of the Player. F3 - PLAYLIST: enables the active Play List when you save the registration. F4 - TEXT: stores the active text. F5 - STYLE: stores the style. F6 - TEMPO: stores the tempo. F7 - ARRANGER VARIATION: stores the variation of the Arranger A, B, C, D F8 - ARRANGER MODES: stores the Arranger settings. F9 - RIGHT/LEFT: stores the right hand and left hand settings. F10 - SLIDERS: stores the slider settings. By pressing USER 1 button (Section page #1) user swap on the 2nd page edit ( Section page#2) with new selectable feature : F1–EFFECTS: Effects settings. F2–MICRO: Mic settings. F3–VOICETRON: Voicetron settings. F4–DRUM MIXER: Drum Mixer settings. F5–MIDI SETTING: MIDI settings. F6–UTILITY: Utility page settings. F7–ARABIC: Arabic scale settings. F8–FOOTSWITCH: Footswitch settings. F9–KEYBOARD PARAM: Keyboard parameters settings. F10–AUTO SWITCH OFF: Feature with automatic Registration switch off button after loading registration is completed. 60 KETRON • AUDYA Figure 124 Figure 125 Figure 126 Registration 3. After set your own Registration User should assign a related name of it by entering letters or number using keybed ( Figure #126 show i.e. MY REGISTRATION) 4. Press SAVE button (User 5) to complete. NOTE When you save a REGISTRATION in automatic mode, a progressive number of 4 digits is added to the file name: 0001_REGIS.SRG, 0002_REGIS.SRG, etc. Figure 127 ▀▀ Recalling a SINGLE REGISTRATION 1. To recall a REGISTRATION from the list on the window, you can use the CURSOR § ¶ buttons or the DATA/VALUE wheel to select a REGISTRATION and then press the ENTER button (Figure 127). 2. To recall a REGISTRATION you can also use the numeric keypad by switching the USER 3 button NUMERIC ON (Figure 128). 3. For example, by using the option NUMERIC ON, just press the number 1 button to recall the REGISTRATION 0001, or the number 2 button to recall the REGISTRATION 0002 and so on. To recall REGISTRATION with two digits or more you must digit the number sequence of the REGISTRATION. For example, to recall the REGISTRATION 0012, just digit 12 on the numeric keypad. Figure 128 NOTE You can store the SINGLE registration also when you are in the MAIN environments, by pressing the SAVE button and choosing REGISTRATION. ▀▀ Creating a REGISTRATION BLOCK The REGISTRATION BLOCK is a bunch of twenty SINGLE REGISTRATIONS or direct functions that can be quickly recalled. 1. Press the REGISTRATION button to open the corresponding screen. If not selected, press the USER 4 button to select BLOCK. If there is no file, an empty screen and “EMPTY” will appear (Figure 129). 2. Press the EDIT button. 3. Press the USER 1 button (CREATE). 4. The display will show all the SINGLE REGISTRATIONS (Figure 130). 5. By using the F1-F10 buttons, select to which button you want to assign the SINGLE REGISTRATION. 6. Select the SINGLE REGISTRATION by using the DATA/VALUE wheel or the CURSOR § ¶. 7. Press the ENTER button in order to confirm the SINGLE REGISTRATION assigned to any F1-F10 button. 8. Repeat the operation for each F1-F10 button. Figure 129 Figure 130 KETRON • AUDYA 61 Registration 9. To jump to the second page, press the BACK or FORWARD buttons below the display. 10. If you want to replace or delete one SINGLE REGISTRATION, select it by using the F1-F10 buttons and press the USER 2 button (REPLACE) or USER 3 button (DELETE), respectively, and then the ENTER button. 11. Press the SAVE button and give a name to the REGISTRATION BLOCK. Digit a name in the text box by inputting the characters directly from the keyboard. 12. Once the REGISTRATION BLOCK is saved, you can recall it from the list by using the CURSOR § ¶ or the DATA/VALUE wheel and by pressing the ENTER button (Figure 131). 13. By using the F1-F10 buttons you recall the corresponding SINGLE REGISTRATION. By using USER 1 button you can enable the SINGLE PLAY or MULTI PLAY functions to play the Registration automatically. Figure 131 ▀▀ Recalling a REGISTRATION BLOCK 1. Once a REGISTRATION BLOCK is stored, you can recall it from the list on the window by using the CURSOR § ¶ buttons or the DATA/ VALUE wheel. Once the file is selected, just press the ENTER button (Figure 132) to recall the REGISTRATION BLOCK. 2. Once the REGISTRATION BLOCK is loaded the REGISTRATION SINGLE is recalled, corresponding to the F1-F10 buttons. 3. By using the USER 1 button you can activate the SINGLE PLAY or MULTI PLAY function in order to play the Registration automatically. 4. It can be useful to store several SINGLE REGISTRATIONS with some WAVE songs prepared into the Player. Storing the SINGLE REGISTRATIONS by using the Player and AUTOPLAY sections enabled, you can quickly recall the REGISTRATION BLOCK containing those SINGLE REGISTRATIONS by using the F1F10 buttons. Figure 132 Figure 133 REGISTRATION BLOCK. 9. By using the F1-F10 buttons you can recall the corresponding item (Style, Voice or Player). ▀▀ Creating a fast REGISTRATION BLOCK 1. In addition to SINGLE REGISTRATION you can save Styles, Voices and Player directly. Press Registration button than USER 4 (BLOCK). 2. Press the EDIT button and the USER 1 button (CREATE). 3. Press F1-F10 button to assign related position. 4. Select a Style, a voice or a song from the Player. 5. Press ENTER to assign this feature on related button. 6. Do the same for any other F1-F10 button (Figure 133). 7. Press the SAVE button and give a name to the REGISTRATION BLOCK. 8. Press the SAVE button and give a name to the 62 KETRON • AUDYA NOTE When you enter the Registration Block EDIT mode, the NUMERIC option is automatically disabled. Registration ecalling a REGISTRATION from the MAIN ▀▀ R VIEW window If the MAIN VIEW function and the NUMERIC ON function are enabled, by pressing the F2 button you can directly recall the REGISTRATION number by using the numeric keypad. 1. From the MAIN VIEW window press the F2 button. “Enter Number ->” will appear (Figure 134). 2. Digit a REGISTRATION number by using the numeric keypad. “Wait Please...” will appear (Figure 135). The corresponding REGISTRATION will be searched and loaded. 3. If the NUMERIC ON function is disabled, you must manually select the REGISTRATION by using the CURSOR § ¶ buttons or the DATA/VALUE wheel and by pressing the ENTER button (Figure 136). NOTE Use Registration UP/DOWN command on footswitch to browse on REGISTRATION BLOCK. Figure 134 Figure 135 Figure 136 KETRON • AUDYA 63 Play List Play List By pressing the PLAY LIST button you can access the Play Lists stored on the hard disk. In order to create a Play List, follow the procedure below. ▀▀ Creating a PLAY LIST 1. Press the PLAY LIST button. A screen like Figure 137 will appear showing a PLAY LIST demo. 2. Select PLAY LIST DEMO by pressing CURSOR ¶ and press the EDIT button. 3. Press the CREATE button (User 1). 4. Press one of the F1-F10 buttons. For example, F1. 5. Press the WAVE button (or MP3, SFX, MIDI) to select a song or a MIDI file, and press ENTER. The selected song/MIDI file will be assigned to the F1 button. 6. Press the F2 button and select another song/MIDI file and press ENTER. The song will be assigned to the F2 button. 7. Do the same for any other F1-F10 button (Figure 138). 8. When finished, press the USER 5 button (SAVE). 9. Give a name to the PLAY LIST and press SAVE again. Figure 137 NOTE By pressing the A.PLAY ON/OFF button (USER 5) you can enable/disable the automatic playback of the songs currently in the Play List. Figure 138 64 KETRON • AUDYA Key Tunes Key Tunes By pressing the KEY TUNES button in the VOICE section, you can assign a song to each key of the keyboard. You can freely assign any song of the WAVE folder to any key of the keyboard. ▀▀ Creating a KEY TUNE 1. Press the KEY TUNES button. A screen showing “KEY_TUNE_DEMO” will appear (Figure 139), that is a demonstration file to understand KEY TUNES features. 2. Press the USER 3 button (CREATE) in order to create a new KEY TUNE. 3. Select a song from the WAVE folder, by using the DATA/VALUE wheel or the CURSOR § ¶. 4. Press the ENTER button to select the song. The song will be automatically assigned to the C3 key of the keyboard. 5. Select another song and press the ENTER button. The song will be automatically assigned to the C#3 key of the keyboard. 6. Continue assigning all the songs that you want to any key of the keyboard (Figure 140). 7. You can see the list of single selected files by pressing the TUNE VIEW (USER 2 key) where you can edit each track settings. 8. Press the USER 5 button (SAVE), to store the KEY TUNE. 9. Digit a name on the dialogue box by using the keys on the keyboard. The example shows “MY_TUNE”. 10. Press SAVE again. At this point, the KEY TUNE file named “MY_TUNE” will appear on the screen (Figure 141). 11. To remove a song from a KEY TUNE, press the USER 3 button (REMOVE) below the display. ▀▀ KEY TUNE parameters When you create a KEY TUNE from scratch or edit a previous one, you can set the following parameters, by using the F1-F10 buttons. • F3 - START: the start note of the trigger interval (e.g. C3). You can set this, by pressing directly any keys on the keyboard. • F4 - END: the end note of the trigger interval (e.g. F3). You can set this, by pressing directly any keys on the keyboard. • F5 - INC/DEC: you can set the automatic insertion of the trigger interval by increasing/ decreasing the note automatically. For example, if you begin from C3 and INC is set, the next song is assigned to C#3. If DEC is set, it the next song will be assigned to B2. • F6 - VOL: sets the output volume of the song in the range 0-127. Figure 139 Figure 140 Figure 141 • F7 - LOOP ON/OFF: sets the loop on/off. • F8 - HOLD ON/OFF: sets the hold on/off, that means that the song continues playing after releasing the key, otherwise the song stops. • F9 - DIN: sets dynamic response of the keyboard, that is, the harder you play, the louder the volume of the song. • F10 - SINGLE/GLOBAL EDIT: sets the changes for a single KEY TUNE or all. ▀▀ Key Tune to Chord function, see page 123. NOTE By pressing USER 1 (CLEAR ALL) you will clear all the songs from the current KEY TUNE. WARNING The Key Tunes feature uses a WAVE track, so if a Key Tune is playing back, the Wave Player will not work and viceversa. KETRON • AUDYA 65 Double, Harmony Double, Harmony By pressing the DOUBLE button in the VOICE section, you can activate the function to double the octave of the voice for the right hand. By pressing the HARMONY button in the VOICE section, you can enable the function to harmonize the voice for the right hand. By hold ( for a couple of seconds ) Harmony button User can scroll 20 different selection ( 2 pages menu )(Figure 142). By using the F1-F10 buttons, you can access the following harmonizations: PAGE 1 F1–FULL1 F2–FULL2 F3–JAZZ1 F4–JAZZ2 F5–2 HANDS F6–FOLK1 F7–FOLK2 F8–TRILL* F9–REPEAT* F10–ECHO* PAGE 2 F1–DOWN1 F2–UP1 F3–DOWN2 F4–UP2 F5–3RD DOWN F6–6TH UP F7–BLUEGRASS DOWN F8–BUEGRASS UP F9–COUNTRY UP F10–COUNTRY DOWN The types of HARMONY marked by an asterisk on the table above, are special effects of trill, repetition and echo. You can access the speed parameter (SPEED) for these special effects by pressing repeatedly the USER 2 button below the display. The available SPEED values are: 6, 8, 12 and 24. In the example shown in Figure 143, if you select the TRILL effect, you will hear the trill effect produced by the note played at right or left of the starting note. You can modify the speed of the trill by using the SPEED parameter corresponding to the USER 2 button. 66 KETRON • AUDYA Figure 142 Figure 143 Style View Style View From the STYLE section on the front panel you can select a style by using the numeric keypad. If the style uses an Audio Style Modeling, please note that a ^ symbol appears before the style name otherwise the name appears without any symbol (Figure 144). In order to view and/or edit the parts of the style, with or without an Audio Style Modeling, you can press the STYLE VIEW button of the PLAY CONTROL section. In this screen the display shows the 10 parts of the style currently selected. By pressing the F1-F10 buttons you can select the corresponding part of the style (Figure 145 and Figure 146): • F1–DRUM 1 • F2–DRUM 2 • F3–BASS • F4–LOW 1 • F5–LOW 2 • F6–CH 1 • F7–CH 2 • F8–CH 3 • F9–CH 4 • F10–CH 5 Figure 144 Figure 145 The four buttons, from USER 1 to USER 4 allow to access to the corresponding edit windows: VOICE, EFFECT, PAN, MUTE. ▀▀ VOICE (USER 1) Figure 146 By pressing VOICE (default selection), you can set an instrument for each part of the style by using the DATA/VALUE wheel. By using the CURSOR Ó Á buttons you can raise or lower the volume of the part from 0 to 63. By pressing the CURSOR Ó Á buttons together you set the volume of the part to 0. By using the OCTAVE +/- buttons you can change the octave of the LOW 1 and LOW 2 parts by +/48 semitones, 12 semitones steps (Figure 147). ▀▀ EFFECT (USER 2) Figure 147 By pressing EFFECT, you can select and edit the type and the amount of the effect for each part (Figure 148). The multieffect unit allows the use of four effects simultaneously, that is a type of the effect for all the voices. Please note that the effects Chorus and Reverb are available for the drum and percussion parts (DRUM1 and DRUM2 and/or Audio Drum and Groove Bank). Figure 148 KETRON • AUDYA 67 Style View For any other part you can set the routing of the effects up to four effects (Figure 149). By using the F1 button you can select the routing of the effects for the parts. Please note that you select the part on the previous VOICE page (USER 1). By using the F2-F3-F4-F5 buttons you select the effect type: REVERB TYPE CHORUS TYPE ECHO TYPE DIST. TYPE By rotating the DATA/VALUE wheel or the CURSOR Ó Á buttons you can set the effect types for each part. By pressing the CURSOR Ó Á buttons together, you set the first default effect. By using the buttons from F7, F8, F9 and F10 you set the amount of the effect for the selected part. By pressing the CURSOR Ó Á buttons together you set the amount to 0. Figure 149 ▀▀ PAN (USER 3) By pressing PAN, you can edit the panoramic position of each part of the style (Figure 150) by using the CURSOR Ó Á buttons. Please note that the PAN cannot be modified for the Audio Drum part. ▀▀ MUTE (USER 4) By pressing MUTE, you can mute the parts of the style by using the F1-F10 buttons. The “muted” parts have an asterisk after the name (Figure 151). Once you have set the MUTE parts in a style, the parts remain muted also changing the style. Figure 150 NOTE By pressing button USER 5 you can select the SINGLE or GLOBAL mode in order to change the single Variation of the style or all the Variations. Figure 151 68 KETRON • AUDYA Style View Audio Style Modeling The Audio Style Modeling is the powerful system of Audya sound engine. The place where you can “model” the style is the Style View section. • By entering the Style View section you can see all the sections of the style on the display. Normally, if you select a section, you can change the Program Change by using the DATA/VALUE wheel or choosing directly the sound. You can control the volume with the CURSOR buttons. • On some sections, by pressing twice the button, you can access directly to a specific Library of that section. The tables of the Library can work in place of the MIDI parts usually programmed for the Style. • By pressing twice the F1, F2, F3, F6, F7, F8, F9 and F10 buttons you can select from the Audio Style Modeling Libraries or from the ordinary MIDI parts. For example: F1-Audio Drum (audio only) F2-Groove Bank (audio + MIDI) F3-Bass Bank (MIDI) F6-Piano Bank F7-Guitar Bank 1 F8-Guitar Bank2 F9-Arp & Lick (MIDI) F10-Live Guitar (audio + MIDI) • For all the sections, you can scroll by using the DATA/VALUE wheel or choosing directly the Program Change number by using the 0-9 numeric keypad. • You can find the Program Change numbers and all the Libraries reference at the the end of this manual. NOTE If the style uses some audio parts (e.g. Audio Drum or Live Guitar) a symbol ^ appears in front of the style name. For this reason, when you store a style with audio parts inside, it’s useful to keep the @ character in front of the name (Figure 152). In this way the symbol ^ will appear in front of the style name and you will be able to distinguish between the MIDI styles and the styles containing audio parts. Figure 152 KETRON • AUDYA 69 Style View The 4 BANK for sections Drum, Piano, Guitar1 and Guitar 2, together with the enhancement of previous existing Libraries for Bank Bass and Arp&Lick makes the Audio Style Modeling a very powerful and easy system to compose new Styles. It’s enough to start from an existing Style and, without programming a note, to scroll the Modeling Libraries while listening in real time the final result and to replace the various parts of the Style using the huge templates available. Let’s take a look to some practical examples for the Audio style Modeling. Figure 153 elect a Style to be edited and access the ▀▀ S Style View The parts underlined are the ones interested to the Bank functioning. By pressing twice the tabs F1, F2, F3, etc. it is possible to select the BANK Libraries. The scroll for various templates is achieved by the l’Alpha dial. The new Bank Libraries, once selected and assigned to the Style parts, are replacing the original MIDI parts written for such Style. F1: the Drum controlling on tab F1 is very sophisticated with the possibility to address 4 different ambients: Audio Drum (Figure 153) Drum Bank (Figure 154) User Audio Drums (Figure 155) Drum1 (Figure 156) Figure 154 Audio Drum Internal Audio Drum library, with more than 324 complete Audio files. Drum Bank Midi Drum database with 255 Styles. User Audio Drums Custom Wave Loops of the user. This new powerful feature provided with the 3.0A allows to replace the internal Audio Drums of Audya with Drum Wave loops created from the user and located into a new HD folder named User Audio Drums. • The Loops must be Wave 44 KHz, 16 bit and must have a name with symbol @ followed from the exact BPM number, for example: [email protected]. Figure 155 Figure 156 70 KETRON • AUDYA Style View • The loops are automatically synchronized with the MIDI of the Style. • It is possible to associate a different Wave for each Style section, such as ABCD, Fill In, Break, Intro and Ending (See the enclosed documentation for User Audio Drums for further details). • Together with the 3.0A is supplied a Demo folder with 4 complete User Audio Drums styles. All variations applied to the Style with the insert of the Bank templates may be memorized and saved as usual into the correspondent User Style. The access to a single template of the Bank Libraries may be reached also with the numerical key pad 0 -9 (Please see the STYLE BANK Lists). Drum1 Drum Set type selection. IMPORTANT • On internal Audio Drum and on User Audio Drums the template scroll may be done only at Style Stop condition. • Internal Audio Drum and User Audio Drums are auto-excluding, same as Drum Bank and original MIDI Drum of the Style. F2: with F2, similar to F1, are accessed 3 different Drum ambients: Groove Bank: Up to 240 Drum Percussion Library with Acoustic and Electric Loops (Latin, Dance, Pop, Folk, etc.). Groove: compatibility set up section for Drum Loops of old Style Libraries (SD1, SD 5, Midjay). Drum2: Drum Set type selection for the second Drum Set. IMPORTANT • Groove section, Groove Bank and Drum 2 are auto-excluding but they can be added individually to Audio Drums or User Audio Drums or Drum Bank or Drum1. F3: Bass Bank. Bass Library (333). F6: Piano Bank. Piano and Electric Piano Library (236). F7: Guitar Bank 1. Acoustic and Electric Guitar Library (253). F8: Guitar Bank 2. Acoustic and Electric Guitar Library (253). F9: Arp & Lick. Arpeggios and various Orchestral embellishments (254). F10: Live Guitar. Audio Live Guitar Library, with up to 150 Live Guitars, synced to MIDI. All the Orchestral Libraries such as Bass, Piano, Guitar 1-2 and Arp&Lick are playing with their original Program Change but it is possible to change the voice on each section (when box is blue coloured) by simply selecting the sound family on the right hand and the single GM Voices. KETRON • AUDYA 71 Style View The Audio Style Modeling sections 1 - Audio Drum Strings, Synth, Banjo. The Audio Drum is a stereo Wave file containing an audio rhythmic sequence. It can replace the normal Drum Set or be “added” to it. If you want only the Audio Drum, you must set volume of the Drum Set (Drum 1) to 0. It works in place of the Chord 4 of the Style. The selection of the Audio Drum is made globally for the entire Style. Replacing the Audio Drum of a preset style with another Audio Drum could result in MIDI and Audio parts not matching, while playing Intro/ Ending arrangements. You can store 4 Arp & Lick for any A, B, C and D part. 5 - Live Guitar The Live Guitar are audio guitar sequences controlled and synchronized by using MIDI. To scroll the parts please refer to the lists at the end of this manual. You can edit the volume of the Audio Drum separately for A, B, C and D and the other parts of the Arranger. 6 – Piano Bank Audio Drum is guaranteed to work well within the range of +/- 30 % of the nominal speed shown for the Audio style. Huge Midi Piano pattern library available on Chord 1 section .Can be used instead of original programmed style midi part. A 2-bands parameters equalizer setting can be stored for each Audio Drum style (Menu Style Mode > Drum). 7 – Guitar 1 Bank The Library contains more than 300 Audio Drum (see list at the end of this manual). NOTE When a style with Audio Drum is running, the Wave player is not available. 2 – Groove Bank The Grooves are short rhythmic sequences (loops) synchronized by using MIDI and controlled in the same way of Drum Sets, with individual controls for volume, reverb, pan, etc. The Groove Library contains more than 200 loops, with acoustic traditional percussions, Latin and dance percussions. The Grooves work in the Drum2 section and they always replace the Drum Set (if present). The Grooves can be stored on the 4 arrangements of the style, with its own volume each. 3 – Bass Bank The automatic Bass MIDI Library, offers more than 180 bass riffs. It works on the Bass section replacing the normal bass part of the style. 4 - Arp&Lick The Arpeggio & Lick Library offers a variety of embellishment for various instruments: Piano, Guitar, 72 KETRON • AUDYA Huge Midi Guitar pattern library available on Chord 2 section .Can be used instead of original programmed style midi part. 8 – Guitar 2 Bank Huge Midi Guitar pattern library available on Chord 3 section .Can be used instead of original programmed style midi part. Style View etting an Audio Drum, Groove Bank or Live ▀▀ S Guitar. The selection of the tables for these three parts is the same. This is the procedure to set an Audio Drum. The procedure is the same for the other two parts. With the Arranger stopped, press the STYLE VIEW button. 1. Press the F1 button. 2. “Wait please...” will appear briefly while reading the Audio Style from disc. The part now is called Audio Drum. 3. Turn the DATA/VALUE wheel to scroll all the available tables or digit the number of the table by using the numeric keypad of the style section. For example, digit 201 to select the Audio Drum called “16 BEAT6_72” (Figure 157). Figure 157 4. Start the style by using the START button on the panel. 5. To change the Audio Drum, stop the Arranger and repeat from step 3. ▀▀ Setting a Bass Bank, Guitar 1/2, Piano Bank or an Arp&Lick The selection from the tables or sounds for these two parts is the same. This is the procedure to set and edit a Bass Bank. With the Arranger stopped, press the STYLE VIEW button. 1. Press the F3 button. 2. “Wait please...” will appear briefly while reading the Bass Bank from disc. The part now is called Bass Bank. Figure 158 3. Turn the DATA/VALUE wheel to scroll all the available tables or digit the number of the table by using the numeric keypad of the style section. For example, digit 55 to select the Bass Bank called “PANDERO1” (Figure 158). 4. Start the style by using the START button on the panel. 5. While the style is playing you can change the instrument choosing from the table by using the DATA/VALUE wheel. You can assign any GM voice. 6. To change the Bass Bank, stop the Arranger and repeat from step 3. KETRON • AUDYA 73 Style View ▀▀ Storing the style Once you made all the desired settings, press the SAVE button on the front panel and give a name from the keyboard to store the style in the current position (Figure 159). In the example of Figure 160 the style name is MY_BALLAD. The changes can be stored both for styles containing normal parts and Audio Style Modeling. The style will be stored in the USER STYLE area in the category previously selected. In other words, if the style is in the BALLAD category, the style will be stored as USER STYLE in the same category. ▀▀ Selecting the style Figure 159 1. Press the USER STYLE button on the front panel. 2. Select the category by using the numeric keypad. 3. Select the style by choosing the previously given name (Figure 161). Figure 160 Figure 161 74 KETRON • AUDYA User Audio Drum User Audio Drum The user can include custom Wave loops instead of the internal AUDIO DRUMS into the Audya Styles. These Loops must be allocated into the folder USER AUDIO DRUMS which is placed on root of Audya (C:). The Loops must have the following characteristics: 44 KHz , 16 bit and the name must have the sign @ followed by the precise BPM indication of the Loop. As an example: [email protected]. When enabled ( see note#2) Display will show “ Loading Audio Resources ) when Audya is turned on. Figure 162 The Demo folder contains 1 User Audio Drums fitted with a complete set up for all parts (Intro, Ending, ABCD, Fill and Break). The Style are: House1, Lounge, NewBossa, NuJazz. In order to access the User Loops it needs to go into Style View and press repeatedly the tab F1 until appears the name User Audio Drum (Figure 1). With Alpha dial is possible to scroll all the User Audio Drums available. The Loops are automatically synchronized with MIDI and may be associated to each part of the Style such as A, B, C, D, Fill In, Break, Intro, Ending (Figure 162). In order to memorize the User Drums on other parts different than ABCD, such as Fill, Break, Intro and Ending, it’s necessary to switch on the two tabs KEY START and KEY STOP on the panel. On Style in Stop condition, when pressing Fill tab the name Fill will appear on the screen thus allowing to set the proper Loop for the Fill. Same thing for Breaks and Intro – Ending. But in order to achieve the Ending programming the tab Intro must be pressed twice. The new Style that incorporates User Audio Drums can be saved as usual with SAVE into the User Style section (Figure 163). Figure 163 NOTE 1) If the User Audio Drums are associated to the 4 Arrangers only, then Fills and Breaks will continue to play the Arrange Loop. Giving a name with the initial symbol @ will make easier to recognize it as an audio Style. 2) A special option has been provided into Style Mode > Drum > 2nd page to control the On/Off condition for the User Audio Drums. When the option is set to Off, then the initial Audio Resources Loading will be skipped. The On/Off condition may be saved as default with Save Custom Start up function. 3) The Audio Resources Loading time is directly proportional to the amount for files present on the User Audio Drums folder. KETRON • AUDYA 75 User Live Guitar User Live Guitar User Live Guitar are located on DISK menu on USER LIVE GUITAR Folder (Figure 164). Once you’ll select this folder display menu’ will inform you on related operating menu. On the left part of display you ‘ll assign 4 available Ins bank of selection. On the right part you’ll operate with followed features: Clear All (F6): Allows to clear all memory User live Guitar data. Load GTR (F7): Load selected User Live Guitar. Save Sel (F8): This function create a file with GBK extension which like RBK file can load more than a single User Live Guitar at the same time and could be assigned as Autoload function hen Audya will be turned ON. A.Load On/Off (F9): Enable or Disable Autoload function for GBK file when Audya turn On. GTR Disable/Enable (F10): Enable or Disable User Live Guitar (once user will enable this function should be saved on Custom Startup in order to get this function on Audya start up). Figure 164 NOTE The Disable option makes RAM available for other Ins sounds, reserved for LiveGuitar when these cannot be loaded into memory. User Live Guitar will be loaded simply after select your own file (Figure 165) and than press Load GTR (or Enter). Up to 4 User Live Guitar can be loaded at the same time’ Once loading procedure will be completed user should be enable User Live Guitar to play set by press F10 button (GTR Enable) (Figure 166). Figure 165 In order to Clear (empty) User Live Guitar memory user could use Clear All (F6) button. If user would clear one by one (or choose GTR) should be use a related button (F1-F2-F3-F4). Once User Live Guitar will be completed user can add this feature over any selected style. Exit from Disk menu and select User Style to select your own style. So now press “View” button (Figure 167). Figure 166 As well other section works user can choose several banks on Ch 5. By press F 10 button user could be choose guitar from User Live Guitar or Ins Live Guitar bank until display will show “Live Ins” as showed on Figure. From this menu User can edit all other style part freely and save it as usual. So now with this feature when user will select your own User Live Guitar Audya will load automatically related sample if not present. 76 KETRON • AUDYA Figure 167 Edit Pattern Edit Pattern The PATTERN Editor offers all the necessary features to create your own Styles directly on the Ketron AUDYA (Figure 168). ▀▀ Using Pattern Editor to Create or Edit Styles In order to access the Pattern Editor screen, from the default screen, press the User Style button, select a Style to modify (or any User style), then press the EDIT button to access the screen shown here. Here is a detailed explanation of the options available:F1 - Shows the Style’s Arranger part to be Edited/ Created - Arranger A, B, C, D. F2 - PARAMETER: access to all Parameter settings for all arrangements. F3 - In this filed, the display shows the chord tonality being edited/created (whatever is recorded will only be played when this chord type is played, apart from Major which applies to all). The default value is set to Major mode. The user can change this value by pressing F3 to highlight, then change with the Data/Value Dial. F4 - METR: On/Off: This enables/disables the Metronome Click (heard only in Record Mode). F5 - VELOCITY: It edits the velocity value for notes. F6 - Displays the current Quantize Value. F7 - QUANTIZE: Quantizes the current recording data/ notes. F8 - RECORD: Used to start recording. F9 - COPY: Access to the COPY menu. F10 - CLEAR: Access to the menu where to clear programmed notes/events. Figure 168 User Buttons: • User 1/6 - ALL/SOLO: This function allows to put “solo” the selected tracks. • User 2/7 - VOLUME/OCTAVE: It toggles between the Volume or Octave values. • User 3/8 – NEW STYLE: It allows to create your own style from scratch. • User 4/9 – LOOP/NO-LOOP (OFF): Enables/ disables Arrangement loop during Recording. • User 5/10- SAVE: It saves the current style. Arranger Arrangement by pressing F1 and the Dial or by pressing directly the A/B/C/D buttons. Parameter Here you can set Parameter values for Tempo (BPM), Time Signature and Arrangement Measure length. These parameters (except Tempo) can be modified only when the arrangement is empty (i.e. nothing has been recorded yet). Furthermore in this section, the user can set their own Metronome Volume value. EXIT button (now displayed in it’s place) allows you to exit from this menu when pressed. KETRON • AUDYA 77 Edit Pattern Velocity The Velocity feature allows one to modify dynamic values of events recorded within selected tracks. This function is applicable to all tracks if the Global parameter is set to ON, or on single notes when the Global parameter is set to OFF. The user can select the desired NOTE by highlighting the related display box using the data arrow buttons and either by pressing the corresponding notes on the keybed or using the Dial selection (Figure 169). Copy The Copy feature can be used for a single part (e.g. Chord 2), or an entire arrangement (Arranger B) (Figure 170): Selected the Arrangement to Copy from by pressing the F2 button, then using the dedicated Arranger buttons (A, B, C, D …Ending). Selected the Arrangement to Replace (Copy to) by pressing the F7 button and changing with the Data Value wheel. Use the navigation arrows to select either the whole Arrangement part (Global) or a single part of the selected Arrangement you want to Copy from the displayed column. Press EXECUTE to actually copy the selected part. Clear This feature allows to one to Clear events such s Note(s), Dynamic, Controllers and other parameter of the selected track. Press and hold down CLEAR (F10) to browse this menu and select the desired part to Clear. To delete a single note, press and hold down CLEAR (F10) and the related note on the keybed you wish to delete. This note will be deleted from the entire track at all past, current and future locations (so you don’t have to repeat for each occurrence). In order to Clear just a single note (as a single event), you will needs to press the Record button then select the CLEAR button once more (Figure 171). NOTE The CLEAR feature operates only on the current Root of the selected part. It is not applicable to Audio Drum parts or any other Banks used. 78 KETRON • AUDYA Figure 169 Figure 170 Figure 171 Edit Pattern ▀▀ How to EDIT/MODIFY an existing Style In order to modify an existing style simply select it (after you have pressed the USER STYLE button to display the user styles), then press EDIT to access the Pattern Editor as shown in Figure 172. By using the navigation arrows, highlight the Voice of the arrangement part to be modified (for our example we’re using the Bass line). Use the Dial to change the voice for this track. You can use any of the Voice Group buttons (Piano, El.Piano, Chrom … etc.) to select the group from which you want to access a voice with the Data Value wheel (Figure 173). Figure 172 To switch to a different Bank, highlight the part (e.g. Bass) and turn the Data Value wheel to access a different bank (e.g. Bass Bank) – then move back to the voice column and use the wheel to select a voice within the new bank. Press RECORD (F8) to enter the recording mode. For our convenience we’ve switched from SOLO to ALL by using User (1/6) button just so we can hear all the other style parts (chord1, chord 2… etc.) while recording (Figure 174). The voice assigned by default is whatever sound the current style used for this part. Figure 173 By pressing the START button, Audya will count in with an extra measure (not recorded) before recording starts, to give you time to have a feel for the tempo before you start recording anything at the next measure. Please keep in mind Recording mode at this point works by adding/inserting events (not replacing) within the existing track data. If during recording unwanted notes are played, the user can delete it/them by pressing the Record button while the arrangement runs (to temporally de-activate recording) and then by pressing the Clear button - so now, while the arrangement part runs, delete unwanted single notes by pressing the corresponding key from the keybed (Figure 1755). Figure 174 Once this procedure is complete, press SAVE (U5/10) to store your work. Figure 175 KETRON • AUDYA 79 Edit Pattern ▀▀ How to Create your own Style Here is how to Create your own style from scratch. First select any existing Style from the User Style selection, then press the EDIT button and NEW STYLE (U3/8) (Figure 176). Figure 176 Name the new style using the keybed and press SAVE (U5/10). Upon completion, the Parameter menu will be displayed automatically. In this menu, you can set the Tempo (BPM) Time Signature, Arrangement Measures and metronome level for your new style, using the data cursor buttons to navigate and changing the value with the Data Value wheel (Figure 177). When set parameters will be completed press SAVE than back to Main Style Creation page by press EXIT button. From this point, you can now proceed to recording your Style as usual (Record the Drums, Bass, Chords …). Figure 177 When done with the recording, simply press SAVE (U5/10) to save it. IMPORTANT QUICK STYLE CREATOR TOOLS Within the Pattern Editor menu, you can access and use the huge Library Banks available to help you instantly create professional styles at once: Substitute internal Audio and/or Midi Drums with User Audio Drums you’ve created/recorded/ sampled or loaded from an external source. Substitute internal Midi Bass parts with the new ones from the Bass Bank. Substitute internal Chord 1 parts with the new ones from the Piano bank. Substitute internal Chord 2 & 3 parts respectively with the new Guitar Banks 1 and 2 sounds. Substitute internal Chord 4 parts with the new Arp&Licks melodies. Substitute internal Chord 5 parts with the Live Audio Guitar (or User Live Guitar). 80 KETRON • AUDYA Figure 178 Move the cursor to highlight the desired part and use Dial to select the required Bank (Figure 178). NOTE During playback, you cannot move the cursor vertically from one instrument to another, but only horizontally. User Styles User Styles Audya features two style families: FACTORY STYLES and USER STYLES . The FACTORY STYLES are the built-in styles of Audya and can be accessed by using the keypad in the STYLE section and the ordinary selection of the style by using the F1-F10 buttons, as already described in the “Styles” chapter on page 17. The styles of this family cannot be modified, meaning that you cannot overwrite them. You can load these FACTORY STYLES into memory and play them. However, you can edit the style currently loaded in memory by using the edit pages described in STYLE VIEW (see on page 67). Then, you can store the edited style as USER STYLE. Figure 179 toring a FACTORY STYLE as a USER ▀▀ S STYLE 1. Select a FACTORY STYLE. 2. Once you have modified the style in the Style Modeling environment (see STYLE VIEW on page 69), press the SAVE button. 3. You will be prompted to input a name for the USER STYLE. Digit a name on the dialogue box by inputting characters directly from the keyboard and press SAVE again (Figure 179). 4. After saving, the style will be available in the USER STYLES area (Figure 1180). 5. Load the modified style, from the USER STYLES area, by pressing the USER STYLES button. To reload the style that you have modified and stored, you must search it and load it from the USER STYLES area. Figure 180 KETRON • AUDYA 81 Style Mode Style Mode By pressing the MODE button of the STYLE section, you can access the functions and the settings of the Arranger. The STYLE MODE main window is similar to Figure 181. From here you can choose 5 sections by using the USER buttons from 1 to 5: MODES (USER 1) DRUM (USER 2) BASS (USER 3) CHORDS (USER 4) LOWER (USER 5) ▀▀ MODES (1) By pressing the USER 1 button once, you can access the first MODES window, where you can see the following functions corresponding to the F1-F10 buttons: • • • • • • • • • • F1–VOICE LIST TO STYLE F2–INTERACT. GUITAR F3–PIANIST/BASSIST F4–PIANIST SUSTAIN F5–PRESET MIX F6–AUTO FILL F7–AFTER FILL F8–FILL TO ARRANGE F9–CHORD MODE F10–ROOTLESS Figure 181 Figure 182 VOICE LIST TO STYLE When this function is ON, it enables the Voice List to Style (Figure 182). You can store for each Style, besides the various parameters, also the Voice List currently selected on the panel. This function works only if the Voice List button is lit while the Style is running. Please note that this option can only be used with the User Style as you must save the style before use. INTERACT. GUITAR When the INTERACTIVE GUITAR function is ON, you can set the dynamic value for the LIVE GUITAR part (Figure 183). In other words, by playing harder on the keyboard, the arrangement of the guitar becomes an arpeggio. By playing softer, the guitar plays rhythmic chords. Figure 183 PIANIST/BASSIST Once selected by using the F3 button, you can choose between 4 operative modes by using the CURSOR Ó Á buttons or the DATA/VALUE wheel for the PIANIST and BASSIST modes (Figure 184). STANDARD: this mode, lets you freeze the recognized chord by using the Sustain Pedal, so you can play the keyboard without altering the tonality of the Arranger. Figure 184 82 KETRON • AUDYA Style Mode AUTO: this mode lets you play 3 or more notes for chord recognition and then play the melody with one or two note max, without altering the tonality of the Arranger. EASY: in easy mode the chord is immediately recognized while the notes are being pressed, without waiting a complete chord with at least three notes. EXPERT: the chord recognition is achieved while the notes are being played by the left hand (with Manual Bass) and playing on the right split. In this way, complex chords can be recognized and the Arranger can be controlled with your right hand. Once a new chord is found, you can freely play the bass line without altering the chord recognition. Figure 185 PIANIST SUSTAIN When this parameter is ON or OFF (Figure 185) enables/disables the Sustain Pedal control on Pianist when this is activated. PRESET MIX When this parameter is ON (Figure 186) the Styles play the original factory mix. While in OFF position, you can freely adjust the volumes of the sections of the Arranger by using the sliders. Figure 186 AUTOFILL When this parameter is ON (Figure 187) the drum plays automatically a Fill In when passes from a variation of the Arranger to another. AFTER FILL When this parameter is ON (Figure 188) the drum plays the Fill In if you apply an Aftertouch on the left split. Figure 187 FILL TO ARRANGE When this parameter is ON (Figure 189) each time you activate the Fill In, causes the automatic change to the next variation. Figure 188 Figure 189 KETRON • AUDYA 83 Style Mode CHORD MODE Once CHORD MODE is selected, you can choose among four operative modes for the automatic chords, by using the CURSOR Ó Á buttons or the DATA/VALUE wheel (Figure 190). • Easy 1 Standard functionality with normal chord recognition. Some chord can be recognized even if they are played partially. For example, you obtain a major chord playing only the root. By using the root and the minor third you obtain the minor chord. By using the root and the seventh you obtain the seventh chord. • Easy 2 Similar to Easy 1, but it keeps in memory all the previously played notes, even if one note or more are released. • Fingered 1 The chord is recognized only by the notes really played. • Fingered 2 Similar to Fingered 1, but it keeps in memory all the previously played notes, even if one note or more are released. Figure 190 Figure 191 ROOTLESS When the parameter is ON (Figure 191) it allows a particular recognition of the chords without the root. ▀▀ MODES (2) By pressing the USER 1 button twice, you can access the second MODES window (Figure 192). This screen allows to enable/disable the VOICE TO ARRANGE function. This function lets you play an instrument on the right split accordingly to Variation A, B, C, D of any style. 1. From the window with the empty slots (Figure 193), press any F1-F4 buttons. 2. Press a button on the VOICE section (Preset, Program or GM Voice). 3. By using the CURSOR Ó Á buttons or the DATA/VALUE wheel select an instrument within the category. For example, FM_PIANO of the EL.Piano category. 4. Repeat the operation for each slot. 5. Press the F5 button (Style Enabled) to enable the function for the single Style. 6. Press the F10 button (Global Enabled) to enable the VOICE TO ARRANGE function globally for all the Styles. 7. Save your choices into the current style by pressing the SAVE button on the front panel. Figure 192 Figure 193 ▀▀ original fill The original fill will be always executed. ▀▀ original break The original break will be always executed. ▀▀ intro to arr a After the intro is executed, the arranger moves automatically to Arr A. ▀▀ Style balance Shows the volume balance of the style with the main volume of the keyboard. 84 KETRON • AUDYA Style Mode ▀▀ DRUM (1) • By pressing the USER 2 (DRUM) once you can access to the first edit window of the audio drum (Figure 194): F1–LIVE DRUM: sets the STRETCH or PITCH mode for Audio Style Modeling of the live drum. The STRETCH algorithm (default) guarantees a good audio quality even changing the tempo. The available range is -30% up to +38% of the nominal speed of the wave. The PITCH algorithm matches the tempo change of the sample altering the audio content. The available range is -30% up to +38%. F3–BASS FREQ EQ: adjusts the EQ low frequency of the audio drum from 50 Hz to 990 Hz. F4–TREBLE FREQ EQ: adjusts the EQ high frequency of the drum from 1030 Hz to 16130 Hz. F8–BASS GAIN EQ: adjusts the EQ low frequency gain by +/-12 dB. F9–TREBLE GAIN EQ: adjusts the EQ high frequency gain by +/-12 dB. Storing the DRUM parameters • The parameters of LIVE DRUM (Stretch and Pitch) and the 2-bands parametric EQ for the audio drum can be saved as USER STYLE with any frequency (FREQ) and gain (GAIN) values. Press the SAVE button on the front panel and give a name by using the keyboard or use the same style name, as shown in Figure 195, by pressing the USER 5 button (SAVE). Figure 194 Figure 195 ▀▀ DRUM (2) • By pressing the USER 2 button twice you can access the AUTOCRASH parameters, that is the automatic hit on the cymbals (CRASH). F1–AUTOCRASH INTRO: the Autocrash function can be enabled/disabled after the Intro of the style. F2–AUTOCRASH FILL/B: the Autocrash function can be enabled/disabled after the Fill In and the Break of the style. Figure 196 NOTE The AUTOCRASH works only if present within the style. If the Autocrash is not programmed into the style its two options have no effect. KETRON • AUDYA 85 Style Mode ▀▀ BASS (1) • The USER 3 button (BASS) opens the edit window for the bass part of the Arranger. By using the F1F10 buttons you can set the following options: F1–BASS TO ROOT: (Figure 197) brings all the automatic bass notes to the root of the recognized chord. F2–RETRIGGER: the bass re-triggers by using the root note each time the chord is recognized. F3–PEDALBOARD: enables the functionality of the bass MIDI pedalboard. F4–MONO/POLY: (Figure 198) sets the monophonic or polyphonic behaviour of the manual bass and the pedalboard. F5–OCTAVE: (Figure 199) octave selection for the manual bass and for the pedalboard, within +/- 2 octaves range. F6–SUSTAIN: Sustain length for the manual bass and for the pedalboard, values from 0 to 64. F7–PEDAL TO CHORD: the bass pedalboard takes a part in the chord recognition. In this way you can control the automatic bass by using the pedalboard while the automatic chords are always controlled by using the left hand. F8–PEDAL DYNAMIC: (Figure 200) dynamic control by using the pedalboard. Use the CURSOR Ó Á buttons to set a fixed dynamic value from 0 to 127. Press the buttons together to return to normal mode. F9–PIANIST BASIC BASS: special feature of the automatic bass within PIANIST mode. You can play the root note of the chord for the beat length. When the beat ends, the bass will follow its original line. F10–BASS ALTERNATE: special mode for the alternate bass that follows the chord change accordingly to the correct harmony rules. For example, when you don’t play again the root note or the fifth that you have just played. The function works only with the styles in which the alternate root/fifth bass was programmed. Figure 197 Figure 198 ▀▀ BASS (2) • Pressing the USER 3 (BASS 1/2) button you enter the second page, which contains the following parameter: • Voice Lock (ON / OFF) It locks the bass voice so it will not change when loading a registration. • Manual Bass Level Bass Volume setting User can define fixed value ( 0-127) or Style linked value related ( Style Parameter ). Figure 199 Figure 200 86 KETRON • AUDYA Style Mode ▀▀ CHORDS (1) • The USER 4 button (CHORDS) allows to access the chords settings (Figure 201). You can select the CLOSE/PARALLEL mode (except Live Guitar) and NORMAL/RETRIGGER mode for the 5 chords of the Style. In CLOSE mode the chords follow the intervals of the notes closer to conventional harmony rules. In PARALLEL mode the notes of the chords will be transposed without changing the intervals. F1– CHORD 1 (CLOSE/PARAL.): sets the Close or Parallel mode. F2–CHORD 2 (CLOSE/PARAL.): as above. F3–CHORD 3 (CLOSE/PARAL.): as above. F4–CHORD 4 (CLOSE/PARAL.): as above. F5–CHORD 5 (CLOSE/PARAL.): as above. F6–CHORD 1 (NORMAL/RETR.): sets how the chord plays. In RETRIGGER mode, the chord retrigger each time it is played. F7–CHORD 2 (NORMAL/RETR.): as above. F8–CHORD 3 (NORMAL/RETR.): as above. F9–CHORD 4 (NORMAL/RETR.): as above. F 10–CHORD 5 (NORMAL/RETR.): as above. Figure 201 ▀▀ CHORDS (2) • By pressing the USER 4 button again you can access the INVERSION function corresponding to F1 button. This function allows the control of the notes and the transposition threshold, so the notes are automatically moved to the lower octave instead of being played on the higher octaves. By using the CURSOR Ó Á buttons or the DATA/ VALUE wheel you can set the Eb E F F# G notes, as shown by the arrow on top of Figure 202. Figure 202 KETRON • AUDYA 87 Style Mode LOWER • The USER 5 button (LOWER) opens the edit window for the left hand (Figure 203): F1–LOWER 1 HOLD: enables the hold control (Hold) on the first Lower section. The setting is valid for all the Styles. F2–LOWER 2 HOLD: enables the hold control (Hold) on the second Lower section. The setting is valid for all the styles. F3–OFF STOP: when is ON it exclude the the Lowers during the Stop condition. F4–MUTE: global mute of the two Lowers. The setting is valid for all the Styles. F5–MODE: sets various modes for the Lower sections. By using the CURSOR Ó Á buttons or the DATA/VALUE wheel you can set the following values: Normal: standard mode, with the Lower always active. Bas+Lower: only when the Arranger is stopped, the manual bass and the chord play together. Hold Stop: holds the Lower also when the Arranger is stopped, instead of being disabled in normal condition. • BREAK HOLD: If set to off, clears the lower 1 when executing a break • BREAK HOLD: If set to off, clears the lower 2 when executing a break • RETRIGGER: makes retrigger of lower when arranger changes • voice lock: locks the voice on lower. 88 KETRON • AUDYA Figure 203 GM Part GM Part When MIDI Player is playing back, you can open the window to control the parts corresponding to the MIDI tracks of the file (Figure 204), by pressing the GM PART button on the PLAY CONTROL section. By using the USER 1-5 buttons you can see the pages where to set all the parameters of the MIDI tracks of the file. The USER buttons allow to edit the following items: GM PARTS FILT. TX/RX FILT. TO ALL 16 PARTS UTILITY Figure 204 ▀▀ GM PARTS (USER 1) By pressing GM PARTS (default selection), the F1-F10 buttons allow to set the following parameters: F1–VOLUME F2–REVERB F3–CHORUS/DISTORTION/ECHO F4–PAN F5–MUTE F6–SHIFT (+/- 36 semitones transposition) F7–CHAN TX ON/OFF F8–CHAN RX ON/OFF F9–MODE (VOICE, VOCAL, DRUM) F10–SOLO You can change the GM part, that is the track of the current MIDI file, by using the CURSOR Ó Á buttons. The parts stand in the middle of the screen as PART 01, PART 02... up to PART 16. Please note that the F5 and F10 buttons set the MUTE and SOLO functions of the part, respectively. For each part you can change also the instrument (Program Change) rotating the DATA/VALUE when no F1-F10 buttons is selected. You can set a GM VOICE and a SUPERSOLO previously loaded into RAM. To deselect a F1-F10 button just press the same button twice. Transposition of the MIDI part 1. Select the part by pressing the CURSOR Ó Á buttons. For example, select part 04. 2. Press the F6 button (SHIFT). 3. Turn the DATA/VALUE to set the value. In Figure 205 the part is transposed by +12 semitones. Figure 205 Figure 206 Setting the VOCAL mode The melody part is, usually, on MIDI channel 4, so you can set the VOCALIZER effect by turning the DATA/VALUE wheel. When you select the VOCAL mode for the MIDI file part, “MIDI MODE” appears in the middle of the screen (Figure 206). At this point, press the VOCALIZER button on the VOICETRON section, and the MIDI file track will drive the channel of the voice, making double voices and choir effects. 1. Select the part by pressing the CURSOR Ó Á buttons. For example, select part 04. 2. Press the F9 button (MODE). 3. Turn the DATA/VALUE to set the value by selecting VOCAL (Figure 206). 4. Turn the button VOCALIZER on. 5. To edit the MIDI MODE, please see VOICETRON section later in this manual. KETRON • AUDYA 89 GM Part ▀▀ FILT. TX/RX (USER 2) By pressing FILTER TX/RX you can access the window where to edit the MIDI transmission filters (Figure 207). By pressing the button again you can access the window where to edit the MIDI reception filters. To change the MIDI transmission/reception parameters, please see the MENU>MIDI section. ▀▀ FILT. TO ALL (USER 3) By pressing FILT. TO ALL, you can set the filter to all (ALL) or to a single MIDI channel (SINGLE). Figure 207 ▀▀ 16 PARTS (USER 4) By pressing 16 PARTS, you can access the window where the status of the 16 parts appear, divided into two windows of 8 parts each. From each of the two windows you can change all the tracks parameters by using the F1-F10 buttons and the DATA/VALUE wheel. ress the F1 or F6 buttons repeatedly to choose 1. P the Program Change of the part/track. In this way you see the 16 parts/tracks of the MIDI file. By using the CURSOR Ó Á buttons or the DATA/ VALUE or the VOICE buttons you can select the GM instrument for each part/track (Figure 208). 2. Press the F2 or F7 buttons repeatedly to hilight one of the 16 parts/tracks of the MIDI file. By using the CURSOR Ó Á buttons or the DATA/ VALUE you can set the volume from 0 to 63. By pressing the CURSOR Ó Á buttons you set the value to 0 (Figure 209). 3. Press the F3 or F8 buttons repeatedly to highlight one of the 16 parts/tracks of the MIDI file. By using the CURSOR Ó Á buttons or the DATA/ VALUE you can set the Reverb from 0 to 63. By pressing the CURSOR Ó Á buttons you set the value to 0 (Figure 210). 4. Press the F4 or F9 buttons repeatedly to highlight one of the 16 parts/tracks of the MIDI file. By using the CURSOR Ó Á buttons or the DATA/ VALUE you can set the Chorus from 0 to 63. By pressing the CURSOR Ó Á buttons you set the value to 0. 5. Press the F5 and F10 buttons to set the MUTE and SOLO function of the selected part, respectively. When the part is in MUTE or in SOLO condition, an asterisk will appear. In Figure 211 the part 1 is in SOLO condition. While more parts can be muted, only one part can be soloed. Figure 208 Figure 209 Figure 210 NOTE To find one or more parts in MUTE condition, press the F1-F6, F2-F7, F3-F8 or F4-F9 buttons repeatedly. Press F5 or F10 to disable the MUTE condition. Press the F10 button (SOLO) twice if you want to disable quickly the MUTE condition on any part. 90 KETRON • AUDYA Figure 211 GM Part ▀▀ UTILITY (USER 5) By pressing UTILITY, you can access the MIDI utility window (Figure 212). Here you can set the following parameters by pressing directly the F1-F10 buttons: • F1–SOFT-THRU: enables the MIDI Thru. • F2–MIDI CLOCK IN: enables the MIDI clock reception. • F3–MIDI CLOCK OUT: enables the MIDI clock transmission. • F4–LOCAL: enables the Local On/Off function of the keyboard. • F5–MIDI PORT IN GM: enables the MIDI IN 1 or 2 port for the General MIDI data reception. • F6–USB MIDI OUT: enables the MIDI transmission on the USB port. • F7–GM2 MODE: enables the General MIDI 2 mode. • F8–GLOBAL GM TX: enables the General MIDI global transmission. • F9–MIDI IN SEND TO: enables the data transmission from the MIDI IN port to the MIDI out 1 or 2 port. • F10-CLOCK IN TO STYLE. Storing the changes into the MIDI file 1. From the window GM PARTS, when the MIDI file is playing back or paused, press the SAVE button on the front panel. A dialogue window where to type the file name will appear (Figure 213). Give a name to the file by typing letters and numbers directly on the keyboard and then press the USER 5 button (SAVE). The MIDI file will be saved with the new name or overwritten, if you leave the same name. The parameters settings to store into the MIDI file can be selected by using the F1-F10 buttons. The options will be highlighted by an asterisk (Figure 214): F1–Arab. Scale: Arabian scale settings F2–Drm. Mixer: Drum Mixer settings F3–Part Param: GM part parameters F4–Song Param: Song parameters F5–Song Tempo: Song tempo setting F6–Lead Chan: Lead channel F7–Right Param: Right hand parameters F8–Song Trans: Song transposition F9–Glob. Trans: Globale transposition F10–Keyb. Trans: Keyboard transposition 2. Only for an example, in each MIDI file you can store: • Tempo settings modified by the TEMPO SLOW FAST buttons. • Keyboard transposition (semitones and/or octaves). • Song transposition. Figure 212 Figure 213 Figure 214 • • • • MIDI file parts transposition. Volume, Reverb and Chorus of each part. Right hand instrument. Single drum instruments settings of the drum, e.g. muting some of them into the MIDI file. Before storing the MIDI file you can choose the GLOBAL or INITIAL option by using the USER 1 button and the REMOVE option by using the USER 3 button. KETRON • AUDYA 91 Drum Mixer Drum Mixer By pressing the DRUM MIXER button on the PLAY CONTROL section you can access the 10 percussive parts of the drum set (Figure 215). By pressing the F1-F10 buttons you select the percussive parts of the drum: • F1–KICK • F2–SNARE • F3–HI-HAT • F4–CYMBAL • F5–TOM • F6–RIMSHOT • F7–LATIN1: Latin percussion 1. • F8–LATIN2: Latin percussion 2. • F9–LATIN3: Latin percussion 3. • F10–CLAP/FX: hands clap and effects. When no USER 1-4 button is selected (to deselect a button just press the button again) you can MUTE the single percussive parts of the drum by using the F1-F10 buttons (Figure 215). To UNMUTE a percussive part, press the same F1-F10 button again. The USER buttons from 1 a 4 let you modify the following items: VOLUME REVERB PAN POT DRUM REMAP SINGLE/GLOBAL VOLUME (USER 1) By pressing VOLUME, you can set the volumes of the percussive parts of the drum by using the F1-F10 buttons and the DATA/VALUE wheel or by using the CURSOR Ó Á buttons. The available values are from 0 to 15 (Figure 217). By pressing the CURSOR Ó Á buttons together you set the value to 0. Figure 215 Figure 216 Figure 217 ▀▀ REVERB (USER 2) By pressing REVERB, you can set the reverb sends of the single percussive parts of the drum, by using the F1-F10 buttons and the DATA/VALUE wheel or by using the CURSOR Ó Á buttons. The available values are from 0 to 15 (Figure 218). By pressing the CURSOR Ó Á buttons together you set the value to 0. ▀▀ PAN POT (USER 3) By pressing PAN POT, you can set the stero position of the single percussive parts of the drum by using the F1-F10 buttons and the DATA/VALUE wheel or by using the CURSOR Ó Á buttons. 92 KETRON • AUDYA Figure 218 Drum Mixer The available values are from 64L to >|< and to 63R, that is totally to the left, in the centre and totally to the right (Figure 219). By pressing the CURSOR Ó Á buttons together you set the PAN value in the centre (>|<). ▀▀ DRUM REMAP (USER 4) By pressing DRUM REMAP, you can access the window where to set a custom map for the percussive parts of the drum. By using the F1-F10 buttons you can select the percussion and then assign the instrument directly to one note of the keyboard. By using the DATA/VALUE wheel or the CURSOR Ó Á buttons you can select the available drum sound (Figure 220). Please note that when the assigned instrument changes, an asterisk appears after the name of the instrument. The USER 5 button enables/disables the MANUAL DRUM function, that is the manual playing of the drum directly from the keyboard. ▀▀ SINGLE/GLOBAL (USER 5) Allow to save modification on single arrangement or whole style. Drum Remap example The Drum Remap function has effect only on the MIDI drum. So, for the following example, select a MIDI style. 1. Select the “Soul_Pop” style from Rock user style category (Figure 221). 2. Press DRUM MIXER and press the USER 4 button (Drum Remap) as shown by the arrow on Figure 222. Start the style to listen immediately to the changes you make. 3. Select the Variation A of the Arranger. 4. If you to “remap” the kick of the drum, press F1 to select the first Drum Remap slot. 5. Press the note corresponding to the kick of the style. In our example is C1. 6. The display will show the sound on that key (Figure 223). 7. Using the wheel DATA/VALUE select “kick15. Next to the name slot will appear with an asterisk (*). In our example you will hear the bass drum sound with an electronic sound (Figure 224). 8. Press F1 again to move on the part of the Drum category so you can navigate between the different categories. Figure 219 Figure 220 Figure 221 Figure 222 NOTE Please note that the Drum Remap applies to the style and to each Variation (A B C D). So, if you select the B Variation, the Drum Remap screen will be empty. In this way, you have the possibility to remap all the Variations of the style independently. Figure 223 KETRON • AUDYA 93 Drum Mixer 9. Press F1 once more to deselect. 10. Repeat the same procedure for the snare (see below). 11. Press F2 and the Eb1 key on the keyboard (Figure 182). 12. Select “snare015” by using the DATA/VALUE wheel (Figure 183). 13. Press F2 twice to deselect. 14. Press F3 to select a new Drum Remap bank. 15. Press the D1 note and select “snare014” by using the DATA/VALUE wheel. 16. Press F3 twice to deselect. 17. Same procedure for the Hi-Hat. Press F4 and the F#1 key on the keyboard. 18. Select “stick09” by using the DATA/VALUE wheel. 19. At this point, the style is modified. You can go on by using the same procedure to remap all the drum sounds as you like. 20. Once you are satisfied, press the SAVE button on the front panel, give a new name to the User style and press the USER 5 button (SAVE) to store the changes (Figure 184). Figure 224 Figure 225 Figure 226 Figure 227 94 KETRON • AUDYA Drum Set Drum Set By pressing the DRUM SET button in the PLAY CONTROL section you can access the screen where to select one of the available 53 DRUM SETS plus 20 user sets (Figure 228). By pressing the F1-F10 buttons you select the DRUM SET, while the CURSOR Ó Á or the BACK and FORWARD buttons below the display allow to access the various pages of the DRUM SET. The USER 1-5 buttons will show the corresponding edit pages: INTERNAL, USER, INS, FUNCTION, FULL RANGE Figure 228 ▀▀ INTERNAL (USER 1) By selecting INTERNAL (default selection), you can set the DRUM SET among the 54 internal drum sets. ▀▀ USER (USER 2) By selecting USER, you can access the screen where to select/edit the 20 DRUM SET created by the user (Figure 229). Figure 229 ▀▀ INS (USER 3) By selecting INS you can DRUM SET loaded into RAM. ▀▀ FUNCTION (USER 4) By selecting FUNCTION, you can access the screen where to set the button SHIFT function which shift the DRUM SET in the range of +/- 24 semitones (in 12 semitones steps) (Figure 230). ▀▀ FULL RANGE (USER 5) By selecting FULL RANGE, you can put the DRUM SET on the entire keyboard or on the left split (SPLITTED). Creating or editing a user DRUM SET 1. Press the USER 2 button (USER) to enter the user DRUM SET editing window (Figure 231). 2. Select one of the 10 USER_DRUM of the first window by using the F1-F10 buttons, or one of 10 of the second window, accessible by using the CURSOR Ó Á buttons or the DATA/VALUE wheel. 3. Press the EDIT button on the front panel. A window like Figure 232 will appear 4. Press F1 (KEY) to select the percussive instrument to assign to the note played on the keyboard. On our example is C1 of the KICK percussive group. If you assign another percussive instrument, press any other key on the keyboard. Figure 230 Figure 231 Figure 232 KETRON • AUDYA 95 Drum Set 5. Press F2 (GROUP) if you want change the percussion group (Figure 233) by using the CURSOR Ó Á buttons or the DATA/VALUE wheel: KICK SNARE HI-HAT CYMBAL TOM RIMSHOT LATIN1 LATIN2 LATIN3 CLAP/FX 6. Press F3 (INSTR.) to select an instrument within the percussion group, by using the CURSOR Ó Á buttons or the DATA/VALUE wheel. In our example is “kick18” (Figure 234). By pressing the CURSOR Ó Á buttons together you set “empty” that is no instrument. 7. Press F6 (TUNE) to set the fine tune of the percussive instrument, by using the CURSOR Ó Á buttons or the DATA/VALUE wheel. The values are from 0 to 128 (0-100 cents). 8. Press F7 (SHIFT) to set the pitch by +/- 32 semitones in one semitone step of the percussive instrument, by using the CURSOR Ó Á buttons or the DATA/VALUE wheel. In Figure 235 the pitch is +16 semitones. 9. Press the USER 5 button (SAVE) to store the user DRUM SET, give a name directly from the keyboard and choose the position where to store. In Figure 236 the name given to the user DRUM SET is “MY_DRUM”. Figure 233 Figure 234 Figure 235 Setting a USER DRUM SET in a style 1. After you have selected a style, press the STYLE VIEW button on the front panel. 2. Press the F1 button to select the drum part of the style. 3. If “Audio Drum” is displayed, press F1 again to select “Drum1”. 4. By using the CURSOR Ó Á buttons or the DATA/VALUE wheel select one of the DRUM SET created by the user. In Figure 237 the selected USER DRUM SET is “MY_DRUM”. Figure 236 NOTE Please see all the DRUM SET lists and the percussive instruments included into the drum sets in the “Sounds” section of this manual. 96 KETRON • AUDYA Figure 237 Drawbars Drawbars By pressing the DRAWBARS button on the VOICE section, you switch the DRAWBARS mode on. For the selection of the different organ types please see “Selecting the organ DRAWBARS” on page 20. Creating a new organ DRAWBARS To create a new type of organ Drawbars, select one of the 20 organs available from the two DRAWBARS pages (Figure 238). 1. Press the EDIT button on the front panel to access the edit window. The F1-F10 buttons allow to access the following parameters (Figure 239): F1–PERCUSS. ON/OFF: enables/disables the organ percussion. F2–HARMON. 2nd/3rd: adds even/odd harmonics to the percussion. F3–DECAY: decay of the percussion (0–7). F4–VOLUME: volume of the percussion (0–63). F5–CLICK: “click” volume (0–63). F6–SUSTAIN: Sustain amount (0–16). F7–BS BOOST: bass boost (0–63). F8–REVERB: Reverb amount (0–63) F9–CHORUS: Chorus amount (0–63) F10–OVERDR.: Distortion amount (0 to 63). Figure 238 Figure 239 2. Set the DRAWBARS values by moving the 9 sliders of the MIXER section independently (Figure 240). 3. Press the USER 5 button (SAVE) to store the organ DRAWBARS setting. The store position is the same of the current organ. Figure 240 NOTE In DRAWBARS mode, if you press the USER 1 button (PedToRotor) you can activate the rotor by using the pedal connected to SUSTAIN PEDAL on the rear panel. The PedToRotor ON/OFF parameter is not stored into the user DRAWBARS so it must be activated manually. KETRON • AUDYA 97 RAM Ins / Supersolo RAM Ins / Supersolo By pressing the RAM INS / SUPERSOLO button in the VOICE section you can access the screen where to select the SUPERSOLO voices, described on page 19. Creating and editing an INS block By pressing the EDIT button you can access the edit screen of the RAM INS / SUPERSOLO voices (Figure 241). By using the F1-F10 buttons you can execute the following functions: • F1 - CLEAR&LOAD: clears the current memory and loads the selected INS voice(s). • F2 - CLEAR SELECT.: clears the memory only for the currently selected INS voice(s). • F6 - CLEAR ALL: clears the memory of all the INS voices. • F7 - SAVE SELECT.: stores the currently selected voices in one file (Figure 242). Give a name by using the keyboard and press the USER 5 button (SAVE) to store the INS block. In the example, the file is “MY_SUPERSOLO”. • F8 - AUTO LOAD OFF: enables/disables the automatic loading into memory of an INS block. To choose the autoload function of an RBK file, just move to the RBK file and switch the Auto Load parameter from OFF to ON. Figure 241 Figure 242 Loading an INS block After storing the INS block, it will be on the internal disc. 1. Press the RAM INS / SUPERSOLO button from the front panel. 2. Scroll the files by using the CURSOR § ¶ buttons or the DATA/VALUE wheel and localize the file “MY_SUPERSOLO .RBK” previously stored on disc (Figure 243). Press ENTER on the front panel to load the INS 3. block and all its instruments at one time (Figure 244). Figure 243 Figure 244 NOTE While loading the INS voices, if there is not enough room in memory, a warning message will appear inviting to free one or more memory locations of INS voices, by using the F2 button (CLEAR SELECT) or the F6 button (CLEAR ALL). 98 KETRON • AUDYA NOTE When you can access to RAM INS section, you can find the folder called SUPERSOLO, containing high quality, exclusive for AUDYA, orchestral voices . MSP function MSP Audya offers a complete Multi Sample Player editor. To access the MSP function, press the WAVE button, choose a file from the list in the WAVE folder and press the EDIT button. ▀▀ Creating an MSP 1. Select a WAV format file from the WAVE folder and press ENTER to load the file into memory (Figure 245). By using the F1-F10 buttons you can access the following functions: F1 - START: sets the start of the note range on the keyboard. Press a button on the keyboard for the automatic assignment (Figure 246) or use the DATA/VALUE wheel or the CURSOR Ó Á. F2 - END: sets the end of the note range (Figure 247) as described above. F3 - KEY: sets the basic pitch. Press a button on the keyboard for the automatic assignment . F4 - PITCH: it can be TRACKING, that is tuned for each button of the keyboard, or FIXED, that is with fixed pitch for any keys of the keyboard. F5 - FINE: fine tuning of the sound up to +99 cents of a semitone. F6 - VOL: sets the output volume. F7 - CUTOFF: sets the cutoff frequency (low-cut filter). F8 - EP (END POINT): sets where the sound ends. F9 - LP (LOOP POINT): sets where the sound loops. 2. By using the USER 1 button (PAGE >>) you can jump to a further screen to edit the parameters of the sample (Figure 248). By using the F1-F10 buttons you can access the following functions: F1 - ATTACK: sets the attack time of the envelope. F2 - DECAY: sets the decay time of the envelope. F3 - SUSTAIN: sets the sustain level of the envelope. F4 - RELEASE: sets the release time of the envelope. F6 - SLOPE: sets the slope of the envelope. F7 - OFFSET: sets the amount of the envelope accordingly to the dynamics. F8 - FILT. SLOPE: sets the filter slope. F9 - FILT. OFFSET: sets the amount of offset on the filter accordingly to the dynamics. 3. Load another WAV file, assign it to another button and repeat editing. 4. When you select all the desired WAV files you can see the list of the files loaded into MSP by pressing the MSP VIEW button (USER 2 button). In this screen you can check the files out, remove files (USER 3 button) and play a file by using the SOLO button (USER 4 button). This environment lets you ri-edit the previously created MSP files. By pressing the MSP VIEW button again you exit to the main window. Figure 245 Figure 246 Figure 247 Figure 248 KETRON • AUDYA 99 MSP function ▀▀ Saving and loading an MSP 1. When you finish editing, save the MSP by using the USER 5 button (SAVE). Digit a name on the dialogue box by inputting characters directly from the keyboard and press SAVE again (Figure 249). 2. Select an MSP from disc to load it into memory. By pressing the ENTER button, a progress bar will appear. When the file is loaded, you can select it by pressing the INS-EFFECT SFX. It will be treated as an INS voice (Program or MIDI insertion, etc.). NOTE The MSP files created by Audya will be stores in a single file containing all the information data to work, unlike the previous versions of KETRON files which need to have the WAV files in the same folder. Ot means that, if you want to use a previous version of MSP file, you should put all the linked WAV files in the same folder of the MSP file. 100 KETRON • AUDYA Figure 249 Voice List Voice List By pressing the VOICE LIST button in the VOICE section, the screen of the custom voices will appear. For each of the 16 VOICES (the first two rows) you can access the VOICE LIST button with 20 memory locations each. In this way, you can customize your favourite voice lists to be used for each voice family. ▀▀ Storing a VOICE LIST 1. Select a group ( family sound) by press a VOICE button ( i.e.EL. PIANO). 2. A screen like Figure 250 will appear, showing the first ten memory locations. 3. Press the CURSOR Á to jump to the second page and see the next ten EMPTY VOICE locations. 4. By using the F1-F10 buttons, select an empty memory location (Figure 251). 5. If you want, you can replace the voice in that location later. 6. Press the EDIT button. The VOICE LIST button flashes. 7. Select any keys in the VOICE section. For example, “EL. PIANO”, if you want to stay in the same family, but you can choose any other family, of course. 8. By using the F1-F10 buttons and the CURSOR Ó Á for page selection, select any voice. For example, “FM_PIANO 2” on the second page of “EL. PIANO” (Figure 252). 9. Press the ENTER button to confirm the selection. 10. If you want, choose further voices following the same procedure from step 5 to step 7, changing each time the memory location by using the F1F10 buttons and the CURSOR Ó Á, until you finish your favourite VOICE LIST (Figure 253). 11. Press SAVE, corresponding to the USER 5 button, or press the SAVE button on the panel to store the custom VOICE LIST. 12. Press the EDIT button to exit edit mode. The VOICE LIST button will stop flashing. 13. At this point, if you press the VOICE LIST button, you will display your custom list for each family of the VOICE section. Figure 250 Figure 251 Figure 252 Figure 253 KETRON • AUDYA 101 User Voice List ▀▀ What is a User Voice List The new User Voice List is controlled from the Voice group Effect/SFX, can be edited independently from the others User Voices and can be associated to Style, Midi, Mp3 and Wave for an automatic recall. User Voice List files (with extension *.UVL) are located per default on folder C: USER VOICE LIST, into 4 subfolders: Midi, Mp3, Style, Wave. In alternative they can be set automatically on Menu: KEYBOARD CONTROL > UTILITY > PAGE 2/4 >Player Autoload and Text+UVL or UVL (Figure 254). Figure 254 ▀▀ How to save your User Voice List: Edit menu is the same used for standard Voice List. Make your modifications on the 20 Voices of the List provided on EFFECT/SFX group. You can Save it in 2 ways: 1. Save together with the entire Voice List on folder C:\SYSTEM\INIT\VOICELIST.TOU by pressing USER 5/10 SAVE. 2. Save just the individual User Voice List by pressing USER 4/9 SAVE UVL. This file will be saved into the UserVoice List folder of Audya (Figure 255). ow to assign a User Voice List to Style, ▀▀ H Midifile, Wave, Mp3 Figure 255 STYLE Select the Style. Press Voice List tab and then select the Voice group EFFECT/SFX. Press Save. Related to the F3 button the display will show SAVE UVL to STYLE. Pressing again F3 will save the User Voice List on folder USER_VOICE_LIST\STYLE. If no other name has been written for the User Voice List, this will be saved with the same name of Style. Any time this Style is recalled Audya will load automatically also it’s correspondent User Voice List (Figure 256). Figure 256 102 KETRON • AUDYA User Voice List MID,WAV and MP3 The same concept of the Style is applied to Mid, Wav and Mp3. Once file is selected press SAVE. On F3 button the display will show: SAVE UVL to MIDI or SAVE UVL to WAVE or SAVE UVL to MP3. By pressing F3 the current User Voice List will be saved on the correspondent User Voice List folders. USER_VOICE_LIST\MIDI or USER_VOICE_LIST\WAVE or USER_VOICE_LIST\MP3 When the User Voice List is saved with same name of the files, then it will automatically loaded (Figure 257). Figure 257 NOTE When <SAVE> button is pressed of F3 must be displayed the file reference information. If not, pls. verify if DISK, REGISTRATION, PLAYLIST or SFX leds are off: at least a Style, Midi, Wave or Mp3 must be selected. KETRON • AUDYA 103 Menu Menu By pressing the MENU button on the front panel you can access the MENU main page (Figure 258). Here you can find many edit pages where to set the keyboard. The F1-F9 buttons will open the following pages: F1–LANGUAGE F2–MIDI F3–DSP F4–KEYBOARD CONTROL F5–OUTPUT ASSIGN F6–METRONOME CLICK F7–VIDEO MODE F8–AUDIO RECORDING F9–MIDI RECORDING Figure 258 ▀▀ LANGUAGE • Press the F1 button (LANGUAGE) for the selection of the system language (Figure 259). By using the F1-F10 buttons you can set the following languages: F1–ENGLISH F3–DEUTSCH: German. F6–ITALIANO: Italian. Once the language is set, exit from MENU by using the EXIT or MENU buttons. Press SAVE and F6 (CUSTOM STARTUP) to store the language setting at Audya start-up. Figure 259 ▀▀ MIDI • Press the F2 button (MIDI) to open the MIDI settings page (Figure 260). By using the F1-F10 buttons you can access the following settings: F1–CHANNEL TX: transmission channels setting. F2–FILTER PROG.CHANGE TX: Program Change transmission filter setting. F3–TRANPOSE TX: part transpose transmission. F4–UTILITY: utility page (see more details later). F6–CHANNEL RX: reception channels setting. F7–FILTER PROG.CHANGE RX: Program Change reception filter setting. F8–TRANSPOSE RX: part transpose reception. NOTE Only the languages really present in the keyboard will appear. Further languages will be updated by adding an ordinary text file loaded into the internal disc. Figure 260 NOTE By pressing the cursor Ó Á buttons together you set the default value — that is no MIDI channel. It means that the part is not transmitted via MIDI. 104 KETRON • AUDYA Menu CHANNEL TX By pressing the F1 button a window like Figure 261 will appear. Here you can set all the MIDI transmission channels for each part of the keyboard by using the F1-F10 buttons. Press the F1 button-10 corresponding to the part and assign the MIDI transmission channel choosing from 1 to 16 by using the CURSOR Ó Á buttons or the DATA/VALUE wheel. F1–Right F2–Left F3–Bass F4–Drum1 F5–Drum2 F6–Global (global channel of the keyboard) F7–Registration F8–Voicetron F9–ARRANGER CHORDS (opens another window) F10–VOICE/DRAWBAR (opens another window) Figure 261 Besides the F1-10 buttons, you can also select the parts by using the CURSOR § ¶ buttons. ARRANGER CHORDS By pressing the F9 button an assign window for the MIDI channels will appear as shown in Figure 262. By pressing the F1-F10 buttons or the CURSOR § ¶ buttons you can select the parts of the Arranger to which assign the transmission MIDI channel from 1 to 16 by using the CURSOR Ó Á buttons or the DATA/ VALUE wheel. F1–Chord1 F2–Chord2 F3–Chord3 F4–Chord4 F5–Chord5 F6–Lower1 F7–Lower2 F8–Live Chord L (Mono) F9–Live Chord R VOICE/DRAWBAR By pressing the F10 button a window will appear where to assign the MIDI channels for each VOICE, DRAWBAR, Click and Percussion, as shown in Figure 263. By pressing the F1-F10 buttons or the CURSOR § ¶ buttons you can select the parts to which assign the MIDI transmission channel from 1 to 16 by using the CURSOR Ó Á buttons or the DATA/VALUE wheel: F1–Voice1 F2–Voice2 F3–Voice3 F4–2ndVoice1 F5–2ndVoice2 F6–GM/RAM Voices F7–Drawbar F8–Click F9–Percussion Figure 262 Figure 263 NOTE To return to the previous MENU page, press the EXIT button on the front panel. To exit the MENU window without saving changes, press the MENU button. KETRON • AUDYA 105 Menu General, Master1, Master2, Accord1, Accord2 You can save the MIDI settings in five Preset, assigned to the USER buttons from 1 to 5: General: General Preset Master1: Master Keyboard Preset Master2: Second Master Keyboard Preset Accord1: MIDI accordion Preset Accord2: Second MIDI accordion Preset The Figure 264 shows the Master2 page (USER 2 button). The following explanation refers to the General Preset. The procedure for the Master1, Master2, Accord1 and Accord2 Presets are identical. Saving the MIDI settings To store the MIDI settings press the SAVE button on the front panel. A brief “SAVE MIDI Setting” message will appear. If you do not save the MIDI settings, the previous settings will return at next keyboard start-up. FILTER PROG.CHANGE TX From the first screen of the MIDI menu, by pressing the F2 button a window will appear where to set the Program Change transmission filter (Figure 265). By using the buttons F1-10 you can select the parts to filter: F1–Right F2–Left F3–Bass F4–Drums F5–ALL PARTS F6–Global (global channel of the keyboard) F7–Registration F8–Voicetron F9–ARRANGER CHORDS (opens another window) F10–VOICE/DRAWBAR (opens another window) Figure 264 Figure 265 Select the MIDI transmission filter options by using the CURSOR § ¶ buttons or the DATA/VALUE wheel. Press the CURSOR Ó Á buttons to set the “FILTERED” value to activate the filter, or the “—” value to deactivate the filter. The filter options are the following (Figure 266, 267, 267): Exclusive Msg Tabs Exc. Msg Program Change AFTERTOUCH PITCH BEND All Controls All RPN All NRPN MODULATION VOLUME REVERB Chorus/Effect Pan Pot EXPRESSION Sust./Soft/Sost. PORTAMENTO WHA Mono/Poly ADSR CUTOFF RESONANCE GM/GS Reset Reset All Controls Arabic Scale Figure 266 Figure 267 106 KETRON • AUDYA Menu TRANPOSE TX From the first screen of the MIDI menu, by pressing the F3 button a window will appear where to set the MIDI transmission of the parts transposition. By using the F1-F10 buttons or the CURSOR § ¶ buttons you can select the parts to transpose via MIDI transmission, as shown in Figure 268. By using the CURSOR Ó Á buttons or the DATA/VALUE wheel you can assign +/- 36 semitones transposition value in 1 semitone steps. By pressing the CURSOR Ó Á together you set the default value “—”, that is no transposition. F1–Right F2–Left F3–Bass F4–Lower1 F5–Lower2 F6–Chord1 F7–Chord2 F8–Chord3 F9–Chord4 F10–Chord5 CHANNEL RX Same procedure of CHANNEL TX. By pressing the F6 button you can access the window where to set the MIDI reception channels for each part (Figure 269). Press the F1 button-10 or the CURSOR § ¶ buttons to select the part and assign the MIDI channel from 1 to 16 by using the CURSOR Ó Á buttons or the DATA/VALUE wheel. F1–Right F2–Left F3–Bass F4–Drum1 F5–Drum2 F6–Global (global channel of the keyboard) F7–Registration F8–Voicetron F9–ARRANGER CHORDS (opens another window) F10–VOICE/DRAWBAR (opens another window) ARRANGER CHORDS By pressing the F9 button a window will appear where to assign the MIDI reception channels (Figure 270). Assign the MIDI channel from 1 to 16 by using the CURSOR Ó Á buttons or the DATA/VALUE wheel. F1–Chord1 F2–Chord2 F3–Chord3 F4–Chord4 F5–Chord5 F6–Lower1 F7–Lower2 F8–Live Chord L (Mono) F9–Live Chord R VOICE/DRAWBAR Press the F10 button to open a window like Figure 271. By pressing the F1-F10 buttons or the CURSOR Figure 268 Figure 269 Figure 270 Figure 271 § ¶ buttons you select the parts to which assign the MIDI reception channel from 1 to 16 by using the CURSOR Ó Á buttons or the DATA/VALUE wheel. F1–Voice1 F2–Voice2 F3–Voice3 F4–2ndVoice1 F5–2ndVoice2 F6–GM/RAM Voices F7–Drawbar F8–Click F9–Percussion KETRON • AUDYA 107 Menu FILTER PROG.CHANGE RX From the first screen of the MIDI menu, by pressing the F7 button a window will appear where to set the Program Change reception filter (Figure 272). By using the buttons F1-10 you can select the parts to filter: F1–Right F2–Left F3–Bass F4–Drums F5–ALL PARTS F6–Global (global channel of the keyboard) F7–Registration F8–Voicetron F9–ARRANGER CHORDS (opens another window) F10–VOICE/DRAWBAR (opens another window) Figure 272 Select the MIDI reception filter options by using the CURSOR § ¶ buttons or the DATA/VALUE wheel. Press the CURSOR Ó Á buttons to set the “FILTERED” value to activate the filter, or the “—” value to deactivate the filter. The filter options are the following (Figure 272, 273, 274): Exclusive Msg Tabs Exc. Msg Program Change AFTERTOUCH PITCH BEND All Controls All RPN All NRPN MODULATION VOLUME REVERB Chorus/Effect Pan Pot EXPRESSION Sust./Soft/Sost. PORTAMENTO WHA Mono/Poly ADSR CUTOFF RESONANCE GM/GS Reset Reset All Controls Arabic Scale TRANPOSE RX From the first screen of the MIDI menu, by pressing the F3 button a window will appear where to set the MIDI reception of the parts transposition. By using the F1-F10 buttons or the CURSOR § ¶ buttons you can select the parts to transpose via MIDI reception, as shown in Figure 275. By using the CURSOR Ó Á buttons or the DATA/VALUE wheel you can assign +/- 36 semitones transposition value in 1 semitone steps. By pressing the CURSOR Ó Á together you set the default value “—”, that is no transposition. F1–Right F2–Left F3–Bass F4–Lower1 F5–Lower2 F6–Chord1 F7–Chord2 F8–Chord3 F9–Chord4 F10–Chord5 Figure 273 Figure 274 Figure 275 108 KETRON • AUDYA Menu ▀▀ UTILITY From the first screen of the MIDI menu, by pressing the F4 button, the UTILITY page will open, as shown in Figure 276. Here you can set the following parameters, by pressing directly the F1-F10 buttons: • F1–SOFT-THRU: enables the MIDI Thru. The MIDI data to MIDI IN port will be transmitted thru the MIDI Out port. • F2–MIDI CLOCK IN: enables the MIDI clock reception. • F3–MIDI CLOCK OUT: enables the MIDI clock transmission • F4–LOCAL: enables the Local On/Off function of the keyboard. In Local Off you will not hear any sound. • F5–MIDI PORT IN KEYB: enables the MIDI IN 1 or 2 port for the General MIDI data reception. • F6–USB MIDI OUT: enables the MIDI transmission from USB port. • F7–GM2 MODE: enables the General MIDI 2 mode. • F8–GLOBAL GM TX: enables the General MIDI transmission. • F9–MIDI IN SEND TO: enables the data transmission from MIDI IN port to MIDI out 1 or 2 port. Figure 276 USB MIDI OUT When you can activate the USB MIDI OUT mode from the UTILITY page, if the keyboard is connected to the USB port of a computer, it will be recognized as USB SPEAKERS driver for the MIDI data transmission from and to the computer. When the keyboard is connected via USB to a computer, the green LED of the USB (EXIT) button will light. • The keyboard can be used as external control unit and as sound module for MIDI applications, such as Cubase, Sonar, Reaper and so on, for example. • Once the MIDI application is open you can select the MIDI In port and the MIDI Out port, recognized as USB SPEAKERS. • In Figure 277 the arrow indicates the MIDI IN and MIDI OUT ports in a Cubase track. • Once the MIDI communication via USB is open, you will be able to record MIDI tracks. • The material that you record via MIDI into a track of the sequencer can be output directly by using the Audya sound module. Figure 277 NOTE Please disable the soft MIDI THRU function from the sequencer application in order to avoid dangerous MIDI loops. For the correct playback of the parts and the instruments, please use the same MIDI channels for the transmission and the reception. For example: Right: MIDI channel 1, both TX and RX Left: MIDI channel 2, both TX and RX Bass: MIDI channel 3, both TX and RX Chord1: MIDI channel 5, both TX and RX Drum1: MIDI channel 10, both TX and RX ... and so on. KETRON • AUDYA 109 Menu ▀▀ DSP • From the first screen of the menu, press the F3 button to open the DSP (Digital Signal Processor) settings page, as shown in Figure 278. By using the F1-F10 buttons you can edit the following pages: F1–REVERB: Reverb settings. F2–CHORUS: Chorus settings. F3–ECHO-DELAY: Echo settings. F4–DISTORTION: Distortion settings. F5–ROTOR: Rotor (Leslie) settings. F6–DRAWBAR OVERDRIVE: Organ distortion settings. F7–EQUALIZER: Equalizer settings. F8–WAVE EQUALIZER: Wave file EQ settings. REVERB By pressing the F1 button on the DSP page, you can access the REVERB window, as shown in Figure 279. Here you can select the following parameters: F1–RIGHT REVERB: selection of the reverb for the right hand (opens another window). F2–LEFT/GM REVERB: selection of the reverb for the left hand and the GM parts (opens another window). F6–Right Level: reverb amount settings for the right hand (values 0-63). F7–Left/GM Level: reverb amount settings for the left hand and the GM parts (values 0-63). F8–Micro Level: reverb amount settings for the microphone (values 0-63). Figure 278 Figure 279 NOTE By pressing the CURSOR Ó Á buttons together you set the value to 0. RIGHT REVERB From the REVERB page, by pressing the F1 button (Right Reverb) you can access the page for the selection of the reverb for the right hand (Figure 280). 10 reverb Presets are available in the first page and 10 in the second, by pressing any CURSOR button or the DATA/VALUE wheel. Press any F1-F10 button to select the corresponding reverb type: Studio1 and Studio2 Club1 and Club2 Hall1 and Hall2 Theatre1 and Theatre2 Stage1 and Stage2 Church1 and Church2 Hangar Galaxy Space User1, User2, User3, User4 and User5 (see details later) 110 KETRON • AUDYA Figure 280 Figure 281 After you select the effect for the right hand, you can hear the result by playing directly on the right split of the keyboard. To lock the reverb also when changing Program or Registration or at start-up, press the Lock: ON button, corresponding to the USER 1 button (Figure 281). After the effect type selection, exit by pressing the EXIT button or directly by pressing the MENU button. To store the reverb type at start-up press the SAVE button on the front panel and F6 (CUSTOM STARTUP). Menu LEFT/GM REVERB From the REVERB page, by pressing the F2 button (LEFT/GM REVERB) you can access the page for the selection of the reverb for the left hand and the GM parts (Figure 282). The available reverb Preset are the same of those for the right hand seen before. To lock the reverb also when changing Program or Registration or at start-up, press the Lock: ON button, corresponding to the USER 1 button, as shown by the arrow on Figure 283. After the effect type selection, exit by pressing the EXIT button or directly by pressing the MENU button. USER REVERB When you select the reverb for the right hand or the left hand and the GM parts, you can choose one of the 5 USER REVERBS (Figure 284) corresponding to the F6-F10 buttons of the second REVERB page. By pressing the EDIT button on the front panel you can customize the user reverbs and store them as User Rev1, User Rev2, User Rev3, User Rev4 and User Rev5. The Figure 285 shows the parameters of User Rev1 that you can modify by using the F1-F10 buttons and the CURSOR Ó Á buttons or the DATA/VALUE wheel: F1–User Rev (choose from 1 to 5) F2–LEVEL: reverb level (values 0–63) F3–TIME: reverb time (values 0–63) F4–THESHOLD GATE: threshold of gate (values 0–63) F5–HIGH DAMP: high frequencies damp (values 0–63) F7–ALGORITHM: algorithm type (Long1, Long2, Medium, Short1, Short2) Figure 282 Figure 283 NOTE By pressing the CURSOR Ó Á buttons together you set the value to 0. After you set the parameters you can to store the custom reverb by pressing the USER 5 button (SAVE) or the SAVE button on the front panel. A brief SAVE DATA TO DISK message will appear. Figure 284 CHORUS By pressing the F2 button on the DSP page, you can access the CHORUS screen, as shown in Figure 233. Here you can select the following parameters: F1–CHORUS RIGHT: selection of the Chorus for the right hand (opens another window). F2–CHORUS LEFT/GM: selection of the Chorus for the left hand and the GM parts (opens another window). F6–Right Level: settings of the Chorus level for the right hand (values 0-63). F7–Left/GM Level: settings of the Chorus level for the left hand and the GM parts (values 0-63). Figure 285 KETRON • AUDYA 111 Menu CHORUS RIGHT From the CHORUS page, by pressing the F1 button (CHORUS RIGHT) you can access the page for the selection of the Chorus for the right hand (Figure 286). 10 Chorus Presets are available in the first page and 10 in the second, by pressing any CURSOR button or the DATA/VALUE wheel. Press any F1-F10 button to select the corresponding Chorus type: Chorus1, Chorus2 ... Chorus6 Tremolo1, Tremolo2 and Tremolo3 Phaser1, Phaser2 and Phaser3 Flanger1, Flanger2 and Flanger3 User1, User2, User3, User4 and User5 (see details later) Figure 286 After you select the effect for the right hand, you can hear the result by playing directly on the right split of the keyboard. To lock the Chorus also when changing Program or Registration or at start-up, press the Lock: ON button, corresponding to the USER 1 button (Figure 286). After the effect type selection, exit by pressing the EXIT button or directly by pressing the MENU button. To store the Chorus type at start-up press the SAVE button on the front panel and F6 (CUSTOM STARTUP). CHORUS LEFT/GM From the CHORUS page, by pressing the F2 button (LEFT/GM REVERB) you can access the page for the selection of the Chorus for the left hand and the GM parts. The available Chorus Preset are the same of those for the right hand seen before. To lock the Chorus also when changing Program or Registration or at start-up, press the Lock: ON button, corresponding to the USER 1 button, as shown by the arrow on Figure 286. After the effect type selection, exit by pressing the EXIT button or directly by pressing the MENU button. USER CHORUS When you select the Chorus for the right hand or the left hand and the GM parts, you can choose one of the 5 USER CHORUSES (Figure 287) corresponding to the F6-F10 buttons of the second CHORUS page. By pressing the EDIT button on the front panel you can customize the User Chorus and store them as User Cho1, User Cho2, User Cho3, User Cho4 and User Cho5. The Figure 288 shows the parameters of User Cho1 that you can modify by using the F1-F10 buttons and the CURSOR Ó Á buttons or the DATA/VALUE: F1–User Cho (choose from 1 to 5) F2–LEVEL: Chorus level (values 0–63) F3–TIME: Chorus time (values 0–63) F4–MODE: Chorus mode (Chorus, Flanger, Tremolo and Phaser) F7–FEEDBACK: feedback amount (values 0–63) F8–DEPTH: Chorus depth (values 0–63) F9–RATE: Chorus rate (values 0–63) 112 KETRON • AUDYA Figure 287 Figure 288 After you set the parameters you can to store the custom Chorus by pressing the USER 5 button (SAVE) or the SAVE button on the front panel. A brief SAVE DATA TO DISK message will appear. NOTE By pressing the CURSOR Ó Á buttons together you set the value to 0. Menu ECHO-DELAY By pressing the F3 button on the DSP page, you can access the ECHO-DELAY screen, as shown in Figure 289. Here you can make the selection of the ECHODELAY type to set into the DSP in order to make it available for PROGRAMS from which you can choose an ECHO algorithm (Figure 290). 10 Echo Presets are available in the first page and 10 in the second, by pressing any CURSOR button or the DATA/VALUE wheel. Press any F1-F10 button to select the corresponding Echo type: Mono Echo1 ... Mono Echo5 Stereo Echo1 ... Stereo Echo5 Triple Echo1 ... Triple Echo5 Mono User1 Stereo User1 and Stereo User2 Triple User1 and Triple User2 When you activate an Echo Preset you can set the option Lock:On/Off as for the previous Reverb and Chorus effects and the option Tap Enable/Disable (Figure 291). The Tap Enable/Disable option allows to activate the Tap function of the Echo effect set into one PROGRAM. In other words , when Tap is active, the delay of the effect will be synchronized accordingly to the current tempo. The effect delay will be synchronized also if the tempo changes. That is, this parameter allows the effect to be automatically synchronized by the tempo change. USER ECHO-DELAY When you select one of the five custom Echo effects, you can access the parameters of the corresponding effect by pressing the EDIT button on the front panel. The Figure 292 shows the parameters for Mono User1, but the parameters are identical for Stereo User 1, Stereo User 2, Triple User 1 and Triple User 2. The only difference is the basic algorithm. The parameters are the following: F1–User Echo (choose from 1 to 5) F2–LEVEL: effect level (values 0–63) F3–TIME: effect time (values 0–63) F4–FEEDBACK: feedback amount (values 0–63) F5–FILTER: filter amount (values 0–63) F7–MASTER VOL.: master volume (values 0–63) F8–LEFT VOL.: left channel volume (values 0–63) F9–RIGHT VOL.: right channel volume (values 0–63) F10–TAP MODE ON/OFF: enables/disables the Tap mode. If the parameter is disabled, the effect will not be affected by the Tap Enable/Disable function. NOTE By pressing the CURSOR Ó Á buttons together you set the value to 0. Figure 289 Figure 290 Figure 291 Figure 292 After you set the parameters you can to store the custom Echo by pressing the USER 5 button (SAVE) or the SAVE button on the front panel. A brief SAVE DATA TO DISK message will appear. KETRON • AUDYA 113 Menu DISTORTION By pressing the F4 button on the DSP page, you can access the DISTORSION screen, as shown in Figure 293. Here you can select the DISTORTION type to set into the DSP in order to make it available for PROGRAMS from which you can choose a DISTORTION algorithm (Figure 294). 10 Distortion Presets are available in the first page and 10 in the second, by pressing any CURSOR button or the DATA/VALUE wheel. Press any F1-F10 button to select the corresponding Distortion type: Overdrive1 ... Overdrive3 Tube1 and Tube2 Distorsion1 ... Distorsion3 Hyper Dist. Grunge Fuzz Hot British Org. Over1 ... Org. Over3 Over. User1 and Over. User2 Dist. User1, Dist. User2 and Dist. User3 Figure 293 When you activate a Distortion Preset you can set the option Lock:On/Off as for the previous effects. USER DISTORTION When you select one of the five custom Distortion effects, you can access the parameters of the corresponding effect by pressing the EDIT button on the front panel. The Figure 295 shows the parameters for Over. User1, but the parameters are identical for Over. User 2, Dist. User 2, Dist. User 1 and Dist. User 3. The only difference is the basic algorithm. The parameters are the following. F1–User Distortion (choose from 1 to 5) F2–GAIN: effect level (values 0–63) F3–INPUT LEVEL: input level (values 0–63) F4–FILTER FREQ: frequency filter cutoff (values 0–63) F5–FILTER RESO: filter resonance (values 0–63) F7–OTUPUT LEVEL: output volume (values 0–63) F8–SUSTAIN: sustain amount (values 0–63) F9–TYPE: algorithm type (Tube, Grunge, Sharp, Heavy, Punk). Figure 294 NOTE By pressing the CURSOR Ó Á buttons together you set the value to 0. After you set the parameters you can to store the custom Distortion by pressing the USER 5 button (SAVE) or the SAVE button on the front panel. A brief message SAVE DATA TO DISK will appear. 114 KETRON • AUDYA Figure 295 Menu ROTOR By pressing the F5 button on the DSP page, you can access the window ROTOR, as shown in Figure 296. Here you can select the speed of the rotor: F1–SLOW F2- FAST The same function is available by using the two SLOW and FAST buttons of the ROTOR section on the front panel. DRAWBAR OVERDRIVE By pressing the F6 button on the DSP page, you can access the DRAWBAR OVERDRIVE screen, as shown in Figure 297. Here you can select the DRAWBAR OVERDRIVE type to set into the DSP to make it available for DRAWBAR. 5 Drawbar Overdrive Presets are available. Just press one of the F1-F5 buttons to select the corresponding Overdrive type: Figure 296 Overdr1 ... Overdr5 When you activate an Overdrive Preset you can set the option Lock:On/Off as for the previous effects. By pressing the EDIT button on the front panel, you can access the parameters of the selected Overdrive Preset, as shown in Figure 298. The parameters are identical for all the five Overdrive effects: F1–Overdrive (choose from 1 to 5) F2–GAIN: effect level (values 0–127) F3–FILTER LEVEL: filter level (values 0–63) F4–FILTER FREQ: frequency filter cutoff (values 0–63) F5–FILTER RESO: filter resonance (values 0–63) F7–INPUT GAIN: input level (values 0–63) F8–OUTPUT LEVEL: output level (values 0–63) Figure 297 NOTE By pressing the CURSOR Ó Á buttons together you set the value to 0. After you set the parameters you can to store the custom Overdrive by pressing the USER 5 button (SAVE) or the SAVE button on the front panel. A brief message SAVE DATA TO DISK will appear. Figure 298 KETRON • AUDYA 115 Menu EQUALIZER By pressing the F7 button on the DSP page, you can access the EQUALIZER screen, as shown in Figure 299. Here you can select the EQUALIZER type to set as global equalization of the keyboard. 5 Equalizer Presets are available. Just press one of the F1-F5 buttons to select the corresponding Equalizer type: Factory......Flat When you activate an Equalizer Preset you can set the option Lock:On/Off as for the previous effects. By pressing the EDIT button on the front panel, you can access the parameters of the selected Equalizer Preset, as shown in Figure 300. The parameters are identical for all the five Equalizer effects: F1–Equalizer (choose from 1 to 5) F2–BASS FREQ: bass frequency (values 80–970 Hz) F3–MID BASS FREQ: mid-high frequency (values 1050–1770 Hz) F4–MID TREBLE FREQ: mid-high frequency (values 3020–5290 Hz) F5–TREBLE FREQ: high frequency (values 6090– 14830 Hz) F7–BASS GAIN: bass gain (values +/-12 dB) F8–MID BASS GAIN: mid-bass gain (values +/-12 dB) F9–MID TREBLE GAIN: mid-high gain (values +/-12 dB) F10–TREBLE GAIN: high gain (values +/-12 dB) Figure 299 NOTE By pressing the CURSOR Ó Á buttons together you set the default frequency value of the EQ band or the Gain value of the EQ band to 0. Press the USER 1 button (ACTIVE) to enable the Equalizer as shown by the arrow on Figure 300. The USER 2 button (DEFAULT) resets the parameters to the default values. After you set the parameters you can to store the custom Equalizer by pressing the USER 5 button (SAVE) or the SAVE button on the front panel. A brief message SAVE DATA TO DISK will appear. 116 KETRON • AUDYA Figure 300 Menu WAVE EQUALIZER By pressing the F8 button on the DSP page, you can access the WAVE EQUALIZER screen, as shown in Figure 301. Here you can select the WAVE EQUALIZER type to set as equalization of the WAVE Player. 5 Wave Equalizer Presets are available. Just press one of the F1-F5 buttons to select the corresponding Wave Equalizer type: Factory......Flat When you activate an Wave Equalizer Preset you can set the option Lock:On/Off as for the previous effects. By pressing the EDIT button on the front panel, you can access the parameters of the selected Wave Equalizer Preset, as shown in Figure 302. The parameters are identical for all the five Wave Equalizer effects: F1–Wave Equalizer (choose from 1 to 5) F2–BASS FREQ: bass frequency (values 50–990 Hz) F3–TREBLE FREQ: high frequency (values 1030– 16130 Hz) F4–BASS GAIN: bass gain (values +/-12 dB) F5–TREBLE GAIN: high gain (values +/-12 dB) F7–VOICE ADJUST: frequency adjustment for the vocal part reduction function (values 1-300). See below. Figure 301 Press the USER 1 button (ACTIVE) to enable the Wave Equalizer. The USER 2 button (DEFAULT) resets the parameters to the default values. By pressing the USER 3 button (VOICE ON/OFF) as shown by the arrow on Figure 302, you can reduce the vocal part of the current WAVE file. You can adjust the VOICE ADJIUST and the bass/high gain parameters, in order to reach the best result in the vocal reduction. Figure 302 Press the F1 button (LEAD MUTE) when the WAVE Player is running (Figure 303) to activate the vocal reduction function. After you set the parameters you can to store the custom Wave Equalizer by pressing the USER 5 button (SAVE) or the SAVE button on the front panel. A brief message SAVE DATA TO DISK will appear. Figure 303 KETRON • AUDYA 117 Menu ▀▀ KEYBOARD CONTROL • From the first MENU screen, by pressing the F4 button you can access the KEYBOARD CONTROL page where to make the keyboard settings (Figure 304). By using the F1-F10 buttons you can access the following pages: F1–PITCH/VOL/TRANS: Pitch Bend, Master Tune, Master Volume, Keyb Transpose, Player Transpose Lock and Right Boost Level settings. F2–MODULATION: Modulation Wheel sensitivity settings. F3–AFTERTOUCH: Aftertouch settings. F4–EXPR. PEDAL: expression pedal settings. F5–ACCORDION: Accordion MIDI parameters settings. F6–VEL CURVE: keyboard dynamic curve setting. F7–VEL FILTER: dynamic filter response setting. F8–ARABIC: Arabian scale settings. F9–FOOTSWITCH: footswitch settings. F10–UTILITY: utility page for the following parameters: • SPDIF In/Out (just only Audya 76 keys) • Edit Value Recycle • Fast Song • Show File Icon • Intelligent Transpose • 2nd Right Tab • Remix Live Guitar • Headphone to Out3&4 • Video Lyric PITCH/VOL/TRANS By pressing the F1 button on the KEYBOARD CONTROL page you can access the settings of the following parameters (Figure 305): F1–Master Tune: master tuning of the keyboard (440 Hz reference, +/-100%) F2–Sound Card Level: master volume of the keyboard (values 16–63). Not for the AUDIO parts. F3–Bend Sens.: Pitch Bend sensitivity (values 0–24 semitones, to 0, that is no Pitch Bend effect) F4–Keyb. Only Transpose: keyboard transposition only (values ON/OFF). If set to ON, the transposition affects the keyboard and not the song of the Player. F5–Player Transpose Lock: transposition lock on the Player (values ON/OFF). F6–Right Boost Level: maximum level for the Right Boost function (value 10–50), when it’s applied by the USER buttons. This function boosts the volume of the right hand accordingly to the level set by the Right Boost Level parameter. F7-Glide Time: Sets the Glide effect time. 118 KETRON • AUDYA Figure 304 Figure 305 Figure 306 MODULATION By pressing the F2 button on the KEYBOARD CONTROL page you can access the MODULATION settings (Figure 306). Here you can control the SENSITIVITY parameter for the Modulation Wheel (values 0–48). AFTERTOUCH By pressing the F3 button on the KEYBOARD CONTROL page you can access the settings of the AFTERTOUCH parameters (Figure 307): F1–Sensitivity: adjustment of the Aftertouch sensitivity (values 0–63) F2–Threshold: threshold of the Aftertouch (values 0–63) F3–Attack Time: attack time of the Aftertouch (values 0–100) F4–Slide Threshold: threshold of the Slide effect (values 10–127). The Slide effect must be programmed within a VOICE. F5–Slide Time: time of the Slide effect (values 0–100). Menu F6–Bend Value: Bend value of the Slide effect (values +/- 12 semitones). F7–Aft&Port Autoswitch: enables/disables the automatic activation of the Portamento and the Aftertouch when they are set within a PROGRAM. EXPR. PEDAL By pressing the F4 button on the KEYBOARD CONTROL page you can access the settings for the EXPRESSION PEDAL (Figure 308), that is the pedal to control the expression connected on the rear panel: F1–Pedal Curve: adjustment of the pedal curve behaviour (values NORMAL, OPEN and CLOSE1/2) F2–Expr. To Song: expression control of the song currently playing in the Player (values ON/OFF) F3–Swell To Right: expression control on the right hand (values ON/OFF) F4–Swell To Player: expression control on Player (values OFF, ALL, WAV-1, WAV-2, MP3-1, MP3-2). ACCORDION By pressing the F5 button on the KEYBOARD CONTROL page you can access the settings for ACCORDION (Figure 309), connected via MIDI: F1–Mode: values Intern., Belgiq., that is International and Belgian. F2–Left Velocity: adjustment of the left hand Velocity response. You can set the values by pressing repeatedly the F2 button and by using the CURSOR Ó Á buttons or the DATA/VALUE wheel (values 0–63, Soft1, Soft2, Normal, Hard1 Hard2). F3–Right Velocity: adjustment of the right hand Velocity response. You can set the values by pressing repeatedly the F2 button and by using the CURSOR Ó Á buttons or the DATA/VALUE wheel (values 0–63, Soft1, Soft2, Normal, Hard1 Hard2). F4–Left Drum: drum on the left hand (values ON/ OFF). F5–Autochord: automatic chords (values ON/OFF). F6–Bass Sustain: sustain for the bass (values 0–63). F7–Bass To Chord: bass to chord (values ON/OFF). F8–Bass Octave: bass octave (values +/- 2 octaves). F9–Lower1 Octave: Lower1 part octave (values +/- 2 octaves). F10–Lower2 Octave: Lower1 part octave (values +/- 2 octaves). Figure 307 Figure 308 Figure 309 LEFT DRUM By pressing the USER 3 button on the ACCORDION page, as shown by the arrow on Figure 309, you can access the LEFT DRUM page where to set percussive instruments for the left hand (see next page). BS ON STOP By pressing USER 4 button on ACCORDION page User enable/disable Bass note played on Style Stop feature. Press the USER 1 button (ACTIVE/INACTIVE) to activate the ACCORDION parameters. Once you set the parameters you can to store the ACCORDION parameters by pressing the USER 5 button (SAVE) or the SAVE button on the front panel. A brief SAVE DATA TO DISK message will appear. KETRON • AUDYA 119 Menu By using the F1-F10 buttons from the LEFT DRUM page (Figure 310) you can set the percussive instruments for the left hand. F1–Bass Drum Instr.1: percussive instrument 1 for the bass (see note). F2–Bass Drum Instr.2: percussive instrument 2 for the bass (see note). F3–Chords Drum Instr.1: percussive instrument 1 for the chords (see note). F4–Chords Drum Instr.2: percussive instrument 2 for the chords (see note). F6–Bass Drum Velo.1: Velocity setting for the percussive instrument 1 of the bass (values 0–127). F7–Bass Drum Velo.2: Velocity setting for the percussive instrument 2 of the bass (values 0–127). F8–Chords Drum Velo.1: Velocity setting for the percussive instrument 1 of the chords (values 0–127). F9–Chords Drum Velo.2: Velocity setting for the percussive instrument 2 of the chords (values 0–127). VEL CURVE By pressing the F6 button from the KEYBOARD CONTROL page, you can set the Velocity Curve (Figure 311), that is the dynamic curve of the keyboard. You can set the values by pressing repeatedly the F6 button. The available values are: Soft1, Soft2, Normal, Hard1 and Hard2 You can select also a fixed Velocity Curve value (VEL CURVE FIXED). In this case, set the fixed value by using the CURSOR Ó Á buttons or the DATA/ VALUE wheel (values 1-63). VEL FILTER By pressing the F7 button from the KEYBOARD CONTROL page, you can set the Velocity Filter (Figure 312), that is the dynamic curve of the filter. You can set the values by pressing repeatedly the F7 button. The available values are: Open1, Open2, Close1 and Close2. ARABIC By pressing the F8 button from the KEYBOARD CONTROL page, you can access a window like Figure 313, where you can set the Arabian scale parameters: F1–Left Scale: sets the Arabian scale for the left hand. Values: NO, ARR. and LOW., that is no scale, Arabian scale to the Arranger or to the Lower part. F2–Footswitch: pedal modes. Values: NO, NOTE, AR.SET., that is no parameter, pedal controlling the note or the Arabic set (from 1 to 16). F7–Arabic Set: selection of one Arabic set, from 1 to 16. F8–Koma Tab (Harmony): activation of the Koma function, which replaces the HARMONY button in order to alter dynamically the pitch of the scale while you are playing. 120 KETRON • AUDYA Figure 310 NOTE You can choose the percussive instrument among those listed in the list at the end of this manual. For example, “kick01”, “ cymbal07”, “snare018” and so on. Figure 311 Figure 312 Figure 313 ▀▀ Modifying one set Using the 6th (5th eighth on Audya 4 and 5) select the note you want to alter, change the amount of tune by using the dial. When done, press the SAVE button. Menu ▀▀ FOOTSWITCH • By pressing the F9 button from the KEYBOARD CONTROL page, you can activate the FOOTSWITCH screen (Figure 314), where you can assign the functions to the pedalboard connected on the rear. The optional FS13 pedalboard has 13 functions, to which you can assign any parameter of the keyboard. By using the CURSOR § ¶ buttons select one of the 13 functions of the pedal and assign one of the parameters of the table below, by using the CURSOR § ¶ buttons or the DATA/VALUE: Sustain, Soft, Sostenuto Arr. A, Arr. B Arr. C Arr. D Fill 1 ~ 4 Fill In Break 1 ~ 4 ReIntro Int.End 1 Int.End 2 Int.End 3 Start Stop FillToArr. Key Start Key Stop Hold Tempo + Tempo Transp + Transp Voice To Arr. Auto Fill After Fill Inter. Gtr. Manual Bass Bas. Mono/Poly Swing Bass BassToRoot Bassist Bass Sust. Lower Mute Low. Off Stop Lower1 Hold Lower2 Hold Pianist Accordion Swell Left Drum Fade Out Manual Drum Crash Play Kick2 Only Kick Drum&Bass Kick Off Snare Off HiHat Off Cymbal Off Tom/FX Off Rimshot Off Latin1 Off Latin2 Off Latin3 Off ClapFx Off minor 7th m7th 5+ dim 6+ 7th+ MIDI Reset Lead Mute Lyric On/Off Zoom Figure 314 A.Play On/Off Loop On/Off Text Page + Text Page Cross Fade Wha-Wha Reverb Chorus Echo/Delay Dist. Overdr. Voicetron Micro On/Off Micro Talk Audio Reset Micro Rev. Autocrash Fill/Break DryOnStop Voc. On/Off Voice Down Voice Up Regis Down Regis Up 2nd Voice Harmony Double Rotor On/Off Rotor Slow/Fast F1 Tab * F2 Tab * F3 Tab * F4 Tab * F5 Tab * F6 Tab * F7 Tab * F8 Tab * F9 Tab * F10 Tab * Arabic_11 Arabic_12 Arabic_13 Arabic_14 Arabic_15 Arabic_16 Right Boost Exit Style Stop Pause/Count In/Res. Program/Preset Aftertouch Portamento EndOnStop FillToEnd Left Voice Unplugged Glide Jukebox Wave Filter. Break BassToLowest PianistSust. Play Kick1 Back Tab Forward Tab Enter File Up/Down Sub Reg. Up/Down NOTE By activating Arabic Scale (see page 120) the footswitches will become Arabic 1, 2, 3... Once you set the FOOTSWITCH parameters you can save them by pressing the USER 5 button (SAVE) or the SAVE button on the front panel. A brief SAVE DATA TO DISK message will appear. KETRON • AUDYA 121 Menu UTILITY By pressing the F10 button from the KEYBOARD CONTROL page you can activate the UTILITY screen (Figure 315), where you can enable/disable the following functions: F1–SPDIF In: enables/disables the digital SPDIF In port (values ON/OFF). F2–SPDIF Out: enables/disables the digital SPDIF Out port (values SPDIF/MAIN). The SPDIF volume is controlled by using the S/PDIF-LINE IN (SFX) slider of the PLAYER section. F3–Edit Value Recycle: enables/disables the recycle of the volume, effect send, etc. parameters type Values ON/OFF. F4–Fast Song: eliminates measures at the beginning of the Midi file, usually Count In or Setup Measure. Values ON/OFF. F5–Show File Icon: enables/disables the icons display for the file types. Values ON/OFF. F6–Intelligent Transpose: affects the transposition of the MIDI file. Each instrument is transposed within its natural octave. Values ON/OFF. F7–LINE IN: enables/disables the LINE IN input. The input volume is controlled by the MP3 slider of the PLAYER section. Values ON/ OFF. F8–Remix Live Guitar: enables/disables the Live Guitar of the style when making a MIDI Remix. Values ON/OFF. F9–Headphone to Out3&4: values ON/OFF. F10–Video Lyric: enables/disables the Lyric display on remote screen monitor. In other words, the Lyric OFF affects also the remote monitor. Values ON/ OFF. ▀▀ Page 2 By pressing the USER 5 button you can access the next settings page (press USER 4 to return to the previous page), as shown on Figure 264. Here you can find the following functions: F1–Cross Fade Mode: selects the Cross Fade mode (Fade 1, Fade 2, Fade 3). F2–Cross Fade Velocity: sets the Cross Fade speed (Normal, Fast 1, Fast 2, Slow 1, Slow 2). F3–Fade Time: sets the Fade time of the Master (values 1–20). F4–Player Autoload: enables/disables the automatic loading of the TXT file together with WAV, MIDI, MP3 (see Text scrolling function on page 117) and of the file WAV associated to the MIDI FILE (MIDI SYNC RECORDING page 99)(TEXT, ALL, NO). F5–Enabled Number Files: enables/disables the the file numbering (values ON/OFF). F6–Main View: enables/disables the MAIN VIEW mode (values ON/OFF). F7–Autoswitch Time (sec.): sets the automatic time to switch to the MAIN VIEW from other screens (values OFF, 0–60). F8–Lyric/Txt Small Font: sets the small font display of 122 KETRON • AUDYA Figure 315 Figure 316 Figure 317 the lyrics (values ON/OFF). F9–Registration Sort: sets the sort mode of the Registration list (values Numeric, Alphab). F10–Registration Restore: enables/disables the RESTORE function which restores the panel to the conditions before the Registration recall (values ON/OFF). ▀▀ Page 3 By pressing the USER 5 button again you can access a further settings page (press USER 4 to return to the previous page), as shown on Figure 265. Here you can find the following functions: F1–MP3/LINE IN TRANSP.: enables/disables (ON/ OFF) the transposition of the MP3 file and of the Line In input signal. This function, if set to OFF, allows to play the MP3 file together with the style without affecting the pitch of the MP3 by changing the tempo of the style. F2–WAV DJ MIX: enables/disables (ON/OFF) the DJ MIX function between the WAVE and DJ LOOP Players (see procedure below). F3–Player & STYLE MIX: (values ON/OFF) activates the Player when a Style is running. Menu F4–KEY TUNE TO CHORD: (values ON/OFF) see procedure below. F5–REG. LOAD MODE: loading behaviour of the right voice into the Registration when a style is playing. Values Mode1 and Mode2. Mode1: the right voice is changed immediately by loading the registration. Mode2: the right voice is changed by the effective change of the Registration, that is at the beginning of the next measure. F6-Dry On Stop: When the style is stopped, enable this option to disable effects on MICRO. F7-Voice Select Mode: Set this option to mode1 in order to allow the selection of various sounds without changing the sound on the Right: This will be changed only by selecting another sound. Set to mode2 for ordinary selection. F8-Half Screen Mode: This feature will show the player in the Main View with the file list on the left and the lyrics on the right. F9-Juke Box: When the file is played back, this feature allows to select a file to start automatically when the first file ends. Press Go To Next to switch immediately to the next file. F10-Midi SysExc. Mode: The function saves MIDI parameters as MIDI events and not as SYS EXC data. By pressing the ENTER button you can preload the MIDI file, while by using the START button you can start the file without loosing any changes stored in the buffer. In GM Part, after you finished the changes, simply press the USER 5/10 button to update the changes. ▀▀ Page 4 F1-Filter Regis. VOICETR: setting are filtered on Registration whne recalled. F2-Block Reg. Autostart: Is enabled, Song will be played when loaded by Footswitch Block Registration (Regis. Up/Down ). WAV DJ MIX function When the WAV DJ MIX function is ON, you can use the two Players together: 1. Select a file WAVE. 2. Press ENTER or START. 3. Select another WAVE file and press ENTER. 4. The second WAVE file will be pre-loaded. 5. Press the DJ Loop button to cue the second Player (the LEDs are blinking). 6. Press the USER 4 button (CONTINUE) to start the second Wave file. 7. Adjust the two sources output by using the WAVE and DJ LOOP faders, as you like. KEY TUNE TO CHORD function When the Key Tune To Chord is active, you can start a Key Tune, by using the associated key, but also by using the recognition of the associated chord. Here’s an example: NOTE By means of the chord recognition, if Bass To Chord is set to On, also the bass section will start the Key Tune. Figure 318 Figure 319 1. Press the KEY TUNE button on the panel and select a Key Tune (Figure 266). 2. Press the EDIT button on the panel. 3. Press the USER 2 button (Tune View) to view the associated keys to the Key Tune. In Figure 267 there are 3 associated keys. 4. For example, if you want to start the song “Barocco.wav”, you can play the C3 note assigned to the Key Tune, but also when you will play a C chord in all the variations. In this way, the Hold parameter will be set to ON. To stop the Key Tune song just press a C chord or C note again. This function is useful for the accordion player playing MIDI files. When the Key Tune To Chord function is active, the melody part of the accordion will not start the Key Tune but only the Chord part will. In this way you can assign 12 songs maximum (for example, a song assigned to the G5 key and another to the G6 key, by using the chord recognition, G will start the song assigned to G5 key). Combining this function to Registrations, the accordion player can launch the MIDI files and the other settings in the Registration directly from the accordion, without touching the keyboard. KETRON • AUDYA 123 Menu ▀▀ OUTPUT ASSIGN • By pressing the F5 button from the main page of the MENU, you can access to the OUTPUT ASSIGN screen where you can make the routing settings of the internal sources to the outputs on the rear (Main Stereo and separate outputs), as shown in Figure 320. The options are the following: F1–Out3&4: 3 and 4 outputs. F2–Out1&2 Drum: 1 and 2 outputs for the drum and the percussive instruments. F3–Out1&2: 1 and 2 outputs for the right hand, all the drums and MIDI1. Figure 320 Out3&4 By using the CURSOR § ¶ buttons or the DATA/ VALUE wheel you can select the source to send to the 3 and 4 outputs. The internal sources interne are the following: Wave 1/2, A.Drum MP3-2 (SFX) MP3-1 Voicetron Drawbars Bass Lower Chords By using the CURSOR Ó Á buttons you can select the source one by one, and set the output destination, choosing from Main Stereo or Main + 3&4. Figure 321 By using the button USER 5 (SAVE) you can store up to 5 outputs Presets. Select a Preset with the F6-F10 buttons and press the USER 5 button (SAVE). Out1&2 Drum By using the CURSOR § ¶ buttons or the DATA/ VALUE wheel, you can select the percussive instrument of the drum to output (Figure 321). The percussive instruments are the following: KICK SNARE HI-HAT CYMBAL TOM RIMSHOT LATIN CLAP Once selected the percussive instrument, you can set the output with the CURSOR Ó Á buttons, choosing between Main Stereo or 1&2 Stereo. Out1&2 By using the CURSOR § ¶ buttons or the DATA/ VALUE wheel, you can select the internal source to 124 KETRON • AUDYA Figure 322 send to the output 1 and 2 (Figure 322). The internal sources are the following: Right All Drums MIDI 1 2nd VOICE Once selected the source, you can set the output destination with the CURSOR Ó Á buttons, choosing between Main Stereo or 1&2 Stereo. NOTE By pressing the USER 1 button you can toggle the 1&2 Stereo and the 1&2 Mono output, as shown by the arrow on Figure 323. Menu ▀▀ METRONOME CLICK • By pressing the F6 button from the main page of the MENU, you can access to the METRONOME CLICK screen, where to make settings of the metronome (Figure 323). By using the F1-F10 buttons you can set the following parameters: F1–LINK MODE: sets the metronome in the following environments: All, Style, MIDI, Wave, MP3. F2–RUN MODE: sets the start mode of the metronome (Free, Start). F3–VOLUME: output volume from 0 to 63. F4–OUTPUT: output assign (Figure 324) to Out 1 and 2, Out 3 and 4, Out 3 and 4 and headphones (34&Hph). In this last mode, you will hear only the metronome on the headphones. Useful for drummers. F5–TYPE: click type CLICK, METR.1 and METR. 2. F6–TEMPO: tempo setting. This applies only if the songs don’t have tempo information (usually the WAV and MP3 files). F7–TIME SIG */.: sets the numerator of the division. Values from 1 to 12. F8–TIME SIG ./*: sets the denominator of the division. Values 4 or 8 . Figure 323 Press the USER 1 button (ACTIVE/INACTIVE) to enable/disable the METRONOME CLICK function, as shown from the arrow in Figure 323. ▀▀ VIDEO MODE • From the main page of the MENU, press the F7 button (VIDEO MODE) to open the page for the video settings (Figure 325). By using the F1F10 buttons you can open the following settings pages: F1 - MODE: sets the VGA video output for lyric display (karaoke) or as MIRROR (all that you see in the display is mirrored on a VGA monitor). F2 - HOR. START: sets the horizontal start position. F3 - HOR. POSITION: horizontal position. F4 - VERT. START: sets the vertical start position. F5 - VERT. POSITION: vertical position. F6 - BACKGROUND: sets the background colour. F7 - NORMAL TEXT: sets the normal text colour. F8 - HIGHLIGHT FORE: sets the highlighted text fore colour. F9 - HIGHLIGHT BACK: sets the highlighted text background colour. F10 - LYRIC UPPERCASE: sets upper/lower case for lyric text (karaoke). Figure 324 Figure 325 KETRON • AUDYA 125 Menu ▀▀ AUDIO RECORDING • From the main page of the MENU, press the F8 button to open the AUDIO RECORDING page dedicated to audio recording (Figure 326). By using the F1-F10 buttons you can set the following parameters: F1- MP3 RECORDING: MP3 file recording. F2- MIDI SYNC RECORDING: audio file recording synchronized with a MIDI file. F5- SELECT SOURCE: selection of the recording source, that is SPDIF, MP3-1, WAVE, MICROPHONE/VOICETRON F6- WAVE RECORDING: WAV file recording. F-10 UPDATE TIME LEFT: calculates the available recording room on the disc. Recording a WAV file 1. Press the MENU button and the F8 button (AUDIO RECORDING) to enter the audio recording environment. 2. Press the F6 button (WAVE REC) to choose WAV file recording mode. 3. Press the RECORD button. 4. You will be prompted to give a name to the file. Digit the name for the audio file directly from the keyboard (Figure 327). In the example, the file is “AUDIO_01”. 5. Press the USER 5 button (ENTER). 6. Press the F3 button (NORMAL) to set the normal recording or the F4 button (MIXDOWN) to make overdubbing (see details later). 7. Play the keyboard and/or sing on your microphone connected to the MICRO 1 connector (enable the MICRO button in the VOICETRON section). Be sure that the input level is not too high by checking the stereo VU-Meter (Figure 328). 8. Press the USER 5 button (START REC) or the ENTER or RECORD button to start recording. It’s also possible to press the MENU button to exit, but keeping ready to record. The RECORD button remains lit. You can then start the recording at any time by simply pressing the REC button, which will start blinking. 9. Press the USER 4 button (STOP REC) to stop recording or press RECORD that is blinking. 10. A file in the WAVE folder of the disk will be created. 11. Press the START button or the USER 5 button (START) to start playback of the recorded file. To browse and select any recorded audio WAV file, press the WAVE button in the Player section. NOTE The recording volume is set by the WAVE slider on the PLAYER section. 126 KETRON • AUDYA Figure 326 Figure 327 Figure 328 Recording an MP3 file 1. Press the MENU button and the F8 button (AUDIO RECORDING) to enter the audio recording environment. 2. Press the F1 button (MP3 RECORDING) to choose MP3 recording. 3. Follow the same procedure for WAV file recording. 4. The recorded MP3 file will be created in the MP3 folder of the disk. To browse and listen to the recorded MP3 file, press the MP3 button in the Player section. Menu MIDI SYNC RECORDING (file audio recording synchronized with a MIDI file) 1. Press the MENU button and the F8 button (AUDIO RECORDING) to open the audio recording environment. 2. Press the F2 button (MIDI SYNC RECORDING) to show the list of MIDI files within the MIDIFILE folder on the disk (Figure 329). 3. Select a MIDI file from the list. In the example, the file is “Cabaret.MID”. 4. Press the ENTER button to start simultaneously the audio recording of the MIDI file (Figure 330). 5. Play the keyboard and/or sing on your microphone connected to the MICRO 1 connector (enable the MICRO button in the VOICETRON section). 6. Press the USER 4 button (STOP REC) to stop recording. If you stop recording before the MIDI file ends, press the START/STOP button on the panel. 7. A wave format file with the same name of the MIDI file plus a progressive numbering and the WAV extension will be created. In the example, the file is “Cabaret_1.wav”. You will find it in the MIDIFILE folder (Figure 331). 8. Also, you can overdub using the same MIDI file and the newly created audio file. Repeat the procedure from step 3 to step 6. 9. After overdubbing, you will find your audio files with progressive numbering, that means “Cabaret_2.wav”, “Cabaret_3.wav” and so on (Figure 332). 10. Once the MIDI sync is created and played back (remember that only two tracks will play in numeric order, e.g. _1 and _2 or _2 and _3, if _1 is not present), by pressing the SAVE button a popup with two options appears: F1 - Save Sync Param: it allows to save the information of the sync into the MIDI file so the next time you play the file it’s not necessary to reload them. You cannot change the audio file after you saved the sync information because you will loose the synchronization. F2 - Merge Audio Track: it combines the current two tracks playing in one audio track. This option appears only if you have 2 WAV tracks playing. Figure 329 Figure 330 Figure 331 NOTE Once the files are “merged”, a single audio file will be created, by using the lower number of the two files, and two .bak files (backup files of the two original wav files). Figure 332 KETRON • AUDYA 127 Menu Avoiding the MIDI file recording mixed to the source When you make a MIDI SYNC RECORDING by selecting a Main or Keyboard source, also the MIDI file playing will be recorded into the audio file. To avoid this, you can follow two procedures: Manual procedure 1. Select MENU > Out Assign > Out1&2 and set MIDI1 to 1&2 stereo. 2. While recording, the keyboard will be output to MAIN OUT and will be recorded. The MIDI will be present on 1 and 2 outputs without being recorded. Automatic procedure 3. Select MENU > Keyboard Control > Utility and set the Headph to out3&4 item to ON. 4. Now, making the recording, the MIDI will be output automatically to the headphones and will not be recorded on the audio track. 5. Remember that when the Headph to out3&4 item is set to ON, also WAV, MP3 will be present on the headphones... that is all the sources set to out 3&4. You can control the output volume by the PFL slider. Overdubbing a WAV file 1. Press the MENU button and the F8 button (AUDIO RECORDING) to enter the audio recording environment. 2. Select F5 (SELECT SOURCE) and choose the desired source Microphone or Keyboard and press EXIT. (Note that when you select Keyboard the Wave output is routed to 3 and 4). 3. Press F6 (WAVE RECORDING). Press ENTER and type you own audio file name by using letters and /or number ( i.e. MIX ). 4. Press F4 (MIXDOWN) to set the record dubbing (Figure 333). 5. Pressing the USER 5/10 (ENTER) you are automatically into the WAVE PLAYER. 6. Select the wave you want to overwrite, not playing it back. 7. Press the PAUSE button and then the START button. 8. Now, pressing the USER 5/10 (Start Rec) the overdubbing of the previously selected Wave will begin. 9. To stop recording and make the mix of the two tracks, just press the STOP button. ▀▀ MIDI RECORDING • Press MENU and the F9 button (MIDI RECORDING) in the MENU screen. The recording MIDI page will open. By using the F1-F10 buttons you can set the following MIDI recording modes: F1- keyboard: sets the recording mode from the keyboard. F2 - MIDI PORT IN GM: sets the MIDI data 128 KETRON • AUDYA Figure 333 Figure 334 Figure 335 recording mode from the MIDI IN port. Recording a MIDI file using the keyboard 10. Press the MENU button and the F9 button (MIDI RECORDING) to enter the MIDI recording environment. 11. You will be prompted to give a name to the file. Digit the name for the MIDI file, directly from the keyboard (Figure 334). In the example, the file is “MIDI_01”. 12. Press the USER 5 button (ENTER). 13. Press the F1 button (KEYBOARD) to set the recording mode from keyboard. 14. Press the USER 5 button (START REC) or the ENTER button to start the MIDI recording. 15. Play the keyboard and/or start the Arranger. 16. Press the USER 4 button (STOP REC) to stop recording. 17. A file in the MIDIFILE folder of the disk will be created (Figure 335). 18. Press the START button or the USER 5 button (START) to start playback of the recorded MIDI file. To browse and listen the recorded MIDI file, press the MIDI button in the Player section. Menu ▀▀ Recording a MIDI file from the MIDI IN port 1. Press the MENU button and the F9 button (MIDI RECORDING) to enter the MIDI recording environment. 2. You will be prompted to give a name to the file. Digit the name for the MIDI file, directly from the keyboard. 3. Press the F2 button (MIDI PORT IN GM) to set the data recording mode from the external port (Figure 336). 4. Press the USER 5 button (START REC) to start the MIDI recording. 5. Start the external MIDI sequencer or play any MIDI keyboard connected to the MIDI IN connector. 6. Press the USER 4 button (STOP REC) to stop MIDI recording. 7. A file in the MIDIFILE folder of the disk will be created. 8. To browse and listen the recorded MIDI file, press the MIDI button in the Player section. Figure 336 WARNING If you make a MIDI recording using an Audio Drum part for the drum, the drum sounds (AUDIO) will not be recorded into the MIDI recording. If you want to record an Audio Drum please use the audio recording method. ▀▀ MACRO RECORDING The MACRO RECORDING records all the events performed on the keyboard (Figure 337). The files have the extension .MRS and are saved into the MIDI folder from where it is also possible to reproduce them. Once the Macro Recording feature is selected, the display will show a sub-menu with the possibility to assign a name and other options (Figure 338). • Macro Restore: if set to On, at the end of the Macro Recording sequence will be automatically restored all the previous panel conditions of the machine before the Macro performance. • Macro Rec Keyb.: Enable/Disable for the keyboard recording. • Macro Play Keyb.: Enable/Disable for keyboard playing during the Macro reproduction. • Macro Play Tab: Enable/Disable for the panel tab functioning during the Macro playback. • Sync Start Rec: this function permits to start automatically the Macro recording as soon the Style is activated. In order to use this feature it’s enough to exit by pressing the tab Menu and then return to the Main View: doing Start to the Style the MACRO will begin it’s recording. • Sync Stop Rec: the feature allow to stop the Macro recording with the Stop fo the Style. ▀▀ Macro Recording & Playback Once a name is given and the various options are Figure 337 Figure 338 selected, it is possible to start the Macro Recording by pressing the tab START REC (user 5/10). All the following events produced on Audya such as voice selection, style changes, player and any other feature, except for Microphone signal, will be recorded. During the Macro Recording all Menus are deactivated. The end of the performance is achieved by pressing STOP REC or RECORD. In order to start the playback just go into MIDI folder, select the file .MRS and press Enter. ▀▀ Macro and Registration While recording a Macro you cannot access a Registration. If you want to record a Macro using one Registration setting, you can launch the Registration first and then the Macro Recording. When the Macro will be executed, it will automatically set the initial values, also the previously selected Registration. KETRON • AUDYA 129 Voicetron Voicetron Once you connect two microphones to the MICRO 1 and MICRO 2 connectors you can access to a bunch of options for the voice treatment. ▀▀ MICRO The MICRO button enables the MICRO 1 input and MICRO 2 input. Connect one or two microphones to the jacks on the rear and adjust the level by using the GAIN 1 and GAIN 2 wheels. ▀▀ VOCALIZER The VOCALIZER button enables the effect processor for the harmonization and the automatic pitch only on MICRO 1. Setting a vocal effect 1. Press the MICRO button. 2. The MICRO PRESETS window will appear (Figure 339). 3. Press the F1-F10 buttons to select one of the MICRO PRESETS, that is one effect for the microphone connected to MICRO 1 and/or MICRO 2. 4. Press the CURSOR Ó Á buttons to scroll the MICRO PRESETS pages. Figure 339 By using the F1-F10 buttons you can select 20 MICRO PRESETS from two pages: PAGE 1 F1–DRY F2–REVERB SMALL F3–REVERB MEDIUM F4–REVERB LARGE F5–REVERB GATED F6–BOOST F7–ECHO REVERB F8–ECHO REVERB TAP F9–CORRECTION F10–BEAR PAGE 2 F1–GIRL F2–BABY F3–VIBRATO F4–PHONE F5–ANGEL F6–MICRO_01 F7–MICRO_02 F8–MICRO_03 F9–MICRO_04 F10–MICRO_05 Editing a vocal effect 1. Select one MICRO PRESETS from the list on the display. 2. Press the EDIT button on the front panel. 3. A window like Figure 340 will appear. 4. By using the F1-F10 buttons you can select the following options: F1–MICRO1 F2–MICRO2 F3–REVERB F4–ECHO F5–TRANSFORM F6–COMPRESSOR F7–LIMITER F8–EQUALIZER F9–VIBRATO F10–PITCH 130 KETRON • AUDYA Figure 340 Please note that for MICRO1 (that is the microphone connected to MICRO 1 on the rear) all the options are available, while for MICRO2, only REVERB and ECHO are available. MICRO1 By selecting the F1 button (MICRO1), you can choose one of the following options: F3–REVERB F4–ECHO F5–TRANSFORM F6–COMPRESSOR F7–LIMITER F8–EQUALIZER F9–VIBRATO F10–PITCH MICRO2 By selecting the F2 button (MICRO2), you can choose one of the following options: F3–REVERB F4–ECHO Voicetron REVERB By selecting the F3 button a REVERB screen like Figure 341 will appear where you can choose one of the available reverbs by using the CURSOR § ¶ buttons or the DATA/VALUE wheel: Off (nessun effect) Church Short Room Cathedral Room Gated Reverb Small Hall Gated Plate Large Hall User1 Short Plate User2 Vocal Plate User3 ECHO By selecting the F4 button a ECHO screen like Figure 342 will appear where you can choose one of the available Echo effects by using the CURSOR § ¶ buttons or the DATA/VALUE wheel: Off (nessun effect) Stereo Tap Mono Mono 3/4 Tap Stereo Stereo 3/4 Tap Mono 3/4 Mono 4/4 Tap Stereo 3/4 Stereo 4/4 Tap Mono 4/4 Mono Triplet Tap Stereo 4/4 Stereo Triplet Tap Mono Triplet User1 Stereo Triplet User2 Mono Tap User3 TRANSFORM By selecting the F5 button a TRANSFORM screen (only for MICRO1) like Figure 343 will appear where you can choose one of the available Transform effects by using the CURSOR § ¶ buttons or the DATA/ VALUE wheel: Default Cartoon Teen Pop Nasal Dark Strange Delicate Bariton Opera Deep Vibrato Girl Phone Drunk Angel User1 Alien User2 Baby User3 COMPRESSOR By selecting the F6 button a COMPRESSOR screen (only for MICRO1) like Figure 344 will appear where you can choose one of the available compressors by using the CURSOR § ¶ buttons or the DATA/VALUE wheel: Off -21 dB 7:1 -18 dB 2:1 -24 dB 12:1 -15 dB 3:1 User -18 dB 5:1 Figure 341 Figure 342 Figure 343 Figure 344 KETRON • AUDYA 131 Voicetron LIMITER By selecting the F7 button a LIMITER screen (only for MICRO1) like Figure 345 will appear where you can choose one of the available Limiters by using the CURSOR § ¶ buttons or the DATA/VALUE wheel: Off -6dB -12dB -18dB User EQUALIZER By selecting the F8 button an EQUALIZER screen (only for MICRO1) like Figure 346 will appear where you can choose one of the equalization Presets by using the USER buttons from 1 to 5, or set the your equalization curve. To change the equalization curve, choose the band by using the CURSORE Ó Á and change the value (+/- 14 dB) by using the DATA/ VALUE wheel or the CURSOR § ¶ buttons. The Preset curves are the following: Flat (USER 1) LowCut (USER 2) HighCut (USER 3) Loudness (USER 4) User (USER 5) VIBRATO By selecting the F9 button a VIBRATO screen (only for MICRO1) like Figure 347 will appear where you can choose one of the available Vibrato effects by using the CURSOR § ¶ buttons or the DATA/VALUE wheel: Off Light Lyric Heavy Slow User PITCH By selecting the F10 button a PITCH screen (only for MICRO1) like Figure 348 will appear where you can set the parameters to change the pitch. Select the PITCH SHIFT parameter by using the CURSOR § ¶ buttons and change the value by using the CURSOR Ó Á or the DATA/VALUE wheel (values +/- 24 semitones). Select the PITCH CORRECTION parameter by using the CURSOR § ¶ buttons and change the value by using the CURSOR Ó Á or the DATA/VALUE wheel (Off, Slight, Slow, Medium, Fast). Figure 345 Figure 346 Figure 347 Figure 348 132 KETRON • AUDYA Voicetron Saving a microphone effect After you have modified one of the MICRO PRESETS, you can save it by overwriting the same Preset or giving a new name. Here is the procedure to follow. 1. Select a MICRO PRESET. 2. Press the EDIT button on the front panel and edit the parameters as explained above. 3. Once finished, press the SAVE button on the front panel. 4. Type a name by using the keyboard (for example MY_MICRO) and press the USER 5 button (SAVE), as shown in Figure 349. 5. By using the F1-F10 buttons is now possible to select the User Preset from the list, as shown in Figure 350. Figure 349 Setting a VOCALIZER effect 1. Press and hold for few seconds VOCALIZER button. 2. The VOICETRON PRESETS window will appear (Figure 351) that is the effects for the microphone connected to MICRO 1 on the rear. 3. Press the F1-F10 buttons to select one of the VOICETRON PRESETS. 4. Press the CURSOR Ó Á buttons to scroll the VOICETRON PRESETS pages. By using the F1-F10 buttons you can select 20 VOICETRON PRESETS, from two pages. PAGE 1 F1–VOCALIZER F2–AUTOTUNE VOCAL F3–BLUEGRASS DUET F4–COUNTRY DUET F5–CHAINED DUET F6–STANDARD TRIO F7–STANDARD TRIO 2 F8–CHAINED TRIO F9–STAND. QUARTET F10–JAZZ QUARTET PAGE 2 F1–USER 1 F2–USER 2 F3–USER 3 F4–USER 4 F5–USER 5 F6–USER 6 F7–USER 7 F8–USER 8 F9–USER 9 F10–MIDI MODE 5. In Figure 352 you can see the VOICETRON PRESETS of the second page. 6. Please note that the last Preset corresponding to the F10 button on the second page is “MIDI MODE” (shown by the arrow on Figure 352), that is the harmonization mode controlled by the MIDI file. In this mode, the harmonization is automatically controlled by the melody track of the MIDI file. Please see “Setting the VOCAL mode” on the GM Parts section in this manual. Figure 350 Figure 351 Figure 352 KETRON • AUDYA 133 Voicetron Editing a VOCALIZER effect 1. Select a VOCALIZER effect. 2. By pressing the EDIT button, a window like Figure 353 will appear. 3. Press the F1-F10 buttons to access the parameters of the Preset: F1–DUET: duet effects. F2–TRIO: trio effects. F3–QUARTET: quartet effects. F4–QUINTET: quintet effects. F5–FIXED INTERV.: fixed interval effects. F6–VOCODER: vocoder parameters. F7–VOICES EDIT: voices parameters (up to 5 voices) Volume, Pan, Formant, Detune, Cutoff, Resonance. F8–EQUALIZER: 10 bands graphic equalizer. F9–EFFECTS: effects parameters. F10–VOCAL TO ARR.: automatic setting of the vocalizer and the Arranger. DUET By pressing the F1 button the list of DUET effects similar to Figure 354 will appear from which you can choose one of the available duet effects by using the CURSOR § ¶ buttons or the DATA/VALUE wheel: Down 1 Bluegrass Folk 1 Up Down Up 1 Folk 2 Down Bluegrass Up Down 2 Folk 3 Up Country Down Up 2 Chained Up Country Up 3rd Down Chained Folk 1 Down Down 6th Up TRIO By pressing the F2 button the list of TRIO effects similar to Figure 355 will appear from where you can choose one of the effects di trio available by using the CURSOR § ¶ buttons or the DATA/VALUE wheel: Standard Octave Up 2 Standard 2 Down-key down Down Up-key down Up Chained Up Octave Down Chained Down Octave Up Chained Open Down Figure 353 Figure 354 Figure 355 QUARTET By pressing the F3 button will appear the list of effects QUARTET similar to Figure 356 from which you can choose one of the available quartet effects by using the CURSOR § ¶ buttons or the DATA/VALUE wheel: Standard Jazz Down Open Jazz Up Octave Down Block Chord Down Jazz Block Chord Up Figure 356 134 KETRON • AUDYA Voicetron QUINTET By pressing the F4 button the list of QUINTET effects similar to Figure 357 will appear from which you can choose one of the available quintet effects by using the CURSOR § ¶ buttons or the DATA/VALUE wheel: Standard Open Octave Down Sextet Open FIXED INTERV. By pressing the F5 button the list of FIXED INTERV. effects similar to Figure 358 will appear from which you can choose one of the available fixed interval effects by using the CURSOR § ¶ buttons or the DATA/VALUE wheel: Duet Unison 5th Down Duet Female Up 5th Up Duet femal Down Lead 5th Down Trio Female/Male Lead 5th Up Sextet Female/Male 3rd Major Up VOCODER By pressing the F6 button the list of VOCODER effects similar to Figure 359 will appear from which you can edit the parameters of the vocoder effect. Select a parameter with the CURSOR § ¶ buttons and change the value by using the DATA/VALUE wheel: ASSIGN (values Right, Left) OCTAVE (values -2, -1, 0, +1, + 2, auto) MIDI MODE (values ON/OFF): in this mode the VOCODER is active for the MIDI melody track. VOICES EDIT By pressing the F7 button the list of VOICES EDIT parameters similar to Figure 360 will appear. Here you can edit the harmonization parameters up to 5 voices. Select a vertiacal parameter by using the CURSOR § ¶ buttons and the horizontal parameter by using the CURSOR Ó Á buttons. Modify the value of each selected parameter of the 5 voices (VOICES from 1 to 5) by using the DATA/VALUE wheel: VOLUME (values 0–63) PAN (values 64R >|< 63L) FORMANT (values 0–63) DETUNE (values 0–63) CUTOFF (values 0–38) RESONANCE (values 0–7) Figure 357 Figure 358 Figure 359 Figure 360 KETRON • AUDYA 135 Voicetron EQUALIZER By pressing the F8 button the list of EQUALIZER effects similar to Figure 361 will appear from which you can choose one of the 10-bands graphical equalizer preset by using the USER buttons from 1 to 5, or edit the parameters to set the custom equalization. Select one of the 10 EQ bands by using the CURSOR Ó Á buttons. Modify the value of the selected band by using the CURSOR § ¶ buttons or the DATA/VALUE wheel (values from -14 dB to14 dB). The USER buttons from 1 to 5 allow to choose one of the following Preset: • Flat (no equalization) • LowCut (equalization with bass frequencies cut) • HighCut (equalization with high frequencies cut) • Loudness (bass and high frequencies boost) • User (equalization set by the user) LowCut By pressing the USER 2 button you can set a low cut equalization, that is a high-pass filter on sound. Useful when you must cancel booming frequencies or to eliminate “pop” noises from the voice (Figure 362). Figure 361 Figure 362 HighCut By pressing the USER 3 button you set a high cut equalization, that is a low-pass filter on sound. Useful when you must cancel hissing frequencies or to eliminate feedback effects on the microphone (Figure 363). Loudness By pressing the button USER 4 you set an equalization with bass and high frequencies boost. Useful when in must enhance the frequencies in too absorbing rooms at too low volume (Figure 364). In other words, the natural loss at quite volumes of low and high frequencies by the human ear is compensated. User By pressing the USER 5 button you set an equalization made by the user. Useful when you must recall a particular equalization for different gigs (Figure 365). The User Preset is stored together the Voicetron Preset, as explained on the next page. Figure 363 Figure 364 Figure 365 136 KETRON • AUDYA Voicetron EFFECTS By selecting the F9 button the list of EFFECTS similar to Figure 366 will appear from which you can edit the parameters of the REVERB and ECHO effects. Select the parameter by using the CURSOR § ¶ buttons and edit the value of the 3 parameters by using the DATA/VALUE wheel. The three parameters are: EFFECTS SEND (values 0–63) REVERB PRESET (see the list at left) ECHO PRESET (see the list at right) REVERB PRESET Short Room Room Small Hall Large Hall Short Plate Vocal Plate Church Cathedral Gated Reverb Gated Plate User1 User2 User3 ECHO PRESET Mono Stereo Mono 3/4 Stereo 3/4 Mono 4/4 Stereo 4/4 Mono Triplet Stereo Triplet VOCAL TO ARR. By selecting the F10 button the VOCAL TO ARR. screen like Figure 367 will appear where you can edit the parameters of this function. The function allows to set automatically a VOCALIZER effect associated to the part played by the Arranger. For example, you can set a DUET effect for the START, a TRIO effect for the variation A of the Arranger, a VOCODER effect for the variation B of the Arranger and so on. You can make the choice of the part by using the CURSOR § ¶ buttons while the effect to assign can be selected by using the DATA/VALUE wheel or by using the F1F5 buttons (DUET, TRIO, QUARTET, QUINTET and FIXED INTERV.) or the DATA/VALUE wheel. If display show --, vocalizer setting remain unchanged. Figure 366 Figure 367 Figure 368 Saving a VOCALIZER effect 1. Once finished, press the SAVE button on the front panel. 2. A dialogue will appear to give a name (Figure 368). Digit the name by using the keyboard and press the USER 5 button (SAVE) 3. Once saved, you can recall the custom effect from the second page of the VOCALIZER window (Figure 369). Figure 369 KETRON • AUDYA 137 Search Search (Main View) Audya features a useful SEARCH function in order to search files stored in the internal disk or in external USB devices. When is the MAIN VIEW is active, the search engine looks different from the normal view. ▀▀ Searching a file in the MAIN VIEW window 1. Press the SEARCH button. 2. The last open directory of the disc will appear (Figure 370). 3. Use the CURSOR § ¶ buttons or the DATA/ VALUE wheel and the ENTER button to search a folder. 4. Digit the name of a file, even partially, inputting letters and numbers from the keyboard. 5. In Figure 371, only the character “S” is inputted, the engine locates the first entry of the file name starting with an “S”. The found file will be highlighted. 6. In Figure 372, by entering the second character the engine locates more precisely what you are looking for. 7. Repeat inputting characters as you like. 8. When the file you are looking for it’s found, you can press the ENTER button to start the file. In Figure 373 is “SOLO TROMBONE.WAV”. 9. By pressing the EXIT button on the front panel you can change the search folder on the disc. 10. By pressing the USER 5 button (EXIT) as shown by the arrow on Figure 374, you can exit the search function and return to the ordinary MAIN VIEW window. Figure 370 Figure 371 Figure 372 Figure 373 Figure 374 138 KETRON • AUDYA Search Search Audya features a useful SEARCH function in order to search files stored in the internal disk or in external USB devices. ▀▀ Searching a file 1. Press the SEARCH button. 2. The last accessed directory of the internal disk will open (Figure 375). 3. Use the CURSOR § ¶ or the DATA/VALUE wheel and the ENTER button to locate a folder and to search inside. 4. Digit the full name file, or a part of it, by inputting letter and numbers directly from the keyboard. In the example (Figure 376) the input name to search is “LIKE”. 5. Press the USER 5 button (GLOB. SEARCH) to start searching. 6. After a while, a screen by using the search results will appear. In the example (Figure 377) all the files containing the text “LIKE” have been found. 7. The files are immediately available to start playback directly from the search screen. Figure 375 Figure 376 Figure 377 KETRON • AUDYA 139 User Assignable User Assignable By pressing the USER ASSIGNABLE button, located to left of the display, you can access the screen where to assign custom functions to the USER buttons (Figure 378). By using the F1-F5 buttons you can assign up to five USER_TABS_PRES, that is five different functions for the five User buttons below the display. Press one of the F1-F5 buttons and the EDIT button to access the screen like Figure 379. Here you can assign to each USER button one of the following functions: FILL 1 FILL 2 FILL 3 FILL 4 FILL IN BREAK 1 BREAK 2 BREAK 3 BREAK 4 BREAK FILL TO ARR. REINTRO AUTO FILL AFTER FILL SWING BASS BASS TO ROOT BASS SUSTAIN LOWER MUTE LOWER OFF STOP LOWER 1 HOLD LOWER 2 HOLD PIANIST SUSTAIN MANUAL DRUM CRASH ONLY KICK DRUM&BASS KICK OFF SNARE OFF HIHAT OFF CYMBAL OFF TOM/FX OFF RIMSHOT OFF LATIN 1 OFF LATIN 2 OFF LATIN 3 OFF CLAP FX OFF WHA-WHA REVERB CHORUS ECHO/DELAY DIST/OVERDRIVE TEXT PAGE TEXT PAGE + ARABIC 1... 10 RIGHT BOOST STYLE STOP DRYONSTOP VOC. ON-OFF ENDONSTOP FILL TO END UNPLUGGED JUKEBOX LEAD MUTE SUB REG. UP-DOWN Use the F10 button to save the USER_TABS_PRES in the current position. By using the BACK and FORWARD buttons you can add further 5 USER_TABS_PRES. By using the buttons F6-F10 you can assign to the USER slider the following functions: F6 - PFL: sets the PRE FADER LISTEN volume control. F7 - WAVE FILTER: sets the USER slider to adjust the cutoff frequency on WAVE Player. By pressing repeatedly the button you can set the reverb send on the RIGHT part or on the microphone. F8 - CHORD 1 WHA-WHA: sets the USER slider to adjust the cutoff frequency of the chord 1, in order to produce a Wha-Wha effect. By pressing 140 KETRON • AUDYA Figure 378 Figure 379 B repeatedly the button you can set the same function to CHORD 1, CHORD 2, CHORD 3, CHORD 4, CHORD 5, BASS, ALL CHORDS, ALL STYLE and RIGHT. F9 - PORTAMENTO TIME: sets the USER slider to adjust the portamento time. F10 - CHORD 2 CUTOFF: sets the USER slider to adjust the cutoff frequency of the chord 2. By pressing repeatedly the button you can set the same function to CHORD 1, CHORD 2, CHORD 3, CHORD 4, CHORD 5, BASS, ALL CHORDS, ALL STYLE and RIGHT. Text Scrolling Text scrolling In addition to the ordinary lyric functions, showing synchronized text contained in the Standard MIDI files (karaoke), Audya allows to synchronize lyric with any audio and MP3 file. ombining a text file with a MIDI file, an MP3 ▀▀ C or a WAVE file 1. Make the USB connection to access the hard disk of Audya. After connecting, open the WAVE folder and copy a text file (an ordinary TXT file) containing the lyric of a song. The name of the TXT file must be identical to the title of the song (except the file extension) (Figure 380). In the example, the text file is “Chill Out.txt” corresponding to the song “Chill Out.wav”. 2. After disconnecting properly the USB connection, press the WAVE button to access the WAVE folder containing the songs. 3. Select the song matching the same TXT file and start playback by pressing the START button (Figure 381). 4. Press F2 (LYRIC ON) to show the lyric on the display (Figure 382). 5. When necessary, jump to the next page of lyric, by pressing the CURSOR ¶ button to display the next lyric page (Figure 383). ▀▀ Synchronizing the lyric auto-scroll Figure 380 Figure 381 1. Playback the WAVE file (MIDI or MP3). 2. Press the RECORD button. 3. Scroll the text pages by pressing the CURSOR ¶ button as necessary. 4. While the file is still running, press the SAVE button. 5. You will be prompted to save the TXT file. 6. Confirm. 7. When you restart the song, the displayed lyric will change in sync. Figure 382 Figure 383 KETRON • AUDYA 141 Disk Disk Audya features a bunch of functions dedicated to the disk management. ▀▀ Disk Menu 1. Press the DISK button to see the content of the internal disk (Figure 384). The disk contains a certain number of folders, that you can access by using the CURSOR § ¶ or the DATA/VALUE wheel. The content is: DJ LOOP MSP MIDIFILE STREAM_LIST MP3 USER_VOICE_LIST PLAYLIST USER AUDIO DRUM SFX USER LIVE GUITAR USER STYLES USER DATA WAVE INSTRUMENTS REGISTRATION SYSTEM 1. Press the ENTER button to enter the selected folder. 2. Press the EXIT button to exit the selected folder and jump to the parent folder. 3. Press the USER 5 button (DISK MENU) to list all the available functions (Figure 385): F1 - COPY: copies one or more files. F2 - DELETE: deletes one or more files. F3 - MOVE: moves one or more files. F4 - RENAME: rename a file. F5 - SAVE: open a screen to save PROGRAM, GM VOICE, VOICE LIST, DRAWBAR, DRUMSET F6 - NEW FOLDER: creates a new folder. F7 - DEL. FOLDER: deletes a folder. F10- FORMAT: Whole Disk FORMAT featured. Figure 384 Figure 385 ▀▀ Copy, delete and move Figure 386 1. In order to execute the copy, delete and move functions,on DISK MENU, first select one or more files by using the ENTER button. A blue dot near to each selected file will appear (Figure 386). 2. Press the F1 button (COPY), F2 (DELETE) or F3 (MOVE) to select the appropriate function. 3. Press the USER 5 button (EXECUTE) to execute the selected function or the USER 4 button (EXIT) to cancel the operation. ▀▀ Create or delete a folder 1. To create a new folder press F6 on DISK MENU. 2. Give a name by inputting the characters from the keyboard. In the example, the folder name is “NEW FOLDER”. 3. Press the USER 5 button (EXECUTE). 4. The folder will be created on the current position of the disk (Figure 387). 5. Selet again folder and press F7 (DEL. FOLDER) to delete it. 6. Press the USER 5 button (EXECUTE) to delete the folder or the EXIT button to cancel the operation. 142 KETRON • AUDYA Figure 387 ▀▀ Disk format 1. To format the disk, press F10 A pop-up will appear where you can choose whether to go on with formatting (USER KEY 5 0) or cancel the operation (USER KEY 4/9). 2. Please remember that formatting will erase all data on disk. USB drive, Search USB drive In addition to the internal disk you can also manage external drive such as pen drives, hard disks, CD players, etc. connected to any of the two USB connectors on the front side. Once you have inserted a USB device into one of the two USB ports, the USB drive will appear on the DISK menu, as in Figure 388. The same functions in the DISK MENU are available also for the files and folders of the USB drive. Figure 388 WARNING Audya recognize USB pen drive or external Hard disk FAT32 formatted . However Floppy USB, Hard Disk, Mp3 Player, CD-ROM, DVD-ROM must be with power supply built in. KETRON • AUDYA 143 Technical Tables Sounds GM Voices BANK A (CC0 Value=0) N° 1 2 3 4 5 6 7 8 9 10 11 12 13 14 15 16 17 18 19 20 21 22 23 24 25 26 27 28 29 30 31 32 VOICE Grand_Piano Pop_Piano Upright Honky El_Piano1 Dx_Piano Harpsichord Clavinet Celesta Glocken Musicbox Vibraphone Marimba Xylophon Tubular_Bell Santur Leslies Jazz_Organ Rock_Organ Church_Organ Theatre_Organ Musette1 Harmonica Accordion1 ClassicFx* Country1* Jazz_Guitar1* Clean* Muted* Distortion* Overdrive* Harmonics N° 33 34 35 36 37 38 39 40 41 42 43 44 45 46 47 48 49 50 51 52 53 54 55 56 57 58 59 60 61 62 63 64 VOICE Acoustic* Finger* Picked* Fretless* Slap Funk* Synbass1* Synbass2* Violin Viola Cellos Contrabass Tremolos Pizzicato Harp Timpani Strings1 Slow_Strings Synstrings1 Synstrings2 Choir1 Choir2 Synvoice Hits Mexican Trombone Tuba* Miles French_Horn Brass1 Synbrass1 Synbrass2 N° 65 66 67 68 69 70 71 72 73 74 75 76 77 78 79 80 81 82 83 84 85 86 87 88 89 90 91 92 93 94 95 96 VOICE N° VOICE Altosoft Altosax Tenor Bariton Oboe English_Horn Bassoon Clarinet Piccolo Classic_Flute Recorder Pan_Flute Bottle Shakuashi Whistle Ocarina Square Sawtooth Calliope Wha Sinesweep Vox Fifth Fm_Lead1 Fantasy Warmpad Score Space Softpad Metal Prelude Sweep 97 98 99 100 101 102 103 104 105 106 107 108 109 110 111 112 113 114 115 116 117 118 119 120 121 122 123 124 125 126 127 128 Ice_Rain Soundtrack Crystal Atmosphere Brightness Goblin Tough_Pad Startheme Sitar Banjo Shamisen Koto Kalimba Bagpipe Fiddle Zurna Tinkle Agogo Steeldrum Wood_Block Taiko Melotom1 Syntom Reverse Fret_Noise Breath Seashore Bird Telephone Helicopter Applause Gunshot1 VOICE N° VOICE BANK B (CC0 Value=1) N° 1 2 3 4 5 6 7 8 9 10 11 12 13 14 15 16 17 18 19 VOICE Jingle Electric Latin_Piano El_Piano1 Concert_Grand Bright Twin_Fm Hard_Dx Musicbox Tubular_Bell Marimba Long_Vibe Kalimba Ep_Phase Orch_Bell Windchimes Rotary Dry_Organ Drawbar 144 KETRON • AUDYA N° 20 21 22 23 24 25 26 27 28 29 30 31 32 33 34 35 36 37 38 VOICE Positive Master Francaise Jazz-Fisa Tango Country&Slide* Ac_Folk1* Funky_Guitar* 60Stopped* Mute_Velo* Pop_Lead* 12Strings* Solid_Body* Warm* Ballad* Funk* Bass&Guit2* Precision* Synbass3* N° 39 40 41 42 43 44 45 46 47 48 49 50 51 52 53 54 55 56 57 Synbass4* Synbass5* Strings2 Violas Strings2 Octastring Strings1 Marcato Strings3 Slow_Strings Strings2 Synstrings3 Dah Choir_Aah1 Choir_Aah2 Ooh Vocal Tuuh Golden 58 59 60 61 62 63 64 65 66 67 68 69 70 71 72 73 74 75 76 Tbone_Section Oberbass1* Muted_Tpt Flughorn_1 Brass2 Growbrass1 Brass1 Soprano Circus Blowed Rock_Alto Mariachi Growbrass2 Blare Slide_Tbone Jazz_Alto Pan_Flute Voice_Flute Synth14 Sounds GM Voices 77 78 79 80 81 82 83 84 85 86 87 88 89 Analogs Flanger Brightpad Wiring Synth23 Ramp Synth22 Synth20 Fusion* Synbass6* Synbass7* Synbass8* 2nd_Perc 90 91 92 93 94 95 96 97 98 99 100 101 102 3rd_Perc Click B3_Vibrato Blues_Slow Blues_Fast Lower_8-4 16_1 R&Rol*l Medium_Guit* Strato* Humbuck* Vintage* Fingered* 103 104 105 106 107 108 109 110 111 112 113 114 115 Stops Whaguitar* Hawaian Mandolin Bright_Acoustic* ClassicFx* Pedalsteel Vintage* Reed Silent Fx Polisynth Sci_Fi 116 117 118 119 120 121 122 123 124 125 126 127 128 Synth21 Wave D_Cycle Synth10 Synth4 Hit&Crash Clackson Pfif&Jew_Harp Huu Alarm&Laser Door_Bell1 1Shot_Jazz Airhorn N° VOICE N° VOICE N° VOICE Blowed Contralto Muted_Tpt Growl_Sax Brass&Fall Mellow_Tpt Smooth_Tpt Brass_Section Smooth_Horns Piccolo Pop_Flute Pan¬_Flute Voice_Flute Shakuashi Whistle Classic_Flute Pulse1 Synbrass3 Lead_Square Chick Triangle1 Triangle2 Synth8 Synth1 Softpad Saw&Pulse Warmpad Fantasy Magic Glockpad Choir_Pad Digipad 97 98 99 100 101 102 103 104 105 106 107 108 109 110 111 112 113 114 115 116 117 118 119 120 121 122 123 124 125 126 127 128 Atmosphere Obx_Pad Bowed_Pad Digipad Fantasy Halo Ensemble Digistring Tres* Hackbrett Tres* Cajun Pan_Flute Ac_Folk1* Jungle Ukulele* Tinkle Triangle Tambora Claves Ac_Tom Brushtom Snare Crash Scratch1 Scratch2 Bellow Breaths Laser2 Fx_Slap Laser1 Fisa_K.Off BANK C (CC0 Value=10) N° 1 2 3 4 5 6 7 8 9 10 11 12 13 14 15 16 17 18 19 20 21 22 23 24 25 26 27 28 29 30 31 32 VOICE Bright Grand_Hammer Grand_L Grand_R Ep_Legend Real_Mark Ep_Phase Tine_Soft Brightpad Crash Tubular_Bell Dry_Vibe Kalimba Marimba Glockpad El_Piano1 Hamm_Slow Hamm_Fast Gospel_Slow Pipe Gospel_Fast 1Shot_Musette Diatonic Alpen Brazilian* CountryFx* MelobarFx* StratoFx* Fingered* Pop_Fx* JGuit&Slide Spanish* 33 34 35 36 37 38 39 40 41 42 43 44 45 46 47 48 49 50 51 52 53 54 55 56 57 58 59 60 61 62 63 64 Sinus* Bass&Guit1* Oberbass1* Fusion* Funk* Oberbass2* Pedal Bass&Guit2* Violin_Slow Geige Marcato Tzivago Concert Chamber Strings3 Symphonic Strings3 Digistring Strings2 DarkEnsemble Tuuh Humming Choir1 Classic_Choir Cornet Bright_Tbone Dixie* Tbone_Section Fall_Brass* Brass3 Trombone Octabrass 65 66 67 68 69 70 71 72 73 74 75 76 77 78 79 80 81 82 83 84 85 86 87 88 89 90 91 92 93 94 95 96 NOTE Voices with * sign represent Real Voice .These voices featuring effect, own noises or else in oredr to reproduce original timbre with more realist nuance. KETRON • AUDYA 145 Sounds GM Voices BANK D (CC0 Value=11) N° 1 2 3 4 5 6 7 8 9 10 11 12 13 14 15 16 17 18 19 20 21 22 23 24 25 26 27 28 29 30 31 32 VOICE Concert_L Concert_R Pop_Hammer Pulse_Clavi El_Piano2 Dx_Tine Soft_Dx Stage_Piano Pop_Slow Synth11 Open_Concert Harps_Wide Harps_Octave ElPiano_Detune Marktree Vibraphon_Wide Marimba_Wide Full_Fast B3_Fast Church_Octave Pipe_Octave Fisa8 Blues_Harp Cassotto Ac_Folk2* Ac_Folk2* Folk&Slide* Jazz_Guitar2* Country2* Thin_Strato* Ac_Nylon1* Jazz_Octave N° 33 34 35 36 37 38 39 40 41 42 43 44 45 46 47 48 49 50 51 52 53 54 55 56 57 58 59 60 61 62 63 64 VOICE Blues_Lead* Chuck_5TH* Folk* Deep* Finger_Slap* Retro* Synbass9* Synbass10* Synbass11* Synbass12* Synbass13* Bass&Guit3* Fingerpick Staccato Swing_Tpt Clean_Detune* Country_Slide Latin_Tenor Latin_Bariton Pulse2 Fm_Lead2 Synth23 Synth6 Synth7 Mariachi Brass_Section Wide_Horns Synth9 Flughorn_2 Synth12 Tijuana Synth13 N° 65 66 67 68 69 70 71 72 73 74 75 76 77 78 79 80 81 82 83 84 85 86 87 88 89 90 91 92 93 94 95 96 VOICE N° VOICE Synth15 Synth16 Synth17 Synth18 Synth19 Musette2 Accordion2 Church_Detune RealBrass Bass&Piano1 Bass&Piano2 Parisienne Jazz_Slide Country_Stereo Muted* Yang_Chin Synth2 Synth3 Door_Bell2 Key_Hammer Fisa_K.On Tremolo Synth5 Ac_Nylon2* Short_Perc Bowed_Pad Brazilian_Slide Hammer_1 Bubble Burst Hammer_2 Synbass14* 97 98 99 100 101 102 103 104 105 106 107 108 109 110 111 112 113 114 115 116 117 118 119 120 121 122 123 124 125 126 127 128 Car_Stop Car_Crash Car_Engine Car_Pass Cow Melotom2 Dog Door_Slam Concert_Bd Explosion Fire_Alarm Foot_Splash Foot_Steps Gunshot2 Gunshot3 Heart Castanets Horse Horse_Gallop Jet Laughing Machine_Gun Punch Rain Screaming Sirene Starship River Thunder Train Wind Sax_Keys Drum Set N° DRUM SET N° DRUM SET N° DRUM SET N° DRUM SET 1 2 3 4 5 6 7 8 9 10 11 12 15 17 25 Standard1 Standard2 Room_Gm2 Power_Gm2 Electro_Gm2 Jazz_Gm2 Analog_Gm2 Standard_Gm2 Folk Acoustic1 JazzDry Vintage Acoustic2 Rock House 26 28 29 30 33 41 42 47 48 49 57 58 59 60 62 Techno Progressive Rave HipHop Fusion Brush Brush_Gm2 Sfx_Kit Orchestra_Gm2 Orchestra Studio LightPop Rap Hip_Box Modern 65 66 73 74 75 76 77 78 79 80 81 82 83 84 85 Custom Latin PopJazz Street Analog Citypop Smooth Acid Kick&Snare JazzBrush Swing Garage U.S.Pop MeloRap Grunge 86 87 88 89 90 Contemporary Urban Electro Country R&B 146 KETRON • AUDYA SPECIAL KIT 91 92 93 Pop_Super_Kit Funk_Super_Kit Power_Super_Kit Audio Drum Audio Drum N° 1 2 3 4 5 6 7 8 9 10 11 12 13 14 15 16 17 18 19 20 21 22 23 24 25 26 27 28 29 30 31 32 33 34 35 36 37 38 39 40 41 42 43 44 45 46 47 48 49 50 51 52 53 54 55 56 57 N° 60'S_POP_01 60'S_POP_02 60'S_POP_03 60'S_POP_04 6_8_BALLAD_01 6_8_BALLAD_02 6_8_BALLAD_03 70'S_BEAT_01 70'S_BEAT_02 70'S_BEAT_03 70'S_BEAT_04 70'S_POP_01 70'S_POP_02 70'S_POP_03 70'S_POP_04 8BEAT1_01 8BEAT1_02 8BEAT1_03 8BEAT1_04 8_BEAT_2_01 8_BEAT_2_02 8_BEAT_2_03 8_BEAT_2_04 8_BEAT_3_01 8_BEAT_3_02 BIGBAND_01 BIGBAND_02 BIGBAND_03 BIGBAND_04 BLUES_01 BLUES_02 BLUES_03 BOSSAMIX_01 BOSSAMIX_02 BOSSAMIX_03 BOSSANOVA_01 BOSSANOVA_02 BOSSANOVA_03 BOSSANOVA_04 BRUSHPOLKA_01 BRUSHPOLKA_02 BRUSHPOLKA_03 BRUSHWALTZ_01 BRUSHWALTZ_02 BRUSHWALTZ_03 BUGG_01 BUGG_02 BUGG_03 BUGG_04 CNTRY_BLD_01 CNTRY_BLD_02 CNTRY_BLD_03 CNTRY_FOX_01 CNTRY_FOX_02 CNTRY_FOX_03 CNTRY_FOX_04 CNTRY_ROCK_01 58 59 60 61 62 63 64 65 66 67 68 69 70 71 72 73 74 75 76 77 78 79 80 81 82 83 84 85 86 87 88 89 90 91 92 93 94 95 96 97 98 99 100 101 102 103 104 105 106 107 108 109 110 111 112 113 114 N° CNTRY_ROCK_02 CNTRY_ROCK_03 CNTRY_ROCK_04 COOLFUNKY_01 COOLFUNKY_02 COOLFUNKY_03 COOLFUNKY_04 DANCEFLOOR_01 DANCEFLOOR_02 DANCEFLOOR_03 DANCEFLOOR_04 DANCEFLOOR_05 DISCODANCE_01 DISCODANCE_02 ENGL_WALTZ_01 ENGL_WALTZ_02 ENGL_WALTZ_03 ENGL_WALTZ_04 ENGL_WALTZ_05 EUROCHACHA_01 EUROCHACHA_02 EUROCHACHA_03 FOLK_SNG_01 FOLK_SNG_02 FOXTROT_01 FOXTROT_02 FOXTROT_03 FOXTROT_04 FUNKY_01 FUNKY_02 FUNKY_03 FUNKY_04 FUSION_01 FUSION_02 FUSION_03 GOSPEL_01 GOSPEL_02 GOSPEL_03 HARDROCK_01 HARDROCK_02 HARDROCK_03 HARDROCK_04 HIPHOP_81_01 HIPHOP_81_02 HIPHOP_89_01 HOUSE6_126_01 HOUSE6_126_02 HOUSE6_126_03 HOUSE6_126_04 HOUSE_132_01 HOUSE_132_02 HULLYGULLY_01 HULLYGULLY_02 HULLYGULLY_03 HULLYGULLY_04 HULLYGULLY_05 HULLYGULLY_06 115 116 117 118 119 120 121 122 123 124 125 126 127 128 129 130 131 132 133 134 135 136 137 138 139 140 141 142 143 144 145 146 147 148 149 150 151 152 153 154 155 156 157 158 159 160 161 162 163 164 165 166 167 168 169 170 171 HULLYGULLY_07 IRISHWALTZ_01 IRISHWALTZ_02 IRISHWALTZ_03 LATINROCK_01 LATINROCK_02 LATINROCK_03 LATINROCK_04 LIMBO_01 LIMBO_02 LIMBO_03 LIMBO_04 LOUNGE_01 LOUNGE_02 LOUNGE_03 LOUNGE_04 MACARENA_01 MACARENA_02 MACARENA_03 MACARENA_04 MARCH_01 MARCH_02 MARCH_03 MARCH_04 MAZURKA_01 MAZURKA_02 MAZURKA_03 MAZURKA_04 MENEITO_01 MENEITO_02 MENEITO_03 MENEITO_04 MODBEGUINE_01 MODBEGUINE_02 MODBEGUINE_03 MODBEGUINE_04 MODBOSSA_01 MODBOSSA_02 MODBOSSA_03 MOVIESONG_01 MOVIESONG_02 MOVIESONG_03 MOVIESONG_04 MUSETTE_01 MUSETTE_02 ONTHEROAD_01 ONTHEROAD_02 ONTHEROAD_03 ONTHEROAD_04 ORGANHIT_01 ORGANHIT_02 ORGANHIT_03 ORGANJAZZ_01 ORGANJAZZ_02 ORGANJAZZ_03 ORGANJAZZ_04 POP12_8_01 KETRON • AUDYA 147 Audio Drum Audio Drum N° 172 173 174 175 176 177 178 179 180 181 182 183 184 185 209 210 211 212 213 214 215 216 186 187 188 189 190 191 192 193 194 195 196 197 198 199 200 201 202 203 204 205 206 207 208 217 218 219 220 221 222 223 224 225 226 227 228 N° POP12_8_02 POP12_8_03 POPFOLK_01 POPFOLK_02 POPFOLK_03 POPFOLK_04 POPMIX_01 POPMIX_02 POPMIX_03 POPMIX_04 POPTWIST_01 POPTWIST_02 POPTWIST_03 POPTWIST_04 R&B04_95_01 R&B04_95_02 R&B05_97_01 R&B05_97_02 R&B06_106_01 R&B06_106_02 R&B07_95_01 R&B08_73_01 R&B10_88_01 R&B10_88_02 R&B12_63_01 R&B12_63_02 R&B12_63_03 R&B12_63_04 R&B13_81_01 R&B13_81_02 R&B13_81_03 R&B15_114_01 R&B15_114_02 R&B15_114_03 R&B17_100_01 R&B17_100_02 R&B17_100_03 R&B17_100_04 R&B20_100_05 R&B21_100_01 R&B21_100_02 R&B22_90_01 R&B22_90_02 R&B23_93_01 R&B23_93_02 R&BALLAD_68_01 RAP_85_01 RAP_85_02 RAVE_125_01 REGGAETON_01 REGGAETON_02 ROCK&ROLL_01 ROCK&ROLL_02 ROCK&ROLL_03 ROCKBLD_01 ROCKBLD_02 ROCKBLD_03 148 KETRON • AUDYA 229 230 231 232 233 234 235 236 237 238 239 240 241 242 243 244 245 246 247 248 249 250 251 252 253 254 255 ROCKBLD_04 ROCKSHUFF_01 ROCKSHUFF_02 ROCKSHUFF_03 ROCKSHUFF_04 SAMBAJAZZ_01 SAMBAJAZZ_02 SAMBAJAZZ_03 SAMBA_01 SAMBA_02 SAMBA_03 SAMBA_04 SLOWALTZ_01 SLOWALTZ_02 SLOWALTZ_03 SLOWALTZ_04 SLOWROCK_01 SLOWROCK_02 SLOWROCK_03 TANGO_01 TANGO_02 TANGO_03 TARANTELLA_01 TARANTELLA_02 TARANTELLA_03 WALZER_01 WALZER_02 NOTE The “RX” after the file name of the AUDIO DRUM stands for “remixed” that is the remixed version of the same file with the same name, while “FX” stands for “effects” that is the original version with some effects applied, like compressor, reverb, etc. Groove (Drum 2) Groove Bank (Drum 2) N° N° N° 1 AFRO_1 40 CONGA_BOLERO1 74 FLAMENCO_F 2 AFRO_2 41 CONGA_BOLERO2 75 FLAMENCO_G 3 AFRO_3 42 CONGA_BOSSA 76 GIPSY1 4 AFRO_4 43 CONGA_CHA1 77 GIPSY2 5 AFRO_5 44 CONGA_CHA2 78 GUAJIRA_A 6 BACHATA_A 45 CONGA_MAMBO 79 GUAJIRA_B 7 BACHATA_B 46 CONGA_MERENG1 186 GUIRA_1 8 BACHATA_C 47 CONGA_MERENG2 187 GUIRA_2 9 BACHATA_D 48 CONGA_RUMBA 80 GUIRA_BACHAT1 10 BATUCADA_A 49 CONGA_SALSA1 81 GUIRA_BACHAT2 11 BATUCADA_B 50 CONGA_SALSA2 82 GUIRA_MERENG1 12 BLUEGRASS 51 CONGA_SALSA3 83 GUIRA_MERENG2 13 BOLERO_A 52 COWBELL_CHA1 84 GUIRO_CHA 14 BOLERO_B 53 COWBELL_CHA2 85 GUIRO_CUMBIA 15 BOLERO_C 181 COWBEL_SALSA1 86 GUIRO_MERENG 225 BONGO_1_T 182 COWBEL_SALSA2 87 GUIRO_SALSA 16 BONGO_BACHAT1 56 CUMBIA_A 88 HHAT_SHUFFLE1 17 BONGO_BACHAT2 57 CUMBIA_B 89 HHAT_SHUFFLE2 18 BONGO_BOLERO1 58 CUMBIA_C 92 HIHAT 16_1 19 BONGO_BOLERO2 59 CUMBIA_D 93 HIHAT 16_2 20 BONGO_CHA 60 CUMBIA_E 90 HIHAT 8_1 21 BONGO_SALSA 61 DANCE_1 91 HIHAT 8_2 22 BOSSA_A 62 DANCE_2 94 HIHAT SWING1 23 BOSSA_B 63 DANCE_3 95 HIHAT SWING2 24 BOSSA_C 64 DANCE_4 96 HIHAT SWING3 226 BRUSH_1_T 65 DANCE_5 97 HIPHOP1 25 BRUSH_FAST 66 DANCE_6 98 HIPHOP2 26 BRUSH_MEDIUM 67 DANCE_7 99 HOUSE_1 27 BRUSH_SLOW1 68 DANCE_8 100 HOUSE_2 28 BRUSH_SLOW2 195 DANCE_Kick1A 101 HOUSE_3 29 BRUSH_SLOW3 196 DANCE_Kick1B 102 HOUSE_4 30 BRUSH_SLOW4 197 DANCE_Kick2A 103 HOUSE_5 184 CABAZA_1 198 DANCE_Kick2B 104 HOUSE_6 185 CABAZA_2 199 DANCE_Kick3A 105 HOUSE_7 31 CAJON 200 DANCE_Kick3B 106 HOUSE_8 32 CHACHA_A 201 DANCE_Kick4A 211 HOUSE_Kick1A 33 CHACHA_B 202 DANCE_Kick4B 212 HOUSE_Kick1B 34 CHACHA_C 203 DANCE_Kick5A 213 HOUSE_Kick2A 35 CHACHA_D 204 DANCE_Kick5B 214 HOUSE_Kick2B 36 CHACHA_E 205 DANCE_Kick6A 215 HOUSE_Kick3A 37 CHACHA_F 206 DANCE_Kick6B 216 HOUSE_Kick3B 38 CLAP_1 207 DANCE_Kick7A 217 HOUSE_Kick4A 39 CLAP_2 208 DANCE_Kick7B 218 HOUSE_Kick4B 227 CONGA_1_T 209 DANCE_Kick8A 219 HOUSE_Kick5A 228 CONGA_2_T 210 DANCE_Kick8B 220 HOUSE_Kick5B 229 CONGA_3_T 69 FLAMENCO_A 221 HOUSE_Kick6A 230 CONGA_4_T 70 FLAMENCO_B 222 HOUSE_Kick6B 231 CONGA_5_T 71 FLAMENCO_C 223 HOUSE_Kick7A 232 CONGA_6_T 72 FLAMENCO_D 224 HOUSE_Kick7B 233 CONGA_7_T 73 FLAMENCO_E 107 JAZZROCK_A KETRON • AUDYA 149 Groove (Drum 2) Groove Bank (Drum 2) N° N° 108 JAZZROCK_B 238 RIDE_1_T 109 JIGS 146 RIDE_FAST1 110 LATINDANCE1 147 RIDE_FAST2 111 LATINDANCE2 148 RIDE_MEDIUM 112 MAMBO_A 149 RIDE_SHUFFLE 113 MAMBO_B 150 RIDE_SLOW 114 MAMBO_C 151 ROCK_A 188 MARACAS_1 152 ROCK_B 234 MARACAS_1_T 153 SALSA_A 189 MARACAS_2 154 SALSA_B 235 MARACAS_2_T 155 SALSA_C 190 MARACAS_3 156 SALSA_D 191 MARACAS_4 157 SALSA_E 192 MARACAS_5 158 SALSA_F 115 MARAC_BOLERO1 159 SALSA_G 116 MARAC_BOLERO2 160 SAMBA_A 117 MARAC_BOLERO3 161 SAMBA_B 118 MARAC_BOSSA 162 SAMBA_C 119 MARAC_CHA 163 SAMBA_D 120 MARAC_CUMBIA 164 SHAKER_1 121 MARAC_MERENG 239 SHAKER_1_T 122 MARAC_SALSA1 165 SHAKER_2 123 MARAC_SALSA2 240 SHAKER_2_T 124 MERENGUE_A 193 SHAKER_3 125 MERENGUE_B 194 SHAKER_4 126 MERENGUE_C 166 SHUFFLE_A 127 MERENGUE_D 167 SHUFFLE_B 128 MERENGUE_E 168 SHUFFLE_C 54 MERENGUE_F 169 STREET1 55 PANDERO1 170 STREET2 129 PANDERO2 171 SWING_A 236 PANDERO_1_T 172 SWING_B 237 PANDERO_2_T 173 SWING_C 130 PASODOBLE 174 TAMBORA 131 POPDOWN_A 183 TAMBOURIN16 132 POPDOWN_B 175 TAMBOURIN16T 133 POPFUNK_A 177 TAMBOURINE_12 134 POPFUNK_B 178 TAMBOURINE_24 135 POPJAZZ_A 176 TAMBOURINE_8 136 POPJAZZ_B 179 TRIPLET 137 POPJAZZ_C 180 URBAN 138 POPJAZZ_D 139 POPJAZZ_E 140 POPJAZZ_F 141 R&BLUES_A 142 R&BLUES_B 143 R&BLUES_C 144 RAP 145 REELS 150 KETRON • AUDYA Bass Bank Bass Bank N° 10 11 12 13 14 15 16 17 18 19 20 21 22 1 2 3 4 5 6 23 24 25 26 7 8 9 306 307 308 309 310 311 312 313 314 315 316 317 318 319 320 321 322 323 324 217 218 219 220 27 28 29 30 31 N° 12_8BALLAD_01 12_8BALLAD_02 12_8BALLAD_03 12_8BALLAD_04 16BEAT_01 16BEAT_02 16BEAT_03 16BEAT_04 16BEAT_05 16BEAT_06 16BEAT_07 16BEAT_08 16BEAT_09 3_4PDOBLE_01 6_8BALLAD_01 6_8BALLAD_02 6_8BLUES_01 6_8WALZ_01 6_8WALZ_02 70BEAT_01 70BEAT_02 70POP_01 70POP_02 8BEAT_01 8BEAT_02 8BEAT_03 8BEAT_04 8BEAT_05 8BEAT_06 8BEAT_07 8BEAT_08 8BEAT_09 8BEAT_10 8BEAT_11 8BEAT_12 8BEAT_13 8BEAT_14 8BEAT_15 8BEAT_16 8BEAT_17 8BEAT_18 8BEAT_19 8BEAT_20 8BEAT_21 8BEAT_22 AFRO_01 AFRO_02 AFRO_03 AFRO_04 BACHATA_01 BACHATA_02 BACHATA_03 BALLAD_01 BALLAD_02 32 33 34 35 291 36 37 296 297 298 299 300 301 302 38 39 40 41 42 43 44 45 46 47 48 49 50 51 221 222 223 52 53 54 55 56 57 58 59 60 61 62 63 64 176 177 178 179 180 181 182 183 224 225 N° BALLAD_03 BALLAD_04 BALLENATO_01 BALLENATO_02 BALLENATO_03 BEGUINE_01 BEGUINE_02 BEGUINE_03 BEGUINE_04 BEGUINE_05 BEGUINE_06 BEGUINE_07 BEGUINE_08 BEGUINE_09 BIGBAND_01 BIGBAND_02 BLUES_01 BLUES_02 BLUES_03 BOLERO_01 BOLERO_02 BOOGIE_01 BOOGIE_02 BOSSA_01 BOSSA_02 BOSSA_03 BOSSA_04 BOSSA_05 BOSSA_06 BOSSA_07 BOSSA_08 BUGG_01 BUGG_02 CALYPSO_01 CALYPSO_02 CANCAN_01 CANCAN_02 CANCAN_03 CHACHA_01 CHACHA_02 CHACHA_03 CHARLESTON CNTRYDIX DANCE_01 DANCE_02 DANCE_03 DANCE_04 DANCE_05 DANCE_06 DANCE_07 DANCE_08 DANCE_09 DANCE_10 DANCE_11 226 227 228 229 187 65 66 67 184 185 186 188 189 194 195 196 197 198 199 200 201 202 203 204 70 71 72 73 74 75 76 77 78 79 80 285 286 287 81 82 83 84 85 86 87 88 209 210 211 212 213 214 215 216 N° DANCE_12 DANCE_13 DANCE_14 DANCE_15 DISCO_01 DISCO_02 DISCO_03 DISCO_04 DISCO_05 DISCO_06 DISCO_07 DISCO_08 DISCO_09 DISCO_10 DISCO_11 DISCO_12 DISCO_13 DISCO_14 DISCO_15 DISCO_16 DISCO_17 DISCO_18 DISCO_19 DISCO_20 ENGLTRIP_01 ENGLTRIP_02 ENGLTRIP_03 FLAMENCO_01 FLAMENCO_02 FLAMENCO_03 FLIPBEAT_01 FOLKSINGER_01 FOLKSINGER_02 FOLKSINGER_03 FOLKSINGER_04 FOX_01 FOX_02 FOX_03 FUNKY_01 FUNKY_02 FUNKY_03 FUNKY_04 FUNKY_05 FUNKY_06 FUNKY_07 FUNKY_08 FUNKY_09 FUNKY_10 FUNKY_11 FUNKY_12 FUNKY_13 FUNKY_14 FUNKY_15 FUNKY_16 89 90 91 92 93 94 95 96 97 98 230 231 99 100 101 102 103 104 105 106 205 206 207 208 232 233 234 235 236 107 108 237 238 239 240 241 242 243 244 109 110 111 112 245 246 247 113 114 115 248 116 117 118 119 FUSION_01 FUSION_02 FUSION_03 FUSION_04 GITANA_01 GITANA_02 GITANA_03 GOSPEL_01 GOSPEL_02 GOSPEL_03 HIP-HOP_01 HIP-HOP_02 HOUSE_01 HOUSE_02 HOUSE_03 HOUSE_04 HOUSE_05 HOUSE_06 HOUSE_07 HOUSE_08 HOUSE_09 HOUSE_10 HOUSE_11 HOUSE_12 HOUSE_13 HOUSE_14 HOUSE_15 HOUSE_16 HOUSE_17 HULLYGULLY_01 HULLYGULLY_02 JAZZ_01 JAZZ_02 JAZZ_03 JAZZ_04 JAZZ_05 JAZZ_06 JAZZ_07 JAZZ_08 LATINROCK LIGHTPOP_01 LIGHTPOP_02 LIGHTPOP_03 LOUNGE_01 LOUNGE_02 LOUNGE_03 MACARENA_01 MACARENA_02 MARCH MAZURKA MENEITO_01 MENEITO_02 MERENGUE_01 MERENGUE_02 KETRON • AUDYA 151 Bass Bank Bass Bank N° 120 249 250 251 252 253 330 331 332 333 166 167 325 326 121 122 254 255 256 257 327 328 329 123 124 125 126 127 128 258 259 260 261 262 138 139 134 135 129 130 131 132 133 136 137 288 289 290 292 263 N° MERENGUE_03 NUJAZZ_01 NUJAZZ_02 NUSOUL_01 NUSOUL_02 NUSOUL_03 NUSOUL_04 NUSOUL_05 NUSOUL_06 NUSOUL_07 OBERPOLKA_01 OBERPOLKA_02 OBERWALZ_01 OBERWALZ_02 PDOBLE_01 PDOBLE_02 POLKA POPCHA_01 POPCHA_02 POPCHA_03 POPLATIN_01 POPLATIN_02 POPLATIN_03 POP_01 POP_02 POP_03 POP_04 POP_05 POP_06 PROGRESS_01 PROGRESS_02 PROGRESS_03 PROGRESS_04 R&BLUES_01 R&BLUES_02 R&BLUES_03 REGGAETON_01 REGGAETON_02 REGGAE_01 REGGAE_02 REGGAE_03 REGGAE_04 REGGAE_05 RHUMBA_01 RHUMBA_02 RHUMBA_03 RHUMBA_04 RHUMBA_05 RHUMBA_06 RNB_01 152 KETRON • AUDYA 264 265 266 267 268 269 270 146 293 294 295 140 141 142 143 144 145 147 148 149 191 192 193 150 151 303 304 305 271 272 273 274 152 153 154 155 156 68 69 190 275 276 277 278 279 280 157 158 N° RNB_02 RNB_03 RNB_04 RNB_05 RNB_06 RNB_07 RNB_08 ROCKSHUFF_01 ROCKSHUFF_02 ROCKSHUFF_03 ROCKSHUFF_04 ROCK_01 ROCK_02 ROCK_03 ROCK_04 ROCK_ BALLAD_01 ROCK_ BALLAD_02 SALSA_01 SALSA_02 SALSA_03 SAMBA_01 SAMBA_02 SAMBA_03 SHAKE SLOWROCK_01 SLOWROCK_02 SLOWROCK_03 SLOWROCK_04 SLOW_01 SLOW_02 SLOW_03 SLOW_04 SOUL_01 SOUL_02 SOUL_03 SOUL_04 SWING_01 SWING_02 SWING_03 SWING_04 SWING_05 SWING_06 SWING_07 SWING_08 SWING_09 SWING_10 TANGO_01 TANGO_02 159 160 161 162 163 281 282 283 284 164 165 168 169 170 171 172 173 174 175 TANGO_03 TANGO_04 TANGO_05 TANGO_06 TANGO_07 TECHNO_01 TECHNO_02 TECHNO_03 TECHNO_04 TWIST_01 TWIST_02 WALZ_01 WALZ_02 WALZ_03 WALZ_04 WALZ_05 WALZ_06 WALZ_07 WALZ_08 Arp & Licks Arp & Licks N° 39 40 41 42 43 44 45 46 47 48 49 50 51 52 53 54 55 56 197 57 58 59 60 61 62 63 64 117 118 119 120 121 122 123 124 125 126 127 128 65 66 67 68 69 70 71 72 73 74 75 N° 16GUIT_01 16GUIT_02 16GUIT_03 16GUIT_04 16GUIT_05 16GUIT_06 16GUIT_07 16GUIT_08 16GUIT_09 16GUIT_10 16GUIT_11 16GUIT_12 16GUIT_13 16GUIT_14 16GUIT_15 16GUIT_16 16GUIT_17 16GUIT_18 16GUIT_19 16PIANO_01 16PIANO_02 16PIANO_03 16PIANO_04 16PIANO_05 16PIANO_06 16PIANO_07 16PIANO_08 16STRINGS_01 16STRINGS_02 16STRINGS_03 16STRINGS_04 16STRINGS_05 16STRINGS_06 16STRINGS_07 16STRINGS_08 16STRINGS_09 16STRINGS_T_01 16STRINGS_T_02 16STRINGS_T_03 16SYNT_01 16SYNT_02 16SYNT_03 16SYNT_04 16SYNT_05 16SYNT_06 16SYNT_07 16SYNT_08 16SYNT_09 16SYNT_10 16SYNT_11 76 77 78 79 80 81 82 83 84 85 86 87 88 89 90 91 198 199 200 201 202 203 204 205 206 207 208 209 210 211 212 213 214 215 216 143 144 92 93 94 95 96 97 98 99 100 101 102 103 104 N° 16SYNT_12 16SYNT_13 16SYNT_14 16SYNT_15 16SYNT_16 16SYNT_17 16SYNT_18 16SYNT_19 16SYNT_20 16SYNT_21 16SYNT_22 16SYNT_23 16SYNT_24 16SYNT_25 16SYNT_26 16SYNT_27 16SYNT_28 16SYNT_29 16SYNT_30 16SYNT_31 16SYNT_32 16SYNT_33 16SYNT_34 16SYNT_35 16SYNT_36 16SYNT_37 16SYNT_38 16SYNT_39 16SYNT_40 16SYNT_41 16SYNT_42 16SYNT_43 16SYNT_44 16SYNT_45 16SYNT_46 3_4HARPSI_01 3_4HARPSI_02 3_4STRINGS_01 3_4STRINGS_02 3_4STRINGS_03 3_4STRINGS_04 3_4STRINGS_05 3_4STRINGS_06 3_4STRINGS_07 3_4STRINGS_08 3_4STRINGS_09 3_4STRINGS_10 3_4STRINGS_11 3_4STRINGS_12 3_4STRINGS_13 105 106 107 145 146 147 148 151 152 153 154 155 129 130 131 132 133 134 135 136 137 138 139 140 141 142 1 2 3 4 5 6 7 8 9 10 11 12 13 14 15 16 17 18 19 20 21 22 23 24 3_4STRINGS_14 3_4STRINGS_15 3_4STRINGS_16 4_4STRINGS_01 4_4STRINGS_02 4_4STRINGS_03 4_4STRINGS_04 6_8PIANO_01 6_8PIANO_02 6_8STRINGS_01 6_8STRINGS_02 6_8STRINGS_03 8BANJO_01 8BANJO_02 8BANJO_03 8BANJO_04 8BANJO_05 8BANJO_06 8BANJO_07 8BANJO_08 8BANJO_09 8BANJO_10 8BANJO_11 8BANJO_12 8BANJO_13 8BANJO_14 8GUIT_01 8GUIT_02 8GUIT_03 8GUIT_04 8GUIT_05 8GUIT_06 8GUIT_07 8GUIT_T_01 8GUIT_T_02 8GUIT_T_03 8GUIT_T_04 8GUIT_T_05 8GUIT_T_06 8GUIT_T_07 8GUIT_T_08 8PIANO_01 8PIANO_02 8PIANO_03 8PIANO_04 8PIANO_T_01 8PIANO_T_02 8PIANO_T_03 8PIANO_T_04 8PIANO_T_05 KETRON • AUDYA 153 Arp & Licks Arp & Licks N° 25 26 108 109 110 111 112 113 114 115 116 27 28 29 156 157 158 159 160 161 162 163 164 165 166 167 168 169 170 171 172 173 174 175 176 177 178 179 180 181 182 183 184 185 186 187 188 30 31 N° 8PIANO_T_06 8PIANO_T_07 8STRINGS_01 8STRINGS_02 8STRINGS_03 8STRINGS_04 8STRINGS_05 8STRINGS_06 8STRINGS_07 8STRINGS_T_01 8STRINGS_T_02 8SYNT_01 8SYNT_02 8SYNT_03 8SYNT_04 8SYNT_05 8SYNT_06 8SYNT_07 8SYNT_08 8SYNT_09 8SYNT_10 8SYNT_11 8SYNT_12 8SYNT_13 8SYNT_14 8SYNT_15 8SYNT_16 8SYNT_17 8SYNT_18 8SYNT_19 8SYNT_20 8SYNT_21 8SYNT_22 8SYNT_23 8SYNT_24 8SYNT_25 8SYNT_26 8SYNT_27 8SYNT_28 8SYNT_29 8SYNT_30 8SYNT_31 8SYNT_32 8SYNT_33 8SYNT_34 8SYNT_35 8SYNT_36 8SYNT_T_01 8SYNT_T_02 154 KETRON • AUDYA 32 33 34 35 36 37 38 189 190 191 192 193 194 195 196 149 150 249 250 251 252 253 254 255 256 257 258 259 260 263 264 265 266 267 268 269 270 271 272 261 262 217 218 219 220 221 222 223 224 8SYNT_T_03 8SYNT_T_04 8SYNT_T_05 8SYNT_T_06 8SYNT_T_07 8SYNT_T_08 8SYNT_T_09 8SYNT_T_10 8SYNT_T_11 8SYNT_T_12 8SYNT_T_13 8SYNT_T_14 8SYNT_T_15 8SYNT_T_16 8SYNT_T_17 8_HARPSI_01 8_HARPSI_02 BRASS_CHA_01 BRASS_CHA_02 BRASS_CHA_03 BRASS_CHA_04 BRASS_POP_01 BRASS_POP_02 BRASS_POP_03 BRASS_POP_04 BRASS_POP_05 BRASS_POP_06 BRASS_POP_07 BRASS_POP_08 BRASS_SWG_01 BRASS_SWG_02 BRASS_SWG_03 BRASS_SWG_04 BRASS_SWG_05 BRASS_SWG_06 BRASS_SWG_07 BRASS_SWG_08 BRASS_SWG_09 BRASS_SWG_10 BRAS_SAMB_01 BRAS_SAMB_02 FISABEGUIN_01 FISABEGUIN_02 FISABEGUIN_03 FISAFOX_01 FISAFOX_02 FISAFOX_03 FISAFOX_04 FISAMAZURK_01 225 226 227 228 229 230 231 232 233 234 235 236 237 238 239 240 241 242 243 244 245 246 247 248 273 274 275 276 277 278 279 280 281 282 283 FISAMAZURK_02 FISAMAZURK_03 FISAMAZURK_04 FISAPARTY_01 FISAPARTY_02 FISAPARTY_03 FISAPARTY_04 FISASLOWLZ_01 FISASLOWLZ_02 FISASLOWLZ_03 FISASLOWLZ_04 FISASLOWLZ_05 FISASLOWLZ_06 FISATANGO_01 FISATANGO_02 FISATANGO_03 FISATARANT_01 FISATARANT_02 FISATARANT_03 FISATARANT_04 FISAWALZ_01 FISAWALZ_02 FISAWALZ_03 FISAWALZ_04 HORNS_SWG_01 HORNS_SWG_02 REEDS_SWG_01 REEDS_SWG_02 REEDS_SWG_03 SAX_SWG_01 SAX_SWG_02 SAX_SWG_03 SAX_SWG_04 SAX_SWG_05 SAX_SWG_06 Live Guitar Live Guitar N° 7 8 9 10 6 69 1 2 135 136 68 3 4 5 127 11 12 59 88 83 90 114 13 122 14 129 137 15 91 92 93 16 17 18 19 60 20 74 21 22 115 70 89 75 76 66 67 71 N° 16B_ELECT_1 16B_ELECT_2 16B_FOLK_1 16B_FOLK_2 16_SMOOTH 2_STEPS 5TH_MUTE 5TH_SHUFFLE 6-8MARCH_1 6-8MARCH_2 8B_ELECT 8B_FOLK_1 8B_FOLK_2 8B_FOLK_3 8B_FOLK_4 BALLAD_1 BALLAD_2 BALLAD_MIX BALLENATO BEAT_1 BEAT_2 BEAT_3 BEGUINE_1 BEGUINE_2 BLUES_1 BLUES_2 BLUES_EL_6_8 BOSSA_NOVA BUGG_1 BUGG_2 BUGG_3 CNTRY_ 12-8 CNTRY_POP DANCE DISCO DISCO_MIX DISCO_WHA ENGLISH_WALZ FAST_FOLK FINGERPICK FOLK_12_8 FOX IRISH_WALZ6_8 LONG ELECT_1 LONG ELECT_2 LONG FOLK_1 LONG FOLK_2 PARTY_FOX_1 72 73 23 24 144 101 138 139 25 26 27 106 128 28 29 94 116 30 31 32 33 34 35 107 108 109 110 111 112 36 37 38 95 96 97 98 99 39 40 130 131 132 133 41 84 85 86 87 N° PARTY_FOX_2 PARTY_POLKA POLKA_1 POLKA_2 POLKA_2_STOP POLKA_3 POLKA_4 POLKA_5 POP_1 POP_2 POP_3 POP_4 POP_5 POP_6-8 R&BLUES_1 R&BLUES_2 R&BLUES_3 R&ROLL_1 R&ROLL_2 REGGAE_1 REGGAE_2 RIDE_WEST ROCK_1 ROCK_10 ROCK_11 ROCK_12 ROCK_13 ROCK_14 ROCK_15 ROCK_2 ROCK_3 ROCK_4 ROCK_5 ROCK_6 ROCK_7 ROCK_8 ROCK_9 RUMBA_1 RUMBA_2 RUMBA_3 RUMBA_4 RUMBA_MIX_1 RUMBA_MIX_2 SAMBA_JAZZ SHORT_ELECT1 SHORT_ELECT2 SHORT_FOLK1 SHORT_FOLK2 46 47 48 103 118 119 42 43 44 45 77 49 125 126 134 80 50 113 51 52 82 78 79 117 53 SHUFFLE_1 SHUFFLE_2 SHUFFLE_3 SHUFFLE_4 SHUFFLE_5 SHUFFLE_6 SHUF_ROCK_1 SHUF_ROCK_2 SHUF_ROCK_3 SHUF_ROCK_4 SLOW_ROCK6_8 SLOW_ROCK_1 SLOW_ROCK_2 SLOW_ROCK_3 SLOW_ROCK_4 SLOW_WALTZ SMOOTH_FOLK SOKA SOUL_16 STOP_FUNK SURF SWING_1 SWING_2 SWING_3 SWING_FOX1 123 124 54 55 56 57 61 143 141 142 62 63 64 81 65 120 104 105 121 58 100 140 145 102 SWING_FOX2 SWING_FOX3 TANGO_1 TANGO_2 TARANTELLA_1 TARANTELLA_2 TRIPL_16SMOTH TRIPL_DISCMIX TRIPL_DISCO TRIPL_DISCWH TRIPL_POP1 TRIPL_POP2 TRIPL_POP3 TRIPL_RNB TRIPL_SOUL16 UP_CLEAN UP_COUNTRY_1 UP_COUNTRY_2 UP_MUTED WALTZ_1 WALTZ_2 WALTZ_3 WALTZ__1_STOP WESTERN KETRON • AUDYA 155 Styles AUDYA FACTORY STYLES BALLAD 1 @SLOW_BALLAD 2 @POP_BALLAD_1 3 @POP_BALLAD_2 4 @NICE_BALLAD 5 @POP_SONG 6 @GENTLE_R&B 7 @MEDIUM_16_BT 8 @16_BEAT_1 9 @16_BEAT_2 10 @ELECTRO_BALLAD 11 @8_BEAT_1 12 @8_BEAT_2 13 @HEAVY_BEAT 14 @ENGLISH_TUNE 15 @EUROPOP 16 @NEW_TITLE 17 @GUITAR_BALLAD 18 @NEW_BALLAD 19 @COUNTRY_BEAT_2 20 @CLASSIC_BALLAD 21 @FOLK_MELODY 22 @FOLK_BEAT 23 @70’S_BEAT 24 @8_LIGHT_FOLK 25 @MODERN_POP 26 @ITALBEAT 27 @SOFT_BEAT_1 28 @WONDER_LIFE 29 @COUNTRY_BEAT_1 30 @SOFT_BEAT_2 31 @8_BEAT_BALLAD 32 @8_FOLK_ROCK 33 @CLASSIC_BEAT 34 @EASYBALLAD 35 @POP_BALLAD_3 36 FOLK_12_8 37 16BEAT_1_SD 38 16BEAT_2_SD NOTE The symbol @ before the name of the STYLE means that the style has AUDIO DRUM, GROOVES or LIVE GUITAR parts. 156 KETRON • AUDYA 39 40 41 42 43 44 45 46 47 48 49 50 51 52 53 54 55 56 57 16BEAT_3_SD 16BEAT_4_SD 16UPBEAT_SD 6-8_BALLAD_SD 70’S_BEAT_SD 70’S_POP_SD 8BEAT_1_SD 8BEAT_2_SD(R) 8BEAT_3_SD 8_BALLAD_SD AFTERHOURS_SD EASY_BEAT_SD GUIT&ORG_SD ITALBEAT_SD LOUNGE_SD MOVIE_SONG_SD PNO_BALLAD_SD POP_12_8_SD SOFT_BALLAD_SD POP 1 @16_POP_ROCK 2 @ACOUSTIC_GROOVE 3 @FUSION_FUNK 4 @TREND_POP 5 @HIP_HOP 6 @EASY_FUSION 7 @ELECTRIC_POP 8 @EMOTIONAL_R&B 9 @LATIN_R&B 10 @ORIENTAL_R&B 11 @ACOUSTIC_POP 12 @SUBWAY 13 @LOUNGE 14 @BROKEN_BIT 15 @SHUFFLE_POP 16 @SOULFUL 17 @LIGHT_POP 18 @R&B_BALLAD_1 19 20 21 22 23 24 25 26 27 28 29 30 31 32 33 34 35 36 37 38 39 40 41 42 43 44 45 46 47 48 49 50 @R&B_BALLAD_2 @SMOOTH_FUNK @OLD_SCHOOL @FUNKY_1 @RAP®GAE @CHILL_OUT @TRIPLET_POP @RUMBA_RAP @FUNKY_2 @DOWNBEAT @BRIT_POP @98_POP @SOULFUNK @ENERGY_RAP @LOUNGE_GROOVE @MIX_HIP_HOP @NU_SOUL @POP_LATIN @STREET_DANCE COOL_FUNKY_SD ENGLISH_TUNE_SD FOLK_SINGER_SD FUNKY_1_SD(R) FUNKY_2_SD(R) FUSION_SD LIGHT_POP_SD POP_CHART_SD POP_FOLK_SD POP_MIX_SD R_N_B_SD STREET_SD DANCE 1 @EURO_DANCE 2 @DISCO_DANCE 3 @DANCE_HALL 4 @DISCO_FEVER_70 5 @DISCO_FUNK_70 Styles AUDYA FACTORY STYLES 6 7 8 9 10 11 12 13 14 15 16 17 18 19 20 21 22 23 24 25 26 27 28 29 30 31 32 33 34 35 36 37 38 39 40 41 42 43 44 45 46 47 48 49 50 51 @DJ_DISCO @LIQUID_FUNK(R) @LATIN_DANCE_1 @LATIN_DANCE_2 @REGGAETON_1 @ELECTRO_DANCE @MINIMAL_TECHNO @ROCK_HOUSE @REGGAETON_2 @MODERN_SOKA @HANDS_UP @GIPSY_DANCE @DISCO_NIGHT @DISCO_70’S @VILLAGE_FÊTE @TECHNO_GARAGE @TECH_HOUSE @AFRO&BASS_1 @AFRO&BASS_2 @AFRO&BASS_3 @AFRO_HOUSE @DEEP&BASS_1 @DEEP&BASS_2 @ELECTRO&BASS_1 @ELECTRO&BASS_2 @FUNK&BASS_1 @FUNK&BASS_2 @HOUSE&BASS_1 @HOUSE&BASS_2 @LATIN&BASS_1 @LATIN&BASS_2 @LATIN&BASS_3 @TRIBE&BASS_1 @TRIBE&BASS_2 @DISCO_70’S_2 @DISCO_FLAVOR @FRESH_GROOVE @GROOVY_FUNK(R) @HOUSE_FEVER 60_REVIVAL_SD D-FLOOR_SD DANCE_1_SD DANCE_2_SD DANCE_3_SD DISCO_1_SD DISCO_2_SD 52 53 54 55 56 57 58 59 DISCO_3_SD DISCO_BAROQUE_SD GIPSY_SD HOUSE_1_SD HOUSE_2_SD HOUSE_3_SD NOCHE_MIX_SD RUMBA_DANCE_SD PARTY 1 @PARTY_POLKA_1 2 @PARTY_POLKA_2 3 @PARTY_FOX 4 @SCHLAGER 5 @ORGELSAMBA 6 @SHUFFLEBEAT 7 @SCANDSCHLAGER 8 @PARTYSAMBA 9 @HAPPY_FOX 10 @SKA_BEAT 11 BOARISCHER 12 OBERWALZ 13 OBERPOLKA 14 DISCOFOX 15 SCHLAGERGRIECH 16 SPATZENBEAT 17 TANZPALAST 18 CTRYBALLAD 19 SCHLAGERWALZER 20 DOLOMITENPOWER 21 DOLOMITENBEAT 22 ALOHA 23 DISCODREAM 24 FLIPFOX 25 FOX_70 26 HAPPYPOLKA 27 JIVECONIE 28 ORGELPARTY 29 SCANBUG 30 SLOWROCK_6_8 31 SUMMERREGGAE 32 DANCE_ROCK_SD 33 DISCO_CHA_CHA_SD 34 DISCO_SAMBA_SD 35 FLIP_BEAT_SD 36 H-GULLY_1_SD 37 38 39 40 41 42 43 44 45 46 47 48 49 50 51 52 H-GULLY_2_SD H-GULLY_DAN_SD HIT_POLKA1_SD HIT_POLKA2_SD HOWY_HITS_SD KASTELBT_SD LIMBO_SD MACARENA_SD MENEITO_SD PARTY_FOX_SD PARTY_GRV_SD PARTY_POLKA_SD SCHLAGER_1_SD SCHLAGER_2_SD WOLLEMIX_SD WOLLE_SD ROCK&SOUL 1 @AMERICAN_ROCK_1 2 @POWER_ROCK 3 @POP_ROCK 4 @STREET_ROCK 5 @STUDIO_ROCK 6 @BLUES_NIGHT 7 @R&BLUES_1 8 @SHUFFLE_BLUES 9 @ROCKING 10 @60’SBLUES 11 @METAL_ROCK 12 @AMERICAN_ROCK_2 13 @R&BLUES_2 14 @R&BLUES_3 15 @ROCK_SHUFFLE_1 16 @STAGE_ROCK 17 @ON_THE_ROCK 18 @GARAGE_ROCK 19 @BLUESY_MOOD 20 SOUL_POP 21 BASICROCK_SD 22 BB_ROCK_SD 23 GOSPEL_SD(R) 24 HARD_ROCK_SD 25 R&BLUES_1_SD 26 R&BLUES_2_SD(R) 27 ROCKING_SD 28 ROCK_BALLAD_SD KETRON • AUDYA 157 Styles AUDYA FACTORY STYLES 29 30 31 32 33 ROCK_SHUFFLE_SD SHUFFLE_BLUES_SD SOUL_1_SD SOUL_2_SD USA_ROCK_SD COUNTRY 1 @APACHE 2 @BLUEGRASS 3 @COUNTRY_BEAT 4 @COUNTRY_QUARTET 5 @ON_THE_ROAD 6 @KRAMER_BALLAD 7 @OLD_CNTRYWALZ 8 @ROCKABILLY 9 @WALKING_FOX 10 @COUNTRY_ROOTS 11 @IRISH_WALZ 12 @COUNTRY_FOX 13 @COUNTRY_SURF 14 @IRISH_FOX 15 @IRISH_SLOW_FOX 16 @QUICK_STEP 17 @UP_COUNTRY_1 18 @SOFT_BALLAD 19 @WESTERN_1 20 @WESTERN_2 21 @UP_COUNTRY_2 22 @FOLK_ROOTS 23 @IRISH_WALKING 24 BALLAD_12_8 25 COUNTRY_BALLAD 26 COUNTRY_DIXIE 27 COUNTRY_WALZ 28 BLUEGRASS_SD 29 CNTRY_BLD_SD 30 CNTRY_FOX_SD 31 CNTRY_POP_SD 32 CNTRY_ROCK_SD 33 KRAMER_SD 34 NASHVILLE_SD 35 ONTHEROAD_SD 36 SLOW_COUNTRY_SD 37 WESTERN_SD 38 WESTRIDE_SD 158 KETRON • AUDYA SWING 1 @BIGBAND_1 2 @BIGBAND_2 3 @BIGBAND_SLOW 4 @JAZZ_COCKTAIL 5 @JAZZ_QUARTET 6 @ORCHESTRAL_SLOW 7 @JAZZ_WALZ 8 @FAST_BEBOP 9 @SWING_1 10 @SWING_2 11 @CHRISTMAS_FOX 12 @GOGO(R) 13 @BRASSY_FOX 14 @ROMANTIC_FOX 15 @SMOOTH_FOX 16 CHARLESTON 17 DIXIELAND(R) 18 JAZZMAN 19 JAZZ_5_4 20 MANOUCHE 21 SHUFFLE_FOX 22 SLOW_FOX(R) 23 SWING3 24 BIG_BAND_SD 25 BLUES_BLD_SD(R) 26 BLUES_SD(R) 27 EASY_JAZZ_SD(R) 28 JAZZ_WALTZ_SD 29 ORCH_SLOW_1_SD 30 ORCH_SLOW_2_SD 31 ORGAN_HIT_SD(R) 32 ORGAN_JAZZ(R) 33 SWING_BLD_SD LATIN 1 @BALADA 2 @FAST_BOSSA 3 @SAMBA_JAZZ 4 @BOLERO_2 5 @TECNO_MERENGUE 6 @PUERTORICANA(R) 7 @MAMBO_SALSA(R) 8 @RUMBA_BEGUINE 9 @DOMINICANA(R) 10 11 12 13 14 15 16 17 18 19 20 21 22 23 24 25 26 27 28 29 30 31 32 33 34 35 36 37 38 39 40 41 42 43 44 45 46 47 48 49 50 51 52 53 54 @GUAJIRA(R) @BOLERO_1 @BOSSA&SALSA @CUBAN_CHACHA(R) @MERENGUE_1(R) @SAMBA_LIGHT @ITALBACHATA @SALSA_CUBANA(R) @LIVE_BOSSA @VILLERA @SAMBA_MOOD @CUMBION @JLG_BACHATA @MEDIUM_BOSSA @REGGAE_BAND @BAJON @DISCO_SAMBA @LATIN_BALLAD @MAMBO_HIT(R) @CALIENTE(R) @MERENGUE_2(R) @CUMBIA(R) @BACHATA @CHA_CHA_1 @MAMBO @CHA_CHA_2(R) @BALLENATO @BOSSA_LOUNGE @SON_ANTIGUO @LATIN_JAZZ @RUMBA_FLAMENCA @LOUNGE_BOSSA_2 @SAMBA_ROCK TROPICAL SOKA(R) ANTILLES_SD BACHATA_SD BALADA_SD BATUCADA_SD BEGUINE_1_MS BEGUINE_2_MS BEGUINE_3_SD BOSSAMIX_SD BOSSANOVA_1_SD BOSSANOVA_2_SD Styles AUDYA FACTORY STYLES 55 56 57 58 59 60 61 62 63 64 65 66 67 68 69 70 71 72 73 74 75 76 77 78 79 BRAZILIAN_SD CALIENTE_SD CHA_CHA_SD(R) EURO_CHA_CHA_SD JAZZ_SAMBA_SD LATIN_JAZZ_SD LATIN_POP_SD LATIN_ROCK_SD MAKOSSA_SD(R) MAMBO_1_SD MAMBO_2_MS MERENGUE_SD(R) MOD_BOSSA_SD NDOMBOLO_SD(R) RAPIDO_SD REGGAETON_SD(R) ROMANTICA_SD RUMBA_FLAM_SD RUMBA_SD SALSA_1_SD(R) SALSA_2_SD SALSITA_SD SAMBA_SD VALLENATO_SD ZOUK_SD(R) R&ROLL 1 @JIVE 2 @SLOW_ROCK_1 3 @SLOW_ROCK_2 4 @ROCKER 5 @SHADOW 6 @PARTY_R&ROLL 7 @RETRO_ROCK 8 @SHUFFLE 9 @R&ROLL 10 @STAGE_R&ROLL 11 @SURF 12 @HIP_SLOW_ROCK 13 @RETRO_S_ROCK 14 @SLOW_12_8 15 @SLOW_BLUES 16 @TERZINATO 17 @VINTAGE_S_ROCK 18 @BLUESMAN 19 @TWIST 20 21 22 23 24 25 26 27 28 29 30 31 32 33 34 35 36 37 38 39 40 41 42 43 44 @6_8_SLOW_BLD @SHUFFLE_BOOGIE BOOGIE POP_60 POP_ROCK R&ROLL_1 R&ROLL_2 SLOW_ROCK TWIST 60’S_POP_SD BOOGIE_WOOGIE_SD BUGG_1_SD BUGG_2_SD JIVE_SD(R) POP_TWIST_SD ROCK&ROLL_1_SD ROCK&ROLL_2_SD SCANDFOX_1_SD SCANDFOX_2_SD SHUFF_FOX_SD SLOWROCK_1_SD SLOWROCK_2_SD SLOWROCK_3_SD SLOWROCK_4_SD SURF_SD UNPLUGGED 1 @16BALLAD 2 @ANDALUZ 3 @BALLAD 4 @BEGUINE 5 @BLUEGRAS 6 @BOSSANOVA 7 @COUNTRYROCK 8 @COUNTRYBEAT 9 @COUNTRY_POP 10 @FAST_SAMBA 11 @GYPSY 12 @MAMBO_SHUFFLE 13 @MEDITERRANEAN 14 @SLOW_ROCK 15 @SMOOTH_FOLK 16 @SOUL_FOLK 17 @SURFIN 18 @IT_TARANTELLA 19 @WESTERN_BALLAD 20 21 22 23 24 25 26 27 28 29 30 31 @FADO G_ANDALUZ_SD G_BALLAD_1_SD G_BALLAD_2_SD G_BOSSA_SD G_BRASIL_SD G_COUNTRY_1_SD G_COUNTRY_2_SD G_COUNTRY_3_SD G_FLAMENCO_SD G_POP_1_SD G_POP_2_SD FOLK 1 @MARCH_4_4 2 @MILONGA 3 @PARISIENNE 4 @PIZZICA 5 @TAMMURRIATA 6 @PASO_DOBLE 7 @PAQUITO 8 @SEVILLANA 9 @RUMBA_NAPOLETA 10 @SALTARELLO 11 @JIGS 12 @QUEBEC_FOLKLORE 13 @REELS 14 ALPEN_POLKA 15 ALPEN_WALZ 16 BAROQUE 17 CAN_CAN 18 ESPANA_HIT 19 MEXICAN 20 OBERKRAIN 21 PASO_DOBLE_3_4 22 SIRTAKY 23 CELTIC_SD 24 FADO_SD 25 HABANERA_SD 26 JIGS_SD 27 MARCH_SD 28 NAPOLETANA_SD 29 PASODOBLE_NEW_SD 30 PASODOBLE_SD 31 P_DOBLE_3-4_SD 32 P_DOBLE_4-4_SD 33 REELS_SD KETRON • AUDYA 159 Styles AUDYA FACTORY STYLES BALLROOM 1 @ARGENTINO 2 @BEGUINE_1 3 @ITALPOLKA 4 @MAZURCA(R) 5 @WALZ_ROMAGNOLO 6 @TARANTELLA 7 @SLOW_FOX 8 @FOX_TROT 9 @MODERATO 10 @SWING_FOX 11 @BEGUINE_2 12 @ENGLISH_WALTZ 13 @H-GULLY_1 14 @H-GULLY_2 15 @MEDIUM_FOX 16 @QUADRIGLIA 17 @SHUFFLE_FOX 18 @SLOW_WALZ 19 @TANGO_ITALIANO 20 @WIENER 21 @CLASSIC_TANGO 22 @NEW_MAZURKA(R) 23 @NEW_POLKA(R) 24 @NEW_WALZER(R) 25 @VALZER_LENTO 26 SMOOTH_FOX 27 SOFT_POLKA 28 SOFT_WALZ 29 BEGUINE 30 POLKA(R) 31 SLOW_BEAT 32 TANGO_1 33 TANGO_2 34 WALZER 35 BRUSH_POLKA_SD 36 BRUSH_WALZ_SD 37 FOXTROT_1_SD 38 FOXTROT_2_SD 39 FOXTROT_3_SD 40 FOXTROT_4_MS 41 FRANCAISE_SD 42 IRISH_WALTZ_SD 43 MARCH_6-8_MS 44 MAZURKA_1_SD 45 MAZURKA_2_SD 160 KETRON • AUDYA 46 47 48 49 50 51 52 53 54 55 56 57 58 59 60 61 62 63 64 65 66 67 68 69 MAZURKA_3_SD(R) MAZURKA_4_MS MEDIUMFOX_SD MODERATO_1_SD MODERATO_2_SD MUSETTE_SD(R) POLKA_1_SD POLKA_2_SD POLKA_3_MS QUADRIGLIA_SD QUICK_STEP_SD SALTARELLO_SD SLOW_FOX_1(R) SLOW_FOX_2 SLOW_WALTZ_SD TANGO_1_SD TANGO_2_SD TANGO_3_MS TARANTELLA_SD WALTZ_1_SD WALTZ_2_SD WALTZ_3_MS WIENER_1_SD WIENER_2_SD NOTE The symbol @ before the name of the STYLE means that the style has AUDIO DRUM, GROOVES or LIVE GUITAR parts. Drum Set Drum Set Standard 1 14 15 16 17 18 19 20 21 22 23 24 25 26 27 28 29 30 31 32 33 34 35 36 37 38 39 40 41 42 43 44 45 46 47 48 49 50 51 52 53 54 55 56 57 58 59 60 61 Snare001 Roll01 Roll02 Snare002 Snare003 Snare004 Snare005 Snare006 Tom Flam01 Tom Flam02 Crash01 Snare007 Fingsnap 01 Slap Snare008 Scratch Up Scratch Down Sticks 01 Click Metronome01 Metronome02 Kick16 Kick07 Rimshot05 Snare094 Clap03 Snare097 Tom01 Stick12 Tom02 Close01 Tom03 Open04 Tom04 Tom05 Crash02 Tom06 Ride01 Crash03 Ridebell01 Tambourine01 Crash04 Cowbell01 Crash05 Vibraslap Ride02 Bongo_Hi Bongo_Low Standard 2 14 15 16 17 18 19 20 21 22 23 24 25 Snare001 Roll01 Roll02 Snare002 Snare003 Snare004 Snare005 Snare006 Tom Flam01 Tom Flam02 Crash01 Snare007 Program Change 1 62 63 64 65 66 67 68 69 70 71 72 73 74 75 76 77 78 79 80 81 82 83 84 85 86 87 88 89 90 91 92 93 94 95 96 97 98 99 100 101 102 103 104 105 106 107 108 109 Conga Slap Conga_Hi Conga_Low Timbales_Hi Timbales_Lo Agogo_Hi Agogo_Low Cabasa Maracas01 Whistle01 Whistle02 Guiro01 Guiro02 Claves01 W_Block_Hi W_Block_Lo Cuica01 Cuica02 Triangle01 Triangle02 Shaker01 Shaker02 Sticks02 Castagnet Tambourine03 Rimshot02 Snare011 Snare012 Snare013 Middle01 Stick02 Close02 Open02 Reverse Applause Belltree Empty Empty Empty Empty Empty Empty Empty Empty Empty Empty Empty Empty Program Change 2 62 Conga Slap 63 Conga_Hi 64 Conga_Low 65 Timbales_Hi 66 Timbales_Lo 67 Agogo_Hi 68 Agogo_Low 69 Cabasa 70 Maracas01 71 Whistle01 72 Whistle02 73 Guiro01 26 27 28 29 30 31 32 33 34 35 36 37 38 39 40 41 42 43 44 45 46 47 48 49 50 51 52 53 54 55 56 57 58 59 60 61 Fingsnap 01 Slap Snare008 Scratch Up Scratch Down Sticks01 Click Metronome01 Metronome02 Kick03 Kick01 Rimshot03 Snare031 Clap01 Snare021 Tom01 Stick15 Tom02 Close01 Tom03 Open02 Tom04 Tom05 Crash02 Tom06 Ride03 Crash03 Ridebell01 Tambourine01 Crash04 Cowbell01 Crash05 Vibraslap Ride01 Bongo_Hi Bongo_Low Room Gm2 14 15 16 17 18 19 20 21 22 23 24 25 26 27 28 29 30 31 32 33 34 35 36 37 38 39 Empty Empty Empty Empty Empty Empty Empty Empty Empty Empty Empty Empty Empty Fingsnap 01 Slap Scratch Up Scratch Down Sticks01 Click Metronome01 Metronome02 Kick04 Kick02 Rimshot01 Snare009 Clap01 74 75 76 77 78 79 80 81 82 83 84 85 86 87 88 89 90 91 92 93 94 95 96 97 98 99 100 101 102 103 104 105 106 107 108 109 Guiro02 Claves01 W_Block_Hi W_Block_Lo Cuica01 Cuica02 Triangle01 Triangle02 Shaker01 Shaker02 Sticks02 Castagnet Tambourine01 Rimshot04 Snare009 Snare010 Snare015 Middle01 Stick01 Close02 Open01 Reverse Applause Belltree Empty Empty Empty Empty Empty Empty Empty Empty Empty Empty Empty Empty Program Change 3 62 Conga Slap 63 Conga_Hi 64 Conga_Low 65 Timbales_Hi 66 Timbales_Lo 67 Agogo_Hi 68 Agogo_Low 69 Cabasa 70 Maracas01 71 Whistle01 72 Whistle02 73 Guiro01 74 Guiro02 75 Claves01 76 W_Block_Hi 77 W_Block_Lo 78 Cuica01 79 Cuica02 80 Triangle01 81 Triangle02 82 Shaker01 83 Shaker02 84 Sticks02 85 Castagnet 86 Kick40 87 Kick39 KETRON • AUDYA 161 Drum Set 40 41 42 43 44 45 46 47 48 49 50 51 52 53 54 55 56 57 58 59 60 61 Snare010 Tom07 Stick01 Tom08 Close01 Tom09 Open01 Tom10 Tom11 Crash02 Tom12 Ride01 Crash03 Ridebell01 Tambourine01 Crash04 Cowbell01 Crash05 Vibraslap Ride02 Bongo_Hi Bongo_Low Power Gm2 14 15 16 17 18 19 20 21 22 23 24 25 26 27 28 29 30 31 32 33 34 35 36 37 38 39 40 41 42 43 44 45 46 47 48 49 50 51 52 53 54 55 56 57 Empty Empty Empty Empty Empty Empty Empty Empty Empty Empty Empty Empty Empty Fingsnap 01 Slap Scratch Up Scratch Down Sticks01 Click Metronome01 Metronome02 Kick16 Kick01 Rimshot01 Snare095 Clap01 Snare096 Tom07 Stick01 Tom08 Close01 Tom09 Open01 Tom10 Tom11 Crash02 Tom12 Ride01 Crash03 Ridebell01 Tambourine01 Crash04 Cowbell01 Crash05 162 KETRON • AUDYA 88 89 90 91 92 93 94 95 96 97 98 99 100 101 102 103 104 105 106 107 108 109 Empty Empty Empty Empty Empty Empty Empty Empty Empty Empty Empty Empty Empty Empty Empty Empty Empty Empty Empty Empty Empty Empty Program Change 4 62 Conga Slap 63 Conga_Hi 64 Conga_Low 65 Timbales_Hi 66 Timbales_Lo 67 Agogo_Hi 68 Agogo_Low 69 Cabasa 70 Maracas01 71 Whistle01 72 Whistle02 73 Guiro01 74 Guiro02 75 Claves01 76 W_Block_Hi 77 W_Block_Lo 78 Cuica01 79 Cuica02 80 Triangle01 81 Triangle02 82 Shaker01 83 Shaker02 84 Sticks02 85 Castagnet 86 Kick40 87 Kick39 88 Empty 89 Empty 90 Empty 91 Empty 92 Empty 93 Empty 94 Empty 95 Empty 96 Empty 97 Empty 98 Empty 99 Empty 100 Empty 101 Empty 102 Empty 103 Empty 104 Empty 105 Empty 58 59 60 61 Vibraslap Ride02 Bongo_Hi Bongo_Low Electro Gm2 14 15 16 17 18 19 20 21 22 23 24 25 26 27 28 29 30 31 32 33 34 35 36 37 38 39 40 41 42 43 44 45 46 47 48 49 50 51 52 53 54 55 56 57 58 59 60 61 Empty Empty Empty Empty Empty Empty Empty Empty Empty Empty Empty Empty Clap11 Fingsnap 01 Slap Scratch Up Scratch Down Sticks01 Click Metronome01 Metronome02 Kick21 KIck20 Rimshot01 Snare045 Clap01 Snare046 Tom43 Stick28 Tom44 Close10 Tom45 Open05 Tom46 Tom47 Crash02 Tom48 Reverse Crash03 Ridebell01 Tambourine01 Crash04 Cowbell01 Crash05 Vibraslap Ride02 Bongo_Hi Bongo_Low Jazz Gm2 14 15 16 17 18 19 20 21 22 23 24 Empty Empty Empty Empty Empty Empty Empty Empty Empty Empty Empty 106 107 108 109 Empty Empty Empty Empty Program Change 5 62 Conga Slap 63 Conga_Hi 64 Conga_Low 65 Timbales_Hi 66 Timbales_Lo 67 Agogo_Hi 68 Agogo_Low 69 Cabasa 70 Maracas01 71 Whistle01 72 Whistle02 73 Guiro01 74 Guiro02 75 Claves01 76 W_Block_Hi 77 W_Block_Lo 78 Cuica01 79 Cuica02 80 Triangle01 81 Triangle02 82 Shaker01 83 Shaker02 84 Sticks02 85 Castagnet 86 Kick40 87 Kick39 88 Empty 89 Empty 90 Empty 91 Empty 92 Empty 93 Empty 94 Empty 95 Empty 96 Empty 97 Empty 98 Empty 99 Empty 100 Empty 101 Empty 102 Empty 103 Empty 104 Empty 105 Empty 106 Empty 107 Empty 108 Empty 109 Empty Program Change 6 62 Conga Slap 63 Conga_Hi 64 Conga_Low 65 Timbales_Hi 66 Timbales_Lo 67 Agogo_Hi 68 Agogo_Low 69 Cabasa 70 Maracas01 71 Whistle01 72 Whistle02 Drum Set 25 26 27 28 29 30 31 32 33 34 35 36 37 38 39 40 41 42 43 44 45 46 47 48 49 50 51 52 53 54 55 56 57 58 59 60 61 Empty Empty Fingsnap 01 Slap Scratch Up Scratch Down Sticks01 Click Metronome01 Metronome02 Kick06 Kick13 Rimshot01 Snare009 Clap01 Snare010 Tom01 Stick01 Tom02 Close01 Tom03 Open01 Tom04 Tom05 Crash02 Tom06 Ride01 Crash03 Ridebell01 Tambourine01 Crash04 Cowbell01 Crash05 Vibraslap Ride02 Bongo_Hi Bongo_Low Analog Gm2 14 15 16 17 18 19 20 21 22 23 24 25 26 27 28 29 30 31 32 33 34 35 36 37 38 39 40 41 42 43 Empty Empty Empty Empty Empty Empty Empty Empty Empty Empty Empty Empty Empty Fingsnap 01 Slap Scratch Up Scratch Down Sticks01 Click Metronome01 Metronome02 Kick16 Kick24 Rimshot12 Snare087 Clap01 Snare010 Tom26 Stick29 Tom27 73 74 75 76 77 78 79 80 81 82 83 84 85 86 87 88 89 90 91 92 93 94 95 96 97 98 99 100 101 102 103 104 105 106 107 108 109 Guiro01 Guiro02 Claves01 W_Block_Hi W_Block_Lo Cuica01 Cuica02 Triangle01 Triangle02 Shaker01 Shaker02 Sticks02 Castagnet Kick40 Kick39 Empty Empty Empty Empty Empty Empty Empty Empty Empty Empty Empty Empty Empty Empty Empty Empty Empty Empty Empty Empty Empty Empty Program Change 7 62 Conga Slap 63 Conga_Hi 64 Conga_Low 65 Timbales_Hi 66 Timbales_Lo 67 Agogo_Hi 68 Agogo_Low 69 Cabasa 70 Maracas02 71 Whistle01 72 Whistle02 73 Guiro01 74 Guiro02 75 Claves02 76 W_Block_Hi 77 W_Block_Lo 78 Cuica01 79 Cuica02 80 Triangle01 81 Triangle02 82 Shaker01 83 Shaker02 84 Sticks02 85 Castagnet 86 Kick40 87 Kick39 88 Empty 89 Empty 90 Empty 91 Empty 44 45 46 47 48 49 50 51 52 53 54 55 56 57 58 59 60 61 Close10 Tom28 Open05 Tom29 Tom30 Open06 Tom31 Ride01 Crash03 Ridebell01 Tambourine01 Crash04 Cowbell01 Crash05 Vibraslap Ride02 Bongo_Hi Bongo_Low Standard Gm2 14 15 16 17 18 19 20 21 22 23 24 25 26 27 28 29 30 31 32 33 34 35 36 37 38 39 40 41 42 43 44 45 46 47 48 49 50 51 52 53 54 55 56 57 58 59 60 61 Empty Empty Roll01 Roll02 Snare002 Snare003 Snare004 Snare005 Snare006 T_Flam01 T_Flam02 Crash01 Snare007 Fingsnap01 Slap Scratch Up Scratch Down Sticks01 Click Metronome01 Metronome02 Kick05 KIck02 Rimshot01 Snare013 Clap01 Snare014 Tom01 Stick02 Tom02 Close01 Tom03 Open01 Tom04 Tom05 Crash02 Tom06 Ride01 Crash03 Ridebell01 Tambourine01 Crash04 Cowbell01 Crash05 Vibraslap Ride02 Bongo_Hi Bongo_Low 92 93 94 95 96 97 98 99 100 101 102 103 104 105 106 107 108 109 Empty Empty Empty Empty Empty Empty Empty Empty Empty Empty Empty Empty Empty Empty Empty Empty Empty Empty Program Change 8 62 Conga Slap 63 Conga_Hi 64 Conga_Low 65 Timbales_Hi 66 Timbales_Lo 67 Agogo_Hi 68 Agogo_Low 69 Cabasa 70 Maracas01 71 Whistle01 72 Whistle02 73 Guiro01 74 Guiro02 75 Claves01 76 W_Block_Hi 77 W_Block_Lo 78 Cuica01 79 Cuica02 80 Triangle01 81 Triangle02 82 Shaker01 83 Shaker02 84 Sticks02 85 Castagnet 86 Tambourine1 87 Rimshot02 88 Snare080 89 Snare012 90 Snare013 91 Middle01 92 Stick02 93 Close02 94 Open02 95 Reverse 96 Applause 97 Belltree 98 Empty 99 Empty 100 Empty 101 Empty 102 Empty 103 Empty 104 Empty 105 Empty 106 Empty 107 Empty 108 Empty 109 Empty KETRON • AUDYA 163 Drum Set Folk 14 15 16 17 18 19 20 21 22 23 24 25 26 27 28 29 30 31 32 33 34 35 36 37 38 39 40 41 42 43 44 45 46 47 48 49 50 51 52 53 54 55 56 57 58 59 60 61 Snare001 Roll01 Roll02 Snare002 Snare003 Snare004 Snare005 Snare006 Tom Flam01 Tom Flam02 Crash01 Snare007 Fingsnap 01 Slap Snare008 Scratch Up Scratch Down Sticks01 Click Metronome01 Metronome02 Kick04 Kick02 Rimshot05 Snare012 Clap01 Snare013 Tom01 Stick02 Tom02 Close01 Tom03 Open01 Tom04 Tom05 Crash02 Tom06 Ride03 Crash03 Ridebell01 Tambourine01 Crash04 Cowbell01 Crash05 Vibraslap Ride01 Bongo_Hi Bongo_Low Program Change 9 62 Conga Slap 63 Conga_Hi 64 Conga_Low 65 Timbales_Hi 66 Timbales_Lo 67 Agogo_Hi 68 Agogo_Low 69 Cabasa 70 Maracas01 71 Whistle01 72 Whistle02 73 Guiro01 74 Guiro02 75 Claves01 76 W_Block_Hi 77 W_Block_Lo 78 Cuica01 79 Cuica02 80 Triangle01 81 Triangle02 82 Shaker01 83 Shaker02 84 Sticks02 85 Castagnet 86 Tambourine01 87 Rimshot03 88 Snare011 89 Snare009 90 Snare010 91 Stick12 92 Stick02 93 Close02 94 Open02 95 Reverse 96 Applause 97 Belltree 98 Empty 99 Empty 100 Empty 101 Empty 102 Empty 103 Empty 104 Empty 105 Empty 106 Empty 107 Empty 108 Empty 109 Empty Acoustic 1 14 15 16 17 18 19 20 21 22 23 24 25 26 27 28 29 30 31 32 33 34 35 36 37 38 39 40 41 42 43 44 45 46 47 48 49 50 51 52 53 54 55 56 57 58 59 60 61 Snare001 Roll01 Roll02 Snare002 Snare003 Snare004 Snare005 Snare006 Tom Flam01 Tom Flam02 Crash01 Snare007 Fingsnap 01 Slap Snare008 Scratch Up Scratch Down Sticks01 Click Metronome01 Metronome02 Kick06 Kick07 Rimshot06 Snare016 Clap01 Snare017 Tom01 Stick02 Tom02 Close07 Tom03 Open02 Tom04 Tom05 Crash02 Tom06 Ride01 Crash03 Ridebell01 Tambourine01 Crash04 Cowbell01 Crash05 Vibraslap Ride02 Bongo_Hi Bongo_Low Jazz Dry 14 15 16 17 18 19 20 21 22 23 24 25 26 27 28 164 KETRON • AUDYA Snare001 Roll01 Roll02 Snare002 Snare003 Snare004 Snare005 Snare006 Tom Flam01 Tom Flam02 Crash01 Snare007 Fingsnap 01 Slap Snare008 Program Change 10 62 Conga Slap 63 Conga_Hi 64 Conga_Low 65 Timbales_Hi 66 Timbales_Lo 67 Agogo_Hi 68 Agogo_Low 69 Cabasa 70 Maracas01 71 Whistle01 72 Whistle02 73 Guiro01 74 Guiro02 75 Claves01 76 W_Block_Hi 77 W_Block_Lo 78 Cuica01 79 Cuica02 80 Triangle01 81 Triangle02 82 Shaker01 83 Shaker02 84 Sticks02 85 Castagnet 86 Tambourine01 87 Rimshot04 88 Snare013 89 Snare018 90 Snare015 91 Close06 92 Stick02 93 Close02 94 Open01 95 Reverse 96 Applause 97 Belltree 98 Pandero01 99 Pandero02 100 Pandero03 101 Empty 102 Empty 103 Empty 104 Empty 105 Empty 106 Empty 107 Empty 108 Empty 109 Empty Program Change 11 62 Conga Slap 63 Conga_Hi 64 Conga_Low 65 Timbales_Hi 66 Timbales_Lo 67 Agogo_Hi 68 Agogo_Low 69 Cabasa 70 Maracas01 71 Whistle01 72 Whistle02 73 Guiro01 74 Guiro02 75 Claves01 76 W_Block_Hi Drum Set 29 30 31 32 33 34 35 36 37 38 39 40 41 42 43 44 45 46 47 48 49 50 51 52 53 54 55 56 57 58 59 60 61 Scratch Up Scratch Down Sticks01 Click Metronome01 Metronome02 Kick16 Kick06 Rimshot08 Snare020 Clap01 Snare019 Tom07 Stick01 Tom08 Close01 Tom09 Open01 Tom10 Tom11 Crash02 Tom12 Ride01 Crash03 Ridebell01 Tambourine01 Crash04 Cowbell01 Crash05 Vibraslap Ride02 Bongo_Hi Bongo_Low Vintage 14 15 16 17 18 19 20 21 22 23 24 25 26 27 28 29 30 31 32 33 34 35 36 37 38 39 40 41 42 43 44 45 46 Snare001 Roll01 Roll02 Snare002 Snare003 Snare004 Snare005 Snare006 Tom Flam01 Tom Flam02 Crash01 Snare007 Fingsnap 01 Slap Snare008 Scratch Up Scratch Down Sticks01 Click Metronome01 Metronome02 Kick10 Kick11 Rimshot09 Snare021 Clap01 Snare016 Tom01 Stick02 Tom02 Close01 Tom03 Open02 77 78 79 80 81 82 83 84 85 86 87 88 89 90 91 92 93 94 95 96 97 98 99 100 101 102 103 104 105 106 107 108 109 W_Block_Lo Cuica01 Cuica02 Triangle01 Triangle02 Shaker01 Shaker02 Sticks02 Castagnet Tambourine01 Rimshot05 Snare009 Snare012 Snare013 Middle01 Stick04 Close02 Open02 Reverse Applause Belltree Empty Empty Empty Empty Empty Empty Empty Empty Empty Empty Empty Empty Program Change 12 62 Conga Slap 63 Conga_Hi 64 Conga_Low 65 Timbales_Hi 66 Timbales_Lo 67 Agogo_Hi 68 Agogo_Low 69 Cabasa 70 Maracas01 71 Whistle01 72 Whistle02 73 Guiro01 74 Guiro02 75 Claves01 76 W_Block_Hi 77 W_Block_Lo 78 Cuica01 79 Cuica02 80 Triangle01 81 Triangle02 82 Shaker01 83 Shaker02 84 Sticks02 85 Castagnet 86 Tambourine01 87 Rimshot03 88 Snare022 89 Snare010 90 Snare015 91 Close06 92 Stick01 93 Close02 94 Open01 47 48 49 50 51 52 53 54 55 56 57 58 59 60 61 Tom04 Tom05 Crash02 Tom06 Ride01 Crash03 Ridebell01 Tambourine01 Crash04 Cowbell01 Crash05 Vibraslap Ride02 Bongo_Hi Bongo_Low Acoustic 2 14 15 16 17 18 19 20 21 22 23 24 25 26 27 28 29 30 31 32 33 34 35 36 37 38 39 40 41 42 43 44 45 46 47 48 49 50 51 52 53 54 55 56 57 58 59 60 61 Snare001 Roll01 Roll02 Snare002 Snare003 Snare004 Snare005 Snare006 Tom Flam01 Tom Flam02 Crash01 Snare007 Fingsnap 01 Slap Snare008 Scratch Up Scratch Down Sticks01 Click Metronome 01 Metronome 02 Kick08 Kick09 Rimshot05 Snare019 Clap01 Snare020 Tom01 Stick04 Tom02 Close02 Tom03 Open02 Tom04 Tom05 Crash02 Tom06 Ride01 Crash03 Ridebell01 Tambourine01 Crash04 Cowbell01 Crash05 Vibraslap Ride02 Bongo_Hi Bongo_Low 95 96 97 98 99 100 101 102 103 104 105 106 107 108 109 Reverse Applause Belltree Empty Empty Empty Empty Empty Empty Empty Empty Empty Empty Empty Empty Program Change 15 62 Conga Slap 63 Conga_Hi 64 Conga_Low 65 Timbales_Hi 66 Timbales_Lo 67 Agogo_Hi 68 Agogo_Low 69 Cabasa 70 Maracas01 71 Whistle01 72 Whistle02 73 Guiro01 74 Guiro02 75 Claves01 76 W_Block_Hi 77 W_Block_Lo 78 Cuica01 79 Cuica02 80 Triangle01 81 Triangle02 82 Shaker01 83 Shaker02 84 Sticks02 85 Castagnet 86 Tambourine01 87 Rimshot02 88 Snare011 89 Snare012 90 Snare013 91 Middle01 92 Stick04 93 Close02 94 Open02 95 Reverse 96 Applause 97 Belltree 98 Empty 99 Empty 100 Empty 101 Empty 102 Empty 103 Empty 104 Empty 105 Empty 106 Empty 107 Empty 108 Empty 109 Empty KETRON • AUDYA 165 Drum Set Rock 14 15 16 17 18 19 20 21 22 23 24 25 26 27 28 29 30 31 32 33 34 35 36 37 38 39 40 41 42 43 44 45 46 47 48 49 50 51 52 53 54 55 56 57 58 59 60 61 Snare001 Roll01 Roll02 Snare002 Snare003 Snare004 Snare005 Snare006 Tom Flam01 Tom Flam02 Crash01 Snare007 Fingsnap 01 Slap Snare008 Scratch Up Scratch Down Sticks01 Click Metronome 01 Metronome 02 Kick05 Kick16 Rimshot21 Snare092 Clap15 Snare093 Tom01 Stick19 Tom02 Close09 Tom03 Open03 Tom04 Tom05 Crash02 Tom06 Ride03 Crash03 Ridebell01 Tambourine01 Crash04 Cowbell01 Crash05 Vibraslap Ride01 Bongo_Hi Bongo_Low House 14 15 16 17 18 19 20 21 22 23 24 25 26 27 28 Snare001 Roll01 Roll02 Snare002 Snare003 Snare004 Snare005 Snare006 Tom Flam01 Tom Flam02 Crash01 Snare007 Fingsnap 01 Slap Snare008 166 KETRON • AUDYA Program Change 17 62 Conga Slap 63 Conga_Hi 64 Conga_Low 65 Timbales_Hi 66 Timbales_Lo 67 Agogo_Hi 68 Agogo_Low 69 Cabasa 70 Maracas01 71 Whistle01 72 Whistle02 73 Guiro01 74 Guiro02 75 Claves01 76 W_Block_Hi 77 W_Block_Lo 78 Cuica01 79 Cuica02 80 Triangle01 81 Triangle02 82 Shaker01 83 Shaker02 84 Sticks02 85 Clap02 86 Tambourine01 87 Rimshot11 88 Snare086 89 Snare084 90 Snare028 91 Middle01 92 Middle04 93 Close02 94 Open01 95 Reverse 96 Applause 97 Belltree 98 Empty 99 Empty 100 Empty 101 Empty 102 Empty 103 Empty 104 Empty 105 Empty 106 Empty 107 Empty 108 Empty 109 Empty Program Change 25 62 Conga Slap 63 Conga_Hi 64 Conga_Low 65 Timbales_Hi 66 Timbales_Lo 67 Agogo_Hi 68 Agogo_Low 69 Cabasa 70 Maracas01 71 Whistle01 72 Whistle02 73 Guiro01 74 Guiro02 75 Claves01 76 W_Block_Hi 29 30 31 32 33 34 35 36 37 38 39 40 41 42 43 44 45 46 47 48 49 50 51 52 53 54 55 56 57 58 59 60 61 Scratch Up Scratch Down Sticks01 Click Metronome01 Metronome02 Kick42 Kick15 Rimshot05 Snare029 Clap10 Snare077 Tom20 Stick20 Tom21 Middle07 Tom22 Middle05 Tom23 Tom24 Crash02 Tom25 Ride01 Crash03 Ridebell01 Tambourine01 Crash04 Cowbell01 Crash05 Vibraslap Ride02 Bongo_Hi Bongo_Low Techno 14 15 16 17 18 19 20 21 22 23 24 25 26 27 28 29 30 31 32 33 34 35 36 37 38 39 40 41 42 43 44 45 46 Snare001 Roll01 Roll02 Snare002 Snare003 Snare004 Snare005 Snare006 Tom Flam01 Tom Flam02 Crash01 Snare007 Fingsnap 01 Slap Snare008 Scratch05 Scratch Down Sticks01 Click Metronome01 Metronome02 Kick15 Kick17 Rimshot13 Snare034 Clap03 Snare033 Tom26 Close04 Tom27 Stick09 Tom28 Middle05 77 78 79 80 81 82 83 84 85 86 87 88 89 90 91 92 93 94 95 96 97 98 99 100 101 102 103 104 105 106 107 108 109 W_Block_Lo Cuica01 Cuica02 Triangle01 Triangle02 Shaker01 Shaker02 Sticks02 Clap04 Tambourine1 Rimshot12 Snare036 Snare037 Kick42 Kick15 Kick17 Stick08 Middle06 Reverse Applause Belltree Empty Empty Empty Empty Empty Empty Empty Empty Empty Empty Empty Empty Program Change 26 62 Conga Slap 63 Conga_Hi 64 Conga_Low 65 Timbales_Hi 66 Timbales_Lo 67 Agogo_Hi 68 Agogo_Low 69 Cabasa 70 Maracas01 71 Whistle01 72 Whistle02 73 Guiro01 74 Guiro02 75 Claves01 76 W_Block_Hi 77 W_Block_Lo 78 Cuica01 79 Cuica02 80 Triangle01 81 Triangle02 82 Shaker01 83 Shaker02 84 Sticks02 85 Clap04 86 Tambourine1 87 Rimshot12 88 Snare038 89 Snare077 90 Snare028 91 Kick28 92 Kick29 93 Stick08 94 Middle06 Drum Set 47 48 49 50 51 52 53 54 55 56 57 58 59 60 61 Tom29 Tom30 Crash02 Tom31 Ride01 Crash03 Ridebell01 Tambourine01 Crash04 Cowbell01 Crash05 Vibraslap Ride02 Bongo_Hi Bongo_Low Progressive 14 15 16 17 18 19 20 21 22 23 24 25 26 27 28 29 30 31 32 33 34 35 36 37 38 39 40 41 42 43 44 45 46 47 48 49 50 51 52 53 54 55 56 57 58 59 60 61 Snare001 Roll01 Roll02 Snare002 Snare003 Snare004 Snare005 Snare006 Tom Flam01 Tom Flam02 Crash01 Snare007 Fingsnap 01 Slap Snare008 Scratch03 Scratch04 Sticks01 Click Metronome01 Metronome02 Kick44 Kick22 Rimshot16 Snare059 Clap12 Snare061 Tom20 Stick21 Tom21 Close10 Tom22 Open05 Tom23 Tom24 Crash02 Tom25 Ride01 Crash03 Ridebell01 Tambourine01 Crash04 Cowbell01 Crash05 Vibraslap Ride03 Bongo_Hi Bongo_Low 95 96 97 98 99 100 101 102 103 104 105 106 107 108 109 Middle08 Applause Belltree Clap07 Clap08 Empty Empty Empty Empty Empty Empty Empty Empty Empty Empty Program Change 28 62 Conga Slap 63 Conga_Hi 64 Conga_Low 65 Timbales_Hi 66 Timbales_Lo 67 Agogo_Hi 68 Agogo_Low 69 Cabasa 70 Maracas01 71 Whistle01 72 Whistle02 73 Guiro01 74 Guiro02 75 Claves01 76 W_Block_Hi 77 W_Block_Lo 78 Cuica01 79 Cuica02 80 Triangle01 81 Triangle02 82 Shaker01 83 Shaker02 84 Sticks02 85 Clap01 86 Tambourine1 87 Rimshot01 88 Snare039 89 Snare040 90 Snare070 91 Kick45 92 Kick15 93 Middle05 94 Middle01 95 Reverse 96 Applause 97 Belltree 98 Empty 99 Empty 100 Empty 101 Empty 102 Empty 103 Empty 104 Empty 105 Empty 106 Empty 107 Empty 108 Empty 109 Empty Rave 14 15 16 17 18 19 20 21 22 23 24 25 26 27 28 29 30 31 32 33 34 35 36 37 38 39 40 41 42 43 44 45 46 47 48 49 50 51 52 53 54 55 56 57 58 59 60 61 Snare001 Roll01 Roll02 Snare002 Snare003 Snare004 Snare005 Snare006 Tom Flam01 Tom Flam02 Crash01 Snare007 Fingsnap 01 Slap Snare008 Scratch01 Scratch02 Sticks01 Click Metronome01 Metronome02 Kick34 Kick51 Rimshot12 Snare037 Clap13 Snare076 Tom26 Stick22 Tom27 Close11 Tom28 Open08 Tom29 Tom30 Crash02 Tom31 Ride01 Crash03 Ridebell01 El.Percussion Crash04 Cowbell01 Crash05 Vibraslap Ride02 Bongo_Hi Bongo_Low Hip Hop 14 15 16 17 18 19 20 21 22 23 24 25 26 27 28 Snare001 Roll01 Roll02 Snare002 Snare003 Snare004 Snare005 Snare006 Tom Flam01 Tom Flam02 Crash01 Snare007 Fingsnap 01 Slap Snare008 Program Change 29 62 Conga Slap 63 Conga_Hi 64 Conga_Low 65 Timbales_Hi 66 Timbales_Lo 67 Agogo_Hi 68 Agogo_Low 69 Cabasa 70 Maracas01 71 Whistle01 72 Whistle02 73 Guiro01 74 Guiro02 75 Claves01 76 W_Block_Hi 77 W_Block_Lo 78 Cuica01 79 Cuica02 80 Triangle01 81 Triangle02 82 Shaker01 83 Shaker02 84 Sticks02 85 Clap03 86 Tambourine1 87 Rimshot12 88 Snare041 89 Snare033 90 Snare042 91 Kick20 92 Kick23 93 Stick23 94 Open01 95 Reverse 96 Applause 97 Belltree 98 Empty 99 Empty 100 Empty 101 Empty 102 Empty 103 Empty 104 Empty 105 Empty 106 Empty 107 Empty 108 Empty 109 Empty Program Change 30 62 Conga Slap 63 Conga_Hi 64 Conga_Low 65 Timbales_Hi 66 Timbales_Lo 67 Agogo_Hi 68 Agogo_Low 69 Cabasa 70 Maracas01 71 Whistle01 72 Whistle02 73 Guiro01 74 Guiro02 75 Claves01 76 W_Block_Hi KETRON • AUDYA 167 Drum Set 29 30 31 32 33 34 35 36 37 38 39 40 41 42 43 44 45 46 47 48 49 50 51 52 53 54 55 56 57 58 59 60 61 Scratch Up Scratch Down Sticks01 Click Metronome01 Metronome02 Kick49 Kick46 Rimshot12 Snare038 Clap14 Snare077 Tom26 Stick23 Tom27 Close12 Tom28 Open05 Tom29 Tom30 Crash02 Tom31 Ride01 Crash03 Ridebell01 Tambourine01 Crash04 Cowbell01 Crash05 Vibraslap Ride03 Bongo_Hi Bongo_Low Fusion 14 15 16 17 18 19 20 21 22 23 24 25 26 27 28 29 30 31 32 33 34 35 36 37 38 39 40 41 42 43 44 45 46 Snare001 Roll01 Roll02 Snare002 Snare003 Snare004 Snare005 Snare006 Tom Flam01 Tom Flam02 Crash01 Snare007 Fingsnap 01 Slap Snare008 Scratch Up Scratch Down Sticks01 Click Metronome01 Metronome02 Kick30 Kick06 Rimshot07 Snare081 Clap01 Snare011 Tom01 Stick02 Tom02 Close01 Tom03 Open02 168 KETRON • AUDYA 77 78 79 80 81 82 83 84 85 86 87 88 89 90 91 92 93 94 95 96 97 98 99 100 101 102 103 104 105 106 107 108 109 W_Block_Lo Cuica01 Cuica02 Triangle01 Triangle02 Shaker01 Shaker02 Sticks02 Clap02 Tambourine1 Rimshot12 Snare042 Snare045 Snare061 Kick21 Kick20 Stick21 Stick18 Reverse Applause Belltree Empty Empty Empty Empty Empty Empty Empty Empty Empty Empty Empty Empty Program Change 33 62 Conga Slap 63 Conga_Hi 64 Conga_Low 65 Timbales_Hi 66 Timbales_Lo 67 Agogo_Hi 68 Agogo_Low 69 Cabasa 70 Maracas01 71 Whistle01 72 Whistle02 73 Guiro01 74 Guiro02 75 Claves01 76 W_Block_Hi 77 W_Block_Lo 78 Cuica01 79 Cuica02 80 Triangle01 81 Triangle02 82 Shaker01 83 Shaker02 84 Sticks02 85 Castagnet 86 Tambourine01 87 Rimshot04 88 Snare022 89 Snare009 90 Snare010 91 Middle04 92 Stick02 93 Close02 94 Open01 47 48 49 50 51 52 53 54 55 56 57 58 59 60 61 Tom04 Tom05 Crash02 Tom06 Ride01 Crash03 Ridebell01 Tambourine01 Crash04 Cowbell01 Crash05 Vibraslap Ride03 Bongo_Hi Bongo_Low Brush 14 15 16 17 18 19 20 21 22 23 24 25 26 27 28 29 30 31 32 33 34 35 36 37 38 39 40 41 42 43 44 45 46 47 48 49 50 51 52 53 54 55 56 57 58 59 60 61 Snare001 Roll01 Roll02 Snare002 Snare003 Snare004 Snare005 Snare006 Tom Flam01 Tom Flam02 Crash01 Snare007 Fingsnap 01 Slap Snare008 Scratch Up Scratch Down Sticks01 Click Metronome01 Metronome02 Kick03 Kick13 Rimshot06 Snare023 Snare024 Snare025 Tom13 Stick02 Tom14 Close01 Tom15 Open01 Tom16 Tom17 Crash02 Tom18 Ride03 Crash03 Ridebell01 Tambourine01 Crash04 Cowbell01 Crash05 Vibraslap Ride04 Bongo_Hi Bongo_Low 95 96 97 98 99 100 101 102 103 104 105 106 107 108 109 Reverse Applause Belltree Empty Empty Empty Empty Empty Empty Empty Empty Empty Empty Empty Empty Program Change 41 62 Conga Slap 63 Conga_Hi 64 Conga_Low 65 Timbales_Hi 66 Timbales_Lo 67 Agogo_Hi 68 Agogo_Low 69 Cabasa 70 Maracas01 71 Whistle01 72 Whistle02 73 Guiro01 74 Guiro02 75 Claves01 76 W_Block_Hi 77 W_Block_Lo 78 Cuica01 79 Cuica02 80 Triangle01 81 Triangle02 82 Shaker01 83 Shaker02 84 Sticks02 85 Castagnet 86 Tambourine01 87 Rimshot05 88 Snare026 89 Snare027 90 Snare043 91 Close06 92 Stick02 93 Close02 94 Open02 95 Reverse 96 Applause 97 Belltree 98 Empty 99 Empty 100 Empty 101 Empty 102 Empty 103 Empty 104 Empty 105 Empty 106 Empty 107 Empty 108 Empty 109 Empty Drum Set Brush Gm2 14 15 16 17 18 19 20 21 22 23 24 25 26 27 28 29 30 31 32 33 34 35 36 37 38 39 40 41 42 43 44 45 46 47 48 49 50 51 52 53 54 55 56 57 58 59 60 61 Empty Empty Empty Empty Empty Empty Empty Empty Empty Empty Empty Empty Empty Fingsnap 01 Slap Scratch Up Scratch Down Sticks01 Click Metronome01 Metronome02 Kick03 Kick13 Rimshot01 Snare023 Snare024 Snare025 Tom01 Stick01 Tom02 Close01 Tom03 Open01 Tom04 Tom05 Crash02 Tom06 Ride01 Crash03 Ridebell01 Tambourine01 Crash04 Cowbell01 Crash05 Vibraslap Ride02 Bongo_Hi Bongo_Low Sfx Kit 14 15 16 17 18 19 20 21 22 23 24 25 26 27 28 Empty Empty Empty Empty Empty Empty Empty Empty Empty Empty Empty Empty Empty Empty Empty Program Change 42 62 Conga Slap 63 Conga_Hi 64 Conga_Low 65 Timbales_Hi 66 Timbales_Lo 67 Agogo_Hi 68 Agogo_Low 69 Cabasa 70 Maracas01 71 Whistle01 72 Whistle02 73 Guiro01 74 Guiro02 75 Claves01 76 W_Block_Hi 77 W_Block_Lo 78 Cuica01 79 Cuica02 80 Triangle01 81 Triangle02 82 Shaker01 83 Shaker02 84 Sticks02 85 Castagnet 86 Kick40 87 Kick39 88 Empty 89 Empty 90 Empty 91 Empty 92 Empty 93 Empty 94 Empty 95 Empty 96 Empty 97 Empty 98 Empty 99 Empty 100 Empty 101 Empty 102 Empty 103 Empty 104 Empty 105 Empty 106 Empty 107 Empty 108 Empty 109 Empty Program Change 47 62 Belltree 63 Engine 64 Car_Stop 65 Car_Pass 66 Car_Crash 67 Sirene 68 Train 69 Jet 70 Helicopter 71 Starship 72 Gunshot 73 Machine_Gun 74 Laser 75 Explosion 76 Dog 29 30 31 32 33 34 35 36 37 38 39 40 41 42 43 44 45 46 47 48 49 50 51 52 53 54 55 56 57 58 59 60 61 Empty Empty Empty Empty Empty Empty Empty Empty Empty Empty Slap Snare008 Scratch Up Scratch Down Sticks01 Click Metronome01 Metronome02 Fret Noise Empty Empty Empty Pfif&Jew Laughing Screaming Punch Heart Foot_Splash Steps Applause Door_Slam Door_Bell Scratch_Fx Orchestra Gm2 14 15 16 17 18 19 20 21 22 23 24 25 26 27 28 29 30 31 32 33 34 35 36 37 38 39 40 41 42 43 44 45 46 Empty Empty Empty Empty Empty Empty Empty Empty Empty Empty Empty Empty Empty Stick02 Close01 Open01 Ride01 Sticks01 Click Metronome01 Metronome02 Kick41 Kick37 Rimshot01 Snare031 Castagnet Snare014 Timpani01 Timpani02 Timpani03 Timpani04 Timpani05 Timpani06 77 78 79 80 81 82 83 84 85 86 87 88 89 90 91 92 93 94 95 96 97 98 99 100 101 102 103 104 105 106 107 108 109 Horse_Gallop Bird Rain Thunder Wind Seashore River Bubble Empty Empty Empty Empty Empty Empty Empty Empty Empty Empty Empty Empty Empty Empty Empty Empty Empty Empty Empty Empty Empty Empty Empty Empty Empty Program Change 48 62 Conga Slap 63 Conga_Hi 64 Conga_Low 65 Timbales_Hi 66 Timbales_Lo 67 Agogo_Hi 68 Agogo_Low 69 Cabasa 70 Maracas01 71 Whistle01 72 Whistle02 73 Guiro01 74 Guiro02 75 Claves01 76 W_Block_Hi 77 W_Block_Lo 78 Cuica01 79 Cuica02 80 Triangle01 81 Triangle02 82 Shaker01 83 Shaker02 84 Sticks02 85 Castagnet 86 Kick40 87 Kick39 88 Applause 89 Empty 90 Empty 91 Empty 92 Empty 93 Empty 94 Empty KETRON • AUDYA 169 Drum Set 47 48 49 50 51 52 53 54 55 56 57 58 59 60 61 Timpani07 Timpani08 Timpani09 Timpani10 Timpani11 Timpani12 Timpani13 Tambourine01 Crash04 Cowbell01 Crash09 Vibraslap Crash07 Bongo_Hi Bongo_Low Orchestra 14 15 16 17 18 19 20 21 22 23 24 25 26 27 28 29 30 31 32 33 34 35 36 37 38 39 40 41 42 43 44 45 46 47 48 49 50 51 52 53 54 55 56 57 58 59 60 61 Snare001 Roll01 Roll02 Snare002 Snare003 Snare004 Snare005 Snare006 Tom Flam01 Tom Flam02 Crash01 Snare007 Fingsnap 01 Stick02 Close01 Open01 Ride01 Sticks01 Click Metronome01 Metronome02 Kick41 Kick37 Rimshot18 Snare031 Clap01 Snare014 Timpani01 Timpani02 Timpani03 Timpani04 Timpani05 Timpani06 Timpani07 Timpani08 Timpani09 Timpani10 Timpani11 Timpani12 Timpani13 Tambourine01 Crash04 Cowbell01 Crash05 Vibraslap Crash07 Bongo_Hi Bongo_Low 170 KETRON • AUDYA 95 96 97 98 99 100 101 102 103 104 105 106 107 108 109 Empty Empty Empty Empty Empty Empty Empty Empty Empty Empty Empty Empty Empty Empty Empty Program Change 49 62 Conga Slap 63 Conga_Hi 64 Conga_Low 65 Timbales_Hi 66 Timbales_Lo 67 Agogo_Hi 68 Agogo_Low 69 Cabasa 70 Maracas01 71 Whistle01 72 Whistle02 73 Guiro01 74 Guiro02 75 Claves01 76 W_Block_Hi 77 W_Block_Lo 78 Cuica01 79 Cuica02 80 Triangle01 81 Triangle02 82 Shaker01 83 Shaker02 84 Sticks02 85 Castagnet 86 Tambourine1 87 Rimshot01 88 Snare013 89 Snare094 90 Snare009 91 Middle01 92 Stick02 93 Close02 94 Open01 95 Reverse 96 Applause 97 Belltree 98 Empty 99 Empty 100 Empty 101 Empty 102 Empty 103 Empty 104 Empty 105 Empty 106 Empty 107 Empty 108 Empty 109 Empty Studio 14 15 16 17 18 19 20 21 22 23 24 25 26 27 28 29 30 31 32 33 34 35 36 37 38 39 40 41 42 43 44 45 46 47 48 49 50 51 52 53 54 55 56 57 58 59 60 61 Snare001 Roll01 Roll02 Snare002 Snare003 Snare004 Snare005 Snare006 Tom Flam01 Tom Flam02 Crash01 Snare007 Fingsnap 01 Slap Snare008 Scratch Up Scratch Down Sticks01 Click Metronome01 Metronome02 Kick03 Kick04 Rimshot01 Snare083 Clap01 Snare082 Tom01 Stick02 Tom02 Close01 Tom03 Open02 Tom04 Tom05 Crash02 Tom06 Ride03 Crash03 Ridebell01 Tambourine01 Crash04 Cowbell01 Crash05 Vibraslap Ride01 Bongo_Hi Bongo_Low Lightpop 14 15 16 17 18 19 20 21 22 23 24 25 26 27 28 Snare001 Roll01 Roll02 Snare002 Snare003 Snare004 Snare005 Snare006 Tom Flam01 Tom Flam02 Crash01 Snare007 Fingsnap 01 Slap Snare008 Program Change 57 62 63 64 65 66 67 68 69 70 71 72 73 74 75 76 77 78 79 80 81 82 83 84 85 86 87 88 89 90 91 92 93 94 95 96 97 98 99 100 101 102 103 104 105 106 107 108 109 Conga Slap Conga_Hi Conga_Low Timbales_Hi Timbales_Lo Agogo_Hi Agogo_Low Cabasa Maracas01 Whistle01 Whistle02 Guiro01 Guiro02 Claves01 W_Block_Hi W_Block_Lo Cuica01 Cuica02 Triangle01 Triangle02 Shaker01 Shaker02 Sticks02 Castagnet Tambourine1 Rimshot04 Snare009 Snare010 Snare012 Middle01 Stick01 Close02 Open01 Reverse Applause Belltree Empty Empty Empty Empty Empty Empty Empty Empty Empty Empty Empty Empty Program Change 58 62 Conga Slap 63 Conga_Hi 64 Conga_Low 65 Timbales_Hi 66 Timbales_Lo 67 Agogo_Hi 68 Agogo_Low 69 Cabasa 70 Maracas01 71 Whistle01 72 Whistle02 73 Guiro01 74 Guiro02 75 Claves01 76 W_Block_Hi Drum Set 29 30 31 32 33 34 35 36 37 38 39 40 41 42 43 44 45 46 47 48 49 50 51 52 53 54 55 56 57 58 59 60 61 Scratch Up Scratch Down Sticks01 Click Metronome01 Metronome02 Kick36 Kick02 Rimshot12 Snare078 Clap03 Snare091 Tom07 Stick12 Tom08 Close09 Tom09 Open03 Tom10 Tom11 Crash02 Tom12 Ride01 Crash03 Ridebell01 Tambourine01 Crash04 Cowbell01 Crash05 Vibraslap Ride02 Bongo_Hi Bongo_Low Rap 14 15 16 17 18 19 20 21 22 23 24 25 26 27 28 29 30 31 32 33 34 35 36 37 38 39 40 41 42 43 44 45 Snare001 Roll01 Roll02 Snare002 Snare003 Snare004 Snare005 Snare006 Tom Flam01 Tom Flam02 Crash01 Snare007 Fingsnap 01 Slap Snare008 Scratch Up Scratch Down Sticks01 Click Metronome01 Metronome02 Kick34 Kick23 Rimshot15 Snare077 Clap02 Snare074 Tom07 Stick08 Tom08 Stick16 Tom09 77 78 79 80 81 82 83 84 85 86 87 88 89 90 91 92 93 94 95 96 97 98 99 100 101 102 103 104 105 106 107 108 109 W_Block_Lo Cuica01 Cuica02 Triangle01 Triangle02 Shaker01 Shaker02 Sticks02 Clap01 Tambourine1 Rimshot02 Snare011 Snare012 Snare013 Stick02 Open04 Open02 Close02 Reverse Applause Belltree Empty Empty Empty Empty Empty Empty Empty Empty Empty Empty Empty Empty Program Change 59 62 Conga Slap 63 Conga_Hi 64 Conga_Low 65 Timbales_Hi 66 Timbales_Lo 67 Agogo_Hi 68 Agogo_Low 69 Cabasa 70 Maracas01 71 Whistle01 72 Whistle02 73 Guiro01 74 Guiro02 75 Claves01 76 W_Block_Hi 77 W_Block_Lo 78 Cuica01 79 Cuica02 80 Triangle01 81 Triangle02 82 Shaker01 83 Shaker02 84 Sticks02 85 Clap03 86 Tambourine1 87 Rimshot12 88 Snare039 89 Snare071 90 Snare041 91 Middle08 92 Stick07 93 Stick18 46 47 48 49 50 51 52 53 54 55 56 57 58 59 60 61 Middle05 Tom10 Tom11 Crash02 Tom12 Ride01 Crash03 Ridebell01 Tambourine01 Crash04 Cowbell01 Crash05 Vibraslap Ride03 Bongo_Hi Bongo_Low Hip Box 14 15 16 17 18 19 20 21 22 23 24 25 26 27 28 29 30 31 32 33 34 35 36 37 38 39 40 41 42 43 44 45 46 47 48 49 50 51 52 53 54 55 56 57 58 59 60 61 Snare001 Roll01 Roll02 Snare002 Snare003 Snare004 Snare005 Snare006 Tom Flam01 Tom Flam02 Crash01 Snare007 Fingsnap 01 Slap Snare008 Scratch Up Scratch Down Sticks01 Click Metronome01 Metronome02 Kick27 Kick15 Rimshot11 Snare076 Clap01 Snare077 Tom07 Stick06 Tom08 Stick18 Tom09 Middle01 Tom10 Tom11 Crash02 Tom12 Ride01 Crash13 Ridebell01 Tambourine01 Crash04 Cowbell01 Crash05 Vibraslap Ride03 Bongo_Hi Bongo_Low 94 95 96 97 98 99 100 101 102 103 104 105 106 107 108 109 Middle06 Reverse Applause Belltree Empty Empty Empty Empty Empty Empty Empty Empty Empty Empty Empty Empty Program Change 60 62 Conga Slap 63 Conga_Hi 64 Conga_Low 65 Timbales_Hi 66 Timbales_Lo 67 Agogo_Hi 68 Agogo_Low 69 Cabasa 70 Maracas01 71 Whistle01 72 Whistle02 73 Guiro01 74 Guiro02 75 Claves01 76 W_Block_Hi 77 W_Block_Lo 78 Cuica01 79 Cuica02 80 Triangle01 81 Triangle02 82 Shaker01 83 Shaker02 84 Sticks02 85 Clap02 86 Tambourine1 87 Rimshot20 88 Snare087 89 Snare045 90 Snare061 91 Kick22 92 Kick02 93 Stick10 94 Stick18 95 Reverse 96 Applause 97 Belltree 98 Empty 99 Empty 100 Empty 101 Empty 102 Empty 103 Empty 104 Empty 105 Empty 106 Empty 107 Empty 108 Empty 109 Empty KETRON • AUDYA 171 Drum Set Modern 14 15 16 17 18 19 20 21 22 23 24 25 26 27 28 29 30 31 32 33 34 35 36 37 38 39 40 41 42 43 44 45 46 47 48 49 50 51 52 53 54 55 56 57 58 59 60 61 Snare001 Roll01 Roll02 Snare002 Snare003 Snare004 Snare005 Snare006 Tom Flam01 Tom Flam02 Crash10 Snare055 Fingsnap03 Slap Snare008 Scratch Up Scratch Down Sticks01 Click Metronome01 Metronome02 Kick50 Kick11 Rimshot22 Snare050 Clap03 Snare090 Tom38 Stick02 Tom41 Close01 Tom40 Open01 Tom40 Tom39 Crash10 Tom39 Ride04 Crash02 Ridebell03 Tambourine01 Crash10 Cowbell01 Crash10 Vibraslap Ride03 Bongo_Hi Bongo_Low Custom 14 15 16 17 18 19 20 21 22 23 24 25 26 27 28 Snare001 Roll01 Roll02 Snare002 Snare003 Snare004 Snare005 Snare006 Tom Flam01 Tom Flam02 Crash01 Snare007 Fingsnap 01 Slap Snare008 172 KETRON • AUDYA Program Change 62 62 Conga Slap 63 Conga_Hi 64 Conga_Low 65 Timbales_Hi 66 Timbales_Lo 67 Agogo_Hi 68 Agogo_Low 69 Cabasa 70 Maracas01 71 Whistle01 72 Whistle02 73 Guiro01 74 Guiro02 75 Claves01 76 W_Block_Hi 77 W_Block_Lo 78 Cuica01 79 Cuica02 80 Triangle01 81 Triangle02 82 Shaker01 83 Shaker02 84 Sticks02 85 Castagnet 86 Tambourine01 87 Rimshot02 88 Snare066 89 Snare067 90 Snare088 91 Middle01 92 Stick02 93 Close02 94 Open02 95 Reverse 96 Applause 97 Belltree 98 Empty 99 Empty 100 Empty 101 Empty 102 Empty 103 Empty 104 Empty 105 Empty 106 Empty 107 Empty 108 Empty 109 Empty Program Change 65 62 Conga Slap 63 Conga_Hi 64 Conga_Low 65 Timbales_Hi 66 Timbales_Lo 67 Agogo_Hi 68 Agogo_Low 69 Cabasa 70 Maracas01 71 Whistle01 72 Whistle02 73 Guiro01 74 Guiro02 75 Claves02 76 Wood_Hi 29 30 31 32 33 34 35 36 37 38 39 40 41 42 43 44 45 46 47 48 49 50 51 52 53 54 55 56 57 58 59 60 61 Scratch Up Scratch Down Sticks01 Click Metronome01 Metronome02 Kick03 Kick02 Rimshot02 Snare081 Clap02 Snare017 Tom01 Stick01 Tom02 Close01 Tom03 Open01 Tom04 Tom05 Crash02 Tom06 Ride01 Crash03 Ridebell01 Tambourine01 Crash04 Cowbell01 Crash05 Vibraslap Ride03 Bongo_Hi Bongo_Low Latin 14 15 16 17 18 19 20 21 22 23 24 25 26 27 28 29 30 31 32 33 34 35 36 37 38 39 40 41 42 43 44 45 46 Snare001 Roll01 Roll02 Snare002 Snare003 Snare004 Snare005 Snare006 Tom Flam01 Tom Flam02 Crash01 Snare007 Maracas02 Tom42 Pandero01 Pandero02 Pandero03 Kick40 Kick39 Tom19 Metronome02 Kick32 Kick04 Rimshot11 Snare009 Clap01 Snare011 Tom07 Stick02 Tom08 Close01 Tom09 Open01 77 78 79 80 81 82 83 84 85 86 87 88 89 90 91 92 93 94 95 96 97 98 99 100 101 102 103 104 105 106 107 108 109 Wood Cuica01 Cuica02 Triangle01 Triangle02 Shaker03 Shaker04 Sticks02 Clap01 Tambourine1 Rimshot11 Snare010 Snare013 Snare028 Stick05 Stick02 Close02 Open01 Cowbell02 Applause Belltree Empty Empty Empty Empty Empty Empty Empty Empty Empty Empty Empty Empty Program Change 66 62 Conga Slap 63 Conga_Hi 64 Conga_Low 65 Timbales_Hi 66 Timbales_Lo 67 Agogo_Hi 68 Agogo_Low 69 Cabasa 70 Maracas03 71 Whistle01 72 Whistle02 73 Guiro01 74 Guiro02 75 Claves01 76 W_Block_Hi 77 W_Block_Lo 78 Cuica01 79 Cuica02 80 Triangle01 81 Triangle02 82 Shaker01 83 Shaker02 84 Sticks02 85 Castagnet 86 Tambourine1 87 Rimshot03 88 Snare009 89 Snare012 90 Snare028 91 Guira01 92 Guira02 93 Tambora01 94 Tambora02 Drum Set 47 48 49 50 51 52 53 54 55 56 57 58 59 60 61 Tom10 Tom11 Crash02 Tom12 Ride03 Crash03 Ridebell01 Tambourine01 Crash04 Cowbell01 Crash05 Vibraslap Ride01 Bongo_Hi Bongo_Low Pop Jazz 14 15 16 17 18 19 20 21 22 23 24 25 26 27 28 29 30 31 32 33 34 35 36 37 38 39 40 41 42 43 44 45 46 47 48 49 50 51 52 53 54 55 56 57 58 59 Snare001 Roll01 Roll02 Snare002 Snare003 Snare004 Snare005 Snare006 Tom Flam01 Tom Flam02 Crash01 Snare007 Fingsnap 01 Slap Snare008 Scratch Up Scratch Down Sticks01 Click Metronome01 Metronome02 Kick02 Kick16 Rimshot09 Snare021 Clap01 Snare028 Tom01 Stick04 Tom02 Close02 Tom03 Open02 Tom04 Tom05 Crash02 Tom06 Ride03 Crash03 Ridebell01 Tambourine01 Crash04 Cowbell01 Crash05 Vibraslap Ride02 95 96 97 98 99 100 101 102 103 104 105 106 107 108 109 Tambora03 Applause Cowbell03 Empty Empty Clap07 Clap08 Empty Empty Empty Empty Empty Empty Empty Empty Program Change 73 62 Conga Slap 63 Conga_Hi 64 Conga_Low 65 Timbales_Hi 66 Timbales_Lo 67 Agogo_Hi 68 Agogo_Low 69 Cabasa 70 Maracas01 71 Whistle01 72 Whistle02 73 Guiro01 74 Guiro02 75 Claves01 76 W_Block_Hi 77 W_Block_Lo 78 Cuica01 79 Cuica02 80 Triangle01 81 Triangle02 82 Shaker01 83 Shaker02 84 Sticks02 85 Castagnet 86 Tambourine01 87 Rimshot18 88 Snare012 89 Snare016 90 Snare013 91 Close06 92 Stick02 93 Close01 94 Open02 95 Reverse 96 Applause 97 Belltree 98 Empty 99 Empty 100 Empty 101 Empty 102 Empty 103 Empty 104 Empty 105 Empty 106 Empty 107 Empty 60 Bongo_Hi 61 Bongo_Low Street 14 15 16 17 18 19 20 21 22 23 24 25 26 27 28 29 30 31 32 33 34 35 36 37 38 39 40 41 42 43 44 45 46 47 48 49 50 51 52 53 54 55 56 57 58 59 60 61 Snare001 Roll01 Roll02 Snare002 Snare003 Snare004 Snare005 Snare006 Tom Flam01 Tom Flam02 Crash01 Snare007 Fingsnap 01 Slap Snare008 Scratch Up Scratch Down Sticks01 Click Metronome01 Metronome02 Kick24 Kick25 Rimshot14 Snare041 Clap05 Snare042 Tom07 Close11 Tom08 Close10 Tom09 Open08 Tom10 Tom11 Crash02 Tom12 Ride01 Crash03 Ridebell01 Tambourine01 Crash04 Cowbell01 Crash05 Vibraslap Ride02 Bongo_Hi Bongo_Low Analog 14 15 16 17 18 19 20 Snare001 Roll01 Roll02 Snare002 Snare003 Snare004 Snare005 108 Empty 109 Empty Program Change 74 62 Conga Slap 63 Conga_Hi 64 Conga_Low 65 Timbales_Hi 66 Timbales_Lo 67 Agogo_Hi 68 Agogo_Low 69 Cabasa 70 Maracas01 71 Whistle01 72 Whistle02 73 Guiro01 74 Guiro02 75 Claves01 76 W_Block_Hi 77 W_Block_Lo 78 Cuica01 79 Cuica02 80 Triangle01 81 Triangle02 82 Shaker01 83 Shaker02 84 Sticks02 85 Clap04 86 Tambourine1 87 Rimshot12 88 Snare039 89 Snare030 90 Kick42 91 Kick17 92 Kick18 93 Stick25 94 Middle03 95 Reverse 96 Applause 97 Belltree 98 Empty 99 Empty 100 Empty 101 Empty 102 Empty 103 Empty 104 Empty 105 Empty 106 Empty 107 Empty 108 Empty 109 Empty Program Change 75 62 Conga Slap 63 Conga_Hi 64 Conga_Low 65 Timbales_Hi 66 Timbales_Lo 67 Agogo_Hi 68 Agogo_Low KETRON • AUDYA 173 Drum Set 21 22 23 24 25 26 27 28 29 30 31 32 33 34 35 36 37 38 39 40 41 42 43 44 45 46 47 48 49 50 51 52 53 54 55 56 57 58 59 60 61 Snare006 Tom Flam01 Tom Flam02 Crash01 Snare007 Fingsnap 01 Slap Snare008 Scratch Up Scratch Down Sticks01 Click Metronome01 Metronome02 Kick23 Kick24 Rimshot20 Snare087 Clap01 Snare037 Tom01 Stick16 Tom02 Stick11 Tom03 Open06 Tom04 Tom05 Crash02 Tom06 Open06 Crash03 Ridebell01 Tambourine01 Crash04 Cowbell01 Crash05 Vibraslap Ride03 Bongo_Hi Bongo_Low Citypop 14 15 16 17 18 19 20 21 22 23 24 25 26 27 28 29 30 31 Snare001 Roll01 Roll02 Snare002 Snare003 Snare004 Snare005 Snare006 Tom Flam01 Tom Flam02 Crash01 Snare007 Fingsnap 01 Slap Snare008 Scratch Up Scratch Down Sticks01 174 KETRON • AUDYA 69 70 71 72 73 74 75 76 77 78 79 80 81 82 83 84 85 86 87 88 89 90 91 92 93 94 95 96 97 98 99 100 101 102 103 104 105 106 107 108 109 Cabasa Maracas01 Whistle01 Whistle02 Guiro01 Guiro02 Claves01 W_Block_Hi W_Block_Lo Cuica01 Cuica02 Triangle01 Triangle02 Shaker01 Shaker02 Sticks02 Clap01 Tambourine1 Rimshot01 Snare059 Snare074 Snare034 Kick17 Kick15 Middle05 Stick13 Reverse Applause Belltree Empty Empty Empty Empty Empty Empty Empty Empty Empty Empty Empty Empty Program Change 76 62 Conga Slap 63 Conga_Hi 64 Conga_Low 65 Timbales_Hi 66 Timbales_Lo 67 Agogo_Hi 68 Agogo_Low 69 Cabasa 70 Maracas01 71 Whistle01 72 Whistle02 73 Guiro01 74 Guiro02 75 Claves01 76 W_Block_Hi 77 W_Block_Lo 78 Cuica01 79 Cuica02 32 33 34 35 36 37 38 39 40 41 42 43 44 45 46 47 48 49 50 51 52 53 54 55 56 57 58 59 60 61 Click Metronome01 Metronome02 Kick02 Kick35 Rimshot25 Snare019 Clap03 Snare062 Tom07 Stick12 Tom08 Close06 Tom09 Open04 Tom10 Tom11 Crash02 Tom12 Ride01 Crash03 Ridebell01 Tambourine01 Crash04 Cowbell01 Crash05 Vibraslap Ride02 Bongo_Hi Bongo_Low Smooth 14 15 16 17 18 19 20 21 22 23 24 25 26 27 28 29 30 31 32 33 34 35 36 37 38 39 40 41 42 Snare001 Roll01 Roll02 Snare002 Snare003 Snare004 Snare005 Snare006 Tom Flam01 Tom Flam02 Crash01 Snare007 Fingsnap 01 Slap Snare008 Scratch Up Scratch Down Sticks01 Click Metronome01 Metronome02 Kick35 Kick32 Rimshot16 Snare083 Clap06 Snare081 Tom07 Stick13 80 81 82 83 84 85 86 87 88 89 90 91 92 93 94 95 96 97 98 99 100 101 102 103 104 105 106 107 108 109 Triangle01 Triangle02 Shaker01 Shaker02 Sticks02 Clap03 Tambourine01 Rimshot08 Snare034 Snare077 Kick08 Kick13 Kick10 Stick07 Middle06 Reverse Applause Belltree Empty Empty Empty Empty Empty Empty Empty Empty Empty Empty Empty Empty Program Change 77 62 Conga Slap 63 Conga_Hi 64 Conga_Low 65 Timbales_Hi 66 Timbales_Lo 67 Agogo_Hi 68 Agogo_Low 69 Cabasa 70 Maracas01 71 Whistle01 72 Whistle02 73 Guiro01 74 Guiro02 75 Claves01 76 W_Block_Hi 77 W_Block_Lo 78 Cuica01 79 Cuica02 80 Triangle01 81 Triangle02 82 Shaker01 83 Shaker02 84 Sticks02 85 Clap02 86 Tambourine01 87 Rimshot12 88 Snare077 89 Snare060 90 Snare061 Drum Set 43 44 45 46 47 48 49 50 51 52 53 54 55 56 57 58 59 60 61 Tom08 Close01 Tom09 Open01 Tom10 Tom11 Crash02 Tom12 Ride01 Crash03 Ridebell01 Tambourine01 Crash04 Cowbell01 Crash05 Vibraslap Ride03 Bongo_Hi Bongo_Low Acid 14 15 16 17 18 19 20 21 22 23 24 25 26 27 28 29 30 31 32 33 34 35 36 37 38 39 40 41 42 43 44 45 46 47 48 49 50 51 52 53 Snare001 Roll01 Roll02 Snare002 Snare003 Snare004 Snare005 Snare006 Tom Flam01 Tom Flam02 Crash01 Snare007 Fingsnap 01 Slap Snare008 Scratch Up Scratch Down Sticks01 Click Metronome01 Metronome02 Kick25 Kick27 Rimshot05 Snare059 Clap07 Snare077 Tom38 Stick26 Tom41 Close13 Tom40 Open05 Tom40 Tom39 Crash02 Tom39 Ride01 Crash03 Ridebell01 91 92 93 94 95 96 97 98 99 100 101 102 103 104 105 106 107 108 109 Kick11 Kick09 Middle06 Stick08 Reverse Applause Belltree Empty Empty Empty Empty Empty Empty Empty Empty Empty Empty Empty Empty Program Change 78 62 Conga Slap 63 Conga_Hi 64 Conga_Low 65 Timbales_Hi 66 Timbales_Lo 67 Agogo_Hi 68 Agogo_Low 69 Cabasa 70 Maracas01 71 Whistle01 72 Whistle02 73 Guiro01 74 Guiro02 75 Claves01 76 W_Block_Hi 77 W_Block_Lo 78 Cuica01 79 Cuica02 80 Triangle01 81 Triangle02 82 Shaker01 83 Shaker02 84 Sticks02 85 Clap01 86 Tambourine1 87 Rimshot03 88 Snare059 89 Snare041 90 Snare034 91 Kick17 92 Kick15 93 Middle05 94 Close04 95 Reverse 96 Applause 97 Belltree 98 Empty 99 Empty 100 Empty 101 Empty 54 55 56 57 58 59 60 61 Tambourine01 Crash04 Cowbell01 Crash05 Vibraslap Ride03 Bongo_Hi Bongo_Low Kick&Snare 14 15 16 17 18 19 20 21 22 23 24 25 26 27 28 29 30 31 32 33 34 35 36 37 38 39 40 41 42 43 44 45 46 47 48 49 50 51 52 53 54 55 56 57 58 59 60 61 Empty Empty Empty Empty Empty Empty Empty Empty Empty Empty Empty Empty Empty Empty Empty Empty Empty Empty Empty Empty Empty Empty Empty Kick02 Kick03 Kick04 Kick05 Kick06 Kick07 Kick19 Kick12 Kick13 Kick08 Kick14 Kick15 Kick17 Kick29 Kick28 Kick30 Kick31 Kick35 Kick16 Kick32 Kick01 Kick25 Kick09 Kick51 Kick36 Jazz Brush 14 15 16 17 18 19 Snare001 Roll01 Roll02 Snare002 Snare003 Snare004 102 103 104 105 106 107 108 109 Empty Empty Empty Empty Empty Empty Empty Empty Program Change 79 62 Kick42 63 Kick22 64 Kick34 65 Kick38 66 Kick27 67 Kick43 68 Snare009 69 Snare010 70 Snare014 71 Snare012 72 Snare013 73 Snare016 74 Snare017 75 Snare077 76 Snare034 77 Snare033 78 Snare056 79 Snare023 80 Snare024 81 Snare032 82 Snare029 83 Snare030 84 Snare070 85 Snare071 86 Snare035 87 Snare058 88 Snare031 89 Snare021 90 Snare060 91 Snare074 92 Snare037 93 Snare36 94 Snare38 95 Snare022 96 Snare011 97 Snare039 98 Snare040 99 Snare059 100 Snare061 101 Snare076 102 Snare019 103 Snare041 104 Snare020 105 Snare042 106 Snare045 107 Snare069 108 Empty 109 Empty Program Change 80 62 Conga Slap 63 Conga_Hi 64 Conga_Low 65 Timbales_Hi 66 Timbales_Lo 67 Agogo_Hi KETRON • AUDYA 175 Drum Set 20 21 22 23 24 25 26 27 28 29 30 31 32 33 34 35 36 37 38 39 40 41 42 43 44 45 46 47 48 49 50 51 52 53 54 55 56 57 58 59 60 61 Snare005 Snare006 Tom Flam01 Tom Flam02 Crash01 Snare007 Fingsnap 01 Slap Snare008 Scratch Up Scratch Down Sticks01 Click Metronome01 Metronome02 Kick06 Kick13 Rimshot02 Snare043 Snare024 Snare025 Tom13 Stick02 Tom14 Close01 Tom15 Open01 Tom16 Tom17 Crash02 Tom18 Ride03 Crash03 Ridebell01 Tambourine01 Crash04 Cowbell01 Crash05 Vibraslap Ride04 Bongo_Hi Bongo_Low Swing 14 15 16 17 18 19 20 21 22 23 24 25 26 27 28 29 30 31 32 33 34 Empty Roll01 Roll02 Snare002 Snare003 Snare004 Snare005 Snare006 Tom Flam01 Tom Flam02 Crash09 Snare065 Fingsnap 01 Slap Snare008 Scratch Up Scratch Down Sticks03 Click Metronome1 Metronome02 176 KETRON • AUDYA 68 69 70 71 72 73 74 75 76 77 78 79 80 81 82 83 84 85 86 87 88 89 90 91 92 93 94 95 96 97 98 99 100 101 102 103 104 105 106 107 108 109 Agogo_Low Cabasa Maracas01 Whistle01 Whistle02 Guiro01 Guiro02 Claves01 W_Block_Hi W_Block_Lo Cuica01 Cuica02 Triangle01 Triangle02 Shaker01 Shaker02 Sticks02 Castagnet Tambourine01 Rimshot05 Snare026 Snare043 Snare023 Middle04 Stick02 Close02 Open02 Reverse Applause Belltree Empty Empty Empty Empty Empty Empty Empty Empty Empty Empty Empty Empty Program Change 81 62 Conga Slap 63 Conga_Hi 64 Conga_Low 65 Timbales_Hi 66 Timbales_Lo 67 Agogo_Hi 68 Agogo_Low 69 Cabasa 70 Maracas01 71 Whistle01 72 Whistle02 73 Guiro01 74 Guiro02 75 Claves01 76 W_Block_Hi 77 W_Block_Lo 78 Cuica01 79 Cuica02 80 Triangle01 81 Triangle02 82 Shaker01 35 36 37 38 39 40 41 42 43 44 45 46 47 48 49 50 51 52 53 54 55 56 57 58 59 60 61 Kick37 Kick35 Rimshot10 Snare024 Snare023 Snare044 Tom37 Stick02 Tom36 Close01 Tom35 Open01 Tom34 Tom33 Crash08 Tom32 Ride03 Crash11 Ridebell02 Tambourine01 Splash01 Cowbell01 Crash06 Vibraslap Ride07 Bongo_Hi Bongo_Low Garage 14 15 16 17 18 19 20 21 22 23 24 25 26 27 28 29 30 31 32 33 34 35 36 37 38 39 40 41 42 43 44 45 Snare001 Roll01 Roll02 Snare002 Snare003 Snare004 Snare005 Snare006 Tom Flam01 Tom Flam02 Crash01 Snare007 Fingsnap 01 Slap Snare008 Scratch Up Scratch Down Sticks01 Click Metronome01 Metronome02 Kick18 Kick09 Rimshot17 Snare019 Clap01 Snare020 Tom01 Stick08 Tom02 Stick10 Tom03 83 84 85 86 87 88 89 90 91 92 93 94 95 96 97 98 99 100 101 102 103 104 105 106 107 108 109 Shaker02 Sticks02 Castagnet Tambourine01 Rimshot07 Snare016 Snare022 Snare026 Middle01 Stick17 Close02 Open01 Reverse Applause Belltree Empty Empty Empty Empty Empty Empty Empty Empty Empty Empty Empty Empty Program Change 82 62 Conga Slap 63 Conga_Hi 64 Conga_Low 65 Timbales_Hi 66 Timbales_Lo 67 Agogo_Hi 68 Agogo_Low 69 Cabasa 70 Maracas01 71 Whistle01 72 Whistle02 73 Guiro01 74 Guiro02 75 Claves01 76 W_Block_Hi 77 W_Block_Lo 78 Cuica01 79 Cuica02 80 Triangle01 81 Triangle02 82 Shaker01 83 Shaker02 84 Sticks02 85 Castagnet 86 Tambourine01 87 Rimshot02 88 Snare011 89 Snare012 90 Snare013 91 Middle01 92 Stick02 93 Close02 Drum Set 46 47 48 49 50 51 52 53 54 55 56 57 58 59 60 61 Open03 Tom04 Tom05 Crash02 Tom06 Ride01 Crash03 Ridebell01 Tambourine01 Crash04 Cowbell01 Crash05 Vibraslap Ride02 Bongo_Hi Bongo_Low U.S. Pop 14 15 16 17 18 19 20 21 22 23 24 25 26 27 28 29 30 31 32 33 34 35 36 37 38 39 40 41 42 43 44 45 46 47 48 49 50 51 52 53 54 55 56 57 58 Snare001 Roll01 Roll02 Snare002 Snare003 Snare004 Snare005 Snare006 Tom Flam01 Tom Flam02 Crash01 Snare007 Fingsnap 01 Slap Snare008 Scratch Up Scratch Down Stick05 Click Metronome01 Metronome02 Kick19 KIck01 Rimshot26 Snare079 Clap09 Snare091 Tom07 Stick04 Tom08 Middle04 Tom09 Open01 Tom10 Tom11 Crash02 Tom12 Ride01 Crash03 Ridebell01 Tambourine01 Crash04 Cowbell01 Crash05 Vibraslap 94 95 96 97 98 99 100 101 102 103 104 105 106 107 108 109 Open02 Reverse Applause Belltree Empty Empty Empty Empty Empty Empty Empty Empty Empty Empty Empty Empty Program Change 83 62 Conga Slap 63 Conga_Hi 64 Conga_Low 65 Timbales_Hi 66 Timbales_Lo 67 Agogo_Hi 68 Agogo_Low 69 Cabasa 70 Maracas01 71 Whistle01 72 Whistle02 73 Guiro01 74 Guiro02 75 Claves01 76 W_Block_Hi 77 W_Block_Lo 78 Cuica01 79 Cuica02 80 Triangle01 81 Triangle02 82 Shaker01 83 Shaker02 84 Sticks02 85 Clap04 86 Tambourine1 87 Rimshot12 88 Snare019 89 Snare020 90 Snare035 91 Kick03 92 Kick08 93 Stick02 94 Open02 95 Close01 96 Applause 97 Belltree 98 Clap07 99 Clap08 100 Empty 101 Empty 102 Empty 103 Empty 104 Empty 105 Empty 106 Empty 59 Ride02 60 Bongo_Hi 61 Bongo_Low Melorap 14 15 16 17 18 19 20 21 22 23 24 25 26 27 28 29 30 31 32 33 34 35 36 37 38 39 40 41 42 43 44 45 46 47 48 49 50 51 52 53 54 55 56 57 58 59 60 61 Snare001 Roll01 Roll02 Snare002 Snare003 Snare004 Snare005 Snare006 Tom Flam01 Tom Flam02 Crash01 Snare007 Fingsnap 01 Slap Snare008 Scratch Up Scratch Down Sticks01 Click Metronome01 Metronome02 KIck33 Kick26 Rimshot16 Snare040 Clap02 Snare029 Tom07 Stick07 Tom08 Stick08 Tom09 Middle06 Tom10 Tom11 Crash12 Tom12 Ride01 Crash03 Ridebell01 Tambourine01 Crash04 Cowbell01 Crash05 Vibraslap Ride03 Bongo_Hi Bongo_Low Grunge 14 15 16 17 18 19 20 21 Snare001 Roll01 Roll02 Snare002 Snare003 Snare004 Snare005 Snare006 107 Empty 108 Empty 109 Empty Program Change 84 62 Conga Slap 63 Conga_Hi 64 Conga_Low 65 Timbales_Hi 66 Timbales_Lo 67 Agogo_Hi 68 Agogo_Low 69 Cabasa 70 Maracas01 71 Whistle01 72 Whistle02 73 Guiro01 74 Guiro02 75 Claves01 76 W_Block_Hi 77 W_Block_Lo 78 Cuica01 79 Cuica02 80 Triangle01 81 Triangle02 82 Shaker01 83 Shaker02 84 Sticks02 85 Clap01 86 Tambourine1 87 Rimshot03 88 Snare042 89 Snare045 90 Snare046 91 Kick17 92 Kick15 93 Middle05 94 Close04 95 Reverse 96 Applause 97 Belltree 98 Empty 99 Empty 100 Empty 101 Empty 102 Empty 103 Empty 104 Empty 105 Empty 106 Empty 107 Empty 108 Empty 109 Empty Program Change 85 62 Conga Slap 63 Conga_Hi 64 Conga_Low 65 Timbales_Hi 66 Timbales_Lo 67 Agogo_Hi 68 Agogo_Low 69 Cabasa KETRON • AUDYA 177 Drum Set 22 23 24 25 26 27 28 29 30 31 32 33 34 35 36 37 38 39 40 41 42 43 44 45 46 47 48 49 50 51 52 53 54 55 56 57 58 59 60 61 Tom Flam01 Tom Flam02 Crash01 Snare007 Fingsnap 01 Slap Snare008 Scratch Up Scratch Down Stick07 Click Metronome01 Metronome02 Kick03 Kick16 Rimshot12 Snare095 Clap01 Snare096 Tom07 Stick02 Tom08 Close01 Tom09 Open01 Tom10 Tom11 Crash02 Tom12 Ride01 Crash03 Ridebell01 Tambourine01 Crash04 Cowbell01 Crash05 Vibraslap Ride03 Bongo_Hi Bongo_Low Contemporary 14 15 16 17 18 19 20 21 22 23 24 25 26 27 28 29 30 31 32 Snare001 Roll01 Roll02 Snare002 Snare003 Snare004 Snare005 Snare006 Tom Flam01 Tom Flam02 Crash01 Snare007 Fingsnap 01 Slap Snare008 Scratch Up Scratch Down Stick21 Click 178 KETRON • AUDYA 70 71 72 73 74 75 76 77 78 79 80 81 82 83 84 85 86 87 88 89 90 91 92 93 94 95 96 97 98 99 100 101 102 103 104 105 106 107 108 109 Maracas01 Whistle01 Whistle02 Guiro01 Guiro02 Claves01 W_Block_Hi W_Block_Lo Cuica01 Cuica02 Triangle01 Triangle02 Shaker01 Shaker02 Stick07 Clap02 Tambourine01 Rimshot01 Snare028 Snare009 Snare085 Kick02 Kick08 Stick02 Stick10 Reverse Applause Belltree Empty Empty Empty Empty Empty Empty Empty Empty Empty Empty Empty Empty Program Change 86 62 Conga Slap 63 Conga_Hi 64 Conga_Low 65 Timbales_Hi 66 Timbales_Lo 67 Agogo_Hi 68 Agogo_Low 69 Cabasa 70 Maracas01 71 Whistle01 72 Whistle02 73 Guiro01 74 Guiro02 75 Claves01 76 W_Block_Hi 77 W_Block_Lo 78 Cuica01 79 Cuica02 80 Triangle01 33 34 35 36 37 38 39 40 41 42 43 44 45 46 47 48 49 50 51 52 53 54 55 56 57 58 59 60 61 Metronome01 Metronome02 Kick21 KIck22 Rimshot16 Snare087 Clap01 Snare033 Tom01 Stick27 Tom02 Close14 Tom03 Open05 Tom04 Tom05 Crash02 Tom06 Ride01 Crash03 Ridebell01 Tambourine01 Crash04 Cowbell01 Crash05 Vibraslap Ride03 Bongo_Hi Bongo_Low Urban 14 15 16 17 18 19 20 21 22 23 24 25 26 27 28 29 30 31 32 33 34 35 36 37 38 39 40 41 42 43 44 45 Snare001 Roll01 Roll02 Snare002 Snare003 Snare004 Snare005 Snare006 Tom Flam01 Tom Flam02 Crash01 Snare007 Fingsnap 01 Slap Snare008 Scratch Up Scratch Down Sticks01 Click Metronome01 Metronome02 Kick14 Kick45 Rimshot06 Snare039 Clap01 Snare030 Tom38 Stick24 Tom41 Stick22 Tom40 81 82 83 84 85 86 87 88 89 90 91 92 93 94 95 96 97 98 99 100 101 102 103 104 105 106 107 108 109 Triangle02 Shaker01 Shaker02 Stick21 Clap09 Tambourine1 Rimshot05 Snare039 Snare040 Snare041 Kick17 Kick15 Middle08 Stick13 Reverse Applause Belltree Empty Empty Empty Empty Empty Empty Empty Empty Empty Empty Empty Empty Program Change 87 62 Conga Slap 63 Conga_Hi 64 Conga_Low 65 Timbales_Hi 66 Timbales_Lo 67 Agogo_Hi 68 Agogo_Low 69 Cabasa 70 Maracas01 71 Whistle01 72 Whistle02 73 Guiro01 74 Guiro02 75 Claves01 76 W_Block_Hi 77 W_Block_Lo 78 Cuica01 79 Cuica02 80 Triangle01 81 Triangle02 82 Shaker01 83 Shaker02 84 Sticks02 85 Castagnet 86 Tambourine01 87 Rimshot12 88 Snare046 89 Snare058 90 Snare059 91 Stick07 92 Stick11 93 Stick18 Drum Set 46 47 48 49 50 51 52 53 54 55 56 57 58 59 60 61 Open05 Tom40 Tom39 Crash02 Tom39 Ride02 Crash03 Ridebell01 Tambourine01 Crash04 Cowbell01 Crash05 Vibraslap Ride03 Bongo_Hi Bongo_Low Electro 14 15 16 17 18 19 20 21 22 23 24 25 26 27 28 29 30 31 32 33 34 35 36 37 38 39 40 41 42 43 44 45 46 47 48 49 50 51 52 53 54 55 56 57 58 59 Snare001 Roll01 Roll02 Snare002 Snare003 Snare004 Snare005 Snare006 Tom Flam01 Tom Flam02 Crash01 Snare007 Fingsnap 01 Slap Snare008 Scratch Up Scratch Down Sticks01 Click Metronome01 Metronome02 Kick48 Kick15 Rimshot01 Snare030 Clap02 Snare061 Tom01 Close04 Tom02 Middle05 Tom03 Open02 Tom04 Tom05 Crash02 Tom06 Ride01 Crash03 Ridebell01 Tambourine01 Crash04 Cowbell01 Crash05 Vibraslap Ride03 94 95 96 97 98 99 100 101 102 103 104 105 106 107 108 109 Close01 Reverse Applause Belltree Empty Empty Empty Empty Empty Empty Empty Empty Empty Empty Empty Empty Program Change 88 62 Conga Slap 63 Conga_Hi 64 Conga_Low 65 Timbales_Hi 66 Timbales_Lo 67 Agogo_Hi 68 Agogo_Low 69 Cabasa 70 Maracas01 71 Whistle01 72 Whistle02 73 Guiro01 74 Guiro02 75 Claves01 76 W_Block_Hi 77 W_Block_Lo 78 Cuica01 79 Cuica02 80 Triangle01 81 Triangle02 82 Shaker01 83 Shaker02 84 Sticks02 85 Clap01 86 Tambourine1 87 Rimshot05 88 Snare045 89 Snare042 90 Snare074 91 Stick07 92 Close05 93 Close03 94 Middle05 95 Middle05 96 Applause 97 Belltree 98 Kick17 99 Empty 100 Empty 101 Empty 102 Empty 103 Empty 104 Empty 105 Empty 106 Empty 107 Empty 60 Bongo_Hi 61 Bongo_Low Country 14 15 16 17 18 19 20 21 22 23 24 25 26 27 28 29 30 31 32 33 34 35 36 37 38 39 40 41 42 43 44 45 46 47 48 49 50 51 52 53 54 55 56 57 58 59 60 61 Snare001 Roll01 Roll02 Snare002 Snare003 Snare004 Snare005 Snare006 Tom Flam01 Tom Flam02 Crash01 Snare007 Fingsnap 01 Slap Snare008 Scratch Up Scratch Down Sticks01 Click Metronome01 Metronome02 Kick16 Kick06 Rimshot01 Snare014 Clap01 Snare012 Tom07 Stick01 Tom08 Close01 Tom09 Open01 Tom10 Tom11 Crash02 Tom12 Ride01 Crash03 Ridebell01 Tambourine01 Crash04 Cowbell01 Crash05 Vibraslap Ride03 Bongo_Hi Bongo_Low R&B 14 15 16 17 18 19 20 Snare001 Roll01 Roll02 Snare002 Snare003 Snare004 Snare005 108 Empty 109 Empty Program Change 89 62 Conga Slap 63 Conga_Hi 64 Conga_Low 65 Timbales_Hi 66 Timbales_Lo 67 Agogo_Hi 68 Agogo_Low 69 Cabasa 70 Maracas01 71 Whistle01 72 Whistle02 73 Guiro01 74 Guiro02 75 Claves01 76 W_Block_Hi 77 W_Block_Lo 78 Cuica01 79 Cuica02 80 Triangle01 81 Triangle02 82 Shaker01 83 Shaker02 84 Sticks02 85 Clap02 86 Tambourine01 87 Rimshot03 88 Snare013 89 Snare011 90 Snare009 91 Stick05 92 Stick02 93 Close06 94 Open01 95 Reverse 96 Applause 97 Belltree 98 Empty 99 Empty 100 Empty 101 Empty 102 Empty 103 Empty 104 Empty 105 Empty 106 Empty 107 Empty 108 Empty 109 Empty Program Change 90 62 Conga Slap 63 Conga_Hi 64 Conga_Low 65 Timbales_Hi 66 Timbales_Lo 67 Agogo_Hi 68 Agogo_Low KETRON • AUDYA 179 Drum Set 21 22 23 24 25 26 27 28 29 30 31 32 33 34 35 36 37 38 39 40 41 42 43 44 45 46 47 48 49 50 51 52 53 54 55 56 57 58 59 60 61 Snare006 Tom Flam01 Tom Flam02 Crash01 Snare007 Fingsnap 01 Slap Snare008 Scratch Up Scratch Down Sticks01 Click Metronome01 Metronome02 Kick15 Kick17 Rimshot19 Snare074 Clap03 Snare076 Tom38 Stick07 Tom41 Stick08 Tom40 Middle08 Tom40 Tom39 Crash02 Tom39 Ride03 Crash03 Ridebell01 Tambourine01 Crash04 Cowbell01 Crash05 Vibraslap Ride01 Bongo_Hi Bongo_Low Pop Super Kit 14 15 16 17 18 19 20 21 22 23 24 25 26 27 28 29 30 31 Empty Empty Empty Empty Empty Empty Empty Empty Empty Empty Empty Empty Empty Empty Kick54 Roll03 Kick53 Roll04 180 KETRON • AUDYA 69 70 71 72 73 74 75 76 77 78 79 80 81 82 83 84 85 86 87 88 89 90 91 92 93 94 95 96 97 98 99 100 101 102 103 104 105 106 107 108 109 Cabasa Maracas01 Whistle01 Whistle02 Guiro01 Guiro02 Claves01 W_Block_Hi W_Block_Lo Cuica01 Cuica02 Triangle01 Triangle02 Shaker01 Shaker02 Sticks02 Clap04 Tambourine1 Rimshot01 Snare016 Snare034 Snare036 Stick08 Stick11 Middle01 Stick06 Middle06 Applause Belltree Empty Empty Empty Empty Empty Empty Empty Empty Empty Empty Empty Empty Program Change 91 62 Whistle01 63 Whistle02 64 Guiro01 65 Guiro02 66 Open07 67 Claves01 68 Open07 69 Tambourine01 70 Close07 71 Clap04 72 Clap02 73 Clap03 74 Clap01 75 Fingsnap02 76 Fingsnap01 77 Tambora01 78 Tambora02 79 Empty 32 33 34 35 36 37 38 39 40 41 42 43 44 45 46 47 48 49 50 51 52 53 54 55 56 57 58 59 60 61 Snare063 Roll05 Snare057 Kick52 Kick54 Rimshot22 Snare055 Snare050 Snare054 Tom38 Stick14 Tom41 Stick03 Tom40 Open07 Tom40 Tom39 Crash10 Tom39 Ride04 Crash02 Ridebell03 Middle09 Crash10 Middle02 Crash10 Open07 Ride03 Maracas01 Maracas02 Funk Super Kit 14 15 16 17 18 19 20 21 22 23 24 25 26 27 28 29 30 31 32 33 34 35 36 37 38 39 40 41 42 Empty Empty Empty Empty Empty Empty Empty Empty Empty Empty Empty Empty Empty Empty Kick54 Roll03 Kick53 Roll04 Snare075 Roll05 Snare073 Kick52 Kick53 Rimshot21 Snare072 Snare068 Snare064 Tom38 Stick14 80 81 82 83 84 85 86 87 88 89 90 91 92 93 94 95 96 97 98 99 100 101 102 103 104 105 106 107 108 109 Empty Empty Empty Empty Empty Empty Empty Empty Empty Empty Empty Empty Empty Empty Empty Empty Empty Empty Empty Empty Empty Empty Empty Empty Empty Empty Empty Empty Empty Empty Program Change 92 62 Whistle01 63 Whistle02 64 Guiro01 65 Guiro02 66 Open07 67 Claves01 68 Open07 69 Tambourine01 70 Close07 71 Clap04 72 Clap02 73 Clap03 74 Clap01 75 Fingsnap02 76 Fingsnap01 77 Tambora01 78 Tambora03 79 Empty 80 Empty 81 Empty 82 Empty 83 Empty 84 Empty 85 Empty 86 Empty 87 Empty 88 Empty 89 Empty 90 Empty Drum Set 43 44 45 46 47 48 49 50 51 52 53 54 55 56 57 58 59 60 61 Tom41 Stick03 Tom40 Open07 Tom40 Tom39 Crash10 Tom39 Ride04 Crash02 Ridebell03 Middle09 Crash10 Middle02 Crash10 Open07 Ride03 Maracas01 Maracas02 Power_S.Kit 14 15 16 17 18 19 20 21 22 23 24 25 26 27 28 29 30 31 32 33 34 35 36 37 38 39 40 41 42 43 44 45 46 47 48 49 50 51 52 53 Empty Empty Empty Empty Empty Empty Empty Empty Empty Empty Empty Empty Snare052 Snare051 Kick52 Roll03 Kick53 Roll04 Snare053 Roll05 Snare066 Kick54 Kick52 Rimshot21 Snare067 Snare088 Snare089 Tom01 Stick14 Tom02 Stick03 Tom03 Open07 Tom04 Tom05 Crash10 Tom06 Ride04 Crash02 Ridebell03 91 92 93 94 95 96 97 98 99 100 101 102 103 104 105 106 107 108 109 Empty Empty Empty Empty Empty Empty Empty Empty Empty Empty Empty Empty Empty Empty Empty Empty Empty Empty Empty Program Change 93 62 Whistle01 63 Whistle02 64 Guiro01 65 Guiro02 66 Open07 67 Claves01 68 Open07 69 Tambourine01 70 Close07 71 Clap04 72 Clap02 73 Clap03 74 Clap01 75 Fingsnap02 76 Fingsnap01 77 Tambora01 78 Tambora02 79 Tambora03 80 Empty 81 Empty 82 Empty 83 Empty 84 Empty 85 Empty 86 Empty 87 Empty 88 Empty 89 Empty 90 Empty 91 Empty 92 Empty 93 Empty 94 Empty 95 Empty 96 Empty 97 Empty 98 Empty 99 Empty 100 Empty 101 Empty 54 55 56 57 58 59 60 61 Middle09 Crash10 Middle02 Crash10 Open07 Ride03 Maracas01 Maracas02 Ms_100_Set 14 15 16 17 18 19 20 21 22 23 24 25 26 27 28 29 30 31 32 33 34 35 36 37 38 39 40 41 42 43 44 45 46 47 48 49 50 51 52 53 54 55 56 57 58 59 60 61 Snare001 Roll01 Roll02 Snare002 Snare003 Snare004 Snare005 Snare006 T_Flam01 T_Flam02 Crash01 Snare007 F_Snap01 Slap Snare008 Scratch_Up Scratch Down Sticks01 Click Metronome01 Metronome02 Kick50 Kick47 Rimshot23 Snare049 Clap01 Snare049 Tom01 Stick15 Tom02 Close01 Tom03 Close08 Tom04 Tom05 Crash02 Tom06 Ride02 Crash05 Ride06 Tambourine02 Crash04 Cowbell04 Crash03 Vibraslap Ride05 Bongo_Hi Bongo_Low 102 103 104 105 106 107 108 109 Empty Empty Empty Empty Empty Empty Empty Empty Program Change 13 62 Congaslap 63 Conga_Hi 64 Conga_Low 65 Timbales_Hi 66 Timbales_Lo 67 Agogo_Hi 68 Agogo_Low 69 Cabasa 70 Maracas01 71 Whistle01 72 Whistle02 73 Guiro01 74 Guiro02 75 Claves01 76 W_Block_Hi 77 W_Block_Lo 78 Cuica01 79 Cuica02 80 Triangle01 81 Triangle02 82 Shaker01 83 Shaker05 84 Sticks02 85 Castagnet 86 Tambourine03 87 Rimshot24 88 Snare047 89 Snare047 90 Snare048 91 Middle01 92 Stick02 93 Close02 94 Open02 95 Reverse 96 Applause 97 Belltree 98 Empty 99 Empty 100 Empty 101 Empty 102 Empty 103 Empty 104 Empty 105 Empty 106 Empty 107 Empty 108 Empty 109 Empty KETRON • AUDYA 181 Voice Preset Voice Preset PIANOS CONCERT_GRAND UPRIGHT_PIANO POP_GRAND HONKY_TONK LATIN_PIANO ROMANTIC_GRAND TINE_PIANO DYNAPIANO HARPSICHORD CLAVI RAGTIME ELECTROMIX PIANO&STRINGS OCTAPIANO JINGLE_PIANO FM&GRAND R&ROLL PIANO_PAD DIGIPIANO HOUSE EL_PIANOS STAGE_73 SUITECASE FM_PIANO1 80’S_MODULE CRISTAL_TX 88_PRO PHASER SWEET_MARK CLAVIMIX TREMOLO_MARK HIGH_TINES FM_PIANO2 ROTOR_E_PIANO ULTRAFUNK E_PIANO_PAD FM_LAYERED CHORUS_E_PIANO 3_OPERATOR VINTAGE DELAY_E_PIANO CHROM CELESTA GLOCKENSPIEL MUSIC_BOX VIBRAPHONE MARIMBA ORCHEST_BELL XYLOPHONE BELL KALIMBA STEEL_DRUM MARKTREE WINDCHIMES 182 KETRON • AUDYA WOODBLOCK SHORTY VIBE TINKLE GLOCKSTRINGS XYLOMARIMBA AIRBELL TUBULAR CARILLON ORGAN CLASSIC_B3 ROCK_ORGAN JAZZ_ORGAN GOSPEL ROTARY HAMM_ON THEATRE LEAKAGE 16’+1’ BLUES_ORGAN FOOTAGE LOWER 8’+4’ VALVE SPIRITUAL EVERGREEN POSITIVE PRINCIPALE+4’ CHURCH B3_VIBRATO 760_ROTOR JAZZ_B3 FULL_FAST DARK_B3 POP_ROCK DRY_ORGAN PIPE1 PIPE2 2ND_PERCUSSION HAPPY DAY TWIN FAST 16’ 8’ 51/3 TONEBARS JAZZY SPIN POP DRAWBARS ROCKER CHORUSED OVERDRIVE FULL_THEATRE FUZZ_ORGAN ACCORDION MUSETTE JAZZ_FISA TANGO PARISIENNE MASTER BLUES_HARP FISARMONICA ALPEN ITALIAN ORGANETTO CELESTE ACCORDION HARMONICA BASSOON CLASSIC TYROLER BANDONEON 8’ REED 16’+8’ ARGENTINIAN PIEMONTESE CASSOTTO FULL_FISA FRANCAISE WIDE_MUSETTE SMOOKEY_HARP FOLK_MASTER MANOUCHE DYNAFISA BELLOW GUITAR ACOUST_NYLON COUNTRY&SLIDE JAZZ_GUIT&SLIDE FOLK STRATO CARLOS DE LUXE SOLIDBODY 12_STRINGS DISTORTED CLEAN FINGERPICKING NYLON&SLIDE MEDIUM STEEL SHADOW POWER PEDAL STEEL SMOOTH_FOLK MUTED JAZZ_OCTAVE BACHATA_GUIT PHASE_GUIT ROCK_LEAD HUMBUCK BOTTLENECK MELLOW_STRAT WHA_LEAD ROCK_STRAT SWEET_NYLON POP_FUNK RAY_BLUES GUITAR BRAZILIAN BRONZE_COUNTRY JAZZ_GUITAR2 TELECAST CNTRY_FOLK POP_WHA AFTERFOLK METAL SOFT BLUES CLASSIC GUITAR_DUO FLAMENCO TREMOLOS BRIGHT_FOLK POP_LEAD STOPPED PUNK HOT_TUBE DARK_LEAD VINTAGE BASS ACOUSTIC FINGER POP FUNK FRETLESS PICKED SLAP RETRO PRECISION BASS&PIANO SYNBASS 1 SYNBASS 2 SYNBASS 3 SYNBASS 4 SYNBASS 5 HOUSE 1 HOUSE 2 SINUS BASS&GUIT OBERBASS STRINGS STRINGS_ ENSEMBLE PHILARMONIC VIOLIN CELLOS VELOSTRINGS OCTASTRING_1 SLOW STRINGS WIENER (otm) HARP PIZZICATO Voice Preset CAMERA DISCO_STRINGS BAROQUE OCTASTRING_3 VIOLA TZIVAGO SYMPHONY (otm) OPERA PRELUDE STACCATO CHOIR POP_AHH POP_OHH VOCALS DAH TOOH UHH CLASSIC CHOIR SYNVOICE TREBLE_VOICES DIGICHOIR HALOCHOIR DIGIVOICE SMOOTH AHH TUU_UAA CHOIRPAD CHURCH_VOCAL 1 CHURCH_VOCAL 2 SYNTHVOX 1 SYNTHVOX 2 SYNTHVOX 3 BRASS BRASS 1 BRASS 2 MEXICAN JAZZ_TROMBONE DIXIE ® MUTED_TPT SWING_TRUMPET OCTABRASS GOLDEN_TRUMPET FLUGHORN JAZZ_CORNET TROMBONES BRASS&FALL FRENCH_HORN MARIACHI BEBOP_MUTED SOFT_BRASS (otm) LATIN_BRASS ALPEN_DUO MEXICAN_DUET MELLOW_TPT GENTLE_HORNS BRIGHT&BRASS TIJUANA T_BONE_SECTION OCTABRASS 2 BAVARIAN_LIED GROWBRASS(otm) SMOOTH_SECTION DARK_TRUMPET SAX BLOWED_TENOR JAZZ_CONTRALTO SWEET_ALTO ROCK&GROWL CIRCUS_SAX ALTOSOFT CLARINET BARITON SOPRANO POP_ALTO WOODWINDS GRAFFIATO ® TENOR MILLER (otm) SAX&BRASS SAXBAND 1 SAXBAND 2 (otm) SAXBAND 3 SAXBAND 4 SAXBAND 5 FLUTE CLASSIC_FLUTE LATIN_FLUTE ANDES WHISTLE SHAKUASHI CHIFF PERUVIAN POP FLUTE OCARINA RECORDER BOTTLE ETHNIC PIPES PICCOLO FLUTE&STRING STEREO FLUTE VOICE FLUTE OCTAFLUTE FLUTE&JAZ_GUIT RAINDROPS PAD ACOUSTIC_DREAM MOVIES OBX SWEEP SPACE DIGIPAD NEW AGE 1 SYNSTRINGS BRIGHTPAD EXPLORER NYLON_PAD GLASSPAD SYBER NEW_ERA (morph) HALO (morph) BELL_PAD WARMNESS TINEPAD ANALOGS NEW AGE 2 EVOLVING INNER_PAD JUMPIN_BRASS LARGE INTERLUDE DRONE MIXPAD CHIFFER MATRIX VANGELUS SYNTH LEAD 1 LEAD 2 LEAD 3 LEAD 4 LEAD 5 SYNTH 1 SYNTH 2 SYNTH 3 SYNTH 4 SYNTH 5 TRANCE RESO RAVE WAVEMIX BRIGHTSYNTH MAXSYNTH SOLOIST QUADRA CALLIOPE SYNTHBRASS 1 MINISOLO CHORD_SYNTH SPARKLY SHINE PAT_SYNTH SYNTHBRASS 2 OVERLOAD SQUARED FOLLOWSYNTH SYNTHBRASS 3 ETHNIC MANDOLIN BANJO FIDDLE steel SITAR PARAGUAYAN_HARP DULCIMER BAG_PIPE BOUZOUKI STEEL_BAND SHAMISEN FADO CELTIC_HARP AFRICAN_MALLET JUNGLE HACKBRETT ZITHER ETHNO_VIBES TRES KOTO ZURNA EFFECT_SFX FRET_NOISE BREATH PFIF&JEW_HARP HUU HEART APPLAUSE LAUGHING SCREAMING JET HELICOPTER EXPLOSION GUN_SHOTS MACHINE_GUN STAR_SHIPS ALARMS DOOR_SLAM&BELL TELEPHONE AIRHORN SCRATCHES LASERS EFFECT_SFX FX_SLAP BIRD BUBBLE DOG&COW HORSE&GALLOP CLACKSON CARS CAR_PASS TRAIN FOOT&SPLASH RAIN RIVER THUNDER SEASHORE WIND BURST HITS&CRASH NYLON_SLIDE COUNTRY_SLIDE JAZZ_SLIDE KETRON • AUDYA 183 MIDI Implementation NOTE ON 9nH kk vv NOTE OFF PITCH BEND 8nH kk vv 9nH kk 00H EnH bl bh PROGRAM CHANGE CHANNEL CONTROL 00H CONTROL 01H CONTROL 05H CONTROL 06H CONTROL 07H CONTROL 0AH CONTROL 0BH CONTROL 40H CONTROL 41H CONTROL 42H CONTROL 43H CONTROL 5BH CONTROL 5DH CONTROL 77H CONTROL 78H CONTROL 79H CONTROL 7BH CONTROL 7EH CONTROL 7FH CONTROL 54H CONTROL 55H CONTROL 10H CONTROL 11H RPN 0000H RPN 0001H RPN 0002H NRPN 0108H NRPN 0109H NRPN 010AH NRPN 0110H NRPN 0111H NRPN 0112H NRPN 0113H NRPN 0120H NRPN 0121H NRPN 0130H NRPN 0131H NRPN 0132H NRPN 0133H NRPN 0163H NRPN 0164H NRPN 0166H NRPN 016BH NRPN 18rrH NRPN 19rrH NRPN 1ArrH NRPN 1CrrH NRPN 1DrrH NRPN 1ErrH CnH pp DnH vv BnH 00H cc BnH 01H cc BnH 05H cc BnH 06H cc BnH 07H cc BnH 0AH cc BnH 0BH cc BnH 40H cc BnH 41H cc BnH 42H cc BnH 43H cc BnH 5BH cc BnH 5DH cc BnH 77H 00H BnH 78H 00H BnH 79H 00H BnH 7BH 00H BnH 7EH 00H BnH 7FH 00H BnH 54H cc BnH 55H cc BnH 10H 00H BnH 11H 08H BnH 65H 00H BnH 65H 00H BnH 65H 00H BnH 63H 01H BnH 63H 01H BnH 63H 01H BnH 63H 01H BnH 63H 01H BnH 63H 01H BnH 63H 01H BnH 63H 01H BnH 63H 01H BnH 63H 01H BnH 63H 01H BnH 63H 01H BnH 63H 01H BnH 63H 01H BnH 63H 01H BnH 63H 01H BnH 63H 01H BnH 63H 18H BnH 63H 19H BnH 63H 1AH BnH 63H 1CH BnH 63H 1DH BnH 63H 1EH 184 KETRON • AUDYA n(0-0FH) midi channel, kk(01H-7FH)=NOTE ON vv=velocity(01H-7FH) (vv=0 means NOTE OFF) n(0-0FH) midi channel, kk(01H-7FH)=NOTE OFF vv=don’t care if command 8nH Pitch Bend as specified by bl(low) bh(high), bl=(00H-7FH),bh=(00H-7FH) 14 bit resolution. Maximum swing is +/-1 tone (default). (Can be changed using RPN 0000H) Center position is bl=00H bh=40H Min. bl=00H bh=00H, Max. bl=7FH bh=7FH Program change. If n=09H Drumset change. Refer to voices or drumset list. vv=pressure value(00H-7FH). Bank select. See voices list for details. Modulation wheel. Rate, Assignment can be set using System excl. Portamento time Data Entry. Provides data to RPN NRPN Volume Pan. (Default 40H) Expression. (Default 7FH) Sustain. (Dumper pedal) On=7FH, Off=00H Portamento. On/Off On=7FH, Off=00H Sostenuto pedal On=7FH, Off=00H Soft pedal On=7FH, Off=00H Auxiliary channel1 Reverb send vv=00H-7FH Auxiliary channel2 Effects send vv=00H-7FH (chorus,delay,distorsor) Reset all NRPN (see note 1). All sound off. (Abrut stop of sound on channel n) Reset all controllers All Notes Off Mono on Poly On (default) Wha-Wha On/Off On=7FH Off=00h Wha-Wha Amount cc=00H-7FH Vocalizer midi mode on Vocalizer midi mode on 64H 00H 06H vv Pitch Bend sensivity in semitones (default vv=02H) 64H 01H 06H vv Fine tuning in cents. vv=00H (-100) vv=40h (0) vv=7FH (+100) 64H 02H 06H vv Coarse tuning in half-tones vv=00H (-64) vv=40H (0) vv=7FH (+64) 62H 08H 06H vv Lfo1 Rate modify (vv=40H no modify) 62H 09H 06H vv Dco Depth modify (vv=40H no modify) 62H 0AH 06H vv Lfo1 Delay modify (vv=40H no modify) 62H 10H 06H vv Lfo2 Rate modify (vv=40H no modify) 62H 11H 06H vv Lfo2 Delay modify (vv=40H no modify) 62H 12H 06H vv Dcf Depth modify (vv=40H no modify) 62H 13H 06H vv Dca Depth modify (vv=40H no modify) 62H 20H 06H vv TVF cutoff freq. modify (vv=40H no modify) 62H 21H 06H vv TVF Resonance modify (vv=40H no modify) 62H 30H 06H vv FM Amplitude1 (vv=40H no modify) 62H 31H 06H vv FM Amplitude2 (vv=40H no modify) 62H 32H 06H vv FM Amplitude3 (vv=40H no modify) 62H 33H 06H vv FM Amplitude4 (vv=40H no modify) 62H 63H 06H vv Env. attack time modify (vv=40H no modify) 62H 64H 06H vv Env. decay time modify (vv=40H no modify) 62H 66H 06H vv Env. release time modify (vv=40H no modify) 62H 6BH 06H vv Env. sustain time modify (vv=40H no modify) 62H rr 06H vv Pitch Course of drum instr. in semitones rr=note vv=40H no modify (see note 2) 62H rr 06H vv Pitch Fine of drum instr. in semitones rr=note vv=00h no modify vv=7FH +1/2 tone (see note 2) 62H rr 06H vv Level of drum instr. note rr. vv=00h to 7FH (see note 2) 62H rr 06H vv Pan of drum instr. note rr. vv=00h to 7FH (see note 2) 62H rr 06H vv Reverb send level of drum instr. note rr. vv=00h to 7FH (see note 2) 62H rr 06H vv Chorus send level of drum instr. note rr. vv=00h to 7FH (see note 2) MIDI Implementation Control Change ▀▀ Modulation wheel Status Byte 2 Byte 3 BnH 01H mmH n = LC-1 or HC-1 (lead or harmony MIDI channel) mm = modulation amount : 00H -7FH ▀▀ Portamento time Status Byte 2 Byte 3 BnH 05H ttH n = LC-1 or HC-1 (lead or harmony MIDI channel) tt = portamento time : 00H -7FH (default = 00H) ▀▀ Volume Status Byte 2 Byte 3 BnH 07H vvH n = LC-1 or HC-1 (lead or harmony MIDI channel) vv = volume : 00H -7FH (default = 64H = 100) ▀▀ Pan Status Byte 2 Byte 3 BnH 0AH ppH n = LC-1 or HC-1 (lead or harmony MIDI channel) pp = pan : 00H -7FH (default = 40H = 64) 0 = full left, 64 = center, 127 = full right ▀▀ GM VOICE Control Change 00, value = 0/1/10/11 Program Change 1-128 ▀▀ PROGRAM VOICE Control Change 00, value 9 (for old compatibility)/20/21/22 Program Change 1-128 ▀▀ PRESET VOICE Control Change 00, value 30/31/32/33 Program Change 00 ▀▀ DRAWBARS Control Change 00, value = 5 Program Change 1-128 ▀▀ INSTRUMENTS Control Change 00, value = 3/6 Program Change 1-128 ▀▀ VOICE LIST Control Change 00, value = 8/35/36 Program Change 1-128 ▀▀ Expression ▀▀ GROOVE Status Byte 2 Byte 3 BnH 0BH eeH n = LC-1 or HC-1 (lead or harmony MIDI channel) ee = expression : 00H -7FH (default = 7FH) Control Change 00, value = 4 Program Change 1-128 ▀▀ Portamento On/Off Status Byte 2 Byte 3 BnH 41H ppH n = LC-1 or HC-1 (lead or harmony MIDI channel) pp = switch : 00H = off, 01H -7FH = on (default = 00H) ▀▀ Reverb/Echo Send Level Status Byte 2 Byte 3 BnH 5BH rrH n = LC-1 or HC-1 (lead or harmony MIDI channel) rr = reverb/echo send level: 00H -7FH (default = 64H) ▀▀ Pitch Bend Change Status Byte 2 Byte 3 EnH llH mmH n = LC-1 or HC-1 (lead or harmony MIDI channel) ll = value LSB : 00H -7FH (default = 00H) mm = value MSB : 00H -7FH (default = 40H) MSB-LSB : 00-00H = -1 octave, 40-00H = no pitch bend, 7F-7FH = +1 octave KETRON • AUDYA 185 MIDI Implementation (Vocalizer) Non Registered Parameter Numbers Note: All NRPN messages are to be sent through harmony or lead MIDI channels (HC or LC). ▀▀ System NRPN NRPN NRPN Data MSB Default MSB LSB value Main volumes, modes and switches 96 0 0...127 127 96 01 0, 1 0 Parameter Master volume: affects the whole system output Vocalizer mode: 0 = MIDI Mode: 5 harmony voices driven by MIDI messages sent through the harmony channel. 1 = Auto-Chord Mode: no note on/off decoded, whatever the midi channel is. The vocalizer detects the note sung into the microphone and computes the notes (up to 5) to be synthesized automatically according to a harmony table. This table indicates the transposition amount of each virtual voice (in semitones) depending on the detected note. 96 preset tables are available and can be simply called by NRPN 96-18. See this NRPN for the list of the presets. When such a NRPN is sent, the preset table overwrites the current one. In addition to these presets, you can program your own table and download it into the vocalizer with a System Exclusive message. See the Sysex part for additional information. Lead voice switch: 0: off (muted), 1...127: on Lead channel processing switch: 0: off = Pitch correction and Voice transform blocks (see synoptic) are bypassed. NRPNs 97-02 to 97-11 have no effect. 1...127: on = full lead channel processing mode. 96 05 0, 1...127 1 96 06 0, 1...127 0 96 96 07 10 0, 1...127 0…5 12 Harmony switch: 0: off (muted), 1...127: on MIDI track transpose: -2, -1, 0, +1, +2 (data MSB=0 to 4) octaves or automatic (data MSB=5). Allow the MIDI notes messages to be transposed in octave increments. This parameter is set correctly if the vocalizer synthesizes the same note as the singer in Melody mode and with harmony part muted. In auto mode, the vocalizer dynamically transposes the MIDI notes to the closest octave to the input signal. 96 15 1 ... 16 ≠ LC 16 96 16 1 ... 16 ≠ HC 1 Harmony MIDI channel: harmony MIDI channel (HC). After you use this command, the harmony MIDI channel will change, so you’ll need to send all the following MIDI messages into the new channel. Harmony and melody MIDI channels must be different: if you try set the harmony channel at the current melody channel value, the command will be ignored. You must move the melody to another channel before. Lead MIDI channel: lead voice MIDI channel (LC). After you use this command, the lead voice MIDI channel will change, so you’ll need to send all the following MIDI messages to the new channel. Harmony and melody MIDI channels must be different: if you try set the melody channel at the current harmony channel value, the command will be ignored. You must change the harmony to another channel before. 186 KETRON • AUDYA MIDI Implementation NRPN MSB 96 NRPN LSB 17 Data MSB Default value 0…23 23 96 18 0…11, 12...23, 24...35, 36...47, 48...59, 60...71, 72...83, 84...95, 96...107, 108...119 none Parameter Virtual voice presets: presets for Virtual voice feature. Calling a preset overwrites the current Voice transform (vibrato, formant, tone…) and EQ parameters of the lead voice. Calling a preset also turns “Lead channel processing switch” (NRPN 96-06) on automatically. Presets are: 0 -Pop 1 -Mellow 2 -Teen pop 3 -Soft air 4 -Dark 5 -Energy 6 -Delicate 7 -Opera 8 -Crooner 9 -Light 10 -Tremolo 11 -Vibrato 12 -Breathy 13 -Shaky 14 -Phone 15 -Angel 16 -Alien 17 -Cartoon 18 -Nasal 19 -Strange 20 -Deep 21 -Girl 22 -Drunk 23 -default Auto-Chord presets: preset tables for Auto-Chord mode (NRPN 9601 data 07). These preset tables are uploaded by the user through a sysex message (sysex ID=1), so you must send such a sysex at least once before using this NRPN. Please refer to the sysex section for more information regarding the content of the preset tables and how to upload them into Voicetron. This NRPN builds a harmony table from a root and one of the 10 stored preset tables. The NRPN value is formatted as follows: Value = 12 * Table number + Root Table number ranges from 0 to 9 and Root from C=0 to B=11. For instance, if you have uploaded the following harmonies in the preset tables: Major, Minor, Major 7th, Minor 7th, ... you can then get a D minor harmony by sending a NRPN value of: 12 * Minor + D = 12 * 1 + 2 = 14. To get an Am7 chord, you will have to send: 12 * Minor 7th + A = 12 * 3 + 9 = 45 96 19 0, 1 0 Note: if you’ve downloaded a custom harmony table (using a Sysex 0), calling this NRPN will overwrite it. Vocalizer output: 0 = Main, 1 = Aux KETRON • AUDYA 187 MIDI Implementation NRPN NRPN Data MSB LSB MSB Pitch to MIDI conversion 96 11 0, 1...127 96 12 0...4 Default value Parameter Pitch to MIDI switch: enables pitch to midi conversion. Refer to “Pitch output” section for more information about this feature. Note trigger sensitivity: this parameter affects the responsiveness 2 of the algorithm for triggering a new MIDI note. Lower values makes the algorithm require a more stable pitch before sending a Note On message. Higher values makes the algorithm respond faster on note onsets (lower perceived latency), but increases the likeliness of artifacts. You can also use NRPN 96-14 to mitigate potential artifacts while keeping the latency low enough. Pitch transition tolerance: affects the way the algorithm handles pitch 96 13 0...4 2 transitions between notes, i.e. when the pitch glides from a note to another. The lower the tolerance, the more the algorithm will consider these transitions as a discontinuity: it will therefore send a Note Off to shut down the old note, then a Note On to start a new note after the transient. The higher the tolerance, the more the algorithm will consider theses transitions as a glissando: it will keep the current note playing while adjusting its tuning to follow the input pitch. Note: you must always have “Note trigger sensitivity” ≤ “Pitch transition tolerance”. By design, it is impossible to have a high “Note trigger sensitivity” and a low “Pitch transition tolerance” at the same time. Therefore, if you set one of these two parameters, the other may be automatically adjusted to comply with this constraint. Pitch to MIDI level threshold: this parameter adjusts the input signal 96 14 0...127 16 level under which no MIDI note will be output. You may want to raise this threshold in a noisy environment for instance, to avoid unwanted short MIDI notes to be triggered during silent or low level sections (consonants). This parameter may also be used to reduce artifacts on note onsets, in conjunction with NRPN 96-12. The shift amount to 0, enabling this mode and playing the loop, the developer can tweak the sensitivity parameter by listening to what audio events the algorithm considers as the critical sections to preserve. There must be enough of them but not too many (see warning above). Note: enabling this mode without being in drum mode will result in muting the shifter (no beat is detected when not in drum mode, so no sound will be output) 188 KETRON • AUDYA 0 MIDI Implementation ▀▀ Lead voice NRPN NRPN MSB 97 97 NRPN LSB 00 01 Data MSB Default value Parameter 0...127 0...64...127 127 64 Lead level: input voice output level Lead pan: same as control 10 on lead MIDI channel (LC) Voice transform parameters 97 02 40...64...88 97 04 0...64...127 97 05 0...38 64 64 38 Transpose: -24...0...+24 semitones Formant: formant control Tone frequency: low pass filter resonance frequency 97 97 97 97 97 64 0 0 48 100 Tone resonance: low pass filter resonance intensity Vibrato depth: up to ± 1 semitone Vibrato style: 10 different vibrato styles Vibrato rate: up to approximately 12Hz Vibrato delay: 0…3 seconds 06 07 08 09 10 64...71 0...127 0...9 0...127 0...127 ▀▀ Harmony voices NRPN NRPN MSB 99 NRPN LSB 00 Data MSB Default value Parameter 0...127 96 99 01 0...64...127 64 99 02 0...64...127 64 99 03 0...64...127 64 99 04 0...64...127 64 99 05 0...64...127 64 99 99 99 99 99 99 99 99 99 99 99 06 07 08 09 10 11 12 13 14 15 16 0...127 0...127 0...127 0...127 0...127 0...64...127 0...64...127 0...64...127 0...64...127 0...64...127 0...38 127 127 127 127 127 64 64 64 64 64 38 99 17 0...38 38 Harmony global level: harmony parts global level (same as Control 7 on channel #HC). Acts on all the harmony voices as a global volume control without overwriting the independent harmony part levels (NRPN 99-06 to 99-10). Harmony voice N volume is: Harmony Global level * Harmony voice N volume Voice 1 pan. Warning: a Control 10 message (pan) will overwrite this setting. Voice 2 pan. Warning: a Control 10 message (pan) will overwrite this setting. Voice 3 pan. Warning: a Control 10 message (pan) will overwrite this setting. Voice 4 pan. Warning: a Control 10 message (pan) will overwrite this setting. Voice 5 pan. Warning: a Control 10 message (pan) will overwrite this setting. Voice 1 volume Voice 2 volume Voice 3 volume Voice 4 volume Voice 5 volume Voice 1 formant Voice 2 formant Voice 3 formant Voice 4 formant Voice 5 formant Voice 1 tone frequency: harmony voice low pass filter cutoff frequency Voice 2 tone frequency KETRON • AUDYA 189 MIDI Implementation 99 99 99 99 18 19 20 21 0...38 0...38 0...38 64...71 38 38 38 64 99 99 99 99 99 99 99 99 99 99 99 99 99 99 99 99 99 99 99 99 99 99 99 99 99 22 23 24 25 26 27 28 29 30 31 32 33 34 35 36 37 38 39 40 41 42 43 44 45 46 64...71 64...71 64...71 64...71 0...64...127 0...64...127 0...64...127 0...64...127 0...64...127 0...127 0...127 0...127 0...127 0...127 0...127 0...127 0...127 0...127 0...127 0...127 0...127 0...127 0...127 0...127 0…127 64 64 64 64 64 64 64 64 64 0 0 0 0 0 48 48 48 48 48 100 100 100 100 100 48 99 99 99 99 99 99 99 99 99 99 99 99 99 99 47 48 49 50 51 52 53 54 55 56 57 58 59 60 0…127 0…127 0…127 0…127 0, 1...127 0, 1...127 0, 1...127 0, 1...127 0, 1...127 0…127 0…127 0…127 0…127 0…127 48 48 48 48 0 0 0 0 0 32 32 32 32 32 190 KETRON • AUDYA Voice 3 tone frequency Voice 4 tone frequency Voice 5 tone frequency Voice 1 tone resonance: harmony voice low pass filter resonance amount Voice 2 tone resonance Voice 3 tone resonance Voice 4 tone resonance Voice 5 tone resonance Voice 1 detune: -50...0...+50 cents Voice 2 detune Voice 3 detune Voice 4 detune Voice 5 detune Voice 1 vibrato depth: up to ±1 semitone Voice 2 vibrato depth Voice 3 vibrato depth Voice 4 vibrato depth Voice 5 vibrato depth Voice 1 vibrato rate: up to approximately 12Hz Voice 2 vibrato rate Voice 3 vibrato rate Voice 4 vibrato rate Voice 5 vibrato rate Voice 1 vibrato delay: 0…3 seconds Voice 2 vibrato delay Voice 3 vibrato delay Voice 4 vibrato delay Voice 5 vibrato delay Voice 1 humanization amount: humanization applies small pitch variations extracted from the input signal to make the harmony voices sound more natural Voice 2 humanization amount Voice 3 humanization amount Voice 4 humanization amount Voice 5 humanization amount Voice 1 portamento switch Voice 2 portamento switch Voice 3 portamento switch Voice 4 portamento switch Voice 5 portamento switch Voice 1 portamento time Voice 2 portamento time Voice 3 portamento time Voice 4 portamento time Voice 5 portamento time MIDI Implementation ▀▀ Effects NRPN NRPN NRPN 84H 4H Compressor 100 00 Data MSB Default value Parameter 0,1...127 0 100 01 0...127 0 100 02 0...127 0 100 03 0...127 0 100 04 0...127 48 100 05 0...127 48 100 06 0...7 0 Compressor switch: 0: Off 1...127: On Attack time: 0=fast attack (0.1 ms), ... 60=1ms. .. . 100= 10ms, 127=slow attack (100ms), exp. curve Release time: 0=fast release (10ms) , ...60= 100 ms, ... 100=1 s. 127=slow release (5s), exp. curve Threshold: 127=0dB, 96=-6dB, 64=-12dB, 45=-18dB, 32=-24dB, 16=-36dB, 8=-48dB , 0=-64dB Ratio: 127=1/128 (128:1), 126=2/128 (64:1), 125=3/128, ... 64=64/128 (2:1), ... 0=1:1 Boost (applied to signal after compression) : 127=x8, 64=x4,32=x2, 16 to 0=x1 Compressor preset: calls a compressor preset, i.e. overwrites NRPN 100-01 t0 100-05 with predefined values. See table below for description of the presets. 40... 64... 76 50... 64... 78 64 Input gain: -24dB .. . 0dB ... +12dB (1 dB step) 64 Band gain: -14dB...0dB.. .+14dB (1 dB step) Lead EQ 101 32 101 0-9 Harmony EQ 102 32 102 0-9 40...64...76 64 50...64...78 64 Input gain: -24d B ... OdB .. . +12dB (1 dB step) Band gain: -14dB...OdB.. .+14dB (1 dB step) Reverb/Ech0 Reverb/Echo 103 00 0...127 0 103 01 0...127 0 103 103 103 103 103 103 103 103 103 02 03 04 05 06 07 08 09 10 0...127 0...127 0...127 0...127 0...127 0...127 0...127 0...127 0...18 127 127 0 103 11 0...8 0 103 103 103 12 13 14 0...127 0...127 0...127 127 0 0 Lead voice reverb send level: same as CC #5Bh on lead channel Harmony reverb send level: same as CC #5Bh on harmony channel Reverb level Echo level Reverb time: 0=40ms Echo time: 0=40ms to 127=400ms Reverb/echo high pass filter on input: 0= no filter Reverb damp: high frequency filter on reverb decay Echo damp: high frequency filter echo feedback Echo feedback Reverb preset: calls a reverb preset. See table below for description of the presets. Echo preset: calls on echo preset. See table below for description of the presets. Reverb input level Echo input level Send echo to reverb Note: EQ band frequencies are fixed to the following values: KETRON • AUDYA 191 MIDI Implementation Band Frequency 1 100Hz 2 160Hz 3 265Hz 4 430Hz 5 700Hz 6 1.1kHz 7 1.9kHz 8 3kHz 9 5kHz 10 8kHz ▀▀ Reset NRPN NRPN MSB 104 NRPN LSB 00 192 KETRON • AUDYA Data MSB 0 Default value Parameter - Soft reset: sets most of the vocalizer parameters to their default value + all notes off. The following parameters are reset : -pan (Control 10) -expression (Control 11) -portamento (Controls 5 & 65) -pitch bend -lead / harmony switches (System NRPN 5 to 7) -voice transform controls (System NRPN 17) -harmony formant & tone controls (Harmony NRPN 11 to 25) -vibrato (Harmony NRPN 26 to 45) -humanization (Harmony NRPN 46 to 50) MIDI Implementation TABS for compatibility SD series F0 26H 7CH Code_tab Status F7H Code_tab = 00H - 7FH Tab code (see list) Status = 7FH Tab pressed Status = 00H Tab released Code_tab list: -------- = Not Used 00h Piano 01h ElPiano 02h Chrom 03h Organ 04h Accordion 05h Guitar 06h Bass 07h String 08h Choir 09h Brass 0ah Sax 0bh Flute 0ch Pad 0dh Synth 0eh Ethnic 0fh Effect 10h Drawbar 11h Drumset 12h --------- 13h Voicetron 14h --------- 15h RamSound 16h --------- 17h --------- 18h Program 19h GM_Voice 1ah ---------- 1bh #/Ballroom 1ch Fade 1dh Intro/End1 1eh Intro/End2 1fh Intro/End3 40h Bass to lowest 50h Key Start 41h Manual Bass 51h Key Stop 42h ---------- 52h ---------- 53h 2nd Voice 43h ---------- 44h ---------- 54h --------- 45h */Unplugged 55h ---------- 56h ---------- 46h ---------- 47h ---------- 57h ---------- 58h ---------- 48h Portamento 49h Harmony 59h Transpose - 4ah Pause Count/Restart 5ah Transpose + 4bh Tempo- 5bh Rotor On/Off 4ch Tempo+ 5ch ---------- 4dh Start/Stop 5dh Split 4eh ---------- 5eh Aftertouch 4fh ---------- 5fh Exit 20h ---------- 21h ---------- 22h Drum Mixer 23h Rewind 24h ---------- 25h ---------- 26h ---------- 27h ---------- 28h ---------- 29h ---------- 2ah ---------- 2bh ---------- 2ch Arr. A 2dh Arr. B 2eh Arr. C 2fh Arr. D 30h ---------31h ---------32h One Touch 33h ---------34h Pianist 35h ---------36h ---------37h ---------38h Fill In 39h Fill2 3ah Fill3 3bh Break 3ch ---------3dh ---------3eh ---------3fh ---------- 60h Number 0 (Unplugged) 61h Number 1 (Pop) 62h Number 2 (Dance) 63h Number 3 (Ballad) 64h Number 4 (Swing) 65h Number 5 (Folk) 66h Number 6 (Country) 67h Number 7 (R&Roll) 68h Number 8 (Latin) 69h Number 9 (Ballroom) 6ah Save 6bh Value- 6ch Value+ 6dh Page- 6eh Page+ 6fh Hold 70h F1 71h F2 72h F3 73h F4 74h F5 75h F6 76h F7 77h F8 78h F9 79h F10 7ah ---------7bh ---------7ch ---------7dh --------7eh ---------7fh --------- TABS Audya F0 26H 7CH 03H Code_tab Status F7H Code_tab = 00H - 7FH Tab code (see list) Status = 7FH Tab pressed Status = 00H Tab released Code_tab list: -------- = Not Used 00h Piano 10h User 01h ElPiano 11h Program 02h Chrom 12h Touch 03h Organ 13h Preset 33h Page Up 04h Accordion 14h Style 05h Guitar 15h Ramsound 16h Sec_voice 06h Bass 07h String 17h Transpose Down 20h F1 21h F2 22h F3 23h F4 30h Cursor Down 31h Value Down 32h Value Up 24h F5 25h F6 26h F7 27h F8 34h Page Down 35h SPlit 36h MIDIFfile 37h WAVE KETRON • AUDYA 193 MIDI Implementation 08h Choir 09h Brass 0ah Sax 0bh Flute 0ch Pad 0dh Synt 0eh Ethnic 0fh Effect 18h Transpose Up 19h Stream List 1ah Harmony 1bh Menù 1ch Save 1dh Edit 1eh Enter 1fh Exit 40h Nu0/Folk 41h Nu1/Ballad 42h Nu2/Pop 43h Nu3/Dance 44h Nu4/Party 45h Nu5/RockSoul 46h Nu6/Country 47h Nu7/SwingJazz 48h Nu8/Latin 49h Nu9/RockRoll 4ah */Unplagged 4bh #/Ballroom 4ch Octave Down 4dh Octave Up 4eh GM Part 4fh Style View 50h TempoSlow 51h TempoFast 52h GM Voice 53h Dial Up 54h Dial Down 55h Fade 56h FREE2 57h Voicetron 58h Rot OnOff 59h Rot SlowFast 5ah DrumSet 5bh Pattern 5ch Playlist 5dh Rewind 5eh Forward 5fh Line In 28h F9 29h F10 2ah F11 2bh F12 2ch F13 2dh F14 2eh F15 2fh Cursor Up 38h DJLOOP 39h ---------3ah MP3 3bh DISK 3ch Registration 3dh Assignable 3eh Finder 3fh Drawbar 60h Double 61h Micro 62h Intro End1 63h Intro End2 64h Intro End3 65h Key Start 66h KEy Stop 67h ARRA 68h ARRB 69h ARRC 6ah ARRD 6bh FILL 6ch BREAK 6dh Portamento 6eh Aftertouch 6fh Manual Bass 70h To Lowest 71h Bassist 72h Pianist 73h Left 74h Drum Mixer 75h Style Mode 76h MP32 77h ---------78h Start 79h Hold 7ah Record 7bh Pause 7ch Cross Fade 7dh ---------7eh ---------7fh ---------- REVERB Reverb Type for compatibility SD series* Type 00h Club1 F0 26 7B 00 00 Type F7 01h Studio1 02h Club2 04h Theatre1 05h Stage2 06h Church2 03h Hall1 Reverb Type right F0 26 7B 10 03 Rev.Type F7 Reverb Type left/gm F0 26 7B 14 03 Rev.Type F7 Reverb Type style F0 26 7B 1f 00 Rev.Type F7 Rev.Type: 00h Studio1 01h Studio2 02h Club1 03h Club2 04h Hall1 05h Hall2 06h Theatre1 07h Theatre2 08h Stage1 09h Stage2 Reverb Level* F0 26 7B 02 00 Rev.Level F7 Rev.Level: 00h - 7f h Reverb Level style F0 26 7B 20 00 Rev.Level F7Rev.Level: 00h - 7f h 194 KETRON • AUDYA 0ah Church1 0bh Church2 0ch Hangar 0dh Galaxy 0eh Space 0fh User Rev1 10h User Rev2 11h User Rev3 12h User Rev4 13h User Rev5 MIDI Implementation CHORUS Chorus Type for compatibility SD series* F0 26 7B 01 00 Type F7 Type: 00h Chorus1 01h Chorus6 02h Chorus2 03h Chorus6 04h Chorus4 05h Phaser1 06h ------07h Flanger1 0ah Phaser2 0bh Phaser3 0ch Flanger1 0dh Flanger2 Chorus Type Right F0 26 7B 11 03 Ch.Type F7 Chorus Type left/gm F0 26 7B 15 03 Ch.Type F7 Ch.Type: 00h Chorus1 01h Chorus2 02h Chorus3 03h Chorus4 * beside MIDI port used will be drive Right or GM/Left part 04h Chorus5 05h Chorus6 06h Tremolo1 07h Tremolo2 08h Tremolo3 09h Phaser1 Chorus Level* F0 26 7B 3b 00 Ch.Level F7 Ch.Level: 00h - 7f h Chorus Delay* F0 26 7B 74 00 Ch.Delay F7 Ch.Delay: 00h - 7f h Chorus Feed* F0 26 7B 75 00 Ch.Feed F7 Ch.Feed: 00h - 7f h Chorus Rate* F0 26 7B 76 00 Ch.Rate F7 Ch.Rate: 00h - 7f h Chorus Depth* F0 26 7B 77 00 Ch.Depth F7Ch.Depth: 00h - 7f h ECHO/DELAY Echo/Delay Type for compatibilty SD series* F0 26 7B 06 00 Type F7 Type: 00h Stereo Echo1 01h Stereo Echo5 02h Stereo Echo2 03h Stereo Echo3 0eh Flanger3 0fh User Cho1 10h User Cho2 11h User Cho3 12h User Cho4 13h User Cho5 04h Mono Echo4 05h Stereo Echo3 06h Mono Echo3 07h Triple Echo4 Echo/Delay Type Right/GM F0 26 7B 12 03 Ec.Type F7 Echo/Delay Type Left F0 26 7B 16 03 Ec.Type F7 Ec.Type: 00h Mono Echo1 01h Mono Echo2 02h Mono Echo3 03h Mono Echo4 04h Mono Echo5 05h Stereo Echo1 06h Stereo Echo2 0ah Triple Echo1 0bh Triple Echo2 0ch Triple Echo3 0dh Triple Echo4 0eh Triple Echo5 0fh Mono User1 10h Stereo User1 KETRON • AUDYA 195 MIDI Implementation 07h Stereo Echo3 08h Stereo Echo4 09h Stereo Echo5 11h Stereo User2 12h Triple User1 13h Triple User2 Echo/Delay Time* F0 26 7B 29 00 Ec.Time F7 Ec.Time: 00h - 7f h Echo/Delay Volume* F0 26 7B 2a 00 Ec.Vol. F7 Ec.Vol.: * beside MIDI port used will be drive Right or GM/Left part 00h - 7f h Echo/Delay Feed* F0 26 7B 2b 00 Ec.Feed F7 Ec.Feed: 00h - 7f h Echo/Delay Filter* F0 26 7B 2c 00 Ec.Filter F7 Ec.Filter: 00h - 7f h DISTORSION Distorsion Type for compatibilty SD series* F0 26 7B 11 00 Type F7 Type: Distorsion Type Right F0 26 7B 13 03 Dist.Type F7 Distorsion Type Left/GM F0 26 7B 17 03 Dist.Type F7Dist.Type: 00h Overdrive 3 01h Overdrive 1 02h Overdrive 1 04h Distorsion3 05h Distorsion2 06h Grunge 00h Overdrive 1 01h Overdrive 2 02h Overdrive 3 03h Tube 1 04h Tube 2 05h Distorsion1 06h Distorsion2 07h Distorsion3 08h Hyper Dist. 09h Grunge 0ah Fuzz 0bh Hot British 0ch Org. Over.1 0dh Org. Over.2 0eh Org. Over.3 0fh Over. User1 10h Over. User2 11h Dist. User1 12h Dist. User2 13h Dist. User3 Distorsion Level* F0 26 7B 22 00 Dist.Level F7 Dist.Level: 00h - 7f h Distorsion Tone* F0 26 7B 25 00 Dist.Tone F7 Dist.Tone: 00h - 7f h Distorsion Resonance* F0 26 7B 26 00 Dist.Reso F7 Dist.Reso: 00h - 7f h DISK MIDIPORT SET F0 26 7B 30 00 Set. F7 Set. = 00h gm SPLIT F0 26 7B 03 00 Split F7 Split: 01h - 7fh GLOBAL TRANSPOSER F0 26 7B 07 00 Tran F7 Tran = 28h - 58h; 40h = no transp. Set. = 01 keyb ARABIC TUNE Chan: 00h - 0fh data:00h – 7fh 40h = no detune F0 26 7B 0a Chan data1 data2 .. data12 F7 7eh = lower; 7fh = all channels; 00=right * beside MIDI port used will be drive Right or GM/Left part 196 KETRON • AUDYA MIDI Implementation ARABIC MODE ACTIVE/INACTIVE F0 26 7B 0F 03 Val F7 Val = 0 disactive; Val != 0 active MASTER TUNE F0 26 7B 0c 00 d1 d2 F7 Data1 00H-0CH high nibble;Data2 00H-0FH low nibble Es. Data1=06h Es. Data1=00h Es. Data1=0Ch Data2=04h no tune (64h) Data2=00h -100% tune Data2=08h +100% tune DRUM/VOICE PART ASS F0 26 7B 0f 00 GMPart Value F7 GMPart: 00h – 0fh; Value = 0 voice; Value = 1 drum GM MIDI RX CHANNEL F0 26 7B 12 00 GMPart Chan F7 GMPart: 00h – 0fh; Chan: 00h - 0fh; 00h = off GM MIDI TX CHANNEL F0 26 7B 18 00 GMPart Chan F7 GMPart: 00h – 0fh; Chan: 00h - 0fh; 00h = off KEYB RX CHANNEL F0 26 7B 13 00 Keyb-Part chan F7 Chan: 00h - 0fh; 00h = off KEYB TX CHANNEL F0 26 7B 19 00 Keyb-Part chan F7 Keyb-Part: MIDI_GM_PART: MIDI_SECOND_VOI1_PART: MIDI_SECOND_VOI2_PART: MIDI_PERCUSSION_PART: MIDI_CLICK_PART: MIDI_DRUM2_PART: MIDI_DRUM1_PART: MIDI_VOICE1_PART: MIDI_VOICE2_PART: MIDI_VOICE3_PART: MIDI_DRAWBAR_PART: MIDI_GLOBAL_PART: MIDI_LEFT_PART: MIDI_RIGHT_PART: MIDI_REGIS_PART: MIDI_VOCALIZER_PART: MIDI_LOWER1_PART: MIDI_LOWER2_PART: MIDI_BASS_PART: MIDI_CH1_PART: MIDI_CH2_PART: MIDI_CH3_PART: MIDI_CH4_PART: MIDI_CH5_PART: MIDI_LIVEL_PART: MIDI_LIVER_PART: Chan: 00h - 0fh; 00h = off 00h 01h 02h 03h 04h 08h 09h 0ch 0dh 0eh 0f h 10h 11h 12h 13h 14h 15h 16h 17h 18h 19h 1ah 1bh 1ch 1dh 1eh VELOCITY CURVE AND FILTER CURVE F0 26 7B 1B 00 Curve F7 Curve: Velocity 00h - 05h Filter 06h- 09h FIXED VALUE CURVE F0 26 7B 16 00 Dyn-Val F7 Dyn-Val : 01h - 7fh GM PART KEY-SHIFT F0 26 7B 1a 00 GMPart Shift F7 GMPart = 00h - 10h; Shift = 10h – 70h; No Shift=40h KETRON • AUDYA 197 MIDI Implementation LEFT LEVEL F0 26 7B 1c 00 Level F7 Level : 00h - 7fh MIDIFILE LEVEL F0 26 7B 1d 00 Level F7 Level : 00h - 7fh GENERAL MIDI VOLUME F0 26 7B 38 00 Level F7 Level : 00h - 7fh DRAWBAR VOLUMES F0 26 7B 40 00 Drawbar vol F7 Drawbar: 40h - 48h Drawbar = 49h percussion Drawbar = 4ah click vol: 00h - 7fh MICRO Micro Preset F0 26 7B 00 03 Mic.Preset F7 Mic.Preset: Micro1 Level F0 26 7B 01 03 Level F7 Level : 00h - 7fh Micro1 Pan F0 26 7B 02 03 Pan F7 Pan: 00h (Left) – 7fh(Right) Micro1 Effect Send F0 26 7B 03 03 Level F7 Level : 00h - 7fh Micro2 Level F0 26 7B 04 03 Level F7 Level : 00h - 7fh Micro2 Pan F0 26 7B 05 03 Pan F7 Pan: 00h (Left) – 7fh(Right) Micro2 Effect Send F0 26 7B 06 03 Level F7 00h Dry 01h Reverb Small 02h Reverb Medium 03h Reverb Large 04h Reverb Gated 05h Boost 06h Echo Reverb 07h Echo Reverb Tap 08h Correction 09h Bear 40h No Pan 40h No Pan Level : 00h - 7fh Micro1/2 rev. Type F0 26 7B 07 03 Rev.Type F7 Rev.Type: 00h Off 01h Short Room 02h Room 03h Small Hall 04h Large Hall 05h Short Plate 06h Vocal Plate Micro1/2 echo type F0 26 7B 08 03 Ech.Type F7 Ech.Type: 00h Off 01h Mono 02h Stereo 03h Mono 3/4 198 KETRON • AUDYA 0ah Girl 0bh Baby 0ch Vibrato 0dh Phone 0eh Angel 0f h MICRO01 10h MICRO02 11h MICRO03 12h MICRO04 13h MICRO05 07h Church 08h Cathedral 09h Gated Reverb 0ah Gated Plate 0bh User1 0ch User2 0dh User3 0ah Stereo Tap 0bh Mono 3/4 Tap 0ch Stereo 3/4 Tap 0dh Mono 4/4 Tap MIDI Implementation FOOTSWITCH F0 26 79 03 footswich Status F7 04h Stereo 3/4 05h Mono 4/4 06h Stereo 4/4 07h Mono Triplet 08h Stereo Triplet 09h Mono Tap 0eh Stereo 4/4 Tap 0fh Mono Triplet Tap 10h St. Triplet Tap 11h User1 12h User2 13h User3 Status=0 off Status=127 ON footswitch: 00h Sustain 10h Break 3 01h Soft 02h Sostenuto 03h Arr.A 04h Arr.B 05h Arr.C 06h Arr.D 07h Int.End.1 08h Int.End.2 09h Int.End.3 0ah Fill 1 0bh Fill 2 3bh Arabic_8 0ch Fill 3 0dh Fill 4 0eh Break 1 0fh Break 2 40h Arabic_13 41h Micro Talk 42h Fade Out 43h Crash 44h Voice Down 45h Voice Up 46h Harmony 47h Swell 48h Transp- 49h Transp+ 4ah 2nd Voice 4bh Hold 4ch Left Drum 4dh Inter.Gtr. 4eh Rotor On/Off 4fh Rotor Slow/Fast 20h Tom/Fx Off 11h Break 4 12h Tempo+ 13h Tempo- 14h minor 15h 7th 16h m7th 17h 5+ 18h dim 19h 6th 1ah 7th+ 1bh Fill In 30h Dist./Overdr. 21h Rimshot Off 22h Latin1 Off 23h Latin2 Off 24h Latin3 Off 25h ClapFx Off 26h Double 27h Midi Reset 28h VoicelistToArr. 29h Lyric On/Off, 2ah A.play On/Off 2bh Start Stop 31h Text Page32h Text Page+ 33h Voicetron 34h Arabic_1 35h Arabic_2 36h Arabic_3 37h Arabic_4 38h Arabic_5 39h Arabic_6 3ah Arabic_7 1ch Kick Off 1dh Snare Off 1eh HiHat Off 1fh Cymbal Off 2ch Echo/Delay 2dh Wha-Wha 2eh Chorus 2fh Reverb 3ch Arabic_9 3dh Arabic_10 3eh Arabic_11 3fh Arabic_12 50h Micro On/Off 51h BasToLowest 52h Lead Mute 53h Pianist 54h Bassist 55h Only Kick 56h Drum&Bass 57h Accordion 58h PianistSust. 59h Bass Sust. 5ah FillToArr. 5bh Bas Mono/Poly 5ch Cross Fade 5dh Zoom 5eh Manual Drum 5fh ReIntro 60h Auto Fill 61h After Fill 62h Arr. Mute 63h Swing Bass 64h BassToRoot 65h Loop On/Off 66h Lower Mute 67h Low.Off Stop 68h Lower1 Hold 69h Lower2 Hold 6ah Arabic_14 6bh Arabic_15 6ch Arabic_16 6dh Key Start 6eh Key Stop 6fh Manual Bass 70h Exit 71h Regis Down 72h Regis Up 73h Play Kick1 74h Play Kick2 75h Right Boost 76h Break 77h Style Stop 78h DryOnStop 79h Pause/CountIn/Rest. 7ah Program/Preset 7bh Voc. On/Off 7ch Aftertouch 7dh Portamento 7eh Not Used1 7fh Not Used2 VOICETRON Assign GM Part to Voicetron F0 26 7B 33 00 gmpart value F7 gmpart 0-15 value=1 to voicetron value=0 to voice Voicetron preset F0 26 7B 37 00 Voc.Preset F7 Voc.Preset: 00h Vocalizer 01h AutoTune Vocal. 02h BlueGrass Duet 0ah User 1 0bh User 2 0ch User 3 KETRON • AUDYA 199 MIDI Implementation Voicetron Lead on/off F0 26 7B 6E 00 Status F7 03h Country Duet 04h Chained Duet 05h Standard Trio 06h Standard Trio 2 07h Chained Trio 08h Stand. Quartet 09h Jazz Quartet 0dh User 4 0eh User 5 0fh User 6 10h User 7 11h User 8 12h User 9 13h MidiMode Status >= 1 = On, Status = 0 = off EQUALIZER Equalizer Type F0 26 7B 09 03 Type F7 Type: 00h - 04h Equalizer active/disactive F0 26 7B 0a 03 Status F7 Status >= 1 = On, Status = 0 = off Wave Equalizer type F0 26 7B 0b 03 Type F7 Type: 00h – 04h Wave Equalizer active/disactive F0 26 7B 0c 03 Status F7 Status >= 1 = On, Status = 0 = off LEAD MUTE F0 26 7B 0d 03 Status F7 Status >= 1 = On, Status = 0 = off SONG NUMBER Numc =0-9 Numd=0-99 F0 26 7B 0B 00 Numc Numd F7 Es. song number 1 Es. song number 50 Es. song number 120 Es. song number 9999 KEYB ONLY TRANSPOSER F0 26 7B 19 03 Val F7 Val = 0 Val != 0 200 KETRON • AUDYA Numc=0 Numd=1 Numc=0 Numd=50 Numc=1 Numd=20 Numc=99 Numd=99 (max.) keyb only transp off; keyb only transp on; Specifications Technical data KEYBOARD Audya: 76 semi-weighed buttons, 8 dynamic curves. Pitch, modulation, aftertouch and portamento controls. Operating system updatable via USB port. 17 volume slider controls (with 1 assignable). 10 assignable user tab functions. Audya 5: 61 semi-weighed keys, 8 dynamic curves, Pitch & Modulation Joystick, Aftertouch, Portamento, 17 Volume slider controls (1 assignable), Operating system updatable via USB port 10 display User Tab. Audya 4: Professional Arranger and Midi Sound module. 8 dynamic curves, Aftertouch, Portamento, Operating system updatable via USB port, 17 Volume slider controls (1 assignable), 10 display User Tab. Audya 8: Right: 52 button. Left: 120 basses. Left and Right separate velocity range controls, 6 velocity curves. Pitch, modulation, aftertouch and portamento controls. Operating system updatable via USB port. 17 volume slider controls (with 1 assignable). 10 display User Tab. DISPLAY 320x240 pixel TFT colour graphic display. HARD DISK 80 GB ATA 2.5”. HD Recording 44,1 kHz recording with MIDI and WAV sync. Up to 2 tracks. MSP Multisample creation starting from preset WAV files. Up to 30. USB 2 USB host + 1 USB device. MASS STORAGE DEVICES USB pen drive. Floppy USB, MP3 Player, CD-ROM and DVD-ROM, HD must be with power supply (or built in). USB pen drive and Hd must be on FAT 32 formatted based. SOUND GENERATION 360 MB PCM wavetable (32 MB rewritable by user). 384 Orchestral presets. Stereo and multi-layer Voices. 512 GM2 sounds. 32 parts multitimbral. POLYPHONY 197 notes. VOICE LIST Up to 320 custom sound locations, 20 User Voice List (UVL) associated to MIDI file, MP3, Wave, Styles ORGAN DRAWBARS 9 digital drawbars, slow/fast rotor, percussion and overdrive. PROGRAMS 320 Programs. 3 Voices, 3 splits. Functions: sustain, portamento, velocity switch, duet, trio, morphing, steel, slide, harmony. Editing: ADSR, cut off, resonance, effects. 2nd Voice. RAM/INS 64 MB RAM sounds loadable from disk. PROFESSIONAL MULTIPLAYER 2 WAV, 2 MP3, 2 MIDI. Time stretching and audio transposition in real time. Play list, autoplay. MP3 encoder (modifiable resolution). Audio Ripper from CD with wave transform and saving. MIDIFILE PLAYER SMF player with KAR file (karaoke) and TXT file (text). KAR and MIDI file conversion type 0 to type 1. Jukebox. Intelligent transposition. Song chain. Drum & bass. Lead on/off. Storing of the new song setup. DRUM REMIX Synchronisation of MIDI files and audio drum. SEQUENCER Real time song recording. REGISTRATIONS Single and block mode. DRUM 1 54 user drum sets. 10 percussion sections. Drum mixer. Manual drums. DRUM 2 (Audio) 240 live drums (acoustic, electro, jazz and Latin loops). REAL AUDIO ARRANGER 570 styles with real audio drums and percussions. Live accompaniment tracks including acoustic and electric guitars. 4 arrangers per style: A, B, C, D. 3 intro/ending, 4 fill ins, 4 breaks. Manual bass. Jump. Tap tempo. Auto Mute for single arranger parts. After fill. Slow/fast tempo. Bass pedal board functions. Standard recognition and rootless chords. Voice to Arrange. Pattern section for new styles programming. Pianist: standard and auto mode. Bassist. OCTAVE/DOUBLE Octave selection +/– 24 semitones. Octave doubling. HARMONY Full, jazz, bluegrass, trill, repeat, folk 1, folk 2. TRANSPOSER Transposition of +/– 24 semitones. ARABIC SCALE 16 settings for the Arabic scale, assignable to footswitch. Tuning +/– 99 cents of a note. KETRON • AUDYA 201 Specifications ACCORDION Accordion functions with international and Belgian system. Controllable dynamics of bass and chords. Octave selectable on manual bass and chord. Manual drum on bass and chords. DSP EFFECTS 16 new DSP multi-effects. Reverb, chorus, flanger, delay, phaser, tremolo, tap delay 4/8, whawha, distortion, overdrive, slow/fast rotor, parameters 4-band equalizer. MICRO 1/MICRO 2 2 microphone inputs with separate gain control, 10-band equalizer, echo, reverb, pan, pitch shift, talk, voice transformation. VOICETRON Ketron harmonizer with 5 voices. Vocoder mode, auto-harmony by using the arranger, vocalizer track on MIDI file, advanced editing on all 5 voices. MIDI In 1, In 2, Out, Thru. 32 MIDI channels. GM2 Standard. OUTPUTS Left/mono, right. 4 separate assignable outputs (1 stereo or 2 mono). Digital input and output S/PDIF at 48 kHz (Audya only). Stereo headphone. INPUTS 2 XLR microphone inputs. 2 line in inputs (2 stereo or 2 mono). Sustain and pedal volume. Footswitch (6 or 13 switches). VIDEO INTERFACE VGA monitor, mirror, zoom, karaoke. Screen size and positioning controls. Resolution: 320x240. INCLUDED ACCESSORIES Video interface, hard disk, vocalizer, power cord, music stand, user manual. OPTIONAL ACCESSORIES Hard case, piano-type sustain pedal, volume pedal, control pedal FS6/FS13 MIDI bass pedals. DIMENSIONS Audya: L x W x Audya 5: L x W Audya 4: L x W Audya 8: L x W WEIGHT Audya: 18,5 Kg (40 lbs). Audya 5: 17 Kg (37 lbs). Audya 4: 7 Kg (15 lbs). Audya 8: 18 Kg (39,7 lbs). POWER Automatic voltage detection - 110V/60Hz – 240V/50Hz (plug and play). H = 114 cm x 43 cm x 15 cm (45” x 17” x 6”). x H = 100 cm x 43 cm x 15 cm. x H = 52 cm x 32 cm x 11 cm. x H = 105 cm x 43 cm x 15 cm. Due to continuing product improvement efforts, specifications and appearance are subject to change without notice. Please visit frequently our website www.ketron.it to check for software updates, user manuals, etc. 202 KETRON • AUDYA Notes KETRON • AUDYA 203 KETRON s.r.l. Via Giuseppe Taliercio n. 7 60131 Ancona (Italy) Tel. +39 071 285771 Tel. +39 071 2857748 www.ketron.it email: [email protected] Printed in Italy