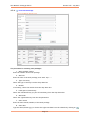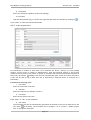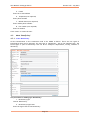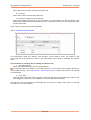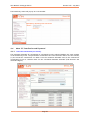
1
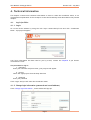
User Manual: Setting Up EU-fin
Coordinator
Product: EU-fin - FP7
Version: July 2010
User Manual: Setting up EU-fin
Version 3.03 – July 2010
Icons:
Icon
Meaning
An important remark
Click this link for more information, your are immediately linked to the right
section in the technical information chapter
The hyperlink to the right section in the coordinator menu. Click this link to
go straight to EU-fin. You must log in first.
Typographic Conventions:
Writing style
Meaning
‘Example » Example’
The menu and submenu item of the coordinator menu. Click this link to go
straight to EU-fin. You will have to log in first.
<Example>
A button in EU-fin
‘Example’
A link in EU-fin
Page 2
User Manual: Setting up EU-fin
Version 3.03 – July 2010
1. Index
1.
Index ..............................................................................................................3
2.
Introduction ......................................................................................................4
2.1.
2.2.
2.3.
2.4.
2.5.
3.
Setting up EU-fin ................................................................................................5
3.1.
3.2.
3.3.
4.
Introduction to EU-fin ...................................................................................4
How to use this coordinator manual ..................................................................4
Log-in .......................................................................................................4
Navigation .................................................................................................4
Session time ...............................................................................................4
Introduction ...............................................................................................5
Important issues before starting.......................................................................5
Step-by-step guide to create the project interface................................................5
Technical information ..........................................................................................7
4.1.
Log
4.1.1.
4.1.2.
4.1.3.
in facilities ...........................................................................................7
Log in ................................................................................................7
Change login information (password and e-mail address) ..................................7
‘Recovery Password’ ..............................................................................8
4.2.
Menu ‘Project’ ............................................................................................9
4.2.1.
'Project information and parameters' ..........................................................9
4.2.2.
'Documents' ....................................................................................... 11
4.2.3.
'Insert Periods' .................................................................................... 11
4.2.4.
'Insert Type of Expenditures'................................................................... 12
4.2.5.
‘Insert project modules’........................................................................ 13
4.2.6.
'Insert Work Package'............................................................................ 14
4.2.7.
'Insert Project Users' ............................................................................ 15
4.3.
Menu ‘Beneficiary’ ..................................................................................... 16
4.3.1.
'Insert Beneficiary' ............................................................................... 16
4.3.2.
'Indirect costs per period' ...................................................................... 18
4.3.3.
Beneficiary Addresses ........................................................................... 18
4.3.4.
Beneficiary Communication.................................................................... 20
4.3.5.
‘Insert Link Beneficiary to Work Package' ................................................... 20
4.3.6.
‘Create Beneficiary Menu’ ..................................................................... 21
4.3.7.
‘Go to Beneficiary Menu’ ....................................................................... 21
4.4.
Menu ‘EC Contribution and Payments’ ............................................................. 22
4.4.1.
‘Insert EC contribution per activity’ ......................................................... 22
5.
Troubleshooting ............................................................................................... 24
5.1.
5.2.
FAQ’s ..................................................................................................... 24
Helpdesk ................................................................................................. 24
Page 3
User Manual: Setting up EU-fin
Version 3.03 – July 2010
2. Introduction
You have chosen to use EU-fin to support the financial management and reporting of an fp6 or fp7
project. After creating your project interface in EU-fin, this will streamline a number of
administrative processes and the management of your project will be much easier.
2.1.
Introduction to EU-fin
The EU-fin system has two ‘entrances’, namely the Coordinator menu and the Beneficiary menu,
both connected to the same database. In the coordinator menu a number of project specific
parameters are entered, like periods, work packages and beneficiary information. This makes EU-fin
fully adapted to the situation of your project.
On the basis of these parameters the beneficiary menu is created, such that a beneficiary finds a
tailor-made menu. After log in, the beneficiary finds only the necessary information.
In the beneficiary menu, the financial contact person of a beneficiary can enter the financial
planning of the budgets, the actual costs that are made and an explanation of these costs. The Form
C calculations are generated by the system. In the coordinator menu you will find a number of other
useful functionalities, like payment administration, form C administration and necessary reports.
2.2.
How to use this coordinator manual
The main section of this manual is divided in two parts, in the first part you will find a quick guide
on how to set up EU-fin, in the second part a more extensive description is given. Furthermore a
chapter on troubleshooting is covering the frequently asked questions to help the coordinator
overcoming most problems that can be encountered.
2.3.
Log-in
You have received your log in information (User name and Password). Go to the EU-fin website by
using the link: http://www.eufin-fp7.com and click <Coordinator Menu>. Enter your username and
your projects will appear, select the right project from the drop down box. Enter your password and
click <Login>.
2.4.
Navigation
You will enter the coordinator menu on the ‘project’ page. On top of each page you will find the
navigation panel.
Click on the titles to navigate through the coordinator menu. After clicking on one of these titles a
submenu will appear on the left side.
2.5.
Session time
EU-fin will automatically close after 1 hour of inactivity, all non-saved data will then be lost.
Therefore it is important to save the information you entered regularly.
Page 4
User Manual: Setting up EU-fin
Version 3.03 – July 2010
3. Setting up EU-fin
3.1.
Introduction
The setting up of EU-fin is done mainly by the information in the ‘Grand Agreement Preparation
Form’ and the ‘Description of Work’. After setting up all changes in the project or consortium can
be updated in EU-fin, to keep the system adjusted to the project situation.
3.2.
Important issues before starting
Be careful when changing settings and parameters after the beneficiary menu has been created and
partners have started entering budgets or costs. Deleting parameters may result in a loss of these
entered budgets and costs. EU-fin prevents the deleting of for example work packages and periods,
when budgets and costs have been entered. Remove the budgets first, before removing links,
beneficiaries, work packages or periods.
3.3.
Step-by-step guide to create the project interface
1. 'Project » Project information and parameters'
Enter or choose the project specific parameters, we advice to use work package level in all
cases, since it is an EU-requirement to report on this level.
2. 'Project » Insert Periods'
Create the necessary periods
3. 'Project » Insert Type of Expenditures'
The following type of expenditures are already created: ‘Personnel costs’, ‘Subcontracting’ and
‘Indirect costs’. Define the subcategories of the cost type ‘Other direct costs’, for example
‘Travel’, ‘Equipment’ etc
4. 'Project » Insert Project Users'
Insert the necessary users per beneficiary; namely scientists, financial officers and work
package leaders
5. 'Beneficiary » Insert Beneficiary'
Create the beneficiaries
6. 'Beneficiary » Indirect Costs per Period'
For beneficiaries using the indirect costs method ‘Actual Indirect Costs’ insert the percentage of
indirect costs for this period
7. 'Project » Insert Work Package'
Create the necessary work packages
8. 'Beneficiary » Insert Link Beneficiary to Work Package'
Link the beneficiaries to the work packages they are working on
9. 'EC Contribution and Payments » Insert Beneficiary Contribution per Activity'
Insert the planned EC-contribution per activity for each beneficiary
10. 'Beneficiary » Create Beneficiary Menu'
Click <Create> to create the beneficiary menu
Optional:
11. 'Project » Insert Project Module'
Create the necessary modules
Page 5
User Manual: Setting up EU-fin
Version 3.03 – July 2010
12. 'Beneficiary » Addresses'
Insert the addresses of the beneficiaries
13. 'Beneficiary » Communication'
Insert the main e-mail addresses, fax number, phone number or website per beneficiary
14. 'Beneficiary » Go to beneficiary menu'
Select the beneficiary from the drop down box and click <Beneficiary Menu>
The beneficiary menu that is accessed from the coordinator menu is not the same as the
beneficiary menu that the beneficiaries see after log in. To access the actual beneficiary menu, go
to the link www.eufin-fp7.com and click <Beneficiary menu>.
Page 6
User Manual: Setting up EU-fin
Version 3.03 – July 2010
4. Technical information
This chapter contains more technical information on how to create the coordinator menu, it is a
comprehensive explanation of the 14 steps to create the beneficiary menu described in the previous
chapter.
4.1.
Log in facilities
4.1.1. Log in
Go to the EU-fin website by using the link: http://www.eufin-fp7.com and click <Coordinator
Menu>. A pop up will appear:
Your log-in information has been send to you by e-mail, contact the helpdesk if you haven’t
received this e-mail.
The procedure for log in:
1. Username
Enter your username and press enter, your projects will appear
2. Project
Select the right project from the drop down box
3. Password
Enter your password
Click <Login> and you will enter the Coordinator menu
4.1.2. Change login information (password and e-mail address)
Click <Change login Information>, a new window will pop up:
Page 7
User Manual: Setting up EU-fin
Version 3.03 – July 2010
To change your password:
1. Username
Enter your user name
2. Old password
Enter your old password
3. New password
Enter your new password
4. Confirm new password
Enter your new password
Click <Change Password> to save your new password
To change your e-mail address:
1. Username
Enter your user name
2. Old E-mail address
Enter your old e-mail address
3. New E-mail address
Enter your new e-mail address
4. Confirm new E-mail address
Enter your new e-mail address
Click <Change E-mail> to save your new e-mail address
4.1.3.
‘Recovery Password’
To recover your password, click on <recovery password> and the following pop-up will appear:
The procedure for recovering your password:
1. Username
Enter your username
2. E-mail
Enter your e-mail address.
Click <Submit> to submit your information. Your password will be send to you in an instant (possibly
delayed by your e-mail server)
Page 8
User Manual: Setting up EU-fin
4.2.
4.2.1.
Version 3.03 – July 2010
Menu ‘Project’
'Project information and parameters'
The first step in creating the project interface in EU-fin is entering the general project information
like the project name and contract number. Furthermore a number of project parameters have to
be defined.
The procedure for defining the project information:
1. Acronym
Enter the short name of the project
2. Description
Enter the full project title
3. Project type
Choose the project type of this project, EU-fin’s set up is different for each type. You can
choose from the following types:
CP
CP-CSA
CSA
NoE
Collaborative Project
Combination of Collaborative project and Coordination / Support Actions
Coordination / Support Actions
Network of Excellence
4. Contract number
Enter the project number of this project
5. EC-Contribution
Enter the total EC-contribution of your project.
This number is for informational purpose only. It is not used anywhere in the system
6. Start date and end date
Page 9
User Manual: Setting up EU-fin
Version 3.03 – July 2010
Type the date (dd-mm-yyyy) or choose the right date from the calender by clicking on
7. Budget level
The budget level is the main setting for the structure of the beneficiary level. Choose the right
level from the drop down menu, you can choose from the following levels:
Work package: In the beneficiary menu the partners will report their data per work package.
This is the most detailed level and provides the most information for the coordinator and thus
the European Commission
Beneficiary: In the beneficiary level the partners will only report their data per activity type.
We advice to use work package level in all cases, since it is an EU-requirement to report on this
level. Only choose beneficiary level when specifically demanded by your EU-officer.
8. Indirect cost calculations
This setting defines the way the indirect cost are dealt with in the beneficiary menu. Choose
the right setting from the drop down menu, you can choose from the following settings:
Advise: When using this setting, the calculated indirect costs are shown as an advise to the
beneficiaries. Beneficiaries can use this calculated number or change it.
No advise: When using this setting there is no advise given for the indirect costs.
9. Whole duration closed
This setting defines the way the whole duration column in the beneficiary menu is dealt with. In
the whole duration column the budget for the whole project is set out. You can choose from the
following settings:
Yes: In the beneficiary menu the beneficiaries can only enter budgets per period. The whole
duration column is accessible only to the coordinator from the coordinator menu.
No: The beneficiaries can enter the whole duration budgets, and the budgets per period.
10. Update scientist and financials
This setting defines the way EU-fin deals with new scientists and financial officers. You can
choose from the following options:
Yes: When updating the responsible scientist and financial officer ( Beneficiary, Update
beneficiary), this will automatically replace the financial officer and scientists that are linked
to the work packages.
No: When updating the responsible scientist and financial officer ( Beneficiary, Update
beneficiary), the financial and scientist that are linked to the work packages remain unchanged.
Click <Save> to save the entered information and settings.
Page 10
User Manual: Setting up EU-fin
4.2.2.
Version 3.03 – July 2010
'Documents'
New! Upload documents into EU-fin. These documents are shown in the beneficiary menu and can
be viewed by your partners.
The procedure for uploading documents:
1. Document type
Choose the type of document from the drop down box
2. File
Browse the file that needs to be uploaded. Click <Browse> and search the file on your computer
3. Description
Enter a description of the uploaded file
Click <Save> to save the uploaded file. A list of uploaded files is shown in the table below.
4.2.3.
'Insert Periods'
The reporting periods of the project need to be defined.
Page 11
User Manual: Setting up EU-fin
Version 3.03 – July 2010
Procedure for inserting periods:
1. Period number
Choose the period number from the drop down menu
2. Description
Enter the name of the period, for example ‘reporting year x’ or ‘period x’
3. Start date and End date
Type the date (dd-mm-yyyy) or choose the right start and end date from the calender by
clicking on
4. Start month and End month
Type the month number
5. Status
After a reporting period has ended, you can close the period to prevent changes made to this
specific period. The following settings can be chosen:
Open: Beneficiaries can enter or adjust budgets for this period in the beneficiary menu
Closed: The period is closed, only the coordinator can enter or adjust budgets
When inserting periods, choose ‘open’.
Click <Save> to save the entered information, the inserted period will be shown in the table below.
4.2.4.
'Insert Type of Expenditures'
Three types of expenditures are already inserted in EU-fin, namely ‘Personnel Costs’,
‘Subcontracting’ and ‘Indirect Costs’. The type of expenditures ‘Other direct costs’ needs to be
added. One can choose for one category ‘Other direct costs’ or make a division into more
categories, for example ‘Travel’ and ‘Equipment’.
On the Form C all the sub-categories of other direct costs will be aggregated to one group.
Page 12
User Manual: Setting up EU-fin
Version 3.03 – July 2010
The procedure for defining the ‘Other direct costs’:
1. Description
Type the description, for example ‘Other direct costs’ or ‘Travel and subsistence’
2. Cost type
The cost type is automatically set to ‘Other direct costs’
3. Order
Select the location of the type of expenditure from the drop down menu
Click <Insert> to insert the type of expenditure, the type of expenditure will be shown in the table
below.
4.2.5.
‘Insert project modules’
Modules can be used to cluster work packages. After creating a module, it can be appointed to a
work package. In the reports created by EU-fin, the work packages are grouped per module.
The use of modules enables you to create another aggregation level. The normal work packages in
EU-fin are then tasks, and the modules become work packages. The beneficiaries can now report
their budgets and costs per tasks.
The procedure for inserting modules:
1. Module no.
Choose the module number from the drop down box
2. Description
Enter a description of this module
3. Coordinator
Enter the name of the coordinator of this module
Click <Insert> to insert the module. The module is displayed in the table below.
Page 13
User Manual: Setting up EU-fin
4.2.6.
Version 3.03 – July 2010
'Insert Work Package'
The procedure for inserting work packages:
1. Work package number
Enter the number of the work package
2. WP Title
Enter the title of the work package, start with ‘wp 1: …’
3. Type of Activity
Select the type of activity from the drop down box
4. Module
If necessary, select the module from the drop down box
5. Lead (part of) beneficiary
Select the lead beneficiary (or part of beneficiary) from the drop down box
6. WP leader
Select the right beneficiary from the drop down box
7. Start month
Enter the start month (number) of this work package
8. Start date
Type the date (dd-mm-yyyy) or choose the right start date from the calender by clicking on
Page 14
User Manual: Setting up EU-fin
Version 3.03 – July 2010
9. End month
Enter the end month (number) of this work package
10. End date
Type the date (dd-mm-yyyy) or choose the right end date from the calender by clicking on
Click <Insert> to save the entered information
4.2.7. 'Insert Project Users'
Per beneficiary a number of users have to be inserted into EU-fin, namely: (1) work package
leaders, (2) the person in charge of administrative, legal and financial aspects in this project
(financial officer) and (3) the person in charge of scientific and technical/technological aspects in
this project (scientist).
Adding a user will not automatically grant access to EU-fin to this users;
a user will be able to log in after this user is selected as a financial officer or scientist for a
beneficiary.
Procedure for inserting users:
1. First name
Enter the first name of the user
2. Insertion
Enter the insertion (for example “van de”)
3. Last name
Enter the last name of the user
Press ‘Enter’ or ‘Tab’ on your keyboard
4. User name
The username will then be automatically generated on the basis of the first 5 characters of the
last name.
If necessary, the username can be changed . Go to ‘project » Update project
user’ to change the username.
Page 15
User Manual: Setting up EU-fin
Version 3.03 – July 2010
5. E-mail
Enter the e-mail address
6. Telephone (not required)
Enter phone number
7. Mobile Phone (not required)
Enter mobile phone number
8. Fax number (not required)
Enter fax number
Click <Insert> to insert the user.
4.3.
Menu ‘Beneficiary’
4.3.1. 'Insert Beneficiary'
All the beneficiaries in the consortium need to be added to EU-fin. There are two types of
beneficiaries that can be selected, the first type is ‘Beneficiary’, this is the standard type. The
second type is ‘part of beneficiary’ this can be for example a department, faculty, institute or
laboratory.
The procedure for adding type ‘Beneficiary’
1. Beneficiary type
Choose ‘Beneficiary’
2. Beneficiary Legal name
Enter the legal name of the beneficiary
Page 16
User Manual: Setting up EU-fin
Version 3.03 – July 2010
3. Beneficiary short name
Enter the short name of the beneficiary
4. Beneficiary number
Select the beneficiary number from the drop down box
5. Status organisation
Select the status of the organisation from the drop down box
6. Indirect costs
Select the method of calculating indirect cost from the drop down box
7. ICPC and lump sum funding
Choose ‘yes’ or ‘no’
8. Legal registration number (not required)
Enter the legal registration number of the organisation
9. VAT number (not required)
Enter the VAT number of the organisation
10. Financial Officer
Select the financial officer from the drop down box
11. Scientist
Select the scientist from the drop down box
The persons that are selected as financial officer and scientist are the ones that will get access
to the beneificiary menu of EU-fin
12. Payment information (not required)
Enter the payment information of the beneficiary. This information can also be entered by the
beneficiaries themselves in the beneficiary menu. Information entered in the beneficiary menu
will be visible here.
Click <Insert> to save the entered information
The procedure for adding type ‘part of Beneficiary’:
1. Beneficiary type
Choose ‘Part of Beneficiary’
2. Beneficiary Legal name
Enter the legal name of the beneficiary
3. Beneficiary short name
Enter the short name of the beneficiary
4. Status organisation
Select the status of the organisation from the drop down box
5. Indirect costs
Select the method of calculating indirect cost from the drop down box
6. ICPC and lump sum funding
Choose ‘yes’ or ‘no’
7. Beneficiary
Choose the beneficiary where this part of beneficiary belongs to
8. Financial Officer
Page 17
User Manual: Setting up EU-fin
Version 3.03 – July 2010
Select the financial officer from the drop down box
9. Scientist
Select the scientist from the drop down box
10. Payment information (not required)
Enter the payment information of the beneficiary. This information can also be filled by the
beneficiaries themselves in the beneficiary menu. Information entered in the beneficiary menu
will be visible here
Click <Insert> to save the entered information
4.3.2. 'Indirect costs per period'
For beneficiaries using the indirect costs method ‘Actual Indirect Costs’ the indirect costs
percentage has to be specified in EU-fin. This percentage is then used to calculate the indirect
costs.
The procedure for inserting the percentage of indirect costs:
1. Select Beneficiary
Select the right beneficiary from the drop down box
A beneficiary will only appear in this drop down box if the indirect cost method selected is
‘Actual indirect costs’. Go to 'Beneficiary » Update Beneficiary' to update the indirect cost method
of a beneficiary
2. Click ‘New’
This will open a new field. Select the period from the drop down box and enter the indirect cost
percentage for that period. Click <Update> to save the entered information
The indirect costs percentages for this beneficiary are shown in a table. Click <edit> to edit the
information for a certain period.
Page 18
User Manual: Setting up EU-fin
4.3.3.
Version 3.03 – July 2010
'Beneficiary » Addresses'
In EU-fin the contact addresses of beneficiaries can be entered, this way all your project
administration is centrally stored.
Procedure for inserting beneficiary addresses:
Click <New> to open a new address field. The following window will appear:
Fill in the necessary information and click <Update> to save the entered information
Page 19
User Manual: Setting up EU-fin
Version 3.03 – July 2010
4.3.4. Beneficiary Communication
Procedure for inserting beneficiary communication:
'Beneficiary » Communication'
Click <New> to open a new communication field. The following window will appear:
Fill in the necessary information and click <update> to save the entered information.
4.3.5. ‘Insert Link Beneficiary to Work Package'
After inserting the necessary work packages and beneficiaries, they have to be linked to each other.
For each work package, the beneficiaries working on this work package have to be linked.
Page 20
User Manual: Setting up EU-fin
Version 3.03 – July 2010
The procedure for adding a link between a work package and a beneficiary:
1. Select WP
Select the right work package from the drop down box
2. (Part of) beneficiary
Select the beneficiary (or part of beneficiary) that has to be linked to this work package
3. Financial officer / Scientist
If necessary, change the financial officer or scientist for this work package
Click <Insert> to insert the link. Repeat step 2 & 3 for each beneficiary that has to be linked and
step 1 to 3 for each work package. After selecting a work package, the beneficiaries linked to this
work package are shown in the table below.
4.3.6. ‘Create Beneficiary Menu’
When all the necessary information and parameters are inserted, the beneficiary menu can be
created.
The procedure for creating the beneficiary menu
1. <Create>
Click <Create> to create the beneficiary menu
4.3.7. ‘Go to Beneficiary Menu’
Setting up EU-fin will create a personal, tailor-made beneficiary menu for each beneficiary in the
consortium. The coordinator can access each beneficiary’s menu from the coordinator menu.
The beneficiary menu that is accessed from the coordinator menu is not the same as the
beneficiary menu that the beneficiaries see after log in. To access the actual beneficiary menu, go
to the link www.eufin-fp7.com and click <beneficiary menu>.
The procedure for going to the beneficiary menu:
1. Choose Beneficiary
Choose the right beneficiary from the drop down box
2. Beneficiary menu
Click ‘Beneficiary menu’ to go to the beneficiary menu
Page 21
User Manual: Setting up EU-fin
Version 3.03 – July 2010
The beneficiary menu will pop-up in a new window.
4.4.
Menu ‘EC Contribution and Payments’
4.4.1. ‘Insert EC contribution per activity’
The maximum allowable EC contribution is calculated from the planned budgets per work package
in the beneficiary menu. The planned EC contribution has to be entered in EU-fin for two reasons,
(1) the actual EC contribution can differ from the maximum allowable and (2) the inserted EC
contribution serves as a double check for the calculated maximum allowable (and therefore the
inserted budgets).
Page 22
User Manual: Setting up EU-fin
Version 3.03 – July 2010
The procedure for entering planned EC contribution
1. Select beneficiary
Select the right beneficiary from the drop down box
2. Activity
Select the right activity type from the drop down box
3. Reference
Enter a description of the entered budget
4. EU Contribution
Enter the EC contribution for this activity type
Repeat step 3 & 4 for each activity type of a beneficiary, repeat step 1 – 4 for each beneficiary in
the consortium. The inserted EC contribution is shown in the table below after inserting.
Page 23
User Manual: Setting up EU-fin
Version 3.03 – July 2010
5. Troubleshooting
5.1.
FAQ’s
How can I change the inserted parameters and settings?
Below every ‘Insert …’ you can find ‘Update …’. Select the parameter you want to change, update
the information and save the updated information. A pop up will appear to confirm the action.
I forgot my password
Go to the EU-fin’s ‘recover password facility’ to recover your password.
I have lost my log-in information
Contact the helpdesk
The right activity type cannot be selected from the drop down box
You haven’t selected the right project type for this project. Go to 'Project » Project information
and parameters' to change the project type.
I have updated parameters and settings, however in the beneficiary menu these settings are not
updated
The beneficiary menu has not yet been updated, go to ‘Beneficiary » Create beneficiary menu’ and
click <Create>.
5.2.
Helpdesk
The helpdesk is available for any other question not in this user manual. Send an email to
[email protected]. Please state your project name and describe your problem (including
exactly where in the system you encountered the problem).
Print screens can be used for additional information, click print screen (on your keyboard) to make
a snapshot of your screen, paste the snapshot into Word (or any other text program) and include
this in your mail. The more information you include in your e-mail, the faster we can solve your
problem!
Heldesk:
E-mail: [email protected]
Page 24