1
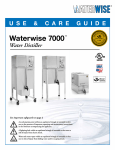
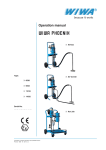
OWNER'S MANUAL
QUICK REFERENCE GUIDE
Your vehicle at a glance
Interior Overview
1
2
3
4
5
6
7
8
9
Inside door handle [4]
Driver position memory system button* [3]
Outside rearview mirror control [4]
Central door lock switch [4]
Power window lock switch [4]
Power window switch [4]
Hood release lever [4]
Headlight leveling device* [4]
Instrument panel illuminationcontrol switch [4]
a
b
c
d
e
f
g
h
Parking assist system On/Off button* [4]
ESC off button* [5]
Steering wheel warmer On/Off Button* [4]
Steering whee [4]
Tilt and telescopic steering control lever [4]
Trunk lid release switch [4]
Fuel filler lid release lever [4]
Fuse box [7]
* if equipped
[#] Number in parentheses indicates chapter in Owner䳒s Manual
The actual shape or engine room in the vehicle may differ from the illustration.
Your vehicle at a glance
Instrument Panel Overview / Engine Compartment
1
2
3
4
5
6
7
8
9
Instrument cluster [4]
Lighting control lever [4]
Audio remote control buttons* [4]
Horn [4]
Driver䳓s front air bag* [3]
Cruise control button* [5]
Wiper and washer control lever [4]
Ignition switch or Engine start/stop button [5]
Digital clock [4]
a
b
c
d
e
f
g
h
i
Hazard warning flasher [6]
Audio* [4]
Climate control system* [4]
Shift lever [5]
Passenger䳓s front air bag* [3]
Glove box [4]
Parking brake [5]
Cup holder [4]
LCD display control button [4]
1
2
3
4
5
6
7
8
9
a
Engine oil filler cap [7]
Engine oil dipstick [7]
Brake/clutch* fluid reservoir [7]
Positive battery terminal [7]
Negative battery terminal [7]
Fuse box [7]
Air cleaner [7]
Radiator cap [7]
Engine coolant reservoir [7]
Windshield washer fluid
reservoir [7]
Features of your vehicle
Door Locks / Trunk / Hood / Fuel Filler Lid
Operating door locks from
outside the vehicle
1
2
3
Opening the trunk
Opening the trunk from inside
the vehicle
Inside door lock
Lock/Unlock position mark
Open the door
Child-protector rear door lock
Emergency trunk safety
release*
Closing the hood
Opening the hood
Pull the release lever to unlatch
the hood.
1
2
Raise the hood slightly.
Push the secondary latch
inside and lift the hood
1. Before closing the hood,
check if all filler caps are
correctly installed and any
other combustible material
are removed from the
engine compartment.
2. Lower the hood halfway
and push down to securely
lock in place.
Closing the fuel filler lid
1. Turn cap clockwise until it
䳖clicks䳗 to ensure a securely
locked cap.
2. Close the fuel filler lid and
push it lightly. Make sure
that it is securely closed.
Opening the fuel filler lid
Pull up fuel filler lid opener
located on the driver䳓s seat.
1
2
Fully open the lid
Turn cap counterclockwise
Features of your vehicle
Windows / Wipers and Washers
1
2
3
4
5
6
7
Driver䳓s door power
window switch
Front passenger䳓s door
power window switch
Rear door (left) power
window switch*
Rear door (right) power
window switch*
Window opening and
closing
Automatic power window
up*/down*
Power window lock
switch*
䳵 In cold and wet climates,
power windows may not
work properly due to freezing
conditions.
Windows [4]
Type A
Type B
A: Wiper speed control
2/HI
High wiper speed
1/LO
Low wiper speed
/INT Intermittent wipe
AUTO*
Automatic control wipe
O/OFF
Off
/MIST Single wipe
B: Intermittent wipe time adjustment
Wipers and Washers [4]
C: Wash with brief wipes
Parking assist system
Sensors
This system activates when the
parking assist system button is
pressed with the ignition switch
ON.
The indicator of the parking assist
system button turns on automatically
and activates the parking assist
system when you shift the gear to
the R (Reverse) position. It will turn off
automatically when you drive above
20 km/h (12.4 mph).
The sensing distance while moving
forward is approximately 60 cm
(24 in.) when you are driving less
than 10 km/h (6.2 mph).
If the vehicle speed is above 20km/h,
the system automatically turns off.
To activate again, push the button.
Safety features of your vehicle
Seat / Air Bag / Child Restraint System
1
2
3
4
5
6
7
8
9
a
b
c
d
e
Forward and backward
Seatback angle
Seat cushion height
(Driver`s seat)
Lumbar support
(Driver䳓s seat)*
Driver position memory
system (for 4 Door, 5 Door)
Headrest
Walk-in seat (for 2 Door)
Forward and rearward
Seatback angle
Headrest
Walk-in seat (for 2 Door)
Armrest
Headrest
Seatback folding lever
(trunk, for 4 Door, 2 Door)*
Seatback folding lever
(for 5 Door)
Seats [3]
Passenger䳓s front air bag ON/
OFF switch* [3]
Installing a child restraint
system by lap/shoulder
belt [3]
Securing with 䳖Tether
Anchor䳗 system* [3]
There are ISOFIX symbols
located on the lower portion
of each side of the rear
seatbacks. These symbols
indicate the position of
the lower anchors for child
restraints*.
Securing with 䳖ISOFIX䳗
system and 䳖Tether
Anchorage䳗 system* [3]
Position of the lower anchors
for child restraints*
Features of your vehicle
Climate Control System
Manual climate control system* [4]
1
2
3
A/C (Air conditioning) button
Fan speed control knob
Mode selection knob
4
5
6
Rear window defroster button
Air intake control button
Temperature control knob
Automatic climate control system* [4]
1
2
3
4
5
6
Driver䳓s temperature control knob
AUTO (automatic control) button
OFF button
LCD display
Front windshield defrost button
Mode selection button
7
8
9
a
b
c
Fan speed control button
Air intake control button
Rear window defrost button
Passenger䳓s temperature control knob
Dual temperature control selection button
A/C (Air conditioning) button
Features of your vehicle
Lighting Control / Steering Wheel / Cruise Control
Lighting control [4]
Tilt steering* [4]
Heated steering wheel* [4]
1
2
3
4
Steering wheel angle
adjustment:
With the ignition switch is in
the ON position, pressing the
heated steering wheel button
warms the steering wheel.
The indicator on the button
will illuminate. To turn off,
press the button once again.
The indicator on the button
will turn off.
OFF
Parking light
Headlight
Auto light*
1
2
3
Pull down lock release
lever
Adjust the steering wheel
to the desired angle
Height adjustment*
Lock steering wheel by pulling
up lock release lever.
Cruise control system* [5]
ON-OFF button to turn the
system on
Set cruise control speed by
pushing the SET-switch
Increase cruise control
set speed
To cancel cruise control, do
one of the following:
Decrease cruise control
set speed
Cancel cruise control
• Press the brake pedal.
• Press the clutch pedal with
a manual transaxle or shift
into N (Neutral) with an
automatic transaxle.
• Press the CANCEL switch
located on the steering
wheel.
What to do in an emergency
Towing / Changing tires
Towing [6]
Removable towing hook
Emergency towing
When towing your vehicle in
an emergency without wheel
dollies:
1. Open the trunk, and remove
the towing hook from the
tool case.
2. Remove the hole cover
pressing the lower part
of the cover on the front
bumper.
3. Install the towing hook by
turning it clockwise until it
is fully secured.
4. Remove the towing hook
and reinstall the cover.
If towing is necessary, we
recommend you to have it
done by an authorised Kia
dealer or a commercial tow
truck service.
4
7
1. Set the ignition switch in
the ACC position.
2. Place the transaxle shift
lever in N (Neutral).
3. Release the parking brake.
Changing tires[6]
1 Park on a level surface and
apply the parking brake
firmly.
2 Shift the shift lever into
R (Reverse) with manual
transaxle or P (Park) with
automatic transaxle.
3 3. Activate the hazard
warning flasher.
5
6
Remove the wheel lug nut
wrench, jack, jack handle,
and spare tire from the
vehicle.
Loosen the wheel lug nuts
coun-terclockwise one turn
each, but do not remove
any nut until the tire has
been raised off the ground.
Place the jack at the front
or rear jacking position
closest to the tire you are
changing.
8
9
a
Insert the jack handle
into the jack and turn it
clockwise, raising the vehicle
until the tire just clears the
ground. This measurement
is approximately 30 mm
(1.2 in).
Loosen the wheel nuts and
remove them with your
fingers.
To reinstall the wheel, hold
it on the studs, put the
wheel nuts on the studs and
tighten them finger tight.
Lower the vehicle to
the ground by turning
the wheel nut wrench
counterclockwise.
What to do in an emergency
Engine Oil / Washer Fluid / Engine coolant
Checking the engine oil level [7]
Pull the dipstick out and check
the level. The level should be
between F and L.
If it is near or at L, add enough
oil to bring the level to F. Do not
overfill.
Check the condition and
connections
of all cooling system hoses
and heater hoses. Replace any
swollen or deteriorated hoses.
The coolant level should be
filled between F and L marks on
the side of the coolant reservoir
when the engine is cool.
Use a funnel to help prevent
oil from being spilled on engine
components.
Use only the specified engine
oil. [8]
Checking the washer fluid
level [7]
Check the fluid level and add
fluid if necessary.
Plain water may be used if
washer fluid is not available.
However, use washer solvent
with antifreeze characteristics
in cold climates to prevent
freezing.
If the coolant level is low, add
enough distilled (deionized)
water to provide protection
against freezing and corrosion.
Bring the level to F, but do not
overfill.
If frequent additions are
required, we recommend that
the system be inspected by an
authorized Kia dealer.
For full details and instructions on any item contained in this quick reference guide, please read the
owner䳓s manual.
Copyright
2013 Kia MOTORS Corp. all rights reserved.
DA7Q-EG31A