1
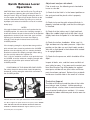
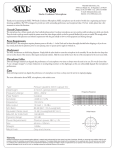
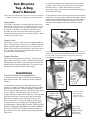
Sun Bicycles
Tug- A-Bug
User’s Manual
Please read and understand the information in this manual before
installing and using your new Sun Bicycles Tug-A-Bug trailer.
Compatibility:
This trailer is designed, and should only be attached to
adult bicycles with a 26", 27" or 700C rear wheel. It connects to the seat post which must be 25.4mm, 27.2mm,
or 28.6mm in diameter. The bottom of the hitch once
attached must be at least 25 inches from the ground.
The towing bicycle must have a cromoly seat post. Steel
or Alloy may bend or break.
3) Install the seat post back into the bicycle and clamp
securely. There must be a minimum of 3" of seat post
inside the frame. Tighten the bolts on the hitch to
remove play while at the same time allowing the hitch to
swing from left to right.
4) Re-attach the trailer to the hitch with the quick release
binder bolt. Use the original supplied binder bolt. Do not
substitute the supplied binder bolt with any other type of
binder. Make sure to re install the safety pin. This will
insure the quick release binder bolt’s nut does not come
loose.
Weight Limits:
The trailer can carry 1 rider with the maximum weight of
85lbs. The front rider must be at least 150lbs to maintain
proper control of both the bicycle and the trailer when in
motion. The Sun Bicycles Tug-A-Bug is not a baby seat. It
is for use with children that are already able to ride a
bicycle without training wheels.
Proper Operation:
This trailer is designed for paved roads. Use on rough
roads could cause loss of control. Do not exceed 12mph.
Riding faster than 12mph could cause loss of control and
possible injury or death to either rider. This trailer is not
designed for and should not be used at night.
Plastic washers.
Pictured top is the hitch assembly disassembled. Below left is the
seatpost with part of the hitch assembly attached. Pictured right is
the nut and bolt of the quick release opposite the lever. PIN
MUST BE FULLY ENGAGED.
Do not overtighten bolts
Installation
To install the hitch to the towing bicycle:
1) Remove the hitch from the trailer by removing the
quick release binder. Be careful not to lose the plastic
washers.
2) Remove the seat post from the towing bicycle and
confirm it is made of cromoly, not steel or alloy and then
determine the diameter. Slide the proper sized plastic
shim on the seat post and install the hitch over the shim,
on the seatpost. The protruding ridge on the shim
(flange) should be at the base of the hitch. This will keep
the plastic shim from rising up out of the hitch during
operation and protect your frame from damage. The
plastic ridge must rest against the top of your bicycles
seat post clamp to insure the hitch will not lower itself
during operation. IMPORTANT: DO NOT TIGHTEN COMPLETELY THE BOLTS SECURING THE HITCH ASSEMBLY TO THE SEAT POST. Tighten enough to eliminate
play, however, the hitch assembly must swing freely from
right to left.
Shim
flange
under
hitch
assembly
Shim flange
between hitch
assembly & seat
colar
Pin must
be
fully
engaged,
pressed
through
the QR
hole.
Left is the entire
hitch assembly
attached to the
bicycle’s seat post.
Do not overtighten bolts.
Tighten enough
to allow the
hitch to swing.
Quick Release Lever
Operation
CAUTION: Never fasten the Sun Bicycles Tug-a-Bug to
the seat post by tightening the quick release lever as
though it were a wing nut. Simply rotating the lever in a
circular motion until tight will not fasten the hitch to the
seat post. Detachment of the Tug-a-Bug as a result of
improper quick release installation can result in serious
bodily injury.
NOTES
If the quick release lever can be easily pushed to the
CLOSED position, this means the clamping strength is
insufficient. Return the quick release lever to the position
perpendicular to the bicycle frame. And again turn the
adjusting nut clockwise to increase the clamping
strength. Push the quick release lever back to the
CLOSED position.
If the clamping strength is adjusted too strong and the
quick release lever cannot be pushed to the CLOSED
position, turn the adjusting nut in a counter-clockwise
direction to reduce the clamping strength. When doing
this, do not fully release the adjuster nut.
Turn it 1/8 of a revolution, and then try to push the lever
to CLOSED, to set the maximum clamping strength with
which you can push the quick release lever to the
CLOSED position.
POSITIONING OF THE QUICK RELEASE LEVER
For safety, the quick release lever should be pointing
backwards, running along the trailer hitch arm when in
the CLOSED position.
Adjustment and pre ride check:
Prior to each use, the following must checked to
insure a safe ride.
1) Check that the hitch is in the lowest position on
the seat post and the plastic shim is properly
installed.
2) Check to insure the quick release hitch pin is
properly installed and tight, and that the safety pin
is installed.
3) Check that the trailers seat is tight and level.
Adjust the saddle height so that the rider’s leg is
slightly bent when the pedal is in the lowest position.
4) Check the trailers handlebar. Make sure it is
tight and does not slip under pressure. Adjust the
position so the rider can rest their hands comfortably with a slight bend in their elbow while seated
in an upright position.
5) Check the tire pressure, which should be 35-to40psi.
Inspect all bolts, nuts, and the frame and hitch of
your trailer for wear. If any wear exists contact your
local Sun Bicycles Tug-A-Bug dealer for replacement parts and do not use your trailer until those
parts have been replaced. Serious injury or death
could occur to either rider in the event of a failure.
Protective Apparel:
closed
open
Pictured above left is the quick release lever in the closed position. Above right is the quick release in the open position. IMPORTANT: DO NOT TIGHTEN THE QUICK RELEASE LEVER AS
THOUGH IT WERE A WING NUT. Tighten and then press the
lever firmly into closed position.
The rider of the bicycle and the rider of the trailer
must always wear a helmet. Unlike operating a
bicycle without a trailer, there is more chance for a
loss of control leading to an accident. It is recommended that elbow and knee pads also be worn for
protection.