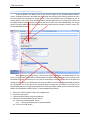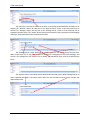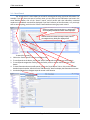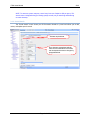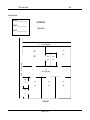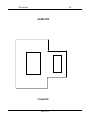
1
Florida Inventory of School Houses (FISH) 2013 Edition User’s Manual FISH Users Manual 2010 TABLE OF CONTENTS 1 – INTRODUCTION ........................................................................................................................................................... 5 1.1 – USER LOGIN............................................................................................................................................................................ 6 1.1.1 – Access URL .................................................................................................................................................................. 6 1.2 – USER REGISTRATION ................................................................................................................................................................ 7 1.2.1 – New User Registration ............................................................................................................................................... 7 1.2.2 – Password Recovery................................................................................................................................................... 12 1.3 – USER PROFILE UPDATE ........................................................................................................................................................... 14 1.3.1 – Modify User Information.......................................................................................................................................... 14 1.3.2 – Change Password ..................................................................................................................................................... 14 1.3.3 – Change Security Question And Answer ................................................................................................................... 14 1.4 – ERROR MESSAGE................................................................................................................................................................... 15 2 – FACILITY INFORMATION ..................................................................................................................................... 16 GENERAL FACILITY INFORMATION ..................................................................................................................................................... 16 2.1 – FACILITY SEARCH ................................................................................................................................................................... 16 2.1.1 – Facility Details ........................................................................................................................................................... 17 2.1.1a – Capital Outlay Classification (COC) ........................................................................................................................ 17 2.1.1b – Primary Use Of Facility (Code) ............................................................................................................................... 19 2.1.1c – Grades/Programs Recommended For Facility ...................................................................................................... 20 2.1.1d – Contract Issued Date .............................................................................................................................................. 20 2.1.1e – Validation Date ....................................................................................................................................................... 20 2.1.1f – Facility Suffix (Code) ................................................................................................................................................ 20 2.2 – MASTER SCHOOL (MSID) ASSIGNMENT TO FACILITIES ............................................................................................................... 22 2.2.1 – Associate MSIDs With An Existing Facility............................................................................................................... 24 2.2.2 – Disassociate MSIDs From An Existing Facility ......................................................................................................... 25 2.3 – ADD A NEW FACILITY RECORD TO FISH ................................................................................................................................... 26 2.4 – UPDATE AN EXISTING FACILITY RECORD.................................................................................................................................... 29 2.4.1 – Assign A Parcel To An Existing Facility ..................................................................................................................... 30 2.4.2 – Disassociate Parcels From An Existing Facility ........................................................................................................ 30 2.5 – DELETE A FACILITY ................................................................................................................................................................. 30 2.5.1 – Remove An Existing Facility...................................................................................................................................... 33 2.6 – RECOVER A REMOVED FACILITY ............................................................................................................................................... 34 2.7 – FACILITY COFTE INFORMATION .............................................................................................................................................. 34 2.7.1 – View COFTE Reported At A Facility .......................................................................................................................... 35 2.8 – FACILITY REEVALUATION ......................................................................................................................................................... 35 2.8.1 – Types Of Reevaluation.............................................................................................................................................. 36 3 – PARCEL INFORMATION ....................................................................................................................................... 39 GENERAL PARCEL INFORMATION ...................................................................................................................................................... 39 3.1 – PARCEL SEARCH .................................................................................................................................................................... 40 3.1.2 – Parcel Details ............................................................................................................................................................ 41 3.2 – ADD A NEW PARCEL .............................................................................................................................................................. 42 3.3 – UPDATE AN EXISTING PARCEL ................................................................................................................................................. 43 3.4 – DELETE A PARCEL .................................................................................................................................................................. 43 3.4.1 – Delete A Parcel That Has No Buildings .................................................................................................................... 43 3.4.2 – Delete A Parcel That Has Buildings.......................................................................................................................... 43 3.5 – RECOVER A DELETED PARCEL .................................................................................................................................................. 43 Page 2 of 105 FISH Users Manual 2010 4 – BUILDING INFORMATION................................................................................................................................... 44 GENERAL BUILDING INFORMATION ................................................................................................................................................... 44 4.1 – BUILDING SEARCH ................................................................................................................................................................. 45 4.1.1 – Building Details ......................................................................................................................................................... 45 4.1.2 – Building Number....................................................................................................................................................... 46 4.1.3 – Building Owner (Code) ............................................................................................................................................. 46 4.1.4 – Building Year Of Construction .................................................................................................................................. 47 4.1.5 – Type Of Structural Composition (Code) ................................................................................................................... 47 4.1.6 – Type Of Exterior Wall Finish (Code) ......................................................................................................................... 48 4.2 – ADD A NEW BUILDING ........................................................................................................................................................... 48 4.3 – UPDATE AN EXISTING BUILDING .............................................................................................................................................. 50 4.4 – DCA INSIGNIA....................................................................................................................................................................... 52 4.5 – SHELTER DATA ...................................................................................................................................................................... 53 4.5.1 – Add Or Modify Building Shelter Information........................................................................................................... 53 4.6 – DELETE A BUILDING ............................................................................................................................................................... 54 4.7 – RECOVER A REMOVED BUILDING ............................................................................................................................................. 55 5 – ROOM INFORMATION ............................................................................................................................................ 56 GENERAL ROOM INFORMATION ....................................................................................................................................................... 56 5.1 – ROOM SEARCH...................................................................................................................................................................... 56 5.1.1 – Room Details............................................................................................................................................................. 57 5.1.1a – Room Number ........................................................................................................................................................ 57 5.1.1b – Room Design (Code) ............................................................................................................................................... 58 5.1.1c – Room Square Footage ............................................................................................................................................ 59 5.1.1d – Student Stations ..................................................................................................................................................... 60 5.1.1e – Space Condition (Code) .......................................................................................................................................... 60 5.1.1f – Year Of Construction ............................................................................................................................................... 61 5.2 – ADDING ROOMS.................................................................................................................................................................... 61 5.2.1 – Adding A Single Room .............................................................................................................................................. 62 5.2.2 – Adding Multiple Rooms............................................................................................................................................ 64 5.3 – UPDATING EXISTING ROOM(S) ................................................................................................................................................ 66 5.4 – TRANSFER A RELOCATABLE TO ANOTHER FACILITY ..................................................................................................................... 68 5.4.1 – Transfer A Relocatable To Another Facility With An Existing Building .................................................................. 68 5.4.2 – Transfer A Relocatable To Another Facility Without An Existing Building ............................................................ 71 5.4.3 – Transfer A Relocatable Without A DCA Insignia ..................................................................................................... 72 5.5 – ROOM DELETE ...................................................................................................................................................................... 73 5.6 – RECOVER A REMOVED ROOM(S) ............................................................................................................................................. 74 6 – REPORTS ........................................................................................................................................................................ 75 6.1 – UPDATE REPORTS .................................................................................................................................................................. 75 6.2 – COMMONLY USED REPORTS ................................................................................................................................................... 76 6.3 – MANAGEMENT REPORTS........................................................................................................................................................ 78 6.4 – ROUTINE DATA REQUEST REPORTS .......................................................................................................................................... 78 7 – EVENT TRACKING AND NOTIFICATIONS ................................................................................................ 80 EVENT TRACKING ........................................................................................................................................................................... 80 7.1 – NOTIFICATION E-MAIL ............................................................................................................................................................ 81 8 – LEXICON AND MISCELLANEA ........................................................................................................................ 82 8.1 – GLOSSARY OF TERMS AND OTHER WORD USAGE ....................................................................................................................... 82 8.1a – Technical .................................................................................................................................................................... 82 8.1b – Educational Facilities ................................................................................................................................................. 82 Page 3 of 105 FISH Users Manual 2010 8.1c – General Definitions .................................................................................................................................................... 83 8.2 – BUSINESS RULES.................................................................................................................................................................... 84 8.3 – CALENDAR ICONS .................................................................................................................................................................. 85 8.4 – NAVIGATION TREE (NODES).................................................................................................................................................... 86 8.5 – COMMON MISTAKES TO AVOID............................................................................................................................................... 86 8.6 – DEFINITIONS ......................................................................................................................................................................... 87 9 – APPENDIXES ............................................................................................................................................................... 95 PLOT PLAN .................................................................................................................................................................................... 95 FLOOR PLANS ................................................................................................................................................................................ 95 BUILDING TYPES............................................................................................................................................................................. 95 CORRIDOR LOADING ....................................................................................................................................................................... 95 PLOT PLAN EXAMPLE ...................................................................................................................................................................... 96 FLOOR PLANS EXAMPLES................................................................................................................................................................. 97 BUILDING TYPES EXAMPLES ............................................................................................................................................................. 99 CORRIDOR LOADING EXAMPLES ..................................................................................................................................................... 105 Page 4 of 105 FISH Users Manual 2010 1 – Introduction The Florida Inventory of School Houses (FISH) is available to all school districts for reporting facilities information. District FISH reports are available on-line for all district staff who have access to the electronic data base; selected summary information is available to the public at: http://www.firn.edu/doe/edfacil/fish/fish.htm Any comments, questions, or concerns about FISH should be directed to: Mr. Brian Gouin Office of Educational Facilities Florida Department of Education Tallahassee, Florida 32399 Telephone: (850)245-9296 Fax: (850)245-9304 E-mail: [email protected] or Ms. Sandra Keen Office of Educational Facilities Florida Department of Education Tallahassee, Florida 32399 Telephone: (850)245-9284 Fax: (850)245-9304 E-mail: [email protected] All requests for access to any EFIS program, questions about security, password reset, and user registrations should be directed to Ms. Sandra Keen. The facilities inventory may be corrected by submitting on-line transactions through the Educational Facilities Information System (EFIS). A district’s facilities inventory may be corrected at any time when new additions or remodeling occurs, during a validation study conducted by the district or the Office of Educational Facilities (OEF), or as the result of an approved educational plant survey. New construction may be added to the inventory when a construction contract is issued. Large areas that are scheduled to undergo major remodeling should be updated in the inventory as soon as a contract agreement has been made. If a major remodeling project is conducted by district staff, the inventory should be updated when the project is substantially completed. Each district should conduct at least an annual update of FISH. Minor changes made to facilities, such as changes in floor coverings, should be reported before April of each year; however, we recommend that facilities changes be reported in FISH as they occur to assure that current, accurate information is always available. District comment fields, along with building and room name fields, are available on the appropriate data entry screens. These fields are not reviewed, edited, or used by OEF; they are reserved solely for use by districts for any purposes that suit local data needs that are beyond the scope of the data needs of the state. NOTE: We recommend all users read the “Glossary of Technical Terms and Other Word Usage” in the Section titled “Lexicon and Miscellanea” before proceeding with reading this manual. Page 5 of 105 FISH Users Manual 2010 On screens where a appears, simply click on the icon and help information will be provided. On screens where a comment field appears, click on the small blue triangle to review the comments; to add a comment, type information into the “Add comment” field and click on the “Save” button. A * beside a data entry field means the information is required. NOTE: Do NOT place in “Favorites” any reports, facility, parcel, building, or room pages. Attempting to use a “favorite” link, other than to the public access URL, is not supported and may cause an error notice. 1.1 – User Login Anyone who uses EFIS must be an authorized, approved user. Users may only access the system via the Internet using Microsoft Internet Explorer; the minimum version 5.5 will work but version 6.0 or higher is recommended, lower versions may work but will not support or engage all features and functionality of the system—no other software or hardware is required. 1.1.1 – Access URL The acronym URL stands for “Uniform Resource Locator”; a URL is an address, link, or location for a place on the World Wide Web (www). A URL can be for something as simple as a file or a directory, or it can be a reference to something more complex such as a query to a database (e.g. EFIS) or to a search engine (e.g. Google). The EFIS access URL is: https://public2.fldoe.org/EFIS/ NOTE: Place this link in your “Favorites” for quick and easy access to EFIS. Clicking on the EFIS access URL will route you to the EFIS login screen. The public access URL has a “Login” box for authorized users. If you are a registered user, enter your user name and password; then click on the Log In button. Page 6 of 105 FISH Users Manual 2010 The EFIS systems that you have access to will automatically display. 1.2 – User Registration The public access URL also has a link for requesting access to EFIS: “Register for a new account”. 1.2.1 – New User Registration The “New User Registration” screen allows school district staff to request access to all appropriate EFIS applications. All required fields are identified with a * and must be completed before submitting a request for registration. Access to at least one EFIS application must be requested; after all information is complete, click on the “Submit” button. If all fields have been reported appropriately and validation criteria are met, e.g., password length is adequate, a user account will be created and marked as “not approved”, which means that OEF will review the application, verify authorization for access, and take the appropriate action to approve or reject a request for EFIS access. To register for a new account: 1. Go to the access URL: https://public2.fldoe.org/EFIS/ 2. Click on the “Register for a new account” link in the Log In box 3. A new User Regisration screen will display Page 7 of 105 FISH Users Manual 2010 4. Fill in the required fields 4.1. From the Organization Type dropdown list, select “District Name” 4.1.1. From the dropdown list of districts, select your district 4.2. Select the application(s) you want to use: 4.2.1. FISH 4.2.2. Survey 4.2.3. Work Plan 4.2.4. Project Tracking 4.3. Select the type access for each application: 4.3.1. No Access 4.3.2. Read Only 4.3.3. Updates 4.4. Click on the “Submit” button 4.4.1. A “Registration Complete” screen will appear 4.4.1.1. Click on the “Continue Button” on the “Registration Complete” screen Page 8 of 105 FISH Users Manual 2010 4.5. Log in with the user name and password that you submitted 4.6. Access your E-mail account that was designated during registration NOTE: An E-mail from “EFISMonitor” with an EFIS-encrypted verification link will be sent to the E-mail address provided by the user. The link will direct the registrant to a confirmation page that is automatically populated with the user name and security question. After verification, the request will be available for DOE approval. 4.6.1. Open the verification E-mail from “EFISMonitor” titled E-Mail verification for User.Name and click on the verification link that was sent to your E-mail address Page 9 of 105 FISH Users Manual 2010 4.7. The confirm logon information screen will appear 4.7.1.1. Enter password and security answer on “Confirmation Login Information” screen 4.7.1.2. Click on the “Submit” button 4.7.1.2.1. If you entered the correct information, EFIS will confirm that you have successfully verified your account NOTE 1: The district security contact will be notified that access to the district’s data has been requested, along with the levels of access solicited in the application; the district security contact must recommend that OEF approve authorization for access to EFIS before OEF will grant anyone right of entry to district data. NOTE 2: The “Confirm Login Information” screen will take the E-mail address provided and encrypt it using the same algorithm that was used to generate the E-mail code value. An EFIS process will compare the two code values to ensure that they match. This matching process guarantees that the person submitting the confirmation request was actually the recipient of the confirmation E-mail. Page 10 of 105 FISH Users Manual 2010 NOTE 3: If the login credentials match the identification associated with the E-mail address that was provided in the confirmation link, and the correct password and security answer are entered, then the registrants’ account is marked as “verified” and will be available for OEF approval. If any of the above validation checks fails, no access will be given to any EFIS program. Additionally, each unverified account will maintain a count of the user verification attempts. If the verify attempts count exceeds three, the user account will be marked as “locked” and the user will have to contact an administrator in the Office of Educational Facilities to have the pending account unlocked or deleted. 4.8. An E-mail message will be sent from “EFISMonitor” to your E-mail address when OEF approves access 4.9. The E-mail will identify all systems approved for access to the user id and provide a link to the EFIS system NOTE: The approval notice will suggest that your first step should be to logon and then read the user manual for the system. The user manual will give clear, concise instructions to help you become proficient in using the EFIS programs. Page 11 of 105 FISH Users Manual 2010 1.2.2 – Password Recovery There is a link on the login screen for approved users to recover forgotten passwords. Clicking on the “forgotten password” link from the main login screen will direct users to the “Password Recovery” screen. After entering the user name, users will be prompted to answer the security question that was defined during registration. To recover a forgotten password: 1. Click on the “Forgotten Password” link at the bottom of the login screen 2. Enter user name on the “Password Recovery” screen 2.1. Click on the “Submit” button 3. Enter answer to the security question into the textbox marked “Answer:” 3.1. Click on the “Submit” button Page 12 of 105 FISH Users Manual 2010 3.2. A notice containing your password will be sent from “EFISMonitor” to the E-mail address you designated during registration 3.3. Access your E-mail account that was designated during registration and open the E-mail notice from “EFISMonitor” titled User User.Name recovered password to receive your forgotten password NOTE: After you recover your password in the E-mail from EFISMonitor, we strongly recommend that you immediately logon and then change your password. Page 13 of 105 FISH Users Manual 2010 1.3 – User Profile Update Sometimes it is necessary to update the information in your user account. It is a good practice to change your password on a regular basis to ensure the security of your EFIS user account. The “Update Account Information” screen allows you to revise any profile information. All users can change their first name, last name, E-mail address, password, and the security question and/or the security answer. NOTE: The User Name cannot be changed. 1.3.1 – Modify User Information To edit your user information: 1. Click on the “Edit Profile” link (located next to user name on any EFIS screen): 1.1. Change user profile information as desired 2. Click on the “Update Profile” button 1.3.2 – Change Password To change your password: 1. Click on the “Edit Profile” link (located next to user name on any EFIS screen): 1.1. Enter your password in the field labeled “Current Password” 1.1.1. Enter the new password in the field labeled “New Password” 1.1.2. Reenter the new password in the field labeled “Confirm New Password” 2. Click on the “Update Security Settings” button 1.3.3 – Change Security Question And Answer To change your security information: 1. Click on the “Edit Profile” link (located next to user name on any EFIS screen): 1.1. Enter the updated security question in the field labeled “New Question” 1.1.1. Enter the updated answer to the security question in the field labeled “New Answer” 1.2. Click on the “Update Security Settings” button 1.2.1. Enter your password in the field labeled “Current Password” Page 14 of 105 FISH Users Manual 2010 2. Click on the “Update Security Settings” button 1.4 – Error Message Sometimes errors occur in all EFIS programs. The most common issue is a “Session Timeout” error; when a timeout occurs it means no interaction has occurred for 20 minutes. You need only click on the “Continue” link and login again to go back to working on EFIS programs. Any system error you encounter will automatically notify EFIS administrators and identify the problem. For most errors, the EFIS notice will give you contact information to report the issue to someone in OEF. When reporting an error to OEF, we recommend that you do a screen snapshot of the error message and include the image in the E-mail; the image helps us to more quickly resolve a problem. The following are examples of common access issues and errors: 1. Session timeout 2. Unrecoverable error 3. EFIS application error NOTE: Before notifying OEF about a system error, close the Microsoft Internet Explorer web browser, open a new web page, then attempt to access EFIS again. If the problem is repeated, do a screen snapshot of the error notice and send it to OEF. Page 15 of 105 FISH Users Manual 2010 2 – Facility Information Only facilities contained in FISH are eligible to generate capital outlay FTE (COFTE) funds. Certain district programs may use rental space, churches, HRS facilities, hospitals, jails, or even existing schools in evening hours and report FTE for operational purposes. However, the Office of Educational Facilities (OEF) will not assign facility numbers to these programs because they are not eligible to earn COFTE. The Bureau of Education Information and Accountability Services (EIAS) may assign a unique school number for these programs so that operational funds may be generated based on student assignments to programs that are not eligible to earn COFTE. General Facility Information A unique facility number is assigned to all school and ancillary facilities identified in the district’s educational plant survey. This number is assigned electronically by the automated FISH system to all school board owned facilities, facilities acquired under a lease/purchase agreement, community/joint use facilities in which the school board acts as fiscal agent with maintenance responsibilities, or any property for which a long-term (40-years or more) facility use/lease agreement exists and is recommended for continued use in the district’s educational plant survey. 2.1 – Facility Search The “Search Facilities” screen allows you to look for existing facilities using any known information. For example, if you only know one part of a school name, you can enter just the information you know in the facility name textbox, click on the “Search” button, and all facilities with that information contained anywhere in the name record will be displayed. If you don’t know any of the information, or if you simply want to see everything, just click on the “Search” button without entering any search criteria. Search by entering any known data, e.g. facility suffix, and everything with that information will be displayed. Search results are sorted by facility number. To search for facilities: 1. Click on the “Search Facilities” link in the navigation tree 2. To see all facilities in the district, click on the “Search” button without entering any search criteria 3. To view information about a specific facility, click on the “Facility Report” link or click on the checkbox beside the facility number and click on the “Edit Record(s)” button to display the information on screen NOTE: To conserve system resources, search result sets are limited to 100 per query. This search screen is designed solely for locating specific records, not for searching and browsing an entire inventory. Page 16 of 105 FISH Users Manual 2010 4. Use the dropdown list to navigate to facility records in the selection. 2.1.1 – Facility Details The “Facility Details” screen shows you all information related to a facility and allows you to add, review, and update facility records. See Item 2.1.1f below See Item 2.1.1b below See Item 2.1.1a below See Item 2.1.1c below See Item 2.1.1d below See Item 2.1.1e below NOTE: Certain data fields in FISH have unique requirements and relationships to other data fields; for example, ancillary facilities cannot report COFTE. 2.1.1a – Capital Outlay Classification (COC) Educational plants are identified by recommended type of facility. The COC determines eligibility for the expenditure of certain funds. Page 17 of 105 FISH Users Manual 2010 NOTE: The COC can only be assigned or changed by an educational plant survey recommendation. These codes cannot be changed in FISH; they must be changed by an approved educational plant survey recommendation. C-1: C-2: C-3: An educational plant that is recommended for continued use. Generally, this includes: (1) Adequate site, (2) Satisfactory building(s), (3) Projected membership within desired size range for the type of school, (4) Recommended new educational plant. An educational plant that is in a period of transition with evidence insufficient to recommend replacement or consolidation, and typically new construction is not recommended for this COC. Generally, this includes: (1) Inadequate site and/or inadequate building(s), (2) Declining or static enrollment, (3) An educational plant that probably would be recommended for consolidation if not for excessive distance required for student transportation. An educational plant that is unsatisfactory in one or more major aspects. Generally, this includes: (1) Inadequate site and/or unsatisfactory building(s), (2) Declining or static enrollment to a level indicating that the needs of students can better and more economically be served at other educational plants, (3) Abandoned educational plants not currently housing students. NOTE: Educational plants assigned a C-3 COC and used to house students should be closed when adequate facilities are available elsewhere. C-6: C-7: Ancillary facility recommended for continued use. Generally, this includes: (1) Adequate site, (2) Satisfactory building(s), (3) Recommended new site and/or facilities. Ancillary facility is unsatisfactory. Generally, this includes: (1) Inadequate site and/or unsatisfactory building(s), (2) Abandoned facilities not currently being used. NOTE: Facilities assigned a C-7 COC that are in current use should be closed when adequate facilities are available elsewhere. C-9: Any district-owned facility leased to an entity for use by the lessee for any purpose, including educational, but is not used by the district during the normal school hours of operation. NOTE 1: Facilities assigned a C-9 COC will not generate PECO maintenance funds even when the facility contains satisfactory space. NOTE 2: Facilities assigned a C-9 COC are to be counted in the district’s inventory of available space and may be considered in the determination of new construction needs. NOTE 3: If the COC is 1, 2, or 3 the grades/programs recommended to be housed for the facility must be a combination of PK, KG, 01-12, or in certain cases AE, VE. If the COC is 6 or 7 Page 18 of 105 FISH Users Manual 2010 the grades/programs recommended to be housed must be CA, CA or DS, DS. If the COC is 9 the grades/programs recommended to be housed must be LS, LS. 2.1.1b – Primary Use Of Facility (Code) The primary use of a facility for all PK-12, vocational, and adult centers is determined annually from FTE data reported by the districts to the Bureau of Education Information and Accountability Services (EIAS). The primary use of a facility for all other centers is assigned, in FISH, by the approved educational plant survey for each facility. OEF automatically updates school center use codes when COFTE is updated. The annual update usually occurs in March or April of each year. The recommended primary use of a facility in FISH will automatically update when a survey or supplemental (spot) survey is approved if there is no COFTE reported at the school/facility or if the primary use is changed from one type ancillary code to another type ancillary code. The primary facility use codes are: ANY UNUSED FACILITIES (01) Vacant SCHOOL CENTERS: PK-12 (02) Pre-K ESE (see Note 2 below) (03) Kindergarten (04) Elementary (05) Middle ADULT AND VOCATIONAL SCHOOLS (11) Adult education ANCILLARY AND OTHER FACILITIES (12) County administration (13) Warehouse (14) Maintenance (15) Transportation (16) Food service (17) Community service (06) Junior high (07) Senior high (08) Exceptional student (09) Combination of 04-07 (10) Alternative education (20) Vocational/technical (18) Joint use facility (19) Multiple use support (20) Vocational/technical (21) State school (22) Other (23) Leased to another entity (24) Agriculture farm NOTE 1: These codes cannot be changed in FISH; they must be changed by an approved recommendation in the educational plant survey. NOTE 2: Pre-K ESE refers only to any child that is below the age of five (5) years who has a sensory, physical, mental, or emotional condition that significantly affects the attainment of normal developmental achievement as established in State Board of Education Rules 6A6.03026, 6A-6.03027, 6A-6.03030, and 6A-6.03031, Florida Administrative Code, and has an approved individual education plan (IEP) or a family support plan developed in accordance with Rules 6A-6.03028 and 6A-6.03029, Florida Administrative Code. No other Pre-K students are eligible for consideration or counted among eligible students for any Pre-K capital outlay facilities services. Page 19 of 105 FISH Users Manual 2010 2.1.1c – Grades/Programs Recommended For Facility Grades/programs recommended for a facility can only be assigned or changed by an approved educational plant survey recommendation. These are the grades/programs that an educational plant survey recommends, NOT necessarily what is actually being housed at the site. For example, a range of grades recommended for a facility could be KG-05, even though the actual grades served might be 9-12. Changes to the recommended Low Grade and recommended High Grade will automatically update FISH when a survey or supplemental (spot) survey is approved. The grades/programs recommended for a facility are: SCHOOL CENTERS PK = Pre-K ESE (see Note 2 below) KG = Kindergarten 01 through 12 = Grade DESIGNATED USE CENTERS AE = Adult education VE = Vocational education ANCILLARY AND OTHER FACILITIES CA = Countywide administration DS = District services LS = District owned facility leased to another entity NOTE 1: These codes cannot be changed in FISH; they must be changed by an approved recommendation in the educational plant survey. NOTE 2: Pre-K ESE refers only to any child that is below the age of five (5) years who has a sensory, physical, mental, or emotional condition that significantly affects the attainment of normal developmental achievement as established in State Board of Education Rules 6A6.03026, 6A-6.03027, 6A-6.03030, and 6A-6.03031, Florida Administrative Code, and has an approved individual education plan (IEP) or a family support plan developed in accordance with Rules 6A-6.03028 and 6A-6.03029, Florida Administrative Code. No other Pre-K students are eligible for consideration or counted among eligible students for any Pre-K capital outlay facilities services. 2.1.1d – Contract Issued Date The contract issued date field should be the actual date when the facility construction contract was originated and signed by the school board. The contract issued date should not be the date when construction began. 2.1.1e – Validation Date The validation date is only used by OEF staff to record the actual date when a facility, along with all spaces and data, was verified by OEF during an official on-site visit. 2.1.1f – Facility Suffix (Code) The facility suffix identifies the type of facility, indicating whether the facility is a standard school center, a school board-owned conversion charter school, or an ancillary facility. The facility suffix cannot be Page 20 of 105 FISH Users Manual 2010 “F” (ancillary facility) if there is COFTE reported at the facility or if the facility is recommended to be an instructional facility. In order to change the facility suffix, you must identify the approved educational plant survey that recommends the appropriate capital outlay classification, primary facility use code, and the recommended low grade and high grade planned for the facility that are consistent with the facility suffix. The facility suffix codes are: A – Standard School B – District Owned Conversion Charter School F – Ancillary Facility Page 21 of 105 FISH Users Manual 2010 2.2 – Master School (MSID) Assignment To Facilities The Master School Identification (MSID) file is maintained by the Department of Education (DOE) to ensure that we have accurate information on each public school in the state. This file contains information for all public PK-12 schools as well as for adult and vocational-technical schools operated by district school boards, and, based on how it is reported, the MSID is one of two sources used for determining COFTE—the facility number is the other source. The MSID number may or may not be assigned to an educational facility; the MSID, primarily, is concerned with identifying instructional programs and not actual facilities. A facility may have multiple MSIDs, but an MSID cannot have multiple facilities associations in FISH. The MSID file is used to edit all records submitted to the Department’s Student, Staff, and Finance Automated Data Base Systems. The MSID provides for accountability reporting, including annual school grades and adequate yearly progress calculations; it is also used for reporting information to the U.S. Department of Education via the Common Core of Data and Education Data Exchange Network reporting systems and the Consolidated State Performance Report. When planning for the opening of a new school, the school district must request a school number (MSID) from DOE. Typically, the application for a new school number (MSID) should be made at least a year before the opening of the school to smooth the process of the assignment of a federal school number which occurs following the annual Common Core of Data submission. The DOE School Approval Committee meets, every other week throughout the year, to review applications for MSIDs. The general guidelines for MSIDs are: A school (MSID) should have separate student and staff populations and its own principal. When a school (MSID) moves from an old school facility to a new school facility, the MSID number from the old school facility should transfer with the student body to the new school facility in order to maintain the ability to track the school’s (MSID) history. A new MSID number is assigned when: • A newly formed student body (usually resulting from re-zoning) occupies a new facility; • An existing school facility changes its type (such as an existing high school being re-designated as a middle school). FISH imports all MSIDs so that appropriate associations may be made for determining COFTE. To see the MSIDs: Page 22 of 105 FISH Users Manual 1. 2. 3. 4. 5. 2010 Click on the "Search Facilities" node in the navigation tree Enter the search criteria Choose the desired facility using the checkboxes Click on the “Search” button Click on the “Associate Master Schools” button 5.1. The “Associate Master Schools” screen will display NOTE: A facility may have multiple MSID numbers; however, an MSID number cannot be assigned to more than one facility. EXCEPTION: MSID number 9001 may be assigned to multiple ancillary facilities; however, no COFTE data can be reported under this generic MSID number. Page 23 of 105 FISH Users Manual 2010 2.2.1 – Associate MSIDs With An Existing Facility To see all MSIDs in the district, click on the “Search” button on the “Associate Master Schools” screen; all MSIDs will be shown, but MSIDs that are already used will have the checkbox grayed out so that it cannot be selected for assignment to another facility. To see only the MSIDs that can be assigned to new or existing facilities, click on the “Show Available” button and only MSIDs that are not assigned to a facility will be displayed and the checkbox will be activated so that you can select any of the available MSIDs. You may go directly to a known MSID by entering the MSID in the search panel and then clicking the “Search” button, only the selected MSID will display. When updating an existing facility, a district user cannot disassociate the default MSID from the facility. The MSID value entered will be validated against the MSID table (maintained by EIAS), and the name associated with it will be returned. You can create an association by checking the box next to the MSID and clicking the “Add” button. For facilities with more than one MSID, you can change the default MSID by clicking the “Set Default” link to the right of the record you wish to change; the “Set Inactive” link allows you to identify MSIDs that are no longer reporting COFTE at a facility (this feature allows you to set the now inactive MSID as an active MSID at another facility). To associate MSIDs with facilities: 1. 2. 3. 4. Click on the "Search Facilities" node in the navigation tree Enter the search criteria Choose the desired facility using the checkboxes Click on the “Associate Master Schools” button 4.1. Click on the “Show Available” button 4.1.1. Click on the checkbox next to the desired MSID 4.2. Click on the “Add” button Page 24 of 105 FISH Users Manual 2010 2.2.2 – Disassociate MSIDs From An Existing Facility A facility must have at least one MSID associated with it (you cannot have a facility record with no MSID associations). The MSID is used to determine FTE reporting at a facility and is also considered when calculating COFTE. Once an MSID is associated with a facility, a district user cannot remove the association; this feature is a safeguard to protect the determination of FTE that is eligible for counting as COFTE and to track the MSID assignments to facilities. You may set an MSID as inactive and that will remove it from being considered for COFTE at the facility; setting the MSID as inactive will move the MSID to the list of available MSIDs so that it can be assigned to another facility; however, the MSID history will remain with the facility as an inactive record. FISH maintains a complete history of MSIDs assigned to facilities for tracking purposes. If you create a wrong association, contact OEF for disassociating MSIDs. Page 25 of 105 FISH Users Manual 2010 2.3 – Add A New Facility Record To FISH A new facility may be added to a district’s inventory when a construction contract is issued for a facility that is recommended in the educational plant survey. The FISH system will automatically assign all facility numbers. To add a new facility: NOTE: There should be a vacant parcel available before attempting to add a new facility. The process of adding a new facility must include adding a facility, using an existing or adding a new parcel, adding at least one building, and adding at least one room to the building. 1. Click on the “Add Facility” node in the navigation tree 2. Click on the checkbox for MSID (see section 2.2 for MSID information) assigned to the facility 2.1. Click on the “Add” button 3. Click on the “Next” button 4. Enter a Facility Name and all required facility details (including the survey that includes the recommendation for the new facility—school centers must be listed with a primary use code of 1 [Vacant]) 4.1. Click on the “Next” button 5. Choose the desired parcel using the checkboxes When creating a new facility, the “Assign Parcel” screen shows all available parcels; any parcels already associated with another facility will not be viewable. You can use the checkbox to select a parcel(s) or you can enter a parcel number in the in the search box; you can also enter any part of a known street address to find a specific parcel. Use the checkbox to select the parcel(s) and then click on the “Add” button. 5.1. Click on the “Add” button Page 26 of 105 FISH Users Manual 2010 When you click on the “Add” button, the parcel will show in the “Currently Associated” section; if you accidentally got the wrong parcel you can click on the “Remove” button. If you have the correct parcel, then click on the “Next” button. 6. Click on the “Next” button 6.1. A building screen will appear with default information pre-populated for all fields; if the default information does not apply, enter the correct building information and then click on the “Next” button Page 27 of 105 FISH Users Manual 2010 6.2. A room screen will appear with default information; if the default information does not apply, enter the correct room information and then click on the “Finish” button NOTE: The process, to this point, only adds the basic requirements for a facility (a parcel with at least one building and at least one room); to add more rooms to the building proceed to step 6.2.1. 6.2.1. 6.2.2. 6.2.3. 6.2.4. 6.2.5. Click on the Add Room link in the navigation tree Enter the facility and/or parcel number and click on the “Search” button Click on the “Select” link (the rightmost position returned from the search) Click on the “Next” button Enter the building number (or accept the value supplied by the system) and all required building details 6.2.6. Click on the “Next” button 6.2.7. Enter the room number and all required room details 6.2.8. Click on the “Finish” button NOTE: The process from step 6.2.1. through 6.2.8. only adds one room at a time; if you want to add multiple rooms to a building, follow the procedure from step 6.2.9. through 6.3. 6.2.9. Click on the Search Building link in the navigation tree 6.2.10. Enter the facility and/or parcel number and click on the “Search” button 6.2.11. Click on the checkbox beside the building number 6.2.12. Click on the “Edit Record(s)” button 6.2.13. Click on the “Add Rooms” button 6.2.13.1. Enter the required room data and then click on the “Add” button 6.2.13.1.1. Repeat until all rooms are added 6.3. Click on the “Finish” button 7. Verify that the only parcels associated with the new facility are those selected 8. Verify that only MSIDs associated with the facility are those selected Page 28 of 105 FISH Users Manual 2010 9. Verify that building(s) associated with the facility and parcel are correct 9.1. Verify that room(s) associated with the building(s) are correct 2.4 – Update An Existing Facility Record To update an existing facility record: 1. Click on the "Search Facilities" node in the navigation tree 2. Enter the search criteria 3. Choose the desired facility using the checkboxes 3.1. Click on the “Edit Record(s)” button 3.2. Change the value of any editable data field (grayed out fields cannot be changed) 3.3. Check that no error message appears and that no information has been changed inadvertently 3.3.1. Click on the “Reset” button if any data change is unwanted (data will return to its value before the last save) 3.3.1.1. Review the reloaded data 4. Click on the “Save” button 5. Verify the changed data 5.1. The form may be grayed out due to pending reevaluation Page 29 of 105 FISH Users Manual 2010 2.4.1 – Assign A Parcel To An Existing Facility A facility must have at least one parcel; the parcel must have at least one building; the building must have at least one room. A facility may have an unlimited number of vacant parcels assigned to it (land with no buildings or rooms). To add a parcel to an existing facility: 1. Click on the “Search Facility” node in the navigation tree 2. Enter the search criteria 3. Use the checkbox next to the desired facility 3.1. Click on the “Associate Parcels” button 4. Use the checkbox next to the desired parcel 4.1. Click on the “Add” button 5. Verify that the selected parcel is listed as associated with the facility 2.4.2 – Disassociate Parcels From An Existing Facility A facility must have at least one parcel associated with it (you cannot have a facility record with no parcel). When updating an existing facility you cannot disassociate all parcels from the facility. When parcels are associated to facilities, you may check the boxes next to any parcel records and disassociate them by clicking the “Remove” button (only applies to vacant parcels; parcels with buildings cannot be disassociated; however, a parcel can be reassigned to another facility if it is not the only parcel assigned to a facility with buildings and rooms). 2.5 – Delete A Facility When a facility is deleted, the parcel(s) associated to the facility must be removed from FISH or assigned to another facility. To delete a facility record from the system, a wizard (a computer linking system that simplifies a complicated process) is used to reduce all of the [sometimes complicated] steps involved. Clicking on the “Remove” button will launch the wizard. Page 30 of 105 FISH Users Manual 2010 The first step is to choose an action to be taken on the parcel(s) associated with the facility to be deleted. The “Remove” button will take you to the “Remove Parcel” screen so that the parcel may be deleted. The “Reassign” button will take you to the “Reassign Parcel” screen so that the parcel can be assigned to another facility. The “Vacate” button will remove the parcel’s facility association and all buildings and rooms, leaving the parcel only as a vacant piece of land. The “Reassign Parcel” action allows you to transfer a parcel to any existing facility from the dropdown list and then click on the “Next” button to continue the reassignment of the land, building(s), and room(s). The reassignment also requires you to identify the educational plant survey that approved the action. The “Remove Parcel” action allows you to delete parcels from the system. When deleting a parcel, all data is captured and saved in the parcel history table. You must provide the survey version number that approved the action. Page 31 of 105 FISH Users Manual 2010 The wizard will delete all buildings and rooms from the parcel. The survey version number is automatically brought forward to the building delete from the remove parcel form. You must enter the “Year Demolished”; if there are multiple buildings, the year demolished is automatically carried forward to each building and you only have to confirm the date by clicking on the “Next” button. After all buildings are identified with the year demolished, you will automatically go to the last step; click on the “Finish” button to complete the deletion of the facility, parcel, building(s), and room(s). The “Vacate Parcel” action allows you to delete the facility from the system, remove all buildings and rooms from the parcel, and leave the land as a vacant parcel. When deleting buildings and rooms from a parcel, all data is captured and saved in the parcel history table. You must provide the survey version number that approved the action. You must enter the “Year Demolished” for the building(s); if there are multiple buildings, the year demolished is automatically carried forward to each building and you only have to confirm the date by clicking on the “Next” button. After all buildings are identified with the year demolished, you will automatically go to the last step for vacating the parcel; click on the “Finish” button to complete the deletion of the facility, building(s), and room(s). Page 32 of 105 FISH Users Manual 2010 2.5.1 – Remove An Existing Facility 1. Click on the “Search Facilities” link that appears in the navigation tree 2. Enter search criteria 3. Choose the desired facility using the checkboxes 3.1. Click on the “Edit Record(s)” button 3.2. Click on the “Remove” button 4. For each associated parcel, perform one of the following actions: Remove, go to step 4.1; Reassign, go to step 4.2; Vacate, go to step 4.3: 4.1. To remove (delete) the facility, parcel, building(s), and room(s): 4.1.1. Click on the “Remove” button 4.1.1.1. Select the survey number and version number from the dropdown list 4.1.1.1.1. Click on the “Next” button 4.1.1.1.1.1. NOTE: The building Removal Screen will appear once for each building associated with the parcel 4.1.1.1.2. Enter the Year Demolished 4.1.1.1.2.1. Click on the “Next” button 4.2. To reassign the parcel along with the building(s) and room(s) to another facility: 4.2.1.1. NOTE: A system notice will inform you that the parcel along with all buildings and rooms are about to be reassigned to another facility and prompt you to accept the action or cancel the reassignment 4.2.2. Click on the “Reassign” button 4.2.3. Choose the facility from the dropdown list where the parcel, buildings, and rooms will transfer to 4.2.3.1. Click on the “Next” button 4.3. To vacate the parcel will remove all buildings and rooms and the facility: 4.3.1.1. NOTE: The building Removal Screen will appear once for each building associated with the parcel; for all succeeding buildings, the approval and year demolished data will automatically be populated from the previous screen 4.3.2. Click on the “Vacate” button 4.3.2.1. For each building associated with the parcel 4.3.2.1.1. Enter the Year Demolished 4.3.2.1.1.1. Click on the “Next” button 5. Click on the “Finish” button to complete the Removal Once a removal form has been completed and you click on the “Next” button, a confirmation screen will be shown to alert you that records are going to be deleted. Click on the “Finish” button to complete the process; select the “Cancel” button to terminate the delete action. Page 33 of 105 FISH Users Manual 2010 After all of the associated parcels and their buildings have been reassigned, deleted, or vacated, the facility record is moved to the history table and marked as removed. You can return to the search page or continue with other tasks. 2.6 – Recover A Removed Facility When a removal/deletion action occurs, records are transferred to history files and are archived. Typically, these records are not restored to active use from the archived data. Contact OEF if records were removed/deleted in error. 2.7 – Facility COFTE Information The “Facility COFTE Information” screen allows you to view COFTE (Capital Outlay Full Time Equivalent) student data for any facility. COFTE data is imported annually into the FISH database from another system and is not editable. From the “Search Facilities” page, select the facilities, then click on the “View COFTE Info” button. You can navigate between the facilities selected using the facilities dropdown list. Select a year from the School Year dropdown list. Page 34 of 105 FISH Users Manual 2010 2.7.1 – View COFTE Reported At A Facility 1. The COFTE view table automatically defaults to the Current Year 2. Use the “Date Range” dropdown list to check historical COFTE data 2.8 – Facility Reevaluation Facilities are automatically reevaluated to determine, among other things, whether certain spaces should be assigned capacity, e.g., when rooms are added, changed, or deleted that have, or should have, student stations assigned, or if the student stations of the band or gymnasium should be recalculated based on other changes made to the inventory, or if the ESE spaces exceed the amounts allowed in SREF. If a record (room, building, parcel, or facility) belongs to a facility that is pending automatic reevaluation, then all data entry fields will be disabled and a status message will appear near the top of the screen stating, “The current record has been queued for reevaluation. No changes may be made to this record until the reevaluation process has completed.” The automatic reevaluation process runs when you save data; you may wait on the current screen and click on the “Reset” button to refresh the status (reevaluation usually takes only a few seconds). Once reevaluation has been completed, the fields will be enabled and the record is available for editing. Page 35 of 105 FISH Users Manual 2010 NOTE: If rooms are being added, changed, or deleted, there is a “Pause” option that will temporarily suspend automatic reevaluation; choose this feature while making changes to allow all data entry items to be completed before reevaluation occurs. Activating the “Pause” feature will prevent an unnecessary slowdown in processing changes due to continuous reevaluation of all facility spaces. When data entry is completed, click on the “Resume” button (“Pause” becomes “Resume” when selected), reevaluation will begin automatically. 2.8.1 – Types Of Reevaluation 1. Automatic Reevaluation: 1.1. Triggered when any record is added, modified, or deleted for a building or room in a facility 2. Manual Manipulation of Reevaluation Status: 2.1. Pause Reevaluation 2.1.1. From a facility record 2.1.2. Click on the checkbox “Pause Reevaluation” on the Facility Details screen 2.1.3. Click on the “Save” button Page 36 of 105 FISH Users Manual 2010 2.1.4. From a building record 2.1.4.1. Click “Pause” on the Building Details screen 2.1.5. From a room record 2.1.5.1. Click “Pause” on the Room Details screen 2.2. Resume Reevaluation (for a facility when the automatic reevaluation has been paused) 2.2.1. From a facility record 2.2.1.1. Click on the checkbox (remove check) “Pause Reevaluation” on the Facility Details screen 2.2.1.2. Click on the “Save” button 2.2.2. From a building record Page 37 of 105 FISH Users Manual 2010 2.2.2.1. Click “Resume” on the Building Details screen 2.2.3. From a room record 2.2.3.1. Click “Resume” on the Room Details screen NOTE: If you forget to reset the “Pause” button, it will automatically reset itself after 10 calendar days and immediately run the automatic reevaluation. Page 38 of 105 FISH Users Manual 2010 3 – Parcel Information FISH should contain an accurate record of all land owned by the school board, land acquired under a lease/purchase agreement, community/joint use land in which the school board acts as fiscal agent with maintenance responsibilities, or any land for which a long-term (40-years or more) use/lease agreement exists; and such land is recommended in the district’s educational plant survey. No other land should be recorded in FISH, regardless of any use agreement a district may have for a piece of property. General Parcel Information Unique numbers are required for each parcel of land. A parcel consists of contiguous land that is not divided by a public thoroughfare, regardless of the number of separate titles to any parts that make up the site. Acreage acquired or transferred from a parcel should be updated in FISH. NOTE: Contiguous land that has more than one facility assigned to it must be divided into separate parcel numbers and the actual acreage assigned to the unique facilities must be reported on the individual parcel numbers assigned to each facility. A new parcel may be added to a district’s inventory when a purchase or long-term lease agreement is signed. The FISH system will automatically assign parcel numbers. NOTE: When a land purchase or long-term lease agreement is issued, add the parcel. Land and real property may be removed from a district’s inventory when an ownership transfer is completed or when structures are razed. NOTE 1: Land and real property should only be removed from FISH based on an approved educational plant survey recommendation. NOTE 2: Certain data fields have unique requirements and relationships to other data fields. Page 39 of 105 FISH Users Manual 2010 3.1 – Parcel Search The “Search Parcels” screen allows you to look for existing parcels using any known information. For example, if you only know one part of a street name, you can enter just the information you know in the street address textbox, click on the “Search” button, and all parcels with that information contained anywhere in the address record will be displayed. If you don’t know any of the information, or if you simply want to see everything, just click on the “Search” button without entering any search criteria. Search by entering any known data, e.g. street name, and everything with that information will be displayed Search results are sorted by facility number; parcels not assigned to any facility are displayed first. 1. 2. 3. 4. 5. To search for a parcel(s): Click on the “Search Parcels” link in the navigation tree To see all parcels in the district, click on the “Search” button without entering any search criteria To see all parcels assigned to a facility, enter the facility name or number then click on the “Search” button To view information about a specific parcel, click on the “Parcel Report” link or click on the checkbox beside the parcel number, then click on the “Edit Record(s)” button to display the information on screen Use the dropdown list to navigate to parcel records in the selection Page 40 of 105 FISH Users Manual 2010 NOTE: To conserve system resources, search result sets are limited to 100 per query. This search screen is designed solely for locating specific records, not for searching and browsing an entire inventory. 3.1.2 – Parcel Details The “Parcel Details” screen shows you all information related to a parcel and allows you to add, review, and update parcel records. * Indicates required data. Some data are prepopulated with the most common information for that field; use the dropdown arrows to change any prepopulated data. Page 41 of 105 FISH Users Manual 2010 3.2 – Add A New Parcel To add a new parcel: 1. Click “Add Parcel” on the site navigation tree 2. Enter all required data 2.1. Click on the “Finish” button 2.2. Check that all data entered is correct NOTE 1: Land data is required for each parcel owned or acquired under a lease-purchase agreement by the school district. Parcels owned by other entities but used by the school district should not be reported in the inventory unless there is a long-term (40-years or more) use/lease agreement or a cooperative/joint use agreement where the school district is made the fiscal agent with maintenance responsibilities. NOTE 2: Parcels used by the school district with ownership codes 01, 02, 03, 04, 06, 08, 09, and 10 should not be reported in FISH (includes land under short-term lease agreements that may be extended and become multi-year contracts) unless there is a long-term (40-years or more) use/lease agreement or a cooperative/joint use agreement that makes the school district the fiscal agent with maintenance responsibilities. NOTE 3: An undeveloped parcel may be added to FISH that is not assigned to a facility. Page 42 of 105 FISH Users Manual 2010 NOTE 4: For recommended useable acreage details see Guidelines for State Requirements for Educational Facilities §1.4(4): http://www.fldoe.org/edfacil/pdf/sref-guidelines.pdf 3.3 – Update An Existing Parcel To update any parcel information: 1. Click on the “Search Parcels” link in the navigation tree 2. Enter the desired search criteria 3. Click on the checkbox next to the desired record 3.1. Click on the “Edit Record(s)” button 4. Change data as necessary 4.1. Click on the “Reset” button if any data change is unwanted (data will return to its value before the last save) 4.1.1. Review the reloaded data 4.2. Click on the “Save” button 5. Verify the changed data 3.4 – Delete A Parcel When a facility is deleted, the parcel(s) associated to the facility must be either vacated (remove all buildings and leave the parcel empty), removed from FISH, or assigned to another facility. To delete a parcel record from FISH that has buildings, a wizard (a computer linking system that simplifies a complicated process) is used to reduce all of the [sometimes complicated] steps involved. 3.4.1 – Delete A Parcel That Has No Buildings To remove a parcel that has no buildings: 1. Click on the “Search Parcels” link that appears in the navigation tree 2. Enter the desired search criteria 3. Click on the checkbox next to the desired record 3.1. Click on the “Edit Record(s)” button 4. Click on the “Remove” button 4.1. Enter the survey/version number that authorizes the removal of the parcel 4.1.1. Click on the “Next” button 5. Click on the “Finish” button 6. Verify that the parcel was removed 3.4.2 – Delete A Parcel That Has Buildings A parcel that has buildings cannot be deleted without first deleting the buildings and rooms on the parcel. Typically, when a parcel is deleted the associated facility is also deleted. See Facility Information in Sections 2.4.2 and 2.5 for the steps to remove a parcel that has buildings. 3.5 – Recover A Deleted Parcel When a removal/deletion action occurs, records are transferred to history files and are archived. Typically, these records are not restored to active use from the archived data. Contact OEF if records were removed/deleted in error. Page 43 of 105 FISH Users Manual 2010 4 – Building Information FISH should contain an accurate record of all permanent, modular, and relocatable buildings on land that is owned by the school board, land acquired under a lease/purchase agreement, community/joint use land in which the school board acts as fiscal agent with maintenance responsibilities, or any land for which a long-term (40-years or more) use/lease agreement exists. No other structures should be recorded in FISH. For FISH purposes, a building is a structure consisting of constructed walls, roof, and floor. The Florida Building Code (FBC) identifies three (3) building types for educational facilities: A permanent building is a structure built with a fixed foundation that has permanently attached walls, roof, and floor that cannot be moved or transported either as a unit or in sections. A relocatable building (also known as “portable”) is a building or portion of a building made up of prefabricated units that may be disassembled and reassembled frequently, or a single unit of construction consisting of walls, roof, and floor that is movable as a unit either on wheels or by truck. Mobile, demountable, dividable, modular, and portable buildings are types of relocatable units. A modular building is a structure that forms a complete building when combined with other modules or structural components and/or a demountable roof and/or wall sections. A modular building may also be a relocatable building. General Building Information Building data must be reported for each structure located on each parcel of land if the building is owned by the school board; all permanent buildings on school board land are considered owned by the school board. A structure that has the same floors, ceiling, walls, and is not separated from another structure by an open air space is considered one building. NOTE: Certain data fields have unique requirements and relationships to other data fields. Page 44 of 105 FISH Users Manual 2010 4.1 – Building Search The “Building Search” screen lets you look for particular types of buildings, all buildings at a particular facility, by year of construction, year modified, etc. To search for buildings: 1. 2. 3. 4. Click on the “Search Building” node in the navigation tree Enter the desired search criteria Click on the “Search” button Click on the checkbox next to the desired record(s) 4.1. Click on the “Edit Record(s)” button 4.1.1. The selected records will be displayed 4.1.1.1. Use the dropdown list to navigate between the selected records NOTE: In an effort to conserve system resources, search result sets are limited to 100 per query. This search screen is designed solely for locating specific records, not for searching and browsing the entire district inventory. 4.1.1 – Building Details The “Building Details” screen allows you to input and update information about buildings. Relational edits will prompt you to make certain changes if data errors are identified; when errors are noted, corrections must be made before the data can be saved to the FISH database. Page 45 of 105 FISH Users Manual 2010 * Indicates required data. Some data are prepopulated with the most common information for that field; use the dropdown arrows to change any prepopulated data. Some fields are related to other fields in that certain information is required for compatibility to conform to statutory or rule guidelines. The building name field is optional and can be used by the school for any purpose such as identifying the primary use of the building. In addition to the normal save/reset/view report/remove/shelter buttons, the “Building Details” screen contains an “Add Rooms” button. Clicking this button will launch the “Add Rooms” screen, which allows you to add new room records and automatically associate them with the building. 4.1.2 – Building Number A unique number is assigned to all permanent buildings located on a parcel. Permanent building numbers are assigned by the school or district and should remain unchanged, and if possible, never be reused at a facility (replacement buildings should have new numbers assigned to maintain historic integrity of all FISH data). All relocatable units should be assigned to a building number (grouped to identify the ownership) and have unique room numbers assigned which will remain with the unit, regardless of facility site. Signage for relocatables must conform to standards prescribed by §553.415, F.S. 4.1.3 – Building Owner (Code) (01) Federal (02) State (03) County government (04) Municipal (05) School board (06) Authority (07) Lease-purchase (08) Combination (09) Private (10) Other (11) Lease/rent NOTE 1: Permanent buildings with ownership codes 01, 02, 03, 04, 06, 08, 09, 10, and 11, even though they may be used by the school district, should not be reported in FISH (includes Page 46 of 105 FISH Users Manual 2010 buildings under short-term lease agreements that may be extended and become multi-year contracts) unless there is a long-term (40-years or more) use/lease agreement or a cooperative/joint use agreement where the school district is made the fiscal agent with maintenance responsibilities. NOTE 2: For relocatable units only ownership codes 01, 05, 07, or 11 may be used. NOTE 3: Ownership code 01 is for any relocatable unit purchased with federal funds when the district holds title to the unit, or a federal agency holds title to the unit and the district has a full maintenance responsibility agreement for the life expectancy of the unit. All other federal ownership conditions are ineligible for inclusion in FISH. 4.1.4 – Building Year Of Construction Enter the year construction was started (calendar year in which the contract was awarded, or for certain relocatable units or similar construction, the calendar year in which the purchase order was issued). NOTE 1: The original year of construction for permanent buildings should not be changed. When additions, remodeling, or renovations occur, including a complete restoration of a building, the original year of construction must remain unchanged. NOTE 2: The YEAR MODIFIED should be used to record the most recent date where substantial modifications (major remodeling) were made to the building. 4.1.5 – Type Of Structural Composition (Code) Permanent Buildings (01) Concrete (02) Steel (03) Wood (04) Combination of 01-03 Relocatable Buildings (05) Relocatable Modular Buildings (06) Permanent concrete (07) Permanent metal (08) Permanent other (09) Combination of 06-08 (10) Reconstructable concrete (11) Reconstructable metal (12) Reconstructable other (13) Combination of 10-12 NOTE 1: Relocatable units can only be recorded as code 05 and TYPE OF EXTERIOR WALL FINISH must be code 08. NOTE 2: Modular buildings can only be recorded as code 06 through 13 and TYPE OF EXTERIOR WALL FINISH must be code 09. Page 47 of 105 FISH Users Manual 2010 4.1.6 – Type Of Exterior Wall Finish (Code) Permanent Buildings (01) Concrete (02) Brick (03) Hollow block (04) Stucco (05) Wood (06) Combination of 01-05 (07) Other Relocatable Buildings (08) Relocatable Modular Buildings (09) Factory built NOTE 1: Relocatable units can only be recorded as code 08 and TYPE OF STRUCTURAL COMPOSITION must be code 05. NOTE 2: Modular buildings can only be recorded as code 09 and TYPE OF STRUCTURAL COMPOSITION must be code 06 through 13. 4.2 – Add A New Building Adding a building requires adding at least one room. To add a building: 1. Click on the “Add Building” node in the navigation tree 2. Enter search criteria for the desired parcel 2.1. Click on the “Search” button (you can see all parcels by omitting all search criteria and just click on the “Search” button) 3. Click on the “Select” link that appears in the right-most cell of the grid row containing the parcel to add a building (vacant parcels that are not assigned to a facility are grayed out and cannot be selected) Page 48 of 105 FISH Users Manual 2010 3.1. The parcel information will display in the bottom section 3.2. Click on the “Next” button 3.3. Enter all required building details (the next available building number will automatically be displayed; if you prefer a different number you can change it. Also, the most common criteria for each field will automatically display, you can change any of the default data entries) 3.3.1. Click on the “Next” Button to add rooms Page 49 of 105 FISH Users Manual 2010 3.3.1.1. Enter the room number and all other required room details 3.3.1.1.1. Click on the “Add Room” Button 3.3.1.1.1.1. Repeat the “Add Room” process until all room data are reported 4. Click on the “Finish” button 5. Verify that the building and room(s) data entered are correct 5.1. The form(s) may or may not be grayed out due to pending reevaluation 4.3 – Update An Existing Building To update building information: 1. Click on the “Search Building” node in the navigation tree 2. Enter the desired search criteria 3. Click on the “Search” button 3.1. A screen will display with all records based on your selection criteria Page 50 of 105 FISH Users Manual 2010 4. Click on the checkbox next to the desired record(s) 4.1. Click on the “Edit Record(s)” button 4.1.1. A screen will display all records based on your selection criteria 4.1.1.1. Use the dropdown list to navigate between selected records 5. Change the data as desired 5.1. Click on the “Reset” button if any data change is unwanted (data will return to its value before the last save) 5.1.1. Review the reloaded data 6. Click on the “Save” button 7. Verify the changed data Page 51 of 105 FISH Users Manual 2010 7.1. The form may or may not be grayed out due to pending reevaluation 4.4 – DCA Insignia All relocatables and modulars require DCA insignia; the insignia includes a prefix that identifies the type of construction and a numeric value. The combination of prefix and numbers are unique to all individual instructional units and cannot be reused. Small rooms such as storage, restrooms, and teacher planning that are inside the unit may have the same insignia as the instructional unit; however, no unique insignia can be used to identify multiple individual units. When adding a room that requires a DCA insignia, choose the insignia prefix from the dropdown list. The DCA insignia prefixes are: Prefix E II-B IV IV-E MB MB E RMB RMB E Description Educational New noncombustible (typically, units constructed after 2002) Old noncombustible (when all existing DCA labels are used up, IV will become II-B) Old noncombustible—educational Manufactured building Manufactured building—educational (old type V & VI) wood Recertified manufactured building Recertified manufactured building—educational NOTE: Department of Community Affairs (DCA) insignia requirements for relocatable and modular facilities, §553.415(13), F.S., states, “As of July 1, 2001, all newly constructed factory-built school buildings shall bear a label [DCA insignia]…As of July 1, 2002, existing factory-built school buildings and manufactured buildings used as classrooms and not bearing such label [DCA insignia] shall not be used as classrooms pursuant to §1013.20.” The standards for relocatables used as classrooms are explained in §1013.20(1), F.S., “…Relocatables that fail to meet the standards…may not be used as classrooms…shall not be Page 52 of 105 FISH Users Manual 2010 reported as providing satisfactory student stations in the Florida Inventory of School Houses [FISH].” 4.5 – Shelter Data Shelter criteria are established in §252.385, F.S. The statute requires that a shelter facility have a minimum of 2,000 square feet of net usable floor area; the net usable floor area can be in a single room, or a combination of rooms each having a minimum of 400 square feet of net usable floor area. Each shelter space, for capacity determination, requires 20 square feet per space; §1013.372 F.S., requires public schools to include appropriate public shelter design criteria. NOTE: Shelter data does not apply to relocatable or modular construction. 4.5.1 – Add Or Modify Building Shelter Information To record shelter information: 1. Click on the “Search Building” node in the navigation tree 2. Enter the desired search criteria 3. Click on the checkbox next to the desired record(s) 3.1. Click on the “Edit Record(s)” button 3.1.1. A screen will display with all records based on your selection criteria 4. Click on the “Edit Shelter Info” button 4.1. Add or change data for the shelter information Page 53 of 105 FISH Users Manual 2010 4.1.1. Click on the “Save” button 5. Verify that the building shelter data is correct 4.6 – Delete A Building The deletion of a satisfactory building(s) requires an approved educational plant survey recommendation. To remove a building(s) from FISH: 1. Click on the “Search Building” node in the navigation tree (see Section 4.1) 2. Enter the desired search criteria 3. Click on the checkbox next to the desired record 3.1. Click on the “Edit Record(s)” button 4. Click on the “Remove” button Page 54 of 105 FISH Users Manual 2010 4.1. Use the dropdown list to select the educational plant survey that recommended the building delete 4.1.1. Enter the year the building was demolished 4.1.2. Click on the “Next” button 4.1.3. A confirmation screen will appear warning that you are about to delete the building and all rooms in the building 5. Click on the “Finish” button 5.1. A verification screen will appear and confirm the deletion of the building and room records; the building and all rooms are moved to the history files NOTE: Selecting the “Previous” or “Cancel” button instead of the “Finish” button will terminate the delete procedure and no action will be taken. 4.7 – Recover A Removed Building When a removal/deletion action occurs, records are transferred to history files and are archived. Typically, these records are not restored to active use from the archived data. Contact OEF if records were removed/deleted in error. Page 55 of 105 FISH Users Manual 2010 5 – Room Information Distinct numbers are required for each space in each building located on any parcel owned by a school board; see Section 3 Parcel Information. For additional reporting information, see both Building and Room definitions in Section 8.6 Definitions, and Section 4.1.3 Building Owner (Code). General Room Information The Florida Building Code §423.14.2 requires signage in all educational and ancillary facilities. Section 423.14.2.3 requires, “Room name, room number and, if different, FISH inventory numbers shall be provided for each space.” Room numbers are assigned by the school or district and should remain unchanged unless a remodeling project alters the existing configuration that would require a renumbering to make the buildings’ room number scheme logical. NOTE: Certain data fields have unique requirements and relationships to other data fields. 5.1 – Room Search The “Search Rooms” screen allows you to select rooms by design code, by condition, year constructed, rooms in one building, rooms in multiple buildings, and rooms on multiple facilities (based on the selection criteria). To search for rooms: 1. Click on the “Search Rooms” link that appears in the navigation tree 2. Enter the desired search criteria 2.1. Click on the “Search” button 3. Click on the checkbox next to the desired record(s) 3.1. Click on the “Edit Record(s)” button Page 56 of 105 FISH Users Manual 3.1.1. 2010 Use the dropdown list to navigate to room records in the selection NOTE: To conserve system resources, search result sets are limited to 100 per query. This search screen is designed solely for locating specific records, not for searching and browsing an entire inventory. 5.1.1 – Room Details The “Room Details” screen shows you all information related to a room and allows you to add, review, and update room records. * Indicates required data. Some data are prepopulated with the most common information for that field; use the dropdown arrows to change any prepopulated data. 5.1.1a – Room Number A unique number must be assigned to all spaces in a building. An optional suffix may be added for small rooms designed as a service or support area to the main room, e.g., a teacher planning office opening Page 57 of 105 FISH Users Manual 2010 into a classroom, a restroom in a primary classroom, or a small storage closet in a principal’s office. The suffix should be an alpha character. NOTE 1: There is no single rule for the placement or display of signage. Signage is discussed throughout the various facilities code regulations and rules, e.g. Section 423.1. and Chapters 10 and 11 of the Florida Building Code address signage for indemnification and exiting. In addition, signage is referenced in the American’s with Disabilities Act (ADA) Accessibility Code, Fire Marshal’s Rule 69A-58, and SREF. In summary, these rules and regulations require that exit signage must be located at each exit door; where non-exit doors may be confused for an exit door, a “No Exit” sign must be installed. Typically, most room identification signage is located on the wall beside the door on the entrance lock side, usually the sign is about 60inches above the floor. Signage at covered walkways, for identification, should be positioned for quick recognition and in a location that will not create a hazard. Most room identification signage is created and guided by local decisions and common sense; however, there are some specific signage requirements noted in certain codes and rules for specified types of spaces. NOTE 2: Mechanical and electrical spaces that are in attics, on roofs, or beneath floors in crawl spaces, enclosures constructed above stages, storage areas in warehouses or other areas that are above ground level but not a structural story of the building must not be reported as rooms in FISH. NOTE 3: Uncovered patios, pole barns, equipment sheds that have dirt floors, horticulture canopies or plant growing and protection areas that do not have permanently constructed walls, roof, and floor, small wooden ticket booths on athletic fields, baseball dugouts, and other similar structures must not be reported in FISH. All relocatable units should be assigned a building and room number in which the building number identifies the ownership of the unit. The unique building and room numbers should remain with the relocatable unit regardless of the facility site. Whenever possible, the unique room number for a relocatable unit should not be reused by the district. NOTE: The Florida Building Code §423.27.2.3 provides that, “A FISH inventory room number and the date of construction shall be noted on an inventory sign permanently affixed outside, beside or above the door, on all relocatables owned or leased by a district.” 5.1.1b – Room Design (Code) Use the design code number that best describes the purpose for which each space was designed. If current use of the space is different from the original design, or subsequent design alteration, choose the code based upon design, not the use of the space. See §6.1, State Requirements for Educational Facilities (SREF) for Size of Space and Occupant Design Criteria. NOTE 1: The design code should represent the actual intended use of the space at the original time of construction or the intended long-term use resulting from survey-recommended remodeling. The space design code should not be changed because of a simple rescheduling of classes or assignment to a different function or use. To change the design code of an existing space, the area should have been remodeled, and the remodeling should be recommended in an approved educational plant survey. Page 58 of 105 FISH Users Manual 2010 NOTE 2: Do not use ancillary design codes in school center facilities; do not use school center design codes in ancillary facilities. NOTE 3: An approved educational plant survey recommendation may change the design of a room(s) without any structural modification, e.g., if a middle school is recommended to be converted to an elementary school, then all middle school design codes may be changed to the appropriate elementary design codes. 5.1.1c – Room Square Footage Record the space area in net square footage (NSF). Room spaces should be measured from the inside surface of enclosing walls. Storage and other areas built into and serving as adjuncts (without doors) to these areas should be included in the total space area, not as separate spaces. NOTE: Permanent buildings with demountable or moveable walls, or large open-concept classrooms, may be assigned space numbers prorated to the total NSF for the assignable areas. When the total NSF of the building is accounted for, it will not be necessary to change FISH each time the interior walls are moved (this procedure is not intended for large classrooms or a room that is simply divided by sliding accordion-type partitions). A. Open plan instruction areas: 1. Student stations (Space design codes 030, 031, 032) 2. Interior circulation (Space design code 700) 3. Teacher planning (Space design code 315) 4. Storage (Space design code 810) 65% of NSF 25% of NSF 5% of NSF 5% of NSF Example: for a 5,000 NSF space in an elementary school assign 3,250 NSF to design code 030, 1,250 NSF to design code 700, 250 NSF to design code 315, and 250 NSF to design code 810, e.g.: Room 001 001A 001B 001C B. NSF Design 3,250 030 1,250 700 250 315 250 810 Space used primarily for administration: 1. Offices (Space design code 317) 2. Interior circulation (Space design code 700) 3. Storage (Space design code 308) Page 59 of 105 70% of NSF 25% of NSF 5% of NSF FISH Users Manual 2010 Example: for a 3,000 NSF space in an administrative complex assign 2,100 NSF to design code 317, 750 NSF to design code 700, and 150 NSF to design code 308, e.g.: Room 001 001A 001B NSF Design 2,100 317 750 700 150 308 NOTE: All covered walkways at a school may be reported in aggregate as one space; covered walkways should be measured based on the actual floor area (do not measure or include the overhang of the covered area). 5.1.1d – Student Stations Student stations are automatically calculated except that actual stations (built in by design) for certain vocational classrooms may be entered if the actual stations are less than the standard stations based on square footage requirements in SREF. NOTE: Student stations are assigned for core curricula classrooms based on the type of classroom without regard to square footage amounts per student station; student stations for non-core curricula classrooms are assigned based on square footage amounts and station assignments are not made until the full square footage requirements are met for the particular design of a space. 5.1.1e – Space Condition (Code) The room condition code describes the suitability of space. NOTE: In order to change the space condition from satisfactory to unsatisfactory the district must certify that the space is no longer physically safe or suitable for occupancy and OEF must approve the condition change; in order to change the space condition from unsatisfactory to satisfactory the district must certify that the space has been successfully reconditioned to meet all applicable regulations regarding occupancy requirements and OEF must approve the condition change. Use the “Room Condition Change Building Replacement/ Raze” OEF Form RCC-BRR for room condition changes: the form can be downloaded from the OEF website at http://www.fldoe.org/edfacil/pdf/UnsatisfactoryBuilding.pd. (1) Satisfactory: The space condition is such that the purpose for which it was designed can be accomplished. (2) Unsatisfactory: The space condition is such that the purpose for which it was designed cannot be accomplished. NOTE 1: Unsatisfactory space is typically designated as such due to compromising effects on the structural integrity, safety, or excessive physical deterioration of a building. Space condition should be the same, either satisfactory or unsatisfactory, for all rooms in a building with the exception of rooms reported in relocatable buildings that represent individual units. Page 60 of 105 FISH Users Manual 2010 NOTE 2: Application of a facility replacement formula that results in determining it is more cost effective to replace a building than to remodel or renovate it, such as the Castaldi generalized formula for modernization or other similar facilities study, does not necessarily mean that the condition of the selected spaces is unsatisfactory. The condition code cannot be changed simply due to the results of a planned replacement unless the architectural integrity of the space meets the criteria identified to classify the space as unsatisfactory. NOTE 3: Space that has been determined to be unsatisfactory should not be occupied. Facilities that have a capital outlay classification of C-3 or C-7 (facilities not recommended for continued use) may be occupied if the space condition is satisfactory. (3) Failed Standards: Relocatable classroom and associated space that does not meet regulations established for long-term use. Relocatable classrooms that fail standards cannot be used for student occupancy. NOTE: Failed standards indicates that a relocatable may meet the normal conditions to be reported as satisfactory space but has failed the criteria established for classroom use in §1013.20, F.S. (4) Scheduled for Replacement: Relocatable classroom and associated space that is scheduled for elimination or replacement with a permanent classroom and associated space. The classroom and associated space must be specifically identified in both the educational plant survey and the facilities work plan. NOTE: Scheduled for elimination or replacement indicates that a relocatable meets normal conditions to be reported as satisfactory space but has been clearly identified and reported as space that is imminently scheduled for removal from a school campus as prescribed in §1013.35(2)(b)2f, F.S. 5.1.1f – Year Of Construction Enter the year construction started (calendar year in which a contract was awarded or, for certain relocatable units or similar construction, the calendar year in which the purchase order was issued). NOTE 1: The original year of construction should not be changed. When remodelings occur, including a complete restoration or size modification of a room, the original year of construction remains unchanged. Rooms built under an existing roof should have the same year of construction as the building. Rooms that are extensions of an existing building with new roof space should reflect the year of construction when the addition was built. NOTE 2: The YEAR MODIFIED should be used to record the most recent date where substantial modifications (major remodeling) were made to the room. 5.2 – Adding Rooms Adding room information to FISH has two features; one is a simple step that is used when you need to add a single room. The second feature has additional steps that allow you to add multiple rooms to a building; this is a time-saving feature when you have a significant amount of work that needs to be added to FISH. Page 61 of 105 FISH Users Manual 2010 5.2.1 – Adding A Single Room To add a single room to a building: 1. Click on the “Add Room” node in the navigation tree 2. Enter search criteria for the desired building 2.1. Click on the “Search” button 2.1.1. Click on the “Select” link that appears on the right-most cell of the grid row containing the building to add a room 2.1.2. The selected building number will display in the “Currently Associated Building” section 2.1.3. Click on the “Next” button 2.1.3.1.1.1. Enter the desired unique room number and all other required room details (use the dropdown lists to choose predefined criteria) * Indicates required data. Some data are prepopulated with the most common information for that field; use the dropdown arrows to change any prepopulated data. 3. Click on the “Finish” button Page 62 of 105 FISH Users Manual 2010 4. A message will display confirming that the room was added 4.1. Verify that the room data is correct 4.1.1. The form may or may not be grayed out due to pending reevaluation Page 63 of 105 FISH Users Manual 2010 5.2.2 – Adding Multiple Rooms To add multiple rooms to a building: 1. Click on the “Search Buildings” node in the navigation tree 2. Enter search criteria for the desired building 2.1. Click on the “Search” button 2.2. Click on the checkbox next to the desired record 2.2.1. Click on the “Edit Record(s)” button 2.2.1.1. Click on the “Add Rooms” button Page 64 of 105 FISH Users Manual 2010 2.2.1.2. Enter the desired room number and all other required room details (use the dropdown lists to choose predefined criteria) 2.2.1.2.1. Click on the “Add Room” button 2.2.1.2.1.1. Repeat the “Add Room” process from Step 2.2.1.2. until all room data are reported 3. Click on the “Finish” button 4. A message will display confirming that the rooms were added 5. Verify that the room(s) data is correct 5.1. The form(s) may or may not be grayed out due to pending reevaluation Page 65 of 105 FISH Users Manual 2010 5.3 – Updating Existing Room(s) The “Room Details” screen allows you to update details about rooms. You can select rooms to update by design code, by condition, year constructed, in one building, in multiple buildings, and on multiple facilities (based on the selection criteria). To update rooms: 1. Click on the “Search Rooms” link that appears in the navigation tree 2. Enter the desired search criteria 2.1. Click on the “Search” button 3. Click on the checkbox next to the desired record(s) 3.1. Click on the “Edit Record(s)” button Page 66 of 105 FISH Users Manual 2010 4. Change the data as desired 4.1. Click on the “Reset” button if any data change is unwanted (data will return to its value before the last save) 4.2. If more than one room record was chosen, use the dropdown list to navigate to the other room records 4.2.1. Review the reloaded data 5. Click on the “Save” button 6. Verify the changed data 6.1. The form(s) may or may not be grayed out due to pending reevaluation Page 67 of 105 FISH Users Manual 2010 5.4 – Transfer A Relocatable To Another Facility The “Transfer Relocatable” screen allows you to move room records of transportable spaces from one facility to another. This is a useful tool for moving relocatable classrooms from one school site to another without having to delete them from one facility and then add them to another facility. NOTE: Relocatable classrooms often have teacher planning, storage, restrooms, and other spaces with unique room numbers; these must be moved along with the classroom. 5.4.1 – Transfer A Relocatable To Another Facility With An Existing Building To transfer a relocatable from one facility to another facility that already has an existing relocatable building: 1. 2. 3. 4. 5. Click on the “Search Rooms” link that appears in the navigation tree Use the dropdown list for “Structure Type” and select “Relocatable” Enter other specific search criteria Click on the “Search” button Click on the checkbox next to the desired record (s) 5.1. Click on the “Edit Record(s)” button Page 68 of 105 FISH Users Manual 2010 5.2. Click on the “Relocate” button 5.2.1. Select the facility where the relocatable is transferring to from the dropdown list 5.2.1.1. Select the building from the dropdown list 5.2.1.1.1. Click on the “Move” button (the move is done immediately, and both facilities are reevaluated for student stations and capacity) Page 69 of 105 FISH Users Manual 2010 6. You can pause the reevaluation for both the sending and receiving facilities; this will make moving multiple rooms much faster. Remember to click on “Resume” (Pause becomes Resume when clicked) to cancel the pause and trigger the reevaluation (you will need to do this on both the sending and receiving facilities) 6.1. Use the dropdown list to select the next record to move 6.1.1. Repeat until all rooms are moved 7. Verify that the building and room(s) data is correct 7.1. From the original site 7.2. At the receiving site 7.2.1. Verify that all rooms inside the relocatable (restrooms, storage, etc.) were moved Page 70 of 105 FISH Users Manual 2010 5.4.2 – Transfer A Relocatable To Another Facility Without An Existing Building To transfer a relocatable from one facility to another facility that does not have an existing relocatable building: 1. 2. 3. 4. 5. Click on the “Search Rooms” link that appears in the navigation tree Use the dropdown list for “Structure Type” and select “Relocatable” Enter other specific search criteria Click on the “Search” button Click on the checkbox next to the desired record(s) 5.1. Click on the “Edit Record(s)” button 5.2. Click on the “Relocate” button Page 71 of 105 FISH Users Manual 2010 6. Select the facility to transfer the relocatable to 6.1. Select “Create New Building” from the building dropdown list 6.2. Enter new building number 6.2.1. Click on the “Move” button 6.2.1.1. Use the dropdown list to select the next record to move 6.2.1.1.1. Repeat until all rooms are moved NOTE: You can pause the reevaluation for both the sending and receiving facilities; this will make moving multiple rooms much faster. Remember to click on “Resume” (Pause becomes Resume when clicked) to cancel the pause and trigger the reevaluation (you will need to do this on both the sending and receiving facilities). 7. Verify that the building and room(s) data is correct 7.1. From the original site 7.2. At the receiving site 7.2.1. Verify that all rooms inside the relocatable (restrooms, storage, etc.) were moved 5.4.3 – Transfer A Relocatable Without A DCA Insignia Department of Community Affairs (DCA) insignia requirements for relocatable and modular facilities, §553.415(13), F.S., states, “…all…factory-built school buildings shall bear a label [DCA insignia]….” Relocatables in the inventory without DCA insignia cannot be moved to another facility in FISH. Page 72 of 105 FISH Users Manual 2010 5.5 – Room Delete Sometimes, facility space in a building needs deleting from the inventory because of remodeling or an incorrect entry. You can delete a single room at a time. To delete a room: 1. 2. 3. 4. Click on the “Room Search” search page link in the navigation tree Enter the desired search criteria Click on the “Search” button Click on the checkbox next to the desired record 4.1. Click on the “Edit Record(s)” button 4.1.1. The selected room record will display 4.2. Click on the “Remove” button Page 73 of 105 FISH Users Manual 2010 5. Click on the “Finish” button 6. A verification notice will display showing that the room has been deleted 6.1. Repeat beginning at Step 3 to delete additional rooms 5.6 – Recover A Removed Room(s) When a removal/deletion action occurs, records are transferred to history files and are archived. Typically, these records are not restored to active use from the archived data. Contact OEF if records were removed/deleted in error. Page 74 of 105 FISH Users Manual 2010 6 – Reports FISH has several reports that are available to help manage the facilities inventory information needs of districts. Some reports, because of the size and volume of behind-the-scene processes, may take several seconds to produce. Other reports generally run very quickly. After a report is generated, there are multiple options for the reports; you can export them to Excel and then add your own formulas to analyze the data, you can save them as PDF files that cannot be edited, or you can review the reports on-line and then cancel them. 6.1 – Update Reports 1.1. Facility Update Report: 1.1.1. Click on the “Facility Update Report” link in the navigation tree 1.1.2. Select a Start Date and an End Date 1.1.3. Click on the “View Report” button 1.1.3.1. To discard report 1.1.3.1.1. Click on the browser “back” arrow 1.1.3.2. To save report 1.1.3.2.1. Select a format-type (e.g., “Acrobat (PDF) file”) from the drop-down list on the toolbar 1.1.3.2.2. Click on the “Export” link 1.1.3.2.3. Click “Open” or “Save” 1.1.3.3. Select file name and location to save report 1.2. Parcel Update Report: 1.2.1. Click on the “Parcel Update Report” link in the navigation tree 1.2.2. Select a Start Date and an End Date 1.2.3. Click on the “View Report” button 1.2.3.1. To discard report 1.2.3.1.1. Click on the browser “back” arrow 1.2.3.2. To save report 1.2.3.2.1. Select a format-type (e.g., “Acrobat (PDF) file”) from the drop-down list on the toolbar 1.2.3.2.2. Click on the “Export” link 1.2.3.2.3. Click “Open” or “Save” 1.2.3.3. Select file name and location to save report 1.3. Building Update Report: 1.3.1. Click on the “Building Update Report” link in the navigation tree 1.3.2. Select a Start Date and an End Date 1.3.3. Select all filter criteria 1.3.4. Click on the “View Report” button 1.3.4.1. To discard report 1.3.4.1.1. Click on the browser “back” arrow 1.3.4.2. To save report 1.3.4.2.1. Select a format-type (e.g., “Acrobat (PDF) file”) from the drop-down list on the toolbar 1.3.4.2.2. Click on the “Export” link Page 75 of 105 FISH Users Manual 2010 1.3.4.2.3. Click “Open” or “Save” 1.3.4.3. Select file name and location to save report 1.4. Room Update Report: 1.4.1. Click on the “Room Update Report” link in the navigation tree 1.4.2. Select a Start Date and an End Date 1.4.3. Select all filter criteria 1.4.4. Click on the “View Report” button 1.4.4.1. To discard report 1.4.4.1.1. Click on the browser “back” arrow 1.4.4.2. To save report 1.4.4.2.1. Select a format-type (e.g., “Acrobat (PDF) file”) from the drop-down list on the toolbar 1.4.4.2.2. Click on the “Export” link 1.4.4.2.3. Click “Open” or “Save” 1.4.4.3. Select file name and location to save report 6.2 – Commonly Used Reports 1.1. Agency Facilities Summary: 1.1.1. Click on the “Agency Facilities Summary” link in the navigation tree 1.1.1. Select all filter criteria 1.1.2. Select “View Report” 1.1.2.1. To discard report 1.1.2.1.1. Click on the browser “back” arrow 1.1.2.2. To save report 1.1.2.2.1. Select a format-type (e.g., “Acrobat (PDF) file”) from the drop-down list on the toolbar 1.1.2.2.2. Click on the “Export” link 1.4.4.3.1. Click “Open” or “Save” 1.1.2.3. Select file name and location to save report 1.2. Agency Use Summary: 1.2.1. Click on the “Agency Use Summary” link in the navigation tree 1.2.2. Select all filter criteria 1.2.3. Select “View Report” 1.2.3.1. To discard report 1.2.3.1.1. Click on the browser “back” arrow 1.2.3.2. To save report 1.2.3.2.1. Select a format-type (e.g., “Acrobat (PDF) file”) from the drop-down list on the toolbar 1.2.3.2.2. Click on the “Export” link 1.4.4.3.2. Click “Open” or “Save” 1.2.3.3. Select file name and location to save report 1.3. Facilities Inventory (FISH): 1.3.1. Click on the “Facilities Inventory (FISH)” link in the navigation tree 1.3.2. Select all filter criteria Page 76 of 105 FISH Users Manual 2010 1.3.3. Select “View Report” 1.3.3.1. To discard report 1.3.3.1.1. Click on the browser “back” arrow 1.3.3.2. To save report 1.3.3.2.1. Select a format-type (e.g., “Acrobat (PDF) file”) from the drop-down list on the toolbar 1.3.3.2.2. Click on the “Export” link 1.4.4.3.3. Click “Open” or “Save” 1.3.3.3. Select file name and location to save report 1.4. School Land Inventory: 1.4.1. Click on the “School Land Inventory” link in the navigation tree 1.4.2. Select all filter criteria 1.4.3. Select “View Report” 1.4.3.1. To discard report 1.4.3.1.1. Click on the browser “back” arrow 1.4.3.2. To save report 1.4.3.2.1. Select a format-type (e.g., “Acrobat (PDF) file”) from the drop-down list on the toolbar 1.4.3.2.2. Click on the “Export” link 1.4.4.3.4. Click “Open” or “Save” 1.4.3.3. Select file name and location to save report 1.5. Level Of Service: 1.5.1. Click on the “Level Of Service” link in the navigation tree 1.5.2. Select all filter criteria 1.5.3. Select “View Report” 1.5.3.1. To discard report 1.5.3.1.1. Click on the browser “back” arrow 1.5.3.2. To save report 1.5.3.2.1. Select a format-type (e.g., “Acrobat (PDF) file”) from the drop-down list on the toolbar 1.5.3.2.2. Click on the “Export” link 1.4.4.3.5. Click “Open” or “Save” 1.5.3.3. Select file name and location to save report 1.6. Student Station Summary: 1.6.1. Click on the “Student Station Summary” link in the navigation tree 1.6.2. Select “View Report” 1.6.2.1. To discard report 1.6.2.1.1. Click on the browser “back” arrow 1.6.2.2. To save report 1.6.2.2.1. Select a format-type (e.g., “Acrobat (PDF) file”) from the drop-down list on the toolbar 1.6.2.2.2. Click on the “Export” link 1.4.4.3.6. Click “Open” or “Save” 1.6.2.3. Select file name and location to save report Page 77 of 105 FISH Users Manual 2010 6.3 – Management Reports 1.1. Design Specifications: 1.1.1. Click on the “Design Specifications” link in the navigation tree 1.1.1.1. To discard report 1.1.1.1.1. Click on the browser “back” arrow 1.1.1.2. To save report 1.1.1.2.1. Select a format-type (e.g., “Excel file”) from the drop-down list on the toolbar 1.1.1.2.2. Click on the “Export” link 1.4.4.3.7. Click “Open” or “Save” 1.1.1.3. Select file name and location to save report 1.2. Age Report: 1.2.1. Click on the “Age Report” link in the navigation tree 1.2.2. Select all filter criteria 1.2.3. Select “View Report” 1.2.3.1. To discard report 1.2.3.1.1. Click on the browser “back” arrow 1.2.3.2. To save report 1.2.3.2.1. Select a format-type (e.g., “Excel file”) from the drop-down list on the toolbar 1.2.3.2.2. Click on the “Export” link 1.4.4.3.8. Click “Open” or “Save” 1.2.3.3. Select file name and location to save report 1.3. Space Report: 1.3.1. Click on the “Space Report” link in the navigation tree 1.3.2. Select all filter criteria 1.3.3. Select “View Report” 1.3.3.1. To discard report 1.3.3.1.1. Click on the browser “back” arrow 1.3.3.2. To save report 1.3.3.2.1. Select a format-type (e.g., “Excel file”) from the drop-down list on the toolbar 1.3.3.2.2. Click on the “Export” link 1.4.4.3.9. Click “Open” or “Save” 1.3.3.3. Select file name and location to save report 6.4 – Routine Data Request Reports 1.1. District Flat File: 1.1.1. Click on the “District Flat File” link in the navigation tree 1.1.1.1. To discard report 1.1.1.1.1. Click on the browser “back” arrow 1.1.1.2. To save report 1.1.1.2.1. Select a format-type (e.g., “Excel file”) from the drop-down list on the toolbar 1.1.1.2.2. Click on the “Export” link 1.4.4.3.10. Click “Open” or “Save” 1.1.1.3. Select file name and location to save report Page 78 of 105 FISH Users Manual 2010 1.2. Snapshot Flat File: 1.2.1. Click on the “Snapshot Flat File” link in the navigation tree 1.2.2. Select all filter criteria 1.2.3. Select “View Report” 1.2.3.1. To discard report 1.2.3.1.1. Click on the browser “back” arrow 1.2.3.2. To save report 1.2.3.2.1. Select a format-type (e.g., “Excel file”) from the drop-down list on the toolbar 1.2.3.2.2. Click on the “Export” link 1.4.4.3.11. Click “Open” or “Save” 1.2.3.3. Select file name and location to save report Page 79 of 105 FISH Users Manual 2010 7 – Event Tracking and Notifications All adds, changes, and deletes to FISH, including those made by district users, Department of Education users, and those automated changes based on statute and rule requirements, are permanently recorded and cannot be edited. E-mail notifications are sent to users when actions are taken in the EFIS system in response to their work, work that is done by Department of Education staff, and the automated changes resulting from statutory and rule requirements. Event Tracking The best way to determine what events have taken place regarding your facilities inventory is to review the update reports. The update reports contain full records of all activities concerning FISH, including the source of the events. Page 80 of 105 FISH Users Manual 2010 7.1 – Notification E-mail Automated E-mail notifications are sent to users when any actions are taken in the system in response to their work or work done by Department of Education staff. For example, when a facility is added to the inventory, an E-mail similar to the following E-mail notice will be sent to the user who entered the change. Page 81 of 105 FISH Users Manual 2010 8 – Lexicon and Miscellanea The Lexicon and Miscellanea component explains related systems and provides information that will help you understand the relationship of other systems to the design and features of the FISH system. 8.1 – Glossary of Terms and Other Word Usage Some of the word usage necessary to explain the technical aspects of the electronic program require certain industry related terms and phrases that may not be common to our daily speech; some of the language used to define or give details for the functioning of the EFIS and FISH systems require certain statutory terminology. Although we strive to make all communication as plain and simple as possible, we cannot always use easy words; that is to say, some communication requires a technical or legal/official vocabulary to express what needs to be said. 8.1a – Technical Authentication: Establishing eligibility for access to a database. Association: A functional connection of two or more data elements by some common factor, e.g. assigning a site to a room to a building. Commit: A data management function that makes changes permanent in a database. Disassociate: Breaking the functional connection of data elements. Functionality: A programming term meaning “features” or “performance”. The capabilities or behaviors of a program, part of a program, or system, seen as the sum of its features. Roughly translated to mean, “The things it can do”. None: A filter designation meaning that no filter option is chosen; returns all records in a search query. Persistent: In computer language, persistent data always preserves the previous version (creates a history record) of itself when it is modified. Populate: To fill data cells with a predetermined value. Remove: Same as delete. Wizard: A computer interface that simplifies the process of moving a user through (sometimes complicated) steps to achieve complex tasks in a database. 8.1b – Educational Facilities Capacity: The number of students that may be housed in a facility at any given time based on a utilization percentage of the total number of existing satisfactory student stations. CO&DS: Capital outlay and debt service; derives from the state constitutional assessment for motor vehicle license plates (also known as tag money). Comprehensive (comp) Plan: A uniform plan for growth that deals with level of service standards, requirements for construction of facilities and/or infrastructure, any proportionate share requirements, the correction of any known deficiencies, and the coordination of new school plans along with residential development plans. Concurrency Plan: A capital improvements plan that establishes a financially feasible capital facilities program in conjunction with all local growth plans; the plan must be adopted and based on appropriate and relevant data and analysis using consistent goals, objectives, and policies. Growth Management Plan: See Comprehensive Plan. Infrastructure: The fundamental facilities, installations, and systems serving the state, county, city, area, or community, including such components as transportation, utilities, communications, power plants, and public institutions. Page 82 of 105 FISH Users Manual 2010 PECO: Public education capital outlay; derives from many state sources, e.g. legislative appropriations, lottery funds. PECO is divided into two primary categories: o New construction; o Maintenance. Leased Facilities: Non-district-owned or district-owned facilities in the facilities inventory that are recommended in an educational plant survey to be leased facilities. Unsatisfactory Space: The space condition is such that the purpose for which it was designed cannot be accomplished. NOTE: Unsatisfactory space is typically designated as such due to compromising effects on the structural integrity, safety, or excessive physical deterioration of a building. Space condition should be the same, either satisfactory or unsatisfactory, for all rooms in a building with the exception of rooms reported in relocatable buildings that represent individual units. A space may be structurally unsound (unsatisfactory) and still be adequate in size. Inadequate Space: Generally means that the size of space is not appropriate, sufficient, suitable, or lacks ability to meet the fitting requirements for instruction or instructional support, such as small classrooms or insufficient acreage for a site. Inadequacy may be a condition brought on by changing standards, or increased enrollment causing overuse thereby resulting in undersized or unsuitable circumstances. NOTE: Inadequate space is typically a designation for an entire facility, not just a building or room; however, there are circumstances when some, but not all, rooms in a building will be classified as inadequate. A space or building may be structurally sound (satisfactory) and still be inadequate. 8.1c – General Definitions Ancillary Plant: Comprises the building site, and site improvements necessary to provide such facilities as vehicle maintenance, warehouses, maintenance, or administrative buildings necessary to provide support services to an educational program; ancillary plants are not appropriate for the normal student occupancy and assignment of instructional programs. Auxiliary Facility: The spaces located at educational plants which are not designed for student occupancy. Board: A public school board, a community college board of trustees, and the Board of Trustees for the Florida School for the Deaf and the Blind. The term “board” does not include the State Board of Education or the university boards of trustees. Capital Project: For the purpose of §9(a), Art. XII of the State Constitution, as amended, means sums of money appropriated from the Public Education Capital Outlay and Debt Service Trust Fund to the state system of public education and other educational agencies as authorized by the Legislature. Core Facilities: The media center, administration, cafeteria, toilet facilities, and circulation space of an educational plant. Educational Facilities: The buildings and equipment, structures, and special educational use areas that are built, installed, or established to serve primarily the educational purposes and secondarily the social and recreational purposes as authorized by the Florida Statutes and approved by boards. Educational Plant: Comprises the educational facilities, site, and site improvements necessary to accommodate students, faculty, administrators, staff, and the activities of the educational program of each plant. Page 83 of 105 FISH Users Manual 2010 Educational Plant Survey: A systematic study of present educational and ancillary plants and the determination of future needs to provide an appropriate educational program and services for each student. Fixed Capital Outlay: Capital expenditures for land, new buildings, additions to buildings, replacement of buildings, and remodeling of real property that materially extends its useful life or materially improves or changes its functional use. Maintenance and Repair: The upkeep of educational and ancillary plants, including, but not limited to, roof or roofing replacement short of complete replacement of membrane or structure; repainting of interior or exterior surfaces; resurfacing of floors; repair or replacement of glass; repair of hardware, furniture, equipment, electrical fixtures, and plumbing fixtures; and repair or resurfacing of parking lots, roads, and walkways. The term “maintenance and repair” does not include custodial or grounds-keeping functions, or renovation except for the replacement of equipment with new equipment of equal systems meeting current code requirements, provided that the replacement item places neither increased demand on utility services nor structural supports nor adversely affects the function of safety-to-life systems. New Construction: Any construction of a building or unit of a building in which the entire work is new, or an entirely new addition connected to an existing building. Operating Capital Outlay: Includes tangible personal property of a non-expendable nature, with a normal life expectancy of one year or more. Equipment, bound books, and fixtures are examples of operating capital outlay items. PECO Funded Projects: Site and site improvements necessary to accommodate buildings, equipment, and other structures, and special educational use areas that are built, installed, or established to serve primarily the educational instructional program of the public school boards or the community college and the university boards of trustees. Project Priority List Project: A project that is listed on a State Board of Education approved list of projects (PPL) which has been survey recommended and a priority of need has been established by the board in accordance with §2.1(5), SREF. Remodeling: The changing of existing facilities by rearrangement of spaces and/or reassignment of their use or function. Renovation: The upgrading of existing facilities by installation or replacement of materials and equipment and includes, but is not limited to, air-conditioning, heating, or ventilation equipment; fire alarm systems; emergency lighting; electrical systems; and complete roofing or roof replacement, including replacement of membrane or structure. Satisfactory Educational Facility: A facility that has been recommended for continued use by an educational plant survey or which has been classified satisfactory in the state inventory of educational facilities. 8.2 – Business Rules Business Rules define the ways in which information is validated, processed, and calculated. Business rules will typically clarify the details behind the functional requirements of the FISH system. FISH system access is limited to certain agencies: o Department of Education, o Public school districts. ALERT: The FISH system imports certain known data, e.g., capital outlay classification and grades recommended to be housed from the approved educational plant survey; Page 84 of 105 FISH Users Manual 2010 users must report all other information. You should verify all entries, including those automatically populated, for accuracy. 8.3 – Calendar Icons All date fields have a calendar icon that, when clicked, will display an interactive calendar. The calendar icon can be used to select dates or the date fields will accept manually entered dates. Page 85 of 105 FISH Users Manual 2010 8.4 – Navigation Tree (Nodes) The expandable/contractible selection topics on the left side of the first screen displays after successful log on. 8.5 – Common Mistakes to Avoid Most mistakes occur when recording design codes. Errors can usually be avoided by carefully selecting design codes from the section appropriate to the grade organization or the correct ancillary or auxiliary sections of SREF. It is very important not to confuse USE of a space with DESIGN of a space. A space may be used according to the unique and changing needs of programs but the actual design of the space should be recorded, and remain unchanged, in FISH. An approved educational plant survey recommendation may change the design of a room(s) without any structural modification, e.g., if a middle school is recommended to be converted to an elementary school, then all middle school design codes may be changed to the appropriate elementary design codes. Existing spaces do not always fit the specific criteria of SREF. Whenever spaces vary from the standards established, EFIS attempts to reconcile the variances based on size and space criteria. When no one-to-one match can be made, enter the design code that most closely identifies the space. Page 86 of 105 FISH Users Manual 2010 The following general tips should serve as guidelines to assure that spaces are correctly identified in FISH: Resource rooms, both regular and exceptional, are generated based on the total number of satisfactory student stations in a school. Elementary resource rooms are earned based on one resource room per each 150 student stations. Resource rooms exceeding the number a school is entitled to have are assigned student stations. Middle, junior high, and senior high resource rooms are earned based on one resource room per each 250 student stations. Resource rooms exceeding the number a school is entitled to have are assigned student stations. ESE resource rooms are earned based on one ESE resource room per each 500 student stations. ESE resource rooms exceeding the number a school is entitled to have are assigned student stations. Multipurpose physical education rooms (design code 110) should have approximately 1,200 NSF. The multipurpose physical education space and multipurpose food service space (design code 361) are not interchangeable. These spaces should not be confused with the family and consumer services multipurpose instruction space (design code 844) contained in the related spaces table of SREF. Small group instruction spaces (design code 389) and group projects and instruction spaces (design code 390) are assigned to the library or media area as unique spaces designed for special media related purposes. These design codes should not be used in areas outside a media center. Careers rooms (design code 313) are assigned to the guidance area as unique spaces designed for guidance counseling toward career related subjects. This design code should not be assigned to areas outside the guidance or administrative suite. Vocational related classrooms that are inside approved vocational laboratories are not assigned student stations. All other uses of this design code will result in the assignment of student stations. Every effort should be made to accurately report all spaces in FISH. If there is ever a question about the design code of an area, a review of the floor plans may help to determine the actual design of the space. 8.6 – Definitions ADMINISTRATIVE SPACE: An area devoted to school business, student personnel management, public relations activities, or a combination of these activities where such an area is not designated for other purposes. ANCILLARY FACILITY: A non-instructional site used by a school district to provide administrative services, warehouse services, vehicle maintenance, general maintenance, or other support services to a district wide educational program (not appropriate for student location for academic instruction). ART ROOM: An instructional area designed or provided with special built-in equipment for some specific type of learning activity related to art. AUDITORIUM: An instructional area designed and usually constructed with a built-in stage and sloping floor or fixed seating for use as an assembly center. AUDIOVISUAL ROOM: An area designed to house media supplies and equipment. AUXILIARY SPACE: The spaces located on a school plant site designed for programs such as administration, food services, and media (areas not designed for student stations/academic instruction). Page 87 of 105 FISH Users Manual 2010 BUILDING: A structure, either permanent or relocatable, consisting of constructed walls, roof, and floor. A structure that has the same floors, ceiling, and walls and is not separated by an open air space is considered one building. Permanent: A structure built with a fixed foundation that has permanently attached walls, roof, and floor that cannot be moved or transported either as a unit or in sections. Relocatable: (Also known as “portable”) a building or portion of a building made up of prefabricated units that may be disassembled and reassembled frequently, or a single unit of construction consisting of walls, roof, and floor that is movable as a unit either on wheels or by truck. Mobile, demountable, dividable, modular, and portable buildings are types of relocatable units. Modular: A structure that forms a complete building when combined with other modules or structural components and/or a demountable roof and/or wall sections. A modular building may also be a relocatable building. BUSINESS EDUCATION LABORATORY: A vocational/technical instruction area designed or provided with special built-in equipment for some specific type of learning activity in the field of business. CAFETERIA: A space designed or adapted specifically for use in preparing and serving meals to the student body or other groups. CAFETORIUM: A support area designed or adapted specifically for the combined functions that might normally be served by a separate cafeteria and a separate auditorium. CAPACITY: The number of students that may be housed in a facility at any given time based on a utilization percentage of the total number of existing satisfactory student stations: Type School Elementary Middle & Junior High Senior High Combination School Exceptional Student Centers Alternative Education Centers Designated Area Vocational Centers Designated Adult Centers Utilization Satisfactory Factor Student Percentage x Stations 100% 90% 70% 75% 80% 85% 90% 95% 90% 100% 100% 120% 150% Page 88 of 105 all all 300 or less 301 - 600 601 - 900 901 - 1200 1201 - 1500 1501 - and above all all all all all FISH Users Manual 2010 NOTE: Alternative education centers may assign classrooms the design codes for regular classrooms based on the grade groups housed or use design code 704 for general classroom spaces at the center. CLASSROOM: An instructional space designed for student occupancy for the purpose of presenting academic subject matter. NOTE 1: CORE CURRICULA CLASSROOM: Refers to classrooms designed for instruction primarily for classes in mathematics, language arts/reading, science, social studies, foreign language, English for speakers of other languages (ESOL), exceptional student education (ESE), and courses taught in traditional self contained elementary school classrooms. Core curricula classrooms is limited in meaning and used for the sole purpose of designating classrooms that are subject to the maximum class size requirements established in §1, Article IX of the State Constitution. NOTE 2: EXTRACURRICULAR CLASSROOM: Refers to all classrooms that are not defined as “core curricula classrooms,” which may include, but are not limited to, physical education, fine arts, performing fine arts, vocational education, and career and technical education. Extracurricular classrooms is limited in meaning and used for the sole purpose of designating classrooms that are not subject to the maximum class size requirements established in §1, Article IX of the State Constitution. CONFERENCE ROOM: A space used primarily for meetings or discussion activities and is usually equipped with tables, chairs, and lounge-type furniture. CORRIDOR LOADING: Refers to passageways, hallways, and open malls (mall area must have at least 50percent of the floor area covered to be included in corridor loading areas) used as a required means of egress either within or adjacent to a building. The corridor may be enclosed or open and may be a heated or unheated space. COURTYARD: A large open space, usable by the student body or faculty, enclosed or surrounded by buildings. COVERED WALKWAY: Enclosed or unenclosed covered passageways connected to a building outside the exterior walls. DISTRIBUTIVE EDUCATION LABORATORY: A vocational/technical area designed and equipped for instructional purposes that covers a wide range of learning activities in the field of marketing and distribution. EDUCATIONAL PLANT: All real property, land, and buildings assigned to the administrative control of one person and uniquely identified in an educational plant survey. EHPA: See definition under SHELTER below. EXCEPTIONAL STUDENT EDUCATION CLASSROOM: A classroom designed to provide instruction for exceptional students according to specific needs. Page 89 of 105 FISH Users Manual 2010 NOTE 1: Special classrooms (design code 061) are for EMH, SLD, VE, HI, VI, and gifted programs. Self contained classrooms (design code 062) are for TMH, EH, profoundly handicapped, and physically handicapped programs. NOTE 2: Pre-K ESE classrooms (design code 060) are for prekindergarten handicapped programs only; these are not for use as regular education Pre-K classrooms. NOTE 3: Pre-K ESE refers only to any child that is below the age of five (5) years who has a sensory, physical, mental, or emotional condition that significantly affects the attainment of normal developmental achievement as established in State Board of Education Rules 6A6.03026, 6A-6.03027, 6A-6.03030, and 6A-6.03031, Florida Administrative Code, and has an approved individual education plan (IEP) or a family support plan developed in accordance with Rules 6A-6.03028 and 6A-6.03029, Florida Administrative Code. No other Pre-K students are eligible for consideration or counted among eligible students for any Pre-K capital outlay facilities services. FACILITY NUMBER: The unique number assigned to designated school board owned facilities, facilities acquired under a lease/purchase agreement, community/joint use facilities in which the school board acts as fiscal agent with maintenance responsibilities, and property for which a long-term (40-years or more) use or lease agreement exists and is recommended in an approved district educational plant survey. NOTE: Education Information and Accountability Services (EIAS) may assign a unique school number to programs that do not meet facilities definition requirements so that operational funds may be generated based on student assignments to programs that are not eligible to earn COFTE. FACTORY-BUILT BUILDING OR SCHOOL: (Also known as “manufactured building” or “modular building”) A closed structure, building assembly, or system of subassemblies, which may include structural, electrical, plumbing, heating, ventilating, or other service systems manufactured for installation or erection, with or without other specified components, as a finished building or as part of a finished building (see also, definitions under BUILDING above). FAMILY AND CONSUMER SERVICES LABORATORY: A vocational/technical instructional area designed and equipped for a variety of learning activities concerned with orientation and exploration of family and consumer services related occupations; the selection, fitting, construction, altering, tailoring, modeling, and care of clothing; grooming and personal development; the care and guidance of children; programs for the aging; reupholstering; construction of draperies, bedspreads, slipcovers, and other home furnishings; selection, use, care, and maintenance of home furnishings and equipment; safety; instructional and home management and support services; interior design and application of art principles; and FHA/HERO. GYMNASIUM: An instructional area designed or adapted specifically for physical education activities. NOTE: Regular or special classrooms connected to, or contained in, gymnasiums are recorded individually as regular or special classrooms and not as part of the gymnasium. GYMNATORIUM: A gymnasium that includes a stage with general seating and other physical education related areas. Page 90 of 105 FISH Users Manual 2010 HIGH SCHOOL CLASSROOM: A general classroom designed for students in grades 9 through 12. INSIDE CIRCULATION: The areas inside a building consisting of corridors, floor opening areas at each floor level for stairs, elevators, ramps, escalators, and foyer and vestibule areas, including any recessed entrances that are part of the total area. For open-plan spaces see Section 5 (Room Information), Subsection 5.1.1c (Room Square Footage). INTERMEDIATE/MIDDLE CLASSROOM: A general classroom designed for students in grades 4 through 8. LABORATORY: An instructional area designed for and furnished with specialized equipment to serve the needs of a particular program of study. Included in this category are science laboratories, language laboratories, reading laboratories, vocational laboratories, and academic laboratories. MAINTENANCE AND OPERATIONS ROOM: Spaces designed or adapted for use in making repairs to an educational plant for keeping it open and ready for use. These include mechanical service areas, fuel storage rooms, custodial service, receiving areas, building work or repair shops, custodial service closets, and other similar building service areas. MECHANICAL AND ELECTRICAL SERVICE ROOM: Furnace, pump, fan, generator, transformer, and similar mechanical and electrical service spaces. MEDIA CENTER: An area specifically designed or adapted as a place for study, reading, and the custody, circulation, and administration of a collection of books, manuscripts, and periodicals, including electronic means of storage retrieval or access, made available for use by the student body. MISCELLANEOUS ADMINISTRATIVE SPACES: School administrative areas for itinerant teachers other than classrooms, separate offices for teachers or department heads that do not open into a classroom, and spaces with other administrative functions. MODULAR BUILDING: See definition under BUILDING above. MULTIPURPOSE ROOM: An instructional area designed or adapted specifically for two or more of the combined functions that might normally be for assemblies, physical education, lunch, music, clubs, audiovisual work, and library services. NOTE: Separate gymnatoriums and cafetoriums are not to be classified as multipurpose rooms. MUSIC ROOM: An instructional area designed or provided with special built-in equipment for learning activities involving choral and instrumental music. PARCEL: The unique acreage of contiguous land. Typically consists of a plot of land that is not divided by a county, city, state, or federally owned or maintained road or highway. Page 91 of 105 FISH Users Manual 2010 EXCEPTION: Contiguous land with separate facilities will have unique parcel numbers assigned for the acreage appropriated to each facility as designated in the educational plant survey. PARCEL NUMBER: The unique number assigned by the EFIS automated FISH system. PAVILION: A building plan with a group of structures connected to form a complex or creating an annex to a larger building. PERMANENT BUILDING: See definition under BUILDING above. PRIMARY CLASSROOM: A special classroom designed for children in grades K through 3. Typically, these classrooms have restrooms and hand washing facilities located within the classroom or in adjoining spaces that may be a part of two or more classrooms. NOTE: A primary classroom should not be located above the first floor. RELATED CLASSROOM: An instructional space designed or provided to support instruction that is primarily conducted in a vocational laboratory. RELOCATABLE UNIT: See definition under BUILDING above. RESOURCE ROOM: An instructional space used primarily to enhance and support, not supplant, instruction received in regular or special classrooms. Resource rooms are generally designed to accommodate fewer students than other classrooms. ROOM: A space enclosed on all sides. Alcoves or recesses are not considered separate rooms and should be included in the NSF of the room where such spaces are found. Design codes 014, 351, and 701 are exceptions to the definition of a room for purposes of space identification in FISH. NOTE 1: Mechanical and electrical spaces that are in attics, on roofs, or beneath floors in crawl spaces, enclosures constructed above stages, storage areas in warehouses or other areas that are above ground or floor level but not a structural story of the building should not be reported as rooms in FISH. NOTE 2: Uncovered patios, pole barns, equipment sheds that have dirt floors, horticulture canopies or plant growing and protection areas that do not have permanently constructed walls, roof, and floor, small wooden ticket booths on athletic fields, baseball dugouts, and other similar structures should not be reported in FISH. SCIENCE DEMONSTRATION CLASSROOM: An instructional area designed or provided with special built-in equipment for teacher demonstrations to provide learning activities involving scientific experimentation and other experiences. Generally, there is no student experiment equipment in this type classroom. SCIENCE LABORATORY: An instructional area designed or provided with special built-in equipment for student participation in learning activities involving scientific experimentation and other experiences. Examples include chemistry, biology, and physics laboratories. Page 92 of 105 FISH Users Manual 2010 SHELTER: The Florida Division of Emergency Management defines a shelter as a predesignated place or building of relative safety that temporarily provides essential support services with the goal of preserving life and reducing human suffering. Shelters are also referred to, among other terms, as “hurricane shelters,” “public shelters,” and “emergency shelters.” The term EHPA is often used as a reference and is the acronym for Emergency Hurricane Protection Area. Additional references or classifications include “host shelter,” “risk shelter,” and “recovery shelter.” The Florida Department of Community Affairs publication, Statewide Emergency Shelter Plan, contains further information regarding shelters and planning. SPACE: All areas of construction, e.g., buildings, rooms, storage facilities, stair wells, gymnasiums, covered walkways, and covered play areas. NOTE: There may be many unique applications for space identification that do not necessarily have an assigned space design code. In such cases, use a code that identifies the space as closely as possible to the actual design of the space. STUDENT STATION: The square footage required per student (as defined in SREF) for an instructional program based on the particular course content to be offered. NOTE: Student stations are assigned based on the design of a space either by type of space or by NSF. Physical Education Standard Student Stations Physical education student stations are assigned to gymnasium floors. Space design code 111 is for middle and junior high schools and space design code 112 is for senior high schools. Total Satisfactory Student Stations (Excluding gymnasiums and band classrooms) 240 or less 241 - 820 821 - 1080 1081 - 1340 1341 - and above Grades 6-8 Assign PE Stations 40 60 80 120 160 Grades 9-12 Assign PE Stations 30 40 50 60 70 NOTE: A school without a gymnasium will not be assigned physical education student stations. Page 93 of 105 FISH Users Manual 2010 Music Education Standard Student Stations Student stations are assigned to design code 076 for band classrooms based on existing satisfactory student stations for middle, junior high, senior high, and combination schools. Total Satisfactory Student Stations (Excluding gymnasiums and band classrooms) 240 or less 241 - 820 821 - 1080 1081 - 1340 1341 - and above Assign Band Stations 30 35 40 45 50 NOTE: Music student stations for vocal, orchestra, general music, guitar, and piano classrooms are calculated based on square footage. Only one band classroom will be assigned calculated student stations. If multiple band classrooms are reported at a school center, each additional occurrence will be treated as design code 078, a general music classroom. STUDY HALL: An area designed or adapted for housing a group of students engaged in individual study of lessons or assignments received in regular or special classrooms. NOTE: Usually assigned as design code 380 for reading room in a school media center. TEACHER STATION: A space or area designated inside a classroom for teacher use/occupancy. VOCATIONAL CLASSROOM: An instructional area designed or provided with special built-in equipment for industrial arts and vocational or trade learning activities, mechanics, machine tools, sheet metal work, wood working, electrical trades, radio, plumbing, masonry, aviation, printing, refrigeration, air conditioning, baking and other commercial food preparation, cosmetology, and agriculture. Page 94 of 105 FISH Users Manual 2010 9 – Appendixes The appendixes contain a variety of valuable information relative to managing FISH data. Examples are shown that make data reporting easier while at the same time allowing user discretion on most issues for managing the inventory data. Plot Plan Districts should maintain current and accurate plot plans for each piece of property owned or acquired under a long-term (40-years or more) lease agreement. A plot plan is a schematic drawing of a piece of property, drawn to scale, that provides the complete dimensions, acreage, site’s relationship to points of the compass, and the location of all existing structures with their relation to highways and streets. The plot plan should identify the agency (district/county), facility name, facility number, parcel number(s), and building number(s). See Appendixes for examples. NOTE 1: Property acquired under a short-term lease agreement and property with annual leases should not be recorded in the inventory. NOTE 2: Buildings should be numbered according to the plot plan and use FISH numbers as recorded in the inventory. Floor Plans A floor plan is a schematic drawing of a building drawn to scale. The floor plan should identify the agency (district/county), facility name, facility number, parcel number, building number(s), FISH room/space number(s), net square feet (NSF), and the primary path of egress for each space in each building. All covered walkways attached to a building should be identified on the floor plan. See Appendixes for examples. NOTE: All spaces should be numbered using FISH numbers as recorded in the inventory, including store rooms, restrooms, corridors, etc. There is no single rule for the placement or display of signage. Typically, most room identification signage is located on the wall beside the door, on the entrance lock side, and usually the sign is about 60-inches above the floor. Most room identification signage is determined by local decisions; however, there are some specific signage requirements noted in certain codes and rules for specified types of spaces. See also, Section 5.1.1a, Room Number, NOTE 1. Building Types The various kinds of single structures or multiple structures connected to form a complex or creating an annex to a larger building that ultimately makes a school campus, educational plant, or ancillary facility. Corridor Loading The passageways, hallways, and open malls (mall area must have at least 50-percent of the floor area covered to be included in corridor loading areas) used as a required means of egress either within or adjacent to a building. The corridor may be enclosed or open and may be a heated or unheated space. Page 95 of 105 FISH Users Manual 2010 Plot Plan Example Agency # ______________ Facility # ______________ PLOT PLAN Facility Name: _______________________________ Street Covered Walkway N Building #1 Building #4 Bldg. #2 Building #99 (2 relocatable units agency owned) Parcel #002 Bldg. #97 (2 relocatable units lease/purchase) 4 Acres Parcel #001 Dimensions 400’x440’x400’x440’ 12 Acres Dimensions 630’x840’x630’x840’ Page 96 of 105 FISH Users Manual 2010 Floor Plans Examples Agency # ______________ FLOOR PLAN Facility # ______________ Facility Name: Parcel # _______________ 007 2155’ Covered Walkway 002 001 1025’ 007 Covered 835’ 001A 002A 125’ 138’ 006 455’ (interior circulation) 005A 48’ 005 004 003 620’ 789’ 828’ 005B 52’ Building #4 Page 97 of 105 FISH Users Manual 2010 FLOOR PLAN Facility Name: _______________________________ 005 5035’ (covered walkway) 001 002 003 004 850’ 850’ 910’ 700’ 005 Covered Walkway 001 650’ 002 135 Building #97 850’ (2 relocatable unites lease-purchase) Building #2 005 Covered Walkway Building #1 412 700’ 700’ Page 98 of 105 FISH Users Manual 2010 Building Types Examples BUILDING TYPES Walkway Building 2 Building 1 Building 2 Building 3 Walkways Building 4 Building 1 Building 3 1. Finger Plan 2. Campus Plan Page 99 of 105 FISH Users Manual 2010 BUILDING TYPES Building 1 Building 1 3. Compact Plan 4. Modified Compact Plan Page 100 of 105 FISH Users Manual 2010 BUILDING TYPES 5. Courtyard Plan Page 101 of 105 FISH Users Manual 2010 BUILDING TYPES 6. Pavilion Plan Page 102 of 105 FISH Users Manual 2010 BUILDING TYPES Building 97 Building 98 Building 99 (lease/purchase) (federally owned) (agency owned) Building 00 (lease/rent) 7. Relocatables Page 103 of 105 FISH Users Manual 2010 BUILDING TYPES Walkway Building 2 Building 1 Building 3 Building 5 Building 4 8. Combination Plan Page 104 of 105 FISH Users Manual 2010 Corridor Loading Examples CORRIDOR LOADING Single Inside Heated Classroom Heated Corridor Double Inside Heated Classroom Heated Corridor Heated Classroom Single Outside Heated Classroom Open Corridor Double Outside Heated Classroom Cold Corridor No Corridors Heated Classroom Page 105 of 105 Heated Classroom