1
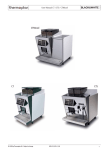
User Manual CT / CTS / CTM / CTMS CTM CTMS CT © 2009 by Thermoplan AG , Subject to change CTS 805.012_REV-4_EN 1 FORM 10072-0_E Activity log for documents Document: Manual BW3 CT / CTS / CTM / CTMS REV-4 Revision Date 0 2009-03-11 Inicials 1 2009-09-08 2 2010-08-03 3 2010-09-17 Added CTMS RZ 4 2010-12-06 !" #$% $& '$& RZ RZ RZ MBO 5 6 7 8 9 10 REVISION 0 1 2 3 4 5 6 7 8 9 10 REVISION 0 1 2 3 4 S S 1 X X 2 X X 3 X X 4 X 38 S S 5 X 39 S S 6 X 40 S 7 X S 41 S 8 X S 9 X S 10 X S 11 X S 12 X S 13 X S 14 X S S 15 X S S 16 X S S 17 X S S 18 X S S 19 X S S 20 X S S 21 X S S 22 X S S 23 X 24 S S S S S S 35 X 25 S S S S 26 S S S S 27 S S S S 28 S S S S 29 S S S S 30 S S S S 31 S S S S 32 S S S S 33 S S S S S S S 34 X S New paging Page Page Page 36 S S 37 S S 5 6 7 8 9 10 REVISION 0 1 2 3 4 5 6 7 8 9 10 User Manual CT / CTS / CTM / CTMS Table of contents Description Page(s) Installation Set-Up 4-5 CT 6 CT (POD-Version) 7 CTS 8 CTS (POD-Version) 9 CTM 10 CTM (POD-Version) 11 CTM without fridge 12 CTM without fridge (POD-Version) 13 CTMS 14 CTMS (POD-Version) 15 Safety in operation 16 Customer information 17 General view Touchscreen CT 18 CTS 19 CTM 20 CTMS 21 POD-versions / Dispense POD-product 22 Function- / Programming- / Product selection keys 23 Product selection examples 24 Handling and Programming of TS Unit from CTMS 25 Base setting Products 26 User display messages 27 - 30 Troubleshooting TS-unit from CTMS Cleaning © 2009 by Thermoplan AG , Subject to change 31 CT 32 CT (POD-Version) 33 CTS 34 CTS (POD-Version) 35 CTM 36 CTM (POD-Version) 37 CTM without fridge 38 CTM without fridge (POD-Version) 39 CTMS 40 CTMS (POD-Version) 41 805.012_REV-4_EN 3 User Manual CT / CTS / CTM / CTMS Important hints INSTALLATION Only an instructed service-engineer may install the unit. The manufacturer is not liable for injuries caused by an improper mountig of the unit. It is a requirement to: a) Install the unit on a solid base. b) The unit may not have a direct contact to the customer. The only exception are automated coffee-machines which are made for the self-service use. POSITION AND LOCATION It is recommended to install the unit in a location that is not nearby an air condition. Do not install the machine in a warm or humid location. POWER SUPPLY The power supplies have to correspond with the data plate. $ < ='> < %< %> =$ %% any damage caused by faulty grounding. Using adapters, multiple plugs and cable extensions are not recommended. Should they be indispensable, use simple or multiple @ < > @ < simple adapters and extensions, and the limit power load shown on multiple adapters. To prevent dangerous overheating, uncoil the power cord to its full length. F <% = The disconnect switch shall disconnect all lines from power net, except grounding. The distance of the contacts in the disconnect switch must be in minimum 3.0 mm. WATER CONNECTION The unit requires a cold water connection of 3/8-inch. The distance between the machine and the water connection should not be more than 1 meter (To connect the unit, use only the supplied original hose). The water pressure must be between 2 and 4 bar (29 - 58 psi). If the water pressure is more than 4 bar (58 psi), you have to install in a pressure reducing valve. WATER QUALITY For getting a good and tasty coffee, the water quality is an important factor. > < K $< LQ"W#QXY"W= = !>= WATER DRAIN The distance between the water drain and the machine should not be more than 1 meter. It is important that the water drain (tube) does not hang down to allow proper draining. CLEANING For hygenic reasons must to be accomplished a cleaning before the start-up of the equipment. Caution:[$ > >% >< % such as cleaning alcohol, ethanol, methanol or other strong detergents. Also prohibited to use for cleaning are acetic acid etc. Futhermore DO NOT put plastic parts, (polyamids), into microwave ovens at any time as the micro waves will affect and deteriorate \>= ()**+%$ !,&%. 805.012_REV-4_EN 4 User Manual CT / CTS / CTM / CTMS Important hints DISPOSAL Packaging Material: Disassembly of Equipment: Safety Instructions: Disposal Instructions: GENERAL SAFETY HINTS The packaging material (cardboard, plastic foil PE and polystyrene EPS) must be recycled. Disconnect equipment from power. If the equipment is hard-wired it must be disconnected by an authorized service agent! In order to avoid any accidents caused by inappropriate use or in particular by playing children the equipment must be put out of operation. Unplug unit from power source or in case of have hardwired installations have it disconnect by an authorized service agent! Subsequently cut off plug from power cord. The proper disposal of your old appliance will help prevent damages to the environment and injuries to human health. The old equipment is not worthless waste. If disposed properly it is possible to recycle its raw materials. Make sure that the old equipment is disposed of or recycled according to local regulations. For any further information about disposal, please contact your manufacturer agent. 1. In case of an emergency, immediately remove the plug from the power socket. 2. Check that the voltage quoted on the rating plate is the same as your mains voltage. 3. ^ <=$ < K 4. Your machine is made for indoor use only. 5. The hot water tube, steam, hot water and coffee are very hot. Avoid direct contact with the skin. (Danger of burning/scalding)! 6. Remove the plug from the mains socket if you will not be using the machine for an extended time (holidays). Before cleaning and servicing, remove the plug from the mains socket and let the machine cool down. Do not unplug by pulling the cable. 7. Do not use the machine if it is not operating perfectly or if is shows any sign of damage. In case of any malfunction or damage notify your nearest service agent. 8. Never immerse the machine, cable, or plug in water or any other liquid. 9. Keep the power cord out of reach of children. 10. Never leave the power cord near or in contact with hot parts of the machine, a source of heat, or a sharp edge. 11. When the power cord or plug is damaged, you may not use the machine. In order to avoid danger, have the defective part repaired or replaced by. 12. [ == =[ |= 13. |% === © 2009 by Thermoplan AG , Subject to change 805.012_REV-4_EN 5 ()**+%$ !,&%. 805.012_REV-4_EN 6 © 2009 by Thermoplan AG, Subject to change each grinder upon start-up of the machine or if the machine did not produce any beverages for hours to get the best quality and taste from your coffee. Note: Preheat cups > Check expiration date of coffee beans Daily set-up 1. 805.019_REV-1_EN Coffee beverages can now be dispensed Fill up the bean hopper with fresh coffee beans Coffee boiler is heating The machine demands to rinse the unit. Press the cleaning key on the display (takes about 50 sec.). Initial Rinse Remove the grounds drawer and press the red button on the left and above the tablet holder. Turn on coffee machine Daily set-up CT Coffee 1 Fill the bean hopper with only the amount of beans you really need. Recommendation: © 2009 by Thermoplan AG , Subject to change 805.012_REV-4_EN 7 © 2009 by Thermoplan AG, Subject to change each grinder upon start-up of the machine or if the machine did not produce any beverages for hours to get the best quality and taste from your coffee. Note: Preheat cups > Check expiration date of coffee beans Daily set-up 1. 805.027_REV-0_EN Coffee beverages can now be dispensed Fill up the bean hopper with fresh coffee beans Coffee boiler is heating The machine demands to rinse the unit. Press the cleaning key on the display (takes about 50 sec.). Initial Rinse Remove the grounds drawer and press the red button on the left and above the tablet holder. Turn on coffee machine Daily set-up CT (POD-Version) Coffee 1 Fill the bean hopper with only the amount of beans you really need. Recommendation: ()**+%$ !,&%. 805.012_REV-4_EN 8 © 2009 by Thermoplan AG, Subject to change each grinder upon start-up of the machine or if the machine did not produce any beverages for hours to get the best quality and taste from your coffee. Note: Preheat cups > Check expiration date of coffee beans Daily set-up 1. 805.021_REV-1_EN Coffee beverages can now be dispensed Fill up the bean hopper with fresh coffee beans Coffee boiler is heating The machine demands to rinse the unit. Press the cleaning key on the display (takes about 50 sec.). Initial Rinse Remove the grounds drawer and press the red button on the left and above the tablet holder. Turn on coffee machine Daily set-up CTS Coffee 1 Fill the bean hopper with only the amount of beans you really need. Recommendation: © 2009 by Thermoplan AG , Subject to change 805.012_REV-4_EN 9 © 2009 by Thermoplan AG, Subject to change each grinder upon start-up of the machine or if the machine did not produce any beverages for hours to get the best quality and taste from your coffee. Note: Preheat cups > Check expiration date of coffee beans Daily set-up 1. 805.031_REV-0_EN Coffee beverages can now be dispensed Fill up the bean hopper with fresh coffee beans Coffee boiler is heating The machine demands to rinse the unit. Press the cleaning key on the display (takes about 50 sec.). Initial Rinse Remove the grounds drawer and press the red button on the left and above the tablet holder. Turn on coffee machine Daily set-up CTS (POD-Version) Coffee 1 Fill the bean hopper with only the amount of beans you really need. Recommendation: ()**+%$ !,&%. 805.012_REV-4_EN 10 © 2009 by Thermoplan AG, Subject to change Store the beans vacumm-packed in the fridge overnight. Recommendation: each grinder upon start-up of the machine or if the machine did not produce any beverages for hours to get the best quality and taste from your coffee. Note: Preheat cups Check expiraton date of coffee beans Daily set-up 1. 805.023_REV-3_EN Coffee beverages can now be dispensed Fill up the bean hopper with fresh coffee beans Coffee boiler is heating The machine demands to rinse the unit. Press the cleaning key on the display (takes about 50 sec.). Initial Rinse Remove the grounds drawer and press the red button on the left and above the tablet holder. Turn on coffee machine Daily set-up CTM Coffee All beverages can now be dispensed Fill up the milk container with milk 1 Fill the bean hopper with only the amount of beans you really need. Recommendation: 2. © 2009 by Thermoplan AG , Subject to change 805.012_REV-4_EN 11 © 2009 by Thermoplan AG, Subject to change each grinder upon start-up of the machine or if the machine did not produce any beverages for hours to get the best quality and taste from your coffee. Note: Preheat cups Check expiraton date of coffee beans Daily set-up 1. 805.029_REV-1_EN Coffee beverages can now be dispensed Fill up the bean hopper with fresh coffee beans Coffee boiler is heating The machine demands to rinse the unit. Press the cleaning key on the display (takes about 50 sec.). Initial Rinse Remove the grounds drawer and press the red button on the left and above the tablet holder. Turn on coffee machine Daily set-up CTM (POD-Version) Coffee All beverages can now be dispensed Fill up the milk container with milk 1 Fill the bean hopper with only the amount of beans you really need. Recommendation: 2. ()**+%$ !,&%. 805.012_REV-4_EN 12 © 2009 by Thermoplan AG, Subject to change each grinder upon start-up of the machine or if the machine did not produce any beverages for hours to get the best quality and taste from your coffee. Note: Preheat cups Check expiraton date of coffee beans Daily set-up 1. 805.036_REV-2_EN Coffee beverages can now be dispensed Fill up the bean hopper with fresh coffee beans Coffee boiler is heating The machine demands to rinse the unit. Press the cleaning key on the display (takes about 50 sec.). Initial Rinse Remove the grounds drawer and press the red button on the left and above the tablet holder. Turn on coffee machine Daily set-up CTM without fridge Coffee All beverages can now be dispensed Place suction tube in a new milk container. 1 Fill the bean hopper with only the amount of beans you really need. Recommendation: 2. © 2009 by Thermoplan AG , Subject to change 805.012_REV-4_EN 13 © 2009 by Thermoplan AG, Subject to change each grinder upon start-up of the machine or if the machine did not produce any beverages for hours to get the best quality and taste from your coffee. Note: Preheat cups Check expiraton date of coffee beans Daily set-up 1. 805.038_REV-1_EN Coffee beverages can now be dispensed Fill up the bean hopper with fresh coffee beans Coffee boiler is heating The machine demands to rinse the unit. Press the cleaning key on the display (takes about 50 sec.). Initial Rinse Remove the grounds drawer and press the red button on the left and above the tablet holder. Turn on coffee machine Daily set-up CTM without fridge (POD-Version) Coffee All beverages can now be dispensed Place suction tube in a new milk container. 1 Fill the bean hopper with only the amount of beans you really need. Recommendation: 2. ()**+%$ !,&%. 805.012_REV-4_EN 14 © 2010 by Thermoplan AG, Subject to change Store the beans vacumm-packed in the fridge overnight. Recommendation: each grinder upon start-up of the machine or if the machine did not produce any beverages for hours to get the best quality and taste from your coffee. Note: Preheat cups Check expiraton date of coffee beans Daily set-up 1. 805.294_REV-0_EN Coffee beverages can now be dispensed Fill up the bean hopper with fresh coffee beans Coffee boiler is heating The machine demands to rinse the unit. Press the cleaning key on the display (takes about 50 sec.). Initial Rinse Remove the grounds drawer and press the red button on the left and above the tablet holder. Turn on coffee machine Daily set-up CTMS Coffee All beverages can now be dispensed Fill up the milk container with milk 1 Fill the bean hopper with only the amount of beans you really need. Recommendation: 2. © 2009 by Thermoplan AG , Subject to change 805.012_REV-4_EN 15 © 2010 by Thermoplan AG, Subject to change Store the beans vacumm-packed in the fridge overnight. Recommendation: each grinder upon start-up of the machine or if the machine did not produce any beverages for hours to get the best quality and taste from your coffee. Note: Preheat cups Check expiraton date of coffee beans Daily set-up 1. 805.291_REV-0_EN Coffee beverages can now be dispensed Fill up the bean hopper with fresh coffee beans Coffee boiler is heating The machine demands to rinse the unit. Press the cleaning key on the display (takes about 50 sec.). Initial Rinse Remove the grounds drawer and press the red button on the left and above the tablet holder. Turn on coffee machine Daily set-up CTMS (POD-Version) Coffee All beverages can now be dispensed Fill up the milk container with milk 1 Fill the bean hopper with only the amount of beans you really need. Recommendation: 2. User Manual CT / CTS / CTM / CTMS & Important hints OPERATION The unit must be serviced only by trained personnel. The units machine not be used to produce other products than described in the manual. General safety notes Beside the hints and notes the following general safety notes have to be observed in any case. SCALD DANGER Using hot water have to be made carefully. - Do not handle underneath the product-outlets. - Coffee-, milk-, tea- and steam-products may cause scalding. - Do not touch any of these outlets during or after dispensing a product. - Take caution if you handle milk in a unit with a milk-heater. Touching the Thermofoam-System may could cause scalding. VENTILATION/ WATER-PROTECTION Do not cover the ventilation slots. Take care that no water enters into the ventilation slots. CLEANING OF THE UNIT The daily cleaning is not only an absolute „must“, but also a guarantee for a constant good coffee taste and ensures a longer life for the machine. AFTER-SALES SERVICE On the display of the coffee-machine appears a message, if a service is required. In any case the machine has to be serviced all six months by a trained technician. Unplug the power-supply before servicing the machine. Important: The power supply must be disconnected before working in the unit. MOVING - Before moving the unit the milk - container has to be emptied. - Pay attention to the weight of the machine. - Use gloves for moving unit by hand. CHANGES MODIFICATIONS It is prohibited to change something on the unit. The manufacturer is not liable for accidents caused by changes made inside or outside the machine. Only trained technical personnel is allowed to work on the inside of the machine. This appliance is not intended for use by persons (including children) with reduced physical, sensory or mental capabilities, or lack of experience and knowledge, unless they have been given supervision or instruction concerning use of the appliance by a person responsible for their safety. Children should be supervised to ensure that they do not play with the appliance. ()**+%$ !,&%. 805.012_REV-4_EN 16 User Manual CT / CTS / CTM / CTMS ' $< . COFFEE - Use only high qualitiy coffee. Type, roasting, mixture and the strength of the coffee should correspond to the desires of your customers. You will be able to = - Never open a receptacle which contains coffee longer than necessary. % % %>} ===~= F % %>=!< quality. - Store your coffee in a cool and dry place. You can store the coffee deep-freezed for several months without loosing quality. FOR COFFEE ENJOYERS Your coffee-machine,besides the choice of the powder quantity, has special setting-possibilities for the three most important steps for the whole product-range for: 1 cup mill 1 1 cup mill 2 2 cups mill 1 2 cups mill 2 Pre-brew time This time shows how long the coffee-powder will be moistend in the brewing chamber. This time chosen is perfect, if no water drips into the cup yet. Relax time @%<<=$< the water. For the ristretto and espresso this time is to choose longer than for a long coffee, where only a short or no pre-brew and relax time should be set. The relax time is about the same or slightly higher than the pre-brew time. Press after This is the last but most important setting of the pre-brew-cycle. Here, the swollen powder will be pressed after. For smaller coffee quantities as there are for Ristretto and Espresso the press after time is set stronger to access the right outlet time. The basic rule is, that the brewing time should be the same for all products. That means, if the water quantity is low (Ristretto, Espresso), the outlet time is smaller. SETTING User As an exclusivity your machine offers the menu „coffee aroma“. An automatic harmonized possibilty to change the pre-brew steps in one menu. Service-Engineer The trained service-engineer and coffee-specialist may set these steps separately too. . © 2009 by Thermoplan AG , Subject to change 805.012_REV-4_EN 17 User Manual CT / CTS / CTM / CTMS , < CT ) X $ ' ' < ()**+%$ !,&%. 805.012_REV-4_EN 18 User Manual CT / CTS / CTM / CTMS , < CTS ) X $ ' ' < "< Steam outlet © 2009 by Thermoplan AG , Subject to change 805.012_REV-4_EN 19 User Manual CT / CTS / CTM / CTMS , < CTM <> ) X $ '#> ' < ()**+%$ !,&%. 805.012_REV-4_EN 20 User Manual CT / CTS / CTM / CTMS ,< CTMS ) X $ <> '#> ' < "< Steam outlet © 2009 by Thermoplan AG , Subject to change 805.012_REV-4_EN 21 User Manual CT / CTS / CTM / CTMS , < # All BW3 machines are also available with a POD instead of the standard coffee / milk outlet. To dispense a POD product do as follows: 1. 2. 2. 1. 1.%%> 3. Close POD 2. 4. %X* = % = ()**+%$ !,&%. 805.012_REV-4_EN 22 User Manual CT / CTS / CTM / CTMS $ # # > Function- / Programming keys ' >&> > > > &>> Product selection keys © 2009 by Thermoplan AG , Subject to change 805.012_REV-4_EN 23 User Manual CT / CTS / CTM / CTMS $ @ X The keyboard consists of: QX) > Y >= %X $ > })L~% % % = ) $ > % > > % } ~ >= ()**+%$ !,&%. %) 805.012_REV-4_EN 24 User Manual CT / CTS / CTM / CTMS " # $& '$& LED-signals hot water manual auto Product selection keys $'# Manual Steam Auto Steam TEA WATER SUPPLY $ <<>@ < < hot water STEAM SUPPLY $<>= & % !$ %[$' }W'#XW ~= manual USE OF KEYS auto ! %=$ >=&%> <\ =!#<= = $%<>< > < =^<>= < #=$% . @= PROGRAMMING X= )= = Y= L= = $ = | %<<= $ <= > >= $ <= & >= < | = <> =$ = Attention: The steam Auto key is combined with a NTC-probe and must be setted with a temperature measuring-instrument. Base setting: 73 °C / 163 °F ex work. = $ < < =!< =[< <> mode. © 2009 by Thermoplan AG , Subject to change 805.012_REV-4_EN 25 User Manual CT / CTS / CTM / CTMS Base settings Products Model CT Model CTM Model CTS Model CTMS ' " W:80 K:20 M: - W:150 K:20 M: - W:270 K:20 M: - W:270 K:20 M: - W:160 K:30 M: - W:300 K:30 M: - W:540 K:30 M: - W:540 K:30 M: - Model CT Model CTM Model CTS Model CTMS "F W:270 ' F > Steam K: - M: - W:160 K:20 M:30 W:160 K:20 M:20 W: - K: - M:60 F}'$&~ W:320 K:30 M:60 W:320 K:30 M:40 W: - K: - M:120 K: - M: - <} '~ W:160 K:20 M:30 W:320 K:30 M:60 ()**+%$ !,&%. D:90 805.012_REV-4_EN 26 User Manual CT / CTS / CTM / CTMS ^ INDEX Display messages: Errors that can be solved by the operater a. < b. c. <F d. X# ) e. f. >&' g. Please Rinse unit h. > i. > j. < k. ' %> $% l. ' m. ' > n. < o. X*+ p. <+X Display messages: Errors that can‘t be solved by the operater (service technician required) q. < r. ' s. t. [$''% u. \ v. $% w. % <X*=% K © 2009 by Thermoplan AG , Subject to change 805.012_REV-4_EN 27 User Manual CT / CTS / CTM / CTMS Display messages: Errors that can be solved by the operater Display message Description a. Drawer defective or not inserted Drawer Missing – < Contact service technician b. Ready Coffee machine is ready for next serving. c. Please wait Coffee boiler has not reached set temperature While heating up – !< % = Contact service technician d. Fill hopper M1 (left side) Bean hopper out of beans or hopper gate is closed. – Contact service technician Fill hopper M2 (right side) e. Bean hopper missing or command unit up f. Machine Locked Start Cleaning g. Please Bean hopper or command unit not correctly mounted – >% – ' } %~ Machine has reached a pre-programmed number of brew cycles, indicating a cleaning cycle must be performed. – Machine demands a rinse – ' % Rinse unit h. Please add milk ()**+%$ !,&%. Milk container almost empty, products are still ready for dispense. – > 805.012_REV-4_EN 28 User Manual CT / CTS / CTM / CTMS Display messages: Errors that can be solved by the operater Display message Description i. Milk container is empty j. Milk empty Powder Error – > ! " ! ## – >=> <\ . = Contact service technician k. Cleaning break Insert Tablet l. Cleaning Key Missing Cleaning was interrupted (e.g. power outage, manipulation during cleaning, ...) – > – <})~ < % > – > Cleaning key is not correctly mounted – > +*W>< Please Insert m. Cleaning Cleaning has to be started again – ' % Press rinse key n. Empty Drawer Grounds drawer has reached the programmed number of coffee pucks and needs to be emptied. – $>>< = – $ < = [<%%L % = o. high p. The option „voltage control“ is working (line voltage too high) Voltage 109% The option „voltage control“ is working (line voltage too high) Voltage low – $ =! . % = 91% © 2009 by Thermoplan AG , Subject to change – $ <=! . % = 805.012_REV-4_EN 29 User Manual CT / CTS / CTM / CTMS Display messages: Errors that can‘t be solved by the operater (service technician required) Display message Description q. Contact service technician r. s. t. Flow Error Change filter Piston Error NTC Coffeeboiler Contact service technician Contact service technician Contact service technician Open u. v. w. PM Required Drain Tub Overtime error Contact service technician – } %~ Contact service technician $ &'* +& – ' % Contact service technician ()**+%$ !,&%. 805.012_REV-4_EN 30 User Manual CT / CTS / CTM / CTMS Troubleshooting TS-unit from CTMS No steam, no pressure in the boiler (gauge reads 0 bar), can be a result of the following causes in order of probability: A) B) C) D) E) F) << < < $X)% # &#$% < [< < D B D A C B HEATING UP ! <| = ! | LED-signals hot water © 2009 by Thermoplan AG , Subject to change manual 805.012_REV-4_EN auto 31 ()**+%$ !,&%. 805.012_REV-4_EN 32 Press the cleaning key on the display. Reinsert the grounds drawer. Load two (2) tablets into the tablet holder and reinsert tablet holder. Pull out the tablet holder by turning the black ring counter-clockwise. Remove the grounds drawer. © 2009 by Thermoplan AG, Subject to change 1. Gloves Black&White cleaning tablets Preparation 90° 2. 805.019_REV-1_EN Cleaning procedure is completed The coffee machine can be prepared for the next operation. Pull down the distribution block, clean it and remount the block with the central screw. Daily cleaning of the coffee outlet: Pull the outlet head to the top position and unscrew the central screw. After about 5 - 10 min. the cleaning is done and the machine shows “Ready” on the display. The machine begins with the automatic cleaning which runs in 6 cycles. You can see the cleaning progress on the display. 2 Store the beans vacumm-packed in the fridge overnight. Recommendation: Use only the Black&White cleaning tablets (art.no. 70.00.06/box with 90 tablets or 70.00.05/carton with 36 boxes) Cleaning Instructions CT © 2009 by Thermoplan AG , Subject to change 805.012_REV-4_EN 33 Empty and clean bean hopper. © 2009 by Thermoplan AG, Subject to change Insert two cleaning tablets and close the POD Slide the little white lever to the left side position Press both levers to the back to open the POD Empty and clean the drip tray before you start the daily cleaning process! 1. Gloves Black&White cleaning tablets Preparation 2. 805.027_REV-0_EN Cleaning procedure is completed The coffee machine can be prepared for the next operation. Press both levers to the back to open the POD. Attention hot!!! Slide the little white lever to the right side position. Close the POD. After about 5 - 10 min. the cleaning is done. The machine begins with the automatic cleaning which runs in 6 cycles. You can see the cleaning progress on the display. 2 Store the beans vacumm-packed in the fridge overnight. Recommendation: Use only the Black&White cleaning tablets (art.no. 70.00.06/box with 90 tablets or 70.00.05/carton with 36 boxes) Cleaning Instructions CT (POD-Version) ()**+%$ !,&%. 805.012_REV-4_EN 34 Press the cleaning key on the display. Reinsert the grounds drawer. Load two (2) tablets into the tablet holder and reinsert tablet holder. Pull out the tablet holder by turning the black ring counter-clockwise. Remove the grounds drawer. © 2009 by Thermoplan AG, Subject to change 1. Gloves Black&White cleaning tablets Preparation 90° 2. 805.021_REV-1_EN Pull down the distribution block, clean it and remount the block with the central screw. Daily cleaning of the coffee outlet: Pull the outlet head to the top position and unscrew the central screw. After about 5 - 10 min. the cleaning is done and the machine shows “Ready” on the display. The machine begins with the automatic cleaning which runs in 6 cycles. You can see the cleaning progress on the display. Cleaning procedure is completed The coffee machine can be prepared for the next operation. Clean the steam outlet and nozzle (Attention: Steam outlet and nozzle are hot. Danger of scalding!) 2 Store the beans vacumm-packed in the fridge overnight. Recommendation: 3. Use only the Black&White cleaning tablets (art.no. 70.00.06/box with 90 tablets or 70.00.05/carton with 36 boxes) Cleaning Instructions CTS © 2009 by Thermoplan AG , Subject to change 805.012_REV-4_EN 35 Empty and clean bean hopper. © 2009 by Thermoplan AG, Subject to change Insert two cleaning tablets and close the POD Slide the little white lever to the left side position Press both levers to the back to open the POD Empty and clean the drip tray before you start the daily cleaning process! 1. Gloves Black&White cleaning tablets Preparation 2. 805.031_REV-0_EN Press both levers to the back to open the POD. Attention hot!!! Slide the little white lever to the right side position. Close the POD.w After about 5 - 10 min. the cleaning is done. The machine begins with the automatic cleaning which runs in 6 cycles. You can see the cleaning progress on the display. Cleaning procedure is completed The coffee machine can be prepared for the next operation. Place the steam wand in a pitcher of ice water. Then press the „manual steam“ key and let it steam for 2 seconds. Let the pitcher sit overnight. Remove the pitcher and blow out the steam wand. Sanitize the wand with a wiping cloth saturated in approved sanitizer. If the wand is clogged remove by turning counter-clockwise by hand and clean the inside of the steam wand and wipe off steam wand probe. Replace the steam wand by carefully sliding the wand over the probe. Finger-tightened the steam wand tube. Clean the steam outlet and nozzle (Attention: Steam outlet and nozzle are hot. Danger of scalding!) 2 Store the beans vacumm-packed in the fridge overnight. Recommendation: 3. Use only the Black&White cleaning tablets (art.no. 70.00.06/box with 90 tablets or 70.00.05/carton with 36 boxes) Cleaning Instructions CTS (POD-Version) ()**+%$ !,&%. 805.012_REV-4_EN 36 Reinsert the grounds drawer. Load two (2) tablets into the tablet holder and reinsert tablet holder. Pull out the tablet holder by turning the black ring counter-clockwise. Remove the grounds drawer. © 2009 by Thermoplan AG, Subject to change 1. Gloves and goggles Cleaning solution „thermoblue“ Black&White cleaning tablets Preparation thermoblue 90° 2. 805.023_REV-3_EN Clean the milk container with fresh water and make sure that there is no thermoblue left in the container. Clean the suction tube and hull thoroughly and put the container back into the fridge. After pressing the cleaning key, the remaining 4 cycles will be started. Takes about 5 min. After the 8th cleaning cycle (after about 10 min.) the machine demands to empty and clean thoroughly the milk container. Replace the suction tubes back into the container and press the cleaning key on the display. The machine begins with the automatic cleaning which runs in 12 cycles. You can see the cleaning progress on the display. Remove the milk container of the fridge and clean it. Pour 60 ml thermoblue into the container and put it back in the fridge. 3. Cleaning procedure is completed The coffee machine can be prepared for the next operation. Weekly cleaning of the bean hoppers: Remove grounds drawer and lift up the front. Turn the lever of the bean hopper clockwise to unlock it. Use both hands to pull out the bean hopper. Use lukewarm water to clean the bean hopper. Dry it thoroughly afterwards. Pull down the distribution block, clean it and remount the block with the central screw. Weekly cleaning of the coffee outlet: Pull the outlet head to the top position and unscrew the central screw. Clean milk container and suction tube thoroughly. After the 12th cleaning cycle: Use only the Black&White cleaning tablets (art.no. 70.00.06/box with 90 tablets or 70.00.05/carton with 36 boxes) to clean the water circuit, for the milk circuit use only the thermoblue cleaning detergent (art.no. 70.01.15/2.5Ltr. or 70.01.16/5Ltr.). Cleaning Instructions CTM 2 © 2009 by Thermoplan AG , Subject to change 805.012_REV-4_EN 37 Empty and clean bean hopper. © 2009 by Thermoplan AG, Subject to change Insert two cleaning tablets and close the POD Slide the little white lever to the left side position Press both levers to the back to open the POD Empty and clean the drip tray before you start the daily cleaning process! 1. Gloves and goggles Cleaning solution „thermoblue“ Black&White cleaning tablets Preparation thermoblue 2. 805.029_REV-1_EN Clean the milk container with fresh water and make sure that there is no thermoblue left in the container. Clean the suction tube and hull thoroughly and put the container back into the fridge. After pressing the cleaning key, the remaining 4 cycles will be started. Takes about 5 min. After the 8th cleaning cycle (after about 10 min.) the machine demands to empty and clean thoroughly the milk container. Replace the suction tubes back into the container and press the cleaning key on the display. The machine begins with the automatic cleaning which runs in 12 cycles. You can see the cleaning progress on the display. Remove the milk container of the fridge and clean it. Pour 60 ml thermoblue into the container and put it back in the fridge. Cleaning procedure is completed The coffee machine can be prepared for the next operation. Daily cleaning of the coffee outlet: Remove the milk outlet and clean it with a brush and warm water. Press both levers to the back to open the POD. Attention hot!!! Slide the little white lever to the right side position. Close the POD. After the 12th cleaning cycle: Clean milk container and suction tube thoroughly. 2 Store the beans vacumm-packed in the fridge overnight. Recommendation: 3. Use only the Black&White cleaning tablets (art.no. 70.00.06/box with 90 tablets or 70.00.05/carton with 36 boxes) to clean the water circuit, for the milk circuit use only the thermoblue cleaning detergent (art.no. 70.01.15/2.5Ltr. or 70.01.16/5Ltr.). Cleaning Instructions CTM (POD-Version) ()**+%$ !,&%. 805.012_REV-4_EN 38 Reinsert the grounds drawer. Load two (2) tablets into the tablet holder and reinsert tablet holder. Pull out the tablet holder by turning the black ring counter-clockwise. Remove the grounds drawer. © 2009 by Thermoplan AG, Subject to change 1. Gloves and goggles Cleaning solution „thermoblue“ Black&White cleaning tablets Preparation thermoblue 90° 2. 805.036_REV-2_EN Clean the milk container with fresh water and make sure that there is no thermoblue left in the container. Clean the suction tube and hull thoroughly and put the container back into the fridge. After pressing the cleaning key, the remaining 4 cycles will be started. Takes about 5 min. After the 8th cleaning cycle (after about 10 min.) the machine demands to empty and clean thoroughly the container. Press the cleaning key on the display. The machine begins with the automatic cleaning which runs in 12 cycles. You can see the cleaning progress on the display. Place suction tube in a container with 60ml thermoblue. Cleaning procedure is completed The coffee machine can be prepared for the next operation. Pull down the distribution block, clean it and remount the block with the central screw. Daily cleaning of the coffee outlet: Pull the outlet head to the top position and unscrew the central screw. After the 12th cleaning cycle: Clean used container and suction tube thoroughly. 2 Store the beans vacumm-packed in the fridge overnight. Recommendation: 3. Use only the Black&White cleaning tablets (art.no. 70.00.06/box with 90 tablets or 70.00.05/carton with 36 boxes) to clean the water circuit, for the milk circuit use only the thermoblue cleaning detergent (art.no. 70.01.15/2.5Ltr. or 70.01.16/5Ltr.). Cleaning Instructions CTM without fridge © 2009 by Thermoplan AG , Subject to change 805.012_REV-4_EN 39 Empty and clean bean hopper. © 2009 by Thermoplan AG, Subject to change Insert two cleaning tablets and close the POD Slide the little white lever to the left side position Press both levers to the back to open the POD Empty and clean the drip tray before you start the daily cleaning process! 1. Gloves and goggles Cleaning solution „thermoblue“ Black&White cleaning tablets Preparation thermoblue 2. 805.038_REV-1_EN Clean the milk container with fresh water and make sure that there is no thermoblue left in the container. Clean the suction tube and hull thoroughly and put the container back into the fridge. After pressing the cleaning key, the remaining 4 cycles will be started. Takes about 5 min. After the 8th cleaning cycle (after about 10 min.) the machine demands to empty and clean thoroughly the container. Press the cleaning key on the display. The machine begins with the automatic cleaning which runs in 12 cycles. You can see the cleaning progress on the display. Place suction tube in a container with 60ml thermoblue. Cleaning procedure is completed The coffee machine can be prepared for the next operation. Daily cleaning of the milk outlet: Remove the milk outlet and clean it with a brush and warm water. Press both levers to the back to open the POD. Attention hot!!! Slide the little white lever to the right side position. Close the POD. After the 12th cleaning cycle: Clean suction tube and used container thoroughly. 2 Store the beans vacumm-packed in the fridge overnight. Recommendation: 3. Use only the Black&White cleaning tablets (art.no. 70.00.06/box with 90 tablets or 70.00.05/carton with 36 boxes) to clean the water circuit, for the milk circuit use only the thermoblue cleaning detergent (art.no. 70.01.15/2.5Ltr. or 70.01.16/5Ltr.). Cleaning Instructions CTM without fridge (POD-Version) ()**+%$ !,&%. 805.012_REV-4_EN 40 Reinsert the grounds drawer. Load two (2) tablets into the tablet holder and reinsert tablet holder. Pull out the tablet holder by turning the black ring counter-clockwise. Remove the grounds drawer. © 2010 by Thermoplan AG, Subject to change 1. Gloves and goggles Cleaning solution „thermoblue“ Black&White cleaning tablets Preparation thermoblue 90° 2. 805.294_REV-0_EN Clean the milk container with fresh water and make sure that there is no thermoblue left in the container. Clean the suction tube and hull thoroughly and put the container back into the fridge. After pressing the cleaning key, the remaining 4 cycles will be started. Takes about 5 min. After the 8th cleaning cycle (after about 10 min.) the machine demands to empty and clean thoroughly the milk container. Replace the suction tubes back into the container and press the cleaning key on the display. The machine begins with the automatic cleaning which runs in 12 cycles. You can see the cleaning progress on the display. Remove the milk container of the fridge and clean it. Pour 60 ml thermoblue into the container and put it back in the fridge. 3. Cleaning procedure is completed The coffee machine can be prepared for the next operation. Pull down the distribution block, clean it and remount the block with the central screw. Weekly cleaning of the coffee outlet: Pull the outlet head to the top position and unscrew the central screw. Clean the steam outlet and nozzle (Attention: Steam outlet and nozzle are hot. Danger of scalding!) Clean milk container and suction tube thoroughly. After the 12th cleaning cycle: Use only the Black&White cleaning tablets (art.no. 70.00.06/box with 90 tablets or 70.00.05/carton with 36 boxes) to clean the water circuit, for the milk circuit use only the thermoblue cleaning detergent (art.no. 70.01.15/2.5Ltr. or 70.01.16/5Ltr.). Cleaning Instructions CTMS 2 © 2009 by Thermoplan AG , Subject to change 805.012_REV-4_EN 41 Empty and clean bean hopper. © 2010 by Thermoplan AG, Subject to change Insert two cleaning tablets and close the POD Slide the little white lever to the left side position Press both levers to the back to open the POD Empty and clean the drip tray before you start the daily cleaning process! 1. Gloves and goggles Cleaning solution „thermoblue“ Black&White cleaning tablets Preparation thermoblue 2. 805.291_REV-0_EN Clean the milk container with fresh water and make sure that there is no thermoblue left in the container. Clean the suction tube and hull thoroughly and put the container back into the fridge. After pressing the cleaning key, the remaining 4 cycles will be started. Takes about 5 min. After the 8th cleaning cycle (after about 10 min.) the machine demands to empty and clean thoroughly the milk container. Replace the suction tubes back into the container and press the cleaning key on the display. The machine begins with the automatic cleaning which runs in 12 cycles. You can see the cleaning progress on the display. Remove the milk container of the fridge and clean it. Pour 60 ml thermoblue into the container and put it back in the fridge. 3. Cleaning procedure is completed The coffee machine can be prepared for the next operation. Daily cleaning of the coffee outlet: Remove the milk outlet and clean it with a brush and warm water. Clean the steam outlet and nozzle (Attention: Steam outlet and nozzle are hot. Danger of scalding!) Place the steam wand in a pitcher of ice water. Then press the „manual steam“ key and let it steam for 2 seconds. Let the pitcher sit overnight. Remove the pitcher and blow out the steam wand. Sanitize the wand with a wiping cloth saturated in approved sanitizer. If the wand is clogged remove by turning counterclockwise by hand and clean the inside of the steam wand and wipe off steam wand probe. Rep l a ce t h e s t ea m wa n d b y ca r efully sliding the wand over the probe. Finger-tightened the steam wand tube. Press both levers to the back to open the POD. Attention hot!!! Slide the little white lever to the right side position. Close the POD. After the 12th cleaning cycle: Clean milk container and suction tube thoroughly. Use only the Black&White cleaning tablets (art.no. 70.00.06/box with 90 tablets or 70.00.05/carton with 36 boxes) to clean the water circuit, for the milk circuit use only the thermoblue cleaning detergent (art.no. 70.01.15/2.5Ltr. or 70.01.16/5Ltr.). Cleaning Instructions CTMS (POD-Version) 2