1
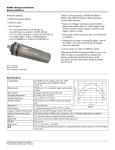
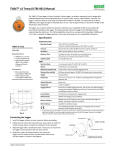
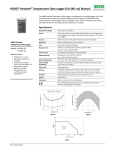
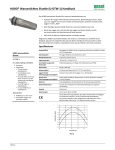
HOBO® Waterproof Shuttle (U-DTW-1) Manual The HOBO Waterproof Shuttle performs several major functions: • Reads out all logger information (serial number, deployment number, data, etc.) from loggers in the field for transfer to host computer, and stores each logger’s data in a “bank” • Nonvolatile memory preserves data, even if batteries are depleted • Relaunches the logger, resetting the logger’s time to the shuttle’s time and synchronizing the logging interval on relaunch • Can be used as an optic-to-USB base station Although the HOBO Waterproof Shuttle is easy to use, Onset strongly recommends that you spend a few minutes reading this manual and trying out the procedures described here before taking the shuttle into the field. Specifications HOBO Waterproof Shuttle Compatibility All HOBO U-Series loggers with optic USB. Not compatible with the HOBO U-Shuttle (U-DT-1). Data Capacity 63 logger readouts of up to 64K each U-DTW-1 Operating Temperature 0° to 50°C (32° to 122°F) Included Items: Storage Temperature -20° to 50°C (-4° to 122°F) Wetted Materials Polycarbonate case, EPDM o-rings and retaining loop Waterproof To 20 m (66 feet) Time Accuracy ±1 minute per month at 25°C (77°F); see Plot A Logger-to-Shuttle Transfer Speed Reads out one full 64K logger in about 30 seconds Shuttle-to-Host Transfer Speed Full shuttle offload (4 MB) to host computer in 10 to 20 minutes, depending on computer Batteries 2 AA alkaline batteries required for remote operation Battery Life One year or at least 50 complete memory fills, typical use Weight 150 g (4 oz) • USB cable • Set of couplers; For UA Pendant (COUPLER2-A) For U20 Water Level (COUPLER2-B) For U22 Water Temp Pro v2, U24 Conductivity, and U26 DO (COUPLER2-C) For UTBI TidbiT v2 (COUPLER2-D) For U23 HOBO Pro v2 (COUPLER2-E) Required Items: Dimensions 15.2 x 4.8 cm (6.0 x 1.9 inches) The CE Marking identifies this product as complying with all relevant directives in the European Union (EU). To maintain CE compliance, this product must be used with the supplied USB cable or equivalent (less than 3 m long). • HOBOware 2.2 or later • Compatible logger and matching coupler 40 20 Timebase Error (ppm) 0 -20 -40 -60 -80 -100 -120 -140 -20 0 20 Temperature (°C) Plot A 10264-H MAN-U-DTW-1 40 60 HOBO Waterproof Shuttle (U-DTW-1) Manual HOBO Waterproof Shuttle Features 7. If you have used the shuttle before, make sure there are enough banks available to accommodate the loggers you plan to read out. Preparing to Go on Location Before using the shuttle for the first time, you must launch it with HOBOware 2.2 or greater. You must also launch any compatible loggers that were last launched with an earlier version of HOBOware, or have never been launched at all. 8. Disconnect the USB cable from the shuttle and replace the center cap securely. 1. Use HOBOware 2.2 or greater to launch each logger you wish to read out and relaunch with the shuttle later. (Read “Using the shuttle as a base station” for instructions if you do not have another base station for the loggers.) The shuttle cannot relaunch loggers that were last launched with an earlier version of HOBOware. (You only have to do this once for each logger.) Reading Out and Relaunching Loggers in the Field After you have ensured that the shuttle’s batteries are good, there is sufficient memory available, and the shuttle’s clock is synchronized, follow these steps to read out and relaunch a logger in the field: 2. Plug the large end of a USB interface cable into a USB port on the computer. (Avoid using a USB hub, if possible.) 1. Make sure the shuttle’s large cap and center cap are closed securely. Tighten the center cap until it is just flush with the large cap, or until the O-ring is no longer visible. 3. Unscrew the center cap on the shuttle. If the cap is too tight to loosen by hand, insert a screwdriver through the lanyard hole and rotate counterclockwise until the cap is loosened. 2. Make sure the communication end of the shuttle is clean. Attach the correct coupler for the logger, and ensure that it is seated properly. 4. Plug the small end of the USB interface cable into the USB port in the shuttle. (If the shuttle has never been connected to the computer before, it may take a few seconds for the new hardware to be detected.) 3. Insert the logger into the coupler, following the instructions that came with the coupler. 4. Momentarily press the coupler lever (pressing hard enough so the lever bends). Readout should begin immediately. The amber LED blinks continuously while readout and relaunch are in progress. Do not remove the logger when the amber LED is blinking. 5. Follow the instructions in the HOBOware User’s Guide to access the Manage Shuttle dialog. Make sure the battery level is good, and change the batteries now if they are weak. Important: If you change the batteries in the field, the shuttle’s clock will stop, and the shuttle will not read out loggers again until you relaunch it in HOBOware. 5. After reading out the logger, the shuttle synchronizes the logger’s clock to the shuttle’s internal clock and relaunches the logger, using the description, channels to log, logging interval, and other settings that are already in the logger. (If the logger was launched with multiple logging intervals, the final defined logging interval will be used.) The logger is launched with a slight delay that causes its readings to be synchronized with those of the previous deployment, as shown in the following diagram. 6. If you are using the shuttle for the first time, launch the shuttle as described in the HOBOware User’s Guide. Launching synchronizes the shuttle’s clock to the host computer and initializes the shuttle’s header. Important: The shuttle’s clock is used to set the logger’s clock at relaunch. For most accurate results, make sure the host computer’s clock is correct before launching the shuttle. If you need to adjust the computer’s clock, quit HOBOware, set the computer’s clock, then reopen HOBOware and launch the shuttle. 1-800-LOGGERS 2 www.onsetcomp.com HOBO Waterproof Shuttle (U-DTW-1) Manual Important: If the logger was launched with multiple logging intervals, there will be no synchronizing delay. The logger will start immediately with the last defined logging interval. 1. Connect the shuttle to the host computer running HOBOware. 6. When the relaunch has completed, the green LED blinks for 15 minutes, or until you momentarily press the coupler lever to stop it (press hard enough so the lever bends). If the red LED blinks instead, there was an error, and the logger may have stopped. Refer to “Troubleshooting” in this manual for details. 3. Momentarily press the coupler’s lever (pressing hard enough so the lever bends). 2. Attach a compatible logger and coupler. 4. The amber LED blinks momentarily, then the green LED should glow steadily to indicate that the logger is ready to communicate with HOBOware. (If the red LED blinks instead, the logger was not found. Make sure the logger and coupler are aligned and seated properly, and that there is no dirt or strong sunlight interfering with communications.) 7. Remove the logger from the coupler. Checking Shuttle Status in the Field 5. When finished, remove the logger from the coupler. The green LED stops glowing when you disconnect the logger or the USB cable. The shuttle’s memory has 63 “banks.” One logger readout can be stored in each bank. To check the shuttle’s memory and batteries in the field, remove the logger and press the coupler’s lever for at least three seconds (pressing hard enough so the lever bends). When you release the lever, the green LED blinks once for each unoccupied bank in the shuttle’s memory. (Press the lever momentarily to stop the blinking, pressing hard enough so the lever bends.) Important: The Waterproof Shuttle cannot be used as a base station with Pendant logger models UA-001 and UA-003 (including rain gauges RG3 and RG3-M) with serial numbers less than 988278. These loggers require a BASE-U-1 for communication with the host computer. If the shuttle’s batteries are running low, all of the shuttle banks are full, or the clock has not been set, the red LED blinks. (Press the lever momentarily to stop the blinking, pressing hard enough so the lever bends) Use HOBOware to check the shuttle’s battery level, available memory, and clock. You may need to change the batteries, or offload the datafiles to the host computer and delete them from the shuttle to free up memory before you can continue reading out loggers. Indicator Lights Green “OK” LED The green “OK” LED blinks when HOBOware recognizes it as a base station; when it finishes reading out and relaunching a logger; and when you press the coupler lever to check the shuttle’s status (see “Checking shuttle status in the field” for details). Momentarily press the coupler lever to stop the blinking (pressing hard enough so the lever bends). Offloading Data to the Host Computer You can offload the data stored in the shuttle even when the batteries are depleted. Take the following steps: The green LED glows steadily when the shuttle is being used as a base station. 1. Connect the shuttle to a host computer running HOBOware. Amber “Transfer” LED The amber “Transfer” LED blinks when the shuttle is reading out a logger and relaunching it. Do not remove the logger when the Transfer light is lit. 2. Follow the instructions in the HOBOware User’s Guide to offload the new datafiles or access the Manage Shuttle dialog. The Manage Shuttle dialog shows you how many banks are occupied, and whether they have already been offloaded and saved to the host computer. Red “Fail” LED 3. Offload and save data from the banks of your choice. Refer to the HOBOware User’s Guide for details on saving datafiles offloaded from the shuttle. The red “Fail” LED blinks whenever the shuttle encounters an error condition. Refer to “Troubleshooting” for details. 4. Review the list of banks and delete any that are no longer needed. Make sure the battery level is good, and change the batteries now if they are weak. (If you change the batteries in the field, the shuttle’s clock will stop, and the shuttle will not read out loggers.) Update the shuttle’s clock, if necessary. All LEDs All LEDs blink in unison when the shuttle has just been powered up, either by installing fresh batteries or (if batteries are not installed) by connecting to the computer’s USB port. Troubleshooting 5. When finished, disconnect the shuttle from the computer and close the center cap securely. This section describes problems you may encounter while using the shuttle. Using the Shuttle as a Base Station Shuttle is not recognized by host computer If HOBOware does not recognize the shuttle when you connect it to the computer, simply disconnect and reconnect the shuttle. You can use the shuttle as a base station for any U-Series logger with an optic USB interface. (This function is available even when the batteries are depleted.) To use the shuttle as a base station: 1-800-LOGGERS 3 www.onsetcomp.com HOBO Waterproof Shuttle (U-DTW-1) Manual Red “Fail” LED blinks The red “Fail” LED blinks (for 15 minutes, or until you press the coupler lever, pressing hard enough so the lever bends) whenever the shuttle encounters an error. There are several conditions that might cause an error: in the shuttle will remain safe, but the shuttle will not read out another logger until its batteries are replaced. To avoid battery problems, always check the shuttle’s batteries in HOBOware before going into the field, and replace them if needed. If you cannot replace the bad batteries right away, you should remove them as soon as possible to ensure that they do not leak and damage the shuttle. • Shuttle is full: If the red LED blinks when you try to read out a logger, check whether all of the banks are full, as described in “Checking shuttle status in the field.” Or, use HOBOware to check the shuttle’s memory. To change the shuttle’s batteries: 1. Work over a clean surface to provide a safe platform for the disassembly. • Shuttle batteries are low: If you cannot read out any loggers at all, check the logger’s status, as described in “Checking shuttle status in the field,” or use HOBOware to check the shuttle’s batteries. The batteries may simply need to be replaced. 2. Unscrew the center cap on the shuttle. If the cap is too tight to loosen by hand, insert a screwdriver through the lanyard hole and rotate counterclockwise until the cap is loosened. • Compatibility: The shuttle cannot read out or relaunch loggers that were last launched from HOBOware prior to version 2.2. You will need to read out these loggers on the host computer and relaunch them in HOBOware 2.2 or greater before you can use them with the shuttle. 3. Use the center cap to help you carefully pull the rubber loop free of the large cap. The large cap cannot be removed while the rubber loop is in place. • Shuttle clock is not set: The shuttle has experienced a power failure that caused the clock to reset. You must use HOBOware to offload the files that are already on the shuttle, then relaunch the shuttle before you can read out another logger. • Can’t communicate with logger: Remove the logger and coupler. Inspect them and the shuttle to ensure that all are free of dirt that could block the optic communication sensor. Carefully reassemble the shuttle, coupler, and logger, and make sure they are all seated properly. Shield the shuttle from strong sunlight, if applicable, which can interfere with optic communications. 4. Turn the large cap counter-clockwise slightly, then pull it off. • Other logger problems: If you can read out some loggers but not others, or if you cannot read out any loggers even with fresh batteries in the shuttle, check the loggers in HOBOware. Make sure their batteries are at acceptable levels and that there is no “corrupted header” message. Amber “Transfer” LED stays on without blinking The amber light is magnetically activated when you press the coupler lever. If it glows steadily at any other time, the magnet in the lever may be too close to the magnetic switch in the shuttle, or another strong magnet may be present. Try bending the lever away from the coupler to reduce the magnet’s effect. 5. Turn the shuttle over and tap it gently. The circuit board should slide into your hand. LEDs do not function If the LEDs are not functioning at all, the batteries may be completely exhausted. To test this, attach the shuttle to the host computer and check the battery level. The shuttle should be able to communicate with the host computer, blink its LEDs normally, and perform as a base station even when the batteries are missing or depleted. Replacing the Shuttle’s Batteries The shuttle’s batteries should last about one year or at least 50 complete memory fills in typical conditions. When the shuttle’s batteries run low (2.2 V or less), any logger data that is already 1-800-LOGGERS 4 www.onsetcomp.com HOBO Waterproof Shuttle (U-DTW-1) Manual 6. Remove the old batteries and install two new ones in the correct orientation. Both batteries should be turned the same way, with their positive ends facing the USB port on the board. (When the second battery makes contact, all of the shuttle’s LEDs will blink in unison.) 7. Put the board back into the case, taking care not to bend the communication LEDs. Align the circuit board with the runners in the case. The USB port should face the open end of the shuttle, and the LEDs should show through the window on the label. 8. Close the shuttle’s case. Line up the tabs on the large cap with the slots on the case, press gently, and turn slightly clockwise until the large cap is closed securely. 9. Replace the rubber loop and center cap. Tighten the center cap until it is just flush with the large cap, or until the O-ring is no longer visible. 10. Using HOBOware, offload any datafiles that are on the shuttle and launch the shuttle before going into the field again. The shuttle will not read out and relaunch loggers until the clock has been synchronized. WARNING: Do not install batteries backwards, recharge, put in fire, expose to extreme heat, or mix with other battery types, as the batteries may explode or leak. Contents of an open or leaking battery can cause chemical burn injuries. Replace all used batteries at the same time. Recycle or dispose of batteries according to applicable federal, state, and local regulations. 1-800-LOGGERS (564-4377) • 508-759-9500 www.onsetcomp.com • [email protected] © 2006–2013 Onset Computer Corporation. All rights reserved. Onset, HOBO, and HOBOware are trademarks or registered trademarks of Onset Computer Corporation. All other trademarks are the property of their respective companies. 10264-H MAN-U-DTW-1