1
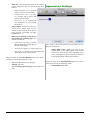
RPGMapMaker Menus Manual Copyright © 2000-2012 François Menneteau. All rights reserved worldwide. Version: 6.6.0 Date: October 2012 Table of contents Menu: About..............................................3 Clear............................................................................8 About RPGMapMaker..........................................3 Select All.....................................................................8 Register…..................................................................3 Layers..........................................................................8 Registration & Contact Info................................3 Undo........................................................................8 Check for Update....................................................3 Undo Level: <value>..........................................8 Preferences…............................................................3 Cut...........................................................................8 Menu: File..................................................4 Copy........................................................................9 Paste........................................................................9 New…..........................................................................4 Clear........................................................................9 Models.........................................................................5 Select All................................................................9 New from Model….............................................5 Markers......................................................................9 New from User Model…...................................5 Show All..............................................................10 Save as User Model…........................................6 Hide All................................................................10 Open…........................................................................6 Map Information…..............................................10 Open Recent..............................................................6 Show Terrain Grid................................................11 Browse.........................................................................6 Show Clipboard.....................................................11 Close.............................................................................6 Reveal Support Folder in Finder.....................11 Save Map....................................................................6 Save Map As….........................................................7 Menu: Effects.........................................12 Import Image….......................................................7 Repeat Last Effect.................................................12 Export….....................................................................7 Clockwise Rotation...............................................12 Printing Preferences...............................................7 Counterclockwise Rotation................................12 Page Setup….............................................................7 Vertical Symmetry................................................12 Print Map…..............................................................7 Horizontal Symmetry...........................................12 Print Selection..........................................................7 Grayscale..................................................................12 Quit..............................................................................7 Negate........................................................................12 Menu: Edit.................................................8 Light Blur.................................................................12 Undo.............................................................................8 Cut................................................................................8 Copy.............................................................................8 Paste.............................................................................8 Heavy Blur...............................................................12 Gaussian Blur.........................................................13 Invert.........................................................................13 Sharpen.....................................................................13 Edge Enhance.........................................................13 1 / 23 Extrude.....................................................................13 Load Library…......................................................17 Focus Enhance........................................................13 Save............................................................................17 Emboss (Relief Map)............................................13 Save A Copy As….................................................17 Brightness................................................................13 Reveal Library in Finder....................................18 Contrast....................................................................13 Menu: Windows......................................19 Auto Contrast.........................................................14 Menu: Help..............................................19 Color Filter… & Color Mask….......................14 User Manual............................................................19 Smooth Edges….....................................................14 Menus Manual........................................................19 Shift….......................................................................15 Scripting Manual...................................................19 Menu: Terrains.......................................16 How to Install Textures.......................................19 Editor…....................................................................16 Keyboard Shortcuts..............................................19 Organizer….............................................................16 Menu Items Shortcuts..........................................19 Edit.............................................................................16 What's New.............................................................19 Undo......................................................................16 Changes History....................................................19 Cut.........................................................................16 Preferences............................................20 Copy......................................................................16 Paste......................................................................16 Clear......................................................................16 Copy to Clipboard..............................................16 Paste from Clipboard........................................16 Scale When Pasting...........................................16 New Blank Library…..........................................16 2 / 23 General Settings ....................................................20 Saving and Loading Settings ............................20 Terrains Library Settings ..................................21 Windows Settings .................................................22 Printing Settings ...................................................22 Appearance Settings.............................................23 Menu: About Registration & Contact Info About About RPGMapMaker… Register… Registration & Contact Info… Check for Update Preferences… This menu item brings a dialog that explains how to re gister, how to contact the author, and where to download the latest version. Cmd-I Check for Update About RPGMapMaker This menu item allows you manually checking for up dates. This menu item brings a standard about box. Preferences… Register… This menu item brings a dialog that allows you registering RPGMapMaker (you must click on the Register button). This menu item allows you modifying some « RPGMapMaker » predefined settings, cf. “Preferences” at the end of this document. 3 / 23 Menu: File File New… Models Open… Open Recent Browse… Close Save Map Save Map As… Import Image… Export… Cmd-N Cmd-O Cmd-Option-O Cmd-W Cmd-S Cmd-Shift-M Cmd-M Printing Preferences Cmd-Shift-I Page Setup… Print Map… Cmd-P Print Selection Cmd-Option-P Quit Cmd-Q New… This menu item allows you creating a « RPGMapMaker » map. Its size depends on two factors: the size of the Grid and the size of its margins. Depending on your needs, you can choose for example to have a small grid with big margins around the grid for comments, notes, extra drawings, … or a huge grid with small margins, or a small grid with small margins, etc. When you select the « New » menu item, a huge dialog appears: 4 / 23 Polygon : • • Shape. Allows you choosing among a hex, a square or a lozenge (pseudo-3D). • Dimensions. Allows you selecting the size of the grid polygons. By default, a hex is 14-pixel width by 16-pixel height and a square or a lozenge is 12-pixel width by 12-pixel height (half the size of terrain tile). • • Miscellaneous : • • • Format. This allows you choosing at which precision you want to display the polygon dimension. Rect Grid Color. Allows you specifying the color of the Rect Grid. Note: Initially this color is the same as the one specified in the Preferences Dialog. • Password. Allows you protecting your map. • Search for files in following folder:. This editfield contains the name of the subfolder within the map folder where external files are searched for. In this folder, you can put any kind of files: Word documents, GraphicConverter images, TextEdit files, etc. Preview : • Typically, for world maps, you would use a value between 100 and 500 (km or mi); for region map, you would use a value between 10 and 50 (km or mi); for village/town map, you would use a value between 10 and 100 (m or ya); for dungeon map, you would use a value between 1 and 10 (m or ya), etc. Note: As you may have noticed, you cannot specify the polygon vertical dimension. This is due to the fact that for the polygons used in « RPGMapMaker », once you know a dimension the other one is automatically deduced. Map Grid Color. Allows you specifying the color of the Map Grid. Note: Initially this color is the same as the one specified in the Preferences Dialog. Add Coordinates. If checked, the polygon coordinates if displayed at the polygon bottom: Scale. Allows you specifying what a polygon width represent in your map. In addition, you can choose among several units : centimeter (cm), meter (m), kilometer (km), feet (ft), yard (ya), mile (mi), ' and “. Dimensions. The map size in the chosen unit. Allows you visualizing how your map fits into various formats (A4, A3, B4, etc.) This is particularly useful when you plan to print your map to make sure its boundaries will match the printer boundaries. Note: The preview makes no attempt to take into account the printer margins. Models This menu item has a sub-menu attached to it. New from Model… New from User Model… Cmd-Option-N Cmd-Control-N Save as User Model… Grid : • Cols x Rows. Allows you selecting the size (in polygons) of the Grid. The bigger the numbers the bigger the map. You can also graphically resize the grid by moving the red triangle in area (1). Note: Remember that for hexagonal grids, hexes are staggered along the Y-axis. So a Grid with the same number of horizontal and vertical hexes is not square but rectangular (the horizontal dimen sion is roughly 1.15 times the vertical one). New from Model… This menu item allows you creating a map based on a model provided by RPGMapMaker (see the UserManual.pdf and ScriptingManual.pdf documents for more information about models). When you select this menu item, a dialog appears. It con tains the list of the available RPGMapMaker models. You can then perform the following actions: Map : • Margins. Allows you selecting the top, left, bottom and right margins of the « RPGMapMaker » map. You can also graphically resize the right and bottom margins by moving the red triangle in area (2). Note: Any 0 pixels margin will become at least a 2 pixels margin (0.07 cm at 72 dpi) as a black rectangle is drawn around the Grid. • Unit. This popup menu allows you specifying the dimension units (either cm or inch or pixels). • Click on a model name to display a preview of the Grid layer. • Click on the Cancel button to abort the operation. • Click on the Ok button to load the desired model. Note: Only registered users can use this functionality. New from User Model… This menu item allows you creating a « RPGMapMaker » map based on a user model i.e. a model created by the 5 / 23 By default, only the name of a map is displayed. How ever, there is an option, in the Preferences Dialog, that allows you displaying the full path for each map. Browse This menu item allows you searching your disks for RP GMapMaker maps, models and terrains libraries and to see a preview of each selected map or library (see image below). You can also use it to open RPGMapMaker maps by clicking on the Ok button. Close “Save as User Model…” menu item (see below). The user models are located into a folder inside the Application Support folder (see “Reveal Support Folder in Finder” menu item). This menu item allows you closing the current « RPGMapMaker » map. If the map was modified since the last saving, a dialog appears: Note: Only registered users can use this functionality. When you select this menu item, a dialog appears. It contains the list of the available user models. You can then perform the same actions as described in the previ ous paragraph. Save as User Model… This menu items allows you saving the model part a map based on a model. In essence, this command al lows you creating user models. Typically, you use the “New from Model…” or “New from User Model…” menu item to create a map based on a model. Then, you modify the model and then save it as a new model. This file is saved into a folder inside the Application Support folder. Please remember that when creating a user model, only the Grid layer is saved. Thus if you have made some drawing on the other layers, they will be lost. If you click on the Cancel button, the Close operation is aborted. If you click on the Don’t Save button the map is closed and its last modifications are lost. At last, if you click on the Save button, the map is first saved then closed. If the map has not been saved yet, a Navigation Note: Only registered users can use this functionality. Open… This menu item allows you opening a « RPGMapMaker » map. In that case, the Main window title contains the name of the opened map. You can open up to 10 maps. Services dialog appears allowing you to choose a location and a name for the map. If you cancel this dialog, the map stays opened. Open Recent This menu item has sub-menu attached to it. This submenu contains the list of the ten most recent maps you opened. The list works circularly i.e. the most recent files replace the least recent ones. Save Map This menu item allows you saving the current map on disk. If the current map is the result of an “ Open…” command, then this menu item is immediately available. How- 6 / 23 ever, if the current map is the result of the “New…” command, this menu item is available only if you have previ ously used the “Save Map As…” command (see below). Save Map As… lows you printing your map. If necessary, the application resizes your map so that it always fits into a printer page. At present, the printed map is always at 72 dpi whatever the resolution of your printer. Print Selection If the current map is the result of the “New…” command, this menu item allows you assigning a name to the map and to save it on disk. Once this is done, the Main window title contains the name of the newly created map and the “Save Map” command becomes available. If the current map is the result of the “Open…” command, this menu item allows you saving the current map under a new name. In that case, the current map is closed (but not saved), the newly created map becomes the current map and the Main window title reflects the change. If the main window is the frontmost window and assuming you have made a selection, this menu item allows you printing the contents of this selection. Quit This menu item allows you quitting the application (but why would you do that…). If all the opened documents have been already saved, the application quits directly. If there is only one document with unsaved changes, then a “save on quit” dialog appears: Import Image… This menu item allows you opening an image in any format Quicktime recognizes and to paste it into your map. The behavior is then similar to dropping a file into the main window (see § “External Drop” in UserManual.pdf for more information). Export… This menu item allows you saving either a « RPGMapMaker » map or the clipboard contents (depend ing on which window is active) as whatever format QuickTime provides. The exported file can then be imported into any graphic or word processing application that recognizes the selec ted format. If you click on the Cancel button, the Quit operation is aborted. If you click on the Don’t Save button the last map modifications are lost and the application quit. At last, if you click on the Save button, the map is first saved then thee application quit. If the map has not been saved yet, a Navigation Services dialog appears allowing you to choose a location and a name for the map. If you cancel this dialog, the quit operation is aborted. If there are more than one window with unsaved changes, a “review changes” dialogs appears: Printing Preferences This menu item brings the “Preferences” Dialog Printing Settings. See UserManual.pdf for more information. Page Setup… If you click on the Cancel button, the Quit operation is aborted. If you click on the Discard Changes button the last modifications to all the maps are ignored and the ap plication quit. At last, if you click on the Review Changes… button, then for each map that needs to be saved, a “save on quit” dialog is presented. This menu item brings the current printer “Page Setup” dialog. Print Map… If the main window is the frontmost window, this menu item al- 7 / 23 Menu: Edit Undo Cmd-Shift-X Undo Level: <value> Edit Undo Cmd-U Cut Copy Paste Clear Select All Cmd-X Cmd-C Cmd-V CmdCmd-A Layers Markers Map Information… Show Terrain Grid Cmd-D Cmd-T Show Clipboard Reveal Support Folder in Finder Cmd-J Cut Copy Paste Clear Select All Cmd-Shift-A Undo Special Characters… This menu item allows you undoing the last modifications you have done on the map. By default, you have 16 levels of undo at your disposal, but you can change this value in the General Settings in the Preferences dialog (see below). Undo Undo Level: <value> This menu item allows you undoing the last modifications you have made in the script window or in some dialogs. Cut This is the standard cut menu item used for example in dialogs to cut text. Copy This is the standard copy menu item used for example in dialogs to copy text. Paste This is the standard paste menu item used for example in dialogs to paste text. This menu item displays the number of undo you can per form on the Main map. Cut Each menu item allows you cutting i.e. copying into the clipboard and clearing the current selection (see Selection tool in the § “Drawing Tools Area” in UserManual.pdf for more information). You can then past the selection into a terrain tile (see “Paste from Clipboard” sub-menu item in the “Menu: Terrains” menu for more information) or any application that accepts PICT image. All Visible Layers All Active Layers Cmd-Shift-X Active Drawing Layer Cmd-Option-X Active Terrain Layer Cmd-Control-X Active Text Layer Cmd-Option-Control-X Clear • • This is the standard clear menu item used for example in dialogs to clear text. • Select All This menu item allows you creating a selection that encompasses the entire map. Layers • • This menu item has a sub-menu attached to it. In addition, each Cut/Copy/Paste/Clear sub-menu item has a sub-menu attached to it. 8 / 23 All Visible Layers. This sub-menu item is not available yet. All Active Layers. The selection (to be cut) comprises all the active layers that are visible. Active Drawing Layer. The selection (to be copied) comprises either Drawing 0 layer or Drawing 1 layer (assuming of course it has been allocated). Please also note that the active layer must be visible. Active Terrain Layer. The selection (to be copied) comprises either Terrain 0 layer or Terrain 1 layer (assuming of course it has been allocated). Please also note that the active layer must be visible. Active Text Layer. The selection (to be copied) comprises either Text 0 layer or Text 1 layer (assuming of course it has been allocated). Please also note that the active layer must be visible. Copy • This menu item has sub-menu attached to it. Each submenu item allows you copying the current selection (see Selection tool in the § “Drawing Tools Area” in UserManual.pdf for more information) and put it into the clipboard. • You can then past the selection into a terrain tile (see “Paste from Clipboard ” sub-menu item in the “Paste from Clipboard” menu for more information) or any application that accepts PICT image. All Visible Layers All Active Layers • Cmd-Shift-C • Active Drawing Layer Cmd-Option-C Active Terrain Layer Cmd-Control-C Active Text Layer Cmd-Option-Control-C • • • • • All Visible Layers. The selection (to be copied) comprises all the visible layers i.e. the grid layer as well any drawing layer, any terrain layer and any text layer. All Active Layer. The selection (to be copied) comprises all the active layers that are visible. Active Drawing Layer. The selection (to be copied) comprises either Drawing 0 layer or Drawing 1 layer (assuming of course it has been allocated). Please also note that the active layer must be visible. Active Terrain Layer. The selection (to be copied) comprises either Terrain 0 layer or Terrain 1 layer (assuming of course it has been allocated). Please also note that the active layer must be visible. Active Text Layer. The selection (to be copied) comprises either Text 0 layer or Text 1 layer (as suming of course it has been allocated). Please also note that the active layer must be visible. Clear This menu item has sub-menu attached to it. Each submenu item allows you clearing the current selection (see § Selection tool for more information). All Visible Layers All Active Layers Active Drawing Layer Active Terrain Layer Active Text Layer Paste This menu item has sub-menu attached to it. Each submenu item allows you pasting a PICT image from the clipboard. In that case, the pasted picture appears inside the Main Window map area surrounded by a blue rectangle. Also, in the top-right corner, you can see the name of the layer on which the paste will occur. The behavior is then exactly as in an external drop (see § “External Drop” in UserManual.pdf for more information). Into All Visible Layers Into All Active Layers Cmd-ShiftCmd-OptionCmd-ControlCmd-Option-Control- • All Visible Layers. This sub-menu item is not available yet. • All Active Layers. The selection (to be cut) comprises all the active layers that are visible. • Active Drawing Layer. The selection (to be cut) comprises either Drawing 0 layer or Drawing 1 layer (assuming of course it has been allocated). Please also note that the active layer must be visible. • Active Terrain Layer. The selection (to be cut) comprises either Terrain 0 layer or Terrain 1 layer (assuming of course it has been allocated). Please also note that the active layer must be visible. • Active Text Layer. The selection (to be cut) comprises either Text 0 layer or Text 1 layer (assuming of course it has been allocated). Please also note that the active layer must be visible. Select All Cmd-Shift-V This menu item allows you creating a selection that encompasses the entire map. Into Active Drawing Layer Cmd-Option-V Into Active Terrain Layer Cmd-Control-V Into Active Text Layer Cmd-Option-Control-V • Into All Active Layers . This sub-menu item is not available yet. To paste several layers at once, use the internal drag and drop capability. Into Active Drawing Layer. The selection (to be pasted) comprises either Drawing 0 layer or Drawing 1 layer (assuming of course it has been allocated). Please also note that the active layer must be visible. Into Active Terrain Layer. The selection (to be pasted) comprises either Terrain 0 layer or Terrain 1 layer (assuming of course it has been allocated). Please also note that the active layer must be visible. Into Active Text Layer. The selection (to be pasted) comprises either Text 0 layer or Text 1 layer (assuming of course it has been allocated). Please also note that the active layer must be visible. Markers Into All Visible Layers. This sub-menu item is not available yet. To paste several layers at once, use the internal drag and drop capability. This menu item has a sub-menu attached to it. Show All Hide All 9 / 23 Show All This menu item allows you showing all the markers previ ously hidden by the “Hide All” menu command. This menu item is enabled only if the all markers are hidden. For your convenience, several buttons (just above the edit field) allows you quickly inserting script directives such as creating the grid, drawing lines, etc. In addition, you can search for text and optionally replace it. Hide All This menu item allows you hiding all the markers previously shown by the “Show All” menu command. This menu item is enabled only if the markers are visible. This menu item is useful when you want to print a map for you players and you do not want to show them what each marker is revealing on the map. Map Information… This menu item brings a dialog that gives you information about your map (polygon shape, grid size and polygon size, …) and allows you modifying all its parameters (as if you where indeed creating the map). If your map has been created from a model, the dialog is different (to modify a script, see the “ScriptingManual.pdf” documentation). To modify a script, simply write some text into the editfield. When this done, press the Run Script button to check for the script syntax and, if there is no error, to draw the corresponding result into the area located at the right of the editfield. Please note that at long as there are errors in your script, clicking on the Ok button has no effect. 10 / 23 Show Terrain Grid • Area (3): Smart trim. This bevel button allows you smart trimming the clipboard contents. The trim al gorithm searches for pixels which color is specified in the Color area and works on all four borders. How ever, by using the four checkboxes ( Top, Left, Bottom, Right), you can specify on which border the smart trim tool is acting. As for the tolerance editfield, it allows you specifying which level of color is used for the trim operation. By default the tolerance is 0, mean ing only the specified color is used. However, by spe cifying a tolerance greater than zero, you tell RP GMapMaker to ignore all red, green and blue color components that are greater or equal to (255 - the tolerance value). • Area (4): Scaling. This bevel button allows you shrinking or enlarging the clipboard contents. The scaling factor is taken from the editfield that is located at the right of this bevel button. A value greater than 100 enlarges the clipboard while a value lower than This menu item allows you showing (or hiding) the Terrain Grid. See § “Terrain Grid” in UserManual.pdf for more information) Show Clipboard When this menu item is selected, the Clipboard window appears. If the clipboard contents is a picture it is dis played. When the clipboard window is displayed, the menu item name becomes “Hide Clipboard” instead of “Show Clipboard”. When you select again the same menu item (or when you close the corresponding window), the menu item name re verts to “Show Window”. 100 reduces it. Above the picture there are five areas: • • Area (1): Clipboard Size. This area gives you the size of the clipboard contents. You can display it either in pixel or in cm or in inch. • Area (2): Margins. This area is made of a bevel button and four editfields. Clicking on the bevel button allows you adding or removing margins to the picture (to its top, left, bottom or right). In the editfields, positive values (a number of pixels) add margins while negative values subtract margins. A zero means no margins. Area (5): Effects. To apply an effect, simply use the Effects popup menu. Note: you can undo the last 8 operations you have per formed. Reveal Support Folder in Finder This menu item reveals in Finder the « RPGMapMaker » Support folder i.e. the folder that contains the User Libraries folder, the User Models folder and an optional Textures folder (for registered users). 11 / 23 Vertical Symmetry Menu: Effects This menu item allows you applying a vertical symmetry to the selection: Effects Repeat Last Effect Cmd-Shift-Y Clockwise Rotation Counterclockwise Rotation Vertical Symmetry Horizontal Symmetry 180° Rotation Horizontal Symmetry Grayscale This menu item allows you applying a horizontal symmetry to the selection: Negate Light Blur Heavy Blur Gaussian Blur Invert Sharpen Edge Enhance Extrude Focus Enhance Emboss (Relief Map) Brightness Contrast Auto Contrast Grayscale This menu item allows you converting the selection into a grayscale area: Color Filter… Color Mask… Blend… Shift… The effects menu allows you applying an effect (transformation or filter) to a selection into the main window. Negate This menu item allows you negating the selection: Repeat Last Effect This menu item allows you repeating the last effect. If the effect works with a parameter (such as a color) it is repeated with the same parameter (i.e. no dialog appears). Clockwise Rotation Light Blur This menu item allows you applying a light blur filter to the selection: This menu item allows you right-rotating the selection from an angle given by the sub menu item attach to it. You ave the choice among 30°, 45°, 60°, 90°, 120°, 135°, 150°. For 180°, use the 180° Rotation menu item, and for higher angle, use the Counterclockwise Rotation menu item. Counterclockwise Rotation Heavy Blur This menu item allows you applying a heavy blur filter to the selection: This menu item allows you left-rotating the selection from an angle given by the sub menu item attach to it. You ave the choice among 30°, 45°, 60°, 90°, 120°, 135°, 150°. For 180°, use the 180° Rotation menu item, and for higher angle, use the Clockwise Rotation menu item. 12 / 23 Gaussian Blur Emboss (Relief Map) This menu item allows you applying a Gaussian blur filter to the selection: Please note that if the Gaussian blur give smoother results than the other blur algorithms, it also needs much more processing power. Invert This menu item allows you applying an invert filter to the selection: This menu item allows you applying an emboss filter to the selection: Brightness This menu item allows you modifying the brightness of the selection by an amount given by the popup menu at tach to it: High Moderately High Moderately Low Low The images below show a normal image, and a low (re spectively high) brightness applied to it: Sharpen This menu item allows you applying a sharpen filter to the selection: Edge Enhance This menu item allows you applying an edge enhance fil ter to the selection: Extrude Contrast This menu item allows you applying an extrude filter to the selection: This menu item allows you modifying the contrast of the se lection by an amount given by the popup menu attach to it: High Moderately High Moderately Low Low Focus Enhance This menu item allows you applying a focus enhance filter to the selection: The images on next page show a normal image, and a low (respectively high) contrast applied to it: 13 / 23 Smooth Edges… This menu item allows you smoothing the edges of the se lection with its surrounding. When you select this menu item, a dialog appears. It allows you selecting the type of smoothing (fixed, linear or exponential) and its depth i.e. the number of edgepixels on which the effect will be applied. Auto Contrast This menu item try to auto contrast the selection: The pictures below shows the differences between the three algorithms: Color Filter… & Color Mask… When you select one of these menu items, a color picker dialog (either the System Color Picker or the default one) appears. It allows you selecting a color that will be used by either the Color Filter or the Color Mask algorithm. In the example below, we have selected a red color and ap plied respectively the Color filter (result in the left image) and the Color Mask algorithm (result in the right picture): As you may have noticed, you need to make a selection which is a few pixels larger than the area you intend to smooth for the algorithm to be effective. 14 / 23 Examples Shift… Suppose you have the following map: This menu item allows you shifting or wrapping the current selection. When you select this effect a dialog appears. It allows you selecting the direction of the operation (left, top, right or bottom), the type of operation (shift or wrap) and how many pixels will be shifted or wrapped each time the effect is called. Then Shifting the map four times to the Left with a Step of 10 pixels will yield the following result: Shifting a selection means that pixels are moved in the se lected direction, pixels from one map border are lost, and pixels from the opposite border become empty (see ex ample below). While Wrapping the map to the Left by the same amount will yield the following result: Wrapping a selection means that pixels are shifted and also that pixels from one border of the map are transferred to the map opposite border (see example below). 15 / 23 Menu: Terrains menu. However, Copy/Paste/Clear operations from within the Terrain Editor destroy its contents. Terrains Editor… Organizer… Cmd-E Cmd-G Edit Paste New Blank Library… Load Library… This sub-menu item allows you replacing the selected ter rain tile by the tile you copied with the previous command. Cmd-Shift-N Cmd-L Save Save A Copy As… Cmd-Y Clear Reveal Library in Finder Cmd-R This sub-menu item allows you clearing the selected ter rain tile. Editor… Copy to Clipboard Using this menu item is equivalent to double-clicking on a terrain tile in the “Toolbar Area” of the Terrains Pallet (see UserManual.pdf manual for more information). Organizer… This sub-menu item allows you copying the selected ter rain tile into the clipboard. Paste from Clipboard Using this menu item is equivalent to clicking on the Terrain Organizer tool in the “Toolbar Area” of the Terrains Pallet (see UserManual.pdf manual for more information). This sub-menu item allows you replacing the selected ter rain tile by the contents of the clipboard (obtained either from an external application or after using the “ Copy” command from the “Edit” menu). Note that if the size of the image contained in the clipboard is greater than a terrain tile it will be clipped to the first 24 bits. Edit Scale When Pasting Undo Cmd-Option-Shift-Z This sub-menu item allows you adjusting the size of the pasted image to the size of the current terrain tile. For example, if you copy a 20 by 20 terrain tile then paste it into a 40 by 40 terrain tile, the picture is double in both direc tions. Please note that this option works for tile pasting and clipboard pasting. Cut Copy Paste Clear Cmd-Option-Shift-X Cmd-Option-Shift-C Cmd-Option-Shift-V New Blank Library… This menu item has sub-menu attached to it. This submenu allows you manipulating terrain tiles directly without using the Terrain Editor. Cmd-Option-Shift- Copy to Clipboard Paste from Clipboard Cmd-Option-Shift-D Cmd-Option-Shift-P Scale when Pasting Cmd-Option-Shift-S This menu item allows you creating a new blank Terrains Library into the Terrains Area of the Terrains Pallet (see UserManual.pdf manual for more information). When you select the “New Blank Library…” menu item, the following dialog appears: Undo This sub-menu item allows you undoing the last Cut/Paste/Clear terrain tile operation. Cut This sub-menu item allows you cutting the selected terrain tile. The tile is copied into an internal buffer and is not destroyed by any Copy/Paste operations from the “Edit” menu. However, Copy/Paste/Clear operations from within the Terrain Editor destroy its contents. Copy This sub-menu item allows you copying the selected ter rain tile. The tile is copied into an internal buffer and is not destroyed by any Copy/Paste operations from the “Edit” 16 / 23 In the dialog you can see a Name button. When you click on this button, a standard Mac OS « Save as » dialog ap pears. When you have chosen a name and pressed the Ok button, the selected library name is stored into the Edit Field at the right of the Name button. Please note that this dialog is automatically positioned into the User Libraries folder. Of course, you can save your library somewhere else, but only the libraries stored in this folder are considered editable by « RPGMapMaker ». Please also note that you can create a folder into the User Libraries folder and put this library inside. Once the name has been chosen, you must enter some comments about the blank Terrains Library you are about to create. It is recommended that you choose a text that ex plains briefly the contents of the file so that when you use the “Load Library” menu command, you can quickly identify its contents. This is especially true if you play with libraries with similar contents and their previews are not sufficient to discriminate them. The listbox located at the left of the dialog contains the name of each Terrain Library. No path is displayed, because the libraries are all located either into the Core Libraries or the User Libraries folders. All libraries from the Core Libraries folder have a locked padlock, meaning the libraries are considered read-only (this is a safety measure to prevent you from accidentally modifying them). When you click on a library name, the File Information area is filled with the comments associated to that library (see § “Save A Copy As…” for more information) and its preview (which contains 64 of the 102 tiles). Once you have decided which library you want to load, click on the Load button. The current Terrains Library is then replaced by the one you have chosen. If you load a read-only library, the “Save: «»” menu item is dimmed. If it is not read-only, the “Save: «»” menu item contains the name of the loaded library. For example, if you load a library called Test, then this menu item becomes “Save: «Test»”. In addition, you can specify the size of each library terrain tiles (either 12 by 12, 16 by 16, 20 by 20, or 24 by 24, or 28 by 28. or 32 by 32, or 36 by 36, or 40 by 40). Save Once the name and the comments have been entered, the Save button is enabled and you can click onto it to create a blank Terrains library. This menu item allows you saving the current Terrains Library. Load Library… Note: If you quit the application and the current Terrains Library is dirty, a dialog appears that allows you saving the file. However, if the file is read-only, no dialog appears and all the modifications are lost. This menu item allows you loading a Terrains Library into the Terrains Area of the Terrains Pallet (see UserManual.pdf manual for more information). Save A Copy As… When you launch « RPGMapMaker », it searches for Terrains Library files into the Core Libraries and the User Libraries folders and exclusively in those folders. It then builds a list of the valid library files it found. When you select the “Load Library…” menu item, the following dialog appears: This menu item allows you saving a copy of the current Terrains Library into another Terrains library. Once this is done the new library is added to the list of Terrains library files. This way, the next time you issue the “Load Library” command, the Terrains library you just created is visible. 17 / 23 When you select the “Save A Copy As…” menu item, a dialog appears: In the dialog you can see a Name button. When you click on this button, a standard Mac OS « Save as » dialog ap pears. When you have chosen a name and pressed the Ok button, the selected library name is stored into the Edit Field at the right of the Name button. Please note that this dialog is automatically positioned into the User Libraries folder. Of course, you can save your library somewhere else, but only the libraries stored in this folder are considered editable by « RPGMapMaker ». Please also note that you can create a folder into the User Libraries folder and put this library inside. Once the name has been chosen, you must enter some comments about the Terrains Library you are about to create/replace. It is recommended that you choose a text that explains briefly the contents of the file so that when you use the “Load Library” command, you can quickly identify its contents. This is especially true if you play with libraries with similar contents and their previews are not sufficient to discriminate them. Once the name and the comments have been entered, the Save button is enabled and you can click on it to create/replace a Terrains library. Reveal Library in Finder This menu item reveals the current library in finder i.e. it opens the User Library folder and hilite the specified library. 18 / 23 Menu: Windows Menu: Help Windows Help Show Tools Pallet Show Terrains Pallet Show Inks Pallet Show Tools Layers Pallet Cmd-Option-T Cmd-Option-R Cmd-Option-K Cmd-Option-L Show Textures Pallet Show Random Terrain Generator Pallet Show Random Maze Generator Pallet Show Fractal Terrain Generator Pallet Cmd-Option-E Cmd-Option-G Cmd-Option-M Cmd-Option-F First Map Window Second Map Window Third Map Window ... User Manual Menus Manual Scripting Manual Cmd-? Cmd-Option-? Cmd-Control-? How to Install Textures Keyboard Shortcuts Menu Items Shortcuts What's New Cmd-Control-H User Manual Cmd-0 Cmd-1 Cmd-2 ... This menu item opens the UserManual.pdf file. Menus Manual The purpose of this menu is several folds. First, the first eight menu items show you what the key board equivalents are for the six buttons located within the Toolbar Pallet. In addition, when you select one of these menu items, the corresponding floating window (pallet) is displayed and the menu item name becomes “Hide …” instead of “Show…”. When you select again the same menu item, the menu item name reverts to “Show …”. At last, it lists the name of all the opened/created map windows (you can have up to ten maps opened at a time). Se lecting one of these menu items brings the corresponding Map Window to the front (thus making it the Main Window). Also, the menu item associated to the Main Window has a check mark. This menu item opens the MenusManual.pdf file (the present file). Scripting Manual This menu item opens the ScriptingManual.pdf file. How to Install Textures This menu item launches the pdf file that describes how to install additional textures. Only registered users can use new textures. Keyboard Shortcuts This menu item brings the pdf file that contains various useful keyboard shortcuts. Menu Items Shortcuts This menu item brings the pdf file that contains the list of menu items shortcuts. What's New This menu item brings the HTML file that contains the last changes made to RPGMapMaker. Changes History This menu item brings the HTML file that contains the list of changes made to RPGMapMaker from version 1.0.0 (just in case you are really curious). 19 / 23 Preferences When you select the Preferences… menu item (in the Application menu under Mac OS X), a dialog box appears that allows you modifying some predefined settings. It contains a toolbar and three buttons. In the toolbar, you can see six icons and the names of the various options. Preferences are grouped into six categories: General Settings, Saving and Loading, Terrains Library, Windows, Printing, and Appearance. When you click onto the icon you are interested in, the corresponding settings are dis played below the toolbar. As usual, the Cancel and Ok buttons have their standard meanings. As for the Panel Defaults button, it allows you resetting the different preferences to their predefined val ues ** but for that category only **. General Settings exact replica of your map albeit in a reduced size. If the checkbox is deselected, no custom icon is ad ded (though if an icon already existed, it is not removed). • Undo Levels. This popup menu allows you choosing among 1, 2, 4, 8, 16, 32 or 64 levels of undo. Note that the new value will only take effect the next time you launch the application. • Check for a new version at Startup. By default, RPGMapMaker checks for a new version at startup. To speed up launching time, you can disable this behavior by disabling this checkbox. Please note that you still can check for update by using the “Check for Update menu” item in the “Apple” menu. When you click on the Panel Defaults button, the various settings are reset to the following values: • • • • • Show path in title in Recent Items submenus: Disabled. Use System Color Picker for color selection: Enabled. Add Custom Icon to Map: Disabled. Undo Levels. 16. Check for a new version at Startup: Enabled. Saving and Loading Settings This category deals with preferences that affect the Colors Tables, the Patterns Table, the Drawing Contexts and the Text Styles. This category deals with general preferences. • Show path in title in Recent Items submenus. You can decide either to display only the name of the recent maps (checkbox disabled) or to display the path to the recent maps (checkbox enabled). • Use System Color Picker for color selection. When checked, this option tells the program to use the system color picker for selecting colors. When unchecked, the program uses the color picker instead. • Add Custom Icon to Map. If this checkbox is enabled, this means each time you save your map, a custom icon is added (or updated if it already exists) to the current map. The icon is an 20 / 23 To understand the interest of these parameters, let's start by an example. Suppose you have built a map with many different shades of blue. Because the default Colors Tables only have three different kinds of blue, you were obliged to use the Color Picker to add the missing colors. Now you quit the application. A few days latter, you launch the application again because you want to modify your map. Unfortunately, your custom Colors Tables are gone, replaced by the default Colors Tables. Suffice to say, you are really disappointed to be obliged to build your custom Colors Tables again. Terrains Library Settings But « RPGMapMaker » is smart. When you modify the contents of a Colors Table, the Patterns Table, the Drawing Contexts area, or the Text Styles area, the application keeps the changes into memory. Afterwards, you can de cide of the application behavior when you launch or quit it. Save into preferences file : • • When you quit the application, you can decide either to save or not the four Color Tables, the Patterns Table and the Drawing Contexts into the preferences file. This category deals with preferences that affect the con tents of the Terrain area. • In addition, you can decide either to save or not the windows position and size (only for resizeable windows). Load from preferences file : • • When you launch the application, you can decide either to load or not from the preferences file the custom Color Tables, to load or not the custom Patterns Table or to load or not the Drawing Contexts. When you click on the Panel Defaults button, the various settings are reset to the following values: When you launch the application, you can decide either to restore or not the windows size and position. When you click on the Panel Defaults button, the various settings are reset to the following values: Save into preferences file : • Save the four Color Tables, the Patterns Table and the Drawing Contexts into the preferences file. • Save the Main Window size as well as the Main Window and the various floating windows positions. Load from preferences file : • Load from the preferences file the custom Color Tables, the custom Patterns Table and the Drawing Contexts. • Restore the Main Window size as well as the Main Window and the floating windows positions. When launching the application. As terrains are stored into files called Terrain Libraries, by selecting one of the radio buttons, you define the library that will be loaded when you launch the application. 21 / 23 • When launching the application. Load the library which name is « @Default » and which contains terrain tiles for drawing regions. the horizontal toolbar) is visible when the map is created/opened. When this checkbox is unchecked, the Map window has its default appearance. Windows Settings Pallets to Open: • Select the list of pallets (Tools Pallet, Terrains Pallet, etc.) to open when the first map is opened or created. Terrains Pallet: • Small Size by Default. When this checkbox is selected the program opens the Terrains Pallet in reduced size (less visible terrain tiles). When this checkbox is unchecked, the Terrains Pallet has its default appearance. When you click on the Panel Defaults button, the various settings are reset to the following values: This category deals with preferences that affect the win dows behavior and appearance. • Map Window: • • Automatically resize to fit map. If the checkbox is selected, the Map window is automatically resized so that you can see your map entirely. Of course, if your map is bigger than the main screen, the Map window is clipped to its dimensions. If the checkbox is not selected, the Map window is opened with a default size. • Open Linked Maps inside the Same Window. If the checkbox is selected, linked maps are opened inside the same window (i.e. the Main Window is closed and reopened). If the checkbox is not checked, a new window is created instead. • • Map Grid Color. When you click on the colored square, a Color Pallet dialog appears. You can then select a new color for the Grid polygons. (Note: pressing the Escape key allows you dismissing the pallet without making any selection). Please note that this new color is only taken into account when creating a new map. • Rect Grid Color. When you click on the colored square, a color pallet appears. You can then select a new color for the RectGrid lines. (Note: pressing the Escape key allows you dismissing the pallet without making any selection). Please note that this new color is only taken into account when creating a new map. • Show Drawing Tools Area by default. When this checkbox is selected, the Drawing Tools Area (just below • • • • Automatically Resize Map Window. Disabled. Open Linked Maps inside the Same Window. Disabled. Map Grid Color: Dark gray. Rect Grid Color: Red. Show Drawing Tools Area by Default: Disabled. Pallets to open: The Tools Pallet as well as the Terrains Pallet are opened when the first map is created or opened. Small Size by Default: Disabled. Printing Settings This category deals with preferences that affect the print ing behavior. 22 / 23 • Map Size. This setting deals with the size of the map to be printed. You can choose among three choices: o Keep Original Area (i.e. print the map as you see it on the screen), o Enlarge/reduce area to fit page (i.e. print the map so that it fills entirely a printer page), o Resize by a % (i.e. multiply the map dimensions by that percent then print it). • Map Position. If the area to be printed fits into a printer page, you can choose to map location on the printer page (top-left, top-middle, top-right, middle-left, etc.) • Behavior for printing a map that is larger than the printing page. You can choose either to : o Scale image to fit page (i.e. reduce the map dimensions so that they fit into one printer page), Appearance Settings This category deals with preferences that affect the appearance of windows. o Print on more pages (i.e. respect map size), o Trim image (i.e. attempt to remove border and then scale if image is still too big). • Pallets Hilite Color. When you click on the colored square, a color pallet appears. You can then select a new color for the tools areas hilite color. (Note: pressing the Escape key allows you dismissing the pallet without making any selection). When you click on the Panel Defaults button, the various settings are reset to the following values: • • • Size: Enlarge/reduce area to fit page. Position: Top Left. For area larger than the page. Scale image to fit page. When you click on the Panel Defaults button, the various settings are reset to the following values: 23 / 23 • Pallets Hilite Color: Blue.