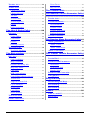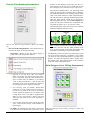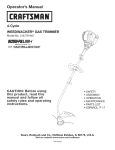
1
RPGMapMaker User Manual
Copyright © 2000-2012 François Menneteau. All rights reserved worldwide.
Version:
6.6.0
Date:
October 2012
Table of contents
Introduction........................................... 3
Rounded Rectangle............................................14
Presentation........................................................... 3
Pipettes.................................................................14
System requirements........................................... 4
Rubber..................................................................14
How to install......................................................... 4
Selection...............................................................14
Documentation...................................................... 4
Text........................................................................15
Registration information.................................... 4
Grid Polygon Color Filling..............................15
How to register...................................................... 4
Line........................................................................15
How to contact the author.................................. 4
Arrow....................................................................15
Where to download the latest version.............4
Pen.........................................................................15
Warranty & License............................................ 4
Terrain Tile Erasing...........................................16
RPGMapMaker maps............................ 5
Color Filling........................................................16
Terrain Tile Drawing.........................................16
Notion of Layers................................................... 5
Pen Size................................................................16
Managing Layers.................................................. 5
Arc.........................................................................16
Definitions ............................................................5
Distance Measuring...........................................16
Layers Manager....................................................6
Terrain Filling.....................................................16
Coordinates System............................................. 7
Marker..................................................................17
Static and Interactive Maps............................... 7
Pen Size................................................................19
External Links....................................................... 8
Keyboard indicator............................................19
Interface................................................. 9
Layer selector......................................................19
At startup............................................................... 9
Drawing Tools Parameters Area.....................20
After the first map is loaded.............................. 9
Drawing Tools Parameters Selector...............20
After the last map is closed............................... 11
Erase Parameters................................................20
When there are more than one map opened 11
Color Filling Parameters..................................20
The Tools Pallet.................................. 12
Rounded Rectangle Parameters......................21
Inks Area.............................................................. 12
Arrow Parameters..............................................21
Frame or Fill Mode Selection.........................12
Pipette Parameters..............................................21
Colors and Pattern Selection...........................12
Terrain Tile Drawing Parameters...................22
Drawing Tools Area........................................... 12
Grid Polygon Color Filling Parameters........22
Grid Polygon.......................................................13
Oval.......................................................................13
Rectangle..............................................................14
Selection Parameters.........................................23
The Terrains Pallet............................. 24
1 / 50
Terrains Area...................................................... 24
Zoom Factor........................................................37
Toolbar Area........................................................ 24
Map Overview....................................................37
Library Dirty Status...........................................24
The Texture Pallet.............................. 38
Library Selection................................................25
The Random Terrain Generator Pallet
Tile Size ..............................................................25
............................................................... 39
Terrain Editor......................................................25
Terrain Areas....................................................... 39
Terrain Organizer...............................................26
Terrains Parameters.......................................... 39
Effects...................................................................26
Area Parameters.................................................41
Pallet Appearance..............................................27
Terrains Colors...................................................41
The Inks & Styles Pallet....................28
Terrains Dimensions..........................................41
Inks pane ............................................................. 28
Random Parameters...........................................41
Colors Tables.......................................................28
Terrain Generation............................................ 41
Color Picker .......................................................29
The Random Maze Generator Pallet 43
Patterns ................................................................29
“Maze” parameters............................................ 43
Drawing Contexts .............................................30
“Maze” Colors....................................................44
Text Styles Pane ................................................. 30
“Maze” Dimensions..........................................44
Text Style Attributes..........................................31
“Maze” Generation............................................ 44
The Main window................................ 32
The Fractal Terrain Generator Pallet
Bars Area.............................................................. 32
............................................................... 45
Grid Coordinates................................................32
Terrain Kind ....................................................... 45
Map Coordinates................................................33
Fractal Terrain Parameters............................. 45
Distance Measuring Info..................................33
World kind...........................................................45
Map Dirty Status................................................33
Archipelago kind................................................45
Link Status...........................................................33
Island(s) kind......................................................46
RGB Color indicator.........................................33
Fractal Terrain Generation.............................. 46
Color Filling behavior selector.......................33
Using physics....................................................... 46
Terrain Grid.........................................................33
Drag and Drop...................................... 48
Align On Terrain Grid.......................................34
Internal Drag and Drop.................................... 48
Layers Managers................................................34
External Drag...................................................... 48
Script Editor........................................................34
External Drop...................................................... 48
Links Editor.........................................................35
Models................................................... 50
Select Window....................................................37
What is a model?................................................ 50
Tool Access Area................................................. 37
How to use?.......................................................... 50
Zoom Control Area............................................ 37
2 / 50
Introduction
Presentation
« RPGMapMaker » is a tool for drawing maps with polygonal grids. This kind of maps is used in Role Playing
Games, but of course can be designed for any other pur poses.
In addition to having most of the capabilities of a real
painting program (such as lines, rectangles, ovals and
rounded rectangles, drawing and filling with color and pat tern, text, rubber, pipettes tools, etc.), « RPGMapMaker »
has also unique features that greatly simplify the building
of this kind of map, such as:
•
•
•
•
•
•
•
•
Various kinds of grids. You can create a grid map
made of hexes (well suited for world, region or village
maps), or squares (well suited for dungeon maps) or
lozenges (well suited for pseudo-3D castle and dun geon maps).
Ten layers static maps. Four pre-allocated layers (one
for the grid, one for drawing, one for terrain tiles and
one for text and lines) and six extra layers allocated on
demand (two for drawing, two for terrain tiles, and two
for text and lines). For example you can change a poly gon color without losing the terrain that lies on top of
it, build a map for the DM eyes only, and a map for his
players, etc.
Interactive maps. Static maps can be linked between
each other like in a hypertext document. This allows
you for example designing a continent, then zoomingin to a country, then zooming-in to a city, then zoom ing-in to a house, then zooming-in to the cellar of the
house, then zooming-in to the dungeon beneath the
house, etc. Of course, you can also zoom-out.
Links to external files. You can attach files (for example notes, comments, etc.) to a static map. The files
must be stored in a subfolder within the map folder.
Layers managers. This feature allows you allocating
and freeing the additional layers, clearing layers, copy ing a layer into another layer, choosing which layer is
visible and which is not, selecting which layer is the
active one (an active layer is a layer where drawing oc curs), and choosing which layer will be involved in a
selection.
Various dimension units. You can specify the map dimensions in either cm or m or km. Alternatively, you
may prefer to use the ft, ya or mi dimension units.
Grid polygon color filling in just two clicks (three, if
using patterns). One selects the color and one selects
the filling area.
Predefined terrains tiles. « RPGMapMaker » comes
with several predefined libraries for building regions,
villages, castles and dungeons. They are available in
either black and white or in colors and their tile sizes
range from 12 by 12 to 40 by 40 pixels, in 4 pixels in -
•
•
•
•
•
•
•
•
•
•
•
•
•
•
3 / 50
crements (i.e. 12 x 12, 16 x 16, 20 x 20, 24 x 24, 28 x
28, 32 x 32, 36 x 36, and 40 x 40).
Terrains editor. If you do not like the terrain tiles and
wish to modify them, the terrain editor goes here for
that purpose. Of course, if you are talented, you can
also create terrain tiles from thin air!
Terrain Organizer. This tool allows you quickly reorganizing a terrain library, transferring tiles between libraries and importing tiles.
Random terrain generator. This tool allows you generating random terrains made of up to five different
“regions” (for example water, mountain, plain, desert,
etc.) and aligned on the grid polygons.
Random maze generator. This tool allows you generating random mazes, caverns and dungeons. For dun geons, rooms’ number can be generated.
Fractal terrain generator. This tool allows you generating realistic terrains using physical models. Three
different algorithms are available for generating
worlds, archipelagos and islands.
Line with arrows of various shapes. In addition, you
can add a distance between the ends of a line. The dis tance is automatically adjusted when you change the
map dimension units.
Drawing contexts. You can memorize up to 40 foreground colors, background colors and patterns for fur ther utilization.
Textures. This pallet allows you using the Color
Filling and Grid Polygon Color Filling tools with textures (instead of the current fill foreground color, fill
background color and fill pattern).
Selective drag or clear. As the map is made of several
layers, you can specify which map layer(s) you want to
drag or clear.
Intelligent copy and paste. As the map is made of
several layers, you can specify which active layer (or a
portion of it) you want to transfer into the clipboard
and on which active layer you want to paste the clip board contents.
Intelligent external drop. You can choose the portion
of an external drop to insert into the chosen active lay er.
Multiple levels of Undo. By default, the application is
configured with 16 levels of undo, but if you need
more levels, this can be changed in the application
preferences. The terrain editor has also several levels
of undo as well as the clipboard window.
Models. Using a special script, you can create maps
with a predefined appearance for the grid layer (a grid
with a legend for example). In addition, you can further
modify the script to alter the grid layer appearance.
Layer Scripts. You can attach a script to a layer. This
script contains directives that allow you drawing into
the layer as if you were using drawing tools.
•
•
•
Text Styles. You can memorize an infinite number of
style contexts to speed up text operations.
Markers. A marker is an icon with a text. Even after
creation, you can move it and change its appearance.
Markers Manager. Allows you manipulating markers
without having to ctrl-click on the map.
Or simply put US$ 37 in an envelope, note your name, ad dress and the program you are paying for and send this to:
Kagi Shareware
1442-A Walnut Street #392-3CX
Berkeley, California 94709-1405
USA
System requirements
How to contact the author
•
PowerPC or Intel-based Macintosh.
•
Thousands of Colors.
•
Mac OS X 10.2.8 or higher.
Please send your comments, suggestions and bug reports
to one of the addresses below. I will try to answer them as
soon as possible!
•
About 50 Mb of disk space.
Send e-mail to: [email protected]
Write a letter to: « François Menneteau. 5 rue des Vignoux. 31600 Muret. France »
How to install
Forget that! You have a Macintosh, don't you? ;-) Just
drag the RPGMapMakerX application anywhere you
want.
Documentation
RPGMapMaker comes with several manuals in pdf
format:
•
User Manual (this present manual)
•
Menus Manual
•
Scripting Manual
Where to download the latest
version
Please take a look at http://fmteau.perso.neuf.fr/rpgmapmaker/rpgmapmaker.htm. There you will
find the version number of the latest release and links to
download it.
Warranty & License
Registration information
«RPGMapMaker» is shareware, which means if you use it,
you have to pay for it. You may try it out for a couple of
weeks, but if you like it and decide to keep it, you are ex pected to register this software and pay the shareware fee
of US$ 25.
Note that the functionalities will always be there (to the
notable exception of models and extra textures), but a nag ging about dialog will constantly remind you to pay for it.
When you register you will receive a code that will per manently remove the « nag Register! Dialog » and you get
free technical support, too.
The easiest way to register it to register online.
By installing, downloading, copying, or otherwise using
the software, you acknowledge that you have read these
terms and conditions, understand them, and agree to be
bound by them. If you do not agree to these terms and
conditions, you are not authorized and may not use the
software.
THE SOFTWARE IS PROVIDED “AS IS”, WITHOUT
WARRANTY OF ANY KIND, EXPRESS OR IMPLIED,
INCLUDING BUT NOT LIMITED TO THE WARRANTIES OF MERCHANTABILITY, FITNESS FOR A
PARTICULAR PURPOSE AND NON INFRINGEMENT.
IN NO EVENT SHALL THE AUTHORS OR COPYRIGHT HOLDERS BE LIABLE FOR ANY CLAIM,
DAMAGES OR OTHER LIABILITY, WHETHER IN AN
ACTION OF CONTRACT, TORT OR OTHERWISE,
ARISING FROM, OUT OF OR IN CONNECTION
WITH THE SOFTWARE OR THE USE OR OTHER
DEALINGS IN THE SOFTWARE.
You may not use the software for any purpose that is un lawful or prohibited by this license agreement, or to solicit
the performance of any illegal activity or other activity
which infringes the rights of the authors or others.
How to register
To register online please point your browser to:
http://order.kagi.com/?3CX
A secure server is available for submitting your payment
information (VISA, MasterCard, American Express and
First Virtual available) safely.
You may include this software in any magazine CD or
software archive without asking for permission (but the
copyright is still mine). Please just drop me an e-mail note
if you do include it.
4 / 50
RPGMapMaker maps
A RPGMapMaker map is a mixture of graphical data (layers, see below) and data information (kind of map, map di mensions, etc.) As a direct consequence, the greater the
map dimensions and the greater the number of allocated
layers the more memory and disk space it will use.
Notion of Layers
A map in « RPGMapMaker » is at least a four-layer map
(see image below). Three layers for “drawing” (the Drw 0,
Trn 0 and Txt 0 layers) and one layer that represents the
grid (the Grid layer) and that cannot be modified. In addition to these four predefined layers, it is possible to alloc ate six additional layers (the Drw 1, Drw 2, Trn 1, Trn 2,
Txt 1 and Txt 2 layers).
fact, this is a little more complicated than that, because the
white color acts as a transparent color. For example if you
put a black & white terrain tile on top of a red rectangle of
the same size then the terrain tile appears as a black & red
terrain tile.
The layers order has been chosen carefully: The Grid Layer is on top of the Drw Layer because otherwise you
would lose all the interest of having a grid; The Trn Layer
is on top of the Grid Layer because this ensures that the
non-white bits of a terrain tile are always visible, thus pre venting from misinterpretation. At last, the Txt Layer is
on top of all the layers because you would not be happy to
have some part of your texts hidden by bits from the Grid,
the Trn or the Drw layer, which would prevent you from
recognizing its meaning!
Surprisingly, Lines are drawn (by default) on the Txt Layer. Why, you may ask? Well, simply because this avoid the
various line extremities (arrows, circles, etc.) and dimensions to be hidden by bits from other layers.
Please note that what we have described here is the **
default behavior ** (i.e. Grid layer on top of the
Drw Layer, drawing tools on the Drw layer, text
tool on the Txt layer, etc.). We'll see below this behavior can be changed.
Managing Layers
Managing layers is done via a listbox and
several buttons located in the Main Window
toolbar (vertical part): the Layers Manager.
The Drw layer (abbreviation for Drawing) is the layer
where drawing takes place i.e. where all the standard
painting tools (such as pen, rectangles, etc.) work BY DEFAULT; The Trn layer (abbreviation for Terrain) is the
layer where terrain tiles drawing takes place; The Txt layer (abbreviation for Text) is the layer where text and **
line ** drawings work BY DEFAULT.
Please note that though you cannot edit the Grid layer, it
has an important purpose: it delimits where the Grid Polygon Color Filling and Tile Erasing tools are effective (see
§ “Drawing Tools Area” for more information).
Definitions
Layer state
A layer can be in the following states:
The layers order is very important: it defines what is visible and what is not. Everything that is drawn on the
Drawing layer is hidden by everything that is drawn on the
upper layers (Grid, Terrain and Text). Using the same logic, terrain tiles are hidden by text and text by nothing. In
5 / 50
•
Pre-allocated. A pre-allocated layer is a layer that
is already allocated when you create a map. There
are four of these layers: the Drw 0, the Trn 0, the
Txt 0 and the Grid layer. All the other layers cannot by pre-allocated.
•
Not Allocated/Allocated. A layer that does not exist at map creation is not allocated. To allocate it,
you must use a button in the Layers Operations
area. The layers that can be allocated/freed are: the
Drw 1, the Drw 2, the Trn 1, the Trn 2, the Txt 1,
and the Txt 2 layer.
If the Selection icon is black the layer will be dragged
when using the Selection tool (and it will be “transformed”
when using the effects menu). If it is in red, the layer will
not be dragged. If the Rubber icon is black (and orange)
the layer will be erased when using the Rubber tool. If it is
in red, the layer will not be erased.
•
Not Locked/Locked. A layer that is locked cannot
be editable i.e. you cannot draw onto it. At present
only the Grid layer is a locked one.
Layers Operations:
In that area, there are four buttons:
The layer state affects the kind of operations that can be
performed on a layer (see below).
Operations on Layers
There are four possible operations:
•
•
•
•
Create a layer. A pre-allocated or already allocated layer cannot be allocated (again).
Delete a layer. A pre-allocated or already deleted
layer cannot be deleted (again). In addition, a
locked layer cannot be deleted.
Make a layer Active/Inactive. An active layer is a
layer upon which drawing occurs. Only a nonlocked, allocated or a non-locked, pre-allocated
layer can be active. In addition, you can have only
one active drawing layer, one active terrain layer
and one active text layer at a time. This means for
example that if you allocate the Drw 1 layer, you
will have to decide which of the two drawing layers is the active one. Of course, you can change at
any time, which layer is active and which layer is
not. Please note that this notion has no meaning for
a locked layer.
•
One for creating a layer (the
button),
•
One for deleting a layer (the
button)
•
One for copying the contents of a layer into anoth er layer (the
button), and
•
One to clear the contents of a layer (the
ton).
but-
Clicking onto any one of these buttons brings a dialog box
that asks you if you really want to perform this operation.
If you press Ok, the operation completes otherwise it is
canceled. Also, the dialog warns you that these operations
are not undoable.
How to use:
In order to apply an operation on a layer, you must first se lect this layer. This is simply done by clicking on its name
in the Layers List.
Make a layer Visible/Invisible. Being an active
layer is in fact not sufficient to allow drawing. This
layer must also be visible. In addition, playing with
the visibility of the other layers allows you printing
(or copying) a map with only partial information.
For example, you will print (or copy) a map with
hidden text layers for your players and you will
print (or copy) a full map for your own use.
Layers Manager
Layers List:
This area contains the name of the various layers. The lay ers appear in the order they are stacked, i.e. the Drw 0 lay er is at the bottom of the layers stack and the Txt 1 layer is
at the top, the Drw 1 layer is on top of the Drw 0 layer,
etc. As for the Grid layer, its position is variable (the de fault is above the drawing layers).
In addition, each layer name has a color that reflects its
state (allocated/pre-allocated or not, etc.) If a layer is allocated/pre-allocated, its name is displayed in black. If it is
active, it is displayed in blue. Otherwise it is light gray.
Because it is different from the other layers, the Grid layer
is displayed in dark gray.
At last, for each layer, its Visibility status is displayed (the
eye icon) as well as whether or not it belongs to the Selection Area of Effect and the Rubber Area of Effect.
6 / 50
•
To copy a layer onto another layer, you must se lect a second layer. This is simply done by command clicking on its name in the Layers List. In
that case, the
button changes its appearance:
for an upward copy (e.g. Trn → Txt), or
for a downward copy (e.g. Trn → Drw).
•
To make a layer active, double-click on its name.
•
To turn On or Off a layer visibility, simply click
on its eye icon.
•
To turn On or Off belonging to the Selection Area
of Effect, simply click on the Selection icon.
•
To turn On or Off belonging to the Rubber Area
of Effect, simply click on the Rubber icon.
•
To change the Grid Layer position, simply click
on the downward black arrow icon. This brings a
popup menu that allows you selecting its position
relative to the other layers: below the drawing
layers, below the terrain layers (default), below
the text layers or above the text layer.
Coordinates System
•
In « RPGMapMaker », the dimensions or map locations
are expressed as a (x, y) couple where the x part identifies
a horizontal coordinate along the X-axis, and the y part
identifies a vertical coordinates along the Y-axis.
The coordinate origin (0,0) is located at the top left corner
of the map grid, horizontal coordinates increase as you
move from left to right and vertical coordinates increase as
you move from top to bottom.
As for the X-axis and Y-axis units (m, km, mi, etc.), they depend on the unit you choose when you create the map. For
more information see in the MenusManual.pdf documentation, the “New…” menu item in the “Menu: File” menu.
Zoom-in link. This kind of link allows you establishing a connection between an object grid ( hex, square
or lozenge) and one static map. Command clicking on
this object closes the current static map (the father
map) and loads the associated static map (the son
map). This link is called zoom-in because it allows
you building a hierarchy of links and each time you
click on this kind of link, you travel downward (one
level at a time) into the hierarchy.
Please note that you can define as many zoom-in links
as the number of polygons in the map grid. For ex ample, if you have created a 10 by 20 hexes grid, you
can have a maximum of 200 zoom-in links. Of course,
several polygons can point to the same static map.
•
Zoom-out link. This link allows you going directly to
a parent in the hierarchy of links i.e. it allows you
traveling upward into the hierarchy. This zoom-out
link is also called the home link and as such is identified by an icon representing a house (in the Interactive Map Area).
•
Navigation link. A navigation link allows you traveling horizontally into the links hierarchy. They are use ful when for example you design a huge continent that
is split into several pieces.
•
There are in fact four navigation links. One that al lows you going to the North of the current static map,
one that allows you going the South, one that allows
you going the West and one that allows you going to
the East. These links are identified by large “arrow”
icons in the Interactive Map Area (up arrow for
North, down arrow for South, left arrow for West and
right arrow for East).
Note: If you are not satisfied with the coordinates units,
you can always change it in the Grid Information dialog.
For more information about this dialog, see in the MenusManual.pdf documentation, the “Grid Information…”
menu item in the “Menu: Edit” menu.
The following picture gives you an example of an interact ive map hierarchy:
Static and Interactive Maps
As you already know, « RPGMapMaker » let you make
layered maps that can be moved around, looked at
and printed. We call this kind of map a static
map. Now, let's introduce another kind of map.
Imagine a process in which static maps are
linked together. By clicking on several
maps you can go from one map to another, like in a hypertext document.
We call this kind of map an Interactive map. As this map must be
easily moved around, all the static
maps that made this map must be
located into the same folder.
To sum up, a static map is a multi
layer map stored into a single file,
and an Interactive map is a collection of static maps (files) located into the same folder.
To build an Interactive map, you click on the Links Editor button (see § “Bars Area” for more information). Suffice to say here this button open a drawer that allows you
creating three kinds of links:
7 / 50
External Links
Sometimes, you want to “attach” some additional information to a map. This can be some simple text files for storing comments or notes about a specific part of the map, or
complex documents (for example in MS Word or Acrobat
format) containing scenarios or similar information, or
even graphical files that containing fine arts, scanned images, etc.
In effect, you use a RPGMapMaker map as a launcher of
files - external to RPGMapMaker, hence the name External Links i.e. a RPGMapMaker map can remember
links to external files.
Though RPGMapMaker can remember any kind of extern al links, there is one limitation: all the files must be located into a subfolder within the map folder (the same sub folder that will hold the maps that make up an interactive
map). In fact, as you can also store aliases to files, this
limitation is not too restrictive. Please note that having all
the files in one place allows you easily moving them
around.
The name of the subfolder must be chosen preferably
when you create your map but it can be specified/changed
later on through the Map Information dialog.
8 / 50
Interface
In this chapter, we describe briefly the interface you get Please note that as tiles can be of size 24 to 40 pixels
when you launch « RPGMapMaker », when you open/cre - (through tiles size remains the same within a terrain
ate the first map and when you close the last map.
library), the Terrains Pallet adjust its appearance.
At startup
After the first map is loaded
When you launch « RPGMapMaker », a non-discardable When the first map is created or opened:
floating window appears (see image below).
•
All the Windows Pallet buttons are enabled,
This pallet is made of several bevel buttons. Aside for the first
one (which purpose will be explained later), all the other but tons allows you showing or hiding its associated (floating)
window. But as you can see, only one button is enabled mean ing only one (floating) window can be shown or hidden.
•
A discardable-resizeable window appears (that will
be called the Map Window in the remaining of this
electronic document),
•
The Terrains Pallet is shown (if not already visible),
•
Another pallet is displayed too (this pallet will be
called the Tools Pallet in the remaining of this electronic document).
This pallet is basically the equivalent of the « Windows »
menu item i.e. clicking on a bevel button but the first one is Thus, the Windows Pallet has the following appearance
similar to selecting the corresponding sub-menu in the « (three buttons are selected because three windows are visible):
Windows » menu.
Note: In the remaining of this electronic document, this
pallet will be simply called the Windows Pallet.
We know that the Windows Pallet allows you showing or
When you click on the only enabled bevel button, a floating hiding (floating) windows. We have already identified two
window appears (see image below). In the remaining of this such windows: the Terrains Pallet, and the Tools Pallet.
document, this floating window will be called the Terrains Let's now describe the purpose of the remaining buttons.
Pallet.
The Terrains Pallet
The Windows Pallet
In the image above, you have probably noticed red numbers
(from one to two) enclosed in a red circle. Each number
symbolizes a functionality (or purpose) or a group of func tionalities:
(1): Terrains Area.
(2): Toolbar Area.
In the previous image, you have probably noticed red num These functionalities are all described in great details in the bers (from one to two) enclosed in a red circle. Each num ber points to a single button or a group of buttons.
next pages of this manual.
(1): Visibility Control button. When you click on this button, a popup menu appears. It allows you quickly showing
or hiding either a group of
three floating windows or
all floating windows.
9 / 50
Each number symbolizes a functionality (or purpose) or a
group of functionalities:
(1): Status bar.
(2): Tools Access Area.
(3): Zoom Control Area.
(4): Map Area.
(2): Pallet buttons. There are seven buttons in two groups
(5): Grid Area.
of buttons. From left to right:
1.
2.
3.
4.
Tools Pallet button. It allows you showing or (6): Toolbar.
hiding the Tools Pallet.
(7): Window Quick Selector.
Terrains Pallet button. It allows you showing or
These functionalities are all described in great details in this
hiding the Terrains Pallet.
manual.
Inks & Styles Pallet button. It allows you showThe Tools Pallet
ing or hiding the Inks & Styles Pallet.
In the image below, you have probably noticed red numbers
Textures Pallet button. It allows you showing or
(from two to five) enclosed in a red circle.
hiding the Textures Pallet.
1.
Random Terrain Generator Pallet button. It allows you showing or hiding the Random Terrain Generator Pallet.
2.
Random Maze Generator Pallet button. It allows
you showing or hiding the Random Maze Generator Pallet.
3.
Fractal Generator Pallet button. It allows you
showing or hiding the Fractal Generator Pallet.
The Map Window
Each number symbolizes
a functionality (or purpose) or a group of functionalities:
In the below image, you have probably noticed red num this manual.
bers (from one to six) enclosed in a red circle.
10 / 50
(1):
Drawing
Area.
Tools
(2):
Drawing
Tools
Parameters Area.
(3):
Inks Area.
(4):
Drawing Tools
Parameters
Selector.
These functionalities are
all described in great details in the next pages of
After the last map is closed
When there are more than one
map opened
When you close a map, the Windows Pallet reverts to the
same aspect as when you launched « RPGMapMaker » i.e.
all the buttons are disabled but the Terrains Pallet one (see In this situation, the interface of the Windows Pallet is unchanged and there are as many Map Windows as the numimage below).
ber of opened/created maps (see example below). Please
The only difference lies in the fact that if the Terrains Pal- note that you can open/create a maximum of 10 Map Winlet was visible before you opened/created a map, then the dows.
pallet remains visible after the map is closed.
In the remaining of this document, the frontmost Map Window (i.e. the window where drawing occurs) is called the
Main Window. Of course, when there is only one window,
the Map Window and the Main Window are identical.
11 / 50
The Tools Pallet
Inks Area
Colors and Pattern Selection
The Inks Area allows you selecting the current foreground and background colors as well as the pattern that
are used by various drawing tools.
These three areas allow you changing the current mode
foreground color (F), background color (B) and pattern (P).
The current (foreground color, background color, and pat tern) triplet is also called the Current Drawing Context.
Clicking on F or B button brings the Color Picker dialog.
Clicking on the P button brings the Pattern Picker dialog.
The Inks Area is in fact made of two areas:
(1) Ink Mode Selection i.e. Pen/Text/Frame or Fill
Mode Selection.
(2) Colors and Pattern Selection.
Frame or Fill Mode Selection
In « RPGMapMaker », some objects can potentially be
drawn with two kinds of colors and pattern: ones that ap ply to its border and ones that apply to its contents.
The colors and pattern that apply to its border are called
the frame colors and pattern while the colors and pattern
that apply to its contents are called the Fill colors and pattern.
The frame colors and pattern are also used when drawing
with the following tools: pen, line, and text. As a consequence, these colors and pattern are more accurately
called the Pen/Text/Frame colors and pattern.
In conclusion, as some tools use either the
Pen/Text/Frame colors and patterns or the Fill colors and
patterns or both, we need to differentiate them. Thus, we
introduce the notion of Ink Mode.
To sum up, clicking on the top area selects the
Pen/Text/Frame mode, while clicking on the bottom area
selects the Fill mode.
Two colors and one pattern are associated with each mode.
Thus, for the Pen/Text/Frame mode we have the
pen/text/frame foreground color, the pen/text/frame background color and the pen/text/frame pattern.
Drawing Tools Area
The Drawing Tools Area contains the following « drawing tools » (for clarity purpose, the small downward ar rows have been erased):
Similarly, for the Fill mode we have the fill foreground
color, the fill background color and the fill pattern.
While a mode is current, any change you made to the cur rent foreground color, current background color, current or
pattern applies to that mode only.
12 / 50
allows you drawing a polygon
frame; the second tool (the one
in the middle of the row) allows
you drawing a polygon contents
(fill); the third tool (the one at
the right of the row) allows you
drawing both polygon frame and
contents (fill + frame).
•
Frame. The polygon frame
is drawn using the current
pen/txt/frame
foreground
color, pen/txt/frame background color, and frame pattern and pen size.
•
Fill. The polygon content is
drawn using the current fill
foreground color, fill background color and fill pattern.
•
Fill + frame. The polygon
frame is drawn using the current pen/txt/frame fore ground color, pen/txt/frame background color, frame
pattern and pen size, and the polygon contents is
drawn using the current fill foreground color, fill
background color and fill pattern.
(1) Grid Polygon.
(2) Oval.
(3) Rectangle.
(4) Rounded Rectangle.
To change the pen fore and back colors or the pen pattern,
use either the Inks Area (see § “Inks Area” for more information) or the Inks & Styles Pallet (see § “The Inks &
Styles Pallet” for more information). To change the pen
size, simply use the Pen Size popup menu.
(5) Pipettes.
(6) Rubber.
(7) Selection.
(8) Text.
Once the desired tool is selected, simply click anywhere
on the map and a polygon appears. The polygon has ex actly the same size as the Grid layer polygons. Note that if
the Align On Terrain Grid checkbox is on, the polygon is
automatically centered on a square of the Terrain Grid.
(9) Grid Polygon Color Filling.
(10) Line and Arrow.
(11) Pen.
(12) Terrain Tile Erasing.
The main purpose of the Grid Polygon tools is to allow you
quickly building a legend for your map (see example below).
(13) Color Filling.
(14) Terrain
Tile
Drawing.
(15) Arc.
(16) Distance
Measuring.
(17) Terrain Filling.
(18) Marker.
Oval
(20) Pen Size.
Selecting one of the Oval tools allows you drawing (on the
active Drawing layer) an oval (or a circle). These three
tools allow you drawing either an oval frame, or an oval
contents or both.
(21) Keyboard indicator.
(22) Layer selector.
Grid Polygon
Selecting one of the Grid Polygon tools allows you drawing (on the active drawing layer) the corresponding polygon i.e. a hex (respectively a square, a lozenge) if your
map is a hex-based (respectively square-based, lozengebased) Grid. The first tool (the one at the left of the row)
To draw an oval, click anywhere on the map then move
the mouse (without releasing it) to another location on the
map. Once you are satisfied with the object size, release
the mouse. If you want to draw circles instead of ovals,
press the shift key while dragging the mouse. If you want
to draw ovals from the center, press the option key while
dragging the mouse.
13 / 50
Rectangle
Selecting the Rectangle tools allows you drawing (on the
active Drawing layer) a rectangle (or a square). These
three tools allow you drawing either a rectangle frame, or
a rectangle contents or both.
Example: The Foreground Colors Table current color is
red, the color found below the mouse location is dark
green and this color is not available in the Colors Table.
To draw a rectangle, click anywhere on the map then move
the mouse (without releasing it) to another location on the
map. Once you are satisfied with the object size, release
the mouse. If you want to draw squares instead of rect angles, press the shift key while dragging the mouse. If
you want to draw rectangles from the center, press the option key while dragging the mouse.
Rounded Rectangle
Rubber
Selecting the Rounded Rectangle tools allows you drawing
(on the active Drawing layer) a rounded rectangle (or a
rounded square). These three tools allow you drawing
either a rounded rectangle frame, or a rounded rectangle
contents or both.
By default, the rounded corner is 5-pixel width and 5-pixel
height. The Rounded Rectangle Information tool allows
you changing these parameters (see § “Drawing Tools
Parameters Area” for more information).
To draw a rounded rectangle, click anywhere on the map
then move the mouse (without releasing it) to another location on the map. Once you are satisfied with the object
size, release the mouse. If you want to draw rounded
squares instead of rounded rectangles, press the shift key
while dragging the mouse. If you want to draw rounded
rectangles from the center, press the option key while
dragging the mouse.
Pipettes
These tools are useful when you play with nearly identical
colors (shades of gray for example) and want to be sure
you always use the same color for the same kind of object.
There are two Pipettes tools:
•
Foreground Pipette. This tool (the top most one in
the column) allows you updating the current Ink Mode
foreground color.
•
Background Pipette. This tool allows you updating
the current Ink Mode background color.
The Rubber tool allows you erasing portions of your map.
By default, the Rubber Area of Effect is a one-polygonwidth circle that clears the drawing and terrain active layers.
To change the Rubber Area of Effect, see Layer States Selectors in § “Bars Area”.
To erase your map, move the mouse onto the map and
press the mouse button. If you release it immediately, then
the region of the map centered on the mouse location and
based on the Rubber Area of Effect is cleared. If you drag
the mouse while the mouse button is still depressed, then
the region below the mouse pathway is cleared.
Selection
The Selection tool allows you selecting a portion of your
map for either copying it into the clipboard, or dragging it
or clearing it or applying an effect on it. The Selection
Area of Effect gives the number of layers that can be selec ted and the way the selection behaves.
To change the Selection Area of Effect, see § Layer States
Selectors in § “Bars Area”.
To make a selection, move your mouse onto the map,
press the mouse button then drag the mouse while the
mouse button is still depressed. Once you are satisfied
with the selection size, release the mouse. A pulsing rect angle - nearly the size of the selected area - appears. Also,
by default, the active layer(s) onto which the selection ap plies is displayed:
When you select one of these tools, the cursor turns into a
pipette. If you then click anywhere on the map, the corres ponding color in the Tools Pallet is replaced by the corres ponding color.
In addition, if, in the Drawing Tools Parameters window,
the “Do not update the Colors Table” checkbox is unchecked, then the corresponding Colors Table in the Inks &
Styles Pallet is also updated.
If the color below the mouse location cannot be found in
the selected Colors Table, a dialog appears (see on next
column) asking if you want to replace the current color by
the new color. The dialog is kind enough to remain you on
which Colors Table the operation will take place.
At this point, you can:
•
14 / 50
Copy the selection (using the various « Copy … »
menu items in the « Edit » menu).
•
•
•
•
Clear the selection (using the various « Clear » menu
items in the « Edit » menu).
Drag the selection (see § “Drag and Drop” for more
information).
Duplicate the selection (except in the current Text layer) if you press the option key before dragging.
Apply an effect by using the Effects menu.
Note: Pressing the Shift key while dragging the mouse allows you making squared selection. This is for example
useful when applying a rotation filter which works better
with square areas.
Line
Text
Selecting the Line tool allows you drawing a line. The line
is drawn on the Drawing Layer (by default) with the current pen foreground and background colors, pen pattern
and pen size.
The Text tool allows you writing one or several lines of
text on, by default, the map Text layer.
To change any of these parameters, simply use the Colors
Pallet tool, the Patterns tool and the Pen Size popup menu.
To write a line of text, move the mouse onto the map and
press the mouse button. A vertical bar appears. This is the
text starting point. Type any character. To validate your text,
press the Command key while hitting the Return keys.
To draw a line, click anywhere on the map then move the
mouse (without releasing it) to another location on the
map. Once you are satisfied with the line size, release the
mouse. If you want to draw diagonal lines, press the shift
key while dragging the mouse. If you want to draw hori zontal or vertical lines, press the option key while dragging the mouse.
If you want to erase a character, press the Backspace key.
To write another line of text, press the Return key. At last, if
you want to cancel the whole typing, press the Escape key.
Note: You cannot write a single line with more than 255
characters. However, there is no limit to the number of
lines.
Grid Polygon Color Filling
The Grid Polygon Color Filling tool only works in the
area delimited by the Grid layer. This means that for maps
made with no grid this tool has no effect.
The Grid Polygon Color Filling tool allows you drawing
one or several grid polygons (hexes, squares or lozenges).
The number of polygons depends on the Grid Polygon
Filling Area of Effect. You can change the Grid Polygon
Filling Area of Effect by using the Grid Polygon Color
Filling Information tool (see § “Grid Polygon Color
Filling ” for more information).
By default, this tool uses the current fill foreground color,
fill background color and fill pattern. However, you can
also use a texture instead. You can change this parameter by
using the Grid Polygon Color Filling Information tool (see
§ “Grid Polygon Color Filling ” for more information).
To draw one or several colored polygons, simply move
you mouse onto the map and click on the desired location.
If you drag the mouse while the mouse button is still depressed, one or several colored polygons appear below the
mouse location.
If you press the shift key while clicking, a shadow is
drawn around the current polygon. To change the Polygon
Shadow Direction, the Polygon Shadow Color and Polygon Shadow Offset (see § “Grid Polygon Color Filling ”).
This functionality is only available when the Grid Polygon Filling Area of Effect is one polygon. The polygon
shadow main purpose is to make a map border more visual
(see example to the right).
Arrow
Selecting the Arrow tool allows you drawing an arrow. The
arrow is drawn on the Text Layer (by default) with the current
arrow parameters (type, shape, size, etc.), pen foreground and
background colors, and pen pattern and pen size.
To change any of these parameters, simply use the Colors
Pallet tool, the Patterns tool and the Pen Size popup
menu.
To change any of the arrow information you can use the
Arrow Information tool (see § “Drawing Tools Parameters Area” for more information).
To draw an arrow, click anywhere on the map then move
the mouse (without releasing it) to another location on the
map. Once you are satisfied with the arrow size, release
the mouse. If you want to draw diagonal arrows, press the
shift key while dragging the mouse. If you want to draw
horizontal or vertical arrows, press the option key while
dragging the mouse.
Pen
Selecting the Pen tool allows you drawing any shape you
like. By default, the pen size is 1-pixel wide by 1-pixel
high, but you can change its dimension by simply clicking
on the Pen Size popup menu and selecting the desired size.
You can also change the pen foreground and background
colors and the pen pattern aspect.
Once the Pen tool is selected, move your mouse onto the
map and press the mouse button. If you release it immedi ately, a simple dot it drawn. If you drag the mouse while
the mouse button is still depressed, a new dot appears be low the mouse location. This trick allows you drawing any
shape you like. To stop drawing, release the mouse button.
15 / 50
Terrain Tile Erasing
This tool allows you erasing the tiles on the same layer as
the one where tiles are drawn. The particularity of this tool
is that the erased area has the shape of exactly one polygon.
rectangular arcs, press the shift key while dragging the
mouse. If you want to draw arcs from the center, press the
option key while dragging the mouse.
Distance Measuring
Once the Tile Erasing tool is selected, move your mouse onto
the map and press the mouse button. If you release it immedi ately, a tile area the size of a polygon is erased. If you drag
the mouse while the mouse button is still depressed, several
cleared areas appear below the mouse location.
Selecting the Distance Measuring tool allows you following a path (a road for example) and getting the correspond ing distance based on the current polygon width and unit.
The information appears in the Distance Measuring Area
(located at the right of the Map Coordinates area).
Color Filling
The interest of this tool is that it gives more precise in formation about distances. In the example below, one can
see that using the line tool to measure the black road gives
a distance of 10.7 km while in reality the distance is 12.3
km (1.6 km more).
The Color Filling tool allows you drawing colored areas
onto the map active drawing layer. The areas are filled
with the current fill foreground color, fill background col or and fill pattern.
An area is simply a region that can have any shape (see
example). The area can be the entire map if there is no re gion at all.
Once this tool is selected, move your mouse onto the map
and press the mouse button. As long as you move the
mouse while the mouse button is still depressed, the distance you have covered is displayed. To stop measuring,
release the mouse button.
To draw a colored area, simply move you mouse onto the
map and click on the desired location.
By default, this tool uses the current (fill foreground color,
fill background color, fill pattern) triplet. However, you
can also use a texture. You can change this parameter by
using the Color Filling Information tool (see § “Drawing
Tools Parameters Area” for more information).
Terrain Tile Drawing
Terrain Filling
This tool allows you drawing terrain tiles.
The Terrain Filling tool allows you filling an area with the
current terrain tile.
To draw a tile, simply move you mouse onto the map and
click on the desired location. If you want to draw several
tiles at once, do not release the mouse while moving it.
Tiles are drawn according to the Terrain Drawing Behavior (see § “Terrain Tile Drawing Parameters” for more
information).
Pen Size
To draw a “colored” area, simply move you mouse onto
the map and click on the desired location. As for the Color
Filling tool, an area is simply a region that can have any
shape (see example on next page). The area can be the en tire map if there is no region at all. Please note that con trary to the Terrain Tile Drawing tool, this tool totally ignores the Terrain Drawing Behavior.
This is a popup menu that allows you selecting the size of
the pen. Once a new size has been chosen, it is reflected in
the area at the left of the popup menu.
Arc
Selecting the Arc tools allows you drawing (on the active
Drawing layer) an arc. These three tools allow you drawing either an arc frame, or an arc contents or both.
To draw an arc, click anywhere on the map then move the
mouse (without releasing it) to another location on the
map. Once you are satisfied with the object size, release
the mouse. If you want to draw squared arcs instead of
16 / 50
Marker Area, we shall have to build it. However, as we
shall see, this is quite easy.
Marker
The Marker tool allows you creating markers.
1) Creation
To create a marker, simply move you mouse onto the map and
click on the desired location. The following dialog appears:
A naïve approach would be to select an orange color and
use the color filling tool to fill the marker. But what about
the various shades of gray the marker is made of? If we se lect a different orange color for each shade, this will take
us a lot of time and this is even not sure the result will be
satisfying.
Fortunately, the various filters are here to help us. So let’s
select the Color Mask filter (see picture on next page):
The dialog is split into three areas:
•
Area (1) allows selecting markers. The marker is
automatically put into the gridded square in area
(2) so that you can modify it.
•
Area (2) allows you modifying or creating markers, and changing the marker legend, color and
style. The marker shape can be altered using the
various tools and filters. The marker color can be
changed using either the 256-color pallet or the
“More Color” button. At last, you can change the
text position relative to the marker icon using the
button located at the right of the “Font…” button.
•
Please note that a marker is created using the text
style that is selected in the Styles pallet (see §
“The Inks & Styles Pallet” for more information). You can of course change that text style af terwards.
•
Area (3) is the marker preview.
Once selected, the Color Picker dialog appears. Select an
orange color and click on the Ok button.
Examples:
Clicking onto the white marker located into the top left
corner leads to the following result:
The marker is drawn with various shapes of orange. No tice that the gray shades have been respected. Of course,
these are now orange shades. However, there are parts of
this image that are painted in orange while they should be
plain white (the outside of the marker). So we need to re move them.
Now suppose you want a marker of similar shape but with
an orange tone (i.e. Similar for example to the yellow
marker but in orange). As no such marker exists in the
17 / 50
To remove the unwanted orange-colored areas, we select a
while color and the color filling tool (see next image).
2) Manipulation
Once a marker has been created, it appears on the main map,
on top of all the various layers (see image on next page).
To change its appearance, its text style, to move or to de lete it, to hide or show it, simply control-click into the
marker. This brings a popup menu that allows you select ing the operation you want to perform (again, see image
on next page).
If you select the “Edit…” menu item, the Marker Editor
dialog appears.
Then we click into each area we want to “erase”. In the
example below, we have clicked somewhere into the yel low area located into the top right corner. Proceed until all
the areas have been converted into white.
If you select the “Update Text Style” menu item, the
marker text style is updated with the text style that is selected in the Styles pallet (see § “The Inks & Styles Pallet” for more information).
If you select the “Delete…” menu item, a dialog appears
asking if you really want to perform this operation as it
cannot be undone.
If you select the “Hide” menu item, the Marker is made
invisible.
If you select the “Show” menu item, the Marker is made
visible again.
If you select the “Move (Press ‘enter’ to validate, ‘Esc’
to cancel)” menu item, a copy of the marker is displayed
surrounded by a blue box. If you move the mouse cursor
within that box, the cursor turns into a hand cursor meaning you can drag the marker.
Once this is done, simply press the return key to validate
your move or the escape key to cancel the operation.
The final result is show in the image bellow. Notice that
the preview is automatically updated to reflect your
changes.
There is also a “Markers” menu item in the “Edit” menu.
This menu item has two attached sub menus that allow hiding or showing all the markers. This can be useful when you
want to print a map for you players and you do not want
them to see the locations identified by the markers.
Alternatively, you can use the Markers Manager that is
located at the bottom left of the main window. There is a
listbox that displays the list of all the markers you have
created.
If you have created more than nine markers, they cannot
be all visible in the listbox. In that case, use the black up
and down arrow above and below the listbox to scroll
through all the available listbox.
18 / 50
For your convenience, when you reach the end of the
markers list and you scroll down, you automatically goes
back to the beginning (and similarly, if you try to scroll
past the first marker, then you go to the last one).
Once a marker is selected, you can show or hide it by
clicking into the second column : a black eye icon means
the marker is visible while a red one means it is invisible.
Double-clicking on a marker brings the Marker Editor.
There are also three buttons below the listbox. The first
one (the
button) allows you deleting
a marker, the second one (the
button)
allows you moving the marker, and the
third one (the
button) allows you updating the marker text style with the Inks
Pallet active Text Style. These buttons are
only enabled when a marker is selected.
For example, when selecting the line tool, this indicator
displays the Shift and Option keys, meaning you can use
them while drawing a line (the Shift key allows you draw ing diagonal lines while the Option key allows you draw ing vertical or horizontal lines).
To get the list of all the available keyboard keys that can
be used with tools, select the “Keyboard Shortcuts”
menu item in the “Help” menu.
Layer selector
This popup menu allows you selecting the
active layer onto which the current tool
will operate.
For example, by default, the Line tool
works on the active Drawing Layer. By
clicking on the corresponding popup
menu, you can specify that this tool now
operates on the active Terrain Layer.
Pen Size
This popup menu allows selecting the pen
thickness (from 1 to 16 pixels).
Keyboard indicator
This area displays the keyboard key(s)
you can use with the current tool.
19 / 50
Drawing
Area
Tools
Parameters
Erase Parameters
The Drawing Tools Parameters Area (see below) is the
part of Drawing Tools Area where there are downward
arrows. To view a tools parameters, you must double-click
on the corresponding tool area. For clarity purpose, only
the tools that are double-clickable are represented:
•
(1): Erase Parameters.
•
(2): Color Filling Parameters.
•
(3): Rounded Rectangle Parameters.
•
(4): Arrow Parameters.
•
(5): Pipette Parameters.
•
(6): Terrain Tile Drawing parameters.
•
(7): Grid Polygon Color Filling Parameters.
•
(7): Selection Parameters.
The Erase Parameters allow you defining the Erase
Shape and Size. In the drawer, you can select:
All the tools parameters are displayed in a window drawer
at the left of the Tools pallet.
Drawing Tools Parameters Selector
•
The area shape: square or circle.
•
The area size: from 2 to 120 points, but with some
holes in the progression : 2, 3, 4, 5, 10, 20, 40, 60, 80
and 120 pixels.
The default Erase Shape and Size is a 20 pixel-diameter
circle that clears the drawing and terrain active layers.
Color Filling Parameters
Clicking on this button allows you displaying the tools
parameters window drawer without having to double-click
on each button in the Drawing Tools Parameters Area.
Clicking again on this button allows you hiding the tools
parameters window drawer.
The Color Filling parameters used to allow you switching
between a Drawing Context or a texture when filling an area.
20 / 50
This is now done directly in the Main window by clicking
on the button containing a Color Filling tool icon.
•
Rounded Rectangle Parameters
Type. You can choose among a line with an « arrow » at the beginning of the line, or an « arrow »
at the end of the line or an « arrow » at both ends.
In addition, you can require a line to be drawn
with a dimension (the XX checkbox).
•
Shape. You can choose among a tip made of a
simple arrow, or a plain arrow, or a circle, or a
bar, or a bar with a simple arrow.
The last two shapes are intended to be used in
conjunction with the dimension display.
•
Size. You can specify the width and height of the
arrows ends as well as the height of the vertical
bar (when used).
Pipette Parameters
The Rounded Rectangle parameters allow you changing
the width (X-radius) and height (Y-radius) of the rounded
corner.
The default is 20-pixel width and 20-pixel height.
Arrow Parameters
The Pipette parameters allow you specifying the Pipette
Behavior.
•
Remember Last Tool. When this option is checked
and when you select a pipette tool, the previous tool is
remembered. In that case, once you have selected a
new color, the previous tool is restored.
•
Reset Pattern. When this option is checked and you
select a color, the current ink pattern is reset to the
black pattern.
•
Do not update the Colors Table. When this option is
checked, the corresponding Colors Table is not up dated i.e. only the Inks Area (in the Tools Pallet) is
updated.
The Arrow parameters allow you modifying the following
arrow aspects :
21 / 50
deselect it (the default), all the tiles you draw, replace the tiles on the map. The or mode can be used
for example to put a cow tile on top of a grass tile.
Terrain Tile Drawing Parameters
The tolerance editfield allows you specifying which
colors are ignored when performing the or operation.
By default the tolerance is 0, meaning only the white
color is not drawn. However, when oring blurred ter rain tiles the result is generally anesthetic because the
light gray pixels remain visible. So, by specifying a
tolerance greater than zero, you tell RPGMapMaker to
ignore all red, green and blue color components that
are greater or equal to (255 - the tolerance value).
The example below shows the result of two ored tiles
with three different tolerance values.
The Terrain Tile Drawing parameters allow you modifying:
•
Note: To draw a terrain tile in Or mode on a case-bycase basis, press the shift key while clicking on the
map. If you are already in Or mode, pressing the shift
key allows you drawing in normal mode instead.
The Terrain Drawing Behavior. This defines how terrain tiles are drawn on the Main window :
◦ Placement. Clicking on the big button display a
popup menu with for possible choices :
•
Tile Repeating. This area allows you repeating a terrain
tile up to 10 times along the x or/and the y-axis. When
you click on each corresponding button, a popup menu
appears. To select the repeating factor, simply select
the desired value. The repeating factor is then reflected
at the left of the small black arrow.
Grid Polygon Color Filling Parameters
➢ Aligned on Terrain Grid (first two modes).
These two modes are useful when tiles placement is important, typically when drawing dungeon or castle walls. In addition, if you choose
“Clip to Map Grid Borders”, then all tiles that
are drawn on top of the grid edges are clipped to
the grid polygons (hex, square or lozenge).
➢ Free Drawing (next two modes). When these
modes are on, a tile is drawn exactly at the location where you click on the map i.e. the Terrain
Grid is ignored. In addition, if you choose “Clip
to Map Grid”, then a tile shape is clipped to the
shape of one grid polygon. Please note that
when this last mode is on, terrain repeating is
disabled.
➢ Align on Map Grid (last mode). When this mode
is on, a tile is drawn exactly in the middle of a
grid polygon.
◦ Or Mode. By selecting this check box, all the tiles
you draw are ored with the tiles on the map. If you
The Grid Polygon Color Filling parameters allow you
modifying :
22 / 50
•
The Polygon Area. This defines how many terrain tiles
are drawn on the Main window and when there are more
than one tile, the shape they will possess (Grid Polygon
Filling area of effect) :
◦ One polygon.
◦ Seven hexes, nine squares or nine lozenges centered
on the mouse location.
◦ Nineteen hexes, twenty-five squares or twenty-five
lozenges centered on the mouse location.
◦ Four polygons in two lines of two polygons. The
polygons are filled to the right and below the mouse
location.
◦ Six polygons in two lines of three polygons. The
polygons are filled to the right and below the mouse
location.
◦ Height polygons in two lines of four polygons. The
polygons are filled to the right and below the mouse
location.
Selection Parameters
◦ Six hexes in three lines of two hexes. The hexes are
filled to the right and centered on the mouse loca tion.
◦ Nine polygons in three lines of three polygons. The
polygons are filled to the right and centered on the
mouse location.
◦ Twelve polygons in three lines of four polygons.
The polygons are filled to the right and centered on
the mouse location.
•
The Polygon shadow characteristics. This defines its
direction, color and thickness:
◦ Direction. To select one direction, simply click on
any icon in the table.
◦ Color. Simply, click on the square to change its col-
or.
◦ Thickness. Click on the popup arrow to change its
value.
Please note that the Grid Polygon Filling Area of Effect
aspect depends on the Polygon shape (the last image is for
maps with no grid. The contents is empty as this tool has
no effect in that situation):
The Selection Information parameters allow you specifying whether or not you want the following information to
be displayed:
•
The selection dimensions,
•
The list of layer(s) onto which the selection operates.
23 / 50
The Terrains Pallet
Terrains Area
The Terrains Area occupies most of the Terrains pallet
contents.
It contains a number of terrain tiles that depends on the tile
size:
•
12-pixel width by 12-pixel height. The library contains 322 terrain tiles (7 rows of 46 columns).
•
16-pixel width by 16-pixel height. The library contains 175 terrain tiles (5 rows of 35 columns).
•
20-pixel width by 20-pixel height. The library contains 140 terrain tiles (5 rows of 28 columns).
•
24-pixel width by 24-pixel height. The library contains 120 terrain tiles (5 rows of 24 columns).
•
28-pixel width by 28-pixel height. The library contains 120 terrain tiles (6 rows of 20 columns).
•
32-pixel width by 32-pixel height. The library contains 120 terrain tiles (6 rows of 20 columns).
•
36-pixel width by 36-pixel height. The library contains 120 terrain tiles (6 rows of 20 columns).
•
40-pixel width by 40-pixel height. The library contains 120 terrain tiles (6 rows of 20 columns).
The number of tiles that are visible depend on the pallet
size (see “Toolbar Area” below).
To select a terrain tile, just click on the desired Terrain tile.
To draw a terrain on the map, select the Terrain Tile
Drawing tool (in the § “The Tools Pallet”) and simply
click on the map where you want it to appear. You can also
press the option key into the Terrains Area to select the
Terrain Tile Drawing tool.
By default, a terrain tile is aligned on the Terrain Grid.
However, this behavior can be changed (see Terrain Tile
Drawing Parameters in the § “Terrain Tile Drawing
Parameters” for more information).
As you may have noticed, not all the terrain tiles are used.
This is intentional: the empty tiles allow you adding cus tom tiles without losing the existing ones (see Terrain Editor in the § “Toolbar Area” for more information). Of
course, the Terrain Editor can also be used to modify existing tiles.
Sometimes, you need to duplicate a terrain tile, or you
want to copy a single tile from a library to another library
or you want to transform a portion of your map into a tile.
To achieve this, and instead of using the Terrain Editor,
you can use the « Copy », « Paste » and « Paste from
Clipboard » menu items that are available in the “Terrains” menu.
Please note that if you want to transfer a great number of
tiles from several libraries into one library or if you want
to quickly reorder the tiles of a library it is recommended
to use the Terrain Organizer tool (see Terrain Organizer
in § “Toolbar Area” for more information).
Toolbar Area
This area is located at the top of the Terrains Pallet.
•
(1): Library Dirty Status indicator.
•
(2): Library Name indicator.
•
(2): Library Selection area.
•
(3): Tile Size indicator.
•
(4): Terrain Editor button.
•
(5): Terrain Organizer button.
•
(6): Effect button.
•
(7): Pallet appearance button.
Library Dirty Status
This indicator is similar to the Map Dirty Status i.e. it reflects the dirty status of the current terrain library: if the
terrain library is dirty the document icon contains a red
check mark, otherwise it is empty.
24 / 50
Library Selection
When you click on the small black arrow, a popup menu is
displayed that contains the list of all the available terrain
tiles libraries (the current library is the one with the check
mark). Once you are familiar with the contents of each ter rain tiles library this popup menu allows you quickly se lecting a library without having to use the « Load Library
» menu item in the “Menu: Terrains” menu (see MenusManual.pdf for more information).
At the left of the Terrain Editor, the terrain tile is displayed
with a variable scaling factor (x 10 for a 24 by 24 terrain
tile, otherwise this ranges from x 20 for 12 by 12, to x 6
for 40 by 40). This allows you drawing with a perfect ac curacy.
The icon located at the bottom right corner of the scaled ter rain represents the terrain tile at its real size.
As for the Terrain Pallet, the Terrain Editor adjusts its appearance depending on the size of the tile currently edited:
Please note that no path is displayed, because the libraries
are all located either into the Core Libraries or in the
User Libraries folder.
All libraries from the Core Libraries folder have a locked
padlock, meaning the libraries are considered read-only
(this is a safety measure to prevent you from accidentally
modifying them). On the contrary, all the libraries from
the User Libraries folder have an unlocked padlock,
meaning you can modify them.
Once you have chosen a terrain tiles library, the current
library is replaced by the selected one and the library name
as well as the padlock icon are updated with the name and
the Locked/Unlocked State of the new library.
Note: This name used to be available in a menu item in the
« Terrains » menu. This is no longer the case.
Tile Size
This indicator gives you the size (in pixels) of each tile of the
current library. The size ranges from 12 to 40, in a 4-pixel in crement (i.e. you can have tiles which dimensions are 12x12,
16x16, 20x20, 24x24, 28x28, 32x32, 36x36, and 40X40
pixels).
To modify or create a terrain tile, you have the following
functionalities at your disposal:
•
Terrain Editor
Tools. The following tools are available: Pen, Line,
Rectangle, Oval, Rounded Rectangle, Rubber, Pipette
and Color Filling.
Holding the shift key while drawing ovals (respectively rectangles) allows you drawing circles (respectively squares) instead.
At some time, you will probably feel the need to modify
existing terrains tiles or create new ones. In that case, the
Terrain Editor is the perfect tool for that operation. To invoke it, you can either click onto this button to edit the
current terrain tile or double-click onto a terrain tile in the
Terrains Area.
The rectangle, oval and rounded rectangle tools can be
used either in framing mode (i.e. only the frame shape
is drawn) or in filling mode (i.e. only the contents of
the shape is drawn).
Note: By double-clicking on the Rounded Rectangle tool,
you bring a dialog that allows you changing the width ( Xradius) and height (Y-radius) of the rounded corner.
•
Transformations. You can apply on a terrain tile the
following effects (from left to right):
o Shift. By clicking into the shift icon (the group
of four arrows located below the tools), you can
shift the entire image - one bit at a time - either
to the left, to the right, to the top or to the bottom.
o If you click on the button at the right of the shift
icon, you transform the shift operation into a circular rotation operation. For example, a one-bit
circular rotation to the left shifts the map one-bit
to the left and replaces the right most column by
the bits from the left most one.
25 / 50
o By default, the shift (or circular rotation opera-
tion) operates one bit at a time (this is called the
operation step). However, you can change this
default by clicking on the Step bevel button. In
that case, you can choose a shift step from one
to six pixels.
o Or Copy. If you have previously copied a terrain
tile (when you where in the Terrain Editor), you
can or it with the current terrain tile.
o Color Filter. This allows you changing at once
of all the bits of the terrain tile which color is
given by the color pallet into another color.
o Effects. By clicking on the popup menu you can
apply an effect to the current tile.
•
Color Pallet. There is a 256-color pallet that allows
you selecting in which color all drawings occur. If
your maps color depth is not 256 colors, you may
prefer to use the three sliders to select a specific RGB
color (not available in the 256-color pallet).
In addition, if you click on the Grayscale check box,
the sliders allow you selecting any shade of gray.
When the maps color depth is 256 colors, the sliders
and the check box are not visible.
The standard « Edit » menu items are also available. This
means you can Copy, Cut or Clear a terrain tile. You can
undo at any time the 40 operations you performed.
If you copy a terrain tile, then the next time you open the
Terrain editor, you will be able to Paste it. Note that the
copied terrain tile is not lost even if you perform
Cut/Copy/Clear/Undo operations in the Main Window.
Terrain Organizer
This tool has two purposes: Current Library tiles reordering
and tiles transferring from other libraries or external pictures
into the Current Library.
(1) Source Library Selector. This popup menu allows
you selecting the source library.
(2) Selected Library. The library selected by the Source
Library Selector. Once a library is selected you can
drag any tile from this library into the destination library. Note that drag between tiles from this library is
not allowed.
(3) Destination Library Selector. This area shows the
name of the Current Library.
(4) Current Library. This is the library you have selected
in the Terrains Area. You can drag tiles from the
source library into the destination library. If the tile
size of the source library is different from the tile size
of this library, you can either decide to scale the tiles
(checkbox Scale tile if size is different selected) or
to truncate it.
In addition, you can duplicate tiles from the destination
library by pressing the Option key while dragging a tile.
At last, you can directly drop a list of files (either PICT
format or any format recognized by QuickTime if Quick Time is installed) into the library. This allows you quickly
importing terrain tiles.
Please note that if the Current Library is locked, the Terrain
Organizer tool is not available.
Effects
When drawing a terrain tile on the grid, you can choose to
apply an effect on it. For an effect to take place you must
click on the small arrow button in the Effect button. A pal-
26 / 50
let appears that let you choose the desired effect (see im age to the right).
Clicking on an icon selects the associated effect. Moving
your mouse over an icon displays the effect name at the
bottom of the pallet.
Once an effect is selected, it is reflected directly in the Terrains Area:
Pallet Appearance
Clicking on the small downward arrow in the Appearance
button brings a popup menu that allows you selecting the
size of the terrain pallet :
•
Small Window. The pallet height is reduced so that
there is more room for the Main window.
•
Normal Window. The pallet height and width is the
one you get when you open the application.
•
Big Window. The pallet height as well as its width is
increased so that you can see more tiles.
•
Huge Window. The pallet height as well as its width
is further increased so that you can see all the tiles.
Example with a 40-pixel tile terrains library:
27 / 50
The Inks & Styles Pallet
Inks pane
Colors Tables
•
Foreground Colors Table. This table must be
used to change the current ink foreground color.
•
Background Colors Table. This table must be
used to change the current ink background color.
Each Colors Table comes with a predefined set of 70 colors. This set of colors is generally sufficient to paint most
of your maps: there are different types of brown for moun tains, hills, etc.; different types of green for grass, mead ows, etc.; different types of blue for sea, rivers, etc.
When you open this pallet for the first time, you get a ver tically-elongated window that is split into several areas:
(1) Colors Tables area for foreground and background color selection (see below for more in formation).
(2) Patterns area for pattern selection (see next paragraphs for more information).
(3) Drawing contexts area for quickly saving and
restoring foreground, background and pattern
triplets (see below for more information).
As you may have noticed, only 28 out of the 70 squares
are colored (when you launch the application for the first
time). This is intentional: the empty squares let you add
custom colors without losing the existing ones (but you
can replace them if you wish).
To select a color from one of the Colors Table, simply
click on the corresponding colored square. This color be comes the new ink foreground or background color. If
you want to change a color, double-click on a color to in voke the corresponding Color Picker (see below).
Each time you select a color in a Colors Table, its corresponding RGB value (in hexadecimal) is displayed.
(4) Ink Mode area. This icon reminds you which current ink mode (pen/text/frame or fill) is active
(see § “Inks Area” in the Tools Pallet for more
information).
You can see each Colors Table as a “shortcut” for selecting colors: instead of clicking each time on the “F” or “B”
button in the Tools Pallet to change a color, you directly
click on a color in one of these tables and this color is re flected back into the Tools Pallet.
(5) Pane Selection area for giving you access to the
Text Styles pane when in the Inks pane and access
to the Inks pane when in the Text Styles pane:
Please note that the reverse is not true: changing a color
through the Tools Pallet interface has no impact on the
Inks & Styles Pallet.
◦
The first button (the leftmost one) allows you
selecting the Inks pane (the one that is visible
when you open the window for the first time).
◦
The second button (the rightmost one) allows
you selecting the Text Styles pane.
28 / 50
Color Picker
In rare circumstances (for example, you want to draw vari ous sea depths using different shades of blue), the Colors
Table does not contain all the needed colors. In that case,
to add new colors (or to modify existing ones) you can use
the Color Picker.
When you double-click on a current color, the Color
Picker dialog appears. This dialog contains, by default, a
256-color pallet, three sliders, three editfields and two
check boxes.
If the Colors Table current color can be found in the 256color pallet, it is highlighted (i.e. the colored square has a
border around it). Otherwise it is not.
To choose another color, click on the desired colored
square. You may prefer to play with the three sliders to se lect a specific RGB color (not available in the 256-color
pallet) or to enter a color directly by using the three editfields. In addition, if you click on the Grayscale check
box, the sliders allow you selecting any shade of gray.
Patterns
This tool lets you choose among 72 different patterns. To
select a pattern, simply click on the Patterns Table.
To enter a color directly, select an editfield, write the desired number (add a '#' at the beginning if the value is in
hexadecimal) and press the tab key.
By default, the RGB color in an editfield is displayed in
hexadecimal (the values into the editfields start with a '#').
However, by unchecking the checkbox labeled Hex, you
force the display to be in decimal. Please note that this
checkbox only affects the way a color is displayed i.e.
whatever the state of this checkbox, you can always enter
a color in either decimal or hexadecimal.
If you close the dialog by clicking onto the Ok button (or
by pressing the Enter key), the Colors Table current color
is replaced by the new color. Otherwise the current color
is left unmodified.
Note: If you do not want to lose the existing colors, first select an empty square on a Colors Table (which now becomes the current color for that pallet). This way, the
empty square will be replaced by the selected color, leaving
the other colors untouched. Also, if you want to dismiss the
pallet without any selection, press the Escape key.
Again, you can see Patterns Table as a “shortcut” for selecting a pattern: instead of clicking each time on the “ P”
button in the Tools Pallet to change a pattern, you directly
click on a pattern in this table and this pattern is reflected
back into the Tools Pallet.
Please note that the reverse is not true: changing a pattern
through the Tools Pallet interface has no impact on the
Inks & Styles Pallet.
Changing a pattern shape:
To edit a pattern, double-click onto a pattern. Please note
that only the last 12 patterns are editable.
Please note that there is an option in the Preferences dialog that allows you using the System Color Picker (see
image to the right) instead of this Color Picker.
29 / 50
You have access to only one tool: a pen tool. It allows you
drawing black pixels when the background is white and
white pixels when the background is black.
Text Styles Pane
Drawing Contexts
The Drawing Contexts tool allows you quickly saving and
restoring up to 40 drawing contexts.
But what is a drawing context? This is simply a set of
three parameters: a foreground color, a background color
and a pattern.
Suppose you have a map with a region filled with ice. To
simulate the ice, you have decided to fill the grid polygons
with a white background scattered with light blue dots.
Then you fill another region (for example a mountain in
plain dark brown). At this point, your “ice” setting is lost. If
you want to draw some more ice, you need to remember
what colors and what patterns you used and this is of course
a waste of time! You wish you had saved this context…
This is the purpose of the Drawing Contexts Area:
Once you are satisfied with the current ink Drawing Context, select in the Context area (1) an empty slot (or one
you want to replace) and press the button marked with a «
plus sign » (2).
Note 1: If you want to clear a context, press the Rubber
button (3).
Note 2: When the Color Filling tool is active, you can directly
drag a Drawing Context into the Main Window map area.
To restore a context, select one slot in the Context area
and use the button marked with an arrow (4). The context
will replace the foreground color, the background color
and the pattern of the current Ink Mode (Frame or Fill).
This pane allows you creating text styles. To select this
pane, click on the “A” button in the pallet area (5).
When you select this pane for the first time, it has the ap pearance of the below picture : a listbox with two entries
named “@default” and “@Room Number” (3) and the
name of the active text style (1).
To create, delete or activate a text style, please use the
three buttons at the top of the pane (4).
30 / 50
•
Creation: to create a text style, press the “Plus”
button. This adds an entry in the listbox with a
pre-generated name (S_<number>) and brings the
Text Styles Attributes sheet (see next page).
•
Edition: once a text style is created, you can
double-click on its entry in area (3) to change its
attributes.
•
Visualization: clicking on any text styles in area
(3) displays a preview in area (2) as well as the
list of all its attributes in area (5).
•
Deletion: to delete a text style, select it and then
press the “Rubber” button. Please note that styles
that are locked (they have a small padlock at their
left side) cannot be deleted.
•
Activation: to activate a text style, select it and
then press the “Arrow” button. Its name can be
seen in area (1).
Behavior:
When you activate a text style, text drawing on the current
map window is done with that style. In addition, any
marker you create also uses that text style.
Special case :
When you create a window, text drawing and markers are
initialized with the “@default” text style.
(S_<number> when created). You cannot change the
name of a locked style.
•
Font. From the fonts available in your system.
•
Size. From 7 to 288 points, but with some missing
sizes.
•
Face. You can choose among Normal i.e. neither Bold
nor Italic nor Underline, Bold, Italic, or Underline.
•
Alignment. You can choose among Left or Center or
Right Alignment.
•
Color. You have the choice among:
When you generate a random dungeon with rooms, the
room numbers uses the “@Room Number” text style.
o
A text in color with no background. By default the
text color is black but you can change it by clicking onto the rectangle at the right of the first radio
button.
o
A text in color with a colored background rect angle. By the default, the background color is red
but you can change it by clicking onto the rectangle
at the right of the second radio button. Of course,
you can also change the text color.
Text Style Attributes
Double-clicking on a style brings a sheet :
It that allows you modifying the following attributes :
•
Style name. This editfield allows you modifying the
name of this style
31 / 50
•
Border. You can choose to have no border
around the text (No Frame) or a colored
border of one to five pixels width. The
frame color is black by default but you can
change it by clicking onto the rectangle below the popup menu.
•
Preview. Display a preview of the text attributes as they will draw on the main window.
The Main window
Bars Area
We describe here the areas that are located below the Main Window titlebar and at the right of the window left edge.
(A) Statusbar
(B) Toolbar
(12) Layers Manager area.
(1)
Grid Coordinates area.
(9)
(13) Links Editor button.
(2)
Map Coordinates area.
(10) Terrain Grid button.
(14) Script Editor button.
(3)
Distance Measuring Info area.
(15) Markers Manager button.
(4)
Link Status indicator.
(11) Align On Terrain Grid Behavior
popup menu.
(5)
Map Dirty Status indicator.
(6)
RGB Color indicator.
Color Filling behavior selector.
(20) Select Window button
Grid Coordinates
When you move the cursor over the map grid, the current
object grid (hex, square or lozenge) coordinates are auto matically displayed in this area. The coordinates are in the
form (Row, Column) where Row is in the range 0 to (map
grid #rows - 1) and Column is in the range 0 to (map grid
#columns - 1).
Please note that if the mouse points into an area of the map
that is not covered the grid, this area is left blank.
This feature is useful when you use the Links Editor to
locate the link locations on the map grid.
32 / 50
Map Coordinates
When you move the cursor over the map, the
map coordinates are displayed into that area.
If the unit is cm (or ft), the dimensions are in the
xxx.xx format (for example 304.12 cm). If the
unit is m (or ya), the format is xxx.x (for example
36.4 m). At least, if the unit is km (or mi), the
format is xxx (for example 2345 mi).
The map (x, y) pixel-coordinates are converted
into the map (X, Y) unit-coordinates by the following formulas:
•
X (in unit) = [x (in pixels) * Polygon Horizontal Dimension (in unit)] / Polygon
Width (in pixels)
•
Y (in unit) = [y (in pixels) * Polygon horizontal dimension (in unit)] / Polygon
Width (in pixels)
Once the map is created, it is still possible to
modify the Polygon horizontal dimension and/or
the coordinates unit as well as the coordinates formatting.
To do so, simply select the “Grid Information…” menu
item in the « Edit » menu (see corresponding § for more
information).
RGB Color indicator
Distance Measuring Info
Color Filling behavior selector
This area displays the distance you get when using the
Distance Measuring tool.
This button lets you select how the Color Filling tool
must behave:
Map Dirty Status
•
Use a Drawing Context when filling an area (
This area is made of a small document icon. If the map is
dirty this icon contains a red check mark, otherwise it is
empty. The overall aspect of the icon depends on the docu ment type:
•
Use a texture when filling an area (
Standard map
Not dirty
Dirty
Display the RGB color value of whatever if below your
mouse cursor.
).
).
Terrain Grid
This button allows you showing (or hiding) the Terrain Grid.
Model-based Map
Not dirty
Dirty
Link Status
This area displays a small link icon if there is a link associated to the current object grid and nothing else other wise. This allows you quickly locating the links on the
map without using the Links Editor.
Please also note that if there is a link, the associated map
is displayed in a text box above the grid (see example on
next column).
However, as this feature can be deactivated (by the check box in the Links window), the Link Status guarantees you
that if there is a link associated to an object grid you will
always be aware of it.
The Terrain Grid or RectGrid allows you visualizing
where on the map the terrain tiles are drawn (see image
below), assuming of course, you have chosen the Align on
Terrain Grid behavior with the Terrain Drawing Behavior popup menu on the Terrains Pallet.
The RectGrid has a real interest when the placement of
tiles is important: i.e. when you build dungeon walls. In
that case, simply click anywhere on the map, and the tile
will be automatically aligned.
If the link to the associated map is broken (for example
because you have deleted the corresponding map) a small
link icon with an exclamation mark is displayed.
33 / 50
Align On Terrain Grid
Script Editor
This popup menu allows you specifying whether or not a
Selection, a Pasted picture or a Dropped picture is aligned
on the Terrain grid when moving, shrinking or expanding
them.
When you click on the Script Editor button, a drawer window appears at the right of the main window.
This window is made of:
Layers Managers
•
A main editfield (for storing the script),
•
Two other editfields (one for searching and one for
replacing text) and two associated buttons (“ Next”
for searching and “Replace” for replacing),
•
Two help buttons (one contains the list of functions and one the list constants you can use in a
script), and
•
A Run button (to execute the script).
See § “Managing Layers” for more information.
In addition, you can control-click on a layer name (but the
Grid one) to bring a contextual menu that allows you cut ting, copying, pasting or clearing a layer.
The contextual menu appearance depends on what you
have done previously. For example, if you just made a se lection, then the menu will show only the Cut, Copy and
Clear menu items, and if you performed a copy operation,
then the Paste menu item is shown, etc.
You can see this contextual menu as a “ shortcut”: instead
of selecting a submenu item in the Layers menu item in
the Edit menu, you control-click directly into the Layers
Manager.
To display the script associated to a layer ('layer script'),
there is nothing special to do. You select the desired layer
in the Layers Manager and if there is an associated layer
script it is automatically displayed.
In addition, there is no need to save a layer script: it is
automatically saved when you select a new layer, and of
course when you save your map (the other layer scripts are
also saved).
At the left of the main edit field (that contains the script),
there is another field that displays the line numbers. The
goal is to help debugging scripts.
Typically, when there is a bug in your script, an error mes sage is displayed along with the line number. Though the
offending line is selected, you may lose it by inadvertently
clicking somewhere else. In that case, thanks to this script
numbering field, you can you easily find again which line
had a problem without having to click again on the Run
button.
34 / 50
For more information about layer script syntax, please
read the ScriptingManual.pdf documentation.
Links Editor
When you click on the Links Editor button, a drawer window appears at the right of the main window (i.e. at the
right of the vertical scrollbar). The window is made of two
listboxes (one for the list of files that can be linked and one
for the list of links), a checkbox (which purpose will be explained layer) and eight buttons (for managing links).
The top listbox contains the list of all the maps that are
located into the same folder as the map you are editing.
You can make links only with these maps.
The bottom listbox contains the list of all the links you
have created for this map. This listbox has two columns.
The first one contains the “location” of the link and the
second one contains the associated map. The “location” is
either an icon (for a zoom-out, a navigation or an external
link) or a couple which represents an object grid coordin ates (for a zoom-in link). Also, if the link is broken (because of a missing map), the broken link icon is displayed.
Below this listbox, there is a bevel button (named Unlink)
that allows you deleting a link. Below this button, there is
a checkbox that allows you preventing (when checked) the
display of link information when you move the mouse
within the map grid. There is also a bevel button (named
Open Map/File) that allows you loading directly a map
without having to command-click on a main map polygon.
At last there is an area between the two listboxes called
the Interactive Map Area :
•
(1): Zoom-out (Home) Button.
•
(2): West Button.
•
(3): East Button.
•
(4): North Button.
•
(5): South Button.
•
(6): External Links Button.
The Zoom-out button (when enabled) allows you going
directly to the map associated with the zoom-out link. The
four following buttons (when enabled) allow you going
directly to the map associated with the navigation links
(North, South, West and East). To create these links, you
must drag a map onto it (see above).
35 / 50
At last, the sixth button allows you directly opening ex ternal files stored in a subfolder located within the map
folder. To create this link, you must use the Links Editor
(again see below).
•
Removing a link. To remove a link you must first select a link entry (in the bottom listbox). In that case,
the Unlink button becomes enabled. Click into this
button. A dialog appears asking if you really want to
remove this entry. If you agree, the entry is perman ently removed (no undo available).
Please note that if you remove a zoom-out or naviga tion link, the corresponding button (in the Interactive
Map Area) becomes disabled.
How to create a link?
•
Examples
Creating a zoom-out or navigation link . To create
this kind of link you first select a map (in the top listbox) then you drag the map onto any button of the Interactive Map Area. Once you release the mouse, a
new link entry is added into the bottom listbox.
1) In the left picture below, you can see that the current
map has four links:
Please note that once you have created such a link, the
corresponding button (in the Interactive Map Area)
becomes enabled.
•
Creating a zoom-in link. To create this kind of link
you first select a map (in the top listbox) then you
drag the map onto one of the main map grid polygon
(i.e. a hex or a square or a lozenge). Once you release
the mouse, a new link entry is added into the bottom
listbox.
•
Link 1. Zoom-out button (home) is linked with
map LozengeDataMap0. As you may see, this link
is broken (which is logical as the LozengeDataMap0 map is missing in the list of
maps).
•
Link 2. North button is linked with map
HexDataMap1.
•
Link 3. Grid polygon (X = 0,Y = 0) is linked with
map LozengeDataMap0. This link is broken too
(same comment as above).
•
Link 4. Grid Polygon (X = 9,Y = 6) is linked with
map HexDataMap1.
2) In the second picture below, you can see that the current
map has three links:
•
Creating an external link. To create this kind of link
you first select a file (in the top listbox) then you drag
the file either onto one of the main map grid polygon
or on the sixth Interactive Map Area button. Once
you release the mouse, a new link entry is added into
the bottom listbox. Please also note that when you
click on that button, the list of all the external links is
displayed.
36 / 50
•
Link 1. There is an external link to the text file
HexDataMap0.txt.
•
Link 2. Grid polygon (X = 0,Y = 0) is linked with
text file HexDataMap0.txt (this is an external link
too).
•
Link 3. There is an external link to the RPGMapMaker file LozengeDataMap0.
Select Window
Zoom Factor
This button allows you quickly selecting a map window.
When you build a really big map (50 by 50 hexes for ex ample), the Main Window may not be large enough to let
view the entire map. Sometimes however, you want to see
it entirely so that you can judge the map final aspect or
you want to edit more precisely a peculiar aspect of the
map. This is the purpose of the Map Overview area.
Clicking on it brings a popup menu that contains the list of
all map windows you have opened. To bring one to the
front, simply select its name in the popup menu.
Tool Access Area
When you click on the button with a wrench inside, a
popup menu appears. It contains the list of all the available
tools and allows you quickly selecting a tool without hav ing to click inside the Tools Pallet drawing tools area.
When you click on the black arrow, a popup menu ap pears. It allows you viewing the map at the following pre defined zooming resolutions: 800%, 400%, 200%, 100%
(the default), 50% and 25%. Once chosen, the resolution is
displayed into the editfield located at the left of the arrow.
Note: For finer control over the zooming resolution, you
can enter directly a value inside the editfield.
Map Overview
When you click onto the small magnifying glass
button (area (2) in the image above), the Map
Overview window appears (area (3) in the image
below). It displays the Main Window map at 20%
of its size. In addition, there is a blue rectangle that
shows you the visible part of the map.
The Map Overview window is first opened at a
location situated at the bottom right corner of the
main window. It remains visible until you click
again into the small magnifying glass button.
When you resize your map, this window is moved
accordingly i.e. it put again at the bottom right
corner of the main window.
It is perfectly possible to move the Map Overview
window outside its default location. However, if
you resize your map, the Map Overview window
is placed again at the bottom right corner of the
main window.
Zoom Control Area
•
(1): Zoom Factor area.
•
(2): Map Overview button.
If you click into the blue rectangle, the cursor
changes into a hand, meaning you can drag it over the re duced map. Without releasing the mouse, move the hand to
the desired location then release the mouse. The blue rect angle is now located onto another portion of the map and
the visible part of the map (in the main window) is changed
accordingly.
37 / 50
The Texture Pallet
This pallet allows you selecting a texture. Textures are organized into libraries.
To select a textures library, click into an entry in the listbox located at the top of the pallet.
Default libraries (those provides with the application) can not be modified and thus have a locked padlock. User lib raries can be modified and thus have an unlocked padlock
(please note that present, creating or modifying user tex tures is not supported yet).
Some libraries come with an informative text (a comment,
a copyright, etc.) In that case, it is displayed in the rectangular area located at the bottom of the pallet.
A textures can only be used with the Grid Polygon Color
Filling and the Color Filling tools (see these tools for
more information) in lieu of the current (fill foreground
color, fill background color, fill pattern) triplet or a
dropped drawing contexts.
To effectively draw with a texture, see § “Color Filling”
and § “Grid Polygon Color Filling” for more information.
Note: When the Color Filling tool is active, you can directly drag a texture into the Main Window map area.
For your convenience, you can remember and restore up to
17 textures. This allows you avoiding the hassle of having
to navigate through the various textures libraries.
To manage these special textures, please use the three but tons located below the listbox right side. They allow you
to:
•
Remember a texture. To do this, select a texture slot
and press the Plus button (see A in the first image).
•
Clear a texture slot. To do this, select a texture slot
and press the Rubber button.
•
Restore a texture. To do this, select a texture slot and
press the Arrow button (see B on the second image). In
that case, the corresponding textures libraries is loaded
and the libraries content is scrolled so that the chosen
texture becomes visible and selected.
38 / 50
The Random Terrain Generator Pallet
This tool allows you generating random terrains. Depend ing on the parameters you decide to use, you can generate
realistic mountains with or without forests, islands, blazing or icy deserts, rocky barrens, etc.
The random terrain generator only fills the map polygonal
area i.e. the area made of hexes, squares or lozenges.
This floating window is made of three areas: the first one
allows you defining terrain areas (1), the second one allows you adjusting the terrain parameters (2) and the
third one allows you generating (3) the terrain.
and 40 columns, then the drawing area will be 160pixel wide by 120-pixel high.
•
If the number of rows and columns is not greater than
100 then the multiple is 2.
•
The drawing area cannot have a width or height greater
than 200 pixels i.e. if your map has more than 100 rows
or 100 columns only the first 100 are drawn. You can
however choose where in the map the random map is
generated (see § “Terrains Parameters” below).
You can even decide to draw an area that is smaller than the
size of the map (again see § “Terrains Parameters” below).
To draw an area, select a color (for example black) then use
the pen tool to draw the contour and use the filling tool to
make it entirely black. When you generate the map, the result
should be more or less (this depends on some parameters)
similar to the area you have drawn (see example below).
You can also cancel the previous drawing operation by
clicking on the Arrow button.
Terrains Parameters
Terrain Areas
In order to achieve realistic terrains i.e. terrains with
mountains, seas, etc, you need to define the areas in which
these terrains peculiarities will grow. This is achieved by
either drawing them using the provided tools or letting the
program generates them automatically.
You can define five kinds of areas: black areas (mountain),
white areas (snow or ice), blue areas (sea or lack), green
areas (grass) and yellow areas (desert).
The size (in pixels) of the drawing area is a multiple of the
size (in objects grid) of the map polygonal area. The mul tiple (which is displayed at the bottom right corner of this
area) depends on the size of your map.
•
This area allows you modifying several parameters that
are used for generating the terrains. Modifying these para meters is totally optional, as their default values have
already been carefully chosen:
•
The Areas button allows you modifying the terrains
parameters (altitude, the temperature, etc.) See below
for more information.
•
The Colors button allows you modifying the terrains
foreground and background colors and patterns. See
below for more information.
If the number of rows and columns is not greater than
50 then the multiple is 4. For example, if you have
created a map with a hexagonal grid made of 30 rows
39 / 50
•
The Dimensions button allows you modifying the size
and location of the generated area. See below for more
information.
•
The Random button allows you configuring the way
the program generates randomly terrain areas. See be low for more information.
•
The Random Seed slider allows you modifying how
the random generator is converging. Typically, the
higher the value the faster the map tends to reduce the
singularities (sic). The best way to understand how
this works is to try, for a given set of parameters, different values for the random seed.
•
The Steps slider allows you specifying the number of
iterations the random generator will use. Depending
on the parameters of the various areas, it is sometimes
necessary to specify a high iteration value to obtain a
good looking preview.
•
The Rnd checkbox, if selected, tells the program to
generate automatically terrain areas i.e. you do not
need to build them by hands. When this button is un checked, the program will use whatever is present on
the drawing area (default behavior).
40 / 50
Area Parameters
This window is made of one popup menu and five sliders.
With the popup menu you select the area color (black,
blue, etc.) for which you want to modify its parameters.
For the current color, you can play with up to five para meters: The Altitude (from -100 i.e. deep sea to +100 i.e.
very high mountain), the Water value (from 0 i.e. extremely arid to +100 i.e. sea), the Temperature (from
-100 to +100), the Percentage of Water Flow i.e. the
dribbling factor (from 0 to 100) and the Percentage of
Evaporation (from 0 to 100).
Because you cannot generate a random terrain that has
more than 100 rows or 100 columns, this dialog allows
you building a greater area by specify different offsets in
the map.
Random Parameters
This window allows you specifying how the terrain areas
are generated (when the Rnd checkbox is selected). Basically, you can change :
(1)
The background color i.e. the color that is used to
fill the entire drawing area. For example, if you want
to generate a random terrain with a lot of water, then
you select the blue color as the background color. To
change the background color, then simply click on
the desired radio button.
(2)
The weight of the other colors i.e. the importance of
a color relative to the other colors. For each color
you can specify a weight that ranges from 1 to 10. A
1 means the color will be selected very rarely and a
10 means the color will be selected very often.
(3)
The maximum number of occurrences i.e. the maximum number of terrain areas that can be potentially
drawn.
(4)
The percentage of the maximum size. This value is
used to compute the potential size of each generated
terrain area. The bigger this value the bigger the
areas.
There are some dependencies between the various para meters:
•
Altitude and Water. If you select a negative altitude
(i.e. a depth), the Water value is automatically set to
100 and you can no longer modify it. Also, the temperature cannot drop below zero (this generator as sumes that sea never freezes).
•
Altitude and temperature. The final temperature
value of each pixel of the area is adjusted by a coeffi cient that depends on the altitude (i.e. the higher the
altitude, the lower the temperature and the deeper the
depth, the lower the temperature [but remember, never
below zero]). This adjustment is not directly visible
but you must take it into account when selecting the
other parameters.
•
Temperature and Water Flow and Evaporation.
The final Percentage of Water Flow and Percentage of
Evaporation is adjusted by a multiplier that depends
on the temperature (the higher the temperature, the
higher the multiplier). This adjustment is not directly
visible.
Terrains Colors
This window is made of a list of terrain types. For each
kind of terrains type (at present there are twelve terrain
types) you can specify the filling foreground color, the
filling background color and the filling pattern (i.e. the
filling drawing context) that will be used when generating
the terrain. These twelve drawing contexts are initialized
with values that give good rendering result most of the
time.
However, if for example, you need to generate of map
with an alien look, it is totally possible to change these
contexts. To do so, simply click on a color square to bring
a color pallet dialog that allows you choosing a new color,
or on a pattern square to bring a pattern pallet dialog that
allows you choosing a new pattern.
As usual, pressing the Escape key will dismiss any dialog
without modifying the existing color or pattern value.
Terrains Dimensions
Within this dialog you can specify where on the Main map
you want to generate the random terrain (top, left position)
and the size of the generated area (#cols, #rows).
Terrain Generation
Once you have drawn your areas or selected the Rnd
checkbox, press the Generate Map button to see the result
on the Main map.
If the Skip Animation checkbox is selected (the default),
only the random terrain final iteration (step) is drawn. Oth erwise, the random terrain is drawn each time an iteration
ends. That way you can see the map generation process.
If you are not satisfied with the way the preview is
evolving, you can stop the process by pressing the Stop
button.
If you want to generate a map without patterns, use the
Use Foreground Color Only checkbox.
If you wan to generate a map using grayscale variants of
the terrain colors use the Grayscale checkbox. This is
faster than generating the map in color and then applying a
grayscale filter (in the Effects menu).
The Replay button allows you regenerating the map. This
is useful when you want to redraw the same map but with
a different color scheme.
At last, you can choose onto which layer you want the
map to be generated. To do so, use the popup menu located at the bottom right of the pallet. By default, this is the
terrain layer.
41 / 50
42 / 50
The Random Maze Generator Pallet
This tool allows you generating random mazes, caverns
and dungeons (well, at present only the rooms are gener ated). Depending on the parameters you decide to use, you
can generate nearly symmetrical mazes or caverns or very
winding ones. In the following paragraphs, we'll call
“maze” either a maze or a cavern or a dungeon.
The random “maze” generator only fills the map polygon al area i.e. the area made of hexes, squares or lozenges.
You cannot generate “mazes” of any size up to 400 by 400
polygons.
This floating window is made of two areas: the first one
allows you defining the “maze” parameters (1), and the
second one allows you generating (2) the “maze”.
caverns that really looks random and is best suited for
generating caverns on hex grids.
•
Denseness. This parameter allows you specifying the
size of the inaccessible areas. The higher this value,
the greater the areas.
•
Random Seed. This parameter (which is only available for Cavern and Dungeon) allows you modifying
how the random generator is converging. Typically,
the higher the value the greater the map winding ap pearance. The best way to understand how this works
is to try, for a given set of parameters, different values
for the random seed.
•
Room Min./Max. Size. These two parameters (which
are only available for Dungeon) allow you specifying
the minimum and maximum size of the generated
rooms.
•
Generate Rooms Number. If selected, this option
tells the program to draw the room number at about
the top-left corner of each room. The default format is
Times New Roman, 12 pt, Red, Bold but this can be
changed by clicking into the small icon at the right of
the checkbox. In that case, a Text Information dialog
appears allowing you changing one, two or several as pects of the drawing format.
•
Rooms Offset. This editfield allows you specifying
the starting value for the numbering of rooms. This is
useful when for example you are generating more than
one maze on the same map and you want a uniform
rooms numbering.
•
The Maze Colors button allows you modifying the
“maze” foreground and background colors and pat terns.
•
The Dimensions button allows you modifying the size
and location of the generated area.
“Maze” parameters
This area allows you setting several parameters that are
used for generating the “maze”.
•
Kind. You can choose to generate either a simple
maze, or a cavern, or a dungeon. A cavern is essen tially a maze but with large portions of inaccessible
areas. A dungeon is a cavern with rooms.
•
Cardinal Directions. This parameter allows you specifying which cardinal directions are allowed. With 4
directions, the algorithm only goes to the North,
South, East and West directions. This produces mazes
or caverns that are relatively symmetrical and is best
suited for square grids. With 6 directions, the algorithm goes to the North, South, East, West, Northwest and Southwest directions. This produces mazes or
43 / 50
you building a greater area by specify different offsets in
the map.
“Maze” Generation
By pressing the Generate Map button, the map polygon
area is filled with polygons which colors and patterns are
specified in the Maze Colors area.
If you want to generate a map without patterns simply
check the Use Foreground Color Only checkbox.
At last, you can choose onto which layer you want the
map to be generated. To do so, use the popup menu located at the bottom of the pallet. By default, this is the terrain layer.
Two examples of generated “dungeons” are shown below:
“Maze” Colors
This area is made of a list of maze types. For each kind of
terrains type (at present there are three maze types) you
can specify the filling foreground color, the filling back ground color and the filling pattern (i.e. the filling drawing
context) that will be used when generating the “maze”.
These three drawing contexts are initialized with values
that give good rendering results.
However, if for example, you need to generate of “maze”
with an alien look, it is totally possible to change these
contexts. To do so, simply click on a color square to bring
a color pallet dialog that allows you choosing a new color,
or on a pattern square to bring a pattern pallet dialog that
allows you choosing a new pattern.
As usual, pressing the Escape key will dismiss any dialog
without modifying the existing color or pattern value.
“Maze” Dimensions
With this dialog you can specify where on the Main map
you want to generate the random terrain (top, left position)
and the size of the generated area (#cols, #rows).
Because you cannot generate a random terrain that has
more than 100 rows or 100 columns, this dialog allows
44 / 50
The Fractal Terrain Generator Pallet
This tool allows you generating realistic terrains.
World kind
This floating window is made of two areas:
•
•
•
The first one allows you selecting the terrain
kind (1), adjusting the fractal terrain parameters
(2) and using physical parameters (4),
The Smoothing slider allows you controlling the jaggedness of the fractal terrain surface.
Moving the slider to the left leads to a landscape with
a lot of rough edges between the different kind of ter rains while moving the slider to the right leads to a
landscape with soft edges.
The second one allows you generating (3) the
fractal terrain.
The Default button allows you restoring the smoothness
default value.
Archipelago kind
Terrain Kind
•
You can generate three kinds of terrains: wold, archipelago
and island(s). To select the desired kind, simply click on
the button. When a popup menu appears, navigate between
the kind and select the one you are interested in.
The Iteration slider allows you controlling the algorithm number of passes.
Moving the slider to the left leads to a landscape with
a few islands while moving the slider to the right leads
to a landscape with a lot of islands.
Note: this algorithm is very slow compared to the other
twos. So, when moving the slider to the right, be sure to
have a powerful computer if you do not want to wait for
too long.
Fractal Terrain Parameters
Once a kind have been selected, you can elect to modify
its parameters. Modifying them is totally optional, as their
default values have already been carefully chosen:
•
•
•
The Roughness slider allows you controlling the perturbation of the fractal terrain surface. Moving the
slider to the left leads to a calm landscape with a few
mountains/valleys while moving the slider to the right
leads to a more chaotic landscape.
The Area size slider allows you controlling the size of
the islands.
Moving the slider to the left leads to a landscape with
a lot of small islands while moving the slider to the
right leads to a landscape with a lot of lands and very
few water areas.
•
The Water slider allows you controlling the amount
of water.
Moving the slider to the left leads to a landscape with
very little water while moving the slider to the right
leads to a landscape with a lot of water.
The Parameters button brings a dialog that allows you
controlling parameters that are specific to a terrain
kind.
The Default button allows you restoring the three para meters to their default values.
45 / 50
Island(s) kind
•
The Iteration slider allows you controlling the algorithm number of passes.
Moving the slider to the left leads to a landscape with
small islands while moving the slider to the right leads
to a landscape with big islands.
•
The Smoothing slider allows you controlling the jaggedness of the fractal terrain surface (see World kind
for more information).
The Default button allows you restoring the two parameters to their default values.
Fractal Terrain Generation
By pressing the Generate Map button the main map is entirely filled with a fractal terrain.
There are four coloring schemes (see examples on next
page):
•
Default. The fractal terrain is generated in color (various shades of brown for mountains, various shades of
green for lands, various shades of blue for waters, and
white for ice).
•
Grayscale. The fractal terrain is generated using grayscale variants of the above colors. This is faster than
generating the map in color and then applying a
“Grayscale” filter (in the Effects menu).
•
Texture (mode 1). The fractal terrain is generated using a one color gradient. This is faster than generating
the map in color and then applying a “Color Filter”
filter (in the Effects menu).
•
Texture (mode 2). The fractal terrain is generated using a one color gradient. This is faster than generating
the map in color and then applying a “Color Mask”
filter (in the Effects menu).
Coloring scheme examples:
The Replay button allows you regenerating the map. This
is useful when you want to redraw the same map but with
a different coloring scheme. Each time you change a ter rain parameter, this button becomes disabled.
Please note that if you are not satisfied with the way the
drawing is evolving, you can always stop the process by
pressing the Stop button.
At last, you can choose onto which layer you want the
map to be generated. To do so, use the popup menu located at the bottom of the pallet. By default, this is the terrain layer.
Using physics
Clicking on the “physics” checkbox enables the “Settings” button.
46 / 50
Clicking on the “Setting” button brings a drawer window
that has the following appearance:
With physics:
This window is made of five sliders that allows you play ing with four physical parameters:
•
Water value (from 0 i.e. extremely arid to +100
deluge),
•
Temperature (from -100 to +100),
•
Percentage of Water Flow i.e. the dribbling
factor (from 0 to 100),
•
Percentage of Evaporation (from 0 to 100).
There are some dependencies between the various para meters:
•
Altitude and temperature. The final temperature
value of each pixel of the map is adjusted by a coeffi cient that depends on the altitude (we are using the
standard ISA atmospheric model in which temperature
decreases roughly by 6.5 °C every km of height 1).
This adjustment is not directly visible but you must
take it into account when selecting the other paramet ers. In addition, water temperature never drops below
zero.
•
Temperature, Water Flow and Evaporation. The final Percentage of Water Flow and Percentage of
Evaporation is adjusted by a multiplier that depends
on the temperature (the higher the temperature, the
higher the multiplier). This adjustment is not directly
visible.
Without physics:
In addition, here are a few hints :
•
To build forests, you need a lot of Water and a high
Water Flow.
•
To build deserts and rocky barrens, you must not use
Water.
•
To build icy or snowy regions, you need a negative
Temperature and some Water.
•
To build swamp marches, you need a lot of Water with
very low Water Flow and Evaporation values.
The two images on next column show you the differences
between a map generated with and without physics.
We have use physics the following parameters (first hint
i.e. forest generation):
1
In fact, this is only true up to an altitude of 11 km (troposphere). This is
ok, because the maps that are generated are normalized so that they never
have a height greater than 10 km.
47 / 50
Drag and Drop
There are two kinds of drag and drop: internal drag and
drop that only works inside Map windows and external
drag and drop that works between « RPGMapMaker » and
another application (the Finder or whatever program cap able of drag and drop). As these two operations behave
differently, we have named them differently.
corresponding radio button is disabled. Once you have
chosen the desired layer, click on the Select button. Of
course, you can cancel the drop operation by clicking on
the Cancel button.
Internal Drag and Drop
Internal drop is always the result of an internal drag. To
start an internal drag, move the mouse inside a selection
(i.e. the pulsing rectangle). While inside the selection, the
mouse cursor turns into a hand. You must then press the
mouse to start the dragging operation.
If the Selection Area of Effect is one (respectively two or
three) layer(s), one (respectively two or three) grayedframe rectangle(s) appear(s). The variable number of rect angles is a convenient mean to remind you how many lay ers will be involved in the dragging operation.
Now, without releasing the mouse button, move the hand
cursor. The rectangle(s) follow(s) the mouse. Once you
have moved the selection to its required location (either
the same window i.e. the Main Window or another Map
Window, release the mouse button. That's it. If you want to
duplicate the selection instead of dragging it, simply press
the option key before you click into the selection.
Assuming you have accepted the drop, the picture appears
inside the Main Window map area surrounded by a blue
rectangle (see image below). Also, in the top-right corner,
you can see the name of the layer on which the drop will
occur.
Please note that option-drag is not allowed within the Text
layer and lines with dimensions are not correctly move
between windows (they no longer refresh themselves
when the polygon dimension changes).
External Drag
To make an external drag, drag the selection outside the
main window. If the target is the finder, a file is created
that contains the portion of the map you just dragged. If
the target is another application (such as GraphicConvert er), the portion of the map appears inside its active win dow.
Please note that when performing an external drag, the se lection always includes the map seven layers.
You can then perform the following operations on the
dropped picture:
External Drop
•
Move. To move the picture, move the mouse inside the blue rectangle. While inside the selection,
the mouse cursor turns into a hand. You must then
press the mouse to start moving the picture. Now,
without releasing the mouse button, move the
hand cursor. The blue rectangle follows the
mouse. Once you have moved the picture to its required location, release the mouse button.
•
You can also use the arrow keys to move more
precisely the picture (please note that if the Ter -
An external drop is realized simply by dropping an image
or a file inside the main window. In that case, the following dialog appears:
On its left part, the entire image or file is displayed. If it is
greater than the frame, it is scale down so that it fits entirely
into it. However, the image proportions are respected.
On the right part of the dialog, you can see three radio but tons (one for each active layer). If a layer is not visible, the
48 / 50
rain Grid Align checkbox is selected, the move is
aligned on the terrain grid boundaries).
•
Expand or Shrink. By moving the cursor near
the border of the dropped picture, the cursor turns
into various arrow shapes. You can then enlarge
or reduce the picture.
•
Toggle Transparency State. By default, the pasted picture is transparent. However, by clicking
into the checkbox in the top left corner you can re-
move the transparency. Of course, by pressing
again the checkbox key, you can make the pasted
picture transparent again.
Once you are satisfied with the location and size of the
dropped picture, you definitively insert the picture into the
specified layer when you press the enter key or click inside the main window.
Please note that you can dismiss the dropped picture by
pressing the escape key.
49 / 50
Models
What is a model?
Suppose you need to build several maps with similar information.
For example, in addition to the grid, each map needs some perman ent information such as: Area Name, Climate, Population Level, an
encounter table framework, etc. (see image below).
not editable, this means there is no risk you erase
inadvertently these data (unless you modify the
model of course).
A model utilizes custom functions to “script” the
automated creation of a map box with a grid and
margins, “text” sections with preprinted text,
graphical enhancements such as lines, “legend”
box, etc. and any shape your imagination and
scripting skill can produce.
How to use?
To create a map based on a model, simply use the
“Create from Model…” or “Create from User
Model…” sub-menu items in the “File” menu
(see MenusManual.pdf documentation for more
information). This will bring a special dialog that
displays a list of models. By clicking on a model,
you can see a preview of the Grid layer. Then select the model that is the most appropriate for
your needs.
Please note that as you can totally change the contents of a model script, this is not a terrible mistake if you picked up the “wrong” model. To
modify a model script use the “Map Information” menu item in the “Edit” menu). See also the
ScriptingManual.pdf document for information
on how to write script.
If you plan to reuse this model, you may opt to
save it back as a model (see “Save as User Model…” sub-menu items in the “File” menu). Otherwise, the modifications you have made to the map
script will be available only to the current map.
Of course, you can create one map with the correct aspect and then
use the “Save As” menu command to duplicate the map. But in
that case, you’ll have to erase the previous information before en tering new ones (and make sure you do not erase some permanent
information).
If you have used one text layer to write the permanent information
and the other text layer to store the variable information, this is not
a complicated task: you simply need to erase the other text layer.
However, this means you have lost the ability to use one layer to
store information that are “private” (for example “DM only” in formation).
A model is simply a way to automate this process: you define the
framework and when you create a map based on this model, all the
permanent information are already drawn. Please note that all these
permanent information are drawn on the Grid layer. As this layer is
50 / 50