1
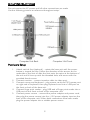
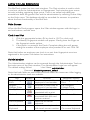
User Guide
1
Table of Contents
Introduction............................................................................................................Page 4
Setup Instructions ...............................................................................................Page 5
How to use BioClock.......................................................................................Page 6
Successful Prints...................................................................................................Page 7
Maintenance...........................................................................................................Page 8
Troubleshooting...................................................................................................Page 9
Specifications.......................................................................................................Page 10
2
3
INTRODUCTION
Thank you for purchasing the BioClock.
Note: Improper connection, mounting, or use of this product could result in
component failure or undesired interference. Read the entire installation
guide before setting up and operating the BioClock.
The BioClock is very easy to configure and was activated on your timekeeping
account before it was shipped to you. This guide will show you how to start using
the system immediately. Once the system is setup, there is rarely a need for
additional maintenance.
Your system should include the following:
•
•
•
•
•
The BioClock base unit
Finger print reader
Keyboard and mouse
Power cord
This manual
Required Equipment (not included)
The following equipment is needed to utilize the system and/or connect it for
functional use:
•
•
•
Monitor (touch screen or regular)
Cat 5 cable (Ethernet cord)
A nearby power source with surge suppressor
Location Suggestion
1.
2.
3.
Place the system where it will be free from bumps, dirt, dust, moisture,
and spills.
Mounting or securing the system and all cabling in a fixed location will
prevent connectivity issues from disrupting service.
Allow sufficient space around the base unit for ventilation. Do not place
the device in any enclosure that restricts airflow or blocks the vent holes
under the device.
4
SETUP INSTRUCTIONS
Do not connect to AC power until all other connections are made.
Use the following pictures as reference throughout setup:
Hardware Setup
1.
2.
3.
4.
5.
Attach vertical foot (optional) – rotate the base unit until the power
button is toward the top. Follow the direction of the arrows on the
underside of the foot to slide the foot onto the spine at the bottom of
the unit until it lines up with the threaded hole, and secure with the
provided thumb screw.
Connect monitor – connect monitor cable to video port.
Connect mouse and keyboard – plug mouse cord into PS/2 mouse port
on right end of keyboard, then plug keyboard cord into a USB port on
the front or back of the base unit.
Connect finger print reader – plug USB end of finger print reader into a
USB port on the front or back of the computer unit.
Connect power source – connect the power adapter and power cord,
then plug the power source into the +12V power adapter input on the
back of the computer unit. When both connections have been made,
plug the power adapter into a suitable power source.
5
HOW TO USE BIOCLOCK
The BioClock system has two main windows. The Main window is used to clock
in and out, while the Administration or Management Tools window gives access
to tools including registering finger prints. There is an online help data base
accessible to both the general user and the administrator by selecting Online Help
on the Help menu. This database should be consulted for answers to questions
about the basic functionality of the BioClock.
Main Screen
When the BioClock program opens, the Main window appears with the logo, in
and out buttons, and the time.
Clock In and Out
1.
2.
3.
Click the appropriate button (IN to clock in, OUT to clock out).
The Identify Fingerprint window will appear. Gently place the finger on
the fingerprint reader surface.
If the punch is successful, the Punch Complete dialog box will appear
stating the number of the employee who punched in or out. Click OK.
Note that before an employee can clock in or out, their fingerprints must me
registered in the system. See below for instructions.
Administration
The Administration window can be accessed through the Administration Tools on
the tools menu of the Main window. The Administrator Login box will appear.
The default settings follow:
User Name: administrator
Password: bioadminpassword_default
Note that both fields are case sensitive and all letters are lowercase. After logging
in, the administrative tools are available.
Tool
Register Single
Print
Register
Multiple Prints
Identify Print
Delete Print
View Keyboard
Use On-Screen
Keyboard
Button
Function
Associate 1 print with an
employee’s card number
Associate 2 prints with an
employee’s card number
Find the card number
associated with a print
Delete any print(s)
associated with the card
number entered
Show the on-screen
keyboard
Use on-screen keyboard
with touch screen monitor
6
Alternate Location
File >Register Single
Print
File >Register
Multiple Prints
File >Identify Print
File >Delete Print
File >Options >Use
On-screen Keyboard
Register Fingerprints
In order to clock in and out using the BioClock, the employee’s fingerprint must
first be registered. To do so, select Register Single Print or Register Multiple Prints.
Enter the employee’s card number, and submit. Select which finger will be used,
click inside the blue box, and place finger on the scanner to scan. Lift and replace
finger twice to scan a total of three times. Repeat with different finger if registering
multiple prints. If the scan was successful, register the print to associate it with the
card number. If unsuccessful, rescan the prints following the successful print
guidelines found below.
SUCCESSFUL PRINTS
The accuracy of the BioClock print recognition engine greatly depends on the
quality of the fingerprints taken when enrolling a person and those taken for
subsequent identification. The initial prints are stored permanently in the database,
and used for comparison each time a person places his/her finger on the sensor
for identification. Consequently, if a poor quality image is taken during enrollment,
the system may not recognize a print when attempting the identification process.
Capture a Full and Centered Fingerprint Image
The biometric matching system of the BioClock works by locating identical
minutiae points, which are unique for each individual. If the system does not locate
enough similar minutiae when comparing the scanned and database prints, it will
return a “no match found” result. For this reason, it is critical that a full and
centered a fingerprint is captured when registering a person in the system and
during subsequent identifications. The fingerprint should nearly fill the scan
window, and be roughly centered within it.
Capture the Core of the Fingerprint
The core of the fingerprint is the center. If the core of the fingerprint is captured
during enrollment, the system will extract unique minutiae points from this distinct
area. Therefore, if the core is again captured during subsequent identification
attempts, this greatly improves the accuracy of the identification process and limits
the possibility of false rejection.
Press and Hold the Finger Firmly Against the Scanning Surface
The fingerprint scanner only captures the print after it detects the presence of a
finger being pressed on the surface of the scanner. If the user does not hold their
finger against the scanner until the scanner flashes, the scanner may capture an
incomplete print or may not capture anything at all. Pressing the finger firmly
against the scanning surface helps to ensure both that the maximum surface area
of the print is in contact with the scanner, and that the print has no “gaps” or
“holes”. Hand moisturizer can be used for problematic dry skin.
7
Use the Middle Finger
Although fingerprint technology is often associated with the thumb or index finger,
these fingers are more widely used for day-to-day activities and therefore are
more prone to damage. Consequently, using the middle finger (or the ring finger)
for enrollment and identification purposes typically produces (and retains) a higher
quality image.
The resulting image of a quality scan
should appear like this on the screen.
MAINTENANCE
BioClock Software
The BioClock software is already installed on your BioClock. Upon startup of the
computer, BioClock will automatically check for software updates and the
program will open.
Time and Date
The server automatically sets the time and date of the unit. If the time is
incorrect, contact your service provider to ensure that your proper time zone is
selected in the timekeeping system. Daylight Saving time and leap years are also
automatically accounted for, including if employees are working during the time
change.
Cleaning
It is not recommended that industrial cleaning solvents be used frequently on the
scanning surface. A piece of scotch tape, placed sticky side down and then peeled
off, is sufficient to remove any dust or latent oil or dirt buildup caused by normal
use. The frequency of use for the tape will vary depending on the amount of
traffic the scanner experiences. Typically, once a week is reasonable. If something
sticky is spilled on the scanner surface, a small amount of mild cleaner (ex.
Windex), can be sprayed onto a cloth (not paper) and blotted or gently wiped on
the problem area. Paper based products should be avoided because they leave
small paper particles which can interfere with the accuracy of the scanning
process.
8
Power Supply
To ensure regulatory compliance, use only the power adapter included. Accidental
loss of power can damage the unit, therefore, don’t disconnect the power cord to
turn off the device, or connect it to a power outlet which can be accidentally
switched off or. Do not hard reset the thin client by holding down the power
button during normal operation. When turning off the, be sure to perform a
complete shutdown.
TROUBLESHOOTING
Your BioClock has been designed so that no additional maintenance should be
needed. However, at times, hiccups do occur and may require some of your
attention.
1.
2.
3.
Problem definition - Define the problem as precisely as possible. What
specifically is happening when the problem occurs and what is the overall
problem?
Gather information - When did the problem occur? Did anything
change? What error messages are you receiving, if any? What software
or hardware is involved? Were you doing anything when the problem
occurred? Is the problem reproducible? Does it happen intermittently or
all the time?
Narrow it down - Try to remove variables from the equation by "dividing
and conquering", a technique often used in electronics to resolve
problems. This means breaking things down into bite-size pieces until the
piece is small enough that the fix can more easily be found.
The fix is often very simple to resolve once the problem has been identified.
Other problems can obviously be far more complicated but by systematically
troubleshooting using the steps above problems can generally be resolved.
9
SPECIFICATIONS
Name
Physical Characteristics
(Thin Client)
Internet Requirements
Description
Height
Width
Depth
Weight
7.9 inches (201mm)
1.8 inches (46mm)
7.1 inches (180mm)
3.56 lbs.
Internet connection via LAN Ethernet connection; Connection not
required for clocking in/out, but required for transmission of data.
Ergonomics
Regulatory Compliance
German EKI-ITB 2000, ISO
9241-3/-8
cULus 60950, TÜV-GS, EN
60950
FCC Class B, CE, VCCI, C-Tick
RoHS Compliant
Safety
RF Interference
Environmental
Display Support
Networking
I/O Peripheral Support
Package Includes
VESA monitor support with Display Data Control (DDC) for
automatic
setting of resolution and refresh rate
•
16-bit/64K colors:
o
1280x1024@100Hz
o
1600x1200@85Hz
•
24-bit/16.7M colors:
o
280x1024@100Hz
•
•
•
10/100 Base-T Fast Ethernet twisted pair (RJ-45)
Optional USB Wi-Fi adapter
Optional CardBus wireless adapter
•
•
•
•
•
•
•
•
Enhanced USB keyboard with PS/2 mouse port and
Windows keys
(104 keys)
PS/2 mouse included
VGA-type video output (DB-15)
Two serial ports
One parallel port
Three USB 2.0 ports
CardBus/PCMCIA card slot
•
•
•
•
•
•
1 Configured Thin Client
BioClock Software (Pre-Installed and configured)
1 2-Piece 12V Power Cord Adapter
1 Keyboard and Mouse
1 User Guide
1 Desktop Stand For Thin Client
10