1
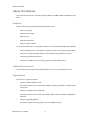
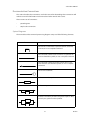
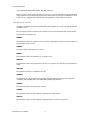
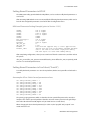
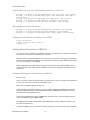
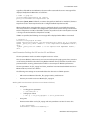
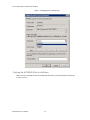
Altibase Administration
Installation User's Manual
Release 5.3.3
------------------------------------------------------------------------------------------------------------------------------------------------------------------------------ALTIBASE Administration Installation User’s Manual
Release 5.3.3
Copyright © 2001~2009 Altibase Corporation. All rights reserved.
This manual contains proprietary information of Altibase Corporation; it is provided under a license agreement containing restrictions
on use and disclosure and is also protected by copyright patent and other intellectual property law. Reverse engineering of the software is prohibited.
All trademarks, registered or otherwise, are the property of their respective owners
Altibase Corporation
10F, Daerung PostTower II, 182-13,
Guro-dong Guro-gu Seoul, 152-847, Korea
Telephone: +82-2-2082-1000
Fax: 82-2-2082-1099
E-mail: [email protected]
www: http://www.altibase.com
-------------------------------------------------------------------------------------------------------------------------------------------------------------------------------
Contents
Preface .........................................................................................................................................................................................i
About This Manual.................................................................................................................................................................................................. ii
Audience ..................................................................................................................................................................................................... ii
Software Environment ........................................................................................................................................................................... ii
Organization .............................................................................................................................................................................................. ii
Documentation Conventions............................................................................................................................................................. iii
Related Documents................................................................................................................................................................................. v
Online Manual........................................................................................................................................................................................... v
Altibase Welcomes Your Opinions .................................................................................................................................................... v
1. Quick Installation Guide....................................................................................................................................................... 1
Quick Installation..................................................................................................................................................................................................... 2
Downloading Altibase............................................................................................................................................................................ 2
Altibase Package ...................................................................................................................................................................................... 2
License ......................................................................................................................................................................................................... 2
Quick Installation and Configuration................................................................................................................................................ 3
Starting Up Altibase ................................................................................................................................................................................ 4
2. Installation and Configuration ............................................................................................................................................ 5
Hardware Requirements....................................................................................................................................................................................... 6
Memory ....................................................................................................................................................................................................... 6
CPU................................................................................................................................................................................................................ 6
Hard Disk .................................................................................................................................................................................................... 6
Network ....................................................................................................................................................................................................... 6
Pre-installation Tasks ............................................................................................................................................................................................. 7
Setting Kernel Parameters .................................................................................................................................................................... 7
Setting Kernel Parameters in HP-UX ................................................................................................................................................ 9
Setting Kernel Parameters in Sun Solaris(“Sun64”)...................................................................................................................... 9
Setting Kernel Parameters in IBM-AIX ............................................................................................................................................10
Setting Kernel Parameters in Digital UNIX (“DEC”) ....................................................................................................................12
Setting Kernel Parameters in Linux .................................................................................................................................................13
Creating Altibase User Accounts ....................................................................................................................................................................15
Setting User Environment Variables ...............................................................................................................................................15
Installation Tasks ...................................................................................................................................................................................................17
Extracting Packages ..............................................................................................................................................................................17
Post-installation Tasks .........................................................................................................................................................................................18
Obtaining a License...............................................................................................................................................................................18
Modifying Altibase Properties...........................................................................................................................................................18
Database Creation .................................................................................................................................................................................20
Startup and Shutdown ........................................................................................................................................................................20
Changing the Name of an Existing Database ..............................................................................................................................21
Service Registration in Microsoft Windows .................................................................................................................................................22
Pre-Installation Configuration...........................................................................................................................................................22
ALTIBASE Installation............................................................................................................................................................................24
Database Creation .................................................................................................................................................................................31
Setting Environment Variables for Service Control Manager ................................................................................................32
Starting Up ALTIBASE After Installation.........................................................................................................................................34
Environment Variables for Client Installation ..............................................................................................................................35
3. Upgrading Altibase............................................................................................................................................................. 37
Upgrading Altibase...............................................................................................................................................................................................38
Release Number-Specific Upgrade Tasks......................................................................................................................................38
Upgrading Considerations .................................................................................................................................................................39
Upgrading the Server Package .........................................................................................................................................................40
Migration Steps.......................................................................................................................................................................................41
ii
Preface
i
Preface
About This Manual
About This Manual
This manual describes how to install and configure Altibase on UNIX and Microsoft Windows platforms.
Audience
This manual has been prepared for the following Altibase users:
•
database managers
•
performance managers
•
database users
•
application developers
•
technical support workers
It is recommended that those reading this manual possess the following background knowledge:
•
basic knowledge in the use of computers, operating systems, and operating system utilities
•
experience in using relational databases and an understanding of database concepts
•
computer programming experience
•
experience in database server, operating system or network administration
Software Environment
This manual has been prepared assuming that Altibase 5.3.3 is used as the database server.
Organization
This manual is organized as follows:
•
Chapter 1. Quick Installation Guide
This chapter explains how to download the Altibase package and provides a simple installation tutorial.
•
Chapter 2. Installation and Configuration
This chapter explains how to install and configure Altibase on Unix and Microsoft Windows
platforms.
•
Chapter 3. Upgrading Altibase
This chapter explains how to upgrade to the newest Altibase release.
Installation Users’ Manual
ii
About This Manual
Documentation Conventions
This section describes the conventions used in this manual. Understanding these conventions will
make it easier to find information in this manual and other manuals in the series.
There are two sets of conventions:
•
syntax diagrams
•
sample code conventions
Syntax Diagrams
This manual describes command syntax using diagrams composed of the following elements:
Elements
semantics
The start of a command. If a syntactic element starts with
an arrow, it is not a complete command.
Reserved
word
The command continues to the next line. If a syntactic element ends with this symbol, it is not a complete command.
The command continues from the previous line. If a syntactic element starts with this symbol, it is not a complete
command.
The end of a statement.
;
Indicates a mandatory element.
SELECT
Indicates an optional element.
NOT
Indicates a mandatory element comprised of options. One,
and only one, option must be specified.
ADD
DROP
iii
Preface
About This Manual
Elements
semantics
Indicates an optional element comprised of options.
ASC
DESC
Indicates an optional element in which multiple elements
may be specified. A comma must precede all but the first
element.
ASC
DESC
,
Sample Code Conventions
The code examples explain SQL, stored procedures, iSQL, and other command line syntax.
The following table describes the printing conventions used in the code examples.
Rules
Meaning
Example
[]
Indicates an optional item.
VARCHAR [(size)] [[FIXED |]
VARIABLE]
{}
Indicates a mandatory field for which one or
more items must be selected.
{ ENABLE | DISABLE | COMPILE }
|
A delimiter between optional or mandatory
arguments.
{ ENABLE | DISABLE | COMPILE
}[ ENABLE | DISABLE | COMPILE
]
...
Indicates that the previous argument is
repeated, or that sample code has been
omitted.
SQL> SELECT ename FROM
employee;
ENAME
-----------------------SWNO
HJNO
HSCHOI
.
.
.
20 rows selected.
Installation Users’ Manual
iv
About This Manual
Rules
Meaning
Example
Other symbols
Symbols other than those shown above are
part of the actual code.
EXEC :p1 := 1;
acc NUMBER(11,2);
Italicized
Statement elements in italics indicate variables and special values specified by the
user.
SELECT * FROM table_name;
CONNECT userID/password;
Lower case
words
Indicate program elements set by the user,
such as table names, column names, file
names, etc.
SELECT ename FROM
employee;
Upper case
words
Keywords and all elements provided by the
system appear in upper case.
DESC SYSTEM_.SYS_INDICES_;
Related Documents
For more detailed information, please refer to the following documents:
•
Altibase Starting User’s Manual
•
Altibase Administrator’s Manual
•
Altibase Replication User’s Manual
•
Altibase C/C++ Precompiler User’s Manual
•
Altibase ODBC User’s Manual
•
Altibase Application Program Interface User’s Manual
•
Altibase iSQL User’s Manual
•
Altibase Utilities User’s Manual
•
Altibase Error Message Reference
Online Manual
Online versions of our manuals (PDF or HTML) are available from the Altibase Download Center
(http://atc.altibase.com/).
Altibase Welcomes Your Opinions
Please feel free to send us your comments and suggestions regarding this manual. Your comments
and suggestions are important to us, and may be used to improve future versions of the manual.
Please send your feedback to [email protected], making sure to include the following information:
•
The name and version of the manual you are using
v
Preface
About This Manual
•
Your comments and suggestions regarding the manual
•
Your full name, address, and phone number
In addition to suggestions, this address may also be used to report any errors or omissions discovered in the manual, which we will address promptly. If you need immediate assistance with technical
issues, please contact the Altibase Customer Support Center.
We always appreciate your comments and suggestions.
Installation Users’ Manual
vi
1 Quick Installation Guide
This chapter provides a quick overview of how to install Altibase after downloading the appropriate
package from our website.
1
Quick Installation Guide
Quick Installation
Quick Installation
This chapter presents a brief installation guide intended for users installing Altibase for the first time.
For a more detailed explanation, please refer to Chapter2.Installation and Configuration Those wishing to upgrade current installations to the latest version or seeking information on bug patches
should refer to Chapter3.Upgrading Altibase.
Downloading Altibase
The Altibase package that is appropriate for the platform on which Altibase is to be installed can be
downloaded from the Altibase Technical Center at http://adc.altibase.com.
When downloading the Altibase package, please have on hand the following information about the
server on which Altibase is to be installed:
•
operating system name and version
•
operating system mode ( 64-bit or 32-bit)
•
names and versions of supported compilers
Altibase Package
Altibase packages are named as shown in the following figure. Download the newest version of the
package corresponding to the server on which Altibase is to be installed. The Altibase server module
and client package are distributed as separate packages.
The following figure explains the meaning of the server module package name. The name of the client package starts with ‘altibase-(client)-’, but subsequent characters are the same as for the server
module.
altibase -SPARC _SOLARIS _2.8-64bit-(compat 5)-5.1.1.0-release -CC.tgz
Compiler Name
Altibase Version Number
OS Version
32 Bit or 64 Bit OS
Compiler Version Number
License
After downloading the Altibase package, contact the Altibase support team ([email protected])
in order to obtain a license key. Please provide the following information:
•
Host ID
•
CPU type and speed
Installation Users’ Manual
2
Quick Installation
•
Number of CPUs
•
Memory capacity
•
Altibase version
Quick Installation and Configuration
To install the downloaded Altibase package:
Create a new account on the platform on which Altibase is to be installed.
If necessary, make a new directory for the downloaded Altibase package.
In this example, a user named “altibase” and an altibase_home directory are created. After logging in
to the operating system using the new account, uncompress the package file in the altibase_home
directory.
To uncompress the Altibase package, use a command like the following:
$gzip –cd *.tgz | tar –xvf -
After uncompressing the package file, configure the environment variables in the Altibase user
account environment variable file as follows, and copy the license file to the directory.
1.
Set ALTIBASE_HOME.
•
If using the CSH shell, set ALTIBASE_HOME as follows:
setenv ALTIBASE_HOME ${HOME}/altibase_home
•
If using the SH or KSH shell, set ALTIBASE_HOME as follows:
ALTIBASE_HOME=${HOME}/altibase_home; export ALTIBASE_HOME
2.
Specify ALTIBASE_PORT_NO.
•
If using the CSH shell, set ALTIBASE_PORT_NO as follows:
setenv ALTIBASE_PORT_NO 20300
•
If using the SH or KSH shell, set ALTIBASE_PORT_NO as follows:
ALTIBASE_PORT_NO=20300; export ALTIBASE_PORT_NO
3.
Set ALTIBASE_NLS_USE.
•
If using the CSH shell, set ALTIBASE_NLS_USE as follows:
setenv ALTIBASE_NLS_USE KO16KSC5601
•
If using the SH or KSH shell, set ALTIBASE_NLS_USE as follows:
ALTIBASE_NLS_USE=KO16KSC5601; export ALTIBASE_NLS_USE
4.
Add the location of the ALTIBASE executable file to PATH.
•
If using the CSH shell:
setenv PATH .:${ALTIBASE_HOME}/bin:${PATH}
•
If using the SH or KSH shell:
3
Quick Installation Guide
Quick Installation
PATH=${ALTIBASE_HOME}/bin:${PATH}; export PATH
5.
Add the following to LD_LIBRARY_PATH.
•
If using the CSH shell:
setenv LD_LIBRARY_PATH .:${ALTIBASE_HOME}/lib:${LD_LIBRARY_PATH}
•
If using the SH or KSH shell:
LD_LIBRARY_PATH=${ALTIBASE_HOME}/lib:${LD_LIBRARY_PATH}; export
LD_LIBRARY_PATH
If nothing comes up in response to “echo $LD_LIBRARY_PATH”, do the following:
•
If using the CSH shell:
setenv LD_LIBRARY_PATH .:${ALTIBASE_HOME}/lib}
•
If using the SH or KSH shell:
LD_LIBRARY_PATH=${ALTIBASE_HOME}/lib; export LD_LIBRARY_PATH
6.
Copy your license file to ${ALTIBASE_HOME}/conf.
Altibase Server has now been successfully installed.
Starting Up Altibase
In order to start up or shut down Altibase Server, it is necessary to connect to the server as the sys
user in -sysdba admin mode.
iSQL, Altibase’s interactive query tool, can be used to create a database or start up a database server
as follows.
•
To create a database:
$isql -sysdba
iSQL(sysdba)> startup process
iSQL(sysdba)> create database mydb initsize=10M noarchivelog character
set ko16ksc5601 national character set utf16;
•
To start up a database:
iSQL(sysdba)> startup;
Installation Users’ Manual
4
2
Installation and Configuration
In this chapter, the steps required to install the Altibase package in a UNIX or Microsoft Windows system environment are described in detail. Additionally, the system parameters that must be set in
order to operate Altibase normally are described for each operating system.
5
Installation and Configuration
Hardware Requirements
Hardware Requirements
In order to install and operate Altibase, the following system requirements must be met.
The requirements and recommendations made in this chapter are based on a typical scenario in
which Altibase is used normally. However, your requirements may vary depending on your database
system or intended use.
For detailed information about system requirements, please contact the Altibase Customer Support
Center ([email protected]).
Memory
32-bit OS : At least 512 MB (1GB recommended; 4GB upper limit)
64-bit OS : At least 512 MB (1GB recommended, no upper limit)
CPU
1 CPU or more (2 or more CPUs recommended)
Hard Disk
The disk used for ALTIBASE must have sufficient space for tablespaces for saving data, the transaction logs, and the ALTIBASE software. There must be at least 1GB of space for each of the ALTIBASE
software and the transaction logs.
We recommend that at least 12GB of free space be provided, depending on your data storage
requirements.
Network
When using the replication function, it is recommended that a dedicated line be used.
Installation Users’ Manual
6
Pre-installation Tasks
Pre-installation Tasks
Altibase is installed merely by uncompressing the package files provided by Altibase.
Although it is simple to install Altibase, in order to ensure that Altibase runs properly, it is first necessary to undertake some tasks to set the system environment for the system in question. Pre-installation tasks include setting kernel parameters appropriately for the operating system and setting
Altibase user environment variables.
Setting Kernel Parameters
The kernel parameters that must be checked depend on the operating system, but in most cases the
following settings must be made:
•
the maximum amount of memory that can be allocated to one process (“Process Memory Allocation Limit”)
•
the maximum number of threads per process (“Process Thread Count”)
•
Maximum shared memory segment size
•
semaphore-related parameters (“Semaphore Parameters”)
Process Memory Allocation Limit
In order for the Altibase server to operate properly, sufficient space must be allocated. If the related
parameters are not suitably set, an “insufficient memory” error will occur, even if there is enough
actual physical memory. The relevant parameter is, for example, ‘maxdsiz_64bit’ in HP-UX and
‘per_proc_address_space’ on DEC systems.
Process Thread Count
Because Altibase has a multithreaded architecture, the number of threads that can be launched by
one process must be set sufficiently high. The parameter that is used to adjust this value depends on
the operating system in question.
Note that the related parameter is called max_thread_proc in HP-UX and max_threads_per_user in
DEC.
Shared Memory Segment Size
Altibase can be set so that the database resides either on memory or on disc. Kernel parameters
related to shared memory segments must be set appropriately, because Altibase usually stores all
data in shared memory when the database resides in memory.
The size of the shared memory segment for Altibase server depends on its configuration. The Altibase parameters STARTUP_SHM_CHUNK_SIZE and SHM_PAGE_COUNT_PER_KEY have an effect on
this. STARTUP_SHM_CHUNK_SIZE determines the size of the shared memory segment when Altibase starts up. If the database is bigger than the value of this parameter, the shared memory segments are split based on this value. If an additional shared memory segment is created due to
insufficient data storage space during system operation, it will be created by splitting the segment
7
Installation and Configuration
Pre-installation Tasks
as specified by the SHM_PAGE_COUNT_PER_KEY parameter.
Hence, in order to avoid memory problems, it is necessary to create a shared memory segment that
is larger than the one created using the parameter above. If the segment size is insufficient, an error
in response to a shmget() system call will occur during Altibase server startup or operation.
Semaphore Parameters
Semaphore parameters need to be modified when client applications use IPC to communicate with
an Altibase server.
These parameter values are related to the number of sessions that simultaneously connect via IPC.
The Semaphore Parameters are:
SEMMNI
The maximum number of semaphore sets in a system, and simultaneously, the maximum number of
semaphores that can be used.
SEMMNS
The total number of semaphores in a system.
SEMMSL
The maximum number of semaphores in a semaphore set.
SEMOPM
The maximum number of operations that can arise in one system every time the semop() function is
called.
SEM-VMX
The maximum value that a semaphore can have.
SHMMAX
The maximum size of a shared memory segment. This must be at least as large as the greater of
<STARTUP_SHM_CHUNK_SIZE> and <SHM_PAGE_COUNT_PER_KEY*32K>.
SHMMIN
The minimum size of a shared memory segment.
SHMMNI
The maximum number of shared memory segments in an entire system.
SHMSEG
The maximum number of shared memory segments that can connect to one process.
Installation Users’ Manual
8
Pre-installation Tasks
Setting Kernel Parameters in HP-UX
The SAM system utility, provided with the HP platform, can be used to modify kernel parameters as
seen below.
After executing SAM under the root account, modify the following kernel parameters, which can be
found in the configurable parameters screen of the kernel configuration menu.
HP Kernel Parameter Setting Example (prior to Version 11.31)
shmmni
shmseg
semmni
semmns
semmnu
semume
max_thread_proc
maxusers
maxfiles
dbc_min_pct
dbc_max_pct
maxdxiz
maxdsiz_64bit
500 or higher
200 or higher
1000 or higher
4096 or higher
semmni
semmni
600 or higher
64 or higher
2048 or higher
5%
5~20%
less than 1GB (applies only to 32-bit applications)
greater than the size of the memory-resident database
(set it the same as the amount of physical memory,
and then adjust its value when adding memory)
After completing configuration, select “process new kernel” from the action menu, and then reboot
the system.
dbc_min_pct and dbc_max_pct were renamed filecache_min and filecache_max, respectively, in HP
version 11.31 and subsequent releases.
Setting Kernel Parameters in Sun Solaris(“Sun64”)
To modify the kernel parameters on a Sun Solaris platform, edit the /etc/system file and reboot the
system.
An example of Sun Solaris kernel parameter values:
set
set
set
set
set
set
set
set
set
set
shmsys:shminfo_shmmin
shmsys:shminfo_shmmni
shmsys:shminfo_shmseg
semsys:seminfo_semmns
semsys:seminfo_semmni
semsys:seminfo_semmsl
semsys:seminfo_semmap
semsys:seminfo_semmnu
semsys:seminfo_semopm
semsys:seminfo_semume
=
=
=
=
=
=
=
=
=
=
1
500
200
8192
5029
2000
5024
1024
512
512
The priority_paging parameter, which is related to the Sun system’s filesystem cache, must absolutely be set in order to prevent problems related to excessive memory use when using the filesystem cache rather than direct I/O. (Applies only to SunOS version 5.7 and above.)
When changing the above kernel parameter(s) in Solaris 10, the “projadd” and “projmod” commands must be used.
9
Installation and Configuration
Pre-installation Tasks
Default Values for sem- and shm-related Parameters in Solaris 10
projadd -U altibase -K "project.max-sem-ids=(priv,5029,deny)" user.altibase
projmod -a -K "project.max-shm-memory=(priv, real memory max value,deny)"
user.altibase
projmod -a -K "process.max-sem-nsems=(priv,2000,deny)" user.altibase
projmod -a -K "process.max-sem-ops=(priv,512,deny)" user.altibase
projmod -a -K "project.max-shm-ids=(priv,1024,deny)" user.altibase
Message Queue-related Parameters
projmod -a -K "project.max-msg-messages=(priv,100,deny)" user.altibase
projmod -a -K "project.max-msg-ids=(priv,100,deny)" user.altibase
projmod -a -K "process.max-msg-qbytes=(priv,1048576,deny)" user.altibase
Checking whether Parameter Settings are in Effect
# more /etc/project
# prctl -i project user.account ID
# projects -l
Setting Kernel Parameters in IBM-AIX
It is not necessary to configure any parameters related to shared memory or semaphores on AIX systems, but it is necessary to set a limit value for each user.
However, before changing the limit values for each user, it is necessary to change the system limits,
which can be accomplished by editing /etc/security/limits. In this file, set the defaults for the “data”,
“rss”, and ”dsize” fields to -1 (unlimited).
After changing the system limit values, change the limit values for the individual Altibase users as
shown below. The “smit” utility, provided with AIX, can be used to change the limit values for individual users.
Example of Changing a Limit Value for an AIX User
Execute “smit”.
In the “user name” column of the menu item, “Security & Users > Users > Change / Show Characteristics of a User”, enter the account name of an Altibase user.
Enter -1 for “Soft DATA Segment” for the user.
In the menu item “System Environments > Change / Show Characteristics Of Operating System”,
change the AIX environment variables “Maximum number of PROCESSES allowed per user” and
“Size of the File System BufferCache???”.
Set the value of “Maximum number of PROCESSES allowed per user” so that it is bigger than the
value of the Altibase property MAX_CLIENT.
If using Atibase Direct I/O, “Size of the File System BufferCache” must be adjusted so that it is less
than 20% of total memory.
In relation to AIO, the posix_aio0 kernel value (“Posix Asynchronous I/O”) must be set to “Available”,
Installation Users’ Manual
10
Pre-installation Tasks
regardless of the AIX version. Otherwise, the server will not start and the an error message will be
displayed. Verify that the AIO values are as follows:
$ lsdev -C |grep aio
aio0 Available Asynchronous I/O (Legacy)
posix_aio0 Defined Posix Asynchronous I/O
If the state of posix_aio0 is “Defined”, use smit to change it from “Defined” to “Available”. (“Devices >
Asynchronous I/O > Posix Asynchronous I/O > Configure Defined Asynchronous I/O”)
When installing AIX, to ensure that the set posix_aio0 kernel value(s) are used after the system is
rebooted, use smit to set “STATE to be configured at system restart” (under “Change / Show Characteristics of Asynchronous I/O”) to “Available”. (“Device > Asynchronous I/O > Posix Asynchronous I/O
> Change / Show Characteristics of Asynchronous I/O”)
If AIO is not specified, the following error message will be displayed when Altibase is executed.
$ altibase –v
Could not load program altibase:
Symbol resolution failed for /usr/lib/threads/libc.a[posix_aio_64.o] because:
Symbol _posix_kaio_rdwr64 (number 2) is not exported from dependent module /
unix.
Symbol _posix_listio64 (number 3) is not exported from dependent module /
unix.
vmo Parameter Settings for AIX version 5.2 and Above
The vmo parameters must be set when using AIX version 5.2 or later.
This is because Altibase’s main memory area can encroach upon the paging space due to excessive
use of memory for the file cache when using Altibase with AIX. These parameters should be set to
prevent this from occurring, otherwise there will be a severe impact on Altibase performance.
The vmo parameters “lru_file_repage” and “strict_maxclient” were introduced with AIX version 5.2
ML04 and above, and are set as follows.
The following vmo settings are recommended based on the version of AIX in question:
•
AIX version 5.2 ML04 and abovelru_file_repage=0 strict_maxclient%=0
•
Versions prior to AIX version 5.2 ML04lru_file_repage=0
Working With vmo Parameters (AIX Version 5.2 ML04 and Above)
•
Using vmo:
—
Looking up vmo parameters
—
Setting upon reboot
$ /usr/sbin/vmo -a
$ vmo -p -o lru_file_repage=0 -o strict_maxclient=0
•
Using smit:
Execute smit and then set lru_file_repage and strict_maxclient to 0. Here is how to do it:
$ smit performance
Performance & Resource Scheduling >>
11
Installation and Configuration
Pre-installation Tasks
Tuning Kernel & Network Parameters >>
Tuning Virtual Memory Manager, File System and Logical Volume Manager
Params >>
+ List All Characteristics of Current Parameters --- Check
+ Change / Show Current Parameters --- Current Change
+ Change / Show Parameters for Next Boot --- Change upon Reboot
Setting Kernel Parameters in Digital UNIX (“DEC”)
The names of the parameters used in V4.0 and V5.1 of the DEC platform are different, but they have
similar functions, so their use can be inferred relatively easily. Additionally, as with HP-UX, many process- and IPC-related parameters must be modified. Parameters on the DEC platform can be
grouped into three categories:
•
PROC (process)
•
IPC
•
VM (Virtual Memory)
The names and current values of the parameters in each of these three broad groups can be
retrieved using the “sysconfig” and “uerf” commands.
Process Resource Limits
/sbin/sysconfig -q proc
IPC Parameters
/sbin/sysconfig -q ipc
Virtual Memory Parameters
/sbin/sysconfig -q vm
Current Amount of Actual System Memory
uerf -r 300 |grep -i mem
PROC subsystem parameters are generally related to process memory address limits, and thus are
closely tied to Altibase server performance. Specifically, process data area exceeding the value of
“max_per_proc_data_size” cannot be allocated. Therefore, the values of related variables must be
set as high as possible to avoid problems. The related parameters are:
•
per_proc_data_size
•
max_per_proc_data_size
•
max_per_proc_address_space
•
per_proc_address_space
As for the IPC subsystem, set a high value for ‘shm-max’ (maximum shared memory segment size),
Installation Users’ Manual
12
Pre-installation Tasks
which is related to the database size and Altibase property values. Furthermore, if using the IPC subsystem, the value of semaphore-related parameters must also be set high.
In the vm subsystem, review the value of the “vm-vpagemax” (maximum contiguous virtual memory address space) parameter. If this value is too small, an insufficient memory error can occur when
a new database is created.
If the following details cannot be found in /etc/sysconfigtab, add them to the file and reboot the system.
Note: Although the actual parameter names differ from those shown below in versions V5.0 and above,
as long as the same values are assigned to similar parameters, there shouldn’t be any problem.
An example of DEC kernel parameter values:
IPC-related
shm-max
shm_mni
shm_seg
sem-mni
sem-msl
sem-opm
sem-ume
sem-vmx
sem-aem
=
=
=
=
=
=
=
=
=
2147483648
512
256
1024
512
512
512
70000
16384
PROC-related
per_proc_address_space depends on database size
max_per_proc_address_space depends on database size
max_per_proc_data_size depends on database size
per_proc_data_size depends on database size
max_threads_per_user 1024 or greater
thread_max 2048 or greater
VM-related
mapentries = 400 or greater
vm-vpagemax = <system memory/8192 >
Setting Kernel Parameters in Linux
Add the line shown below to the end of the /etc/rc.d/rc.local file and reboot the system.
echo 512 32000 512 512 > /proc/sys/kernel/sem
If this line is not added, the above command must be executed in a shell every time the system is
rebooted.
Additionally, the value of the “shmall” kernel parameter must be set if Altibase is to be used in shared
memory mode. The value of this parameter, which determines the maximum database size (in
bytes) that Altibase can use, is set by adding the following line to this file.
echo 872415232 > /proc/sys/kernel/shmall
13
Installation and Configuration
Pre-installation Tasks
A Warning about Using IPC with Linux
In Linux kernel versions 2.5 and earlier, problems have been reported with semaphore operations
that use SEM_UNDO in thread programming.
In Altibase, this problem manifests itself as the following phenomenon. If one client frequently connects and disconnects, it can have the effect of interrupting the connections of other, normally operating, clients.
* See: http://www.uwsg.iu.edu/hypermail/linux/kernel/0202.0/0819.html
Installation Users’ Manual
14
Creating Altibase User Accounts
Creating Altibase User Accounts
After adjusting the system kernel parameters, create a user account on the system on which Altibase
is to be installed and configure the environment of that user account. As this account will be used to
install and operate the Altibase application, we recommend that you name it “altibase”.
Setting User Environment Variables
After creating the Altibase user account, the first environment variables that typically need to be set
are:
•
ALTIBASE_HOME
•
PATH
•
LD_LIBRARY_PATH
•
CLASSPATH
The following environment variables are not absolutely necessary, but we recommend that they be
set, so that utilities such as iSQL and lLoader run correctly.
•
ALTIBASE_PORT_NO
•
ALTIBASE_NLS_USE
Add the following to the environment variable file of the Altibase user account.
1.
ALTIBASE_HOME, PATH, LD_LIBRARY_PATH
•
If using a C Shell (CSH):
setenv ALTIBASE_HOME ${HOME}/altibase_home
setenv PATH .:${ALTIBASE_HOME}/bin:${PATH}
setenv LD_LIBRARY_PATH .:${ALTIBASE_HOME}/lib:${LD_LIBRARY_PATH}
•
If using a Bourne, Korn, or Bash Shell:
ALTIBASE_HOME=${HOME}/altibase_home; export ALTIBASE_HOME
PATH=${ALTIBASE_HOME}/bin:${PATH}; export PATH
LD_LIBRARY_PATH=${ALTIBASE_HOME}/lib: ${LD_LIBRARY_PATH};export
LD_LIBRARY_PATH
2.
CLASSPATH
If using the JDBC driver, place the “Altibase.jar” file in $ALTIBASE_HOME/lib and then create a
reference to the Jar file using a CLASSPATH environment variable.
setenv CLASSPATH ${ALTIBASE_HOME}/lib/Altibase.jar
or
CLASSPATH=${ALTIBASE_HOME}/lib/Altibase.jar; export CLASSPATH
3.
ALTIBASE_PORT_NO, ALTIBASE_NLS_USE
•
If using a C Shell (CSH):
setenv ALTIBASE_PORT_NO 20300
setenv ALTIBASE_NLS_USE KO16KSC5601
•
If using a Bourne, Korn, or Bash Shell:
ALTIBASE_PORT_NO=20300; export ALTIBASE_PORT_NO
15
Installation and Configuration
Creating Altibase User Accounts
ALTIBASE_NLS_USE=KO16KSC5601; export ALTIBASE_NLS_USE
4.
System-Specific Tasks:
For each system, set the corresponding variables as follows:
•
HP-UX
Add $ALTIBASE_HOME/lib to the SHLIB_PATH environment variable, and then check the
variable against the following:
PTHREAD_FORCE_SCOPE_SYSTEM = 1
_M_ARENA_OPTS = 1:8
•
Sun-Solaris
ADD $ALTIBASE_HOME/lib to the LD_LIBRARY_PATH_64 environment variable.
•
IBM-AIX
In AIX, environment variables related to thread programming must be set to the following values in the environment variable file. If these variables are not set, warnings will be
raised when Altibase is started, and inexplicable errors will occur during Altibase operation.
AIXTHREAD_MNRATIO=1:1;export AIXTHREAD_MNRATIOAIXTHREAD_SCOPE=S;
export AIXTHREAD_SCOPE
AIXTHREAD_MUTEX_DEBUG= OFF;export AIXTHREAD_MUTEX_DEBUG
AIXTHREAD_RWLOCK_DEBUG=OFF;export AIXTHREAD_RWLOCK_DEBUG
AIXTHREAD_COND_DEBUG = OFF;export AIXTHREAD_COND_DEBUG
SPINLOOPTIME = 1000;export SPINLOOPTIME
YIELDLOOPTIME = 50;export YIELDLOOPTIME
MALLOCMULTIHEAP=1;export MALLOCMULTIHEAP
To use extended shared memory automatically in 32-bit AIX 4.3, make the following setting:
EXTSHM=ON;export EXTSHM
SHMLBA_EXTSHM=bytes;export SHMLBA_EXTSHM
If this setting is not made, errno=24(EMFILE) occurs when a shmat() system call is made
due to limitations in the ability to automatically use expanded shared memory.
•
Microsoft Windows
On Windows systems, after installing Altibase, use the Control Panel to confirm that the
system variables ALTIBASE_HOME and PATH have been set as follows:
ALTIBASE_HOME = c:\altibase\altibase_home
PATH = .;%ALTIBASE_HOME%\bin;%PATH%
Installation Users’ Manual
16
Installation Tasks
Installation Tasks
After all pre-installation tasks have been completed, on UNIX systems, uncompressing the Altibase
package into the Altibase home directory using the Altibase user account is all it takes to install Altibase. Then, conduct the post-installation tasks.
Extracting Packages
UNIX Systems
On UNIX systems, execute the following command in the $ALTIBASE_HOME directory using the Altibase user account. This will install the Altibase package in the designated location.
$ gzip –cd *.tgz | tar –xvf -
Microsoft Windows
On Windows systems, after downloading the package for Windows from the download section of
the Altibase website (www.altibase.com), run the executable installation file in the directory specified in the ALTIBASE_HOME environment variable.
17
Installation and Configuration
Post-installation Tasks
Post-installation Tasks
Once the Altibase package has been installed successfully, follow these steps:
1.
Obtain a license key.
2.
Configure Altibase properties.
3.
Create a database.
4.
After following the steps to start up Altibase, execute the Altibase sample programs, which are
located in the “$ALTIBASE_HOME/sample” directory, to confirm that Altibase is operating correctly.
Obtaining a License
The $ALTIBASE_HOME/conf/license file (no filename extension) contains the Altibase license information. License keys are valid for specific periods of time. If no license file exists, or the license has
expired, Altibase will not start, and it will be necessary to obtain a new license.
A temporary test license can be obtained from the Altibase Technical Center (http://atc.altibase.com/). If the database server’s host ID, CPU speed, number of CPUs, memory capacity etc. are
entered into the license menu, a temorary license will be issued and automatically sent to the email
address provided to the download center.
To obtain a permanent license, contact from Altibase Technical Support ([email protected]).
When you are issued a new license key, copy the new license file to your $ALTIBASE_HOME/conf
directory. Once the name of the license file has been changed, it is ready to use.
%cp license $ALTIBASE_HOME/conf/
Note: The license file has no extension.
Modifying Altibase Properties
To tune the Altibase server, configure the altibase.properties file in the ${ALTIBASE_HOME}/conf
directory before starting the Altibase server. If there is no file named altibase.properties in this directory, copy the altibase.properties.sample file, which is located in the same directory, and use it.
cp altibase.properties.sample altibase.properties
Depending on the kind of property that is to be changed, Altibase server can be configured while it
is running, or may need to be restarted. Some of these settings can also be made using the operating system environment variables. Additionally, when Altibase is installed for the first time, some
properties will need to be modified to suit the operating environment in order for Altibase to operate normally. This chapter describes only the properties related to the initial settings. Please refer to
the Starting User's Manual for details on Altibase properties required for other database operations
and how to set them.
Installation Users’ Manual
18
Post-installation Tasks
DB_NAME
This sets the default database name to be used when creating a database. The original default database name is mydb, which can be changed.
DB_NAME = mydb
MEM_MAX_DB_SIZE
This specifies the unit size by which to divide memory tablespace files for saving data. Because file
systems may not be able to support files larger than 2GB, it is recommended that this value be set to
less than 2GB to make backups and other tasks easier.
LOG_DIR
This specifies the directory in which the log files are located. The default value for this property is
$ALTIBASE_HOME/logs (or %ALTIBASE_HOME%\log in the case of Windows ). Because the log files
can be I/O-intensive, if expecting high performance, it is important to choose a directory with good
disk I/O for storing the log files.
MEM_DB_DIR
This sets the path for creating memory tablespace files. It is possible to specify some other path
when creating memory tablespace files.
LOGANCHOR_DIR
This sets the path where the log anchor files are located. Three directories must be specified. The
current default directory is $ALTIBASE_HOME/logs.
SERVER_MSGLOG_DIR
This sets the path where the server message log files are located. These files are altibase_boot.log, in
which system information about server startup, shutdown and the like are stored, and altibase.lock,
which is internally used by server maintenance applications.
PORT_NO
This sets the communication port number used by Altibase clients connecting via TCP/IP. It can be
set to any port number that is not in use by other applications.
IPC_PORT_NO
This is actually the TCP port number used by Windows when using IPC for client- server connections.
In a Unix environment, a Unix domain socket is used to connect via IPC, but because a Unix domain
socket can’t be used in a Windows environment, this port number is necessary.
IPC_CHANNEL_COUNT
This is the IPC channel count, which is relevant when using IPC for communication between Altibase
19
Installation and Configuration
Post-installation Tasks
and the client. Each channel on the Altibase server should be connected to a corresponding channel
on the client for normal operation. Because shared memory and semaphore resources are assigned
in proportion to the number of channels, it is advisable to set this value to the maximum number of
IPC connections that can simultaneously be established with Altibase.
DEFAULT_DATE_FORMAT
This sets the default method of expressing DATE type data. If not explicitly specified otherwise using
SQL, DATE type data are input or output as specified here.
The default value is DD-MON-RRRR.
AUTOCOMMIT_MODE
This parameter specifies whether Altibase globally operates in auto-commit mode. If it is set to 1,
individual SQL statements will be automatically committed, even if no commit command is given.
Database Creation
When the Altibase properties have been set properly, create a database using the CREATE DATABASE
command (or, alternatively, the ‘createdb.bat’ batch file in Windows). Once the database has been
created, system meta- tables and system dictionary tables will also be automatically created.
The database size, which is one of the parameters that must be provided when a database is created,
is not critical, since the database will automatically be increased in size while Altibase is running if
more space is required.
Furthermore, because increasing the space piecemeal is an inefficient alternative, the space is
increased in increments corresponding to the page size (32kB) specified using the
EXPAND_CHUNK_PAGE_COUNT property. The default value is 128 pages, which means a maximum
size of 4MB.
The following simple example shows how to create a database specifying KO16KSC5601 as the character set and UTF16 as the national character set.
$isql -sysdba
iSQL(sysdba)>startup process;
iSQL(sysdba)>create database mydb initsize=10M noarchivelog character set
ko16ksc5601 national character set utf16;
iSQL(sysdba)> shutdown abort
iSQL(sysdba)> startup service;
Note: Because the service cannot be started immediately after a database has been created, it will be necessary to execute “STARTUP [service]” after executing “SHUTDOWN ABORT”.
Startup and Shutdown
After creating a database, in order to use Altibase, the Altibase server must be started. The server
must be started using the Altibase user account, otherwise an error will occur when Altibase starts
up. The “iSQL” utility (or a server script that uses iSQL) is used to start up and shut down the Altibase
server.
The following is a simple example of how to start up Altibase using iSQL:
Installation Users’ Manual
20
Post-installation Tasks
$isql -sysdbaiSQL(sysdba)>startup;
StartiSQL(sysdba)>shutdown abort;
<= starting Altibase
<= stopping Altibase
The above commands can be executed using a single command as follows, by executing a server
script called “server”:
$server start;
$server stop;
<= starting Altibase
<= stopping Altibase
Changing the Name of an Existing Database
When a database is created, it is created with the name “mydb” by default.It is necessary to create a
new database in order to change the name of an existing database.
In the following example, the default database name “mydb” will be changed to “testdb”, and a new
database created.
Change the value of DB_NAME in the altibase.properties file.
DB_NAME = testdb
Create a database with the new name.
iSQL(sysdba)> Create database testdb INITSIZE=10M noarchivelog character set
ko16ksc5601 national character set utf16;
To create a database using the “server” command, change the database name in the “server” script
file. This file can be found in $ALTIBASE_HOME/bin.
'create')
rm -f live-altibase.txt;
${ISQL} << EOF
spool live-altibase.txt;
EOF
if [ -f live-altibase.txt ]; then
echo " server is running !!!! \n "
echo " you must shutdown first before server create "
rm -f live-altibase.txt;
else
${ADMIN} << EOF
startup process;
create database testdb INITSIZE=10M noarchivelog character set $2 national
character set $3 ;
shutdown abort
quit
EOF
fi
;;
$ server create
21
Installation and Configuration
Service Registration in Microsoft Windows
Service Registration in Microsoft Windows
This chapter describes how to install Altibase on Microsoft Windows platforms, register it in the Service Control Manager, and use it.
Pre-Installation Configuration
In order to register Altibase in the Service Control Manager and use it, a user account must be added
to the Administrators group before Altibase is installed.
The following explains how to add users on Microsoft Windows platforms:
1.
In Windows, open the Control Panel.
2.
Choose Control Panel -> Administrative Tools -> Computer Management.
3.
Choose “Computer Management -> System Tools. Local -> Users and Groups” in the tree menu
in the left-hand pane. (Refer to Figure 2-1.)
Figure 2-1 Computer Management Dialog Box
4.
Choose ”Properties” after right-clicking on a name in the “Users” folder to show the context
Installation Users’ Manual
22
Service Registration in Microsoft Windows
menu.
5.
Choose the “Member Of” tab and then click the “Add…” button (Refer to Figure 2-2)
Figure 2-2 “Member Of” Tab in “(user) Properties” dialog
6.
Enter “Administrators” in the box for selecting object names, and then click on “Check Names”.
23
Installation and Configuration
Service Registration in Microsoft Windows
Figure 2-3 “Select Groups” dialog
7.
After registration, logging out and in again will make normal operation and normal authorization possible.
ALTIBASE Installation
In order to use Altibase in Service Control Manager, log in, not using the system account but as a
user in the Administrators group, and then install Altibase.
The procedure for installing Altibase on Microsoft Windows platforms and registering the service is
as follows:
1.
When the Altibase Setup file is executed, an installation dialog box like that shown in Figure 24 will be displayed. Click on the “Next” button to install Altibase.
Installation Users’ Manual
24
Service Registration in Microsoft Windows
Figure 2-4 ALTIBASE Installation Dialog Box
2.
A dialog box asking whether you agree with the Altibase license policy is shown, as seen in Figure 2-5. If you agree, choose “I accept the terms in the license agreement” and then click
“Next”.
25
Installation and Configuration
Service Registration in Microsoft Windows
Figure 2-5 License Agreement Dialog Box
3.
When the dialog box for inputting customer information is displayed, as seen in Figure 2-6,
click “Next” after entering your information and choosing the appropriate installation option.
Installation Users’ Manual
26
Service Registration in Microsoft Windows
Figure 2-6 Customer Information Input Dialog Box
4.
When a dialog box like that shown in Figure 2-7 is displayed, choose the location in which to
install Altibase and then click “Next”.
27
Installation and Configuration
Service Registration in Microsoft Windows
Figure 2-7 ALTIBASE Installation Path Selection Dialog Box
5.
Once preparations for Altibase installation are complete, a dialog box like that shown in Figure
2-8 is displayed. Click on the “Install” button after checking the installation information.
Installation Users’ Manual
28
Service Registration in Microsoft Windows
Figure 2-8 ALTIBASE Installation Preparation Dialog Box
6.
The files required to install Altibase are copied.
29
Installation and Configuration
Service Registration in Microsoft Windows
Figure 2-9 Copying Files for ALTIBASE Installation
7.
The service registration dialog box, which can be seen in Figure 2-10, is displayed after installation. Enter the name shown in the Service Control Manager as the service name.
To register Altibase as a service, it is necessary to enter the Windows password for the Altibase
user. If this password is not provided at this stage, the Altibase service will be registered, but
when the service is started (either manually or when Windows is rebooted), it will raise a login
failure error and not start normally. Therefore, it will be necessary to manually enter the password.
Note: If you installed the application for all users, it will be impossible to specify a user name at this
stage.
To finish registering the service, click on the “OK” button after entering all of the required information.
If you do not wish to register Altibase as a service, choose the second option, indicating that
you do not wish to register Altibase as a service.
Installation Users’ Manual
30
Service Registration in Microsoft Windows
Figure 2-10 ALTIBASE Service Registration Dialog Box
Database Creation
After a license has been issued, create a database using a command prompt.
Please refer to the following sections:
•
Refer to Obtaining a License in the Post-Installation Tasks section for detailed information
about obtaining an Altibase license.
•
Refer to Database Creation in the Post-Installation Tasks section for detailed information about
creating a database using a command prompt.
31
Installation and Configuration
Service Registration in Microsoft Windows
Figure 2-11 Database Creation
Setting Environment Variables for Service Control Manager
As seen in Figure 2-12, if the environment variables ALTIBASE_SERVICE, ALTIBASE_HOME and PATH
do not already exist, register them, so that Altibase can be used with the Service Control Manager.
Installation Users’ Manual
32
Service Registration in Microsoft Windows
Figure 2-12 Environment Variable Setting Dialog Box
Once Altibase has been installed, a database created, and the license information correctly input, the
service startup type can be changed. The service startup type, which can be chosen from among
“Automatic”, “Manual”, and “Disabled”, determines how the service is started when Windows is
rebooted.
To have Altibase start automatically when Windows is restarted, select the properties for this service
in Service Control Manager, and then set its startup type to “Automatic”.
33
Installation and Configuration
Service Registration in Microsoft Windows
Figure 2-13 Changing Service Startup Type
Starting Up ALTIBASE After Installation
Altibase can be used with Service Control Manager after it has been installed and correctly registered as a service.
Installation Users’ Manual
34
Service Registration in Microsoft Windows
Figure 2-14 Service Control Manager Window
The Service Control Manager is displayed as seen in Figure 2-14 when it is launched by clicking on
“Control Panel -> Administrative Tools -> Services”.
Select the ALTIBASE service and then click Start/Shutdown on the Action tab to start it up or shut it
down.
Environment Variables for Client Installation
When installing the Altibase client in a Windows environment, the following environment variables
must be added or set:
•
ALTIBASE_HOME: This is the path in which the client is installed.
•
PATH: The path containing the executable file, which is $ALTIBASE_HOME/bin, must be added.
The following environment variables are not strictly necessary, but it is recommended that they be
set so that utilities such as iSQL and iLoader can be easily used.
•
ALTIBASE_PORT_NO : the port number with which to connect to the server
•
ALTIBASE_NLS_USE : the character set to use when displaying data to the user
35
Installation and Configuration
Service Registration in Microsoft Windows
Installation Users’ Manual
36
3 Upgrading Altibase
This chapter describes how to upgrade a currently operating Altibase installation to a more recent
Altibase release.
37
Upgrading Altibase
Upgrading Altibase
Upgrading Altibase
“Upgrading Altibase” refers to the task of applying a version of the Altibase package that is more
recent than the current Altibase usage environment. Because the extent and exact nature of the task
may vary depending on your current version and the version to which you are upgrading, please
read the following information carefully before attempting to upgrade a current installation.
Release Number-Specific Upgrade Tasks
Because the procedure for upgrading Altibase is closely dependent on the database version, it’s
worth taking a close look at the construction of the Altibase release number. For reference, the Altibase package version number indicates major releases and minor releases (binary db versions) as
follows. To determine the scope of the work required in order to upgrade to a new version of Altibase, use the “altibase -v” command to check the current version of Altibase.
% altibase -v
Check the release number of both your current Altibase installation and the new Altibase package
you want to install.
Each part of the number of a major release is meaningful, as shown below:
Major Package Release:
ALTIBASE 5.3.3.1
Major Version Number: 5
Minor Version Number: 3
Term Version Number: 3
Patch Version Number: 1
Major release 5.3.3.1 currently comprises the following Internal Component Releases. If you experience compatibility issues between different Major Releases, please check the Internal Component
Release versions.
Internal Component Release:
binary db version 5.4.1
meta version 5.6.1
cm protocol version 5.6.1
replication protocol version 5.4.1
This chapter describes the upgrade procedure depending on the specific release of the Altibase
database server. Sometimes this will require you to migrate your database (i.e. upgrade to the newest Major Package Release), depending on the change in the internal release number.
Binary Database Version
The binary database version indicates the compatibility of database image files and log files. When
this value changes, the database must be migrated, using iLoader or the like.
Meta Version
The meta version indicates the compatibility of meta tables that are internally used by Altibase. It is
Installation Users’ Manual
38
Upgrading Altibase
possible to port a database in one direction from a lower meta version to a higher meta version.
Communication Module Protocol Version
When the CM protocol version changes, the communication protocol between the Altibase server
and clients changes, and thus all client applications need to be recompiled. When using JDBC or
ODBC, the driver file must also be changed.
Replication Protocol Version
The replication protocol is used between 2 or more installations of Altibase server. If this version
changes, all installations of Altibase that are connected for replication must be upgraded together.
Upgrading Considerations
When it is time to upgrade Altibase, please consider the following cases:
Upgrading Only the Client Package
If you are changing the compiler you use to develop applications, or if only the Altibase client version is to be upgraded, it is not even necessary to stop the Altibase server. Merely install the new
package in the current client installation location.
Upgrading the Server Package (Same Detail Version?)
Aside from the meta version, if the binary db version, cm protocol version, and replication protocol
version are not changed, install the package after stopping Altibase normally. If upgrading in a replication environment, by working on one machine at a time, it will be possible to upgrade without
interrupting service.
Upgrading the Server Package (Different CM Protocol Version)
If the binary db version and replication protocol version are not changed, and only the cm protocol
version is changed, install the package after stopping Altibase normally. If upgrading in a replication
environment, by working on one machine at a time, it will be possible to upgrade without interrupting service. However, client applications that access the machines to be upgraded will need to be
recompiled.
Upgrading the Server Package (Different Replication Protocol Version)
If the replication protocol version is to be changed, all installations in the replication environment
must be upgraded at the same time. That is to say, the service will need to be interrupted.
When the Binary DB Version has Changed but the Replication Protocol Version is
the Same
The database image file and log file compatibility are different for different binary db versions, which
means that when upgrading to another binary db version, the data must be migrated using iLoader.
It is possible to migrate an Altibase database to an upgraded version in an active replication environ39
Upgrading Altibase
Upgrading Altibase
ment without interrupting service as long as the following conditions are met:
•
the replication protocol versions of all of the servers are the same, and
•
sufficient disk space for log files, which are not deleted but will increased in size during the
upgrade, is provided.
When the Binary DB Version and the Replication Protocol Version have Changed
Because the replication protocol version has changed, it is necessary to interrupt the service and
migrate the data in order to upgrade Altibase. This particular Altibase upgrade case causes the most
severe service interruption.
In the case of hardware that is actually in use, when upgrading to a higher version than the version
of Altibase that is currently being used, we recommend that you consult the Altibase Technical Center and ask whether it will be necessary to migrate the data.
When using a new package with an original database, data files, log files, settings files and the like
written using a previous version of Altibase are internally inspected, and if there is any problem,
operation will fail and an error will be raised. To prepare for such a case, it is necessary to back up
your existing database files and perform the upgrade with reference to the following migration procedure.
Upgrading the Server Package
Upgrade tasks must be performed using the altibase user account. Addltionally, retain and reuse the
license and altibase.properties files.
Altibase Backup Tasks
To keep your current database:
Note: if it is necessary to back up your data files and log files, you must do so before installing a new Altibase package. This section assumes that your data files and log files are located in the Altibase home
directory.
1.
Shut down the currently running Altibase server
% server stop
2.
Back up the current Altibase home directory, log files and data files.
% mv altibase_home_dir altibase_home_backup
3.
Create a new Altibase home directory (create a new folder for installation).
% mkdir altibase_home_dir
% cd altibase_home
4.
Install the downloaded package into the new altibase_home directory.
% gunzip -cd altibase_package_name |tar -xvf -
5.
Copy the previously used license and altibase.properties file, either as they are or changed,
from the backup of the Altibase home directory
Installation Users’ Manual
40
Upgrading Altibase
% cp -rf altibase_old/conf altibase_home/
6.
Copy existing data files, log files and anchor files from the backup directory. The following is an
example of copying data files.
iSQL> select name from v$datafiles;
NAME
---------------------------------------/altibase_home/dbs/system001.dbf
/altibase_home/dbs/system002.dbf
$ cp altibase_old/dbs/system001.dbf altibase_home/dbs/
$ cp altibase_old/dbs/system002.dbf altibase_home/dbs/
7.
Restart your Altibase server.
% server start
To reuse the license file and altibase.properties file without backing up the Altibase database, do the
following:
1.
Shut down the current Altibase server.
% server stop
2.
Back up the current license file and altibase.properties file.
% cp -rf conf conf.backup
3.
Install the newly downloaded package into the current Altibase home directory.
% gzip -cd altibase_package_name |tar -xvf -
4.
Reinstate your backed up license file and altibase.properties file.
% cp -rf conf.backup conf
5.
Restart the Altibase server.
% server start
Migration Steps
To determine whether it is necessary to migrate the database, first check the internal Altibase version. Altibase utilities such as iSQL, iLoader, and aexport can be used to move a database. Refer to
the “Altibase Utilities Reference” for more details about these tools and utilities. The following is an
overview of the steps that must be taken for migration:
1.
Extract your database data and schema using the iLoader or aexport utility.
2.
Shut down the current Altibase server.
% server stop
3.
Move the current Altibase home directory to a backup location and create a new directory.
% mv altibase_home_dir altibase_home_old
% mkdir altibase_home_dir
% cd altibase_home
41
Upgrading Altibase
Upgrading Altibase
4.
Install the newly downloaded package into the new Altibase home directory.
% gzip -cd altibase_package |tar -xvf -
5.
Reuse or modify the license and altibase.properties files from the backup of the Altibase home
directory.
% cp -rf altibase_old/conf conf
6.
Create a database.
% server create
7.
Start the Altibase server.
% server start
8.
Execute a table generation script.
9.
Reload the backed up data and validate the Altibase server.
Please do not hesitate to contact Altibase Customer Support when migrating your Altibase server,
because the migration steps and operation vary greatly depending on the version of Altibase that
you are running.
Installation Users’ Manual
42
Index
Migration Steps 41
P
Package
A
Downloading 2
Extracting 17
Altibase Properties
Modifying 18
PORT_NO 19
Post-Installation Tasks 18
Pre-Installation Tasks 7
C
Configuration, Quick 3
CREATE DATABASE 20
Q
Quick Installation 2, 3
D
R
Database
Creating 20, 31
Release Number 38
S
Database Name
changing 21
setting 19
DB_NAME 19
DEC 12
Digital UNIX
SERVER_MSGLOG_DIR 19
Shutdown 20
Startup 4, 20
Sun Solaris
Setting Kernel Parameters in 9
Setting Kernel Parameters in 12
U
Downloading Altibase 2
Upgrading Altibase 38
considerations 39
Upgrading Steps 40
User Accounts
Creating 15
User Environment Variables 15
E
Environment Variables
User Account 15
H
Hardware Requirements 6
HP-UX
Setting Kernel Parameters in 9
I
IBM-AIX
Setting Kernel Parameters in 10
Installation 17
After 18
Before 7
IPC_PORT_NO 19
K
Kernel Parameters 7
Setting in Digital UNIX 12
Setting in HP-UX 9
Setting in IBM-AIX 10
Setting in Linux 13
Setting in Sun Solaris 9
L
License 2
Obtaining 18
Linux
Setting Kernel Parameters in 13
M
MEM_MAX_DB_SIZE 19
Microsoft Windows 16, 19
installing Altibase in 17, 24
registering Altibase in 22
43