1
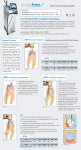
REPLACING THE
PROTECTIVE WINDOW
A
INSTRUCTIONS FOR USE
C
B
Description
D
The SureFire™ YSGG Delivery System is used
with WaterLase iPlus (all versions), WaterLase
MDX, and WaterLase MD Turbo.
Fig. 1. A. Distal end of fiber. B. Locking tab
opening. C. Protective Window.
D. Locking tab.
Installing the SureFire YSGG
Delivery System
Please note: Once removed, protective
window is no longer usable.
A
B
Fig. 2. Push locking tab with pin or curette to
release the Protective Window.
Fig. 3. Gently pull the released Protective
Window from the fiber end.
A
1. Remove the SureFire fiber from its
packaging.
BIOLASE, Inc.
4 Cromwell
Irvine, CA 92618 USA
949.361.1200
888.424.6527
biolase.com
NOTE: Drape the SureFire fiber
around your neck as you prepare it
for installation.
MT Promedt Consulting GmbH
Altenhofstrasse 80
D-66386 St. Ingbert/Germany
+49 6894 581020
mt-procons.com
C
5201506 Rev B
B
Fig. 4. Insert the new replacement Protective
Window into fiber end until it locks in place.
© 2015 BIOLASE, Inc. All rights reserved.
2. Remove the protective silver cap from
the proximal end (which connects to the
WaterLase) of the Fiber.
3. Remove the protective cover of the fiber
shaft at the distal end and hold it against
any light source; look into the proximal end
of the Fiber – it should glow yellow, be flat
and clean. Replace the cover.
4. Remove the black pastic cover and the
internal red protective cap from the laser
head and laser aperture; save these for
future use (do not lose them).
5. Align the blue guide of the fiber connector
(proximal end) to the blue dot on the laser
head interface. Position the middle of
the connector to the laser aperture and
vertically push down, gently, as far as the
connector will go.
WARNING: DO NOT APPLY FORCE
when installing the fiber. Applying
force may damage the laser head
components.
6. Secure the retainer ring by turning it
clockwise until it is snug.
7. Align the middle length of the fiber to the
hook of the telescopic arm and push it in
gently to secure it.
8. Remove the protective cover from the
distal end of the fiber again and verify that
it is clean and not damaged (see Section
11 of WaterLase iPlus User Manual,
Maintenance and Troubleshooting).
NOTE: Make sure the black retaining
O-ring on the fiber cable is on the
front side of the hook to keep the
cable in place.
9. Carefully place the fiber with its protective
cover or with the handpiece connected in
the handpiece holder.
Troubleshooting Fiber Performance
Please refer to WaterLase iPlus User Manual,
Section 11 for troubleshooting steps for the
SureFire fiber.
Replacing the Protective Window
SureFire™ Protective Windows are used in
conjunction with SureFire YSGG Delivery
System. A SureFire fiber ships with a preinstalled protective window, and two (2)
replacement windows.
Protective Window Kit is available for
re-order (PN 7200114).
PRELIMINARY STEPS
Before replacing the SureFire fiber Protective
Window, purge the handpiece and fiber of any
residual water. Power off the laser system.
Remove the handpiece from SureFire fiber.
NEVER REMOVE THE HANDPIECE FROM
THE SUREFIRE FIBER WITHOUT PURGING
PROPERLY. Locate the distal end of the
SureFire fiber.
WINDOW REPLACEMENT STEPS
1. Remove the Protective Window from the
SureFire fiber. Use a small pin, such as a
paper clip (Fig. 2A), to push the tab of the
Protective Window mounted into the metal
housing located at the distal end of the
fiber (Fig. 2B).
2. Gently pull the loosened Protective
Window from the distal end of the Trunk
Fiber (Fig. 3).
3. Insert the replacement Protective
Window (Fig. 4A) by aligning the tab of
the Protective Window (Fig. 4B) to the
rectangular opening of the metal bearing
and gently insert into place. The tab of the
Protective Window should snap into the
rectangular opening (Fig 4C).
4. Discard of the burned/damaged Protective
Window in normal disposal bins.
5. Re-attach the Handpiece and prime
before use.