1
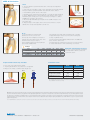
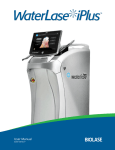
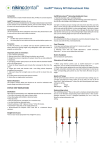
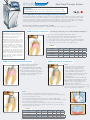
Root Canal Therapy System
Contents:
Anterior kit: RFT2, 25mm Tip - 1 (EA) / RFT3, 21mm Tip - 1 (EA)
Posterior kit: RFT2, 21mm Tip - 1 (EA) / RFT3, 17mm Tip - 1 (EA)
Er, Cr: YSGG Waterlase MD™ for Complete Root Canal Therapy
The Waterlase MD™ Er,Cr:YSGG system has numerous applications for cutting, removing, shaping and
contouring hard and soft tissues including access preparation, cleaning and enlargement procedures
related to endodontic therapy. Recently, these clinical indications have been expanded to include root
canal disinfection after endodontic instrumentation. Following is a basic reference guide to procedural
steps involved in performing complete laser root canal therapy including disinfection.
Anterior Part No. 7200795 / Posterior Part No. 7200801
To reorder call Henry Schein at (800) 372-4346 and for information call Biolase at (800) 321-6717.
STEP 1 Access Preparation
Warnings & Precautions:
Eyewear: Doctor, patient, assistant and all
others inside the operatory must wear
appropriate laser protective eyewear for
the 2.78 µm wavelength (OD 4).
All settings provided are for use with the MD Gold Handpiece.
1. Access is prepared using the MZ5 ZipTip™ (6mm).
2. Select settings listed in the table below. Angle the tip 30-45°
to the long axis of the tooth to cut enamel effectively.
Clinical Use: The Endolase RFT™ system
is suited for straight and slightly curved
canals. Before proceeding with any
endodontic treatment, a careful review of
the Waterlase MD™ User Manual (e.g.,
Section: Contraindications, Precautions
and Warnings), proper clinical training
and practice on extracted teeth is
recommended. Use caution when using
tips through narrow and curved passages
at all times. Forcing a tip through a narrow
curved or obstructed canal could results
in tip breakage and/or perforation.
Activate the laser only when moving the
tip upward coronally.
3. Lower power setting or defocus the beam to cut through dentin.
4. Use the MZ5 for removal of pulp. Select “pulp removal” settings
(see table below) to remove vital/non-vital pulpal tissue.
Settings
Figure 1
STEP 2 Conventional Instrumentation
Step 1
Tip
Access
MZ5
Power
Pulse Rate
Step 1
Tip
Power
Pulse Rate
Pulp Removal
MZ5
.75-1.0 W
20 Hz
4.5 - 5.5 W 15/20 Hz
Air
Water
Mode
60%
30%
H
Air
Water
Mode
2-11% 7-11%
H
STEP 3 Cleaning & Enlargement
RFT2
1. Estimate the working length
following standard protocol.
1. Use the RFT2 to perform apical
and partial coronal 2/3 cleaning.
2. Start instrumentation using K-files
or a combination of K-files and rotary
files to enlarge and shape the canal.
2. Place tip into handpiece and
select settings from the table below.
3. Apical instrumentation is performed
to at least a size 30 K-file to allow the
RFT2 tip to reach the apex.
3. Fill canal with sterile solution.
4. Insert RFT2 (1) mm short of the apex.
(Use the rubber slider on the tip as a
depth indicator.)
5. Activate laser and start moving the
tip coronally at approximately 1 mm/s.
Maintain tip in contact with the side
surface of the canal wall during the
entire apical to coronal pass.
Figure 2
6. Repeat steps 4 and 5 one or two more
times to ensure that the entire inner-canal
has been cleaned (see Figure 6).
Figure 3
RFT3
7. Use the RFT3 to perform final cleaning of the coronal 2/3.
8. Place tip into the handpiece and select settings from the table below.
9. Fill canal with sterile solution.
10. Insert RFT3 at the junction between apical and middle third.
11. Activate laser and start moving the tip coronally at approximately 1 mm/s.
Use the same technique as step 5.
12. Re-insert tip and perform an additional pass over the same area.
Figure 5 – Hydrophotonic effect
13. Repeat Steps 10 through 12 three more times to ensure cleaning
of the remaining coronal 2/3.
Settings
Figure 4
Step 3
Tip
Power
Pulse Rate
Air
Water
Mode
Cleaning & Enlargement
RFT2
1.25 W
50 Hz
24%
34%
H
Step 3
Tip
Power
Pulse Rate
Air
Water
Mode
Cleaning & Enlargement
RFT3
1.25 W
50 Hz
24%
34%
H
Figure 6 – Tip position during
different passes
STEP 4 Disinfection
RFT2
1. Use the RFT2 to perform disinfection of the apical and partial
coronal 2/3.
2. Place tip into handpiece and select settings from the table below.
This procedure is performed with 10% air flow and no water.
3. Insert RFT2 (1) mm short of the apex.
4. Activate laser and start moving the tip coronally, at approximately
1 mm/s. Maintain tip in contact with the side surface of the canal
wall during the entire pass. Use a brushing technique to deliver
YSGG laser energy to the surface.
Figure 8
5. Re-insert tip immediately and perform an additional pass over
the same area.
Figure 7
6. Repeat steps 3 through 5, two to three more times to ensure
disinfection of apical and partial coronal 2/3.
Figure 9
RFT3
7. Use the RFT3 to perform final
disinfection of the coronal 2/3.
8. Place tip into handpiece and select
settings from the table below. Use 10%
air flow as before (see step 2).
9. Insert RFT3 at the junction between
apical and middle third.
10. Activate laser and start moving the tip coronally,
at approximately 1 mm/s. Use the same techniques
as step 4 (disinfection).
11. Re-insert tip immediately and perform an additional
pass over the same area.
12. Repeat steps 9 through 11, three to four more times
to ensure disinfection of the remaining coronal 2/3.
Settings
Step 4
Tip
Power
Pulse Rate
Air
Water
Mode
Disinfection
RFT2
.75 W
20 Hz
10%
Off
H
Step 4
Tip
Power
Pulse Rate
Air
Water
Mode
Disinfection
RFT3
.75 W
20 Hz
10%
Off
H
Figure 10
Use any of your preferred techniques
and materials to fill the canal and
restore the tooth.
Calibration Factor
Single Use Non-Sterile Tips Included
1. Use only as specified in this guide.
2. Tip may break when excessive force is applied.
3. Dispose in sharps container after single use.
RFT2
Obturation & Restoration Placement
RFT3
RFT2
RFT3
Tip Diameter, μm
275
415
Tip Length, mm
25, 21
21, 17
Max Power
of Operation [Watt]
4.0
4.0
Calibration Factor *
0.55
0.85
* Laser Power recommended with procedural steps are values on the display.
The actual power output can be calculated by multiplying that value by
the Calibration Factor for each tip.
Disclaimer Only licensed professionals who have successfully completed training should use this instrument. Always start treatment at the lowest power setting and increase as required. Closely
observe the clinical effects and use your judgment to make appropriate adjustments to compensate for varying tissue compositions, density and thickness. Use your clinical judgment to decide
the clinical protocol and whether any additional laser or conventional instrumentation is required. It is important to note that sound principles of endodontic treatment have not been affected by
using this technique. Protocols that constitute correct endodontic treatment such as rubber dam isolation, irrigation, drying and obturation, etc. remain within the scope of the operator’s clinical
judgment and experience.
U.S. Patent Numbers: 4,940,411; 5,116,227; 5,151,029; 5,232,367; 5,257,935; 5,267,856; 5,324,200; 5,342,198. Other U.S. and Int’l Patents Granted and Pending
4 Cromwell • Irvine CA 92618 • 800.321.6717 • biolase.com
5201077 Rev. A (03/31/08)