1
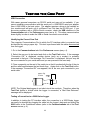
SpecWare™ 9
Professional &
Basic Editions
Quick-Start Guide
Spectrum
Technologies, Inc.
Table of Contents
Installation
3
Upgrading from Prior SpecWare Versions
3
SpecWare Directory
3
Default Settings
4
Testing the Com Port
5
Original WatchDog Data Loggers and Weather Stations
6
2000-Series Stations
7
Thank you for purchasing SpecWare software. The full user’s manual and Disease
Model manual are included as a .pdf file on the installation CD. During software installation, you will also have the option of installing the manual on your desktop. The
Adobe® Reader (available free from www.adobe.com) is required to view these documents.
This Quick-Start guide serves as a resource for some of the most commonly encountered features of the software.
Spectrum
Technologies, Inc.
SpecWare Software © 1997-2009
Spectrum Technologies, Inc.
SpecWareTM is a trademark of Spectrum Technologies, Inc
Spectrum Technologies, Inc.
12360 S. Industrial Dr. East
Plainfield, IL 60585
(800) 248-8873 or (815) 436-4440, Fax (815) 436-4460
E-Mail: [email protected]
www.specmeters.com
2
Installation
Insert the SpecWare installation CD in your computer’s disk drive. On most machines,
the software installation will begin automatically. If it does not, run the Setup.exe program on the CD. Follow the screen instructions to complete the installation. A desktop
icon and a Start menu entry for SpecWare will be created. The program can also be
run by clicking on the Spec9Pro.exe (or Spec9Bas.exe) file in the C:\SpecWare directory.
Upgrading From Prior
SpecWare Versions
If you have a prior version of SpecWare already installed on a given computer, it is recommended that SpecWare be installed in the same directory as the existing version.
Multiple versions of SpecWare can co-exist without interfering with one another. Data
files from SpecWare versions 6 or earlier must be imported into the current version of
SpecWare before they can be viewed and manipulated. SpecWare cannot convert
SpecWare data files to a format compatible with earlier versions.
SpecWare Directory
The SpecWare directory is created during the installation process. The default location
of this directory is usually C:\SpecWare or wherever SpecWare has been previously
installed. The SpecWare directory contains the program’s executable file as well as
other support files. The SpecWare directory is also where logger and weather station
data is saved. Data are stored in sub-directories of the SpecWare directory (usually
referred to as Logger Locations). Upon installation, SpecWare will create a subdirectory called SPECDEMO. This sub-directory contains sample data and allows new
users to try out SpecWare’s graph and report features.
3
Default Settings
The default settings are selected in the Preferences screen which is accessed from
the File toolbar menu. This screen allows you to configure the software’s default settings. Two important ones are mentioned here. The unit system to be used (English
or metric) is set in the General tab. The Com Port SpecWare will use to communicate
with the data logger is selected, and can be tested, in the Communication tab (see
Testing the Com Port, p. 5).
4
Testing the Com Port
USB-Connection
With newer personal computers, an RS-232 serial port may not be available. If you
cannot establish communication with the serial port, a USB-RS232 serial port adapter
(item # 3661USB) is the best option. The adapter requires a driver to be installed on
your machine and will work out of a different Com Port than the RS-232 port. If you
encounter problems with a USB-to-Serial converter, check the USB checkbox in the
Communication tab of the Preferences screen (see p. 4). This slows communication
down slightly in order to make the USB to Serial conversion more reliable.
Identifying the Correct Com Port
The computer Communications Port to which the PC interface cable is connected can
be identified by using a paper clip. This test is performed with the cable disconnected
from the logger.
1. Go to the Communications tab of the Preferences screen (see p. 4).
2. Select the com port to be tested and click on the Test Port button. If the message
“Connection OK” is displayed, another device (such as a modem) is probably
connected to that port. If the message “No Connection” is displayed, this port may be
the one connected to your serial cable and you can proceed to the next step.
3. Place a paperclip on the end of the serial pin so that it touches both the tip of the pin
and the metal area between the two black rings. Again click on the Test Port button.
If the message “Connection OK” now appears, this is the com port connected to your
serial cable.
paper clip
or wire
NOTE: The Original dataloggers do not short-circuit the serial pin. Therefore, when the
Test Port button is clicked while the logger is connected, a “Bad Data Returned”
message will be displayed.
Testing a Connection to a 2000-Series Logger
In addition to testing the PC interface cable, the connection to a 2000-Series logger
can easily be checked by plugging the cable into the logger’s data port and hitting the
2000 button in the Preferences screen (refer to the Communications tab of the Preferences screen, p. 4).
5
Original WatchDog Data Loggers
and Weather Stations
The original WatchDog data loggers and weather stations all have 3-digit model numbers. The term “data logger” will be used below to refer to both the mini logger as well
as the data logger in the weather station.
Activating (Launching) a Data Logger
These models will not actively record data until they have been started via SpecWare
software. Launching a logger will clear all data from its memory. Care should be taken
that the logger has been downloaded before initiating the launch sequence. The
launch procedure is as follows:
1. Connect gray PC interface cable to your PC and to the logger.
2. Select Launch Original WatchDog option from the SpecWare Logger menu.
3. Enter the appropriate information in the Launch Options screen.
4. Hit the OK button to transfer this information to the logger and begin the data logging process.
Downloading a Data Logger
1. Connect gray PC interface cable to your PC and to the logger.
2. Select Get Original WatchDog Data option from the SpecWare Logger menu.
3. Hit the OK button when the “Readout and Translation complete …” message appears.
4. Save data to an existing Logger Location by selecting that station from the list or
create a new location with the Create Location option.
Viewing Data
1. Select Open File option from the SpecWare File menu.
2. Select Logger Location of interest as well one or more months of data you wish to
view and click the Open button.
3. Select one or two parameters to plot and hit Redraw button.
4. To view reports, select an option from the Tools menu. After selecting a specific
report, click the View Report tab.
6
2000-Series Stations
The 2000-Series stations are the family of mini- and full weather stations with 4-digit
model numbers that begin with the number 2.
Activating a Station
Whenever batteries are installed or replaced, the logger will immediately resume reading. You will, however, be prompted to set the date and time. This must be done immediately to ensure accurate time-stamping of data. Setting the date and time is done
with the keypad as follows:
1. Hit Set button.
2. Use arrow keys to scroll to “Time & Date” option and press Set.
3. Press Set to make the month modifiable.
4. Use arrow keys to select current month and press Set.
5. Repeat Step 3 for day, hour, minute, and am/pm selection.
Configuring a New Station with SpecWare
The 2000-Series data logger will begin reading with default settings as soon as the
batteries are installed. In SpecWare, the configuration is changed with the WatchDog
Properties screen which can be accessed as follows:
1. Connect gray PC interface cable to your PC and to the logger.
2. Select WatchDog Manager option from the SpecWare Logger menu.
3. Click the New Station button.
4. Enter the station name, and select the appropriate WatchDog Type and Connection Type.
5. Hit the More button to expand the screen.
6. After setting all configuration settings, hit the OK button to transfer this information
to the logger.
When a new station is created in WatchDog Manager, that station’s name is compared to the name in the electronic header of the station’s firmware. If this name is different than the name currently in the firmware, you will be given the option to clear the
logger’s memory. See the SpecWare User’s manual for details on erasing logger
data.
7
Configuring an Existing Station with SpecWare
The process for reconfiguring a station that has already been set up in the WatchDog
Manager screen is similar to creating a new station.
1. Connect gray PC interface cable to your PC and to the logger.
2. Select WatchDog Manager option from the SpecWare Logger menu.
3. Select the desired station.
4. Click the Properties button.
5. Hit the More button to expand the screen.
6. After setting all configuration settings, hit the OK button to transfer this information
to the logger
Downloading a Station
1. Connect gray PC interface cable to your PC and to the logger.
2. Select WatchDog Manager option from the SpecWare Logger menu.
3. Select the “<Direct-Connect 2000 Series> option and hit the Readout button.
4. Data will be saved to a Logger Location with the same name as the Station/
Logger Name. If such a location does not exist, SpecWare will prompt you before
creating it.
Viewing Data
1. Select Open File option from the SpecWare File menu.
2. Select Logger Location of interest as well one or more months of data you wish to
view and click the Open button.
3. Select one or two parameters to plot and hit Redraw button.
4. To view reports, select an option from the Tools menu. After selecting a specific
report, click the View Report tab.
Configuring a Full Weather Station with the Keypad
It is possible to deploy a full weather station without configuring it with SpecWare. Station-configurable parameters are; sensor type, logging interval, Degree Day calculation
method and latitude and altitude (model 2900ET only). The procedure for any given
parameter is similar to that for setting the date and time (see Activating a Station, p.
7) and is outlined in the WatchDog 2000 Series Weather Stations User’s Guide. This
option is not available for the WatchDog Mini Stations.
8