1
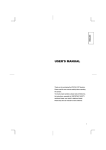
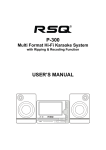
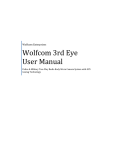
USER’S MANUAL
TV RECEIVER
DSA-9310E
CUST OMER HELPLINE NUMBER: 0870 100 2525
PARTS INCLUDED IN THE BOX
Remote control
Audio Cable(optional)
1UNIT
P/C Cable(optional)
1UNIT
1UNIT
AC Cable 1UNIT
2
TABLE OF CONTENTS
PARTS INCLUDED IN THE BOX
TABLE OF CONTENTS
SAFETY INSTRUCTIONS
FRONT & REAR VIEW OF RECEIVER
FRONT PANEL
REAR PANEL
CONNECTION GUIDE
CONNECTING WITH MONITOR
CONNECTING WITH AN AERIAL
CONNECTING WITH ANOTHER SET TOP BOX OR VIDEO EQUIPMENT
CONNECTING WITH PC
REMOTE CONTROL
PROGRAMME BANNNER
VOLUME BAR
FEATURES OF THE MAIN MENU
TO START SET
TO MUTE THE SOUND INSTANTLY
AUTO TUNING MEMORY OF PROGRAM
EDIT OF MEMORISED PROGRAM
SKIPPING THE PROGRAMS POSITIONS
DELETING THE PROGRAM POSITIONS
MOVING THE PROGRAM POSITIONS
MANUAL TUNING
FINE TUNING
WATCHING VIDEO PROGRAMS
OPERATING PICTURE AND PICTURES
PIP(PICTURE IN PICTURE)
2PIC(TWIN PICTURES)
POP(PICTURE OUT PICTURE)
OPERATING PAP BY MENU
SOUND
SETTING THE CLOCK
TELETEXT
TROUBLE SHOOTING
SPECIFICATIONS
2
3
5
8
8
9
10
10
11
12
13
14
16
17
18
20
21
22
26
28
29
29
30
31
32
33
33
35
36
37
38
39
40
42
43
3
SAFETY INSTRUCTIONS
Remove mains plug from socket when receiver
is not in use for a long time or during a
lightening storm.
Do not place any liquid container on top of
RECEIVER.
Do not handle the power cord with wet hands.
Do not pull the power cord to remove the plug
from the socket.
Do not overload wall outlets and extension
cords. It may result in power failure.
If water spills into RECEIVER, an electric short may
occur which can cause a fire.
It may cause an electric shock or damage.
Do not make any modifications.
Never attempt to disassemble the unit.
When a strange noise or smell comes from the
RECEIVER, stop all operations and pull out
plug. And then contact your Service agent.
5
Place the RECEIVER on a plain stable surface.
If not, the RECEIVER may fall off or tip over
causing injury or damage.
Keep the RECEIVER safe from any foreign
objects.
Be sure to disconnect all cables before moving
RECEIVER.
Put the RECEIVER in a place of moderate
temperature 5 - 40 degrees.
If not, it may cause damage or shorten the
lifetime of the RECEIVER.
Do not put the RECEIVER in a place where it is
humid or dusty, or near oil, smoke or steam.
Do not lay heavy objects on the RECEIVER.
6
It may cause ventilation trouble, internal temperature
increasing, and fire.
Do not use water or oil to clean.
Do not put RECEIVER under the sunlight or
near heating units.
It may cause damage or shorten lifetime of the
RECEIVER.
Do not press two buttons of the remote
controller in at the same time.
Never attempt to disassemble remote
controller.
Keep the RECEIVER away from magnets or
vibration.
Ensure the RECEIVER is placed in a position
with good ventilation.
Do not plug in when the shape of socket does
not match with the plug.
It may cause blurred colour of screen and a damage.
Leave a space more then 10Cm rear and 5Cm side
from the wall.
7
FRONT & REAR VIEW OF RECEIVER
FRONT
PANEL
POWER SOUND
1
2
TV/AV
MENU
3 4
RECALL
5
6
7
1. POWER BUTTON
Use to power unit on & off.
2. LED
POWER : Displays RED when the unit is powered off or standby, GREEN when the unit
is powered on.
SOUND : Displays when the sound is STEREO or DUAL.
3. TV/AV BUTTON
Use to select TV/External Input MODE.
TV, AV1/2/3/4 is selected in order whenever the button is pushed.
4. MENU BUTTON
Use to access MENU option.
When The button is pressed once, MENU appears on the screen.
5. RECALL BUTTON
Use to mark a channel banner.
6. LEFT/RIGHT (C / B) BUTTON
Use to move cursor left/right in the MENU option or use to control sound volume.
7. UP/DOWN (V / W) BUTTON
Use to move cursor up/down in the MENU option or use for change channel.
8
REAR
PANEL
1
2
3
4
5
6
7
1. AV1, AV2 INPUT TERMINAL ( SCART TERMINAL ).
Use to connect external input such as VTR, Satellite Receiver, DVD, etc. to the
RECEIVER.
2. POWER CORD CONNECTOR
Use to connect POWER CORD to the RECEIVER.
3. MONITOR / AUDIO OUTPUT TERMINAL
Use to connect MONITOR or external speaker to the RECEIVER.
4. PC INPUT / AUDIO INPUT TERMINAL
Use to connect PC input to the RECEIVER.
PC input is transferred to output terminal when the power of RECEIVER is off.
5. AV3 INPUT TERMINAL (S-VIDEO, V/L/R)
Use to connect S-VIDEO, A/V Input to the RECEIVER.
S-VIDEO input is transferred to output terminal when S-VIDEO and RCA Video input is
connected to the RECEIVER at the same time.
6. A/V4 INPUT TERMINAL(V/L/R)
Use to connect A/V input to the RECEIVER.
7. ANTENNA INPUT TERMINAL
Use to connect antenna to the RECEIVER.
* This RECEIVER can receive PAL/ SECAM except PAL M/N via antenna and can receive
PAL SECAM, NTSC input via external input terminal.
9
CONNECTION GUIDE
Connecting with Monitor
Connect D-SUB input of MONITOR to the output terminal of D-SUB output of
the RECEIVER.
Connect input of speaker to audio output terminal of the RECEIVER.
RECEIVER
MONITOR
MONITOR BACK
R
AUDIO
L
PC INPUT
10
Connecting with an Aerial
Plug the aerial into the coaxial socket.
Notice
This RECEIVER can receive SECAM/PAL except PAL M/N via antenna.
RECEIVER
RECEIVER
11
Connecting with another Set Top Box or Video Equipment
Connect output of another STB or Video equipment (SCART, A/V, S-video) to
input of the RECEIVER using SCART cable, A/V cable, S-video cable.
Notice
This RECEIVER can receive SECAM/PAL/NTSC via external input.
- AV1, AV2
RECEIVER
DVD
- AV3, AV4
VCR
12
ABC
Connecting with PC
Connect PC output (D-SUB & audio output) to input of RECEIVER (D-SUB &
audio input).
PC input can be outputted only when the power of RECEIVER is OFF.
RECEIVER
PC
PC BACK
RR
AUDIO
L
PC OUTPUT
13
REMOTE CONTROL
MUTE BUTTON
Switches the sound
on or off.
DISPLAY POWER
BUTTON
POWER BUTTON
MULTIMEDIA
BUTTON
SOUND BUTTON
TV/AV BUTTON
PREV BUTTON
PROGRAM
BUTTONS
MENU BUTTON
TV/TEXT BUTTON
Caution
. Do not drop, avoid
moisture, heat, and dust.
14
RECALL BUTTON
DIRECTION
BUTTONS
VOLUME
BUTTONS
How to install the batteries(not supplied).
. Push to open the cover of the Remote
Control.
. Set the Batteries in the battery (cell),
compartment after checking the
polarities(+/-), and then, shut the
cover(battery type “AA”).
PIP BUTTON
2PICTURES
BUTTON
TELETEXT
BUTTONS
TV/VIDEO BUTTON
NUMBER
BUTTONS
Switches the
TV/VIDEO of sub
picture
POP BUTTON
SWAP BUTTON
15
PROGRAMME BANNER
16
programme Banner allows you to view the current programme
information. If you press the RECALL button in normal TV
viewing, the channel banner appears on the screen. Press the
RECALL button once again, the programme banner
disappears.
PR Number & Name Sound System Clock
Volume Bar
Volume Bar
Volume Bar allows you to control the volume V / W.
17
Features of the Main Menu
Pressing the MENU button on the remote controller takes
you to the “Main Menu”screen. The “Main Menu” contains
four options:PAP, Timer, Install, Language. Also each option
has the submenu. The option you want to select is
highlighted and its submenu is displayed on the right-hand.
PAP : Screen displays and controls PIP, 2PIC,
POP. Control sub picture.
Timer : Set time.
Install : Tuning menu displays and controls
Edit, Auto Tuning, Manual Tuning, Fine
Tuning.
Language : Displays and controls the OSD
Lanugage.
18
ABC
Language Selection(OPTIONAL)
1
Press the MENU button to call up the Main menu.
2
Select the Language with ARROW C / B button.
Then the languages will be displayed.
3
Press the MENU button to return to Main Menu .
19
TO START SET
Notice
Buttons on the front of the set have the same functions as those of the
REMOTE CONTROL.
20
1
Press the POWER button.
The Monitor will illuminate, and
the power indicator lamp will light
up green.
2
Press the PR buttons.
Press the PR V / W button or
number buttons to select the
Program you want.
3
Adjust the Volume.
When the VOLUME V / W button is
pressed, the volume changes.
4
Press the POWER button to turn
off the set.
When the set is turned off, the
power indicator lamp lights up red.
TO MUTE THE SOUND INSTANTLY
This function is used when there is a phone call or a visitor.
Press the MUTE button, to stop the sound of the program
. When this button is pressed, the sound goes off with word
Mute Icon displayed on the Monitor.
. Press it again, and the sound returns.
21
AUTO TUNING MEMORY OF PROGRAM
. Actual broadcasting channels can be
set up in the “Memory” of the set
through this function.
With auto Tuning, desired channels
can be selected easily with PR V / W
buttons. Such inconvenience as
pressing PR Numbers one by one is
not necessary.
. MENU mode automatically disappears
in several seconds when there is no
button operation. If you want to get
out of the MENU mode yourself,
press MENU button several times.
1
22
Press the MENU Button.
ABC
2
Select Install.
. Move the cursor by ARROW V / W buttons.
. Select Install sub-menu by using ARROW B button.
3
Select “Auto Tuning”
. Select country by ARROW C / B buttons.
. Select “Auto Tuning” sub-menu by using ARROW V / W button.
23
4
Select “Auto Tuning”
. Start tuning by ARROW B button.
Notice
The Country menu allows you to select your local
station before channel tuning.
.Europe
: PAL/SECAM —> SECAM-L.
.East Europe : PAL/SECAM.
.Deutschland : PAL/SECAM.
.Great Britain : PAL/SECAM(UHF only).
.France
: SECAM-L —> PAL/SECAM.
.Ireland
: PAL/SECAM.
24
5
When the Auto Tuning is completed, “edit Mode”
appears on the Monitor.
. Edit mode disappears automatically in several seconds
or Pressing MENU button.
6
Check the memorised status by pressing PR
buttons.
. Only memorised channels are selected.
V/ W
25
EDIT OF MEMORISED PROGRAM
. The change is memorised automatically.
Notice
The EDIT menu shows you information as follows :
. Program position assignment : PR number and
Station name.
. Skip information : YES, NO
. Sound information : Auto, B/G, I, D/K1, D/K2,
D/K3, L.
1
26
Select EDIT at the Tuning Menu.
2
After Moving the cursor by ARROW C / B buttons,
select the information by ARROW V / W button.
Ex) ENTER A STATION NAME
. Move the cursor to Name.
. You can enter a station name with the V / W
buttons. A letter from the Alphabet and Numbers
will appear one-by-one.
3
Check the Edit status by pressing PR V / W buttons.”
. The edit status appears in the PR banner.
27
SKIPPING THE PROGRAMS
The programme marked with SKIP “YES”
is skipped when changing channel using
the PR V / W buttons.
A skipped program number can be
selected using the NUMBER button 0..9,
These will be displayed in Red.
. Select SKIP “YES” or “NO” with the “SKIP
(Red)”button.
. You can also use the ARROW V /
buttons after moving the cursor to Skip.
28
W
DELETING THE PROGRAM POSITIONS
. Position the selection bar to program number to delete with the
V / W buttons.
. Press the “DELETE (Yellow)”button.
MOVING THE PROGRAM POSITIONS
. Position the selection bar to program number you want to move.
. Press the “MOVE(Green)”button. The colour of selection bar will
be changed to Green.
. Position the new selection bar to new program number.
. Press the MOVE(Green) button.
29
MANUAL TUNING
. If you are unable to get any programs because of a poor broadcasting signal, it
is possible to store the Manual tuning.
30
1
Select manual tuning at the Install menu.
2
Press the Arrow C / B Buttons.
. A Tuning bar will move from left to right /
from right to left.
. After searching a station, the tuning Bar
will stop. If you want to stop tuning, press
the MENU button.
3
Select programme number using the
Press the “Green” button to store.
V/W
buttons and
FINE TUNING
. If you are unable to get a good picture or sound because of
a poor broadcasting signal, it is possible to adjust the fine
tuning.
. The change is memorised automatically.
1
Select “Fine Tuning”.
2
Press ARROW C / B buttons to activate fine tuning up or
down.
31
WATCHING VIDEO PROGRAMS
Notice
S-VIDEO takes precedence if S-VIDEO is connected to AV3.
1
Connect the video cable to the VIDEO
socket at the back of set, and press AV
Button on the remote control and on the
Front.
. The screen changes to video mode as
follows:
. Whenever this button is pressed, the
screen shifts in sequence :
PR —> AV1 —> AV2 —> AV3 —>AV4 —> PR.
AV1
--:--
32
OPERATING PICTURE AND PICTURE
Notice
. The sound of the set is available only in the main program window(the left one).
. The same PRs or the two video programs can not be operated in both
windows of the screen.
. Every time SWAP button is pressed, the Pictures alternate.
PIP (PICTURE IN PICTURE)
You can enjoy two window programs at the same
time. Along with the main window program, you
can have another TV channel program or a
Video program simultaneously.
1
Press PIP Button
. Single PIP appears on the picture left top.
2
Select a programme you want to watch in the
auxiliary window.
. Select a programme you want to watch in the
auxiliary window by using ARROW V /
Wbuttons on the Remote Control.
33
3
34
Select Video Program in the auxiliary window.
. To operate VIDEO program in the auxiliary window, connect the video cable to
the VIDEO IN socket at the back of SET, and press TV/VIDEO button on the
auxiliary window control panel area on the Remote Control.
. The mode will be changed in the following sequence:
PR —> AV1 —> AV2 —> AV3 —> AV4 —> PR
4
Select Position of the auxiliary window.
. Select Position you want to display the auxiliary
window by using ARROW C / B buttons on the
Remote Control.
5
Press PIP Button again, and the auxiliary
window disappears.
2PIC ( Twin Pictures)
. You can enjoy two window programs at the same time. Along
with the main window program, you can have another TV
channel program or a Video program simultaneously.
1
Press 2PIC Button
. The operating program window becomes the main
window and moves to the left side of the screen, an
auxiliary window appears on the right side at the same
time.
2
Select a programme you want to watch, Select Video
Program in the auxiliary window.
. The function is identical with the PIP function.
3
Press 2PIC Button again, and the auxiliary window
disappears.
35
POP (Picture Out Picture)
Five windows appear on the screen. Memorised programmes are
connected one-by-one to each auxiliary window in sequence. Thus, it is
easy to check the contents of the programs on air.
1
Press POP Button
. Four auxiliary window appears on the
picture Right.
2
36
Press POP Button again, and the
auxiliary window disappears.
OPERATING PAP BY MENU
Notice
Functions on the Menu have the same functions as those of the REMOTE CONTROL.
1
2
Press Menu Button, Select PAP.
. Move the cursor by ARROW V / W
buttons.
. Select PAP sub-menu by using
ARROW B button.
Select “On” PAP on the sub-menu
using right hand arrow.
. Move the cursor by ARROW V / W
buttons.
. Select items by ARROW C / B
buttons.
Notice
. PAP:On/Off
. TV/AV Select Video Program in the auxiliary window:
PR —> AV1 —> AV2 —> AV3 —> AV4 —> PR
. Program Select a PR you want to watch in the
auxiliary window.
Ex)PR01 —> PR02 —> | | —> PR## —> PR01
MODE: PIP L —> PIP R —> 2PIC —> POP —> PIP L.
37
SOUND
. There may be cases of stereo broadcasts where excessive noise will be
heard due to weak incoming signal. You may be able to eliminate this
noise by selecting the MONO mode.
During a stereo Program transmission
1
2
Press the Sound( ) button.
It will change to MONO from STEREO.
Then the Banner OSD will be changed to
MONO.
Press the Sound ( ) button again
It will change it back to stereo.
During a bilingual programme transmission
1
2
38
Press the Sound ( ) button.
It will change the language to the second
channel (DUAL SUB).
Press again will change it back to the main
channel (DUAL MAIN).
SETTING THE CLOCK
Notice
If you turn the set off with MAIN POWER, the clock setting is lost and must
be reset if necessary.
1
Press tne MENU Button, Select “Timer”
2
Manually clock setting and collection
. Set “HOUR” by “ARROW” C button and,
MIN by Arrow B.
3
Automatic clock setting and correction
. Even though you turn the set off with
MAIN POWER, if you select a program of
your country which has Teletext or PDC
transmission, clock will be set and
corrected automatically.
4
Check the Clock by pressing RECALL
buttons.
. The Clock and the PR banner will appear
for a few seconds.
Notice
This function is only available for the countries as
follows :
Deutschland, Great Britain, France, Italy,
Sweden,Switzerland, Netherlands, Ireland.
39
TELETEXT
SWITCHING TELETEXT ON/OFF
Press the TEXT button( ).
The index page or the page viewed last will appear.
Press the TEXT button( ) again to return to the TV mode.
COLOUR BUTTONS IN TOP/FLOF TELETEXT
A red( ), green( ), yellow( ) and blue( ) field is shown at the bottom of
the screen.
If TOP or FLOF Teletext is transmitted by the station, pressing the
corresponding
colour button on the remote controller, you can select the desired page easily.
SELECTING PAGES
The NUMBER button 0..9 are used to enter a page number.
The selected page number appears at the top of the screen and the page
appears after a short time.
The V / W buttons increase or decrease the current page number by 1.
INDEX PAGE
You can switch directly to the programme preview(with TOP text) or the
overview
page of the station you are currently viewing by pressing the INDEX( )
button.
PAGE HOLD
Several sub pages can be combined under a page number and are scrolled at
an interval determined by the television station.
The presence of sub pages is indicated by, for example, 3/6 beneath the time,
which means that you are looking at the 3rd page of a total of 6 pages.
If you want to look at a subpage for a longer period of time, press the HOLD
( ) button.
The “ stop ! “ appears beside page number and the contents of the subpage
shown are kept on the screen and no longer updated or switched to other
subpages.
Pressing the HOLD button( ) again, the current subpage appear.
40
CALLING UP SUBPAGE DIRECTLY
Pressing the SUBPAGE( ) button , “ sub-code - - - - “ appears beside page
number.
Enter the subpage number that you want to call up with the NUMBER button
0..9 ,for example, the 2nd page, sequence 0002.
The desired subpage will eventually be displayed on the screen and holds it
there. Meanwhile whilst you are waiting, it is possible to go back to the TV picture
by pressing the CANCEL button( ) on the remote and after a while, press the
CANCEL button( ) again to revert back to the saved text sub page.
WATCHING TELEVISION DURING TELETEXT MODE
Some pages are continually updated, for example, stock market reports, sports
announcements, and the latest news.
If you want to watch television and stay informed at the same time, press
CANCEL ( ) button.
The regular programme is still visible and the teletext page number appears at
the top of the screen.
Pressing the CANCEL button( ), the teletext page appears with the updated
information.
REVEAL ANSWER
This function can be used on certain pages to reveal the solution of riddles.
Press the REVEAL button ( ) to reveal a hidden answer and press again
to hide it.
DOUBLING CHARACTER SIZE
Repeatedly pressing the SIZE button ( ) doubles the character size in the following
order:
Upper half of the page -> Lower half of the page -> Return to normal size.
41
TROUBLE SHOOTING
. Most problems are possible to solve by checking basic settings. Please
check the following settings prior to calling the Daewoo Electronics
Service Centre for assistance.
SYMPTOM
SOLUTION
It is not powering on
. Check to see if the power cord is plugged in
securely.
Can not change to a
specific programme
with PR V / Wbutton.
. Check the programme mode by pressing
the RECALL button.
. It’s possible that the channel may not have
been memorised and stored correctly.
Picture Quality is
poor.
. Check the FINE TUNING.
Remote control
doesn’t work
. Check for batteries. Change batteries if the
42
charge has been depleted.
. Use remote control within 23feet of the
remote sensor.
. Remove all hindrances between remote
sensor and remote control.
SPECIFICATION
MODEL NO.
DSA-9310E
System
PAL, SECAM-B/G, D/K, PAL-I/I, SECAM-L/L,
NTSC-3.58Mhz(External Input)
Rated Voltage
AC 100-250V , 50/60Hz
POWER Consumption
15 W
Dimension
350 x 73 x 258.5 mm
Number of Program
100 Programs
. The appearance and specification of this product can change without
notice for product modification.
43
48586100E108-R1