1
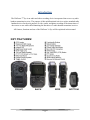
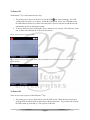
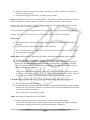
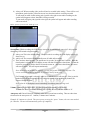
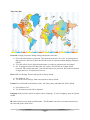
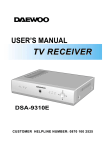
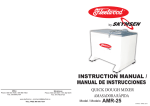
WolfcomEnterprises
Wolfcom3rdEye
UserManual
Police&MilitaryTwo‐WayRadioBody‐WornCameraSystemwithGPS
GeotagTechnology
Table of Contents
Introduction………………………………………………..………………………………………….….. 4
Key Features..………..…………………….………………..……………….………………………..….. 4
How to power on………………………………………….…….……………….…………………..…… 5
How to power off………………………………………….…………………………..…………..……… 5
How to record video ……………………………………….……………………………………..………. 6
How to turn on night vision …………………………………………………………….……….. 7
How to use GPS Geo-Tagging……………………….…………………………………………… 7
How to take digital picture ……………………………………………………………………………….. 8
How to zoom ……………………………………………………………………………………………. 8-9
How to record audio only …………………………………………………………………………………. 9
How to playback files …………………………………………………………….………………….. 10-12
How to charge ………………………………………………………………………..……………..... 12-13
How to extract files……………………………………………………………………………...……….. 13
How to connect to HDMI……………………..………………………………………………………….. 13
How to connect to two-way radio…………………...…………………………………………………… 13
How to use unit as speaker microphone…………………..……………………………………. 13
Video menu options………………………………………………………...………………………… 14-19
How to change resolution………………………………………………...………………………14
How to change white balance…………………………………………………………………… 14
How to change contrast……………………………………………………………..…………… 14
How to change sharpness………………………………………………………………….… 14-15
How to use recycle record………………….…………………………………………………… 15
How to use loop record………………………………..………………………………………… 15
How to use motion detect……………………...………………...……………………………… 15
How to use as car DVR…………………………………..……………………………………… 15
2
How to set audio off during recording………………………….……….…………………… 15-16
How to keep display screen off during recording……………………..………………………… 16
How to change volume…………………………..……………………………………………… 16
How to set auto power off…………………………………………………………………… 16-17
How to set date and time stamp…………………………….…………………………………… 17
How to set date and time…………………………………………..…………………………….. 17
How to use GPS GeoTag…………………………………………………...…………………… 17
How to use time zone…………………….………………………………………………….. 17-18
How to set password……………………………….…………………………………………… 18
How to reset……………………………………….…………….………………………………. 18
How to format memory…………………………………………………………………………. 18
How to change language………………………………………………………………………… 18
How to find unique ID……………………………………………………………………...…… 18
How to find version number…………………………………………………………………….. 19
How to find batch number…………………….………………………………………………… 19
Photo menu options………………………………………………………………………………………. 19
Playback mode options…………….…………………………………………………………………….. 19
How to reboot the unit…………………...………………………………………………………………. 20
How to change from Motorola to Kenwood……………..………………………………………………. 20
3
Introduction
The Wolfcom 3rd Eye is an audio and video recording device incorporated into a two-way radio
handset transmitter/receiver. The purpose of this multifunctional unit is to replace standard radio
handset devices for the sole purpose of video, audio, and photo recording of the interactions of
the wearer or user while still maintaining the functions of a radio handset transmitter/receiver.
All features, functions and use of the Wolfcom 3rd Eye will be explained in this manual.
4
To Power ON
TheWolfcom 3rd Eye can be turned on two ways.
1. The primary way to power on the unit is to use the OTR
(one touch recording). The OTR
switch needs to be in the “up” position. Switch the OTR button “down”, the LED light next to
the OTR button will turn red, a chime will sound, the LCD screen will turn on and the unit will
automatically power on and begin recording.
2. To power on the unit, press and hold the “power” button for two seconds. This will power on the
unit, a chime will sound and the LCD screen will turn on.
Below: picture of screen when recording
Below: picture of screen while in video mode. This is the default screen when the unit is powered on using the
second method.
To Power Off
There are two ways to power off the Wolfcom 3rd Eye
1. The primary way to power off the unit is to use the OTR switch. When the unit is powered on
using the OTR switch, the OTR switch will be in the down position. To power the unit off, push
the OTR switch up, down and up. This is power off the unit.
5
2. To power off the unit, press and hold the “power” button for two seconds. This will power off
the unit completely.
Note: Always make sure the OTR button is in the up position when the unit is not in use. This
assures that the unit will always be ready to go.
To Start Recording Video: Video Mode
Below: picture of screen in video mode
There are three ways to start recording video on the Wolfcom 3rd Eye.
1. The primary efficient practical way to start recording while wearing the unit is to switch the OTR
button “down”. This will turn on the red LED light next to the OTR button will turn on, the
screen will turn on, a chime will sound and the unit will automatically power on and begin
recording.
2. Press and hold the “power” button for two seconds. The unit will power on and a chime will
sound. Press the “rec” button. The unit will have a red flashing dot on the top left corner of the
LCD screen.
3. With the OTR switch on in the “down” position, press and hold the “power” button for two
seconds. This will power on the unit, the red LED will turn on, the screen will turn on and the
unit will have a red flashing dot on the top left corner of the LCD screen.
When video is being recorded, the red LED light next to the OTR switch will be on and a red flashing dot
will be blinking on the top left corner of the LCD screen. On default, the unit will automatically be
recording audio.
6
Night Vision
Night vision gives the ability for the unit to record video and take digital pictures in low lighting all the
way to total darkness. The Wolfcom 3rd Eye uses four (4) infrared LEDs to emit infrared lights that are
not visible by the human or animal eyes.
To turn on night vision, toggle the night vision switch
to the “right” position. When in night vision
mode, and “IR” symbol will appear on the top right area of the screen.
Below: picture of screen with “IR” icon, indicating infrared night vision LEDs are on.
To turn off night vision, toggle the night vision switch to the “left position. The “IR” symbol will not be
on the screen.
GPS GeoTag
On default, the unit will receive GPS satellite signals. The unit will display a green “G” on the upper
right side of the screen to indicate that the GPS satellite signal is being received. When the green “G” is
displayed, the GPS longitude and latitude coordinate will be stamped onto each video frame by frame and
each picture that is taken.
Below: picture of screen with GPS icon, indicating GPS Geo-Tagging is taking place.
7
To Take Digital Pictures: Picture Mode
Below: picture of screen on picture mode
There are two ways to take still digital pictures.
1. While the unit is on, press the “mode” button until the unit has the picture mode symbol on the
top left corner of the screen. Press the “rec” button. A shutter sound will sound and the unit will
take a still digital photo and automatically safe the picture file into memory.
2. Press the snapshot picture button
to take a picture. The snapshot button can be used when the
unit is on video mode, picture mode and audio only mode. When a picture is taken, a shutter
sound will sound and the picture file will be saved into memory.
The snapshot button can also be used to take picture while the unit is recording video.
When the unit is recording video, press the snapshot button and the unit will automatically take a
still photo and save that picture file into memory. When this approach is taken, the snapshot
button will not make a shutter sound.
This is useful and discreet. When the user is wear the unit and recording video while
speaking to a person, the user might want a picture snapshot of this person. By pressing the
snapshot button, the subject getting their picture taken will not be aware of it. The picture file
will be stored into memory and can be easily viewed.
To Zoom in Video and Picture
When unit is in video mode and in picture mode, use the joystick to zoom in and out. Press the joystick
in the up direction to zoom in. Press the joystick in the down direction to zoom out. Zoom can be used
while recording.
There is a zoom bar on the right side of the screen to display how much more the camera can zoom in or
out.
8
Below: picture of the screen with the zoom bar on the right.
Note: video recording zoom can be used in video resolutions: 1280 x 720, 848 x 480 and 848 x 480 @
60FPS.
To Record Audio Only: Voice Record Mode
Below: picture of screen in voice record mode
With the unit on, press “mode” button until the unit has the voice record symbol on the top right corner.
Press the “rec” button in start recording audio only. The timer running at the bottom of the LCD screen
displays the amount of time audio is being recorder. Press the “rec” button to stop recording audio. The
audio file will be stored into memory.
9
To Playback files: Playback Mode
Below: picture of screen during playback mode.
When on playback mode, the bottom left side of the LCD screen will display the file number, date and
time. In playback mode, all video, picture and audio files are here and can be played back. The files will
start at the most recent file.
To sort through the files, press the joystick to the left or right.
To see thumb nails of all files, press the joystick in the down direction. This will show six files at a time
in thumb nails. Picture files will show the picture thumbnail, Video files will show the first frame of the
video in the thumbnail and Audio files will show a microphone in the thumbnail.
Below: picture of playback file’s thumbnails.
Use the joystick to navigate through the thumbnails. To select a file, press inward on the joystick.
To play a video file, press inward on the joystick. This will start the video playback. The play time will
display on the top right side. The top left side will have the unique unit ID, under that will be the date and
time stamp and under that is the GPS coordinates that the file was taken (if the GPS function was on
during recording).
The time display will disappear after a five seconds. Press the joystick inward to display the play timer.
To go back to main file, push the joystick in the down direction.
During any play mode, the joystick can be push in the down direction to go back to main file.
10
Fast Forward / Slow Motion
To fast forward, press the joystick to the right. The first fast forward speed is at twice the speed.
The
fast forward symbol will appear with x2. Each time the joystick is pushed to the right, the speed will
increase by these increments: x2, x4, x8, x16. When on fast forward x16, push the joystick right to play
in normal speed.
When on any increment of fast forward, push joystick to the left to decrease the fast forward play
speed.
To play in slow motion, press joystick inward to start playing video, then push joystick to the left to start
slow motion playing. This will play the video at half the speed. The symbol will display the play speed.
Each time the joystick is pushed to the left, the play speed will decrease in these increments: x1/2,
x1/4, x1/8, x1/16, x1/32. When on slow motion speed x1/32, push the joystick to the left to play in
normal speed.
When on any increment of the slow motion play, push the joystick to the right to increase slow
motion play speed.
Rewind / Slow Motion Rewind
To rewind, press joystick in the up direction. This will start rewinding video at normal speed. Each time
the joystick is pushed to the right, the rewind speed will increase by these increments: x2, x4, x8, x16.
When on fast rewind x16, push the joystick to the right to rewind at normal speed.
When on any increment of fast rewind, push joystick to the left to decrease the rewind speed.
To rewind in slow motion, press inward to start playing video. Push joystick in the up direction, then
push the joystick to the left to start rewinding in slow motion. This will start rewinding the video at half
the normal speed. The symbol will display the rewind speed.
Each time the joystick is pushed to
the left, the rewind speed will decrease in these increments: x1/2, x1/4, x1/8, x1/16, x1/32. When on slow
motion rewind speed x1/32, push the joystick to the left to rewind at normal speed.
When on any increment of slow motion rewind, push the joystick to the right to increase the slow
motion rewind speed.
When on normal rewind
speed.
, push the joystick up and the video will go back to normal play mode and
Screen Capture on Videos
When playing a video and there is an important frame that is needed, a screen capture can be taken. The
screen capture saves as a picture file.
11
To do a screen capture, start playing the video, press inward on the joystick to pause at the time the screen
capture is needed. Once the video is paused at the correct frame, press the “rec” button to perform a
screen capture. The shutter sound will sound and that frame will be saved as a picture file into memory.
To sort through frames, during video play, press inward on the joystick to pause video. Push the joystick
in the up direction to get to frame selection. This symbol will appear
Push the joystick to the left to
go backward frame by frame. Push the joystick to the right to go forward frame by frame. Each second
of video has 30 frames. On video resolution 848 x 480 @ 60FPS, each second of video has 60 frames.
When on the frame need, press “rec” button to perform a screen capture. The shutter sound will sound
and that frame will be saved as a picture file into memory.
To get out of frame selection, push the joystick in the up direction to be in regular pause. To go back to
play mode, press the joystick inward.
How to Charge
There are three ways to charge the unit.
1. Unlatch the “HDMI PC” rubber cover
. Take the USB cable and plug the mini USB end
into the Wolfcom 3rd Eye in the mini USB slot. Plug the USB end of the cable into a USB port
on your PC. A menu screen will appear. Push the joystick in the down direction until “Charge”
is highlighted. Press inward on the joystick and the unit will begin charging. The red LED
charging light will turn on
.
When “Power ON” is selected, the unit will still be charging.
Below: picture of menu options when USB in plugged in to unit.
2. Unlatch the “HDMI PC” rubber cover. Take the USB cable and plus the mini USB end into the
Wolfcom 3rd Eye in the mini USB slot. Plug the USB end of the cable into the AC adapter. Plug
the AC adapter into a wall socket. A menu screen will appear. Push the joystick in the down
direction until “Charge” is highlighted. Press inward on the joystick and the unit will begin
charging. The red LED charging light will turn on.
12
3. Unlatch the “HDMI PC” rubber cover. Take the USB cable and plus the mini USB end into the
Wolfcom 3rd Eye in the mini USB slot. Plug the USB end of the cable into the car charger. Plug
the car charger into a car lighter socket. A menu screen will appear. Push the joystick in the
down direction until “Charge” is highlighted. Press inward on the joystick and the unit will begin
charging. The red LED charging light will turn on.
Note: only works with the Wolfcom 3rd Eye Car Kit (an additional accessory)
How to Extract Files
Files can only be extracted with the password. Unlatch the “HDMI PC” rubber cover
. Connect the
mini USB end of the USB cable to the socket. Connect the USB to the USB socket on PC.
How to view files using HDMI
Take the HDMI cable and insert the HDMI end into the HDMI socket . Insert the other end of the
HDMI cable into the HDMI input in the monitor or TV. A menu screen will appear. Use the joystick to
choose, connect to USB. Highlight “Power on” and press inward on the joystick. Now the unit can
playback files on the monitor or TV the HDMI cable is connected to.
Note: HDMI connection is only for playback. Only works for TV and monitors that have HDMI input.
Two-Way Radio Connection
Unlatch the microphone/speaker rubber cover . Take the two-way radio cable and insert the plugs into
the two sockets. Latch the other end of the cable to the two-way radio.
Note: If using Wolfcom 3rd Eye as a standalone unit, this feature is not used.
Two-way radio cable is an additional accessory.
Using Unit as Speaker Microphone for Two-Way Radio
After two-way radio cable is connected. Press the PTT (push to talk) button
speaker microphone for the two-way radio.
The speaker microphone can be used when the unit is on or off.
13
to use the unit as the
Menus
When asked for password, use joystick in up, down, left and right directions to get to the number needed.
Press joystick inward to select each number. Once the whole password is entered, highlight “OK” and
press inward on the joystick.
To scroll through the menu, push the joystick in the up or down direction. To change the selection on a
menu option, push the joystick to the left or right. To enter the choice on the menu option, press inward
on the selection to choose.
To get into menu for each mode, go to the desired mode, press “menu” and that mode’s menu will appear.
To get out of menu screen, push the “menu” button.
Video Menu
Video Resolution: There are four different resolutions.
a)
b)
c)
d)
1920 x 1080 @ 30FPS; This is full HD 1080p
1280 x 720 @30FPS; This is HD 720p
848 x 480 @ 60 FPS
848 x 480 @ 30FPS
Recording at a lower video resolution will allow the unit to have longer battery life.
White Balance: Used to adjust the color in an image to achieve the most accurate color seen by the
human eye.
a) Auto: White balance is almost always set on auto. With all the resolutions on this unit, the white
balance does not need to be changed.
b) Incandescent: Incandescent light comes from light bulbs that product light from high
temperatures.
c) Sunny: Sunny light comes directly from the sun.
d) Cloudy: Cloudy, Rainy, Overcast outdoor areas will use this setting.
e) Fluorescent: Fluorescent light comes most commonly from fluorescent lamps.
Contrast: How light is casted on an image and the shadows that are casted because of the objects in the
way of the light.
a) Standard: Standard is auto setting. Standard is the ideal choice for the contrast.
b) Hard: Hard contrast creates sharp shadow edges.
c) Soft: Soft contrast creates a gradual transition from light to shadow.
Sharpness: Used to highlight or blend the edges of the subject in the image.
a) Standard: Standard is ideal for everyday use.
14
b) Hard: Hard increases contrast on the edges of the image. Usually used when an specific area
needs to be cropped for use.
c) Soft: Softens the edges of the image. Usually used for portraits.
Recycle record: Records videos in selected increments. The length of each file recorded can be selected
by these increments: 1 minute, 5 minutes, 10 minutes, 15 minutes, 30 minutes, and 45 minutes.
Example: The 10 minute option is selected. Video is recorded for 50 minutes. The 50 minutes of video
will be saved as five – ten minute video files.
To have continuous video recording, select the “No” option. The video will record all in one video file.
Example: Three hours of video has been recorded. All three hours will be in one video file.
Loop record
a) Off: When memory is full, unit will stop recording. Can only record more files when files are
extracted.
b) On: When memory is full, unit will record over the oldest file.
Note: if the oldest file is a 15 minute file, the whole file will be deleted and the new file will take
the memory of the oldest file.
Motion Detect: When motion is detected by the camera, the unit will automatically begin recording.
a) Off: The unit will record as normal, whenever video record is turned on.
b) On: When the unit is turned on, it is on standby motion detect mode. Once the camera detects
motion, the unit will automatically begin recording video and audio. If no motion is detected,
after 30 seconds the unit will automatically stop recording. The unit will continuously do this
until the unit runs out of batteries.
Note: To turn off motion detect feature, whenever the unit turns on, the unit will begin recording
because the camera detects motion. Press “rec” button and immediately press “menu” button to
get into the menu options. Now the motion detect feature can be turned off, if wanted.
Car Mode: When using the Wolfcom 3rd Eye as a car DVR, recording while driving in your car.
a) Off: The unit will record as normal
b) On: When the unit is connected with the car DVR kit, the unit will automatically begin recording
whenever the car is turned on. When the car is turned off, the unit will automatically turn off and
save all recorded files into memory.
Note: Screen can be turned during car mode.
Audio: audio sound recording during video recording
a) Normal: The unit will record as normal; audio is recorded during video recording.
To turn audio recording off in this setting, push joystick to the right to turn audio recording off.
To turn audio on again, push joystick to the right to turn audio recording on.
15
b) Always off: When recording video, audio will not be recorded in this setting. There will be a red
microphone symbol with a yellow line across it to show that audio is not being recorded.
To turn audio on while in this setting, push joystick to the right to turn audio recording on, the
symbol will disappear to show that audio is being recorded.
To turn audio off again, push joystick to the right, the symbol will appear and audio recording
will be turned off.
Below: picture of screen with “audio off” icon
Screen timer: While recording, the LCD display screen can be automatically turned off. Only applied
when using OTR switch to begin recording.
a) Always on: This is the default setting. Whenever unit is recording, the LCD display screen will
always be on.
b) Always off: The screen will automatically turn off while still recording.
c) There are three timed options. The options are 10 seconds, 30 seconds and 1 minute. When the
timed option is selected, the LCD display screen will shut off after the selected time. To turn the
screen on, press the joystick to the left to turn the screen on. After the selected time, the screen
will turn off again. This will repeat continuously.
Note: the screen can be turned on again by pressing the joystick to the left at any time. The
screen can also be turned off by press the joystick to the left at any time.
For Example: 10 seconds is selected. After 10 seconds the screen will turn off. If the joystick is
pushed to the left, the screen will turn on. After 10 seconds of not pushing any buttons, the
screen will turn off again.
Note: when the LCD display screen is turned off, less battery power is being used.
Volume: sound level on button clicks, joystick selections and powering on/off the unit.
To make sure there is no sound when the unit is power on or off, turn the volume to “0”.
Auto power off: Unit will shut off completely when unit is on and not recording. There are three time
selections for the auto power off. 1 minute, 3 minutes and 5 minutes.
Example: If 3 minutes is selected. The unit is power on using the “power” button, the unit is not touched
for 3 minutes. The unit will automatically power off completely.
16
This feature is to no waste battery. In cases where user is distracted by a phone call and forgets about the
unit, the unit can automatically power off so it does not waste battery.
To not have the unit ever automatically power off, select the “Off” option. When the unit is on and not
recording, the unit will stay on until the unit is out of battery life.
Stamp: Date and Time stamp on all files
a) On: Date and Time stamp will be imprinted on every video, picture and audio file recorded.
b) Off: Date and Time will not be on any video, picture or audio file recorded.
Date & Time: The date and time on the unit. Format mm.dd.yyyyhh:mm
To set the date and time, push the joystick to the right. This will highlight the month red. Use the
joystick in the up or down direction to find the number needed. Once correct number is selected, push the
joystick to the right to highlight the next number. Repeat this unit date and time is set. To finish, press
inward on the joystick. All numbers on the date and time will turn black.
GPS: Longitude and latitude of the location of the unit.
a) On: the Longitude and latitude of the location where the video or picture file was taken will be
stamped onto each file. For video files, the GPS stamp will be on each frame.
b) Off: No GPS coordinates will be stamped on any file.
Time zone: The world has 24 different time zones. Each time zone is given a number. This time zone
option is to keep the unit’s clock time correct when traveling or moving to a different time zone.
Example: If an officer is stationed in Houston, TX, the time zone there is “-6” so the unit time
zone will be on “-6”. Then, the officer gets an assignment is Sacramento, CA, the time zone there is “8”. To change the clock time on the unit, the time zone will need to be changed to “-8”. The clock time
will change automatically to the time in that time zone.
17
Time Zone Map
Password: six digit password to change settings and options on the unit.
a) No: Fresh units will have a password. The password can only be set to “No” by entering the sec
digit password. After this is done, the unit will not ask for a password when changing settings or
options.
b) Yes: Unit will ask for six digit password whenever a setting or option needs to be changed.
c) Set: To change the password, choose the “Set” option. Unit will ask for six digit current
password. Enter current password. Unit will then ask for new password. Key in the new desired
six digit password. New password is now set.
Reset: Will reset Settings, Features and Options to factory default.
a) No: default on “No”
b) Yes: Will reset all settings, features and options to factory default.
Format: Does full format on all memory in unit. All video, picture and audio files will be deleted.
a) No: Default on “No”
b) Yes: all memory in unit will be formatted.
Language: Push joystick to the left or right to choose a language. To select a language, press the joystick
inward.
ID: Each unit has its own unique unit ID number. The ID number can also be seen at the bottom left of
the video and picture mode screen.
18
Version: the version number of the Wolfcom 3rd Eye.
Batch #: The batch is which the unit came from.
Photo Menu
Photo size:The megapixel of each digital picture taken can be changed from 5, 8 and 12.
White Balance: (see video mode white balance) section
Contrast: (see video mode contrast) section
Sharpness: (see video mode sharpness) section
Burst: When pressing the snapshot button or “rec” button to take a picture, the single press will take
multiple pictures right after one another.
a) 1pic: Normal picture taking. Press a picture button and unit will take one picture.
b) 2pic: Press a picture button and the unit will take two pictures automatically one after the other.
c) 3pic: Press a picture button and the unit will take three pictures automatically, one after another.
Note: Burst feature work in video mode screen or picture mode screen. During video recording,
one picture will be taken when snapshot button is pressed.
Playback Mode Menu
Delete file:
a) No: Default is on “No”. This will keep everything the same.
b) Delete: Will delete the file that the playback is currently on.
Note: Can only delete with password.
Slideshow: The unit will play all video, picture and audio files in memory. The slideshow will start on
the file that was last on the playback mode screen and go forward from there. When the slide show gets
to a video file, the video will play. When the slideshow gets to an audio file, the audio file will play.
a) No: This is manual mode. The files can be scrolled through using the joystick.
b) 1 second: Each picture will display for 1 second, video and audio files will play and go to next
file.
c) 3 seconds: Each picture will display for 3 second, video and audio files will play and go to next
file.
d) 5 seconds: Each picture will display for 5 second, video and audio files will play and go to next
file.
19
Reboot
To reboot the whole unit, take a small pointed object to press the reboot button.
This is used if the unit freezes. The unit will reboot itself when the reboot button is pressed.
Switching from Motorola to Kenwood Two-Way Radio
If user is using Wolfcom 3rd Eye with a Kenwood Two-Way Radio, use a small screw driving to remove
the door on the bottom on the unit. Take a small pointed object to switch the switch to the other side.
Unit can be switch from Kenwood to Motorola and Motorola to Kenwood with this switch.
“Because Cops Deserve The Best”
www.WolfcomUSA.com
CopyRight 2012
20