1
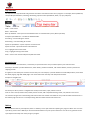
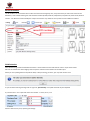
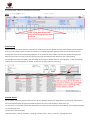
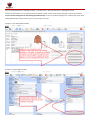
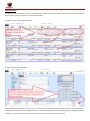
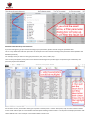
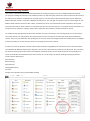
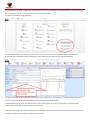
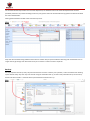
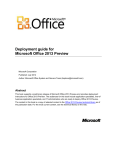
merchandising software garment textile software
inventory software warehouse management
software order management system logistic
software export documentation software textile
software costing software sampling software
development software invoicing system quality
assurance software export shipping software
documentation software fiber inventory software
fabric costing software export trading company
software merchandising management system
apparel software clothing factory software fabric
mill inventory system cotton mill costing software
factory evaluation software AQL inspection system
sample & sourcing software product development
system yarn woven knit fabric costing inventory
software garment merchandising system raw
material resources planning system software
wholesaler inventory system order system export
trading shipping document system catalog software
trading invoice software stock management
software warehouse movement system garment
software for merchandiser production tracking
software export shipment system order
Welcome to the ibuyer.hk general user manual
-
This is a general knowledge for all of our software V3.58 onward. For earlier version please refer to the old manual.
-
For installation instruction, please refer to the separate installation guide.
-
For the using of individual software, please refer to the specific manual for individual software.
-
For the platform, database structure and design change of software, please refer to the technical manual.
Content
Concept
01. Multiple users database
02. Desktop icon.
03. Data file location & Security.
04. Shortcut path.
05. Start.
06. Work group.
07. Dashboard
08. Button logic.
Input record
09. Records
10. Top menu bar.
11. Navigation bar.
12. TAB key.
13. Record ID number.
14. Field limitation.
15. Auto look up.
16. Convert button.
17. Select & insert.
Delete record
18. Delete record.
Search record
19. Find record.
Print out
20. Print Preview document & report.
Filing electronic document
21. Documentation Filing Database.
Most Important
22. Back up.
Multiple user database
All of our software is database for multiple user to connect, read, write, edit at the same time. Principle is similar to sharing a
Word or Excel file in a share folder. By select install location to the same share folder during installation, all PC in the network is
targeted to the same set of data file which means sharing same set of information. This is the purpose of using database and let
every colleague in the office to share business information.
Desktop Icon
Once you have successfully installed our software, you will see two icon on the desktop of your PC. Double click it and will open
the software that you have installed. (You must click the desktop icon shortcut to open the product, directly clicking the data files
inside the working folder won’t open the product)
One of the icon open a blank database (actual working database)
While the other open a database with simulated data demo (for self-learning)
Data File Location & Security
For Windows base Edition, which means the software, is physically downloaded, installed and located in user's hard disk. We do
not keep any of your data; it is being kept inside your PC's storage media. Default install in C:\ drive and network share folder for
multiple user installation. When user input and save the data, it saved in a data file inside their C:\ drive. For example
C:\MerchanNet\MerchanNetEN.mdb
C:\CostingNet\CostingNetEN.mdb
C:\TextileNet\TextileNetEN.mdb
In this connection, users have 100% secure of their own data and 100% privacy of the sensitive figures inside the software.
Shortcut path
In general, the shortcut path on the desktop icon is usually pointed to the data files of the software. For our product, the
shortcut path will be pointed to more than one single data file due to workgroup user logon engaged.
In case of MerchanNet, for example
"C:\Program Files\Microsoft Office\Office15\MSACCESS.EXE" "C:\ MerchanNet\MerchanNetEN.mdb " /wrkgrp "C:\ MerchanNet\MerchanNet.mdw" /runtime
If you right click the software desktop icon > select “property” on the “target” field, you will see the above.
The 1st command script is pointed to MS Access.exe file to open Microsoft access
The 2nd command script is pointed to MerchanNetEN.mdb to open data file
The 3rd command script is pointed to the MerchanNet.mdw to logon the user workgroup file
For multiple user installation, all the target shortcut path pointed to the same files inside the same share folder location
Start
Our software has a workgroup control, which means user has to logon with a name and password. The workgroup user right
control is a common tool for controlling the read / write / edit / delete for a database in multi-users environment. Simply saying,
for example, a merchandiser can read write the merchandising but not the accounts. A production coordinator can read the
shipping but not the personnel details.
If you click the program icon, it will open the dashboard, suppose the software is successfully installed. A logon dialogue will be
pop-up and asking for the logon user name and password. By default, the official admin user name and logon password is;
Name: CEO
Password: 123
Workgroup
Since our software product has work group user right implemented, when you logon, user name and password will be required
to reinforce the user right security. By default, all user password is 123. Once you have first logon to the user account, please
change the password to reinforce the security. In case the password has been forgotten or lost, you can always logon as
administrator to re-set the password. To the most case, we can re-set all the user name and password to the original installed
default by replacing password security files.
Click the above button will pop up with user group dialog. On the above dialog, you can see the entire user name and their user
right. The user’s read write permission can be assigned by the User and Group Permission button. Separate user level security
(read / write) can be set individually according to user or group. This can limit the user to read or write individual modules (table
records) by their job nature and limitations.
Dashboard
Once the software is opened, you will see the dashboard with departments or the work flow of the program. This is the main
screen of the program and user will use it to
-
Switch to different departmental modules.
-
Follow the workflows
For example; MerchanNet dashboard - departmental
For example; CostingNet dashboard – workflows
For example; TextileNet dashboard – workflows
Button logic.
The workflow and button logic of the dashboard is always from left to right, top to bottom.
1, 2, 3, 4, 5…
A, B, C, D, E…
a,b,c,d,e…
Records
The database handles the record in two ways and interact with the users in
1.
Forms – for input, edit record. (exists in single form view and datasheet view)
2.
Reports – for print preview record. (in document and report list summary)
Below is a single form view display 1 main record and few sub-table record. First input the main form record and then the
sub-table record. Use the right-hand side filter to search record, print preview pull down list, convert button or select &
insert button to handle or re-use the record.
Datasheet view (list button)
Top menu bar
The top menu bar (Top left hand side) provides some basic and useful function of our program. For example; back up database,
compact & repair database, ascending, descending, export to excel spreadsheet, word, cut, copy and paste,
Undo – undo record
Redo – redo record
Back up database – back up the current database into an individual back up file. (Back up all data)
Compact repair database – re-index the database table.
Ascending – sort ascending for records.
Descending – sort descending for records.
Export to spreadsheet – export report to an excel format.
Export to rtf file – export document to word format.
Cut – highlight and cut text record.
Copy – highlight and copy text record.
Paste – move cursor to field and paste copied text record.
Navigation bar
When user opens one of the form, it is basically an input front end to carry out data input for your business need.
Generally it would be a product details form, order details, productions details, raw material details, inventory record and
shipping records.
A single form view holds your business record one by one. For example, a product detail form holds 1000 products; it will show
the detail page by page with 1000 pages. User can browse each record by next and previous button.
Example of navigation bar
On the top of a form, there is a navigation bar to help user browse / input / edit the record
User can use it to find, browse next, browse previous record, add or duplicate existing record, save, delete or list record.
The record is being shown in descending order which means the newest record will be on top and the oldest record will be on
the bottom page. Cause user is normally working with the newest record most of the time.
TAB key
On the left hand side on your keyboard, there is a TAB key. This is quite useful for inputting our program. When user are in the
input form, please use the TAB key to move from field to field to carry out input of the forms. This will act as guidance for the
input sequence that help user easily using our program.
Record ID number
The ID number is an incremental auto number and cannot be changed by user, every time when you add a new record to the
database, a new number will be given. We named it Product ID, POID, Order ID, Shipment ID, Inspection ID, Purchase ID, PurID or
item ID….etc. Which is used to identify the unique record and is very useful for link up other record in different modules.
Field limitation
Since we are using a relational database and there is some limitation to the data that we enter or input into the field.
We have to maintain the data integrity, that’s why there must be some limitation to the data input.
When you are inputting data to the product detail, order processing, purchase, you may have see this error:
IF you see above warning message and can’t get out, press ESC key on top left hand side of your keyboard
A/ numeric field – can’t input data other than number. i.e. 4.35 / 6.75 / 7.15
Numeric field such as price, quantity, percentage
B/ date field – can’t input data other than date format. i.e. 16-Jul-2010
When the cursor move into a date field, a date picker will show at the end of the field, please use it to select the date that
you want to input to the date field. A calendar will pop up when you click the date picker icon.
C/ selection field – must select from the data within the pull down list
For example, most of the merchandiser will input:
A/ on a date field (delivery) > ASAP, TBA, Before Xmas, B4 CNY rather than 31-dec-2010 > it won’t accept
B/ on a quantity field > TBA, order minimum, MOQ instead of absolute quantity 800.00 > it won’t accept
When it happen and if you got hold up, presses ESC to leave
D/ calculated field – result of other figures. i.e. subtotal, total, percentage, grand total, amount.
Normally these calculated field do not allow (no need) for you to key in any figures. It will be automatically calculated by the
result (quantity x price). The background color is usually in gray color to denote.
E/ read only field – reference of record from other tables.
Auto look up
When a user wants to select from the pull down list, usually they scroll through the list to find out what they wanted. However,
when you have a large number of records for selection, it would be impossible. We have made the auto look up function to
facilitate the search of record more easily. When the cursor moves into the pull down selection field, please start typing the
detail that you want. It will then jump to that particular group of record with best match from your input wording.
For example of the below sub-table; if you are looking for the style no. DEFGH, when you start typing DE…. It will automatically
jump to the record matching style no. DEFGH, so that user can easily pick their own choice.
Convert button
This is another important invention after version 7.38. Our database software are designed base on work flows. These buttons
will convert business data throughout the database system from one to two and two to three and so on.
The concept is to convert the business data forward hence improve the input to become more efficient, prevent duplicated input
and minimize typo error.
Concept of this converting data;
Like convert style > costing > quotation > sampling > sample invoice > order > purchase > shipping document.
Like convert product details > trading documents > purchase order > receiving > deliveries > shipping documents.
You will see these buttons on the right hand column bottom and will convert to next step accordingly. However, the next step
must be at least having the first record being inputted manually. As it has an artificial intelligence to made the best guess of the
newly append business data, which rely on the result of your last input.
Example: in style details (MerchanNet)
Example: in samples (MerchanNet)
Select & insert
In addition to the convert button, we also invented the filter, select & insert button. Which serve the same purpose of converting
old record from previous workflow to next workflow modules.
Example: in order processing (MerchanNet)
Example: in documents (TextileNet)
The above examples show that the A,B,C, 1,2,3, a,b,c pull down-list is a filter, filter then select & insert from the pull down list to
withdraw old record from previous workflow and insert into the sub-table of the current workflow. Which is designed to improve
efficiency, re-use old information, avoid duplicated input, avoids human error and speed up input.
Delete record
There is a delete button on the top menu. Once clicked, it will pop up with dialog asking for confirmation to delete the current
record. First it will delete all sub-table records and then the main record. This is to avoid user mistakenly delete important record.
At the same time avoiding merchandiser delete large number of records from the database.
If any user wanted to delete sub-table record, first highlight the sub-table record and then hit the delete key in your keyboard.
Example of deleting sub-table row
Some sub-table has a delete button at the end, may use it to delete a row of record.
Find record
Since the database will hold a lot of records for many years, it must be some effective way to find out and search old record.
In this connection, we have invented couple ways to help user finding old records.
-
Find record function.
-
Go To> record function.
-
Search record function.
-
List record function.
-
Parameters Filter & Look Up group of record function.
Find record function
If you hit the find button, a find dialogue will pop up. In the find what field, please fill in the text that you are looking for. You can
also specify the condition. Like “look in”, “match”, “search” and match case.
Go To> record function
It is a pull down list and simply select it will go to that particular record.
Search record function
List record function
There is a list button on the navigation bar. If you hit this button, a complete record list form will be opened, showing you all the
records. By clicking the ID number, style number, article number will move to that main record.
Example of list record button
There is sort ascending and sort descending function on the list form. User can use the text filters to filter the record by the text
selected. This could help user easily filter a group of record according to text selected.
If user want to further filter the pulled out list view (datasheet view of all records), please notice there is some pull down-list to
filter the list and minimize the resulting records. If user take a closer look at the end of each field, there is a small downward
arrow. Once you click it, a parameter filter dialog will pop up and provide further list filter function to minimize the resulting list.
This is quire useful if user looking at a modules will a lots of record on it as it has been used for many years.
Parameter Filter & Look Up record function
If you are looking for a group of record according to your parameters, please consider using the parameter filter.
This is a very useful filter and look up function. It could pull out a list of record according to the parameters that inputted to the
database previously.
For example, when you select an item group like woven, knit, men’s, ladies, toys…
Then on the [=result] field, it will pull out a list of item that belongs to this product type. The product type is defined by user
previously input to the database.
On the above screen, merchandise looking for any fabric inventory with a “cotton” description, they can select cotton and then
on the result material pull out a list of fabric with description wording include “cotton”. It could pull out multiple parameters. Like
cotton & black color. Then it will pull a list of cotton fabric in black color
Print preview document and report
User can only print document and report in the preview mode.
Example: Print preview mode
In addition, there are few more options;
-
Export to RTF file. (For document, PI, contract, Invoice & etc.)
-
Export to excel. (for summary list report)
-
Export to PDF format. (all print out)
User may also use this print preview mode to select printer, adjust margin, change paper size, set up pages etc. which is similar
to any office software to set the printer preference.
Documentation filing database
From Version 7.38 onward, we have added a documentation management system to all of our database software products.
The purpose of adding this function to our software product is to help solving the problem of numerous electronic documents in
the office. Here is what you are dealing with, everyday there are a lot of electronic documents being sent to your office from
different business contacts. These exist in different formats like .xls .doc .pdf .jpeg .eml .tiff .fax emails, scanned images .txt and
different kinds of electronic format. After a while, it would be too much of it and would be almost impossible to find out the
exact document that you want. However it is important and vital to find out the copy of it as a proof of business transaction. For
example like price quote from supplier, delivery date confirmation with customer, product specification and etc.
The traditional way dealing with these document would be very time consuming or even annoying. By print it out and insert it
into a paper box file. The merchandiser will need to spend tens of hours to dig out an exact copy of the document after few
months. That is very cost ineffective and spending too must time on these searching document issue leading to error and fatigue
of the merchandiser as a result they cannot focus on providing service to the customer.
In order to sort out this problem, we have invented a documentation filing database to overcome this issue. We have created
some database for different department to keep their own electronic documents and index by some key words. User can attach
the electronic documents end of the day to the database and meantime key in some simple key words. The whole office can
search, find and filter the related document within second. As a result saving a lot of time spending on finding documents.
It splits into five departments,
Administration,
Merchandising,
QC/Production,
Shipping/Warehouse,
Accounts,
Example: Documentation Filing modules (MerchanNet)
Each department supposed to file their own electronic documents by the above document filing database at the end of the day.
Other department can open it by search and share the relevant documents.
Example: documentation filing (TextileNet)
The relevant department can attach their electronic document to their own section of database. When they attach the
documents they are required to fill in simple text for future index, filter and search for the relevant documents.
The simple index text could be customer name, supplier name, pro forma no, sales contract no, purchase order no, invoice no,
article no, style no or any remarks with reference to the particular electronic document.
It could be attaching more than one document per record, simply saying just group the same electronic documents with
common nature and made it easier for future find and search.
While the Administration and Accounts department has sensitive information, these two form for these two department can be
encrypted and protected by adding an additional password to it.
For the administration department and accounts department, the database section for these two departments could be
password protected. The password setting would only encrypt this section of documentation filing system and would not affect
the rest of the database.
Setting password button located at the end of the top menu.
Hope this documentation filing database would work as a better way to replace traditional box filing and merchandiser has no
longer need to go through each document one by one in future in order to locate a simple fax.
Back up
It’s very important to back up every day. Since the business record is a vital for your operation, so we recommend user backing
up the data file every day. User may also consider using the automatic back up, so that a daily schedule back up can be set up.
Please click admin button > automatic back up and follow the wizard to set it up.