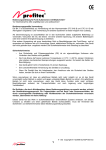
1
300 220-1
Environmental conditions
-10°C to 40°C, relative humidity
70% non-condensing for all units
except the external siren. Siren: -20°C
to 50°C, relative humidity 95% noncondensing
Radio operational range
30m in a typical domestic
installation, range can vary depending
on building construction, device
positions and RF environment
Housings ABS/polycarbonate
Siren
Siren output 104dBA sound pressure @
1m minimum
Radio 433.92MHz AM super heterodyne
receiver with jamming detection
Power supply 6V, 4 x D alkaline cells. 3
years typical service life
EMC Tested to EN 300 220-1 and ETS
300 683
Environmental conditions -10°C to
40°C, relative humidity 70% noncondensing
Radio operational range 30m in a
typical domestic installation. Can vary
Door/window contact
building
and the batteries are installed
The unitsdepending
red LEDondoes
notconstruction
flash when
RF environment
Radio Microprocessor controlled
Ensure the
batteries are connected correctly according to the
Radio
Microprocessor
controlled
433.92MHz AM transmitter
in the battery
compartment.
433.92MHz AM transmitter
Power supply 3V, 2 x AAA alkaline cells. 3
Power supply 12V 23A/MN21 alkaline
years typical domestic service life
miniature
‘lighter
battery’. 3 years
The red light
keeps
flashing
typical domestic service life
Radio 433.92MHz AM transmitter
Power supply 4.5V, 3 x AA alkaline cells.
3 years typical domestic service life, 1minute sleep timer
Movement detection range 15m, 110°
Troubleshooting
Smoke detector
diagram
This is the ‘low battery’ indicator. Replace the unit’s batteries.
Radio Microprocessor controlled
Radio ON/OFF
433.92MHz AM transmitter
The
Power supply 6V, 4 x AAA alkaline cells.
3 radio is default to
years typical domestic service life if you are using just a
Keyfob remote control
be always on. It is possible to disable the radio function
single device in order to conserve power.
To turn ON radio: Enter your 4 digit PIN followed by “2, 1, 1, 1, 1”.
To turn OFF radio: Enter your 4 digit PIN followed by “2, Yale, Yale, Yale,
Yale”.
Radio Microprocessor controlled
433.92MHz AM transmitter
Power supply 12V, 23A/MN21 alkaline Factory reset
miniature "lighter" battery. 3 years
If you forget your
typical domestic service life
Keypad remote control
Radio Microprocessor controlled
433.92MHz AM transmitter
PIN or the system malfunctions, you can press the reset
button (locates behind battery cover) to erase all memory. Please ensure the
device is powered and system is in Disarm mode. After reset you will need to
set-up your PIN again and pair with other devices (if required).
ARM
CLR
Battery precautions
When using this product follow these precautions at all times;
• Use only the appropriate size batteries
• Be sure to follow the correct polarity when installing the batteries as indicated in the battery compartment. Incorrect polarity may cause damage to the unit
• Do not mix old and new batteries
• If the alarm is not used for long periods of time, remove the batteries to prevent damage to the unit or injury from possible battery leakage
• Do not recharge batteries not intended to be recharged. Always follow the manufacturers directions
• Please only use alkaline batteries
1
2
3
Wireless range
If using as part of an extended system the range of these parts is a
minimum of 1 meter, up to a maximum of 25 meters.
System activity
Please note, when the red light is on the product is processing, so no
operation will work (for example, you will not be able to enter your PIN)
0560
WEEE
Note: Waste electrical products should
not be disposed of with household
waste. Please recycle where facilities
exist. Check with your local authority or
retailer for recycling advice.
Single room alarm with PIR
Yale
School Street, Willenhall,
West Midlands WV13 3PW
Tel: +44 (0) 1902 364606
Fax: +44 (0) 1902 364692
email: [email protected]
www.yale.co.uk
User Manual
Keep this manual safe for future reference
E1 09/08
18
SAA8011
Product diagram
Setting the PIN code
Front
In order to use the unit you must set a 4 digit PIN code, using the
buttons 1, 2, 3, Yale. The default setting of this is 1, 2, 3, Yale. To
change this;
1. Front ‘eyebrow’ contacts
2. Motion sensor
ARM
1
2
3. LED x 3
4. ARM & CLR buttons
CLR
3
5. 1, 2, 3 & Yale buttons
6. Siren
1. Enter the current PIN (default set to 1, 2, 3, Yale)
2. Press CLR (the orange LED will be on for 3 seconds)
3. Enter the new PIN code
4. Enter old PIN and press CLR.
5. The orange LED will flash 3 times to confirm
6. The unit will return to disarm mode (red LED will flash 3 times)
NOTE: For security reasons, if a delay of more than 5 seconds occurs
between any of the above steps all LEDs will flash 3 times, and the
unit will beep to confirm an error the unit will return to disarm mode.
NOTE: If this procedure is not completed correctly within 5 attempts
the unit will lock for 5 minutes.
Installing the unit
The unit has been designed to be either free standing or wall
mounted.
To wall mount;
1. Place the alarm in the desired location (preferably with the PIR
angled towards a door).
Back
1. Reset button
Operation
Leaving the protected area
2. Battery compartment
3. Rear contact points
Battery installation
Press the ARM button on the unit, the red LED will quickly flash to
confirm the unit is armed. You have 20 seconds to vacate the area.
During this period, 4 count down beeps (with 4 single Green LED
flashes) will sound to warn of the exit period.
Entering the protected area
The battery compartment is located on the rear of the alarm unit. It can be
accessed by removing the screw from the back of the unit and lifting the
cover.
Insert 4 ‘AA’ Alkaline size batteries (not included) as shown on the diagram
inside the compartment. When the final batteries are inserted the centre
red LED will flash 3 times. Replace the back cover and fix with screw.
NOTE: Please wait 30 seconds before inserting new batteries whenever
you take old batteries out.
Within 10 seconds of entering type in your 4 digit PIN code and press
CLR. The red LED will quickly flash and the unit will beep once to
confirm the unit is disarmed.
NOTE: If PIN entered incorrectly 5 times, unit will beep 10 times and
the unit will ‘lock’ (not do anything e.g. keypad locked) for 5 minutes. Unit continues in whatever mode it was in prior (e.g. siren sounding)
Care and maintenance
If the unit is activated the siren will sound for 2 minutes. The orange
LED will also flash (this is to show which unit has been triggered, if you
have move than one device set up to work together).
To clean the unit, simply use a soft, slightly damp with water, cloth
and wipe dry immediately.
Caution: Never use chemicals to clean the unit as this may cause
damage to the plastic and result in the alarm not functioning.
Alarm activated
Pairing the PIR with another unit from the
range
The standalone alarm range has been designed specifically to
operate as single units or be paired together to work as kits.
Up to 3 of the master units – those that have sensors as well as
sirens – can be paired together. The number of slave units – those
that do not have sensors – that will work together is limitless.
This PIR is a master unit.
Each master unit has a unique radio code, which can be sent to any
other unit in order to make them work together.
The procedure for doing this is as follows:
1. Starting with any master unit which you want to be the main unit for the system
2. Enter your PIN code and then press the Yale button
3. The LED will flash in the sequence green, orange, red
4. The unit is now in ‘sending’ mode for the next 2 minutes.
The green and orange LED will flash every second
5. Hold the rear metal contact points of the main unit against the ‘eyebrow’ contact points of the learner unit to which you are pairing
6. To confirm the units are paired, the learner unit will have red LED on constantly (indicates units in contact) and will beep once.
If you do not hear a beep release the units and pair again (step 5).
7. Repeat this contact (steps 5 and 6) for all other learner units you want to pair with the main unit
8. After the 2 minutes 3
2
1
sending mode the main unit will return to disarmed mode. The red LED will flash 3 times to confirm.
NOTE: If you wish to exit the learning mode within the 2 minute
duration, press CLR button twice on the main unit to exit.
RANGE: Minimum 1 metre, maximum upto 25 metres.