1
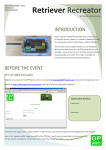
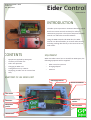
Document number: 3349
Version: 02
Date: Nov/2012
Eider Control
USER MANUAL
INTRODUCTION
The Eider system provides a method of delivering punch
data from remote controls wirelessly for safety or
commentary purposes. The system comprises the Eider
Control unit and Eider Terminal hardware.
Using the GSM network and GPRS data, the Eider
Control unit allows flexibility on remote radio controls,
including sending data directly to the internet for live
web results.
CONTENTS
∼
∼
∼
∼
∼
∼
∼
Equipment supplied by GPProjects
Anatomy of an Eider unit
Eider unit operation
Charging an Eider unit.
Configuration set up - Menus.
Deploying an Eider unit at a control site
FAQ
EQUIPMENT
When the Eider Control unit is rented from GPProjects, the
following equipment will be supplied:
∼
∼
∼
Eider Control 3 input unit
Charging adaptor
Antenna
ANATOMY OF AN EIDER UNIT
USB Charging Connector
RS232 Serial Connectors
Radio antenna
Menu Button
GSM Coverage
Indicator
Battery Status
Indicator
IMEI serial number
SIM Card Socket
OPERATION
When programming SportIdent
controls, ensure that ‘Autosend’ is
enabled, the baud is set to 4800, and
extended mode is NOT selected.
The default screen for the Eider unit
shows the status of the device.
CONFIGURATION SET UP
∼
∼
∼
∼
∼
Stored: Indicates the number of
punch records received / stored
Sent: Indicates the number of punch
records transmitted to the server
The bottom edge of the LCD indicates
the status of the battery, the
connection status and the signal
strength of the GSM network:
x
not connected
full signal
Note the signal strength indicator is
only valid when the GSM modem is
online.
The network status can have the
following states:
∼
∼
∼
OFF-LINE – The GSM modem is
powered off
SEARCH – The GSM modem is
searching for a network
ONLINE – The Eider unit has
registered on a network, but
no network name is available
ROAM – The Eider unit has
registered on a network, but
no network name is available
DENIED – The Eider unit has
been unable to register on a
GSM network
STAT TX – A status message
has been sent
GPRS – The Eider unit has
successfully connected to the
GPRS network.
Or, the name of the network
the Eider is registered with.
Eider is based on a menu
configuration system. The four
buttons have consistent functions
within each menu:
∼
∼
∼
∼
Black: Move to next menu
Green: Restore setting to
factory default
Red: move the setting up
Yellow: move the setting down
MENUS
Hardware
CHARGING
Remove the waterproof lid on the
Eider unit by releasing the 4 screws
(turn by 90 degrees).
Switch on the Eider unit using the
external battery isolate switch.
Connect the charging adaptor to
either of the ‘Mini-USB’ socket inside
the Eider unit.
Within 30 seconds the battery
indicator on the screen will indicate
the battery is charging. The green
charging indicator will also light up.
In the event that the red error charge
indicator becomes lit, unplug the
charging adaptor then reconnect. If
the error continues, please contact
GPProjects.
Once the Eider Control unit is fully
charged the green indicator will go
out. The battery may take up to 6
hours to charge fully.
This menu selects what hardware is
connected to the RS232 serial input
(SportIdent or EMIT)
Flash Status
Indicates the current status of the
record archive memory, including the
number of records received from the
radio control (‘stored’) and
transmitted (‘sent’) to the server.
Adjusting the ‘Sent’ number down
will force the most recently received
records to be resent.
Boot Count
The boot count is a number that
helps in time correction. Normally it
does not need to be changed.
However should you need to reset
the flash, the green button pressed
at this menu will reset both the
‘Stored’ and ‘Sent’ counters to zero
and return you to the previous
screen for confirmation.
Watch the Eider unit find a network
and send the data – the network
status will change to ‘GPRS SEND’
and the ‘Sent’ number will increment
to the same number as ‘Stored’.
Stay Awake Time
The Eider unit will remain online for
the defined period after sending a
record. When using power saving
settings this allows the server to
communicate with the Eider unit.
Menu Status Interval
The Eider Control unit will
automatically send a status message
if there have been no punch data
received for the time selected. This
allows the base to know if it has
received all the data packets and the
current status of the Eider unit. To
disable this feature set the interval to
0 minutes.
Menu Maximum Time Offline
If the Eider Control unit is offline, it is
unable to receive communication
from the server (e.g. to re-request
missing punch data). When the Eider
unit has been offline for the period of
time selected, it will come online to
communicate with the server. The
unit will stay online if the time is set
to 0.
AT THE CONTROL SITE
When the unit is charged and it is set
up as required remove the charger,
switch off the unit and replace the
lid. Ensure the screws are turned 90
degrees to maintain the waterproof
seal.
At the control site, attach the radio
control(s) to the Eider unit, and
switch it on. The screen will go
through the welcome messages to
the base view. Check battery status
and network signal detection (this
may take a minute or two).
Punch radio control, and watch the
‘Stored’ count increment. If more
than one radio control is attached,
punch every one. The ‘Stored’ count
will include status updates, so may
show a number greater than the
number of punches – check every
punch makes a corresponding
‘Stored’ count increment.
Using cable ties through the plastic
loops on the back of the Eider
Control unit, attach it securely to the
stake.
Neatly gather any loose cable into
the stake and secure with cable ties.
If more than one control stake is
used, either dig-in the cable or locate
the two stakes back to back so that
competitors cannot trip over, or
damage, the cable.
FAQ
Q. I am not receiving data back from
my radio control, what should I do?
A. Check the Eider and radio controls
are on. Check the Eider battery level,
network status and ‘Stored’/’Sent’
status of punch data.
A. If punching the radio control
doesn’t cause the ‘Stored’ number to
increment, check the connection(s)
between the radio control and the
Eider unit, next check that the Eider
unit is set to receive data from the
correct radio control type. Lastly
confirm the radio
control hardware is
programmed for
autosend.
8 Fredrick Sanger Road
Surrey Research Park
Guildford, GU2 7YD
Tel: +44 (0) 1483 685200
Fax: +44 (0) 1483 685201