1
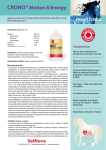
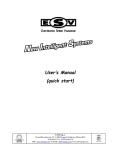
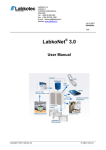
RF Remote Control User Manual Rev. A: Jukka Viinamäki 19.08.2010 RF Remote Control User Manual Table of Contents General Description ......................................................................................................................... 3 Features ................................................................................................................................... 3 Battery Installation ........................................................................................................................... 4 Using of RF Remote Control ........................................................................................................... 5 Menu Structure ............................................................................................................................. 6 Menu Usage ................................................................................................................................. 7 Main menu ............................................................................................................................... 7 Prices menu (menu > prices) .................................................................................................... 7 Settings menu (menu > settings) .............................................................................................. 8 Pylons menu (menu > settings > pylons) ................................................................................. 8 Adding of new pylon (menu > settings > pylons > Add new) ................................................. 8 Removal of pylon (menu > settings > pylons > remove)......................................................... 9 Editing of existing pylon (menu > settings > pylons > edit).................................................... 9 Qualitys menu (menu > settings > qualitys) .......................................................................... 10 Adding of new fuel type (menu > settings > qualitys > add new) ......................................... 10 Removal of fuel type (menu > settings > qualitys > remove)................................................ 10 Changing the name of fuel type (menu > settings > qualitys > edit) ..................................... 10 Changing the dot position (menu > settings > dot pos.) ........................................................ 11 Usage Example .............................................................................................................................. 12 1. Set the fuel types (qualities) ............................................................................................... 12 2. Set the pylon....................................................................................................................... 13 3. Set the prices ...................................................................................................................... 13 4. Transmit information to the pylon ..................................................................................... 14 Error messages ............................................................................................................................... 14 Error: Nothing to send................................................................................................................ 14 Error: Pylon x ............................................................................................................................. 14 Error: No qualitys defined.......................................................................................................... 14 Error: X Allready defined .......................................................................................................... 14 2 PIKOTEC OY 269.085/Tampere Tykkitie 1 FIN-36240 Kangasala Tel +358 3 3596000 Trade Reg.No Fax. +358 3 3596040 E-mail: [email protected] VAT number FI02982183 ALV REK. RF Remote Control User Manual General Description RF Remote control is designed for sending pricing information into the fuel displays using wireless connection. There could be several fuel displays in several display pylons. Pricing information is entered to the remote control and it will send all the information simultaneously to the pylons. So users don’t have to send the pricing information individually to every pylon. Features RF operational frequency is 433MHz Battery operated (3 x AA) Up to1000m range in free space. Range is usually less, since it is reduced by trees, buildings and other objects Radio conforms with EU R&TTE directive (EN 300 220, EN 301 489, EN 60950) Operational temperature range: -30C…+70C Amount of controllable devices by one remote up to o 9 Pylons with o 9 Displays with o 3 Sides 3 PIKOTEC OY 269.085/Tampere Tykkitie 1 FIN-36240 Kangasala Tel +358 3 3596000 Trade Reg.No Fax. +358 3 3596040 E-mail: [email protected] VAT number FI02982183 ALV REK. RF Remote Control User Manual Battery Installation Remote Control operates with three AA batteries. They are situated backside under the plastic cover. When batteries are getting uncharged, the display might go dim or it might glitter. That is fixed by replacing all three batteries by fully charged. Battery cover could be removed by unscrewing two screws as shown in the following pictures. Picture 1 – Unscrewing the cover Picture 2 – Proper order of the batteries 4 PIKOTEC OY 269.085/Tampere Tykkitie 1 FIN-36240 Kangasala Tel +358 3 3596000 Trade Reg.No Fax. +358 3 3596040 E-mail: [email protected] VAT number FI02982183 ALV REK. RF Remote Control User Manual Using of RF Remote Control Remote Control is controlled by keypad and the actions are shown in the display. There is no separate power switch in the device. Power is turned on if any of the keypad buttons are pressed and the power is turned off after 60 seconds if no key is pressed. There is no need for separate power supply since this device is battery operated. Check out the “Battery installation” in previous chapter. This remote control could be used to control different kinds of fuel display pylons. User could freely define the amount of displays per pylon, amount of display sides (directions), and the location of fuel types in the pylon. These settings have to be done only in the first time of use. Remote control remembers the settings because they are stored to the non-volatile memory. Settings will remain even if the batteries are removed. All the information could later be edited. If user wants to change the fuel price, this could be done simply editing the pricing information in the menu of remote control. After transmit is selected, all pricing information is updated to the displays of pylons simultaneously. In this point, user don’t have to know how many and what kinds of pylons there are, but just the new price of fuel. Main steps when setting prices at first time Set the fuel types (Diesel, 95E, etc.) Set the pylons (including information about the number of displays and which side of the pylon they are situated) Set the prices Transmit Main steps when changing prices later on Edit prices Transmit 5 PIKOTEC OY 269.085/Tampere Tykkitie 1 FIN-36240 Kangasala Tel +358 3 3596000 Trade Reg.No Fax. +358 3 3596040 E-mail: [email protected] VAT number FI02982183 ALV REK. RF Remote Control User Manual Menu Structure Main menu Add New Prices Settings Pylons Qualities Remove Edit Test SW ver Transmit Dot Position (not implemented in the pylon yet) Add New Remove Edit 6 PIKOTEC OY 269.085/Tampere Tykkitie 1 FIN-36240 Kangasala Tel +358 3 3596000 Trade Reg.No Fax. +358 3 3596040 E-mail: [email protected] VAT number FI02982183 ALV REK. RF Remote Control User Manual Menu Usage Main rules for navigation are: Press Enter to proceed to the selected menu bar (downward in the menu structure) Press Shift + F1 simultaneously to go back (upward in the menu structure) Press Shift + simultaneously to move up (keep shift down and press ) Press Shift + simultaneously to move down (keep shift down and press ) Main menu Menu Prices Settings Transmit Use arrow buttons (Shift + or Shift + ) to move up or down Press Enter to proceed “Transmit” will transmit all pricing information from the remote control to the display (or displays) in the pylon (or pylons). Always remember to press the transmit button after changes! If the pylon is not powered, remote control will give an error message. Likewise in other problems with transmission. Prices menu (menu > prices) Prices DIESEL 95E 98E DIESEL 0,000 DIESEL Save Cancel Use arrow buttons (Shift + or Shift + ) to move up or down Press Enter to change the price of selected fuel Press Shift + F1 to get back to the main menu Note that prices could not be set before qualities, for example DIESEL: Set the price by pressing numbers in the keypad Move cursor to the left or right by pressing (Shift + or Shift + ) Press Enter to approve the price Press Shift + F1 to get back to the prices menu Use arrow buttons (Shift + or Shift + ) to move up or down Press Enter to either save the changes or to cancel Press Shift + F1 two times to get back to the main menu 7 PIKOTEC OY 269.085/Tampere Tykkitie 1 FIN-36240 Kangasala Tel +358 3 3596000 Trade Reg.No Fax. +358 3 3596040 E-mail: [email protected] VAT number FI02982183 ALV REK. RF Remote Control User Manual Settings menu (menu > settings) Settings Pylons Qualitys Dot Pos. Use arrow buttons (Shift + or Shift + ) to move up or down Press Enter to proceed Press Shift + F1 to get back to the main menu Dot Position is not in use yet, so this should be ignored. Dot is always after first digit, for example 1,234. Pylons menu (menu > settings > pylons) Pylons Add new Remove Edit Test SW ver Use arrow buttons (Shift + or Shift + ) to move up or down Press Enter to proceed Press Shift + F1 to get back to the settings By selecting “Test” the device will begin the testing sequence, which will go through all the segments in the display. This could be used to verify that all LEDs in the display and the RF link are operating By selecting “SW ver” the device will ask the software version from the pylon. Pylon will answer by sending the software version and it will be shown in the display of remote control Adding of new pylon (menu > settings > pylons > Add new) Pylon 1 Displays: 1 Pylon 1 A1 Blank DIESEL 95E 98E All Set Set the number of display sides (directions) by pressing numbers in the keypad. Note that there could be only one, two or three sides, so only those are applicable values (1…3) Press Enter to approve the amount of sides Press Shift + F1 to get back to the pylons menu without saving the changes This is the quality of lowest (1) display in the pylon Use arrow buttons (Shift + or Shift + ) to move up or down Press Enter to proceed Press Shift + F1 to get back to the pylons menu without saving the changes “Blank” will set the lowest display empty. (All LEDs in that display are off) “All Set” will return to pylon menu after saving the changes. Example: There are two displays in one side of the pylon. Choose now some of the qualities and press Enter. The following menu will appear: 8 PIKOTEC OY 269.085/Tampere Tykkitie 1 FIN-36240 Kangasala Tel +358 3 3596000 Trade Reg.No Fax. +358 3 3596040 E-mail: [email protected] VAT number FI02982183 ALV REK. RF Remote Control User Manual Pylon 1 A2 Blank DIESEL 95E 98E All Set Pylon 1 A3 Blank DIESEL 95E 98E All Set This is the quality of second (2) display from the ground Use arrow buttons (Shift + or Shift + ) to move up or down Press Enter to proceed Choose now some of the qualities for second display and press Enter. Now the following menu will appear: This is the quality of third (3) display from the ground Use arrow buttons (Shift + or Shift + ) to move up or down Press Enter to proceed Because in this example there are only two displays, “All Set” should be chosen and Enter should be pressed. When this is done, new pylon is created. Remember to navigate back to the main menu and to press transmit in order to send this pricing information to the displays in the pylon. Removal of pylon (menu > settings > pylons > remove) Rem. Pylon Pylon 1 Pylon 2 Pylon 3 Pylon 2 Remove Cancel Use arrow buttons (Shift + or Shift + ) to move up or down Press Enter to remove selected pylon Press Shift + F1 to get back to the pylons menu If for example pylon 2 is selected, this menu appears Use arrow buttons (Shift + or Shift + ) to move up or down Press Enter to proceed “Remove” will remove the selected pylon (Pylon 2 in this case) “Cancel” will return to remove menu without deleting selected pylon Editing of existing pylon (menu > settings > pylons > edit) Edit Pylon 1 Pylon 2 Pylon 3 Use arrow buttons (Shift + or Shift + ) to move up or down Press Enter to edit selected pylon Press Shift + F1 to get back to the pylons menu After pressing of enter the procedure is similar to adding new pylon 9 PIKOTEC OY 269.085/Tampere Tykkitie 1 FIN-36240 Kangasala Tel +358 3 3596000 Trade Reg.No Fax. +358 3 3596040 E-mail: [email protected] VAT number FI02982183 ALV REK. RF Remote Control User Manual Qualitys menu (menu > settings > qualitys) Qualitys Add new Remove Edit Use arrow buttons (Shift + or Shift + ) to move up or down Press Enter to proceed Press Shift + F1 to get back to the settings menu Adding of new fuel type (menu > settings > qualitys > add new) New quality A_____ Move cursor to left and right by keeping shift depressed and pressing arrow buttons (Shift+ and Shift+) Explore numbers and characters by keeping shift depressed and pressing arrow buttons up and down (Shift + or Shift + ) Press Enter to save new fuel type (quality) Press Shift + F1 to get back to the qualitys menu without saving the changes Removal of fuel type (menu > settings > qualitys > remove) Rem. quality DIESEL 95E DIESEL 98E Remove Cancel Use arrow buttons (Shift + or Shift + ) to move up or down Press Enter to remove selected fuel type (quality) Press Shift + F1 to get back to the qualitys menu Menu looks like this if “DIESEL” is selected Use arrow buttons (Shift + or Shift + ) to move up or down Press Enter to proceed “Remove” will remove the fuel type (DIESEL in this case) “Cancel” will return to remove menu without deleting selected fuel type Changing the name of fuel type (menu > settings > qualitys > edit) Edit quality DIESEL 95E 98E Move cursor to left and right by pressing arrow buttons (Shift+ and Shift+) Explore numbers and characters by pressing arrow buttons up and down (Shift + or Shift + ) Press Enter to save changes Press Shift + F1 to get back to the qualitys menu without saving the changes This menu could also be used to check out what fuel types there are in the memory of remote control 10 PIKOTEC OY 269.085/Tampere Tykkitie 1 FIN-36240 Kangasala Tel +358 3 3596000 Trade Reg.No Fax. +358 3 3596040 E-mail: [email protected] VAT number FI02982183 ALV REK. RF Remote Control User Manual Changing the dot position (menu > settings > dot pos.) This function is not implemented in the display yet. It is for the future development 11 PIKOTEC OY 269.085/Tampere Tykkitie 1 FIN-36240 Kangasala Tel +358 3 3596000 Trade Reg.No Fax. +358 3 3596040 E-mail: [email protected] VAT number FI02982183 ALV REK. RF Remote Control User Manual Usage Example In this example there is a fuel display pylon with six displays. There are three displays on top of each other in two sides. See the picture beneath. Picture 3 – Example Pylon There are three types of fuel for sale: 98E, 95E and Diesel. Prices are 1.762, 1.327 and 1.012 respectively. The prices are shown into two directions as shown in the picture. 1. Set the fuel types (qualities) Go to the menu > settings > qualitys > add new by using Shift + , Shift + and Enter as described in the earlier chapter. Now write DIESEL and press Enter. You should be returned to the qualitys menu. Press Enter, write 95E and press Enter again. Do the same thing with 98E. Return to the main menu by pressing two times Shift + F1. 12 PIKOTEC OY 269.085/Tampere Tykkitie 1 FIN-36240 Kangasala Tel +358 3 3596000 Trade Reg.No Fax. +358 3 3596040 E-mail: [email protected] VAT number FI02982183 ALV REK. RF Remote Control User Manual 2. Set the pylon Go to the menu > settings > pylons > Add new by using Shift + , Shift + and Enter as described in the earlier chapter. Press number 2 to impress that the displays reside in two sides of the pylon. Now do the following selections: Select “DIESEL” and press Enter > Select “95E” and press Enter > Select “98E” and press Enter > Select “All Set” and press Enter. Repeat this sequence (Select “DIESEL” and…). Return to the main menu by pressing two times Shift + F1. Views in the display should be as follows (selections are bolded): Pylon 1 Displays: 2 Pylon 1 A1 Blank DIESEL 95E 98E All Set Pylon 1 B1 Blank DIESEL 95E 98E All Set Pylon 1 B2 Blank DIESEL 95E 98E All Set Pylon 1 A2 Blank DIESEL 95E 98E All Set Pylon 1 B3 Blank DIESEL 95E 98E All Set Pylon 1 A3 Blank DIESEL 95E 98E All Set Pylon 1 B4 Blank DIESEL 95E 98E All Set Pylon 1 A4 Blank DIESEL 95E 98E All Set Pylons Add new Remove Edit Test SW ver Directions are separated from each other by calling first direction as A and second as B. Return to the main menu by pressing two times Shift + F1. 3. Set the prices Go to the menu > prices > DIESEL by pressing two times Enter in the main menu. Now set the price for Diesel (1.012) by pressing the numbers in the keypad and press Enter. Check that “Save” is selected and press Enter again. You should be returned to the prices menu. Repeat this procedure for the other fuel types 95E and 98E. These should be visible in the prices menu. If not, ensure that first step was made correctly (1. Set the fuel types). Views in the display should be as follows while setting the prices: Prices DIESEL DIESEL 95E 98E 1.012 Prices 98E DIESEL 95E 98E 1.762 DIESEL Save Cancel 98E Save Cancel Prices DIESEL 95E 98E 95E 1.327 95E Save Cancel Prices DIESEL 95E 98E 13 PIKOTEC OY 269.085/Tampere Tykkitie 1 FIN-36240 Kangasala Tel +358 3 3596000 Trade Reg.No Fax. +358 3 3596040 E-mail: [email protected] VAT number FI02982183 ALV REK. RF Remote Control User Manual Return to the main menu by pressing Shift + F1. 4. Transmit information to the pylon Select “Transmit” in the main menu and press Enter. (Notice that this is example only. If you don’t have pylon where this information could be sent, you get an error message). If this pylon really exists, you get message “Success: All prices sent”. Error messages Error: Nothing to send This error occurs if you try to transmit, but there is no any pylon set up in the remote control. Use menu usage explanation “Adding of New Pylon” or “Usage Example” to set up pylon correctly (pages 6 and 9 of this manual). Error: Pylon x (x is a digit that denotes the particular pylon) For some reason remote control could not send the information to the pylon. Common reason is that there is no power connected to the pylon. There are usually some digits visible in the pylons display if it is powered. Other strong possibility is that distance between remote control and pylon is too great. Go closer to pole with remote control and try to transmit again. Error: No qualitys defined This error occurs if you try to set up pylon or to navigate to the Prices menu before defining qualities (fuel types). Return to the main menu and define qualities as described in chapters “Adding of new fuel type” and “Usage example”(pages 7 and 9). After that, you should be able to set up new pylons and to set the prices without receiving this error message. Error: X Allready defined This error occurs if you try to add new fuel type (quality) but there is already fuel type with same name (X in this case). Use different name for your new fuel type (for example Diesel2). Note that if you want just to change the price of this existing quality, it could be done as described in chapter “Prices menu” (page 5). 14 PIKOTEC OY 269.085/Tampere Tykkitie 1 FIN-36240 Kangasala Tel +358 3 3596000 Trade Reg.No Fax. +358 3 3596040 E-mail: [email protected] VAT number FI02982183 ALV REK.