1
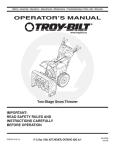
Form No. 3365-267 Rev A
1800 Power Curve® Snowthrower
Model No. 38381—Serial No. 311000001 and Up
Operator's Manual
IMPORTANT SAFETY
INSTRUCTIONS
Do not overreach—Watch your footing and keep your balance at all
times.
If the appliance strikes a foreign object, follow these steps:
When using an electrical appliance, basic precautions should
always be followed, including the following:
READ ALL INSTRUCTIONS BEFORE
USING THIS APPLIANCE
WARNING
—To reduce the risk of fire, electric shock,
or injury, follow these safety instructions.
It is essential that you or any other operator of the appliance
read and understand the contents of this manual before operating
the appliance. Pay particular attention to the safety alert symbol
which means CAUTION, WARNING, or DANGER—personal safety
instruction. Read and understand the instruction because it has to do
with safety. Failure to comply with these instructions may result in
personal injury, risk of fire, or electrical shock.
•
•
•
Stop the appliance.
Inspect for damage.
Repair any damage before starting and operating the appliance.
Disconnect the appliance—Disconnect the appliance from the power
supply when not in use, before servicing, when changing accessories,
etc.
Store an idle appliance indoors. When the appliance is not in use,
it should be stored indoors in a dry, secured place out of the reach
of children.
Maintain the appliance with care—Follow instructions for changing
accessories.
This appliance meets or exceeds the B71.3 specifications of the
American National Standards Institute in effect at the time of
production.
Replacement parts—When servicing the appliance, use only identical
Read and understand the contents of this manual before you start
replacement parts. Repair or replace damaged extension cords.
the motor.
Do not use the appliance on graveled surface unless it is adjusted for
This is the safety alert symbol. It is used to alert you to
such a surface in accordance with the Operator’s Manual.
potential personal injury hazards. Obey all safety messages that
Keep children and bystanders away—All visitors should be kept
follow this symbol to avoid possible injury or death.
at a distance from the work area.
Improperly using or maintaining this appliance could result in
Dress properly—Do not wear loose clothing or jewelry. They can
injury or death. To reduce this potential, comply with the following
be caught in moving parts.
safety instructions.
Wear rubber boots when operating the appliance.
Operating the appliance in the hand-held position is unsafe, except in
accordance with the special instructions for such use provided in the
Operator’s Manual.
Warning—To prevent electric shock, use the appliance only with an
extension cord suitable for outdoor use.
This appliance is capable of amputating hands and feet and
of throwing objects. Failure to observe the following safety
instructions could result in serious injury.
Training
•
Read, understand, and follow all instructions on the appliance and
in the manual(s) before operating this appliance. Be thoroughly
familiar with all the controls and the proper use of the appliance.
Know how to stop the appliance and disengage the controls
quickly.
•
Never allow children to operate the appliance. Never allow adults
to operate the appliance without proper instruction.
•
Keep the area of operation clear of all persons, particularly small
children.
•
Exercise caution to avoid slipping or falling.
Extension cords—To prevent the appliance cord and the extension
cord from disconnecting during operation, connect the extension cord
to the appliance as shown in Figure 9.
Avoid accidental starting—Do not carry the appliance with your
finger on the switch. Ensure that the switch is off when plugging in
the appliance.
If the appliance cord is damaged in any manner while it is plugged in,
disconnect the extension cord from the wall receptacle and contact an
Authorized Service Dealer.
Do not abuse the cord—Never carry the appliance by its cord or yank
on the extension cord to disconnect the appliance from the receptacle.
Keep the cord from heat, oil, and sharp edges.
Preparation
•
Thoroughly inspect the area where the appliance is to be used
and remove all doormats, sleds, boards, wires, and other foreign
objects.
•
Do not operate the appliance without wearing adequate winter
garments. Avoid loose fitting clothing that can get caught in moving
parts. Wear footwear that will improve footing on slippery surfaces.
Keep hands away from moving parts.
Keep guards in place and in working order.
Do not force the appliance—It will perform better and safer at the rate
for which it was designed.
© 2010—The Toro® Company
8111 Lyndale Avenue South
Bloomington, MN 55420
Register at www.Toro.com.
Original Instructions (EN)
Printed in the USA
All Rights Reserved
•
Do not attempt to clear snow from a gravel or crushed rock surface.
This appliance is intended for use only on paved surfaces.
SAVE THESE INSTRUCTIONS
•
Never attempt to make any adjustments while the motor is running
(except when specifically recommended by manufacturer).
Safety and Instructional Decals
•
Always wear safety glasses or eye shields during operation or
while performing an adjustment or repair to protect eyes from
foreign objects that may be thrown from the appliance.
Safety decals and instructions are easily visible
to the operator and are located near any area
of potential danger. Replace any decal that is
damaged or lost.
Operation
•
Do not put hands or feet near or under rotating parts. Keep clear
of the discharge opening at all times.
•
Exercise extreme caution when operating on or crossing gravel
drives, walks, or roads. Stay alert for hidden hazards or traffic.
•
After striking a foreign object, stop the motor, unplug the extension
cord, remove the key, and thoroughly inspect the appliance for
any damage. Repair any damage before starting and operating
the appliance.
•
If the appliance should start to vibrate abnormally, stop the motor
and check immediately for the cause. Vibration is generally a
warning of trouble.
•
Stop the motor, remove the key, and unplug the appliance
whenever you leave the operating position, before unclogging the
rotor blade housing or discharge chute, and when making any
repairs, adjustments, or inspections.
•
When cleaning, repairing, or inspecting the appliance, stop the
motor, remove the key, unplug the appliance, and ensure that the
rotor blades and all moving parts have stopped.
•
•
Exercise extreme caution when operating on slopes.
•
Never direct the discharge toward people or areas where property
damage can occur. Keep children and others away.
•
Do not overload the capacity of the appliance by attempting to
clear snow at too fast a rate.
•
•
Look behind and use care when backing up with the appliance.
Never operate the appliance without proper guards and other
safety protective devices in place and working.
Never operate the appliance without good visibility or light. Always
be sure of your footing, and keep a firm hold on the handle. Walk;
never run.
Clearing a Clogged Discharge Chute
Hand contact with the rotating rotor blades inside the discharge chute
is the most common cause of injury associated with snowthrowers.
Never use your hand to clean out the discharge chute.
To clear the chute:
•
Shut the motor off, remove the key, and unplug the extension
cord from the machine!
•
•
Wait 10 seconds to be sure the rotor blades have stopped rotating.
112-1597
Always use a clean-out tool, not your hands.
Maintenance and Storage
•
Check all fasteners at frequent intervals for proper tightness to
ensure that the appliance is in safe working condition.
•
Always refer to the Operator’s Manual for important details if the
appliance is to be stored for an extended period.
•
•
Maintain or replace safety and instruction labels as needed.
Run the appliance for a few minutes after throwing snow to prevent
freeze-up of the rotor blades.
2
114-4542
1. Read the Operator’s Manual.
2. Remove decal
3. Warning
117-8760
1. Warning—read the Operator’s Manual.
2. Thrown object hazard—keep bystanders a safe distance from
the machine.
3. Cutting/dismemberment hazard, rotor—stay away from moving
parts, keep all guards and shields in place; disconnect power
cord from power source and read the instructions before
servicing or performing maintenance.
4. Cutting/dismemberment hazard, rotor—stop the engine and
machine before leaving the machine.
5. Electric shock hazard—do not use a damaged power cord.
117-8778
114-9034
1. To engage the rotor, press the interlock switch on the handle.
117-8781
114-9035
1. To disengage the rotor, release the interlock switch on the
handle.
1. Cutting/dismemberment hazard, rotor—do not place your hand
in the chute; remove the ignition key and read the instructions
before servicing or performing maintenance.
3
Installing the Chute Control Rod
Setup
1.
Note: Determine the left and right sides of the machine from the
normal operating position.
Position the discharge chute so that it faces forward.
NOTICE! Align the arrow on the discharge chute with the
arrow on the housing (Figure 3).
Installing the Upper Handle
1.
Remove the handle knobs, oval bolts, and curved washers from
the lower handle.
2.
Install the upper handle to the lower handle of the machine with
the handle knobs, curved washers, and oval bolts as shown in
Figure 1.
Figure 3
1. Discharge chute
2.
2. Align the arrows
Insert the end of the chute control rod through the keyed hole in the
bracket that is attached to the top of the lower handle (Figure 4).
Figure 1
1. Handle knob (2)
2. Curved washer (2)
3. Oval bolt (2)
4. Lower handle
5. Upper handle
Note: Ensure that the power cord attached to the machine is
routed over the lower handle and to the inside of the handle
assembly.
3.
Tighten the handle knobs firmly by hand.
4.
Attach the cord guide to the handle (Figure 2).
Figure 4
1. Keyed hole
3.
Figure 2
1. Cord guide
2. Handle
3. Cord
4
2. Bracket
Remove the decal that covers the keyed hole in the back of the
housing (Figure 5).
Figure 7
Figure 5
1. Decal
4.
2. Keyed hole
Ensure that the handle of the chute control rod points upward
(Figure 6), and insert the rod into the keyed hole in the back of
the housing.
Figure 6
1. Handle on the chute control rod
5.
Firmly push the rod into the keyed hole in the back of the housing
until it snaps into place.
6.
Move the handle on the chute control rod to ensure that it moves in
the same direction as the chute (Figure 7).
5
Operation
Note: Do not use an extension cord over 150 feet.
Product Overview
NOTICE! Check the extension cord frequently during use for holes
or cracks in the insulation. Do not use a damaged cord. Do not
run the cord through standing water or wet grass.
Note: To prevent the extension cord from disconnecting during
operation, use the cord lock on the upper handle before you connect it
to the machine (Figure 9).
Figure 9
Figure 8
1.
2.
3.
4.
5.
6.
7.
Rotor blades
Belt cover (not shown)
Chute deflector
Chute deflector trigger
Discharge chute handle
Cord guide
Chute control rod
8.
9.
10.
11.
12.
13.
14.
1. Cord lock
Interlock button
Key
Upper handle
Power control bar
Cord
Handle knobs
Discharge chute
WARNING
A damaged appliance cord can cause a shock or fire.
Thoroughly inspect the appliance cord before using the machine.
If the cord is damaged, do not operate the machine. The supply
cord or switch of this equipment cannot be replaced, and the
equipment shall be scrapped.
NOTICE! This machine is intended for outdoor, residential use
only. Do not use it indoors or for commercial or industrial
purposes.
Starting and Stopping the Motor
Connecting to a Power Source
1.
To reduce the risk of electric shock, this machine has a polarized plug
(i.e., one blade is wider than the other). Use only a polarized plug,
UL-listed (CSA certified in Canada) extension cord recommended
for outdoor use. A polarized plug will fit in a polarized cord only one
way. If the plug does not fit fully in the cord, reverse the cord. If it
still does not fit, purchase a polarized extension cord. If you have a
polarized extension cord and the extension cord plug does not fit fully
into the wall receptacle, reverse the plug. If it still does not fit, contact
a qualified electrician to install the proper outlet. Do not change the
machine or extension cord plug in any way.
DANGER
Contact with water while operating the machine could cause
electric shock, causing injury or death.
•
Don’t handle the plug or the machine with wet hands or while
standing in water.
•
Use only an extension cord recommended for outdoor
cold-weather use.
Extension Cord Length
Minimum Wire Gauge (A.W.G.)
100 feet
14
150 feet
12
2. Extension cord
6
To start the motor, insert the key, press and hold the interlock
button, and squeeze the power control bar (Figure 10).
WARNING
A gap between the discharge chute and the chute deflector may
allow the machine to throw snow and objects in the direction of
the operator. Thrown objects could cause serious personal injury.
•
Do not force the chute deflector too far forward so that a gap
appears between the discharge chute and chute deflector.
•
Do not adjust the chute deflector with the power control bar
engaged. Release the power control bar before adjusting the
chute deflector.
Operating Tips
WARNING
If the machine hits an object while in operation, the object could
be thrown in operator’s or bystander’s direction. Thrown objects
could cause serious personal injury.
Figure 10
1. Key
2. Interlock button
3. Power control bar
Keep the area to be cleared free of all objects which may be
picked up and thrown by the rotor blades.
Note: You may release the interlock button after you squeeze and
hold the power control bar to the handle.
2.
To stop the motor, release the power control bar.
•
Check the condition of the machine before operating it to ensure
that the rotor turns freely.
•
•
Always keep children and pets away from the area of operation.
Note: When you stop the machine after you have finished
removing the snow, also remove the key and disconnect the
extension cord.
Adjusting the Discharge Chute and Chute •
Deflector
•
To adjust the discharge chute, move the handle on the chute control
rod in the direction that you wish to direct the snow stream (Figure 6
and Figure 7).
•
To adjust the chute deflector (and therefore the height of the snow
stream), squeeze the trigger and raise or lower the chute deflector
(Figure 11).
Keep the area to be cleared free of stones, toys, or other objects
which the rotor blades can throw. Such items could be covered by
snowfall and go unnoticed. If the machine strikes an object during
operation, stop the machine, unplug the extension cord, remove
the obstruction, and check the machine for damage.
Begin removing snow near the electrical outlet and work outward.
Blow back and forth, not away from and toward the outlet.
When turning at the end of a swath, step over the cord and turn
the machine.
Always overlap each swath and discharge the snow downwind
when possible.
WARNING
When using the discharge chute handle, never direct the
snow discharge chute at the operator or bystanders. The
machine can throw objects and cause serious personal injury.
When using the discharge chute handle, always turn the
discharge chute in the opposite direction from where you or
bystanders are standing.
Figure 11
•
Keep the extension cord clear of obstructions, sharp objects, and
all moving parts. Do not pull sharply on cord or abuse it in any
manner. Inspect the extension cord frequently for damage that
may result in an electric shock. If the extension cord is damaged,
replace it.
•
In cold and snowy weather conditions, some controls and moving
parts may freeze. Therefore, if any control becomes difficult to
operate, stop the motor, disconnect the extension cord, and check
for frozen parts. Do not use excessive force when trying to operate
frozen controls. Bring the machine indoors to thaw frozen controls
before operating it.
•
When operating the machine, keep the wheels 1 inch (2.5 cm) off
the pavement by tipping the machine forward. This helps prevent
the snow from building up on the wheels.
•
After clearing the snow, let the motor run for a few minutes so that
moving parts do not freeze. Then shut off the motor, wait for all
moving parts to stop, and wipe the ice and snow off the machine.
Rotate the chute crank several times to remove any snow.
1. Chute deflector trigger
7
Maintenance
NOTICE! All electrical repairs should be performed by an
Authorized Service Dealer only.
Note: Determine the left and right sides of the machine from the
normal operating position.
WARNING
If the extension cord is plugged into the machine, someone
could accidentally operate the machine while you are performing
maintenance on it, causing serious personal injury.
Figure 14
Remove the key and disconnect the extension cord before you
perform any maintenance on the machine.
1. Screws
Lubricating the Machine
2.
Remove and discard the old scraper.
You do not need to lubricate the machine; all the bearings have been
lubricated at the factory for the life of the machine.
3.
Install the new scraper, and fasten it securely with the 4 screws
that you previously removed.
Replacing the Scraper
Replacing the Rotor
1.
The scraper is located at the bottom of the rotor housing as shown in
Figure 12.
Remove the screws that secure the right side plate to the machine
frame (Figure 15).
Figure 12
Figure 15
1. Scraper
1.
2.
Remove the screw from each side plate that holds the scraper
(Figure 13) and 2 screws from under the machine (Figure 14) that
secure the scraper to the machine.
Remove the rotor pin (Figure 16).
Figure 13
1. Screw (2)
Figure 16
1. Rotor pin
3.
8
Remove the old rotor.
4.
Storage
Install the new rotor by inserting the end of the rotor onto the fitted
end in the housing and rotating the rotor until it snaps into place
(Figure 17).
Figure 17
1. Fitted end of the rotor
Note: Ensure that the nut that secures the rotor pin remains inside
the recessed hole in the right inside wall of the housing.
Note: The housing will flex when you install the rotor.
5.
Tighten the bolt on the side of the housing.
6.
Install the right side plate with the screws that you removed in
step 1.
Service
Toro has designed this machine to give you years of trouble-free
use. Should it need service, bring the machine to an Authorized Toro
Service Dealer, who is specially trained to repair Toro products and will
ensure that your Toro stays “all” Toro.
Double-insulated Appliances
In a double-insulated appliance, two systems of insulation are
provided instead of grounding. No grounding means is provided on
a double-insulated appliance, nor should a means for grounding
be added to the appliance. Servicing a double-insulated appliance
requires extreme care and knowledge of the system, and should be
done only by the qualified service personnel at an Authorized Toro
Service Dealer. Replacement parts for a double-insulated appliance
must be identical to the parts they replace. A double-insulated
appliance is marked with the words “Double Insulation” or “Double
Insulated.” The symbol (square within a square)
may also be
marked on the appliance.
Product Information
A model and serial number decal is located on the housing. Always
refer to specific numbers on the decal in correspondence or when you
need replacement parts.
9
1.
Run the machine for a few minutes and wipe away any melted
snow on the machine.
2.
Remove the key and disconnect the extension cord from the
machine.
3.
Examine the extension cord thoroughly for signs of wear or
damage. Replace it if it is worn or damaged.
4.
Examine the machine thoroughly for worn, loose, or damaged
parts. To repair or replace parts, contact an Authorized Service
Dealer for assistance.
5.
Store the extension cord with the machine.
6.
Store the machine in a clean, dry place.
The Toro Promise - Electric Snowthrowers and Brooms
A Two-Year Full Warranty for Residential Use for the United States and Canada
The Toro Company and its affiliate, Toro Warranty Company, pursuant to an agreement between them, jointly warrant this product for two years against
defects in material or workmanship when used for normal residential purposes.*
• If you have questions or problems, or before returning this product, call toll free: 1-800-808-2963 (US) or 1-800-808-3072 (Canada).
• To receive a replacement or repair, at our option, return the complete unit to the seller.
United States and Canada customers may return their
product, with proof of purchase, to any Authorized Service Dealer. United States customers may also return their product, with proof of purchase,
postage prepaid, to the Toro Service Center, 21350 Cedar Avenue S., Lakeville, MN 55044-9090.
This warranty covers product defects only. Neither The Toro Company nor Toro Warranty Company is liable for indirect, incidental or
consequential damages in connection with the use of the Toro Products covered by this warranty, including any cost or expense of
providing substitute equipment or service during reasonable periods of malfunction or non-use pending completion of repairs under this
warranty. Some states do not allow exclusions of incidental or consequential damages, so the above exclusions may not apply to you. This
warranty gives you specific legal rights, and you may also have other rights which vary from state to state.
Countries Other than the United States and Canada
Customers who have purchased Toro products exported from the United States or Canada should contact their Toro Distributor (Dealer) to obtain
guarantee policies for your country, province, or state. If for any reason you are dissatisfied with your Distributor’s service or have difficulty obtaining
guarantee information, contact the Toro importer. If all other remedies fail, you may contact us at Toro Warranty Company.
* Residential use means use of the product on the same lot as your home.
Part Number 374-0262 Rev. B
Notes:
11