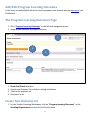
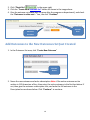
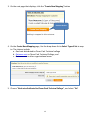
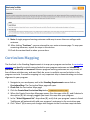
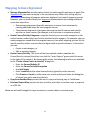
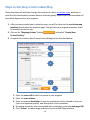
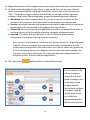
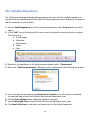
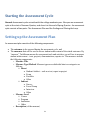
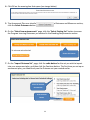
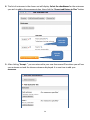
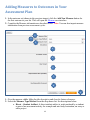
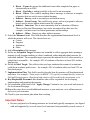
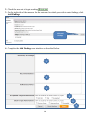
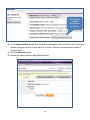
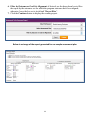
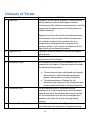
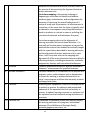
1
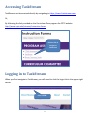
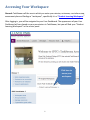
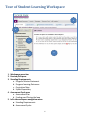
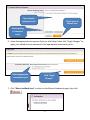
Participant User Manual 1 Table of Contents Accessing TaskStream ............................................................................................................................................................. 3 Logging in to TaskStream ........................................................................................................................................................ 3 Login Credentials................................................................................................................................................................. 4 Changing Your Password..................................................................................................................................................... 4 Accessing Your Workspace ..................................................................................................................................................... 5 Tour of Student Learning Workspace ..................................................................................................................................... 6 Completing the Standing Requirements ................................................................................................................................. 7 Add/Edit Program Mission Statement ................................................................................................................................ 7 Add/Edit Program Learning Outcomes ............................................................................................................................... 9 The Program Learning Outcomes Page ........................................................................................................................... 9 Create New Outcome Set................................................................................................................................................ 9 Add Outcomes to the New Outcomes Set Just Created ............................................................................................... 10 Mapping Program Learning Outcomes to College-wide Outcomes ............................................................................. 11 Curriculum Mapping ......................................................................................................................................................... 14 The Curriculum Map Interface ...................................................................................................................................... 16 Mapping Actions Explained........................................................................................................................................... 17 Steps to Develop a Curriculum Map ............................................................................................................................. 18 The Syllabus Repository .................................................................................................................................................... 20 Starting the Assessment Cycle .............................................................................................................................................. 21 Setting up the Assessment Plan ........................................................................................................................................ 21 Steps to Set Up an Assessment Plan ............................................................................................................................. 22 Adding Measures to Outcomes in Your Assessment Plan ............................................................................................ 25 Findings and Closing the Loop .............................................................................................................................................. 27 Steps to Enter Findings and Close the Loop...................................................................................................................... 27 Add/Edit Attachments to the Measures or Findings Areas .................................................................................................. 29 Steps to Add/Edit Attachments to the Measures ............................................................................................................. 29 Steps to Add/Edit Substantiating Evidence to the Findings .............................................................................................. 31 Submitting your Work for Review and Approval .................................................................................................................. 31 Generating Reports ............................................................................................................................................................... 32 Steps to Generate Workspace Reports ............................................................................................................................. 32 Glossary of Terms ............................................................................................................................................................. 34 2 Accessing TaskStream TaskStream can be accessed directly by navigating to https://www1.taskstream.com Or, By following the link provided on the Curriculum Docs page on the CPTC website: http://www.cptc.edu/intranet/instruction-forms Click this link to navigate to TaskStream Logging in to TaskStream When you first navigate to TaskStream, you will need to click the Login link in the upper right corner. Click “LOGIN” 3 Login Credentials User Name: CPTC email address ([email protected]) Default Password: taskstream1 If this is the first time you have logged into TaskStream, • Sign “End User Agreement” • Complete account information • Personalize password, if desired • Open Work space Changing Your Password 1. Click “My Account” in upper right 2. Click the “Username/Password” Tab 3. Follow the prompts. 4 Accessing Your Workspace General: TaskStream call the area in which you enter your mission, outcomes, curriculum map, assessment plan and findings a “workspace”, specifically it is a “Student Learning Workspace.” After logging in, you will be navigated to your User Dashboard. The appearance of your User Dashboard will vary based on your permissions in TaskStream, but you will find your “Student Learning Workspace” in the center panel. Click here to access your workspace 5 Tour of Student Learning Workspace 1 5 3 2 4 1. Workspace menu bar 2. Preview/Edit pane 3. Standing Requirements a. Program Mission Statement b. Program learning Outcomes c. Curriculum Map d. Syllabi Repository 4. Assessment Cycle area a. Assessment Plan b. Findings and Closing the loop 5. Left-side workspace navigation menu a. Standing Requirements b. Assessment Cycles 6 Completing the Standing Requirements Add/Edit Program Mission Statement 1. Navigate to TaskStream, log into your account, and open your Student Learning Workspace 2. Click Program Mission Statement (on left-side navigation menu) to open this content area Click to open 3. To add or edit your mission statement, click in the upper right. TaskStream is designed to permit multiple users to have permission to work in a single workspace. In order to avoid confusion by editors overwriting each other, you must first “check out” any document you are editing, and then check the document back in when you are done. 4. Click the “Edit” button on the right side to begin adding or editing your program’s mission statement. 5. Type your mission statement in the textbox, use the spellchecker and character count as appropriate, then click “Cancel” or “Submit” when done. a. Cancel will exit the page without saving your changes, and b. Submit will save your changes then return to the Mission Statement page. 7 Type mission statement here Click Cancel or Submit here Check spelling or character count 6. Select the appropriate Assessment Cycle (or all of them), then click “Apply Changes” to apply your edited mission statement to the appropriate assessment cycles. Select appropriate assessment cycle Click “Apply Changes” 7. Click “Return to Work Area” to return to the Mission Statement page, then click 8 Add/Edit Program Learning Outcomes In this area, you will add/edit all of the current program-level student learning outcomes into TaskStream. The Program Learning Outcomes Page 1. Click “Program Learning Outcomes” in the left-side navigation menu. 2. Image below identifies the major functions. 1 2 3 4 1. 2. 3. 4. Check Out/Check In button Create new Outcome Set or Select existing set buttons Title bar for outcome set Outcomes in set. Create New Outcome Set 1. In your Student Learning Workspace, click on “Program Learning Outcomes” in the Standing Requirements section of the left-side menu 9 2. Click “Check Out” in the upper right 3. Click the “Create New Outcome Set” button As shown in the image above 4. Give the outcome set a title (best to name after the program or department), and check the “Outcomes in other sets…” box, the click “Continue” Add title here! Select this check-box Add Outcomes to the New Outcomes Set Just Created 1. In the Outcomes Set area, click “Create New Outcome” Click this button 2. Name the new outcome and write a description Note: if the entire outcome can be written in 140 characters of less, then enter the entire outcome in the first box below. If not, then give the outcome a descriptive title, and write the full outcome in the Description box as shown below. Click “Continue” to continue 10 Enter outcome title or entire outcome here Enter entire outcome here if only title is entered above 3. After clicking “Continue” you have the options of “Add Mapping”, “Add another outcome”, or going “Back to all outcomes sets”. 4. Continue adding outcomes until all program learning outcomes have been entered. Mapping Program Learning Outcomes to College-wide Outcomes General: Mapping refers to the process of demonstrating a direct alignment. Mapping provides a record of which program-level outcomes support which college-wide outcomes. By mapping our outcomes, the measures of student achievement of a program outcome, then correlate to student achievement of a college-wide outcome. Note: We should only map program learning outcomes to other outcomes in other sets when there is a clear correlation (alignment) to the other outcome, and when the assessment process will also measure student achievement of an outcome in another set. 1. Navigate to the Program Learning Outcomes page, and check it out. 2. Scroll down to the first outcome you wish to map, and click “Map” on the right side. Click Map 11 3. On the next page that displays, click the “Create New Mapping” button Click this button 4. On the Create New Mapping page, Use the drop-down list to Select Type of Set to map to. The choices include: a. Goal sets distributed to Clover Park Technical college b. Outcome sets in Clover Park Technical College, and c. Outcome sets is other organizational areas 5. Choose “Goal sets distributed to Clover Park Technical College”, and select “Go” 12 Click “Go”: 6. After clicking “Go” you will be able to choose the goal set, or sets, you wish to map to. On the far right of each listed set, is a “View Set” link you can use to preview the set before making your choices. Note: you should map to all sets and outcomes for which there is a direct alignment; however, for most program learning outcomes this will be the “Student Learning Core Abilities”. However, you should review all the goal sets available, and map to any outcome for which alignment can be demonstrated, and for which the assessment process will also measure student achievement of that outcome. 7. Click the radio button for the set to which you wish to map, then click “Continue”. Select goal set and click “Continue” 8. On the next page you will see the list of goals in the set (in the example below we have selected the “Core Abilities”) and the individual elements for each goal. Read the descriptions of the main goals and elements carefully, and click the radio-buttons for any which are clearly aligned with the program outcome you are mapping. After making your selection(s), click Continue. 13 9. Note: A single program learning outcome could map to more than one college-wide outcome. 10. After clicking “Continue”, you are returned to your main outcomes page. To map your remaining outcomes, repeat the steps in this section. 11.Check the content back in when you are done. Curriculum Mapping The final task in the Standing Requirements is to map your program curriculum. In curriculum mapping you identify in which courses/activities your program outcomes are introduced, practiced, reinforced and assessed. Because program learning outcomes are very broad, all four of those activities may, and most likely do, occur in multiple courses/activities in the program curricula. Curriculum mapping is a very important step in demonstrating curriculum alignment in your program. 1. Navigate to your workspace, and in the Standing Requirements menu click on Curriculum Map. The Curriculum Maps page will open. 2. Check Out the Curriculum Maps page 3. Click the Create New Curriculum Map button 4. When the Create Curriculum Map page opens, Give the map a title (1), and if desired a description (2). We strongly suggest you name this map after your program. 5. In the “Select Alignment Set” drop-down (3), verify that your program’s name is listed. TaskStream will automatically add your program’s outcomes to the curriculum map. 6. Click “Select” (4) to save your changes and navigate to the Curriculum map interface. 14 1 2 3 4 15 The Curriculum Map Interface 1 2 3 4 1. Mapping Actions: The Mapping Actions button contains the options for content addition and editing to the curriculum map. These options include: Manage Alignment Set Create Course/Activity Categories Create Course/Activity Copy from Another Map Print and Export Map 2. Horizontal row displaying program learning outcomes 3. Vertical column where courses and or activities are listed 4. Alignment Codes 5. Key to alignment codes 5 16 Mapping Actions Explained Manage Alignment Set: use this option (action) to select specific outcomes or goals (the alignment set) you want to display in the curriculum map. When first setting up your workspace, please keep all program outcomes displayed, and map all program courses. However, you can further focus your alignment documentation by creating additional curriculum maps that: o Demonstrate alignment of specific outcomes to course-level outcomes by creating additional maps for each program course, o Demonstrate alignment of program outcomes to specific courses and specific activities in those courses (for example to a final exam or a capstone project) Create Course/Activity Categories: using this function you can create categories in the vertical column under which you list the activities for the category. For example: you can create categories named after the program courses, then when mapping you can list the specific activities within a course that are aligned with a specific outcome. In this action you can: o Create a new category, or o Edit an existing category Create Course/Activity: This is one of the two methods used to populate the Course/Activity column (the other is to click the “insert Course” green quick-link arrow to the right of this column). By choosing this action, the following functions are available in the “Create a New Course or Activity” dialog box: o Enter the Course/Activity ID o Enter the Course Activity Description o Use Spell check o Enter a web link to the actual course/activity (great for online courses) o Click Create or Cancel to either save your course activity and close the dialog box, of cancel your entry and close the box Copy from Another Map: permits the user to copy and existing map in TaskStream Print and Export Map: permits the user to either print their curriculum map, or export it as a PDF file. Below we will walk through the steps necessary to create a basic curriculum map. 17 Steps to Develop a Curriculum Map These directions will walk you through the creation of a basic curriculum map, but keep in mind that this functionality includes features that can greatly improve your documentation of curriculum alignment for your program. 1. After you have created your curriculum map, you will be taken to the curriculum map interface described on the previous page. You will note your program outcomes listed horizontally across the top. 2. Click on the “Mapping Actions” button , and select “Create New Course/Activity” 3. Complete the Create a New Course Activity dialog box as described below: 1 2 3 4 5 1. Enter the course ID for the first course in your program 2. Enter the course Name 3. Enter an optional description. If you are creating an activity instead of a course (such as a capstone project), and description is very important. 4. If creating an activity that is associated with a web page, enter the web page URL 5. Click “Create” to save change and return to Curriculum Map interface. 18 4. Repeat this process until all program courses have been entered into the curriculum map 5. For each course add alignment identifiers, as appropriate, for each outcome. On each course row, centered below each program outcome you will note a gray box that says “Click”. The boxes are toggle-switches that will take you through the four alignment indicators listed below. Stop clicking when you get the desired alignment indicator. a. Introduced: this choice indicates that in this course (or activity) students are first introduced to concepts or skills represented by the program learning outcome b. Practice: this choice indicates that students are provided an opportunity to practice the knowledge or skills represented by the program learning outcome c. Reinforced: this choice indicates that additional instruction is provided at this point to reinforce student skill of knowledge related to a program learning outcome. d. Assessed: This choice indicates the point in the curriculum in which student achievement of a program learning outcome is assessed. Note: for each course/activity TaskStream only permits the use of a single alignment indicator. Because a program learning outcome could be introduced, practiced, reinforced and assessed all in the same course, this is why it makes very good sense to list your program courses as categories, then beneath each course category list the major instructional milestones, then apply the alignment indicators to each milestone activity. See the example imaged below. 6. Click “Save Now” and close the Curriculum Map window. 1 2 3 1 2 3 19 In the example to the left, each program course (1) has been made a category, then under each course category specific instructional activities have been listed (2) and for each activity one of the four alignment indicators (3) has been selected. The Syllabus Repository The TaskStream workspace Standing Requirements area also includes a syllabi repository in which faculty can upload copies of the syllabi for their program courses. Below are the steps to use this repository if you so desire. 1. Click on Syllabi Repository in the left-side workspace menu, then check out the area that opens 2. In the “Add” line at the bottom of the area, chose the type of content you wish to upload. The choices are: a. Text & Image b. Slideshow c. Attachments d. Videos e. Links 3. Because a file attachment is the most common upload, select “Attachments”. 4. When the “Add New Attachment” dialog box opens, make one of the following the choices 5. In this example we are selecting to Upload from Computer. Once this option is selected, the user can drag-n-drop their syllabus files into the upload box, then 6. Click the Start upload button. When the upload is complete 7. Select Upload and Close to save the file and close the upload window, then 8. Click Save and Return to save your work and return to the Syllabi Repository. 20 Starting the Assessment Cycle General: Assessment cycles coincide with the college academic year. We open an assessment cycle at the start of Summer Quarter, and close it at the end of Spring Quarter. An assessment cycle consists of two parts: The Assessment Plan and the Findings and Closing the Loop. Setting up the Assessment Plan An assessment plan consists of the following components: The outcomes to be assessed during the assessment cycle, and The measures that will be used to assess student achievement of the stated outcomes. By “measure” TaskStream means the assessment tools and activities you will use to measure student achievement – tests, projects, demonstrations, reports etc. The measures include the following components: o Measure Title o Measure Type/Method. Measure types are subdivided into two categories as follows: Direct Student Artifact – such as a test, report or project Exam Portfolio Other Indirect Survey Focus Group Interview Other o Measure Level Course Program Institution Other o Description (of the measure) 21 o o o o Acceptable target Ideal Target Implementation Plan (timeline) Key/Responsible Personnel Steps to Set Up an Assessment Plan 1. Navigate to your Student Learning Workspace, and in the left-side navigation menu scroll down to the appropriate assessment cycle year, and click on Assessment Plan Left Side Navigation menu Standing Requirements Annual Assessment Cycles Assessment Plan 2. Check Out the plan to begin working on it 3. Click the Create New Assessment Plan button 22 4. Click OK on the warning box that opens (see image below) 5. The Assessment Plan user interface will open. Under the Outcomes and Measures section, click the Select Outcomes button 6. On the “Select from outcome sets” page, click the “Select Existing Set” button to access the Program Learning Outcomes you entered in the Standing Requirements section Choose this button 7. On the “Import Outcome Set” page, click the radio button for the set you wish to import into your assessment plan, and then click the Continue button. The first time you set up an assessment plan, you should only see the Outcome set you created earlier. Select the desired Outcome Set Click Continue button 23 8. The list of outcomes in the chosen set will display. Select the checkboxes for the outcomes you wish to add to this assessment plan, then click the “Accept and Return to Plan” button Select the outcomes Click this button 9. After clicking “Accept…” you are returned to your new Assessment Plan where you will see your outcome set and the chosen outcomes displayed. It is now time to add your measures. 24 Adding Measures to Outcomes in Your Assessment Plan 1. In the outcome set (shown in the previous image), click the Add New Measure button for the first outcome in your list. This will open the Measure user interface. 2. Complete the Measure information as described below. Note: You can also import measure information from previous assessment cycles. 1 2 3 4 5 6 7 8 9 1. Give the measure a title. Make the title descriptive and clear for future references. 2. Select the Measure Type/Method from the drop-down list. See descriptions below. a. Direct – Student Artifact: A direct student artifact is work produced by a student as part of an assessment activity for example and auto body restoration, an essay or other project 25 b. Direct – Exam: this means the traditional exam either completed on paper or electronically in an LMS c. Direct – Portfolio: a student portfolio to be used as an assessment d. Direct – Other: This could be anything from a massage, to a haircut, to samples of pastries that are used to assess student learning e. Indirect – Survey: such as an employer satisfaction survey f. Indirect – Focus Group: This could be any group, such as a program’s advisory board, used to assess student achievement for a program g. Indirect – Interview: This is most commonly seen in evaluation of Masters Theses or Doctoral Dissertations, but can be encountered for other uses for example, exit interviews for clinical practicums and internships h. Indirect – Other: Almost any other indirect measure. 3. Select the Measure Level: This field describes the organizational/instructional level at which the measure will occur. The choices here are: a. Course b. Program c. Institution d. Other 4. Add a Description of the measure. 5. Define an Acceptable Target. Measures are intended to reflect aggregate data, meaning a measure for all program students (a cohort) combined, rather than individual measure for individual students. The acceptable target represents the minimal level of achievement by a cohort that is acceptable – for example: 90% of students will achieve at least 80% on their final project. 6. Define an Ideal Target: This reflects what you hope student achievement of an outcome could be in an almost perfect case – for example: 98% of students achieve at least 95% on their final project. 7. Implementation Plan: This field is used to describe how the measure will be administered and when. For example: “Final project in BMOC 235, typically accomplished by cohorts in Fall and Spring quarters. Data from both cohorts will be used for this assessment cycle.” 8. Key/Responsible Personnel: this identifies who will be responsible for developing, implementing and reporting the measure. 9. On completion of this form, click “Apply Changes” button to save your work and return to the Assessment Plan page. 10.Repeat the steps above to add additional measures to your outcome, or to add measures to the rest of your outcomes 11.Check in your assessment plan when done working Important Notes: Because program-level learning outcomes are broad and typically encompass (are aligned with and supported by) several course-level outcomes from potentially several courses, it 26 will often require several measures to demonstrate student achievement of a single program-level outcome. Be realistic and set achievable acceptable targets. It would be a wonderful world if 100% of our students could achieve 100% on all assessments, but it likely will not happen. Be descriptive in your implementation plan, and the description of your measure. This will help reviewers determine if the measure will accurately measure student achievement of both the program outcome and any institutional outcomes to which it is aligned. Remember that measures are meant to be a measure of the overall (aggregate) achievement of a learning objective for an entire program cohort, rather than for individual students. Findings and Closing the Loop General: This area of your assessment cycle workspace is where you will document the “findings” from your assessment measure – what percentage of the student cohort achieved the skill or knowledge stated in your outcomes as determined by the measures you used. This area is also where you will document your recommendations and reflections on the findings which will set the stage for program improvement activities (as appropriate) for the following assessment cycle. Steps to Enter Findings and Close the Loop 1. Open your student learning Workspace, scroll down the left-side navigation menu to the appropriate Assessment Cycle year, and click on “Findings and Closing the Loop” Click here! 27 2. Check the area out to begin working 3. On the right side of the measure for the outcome for which you wish to enter findings, click Add Findings Click Add Findings 4. Complete the Add Findings user interface as described below. 1 2 3 4 5 6 28 1. Provide a Summary of the Findings for the measure. Be descriptive and include any documentation that can guide future improvement activities. Include numbers of students in cohort, overall achievement rates, percentage that met acceptable target and percentage that met ideal target. 2. Recommendations: in this field, describe what the findings mean to the program and its students and what will be done in response to the findings: Were the findings acceptable, and no improvement in instruction or assessment need to be considered at this time? Were the findings acceptable, but could still be improved upon? Were the findings unacceptable, and improvement activities are needed? Describe what improvement activities will be planned. 3. Reflections/Notes: This space is provided to give the user an opportunity to reflect on this measure and what it means to the program and its students. 4. Acceptable Target Achievement: Use the radio buttons to identify if the acceptable target was not met, met or exceeded. 5. Ideal Target Achievement: Use the radio buttons to identify if the measure is moving away from, approaching or has exceeded the ideal target achievement. 6. Click “Submit” to save your work and return to the Findings and Closing the Loop user interface. 7. Repeat the above steps for all measures in which findings must be documented. 8. Check the Findings area back in when complete. Add/Edit Attachments to the Measures or Findings Areas General: Supporting documentation in the form of document files and even links can be added to the Measures and Findings areas – Copies of assessment tools (exams), spreadsheets that provide substantiating evidence, links to online materials and more. Steps to Add/Edit Attachments to the Measures 1. Click on “Assessment Plan” for the assessment cycle in which you wish to upload supporting documentation 2. Check the Assessment Plan out 3. In the Assessment Plan user interface, scroll down to the outcome and measure for which you wish to upload documentation, and click “Add/Edit Attachments and Links” to open the Content Editor dialog box 29 Click this button to upload attachments to this measure 4. In the Content Editor provide the file with a meaningful name, and then use the browse button to locate the file on your own PC or server. Provide an optional description if needed, then 5. Click the Add File button 6. Repeat the above steps to add additional files 30 Note: In the image above you will note that you can also upload web links, or attach previously developed TaskStream reports. You can view/attach previously uploaded files, or copies of work added to TaskStream by your administrators (for example: the Problem Solving Rubric) Steps to Add/Edit Substantiating Evidence to the Findings 1. Click on “Findings and Closing the Loop” for the assessment cycle in which you wish to upload supporting documentation 2. Check the area out 3. In the Findings and closing the Plan user interface, scroll down to the outcome, measure and measure findings for which you wish to upload documentation, and click “Add/Edit Attachments and Links” to open the Content Editor dialog box 4. In the Content Editor provide the file with a meaningful name, and then use the browse button to locate the file on your own PC or server. Provide an optional description if needed, then 5. Click the Add File button 6. Repeat the above steps to add additional files Submitting your Work for Review and Approval General: All assessment plans and findings must be reviewed and approved before becoming final in TaskStream. To submit your work, use the following steps. 1. Navigate to the assessment cycle for which you wish to submit your work, and click on the Assessment Cycle title 2. On the right side of the Assessment Cycle page, click the yellow “Submit Work” buttons to submit your work for review. Click “Submit Work” 31 Generating Reports General: the following workspace reports can be generated by TaskStream, and downloaded as PDF files. These reports can be used to support quality improvement efforts, provide program assessment documentation for program evaluations, and provide documentation for accrediting bodies. Alignment: This report will display the alignment of program outcomes with institutionwide outcomes sets as mapped in your workspace Assessment Cycle Summary: This report summarizes the findings for all measures for all outcomes for a specified assessment cycle Assessment Cycle Detail: This report provides details for each outcome, its measures and its findings for a specified assessment cycle Operational Plan Summary: this functionality is not currently being used Operational Plan Details: this functionality is not currently being used Steps to Generate Workspace Reports For this operation the Assessment Cycle Summary report will be used as an example. The steps are very similar for all report types. 1. Log into TaskStream 2. On the User Dashboard (the page you land in after logging in), select the report type using the drop-down box on the right side of the line in which your program and workspace are listed Use drop-down list to select report type 3. Click the Go button next to the drop-down box 4. On the next screen use the drop-down box to select the workspace (Student Learning Workspace). When the workspace is selected addition options will become available 5. Select the Assessment Plan: Use the drop-down box to select the appropriate assessment cycle for which you wish to generate the report 32 6. Filter by Outcome or Goal Set Alignment: if desired, use the drop-down box to filter the report by the outcomes set for which the program outcomes have been aligned; otherwise, leave the box set to its default “Do not filter”. 7. Click the Continue button to display the resulting report. Below is an image of the report generated for our sample assessment plan 33 Glossary of Terms Term 1. Alignment 2. Alignment Set 3. Assessment 4. Assessment Cycle 5. Assessment Plan 6. Curriculum Map/Mapping Definition Alignment, or curriculum alignment, means that the course materials and activities support student achievement of the stated learning outcomes, and that assessment strategies measure the achievement of student outcomes. Alignment can also refer to the correlations between the outcomes in two or more related outcome sets. For example, a course-level outcome may be a component of and aligned with a program-level outcome; which, in turn can be a component of and aligned with an institutional outcome. A group of related outcomes from different aligned outcome sets. The activities, tools and materials used to measure achievement of an outcome. An Assessment Cycle equals one academic year. An assessment cycle begins in Summer quarter and ends the following Spring quarter. The assessment plan is developed and typically documented in TaskStream during Summer quarter, but sometimes in early Fall quarter The documentation of findings for the assessment plan measures and closing the loop are accomplished by the end of Spring quarter The plan documented in TaskStream for the assessment of student achievement of the program learning outcomes. Assessment plans cover a period call the Assessment Cycle which corresponds to an academic year (Summer quarter through Spring quarter). In TaskStream the Curriculum Map is the area in which users document the alignment of program learning 34 outcomes to courses and activities, and also refers to the process of documenting the alignment between various outcome sets. Curriculum mapping is the process indexing or diagraming a curriculum to identify and address academic gaps, redundancies, and misalignments for purposes of improving the overall coherence of a course of study and, by extension, its effectiveness (a curriculum, in the sense that the term is typically used by educators, encompasses everything that teachers teach to students in a school or course, including the instructional materials and techniques they use). 7. Measure 8. Mission Statement 9. Outcome 10. Outcome Set Curriculum mapping refers to the alignment of learning outcomes and instructional activities—i.e., how well and to what extent a program or course has matched the content that students are actually taught with the expectations described in learning outcomes, and the alignment of various outcome sets to each other—but it may also refer to the mapping and alignment of all the many elements that are entailed in educating students, including assessments, textbooks, assignments, lessons, and instructional techniques. A specific assessment activity or process intended to “measure” achievement of a specified outcome A mission statement is a statement of the purpose of a program, course, administrative unit or department; its reason for existing; a written declaration of an entity’s core purpose and focus that normally remains unchanged over time. Something that happens as a result or consequence of an activity or process. An objective and measurable statement of the expected result of and activity or process. A student learning outcome is a statement of the expected result of student learning activities and processes. A collection of outcomes related to a specific person; the learning outcomes of a program, institutional outcomes (Core Abilities and Strategic Goals), accrediting agency outcomes, etc. 35 11. Participating Area 12. Program Assessment 13. Program Learning Outcomes 14. Standing Requirements 15. Student Learning Workspace 16. Workspace In TaskStream a participating area means the instructional, administrative and departmental units assigned workspaces in TaskStream. For the purposes of this manual, a participating area means a professional, technical or academic program. Program assessment is a process in which faculty ask and answer questions about how well students are achieving learning outcomes over the course of their program of study. The resulting information is then used to improve or ascertain high quality of teaching and learning. A clear, objective and measurable statement of what a student will be able to do or know upon completion of a program of instruction A data entry area in each TaskStream participating areas workspace in which users record more persistent information related to the assessment cycles. Data recorded here includes: Program Mission Statement Program Learning Outcomes Curriculum Map Syllabi Repository The working area in TaskStream assigned to each participating area (Program) to document program assessment and improvement activities. An area in TaskStream, reserved for each participating are to document assessment activities. The following workspaces are currently developed in our TaskStream instance: Administrative Unit Workspace Division/Department Workspace Student Learning Workspace 36