1
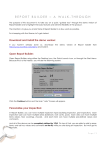
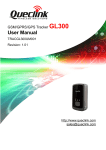
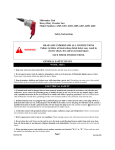
Alert Community
Installation & User’s
Manual
Preliminary Copy – Use as a guide only
As a NEW RELEASE linking Call Points to Paging Groups
is due for release Spring 2009
ScanAlert Support Software
Version 1.708.7
August 2007
Revision Sheet
Release No.
Rev. 1.704.4
Date
22/04/07
Revision Description
User’s Manual with installation Detail
Rev 1.708.4
04/08/07
Additions and Modifications
- Allow an importing/exporting function of Call Points
- Ensure CAP CODES can be any length (within reason (up to 20
chars))
- Alter the Personalised Notification to allow one database entry to be
able to be attached to multiple Personalised Notification tags.
- Introduce the ability to play a wav file when a new call comes in.
+ (New) Added a simple report listing the Call Point Number, Name
and the Resident that it is connected to.
Make the reporting function similar to Tracker and has the ability to
export to Excel
Can see Call duration in the reports with a final average time taken
per call
Fix bug with screen presentation when screen passes 5 active calls
Rev 1.708.7
7/8/07
Introduce a watchdog where we monitor the stack – if there is a call
present and there has been no reply pulses for a set time – then clear
the stack as there are no calls present and something has gone wrong.
Call point description length increased to 25 Characters with
improved scripting
Custom pages displayed for 15 Secs then automatically removed
Ability to set call wav file to occur (None / Once per call / Every DSD
cycle)
Ability to Import and Export Residence database
-1-
USER'S MANUAL
TABLE OF CONTENTS
Revision Sheet ......................................................................................................... 1
1.0 System Overview ............................................................................................... 3
1.1 Initial Installation
1.2 Upgrade Procedure
2.0 File....................................................................................................................... 4
2.1 Backup
2.2 Restore
3.0 Settings
3.1 About
3.2 Communication
3.3 Messaging
5
4 Developer – Debug Mode ..................................................................................... 6
5.0 WINDOW ............................................................................................................. 6
5.1 Residents F2 ................................................................................................. 6
5.2 Call Points F3 ................................................................................................ 6
5.3 Pagers F4 ....................................................................................................... 7
5.4 Paging F5 ....................................................................................................... 7
6.0 Reports
8
-2-
1.0 System Overview
Alert Community is a computer based reporting system designed to be of
assistance to caring staff in charge of groups of residence in a nursing facility.
Opening with a comprehensive residence database, Alert Community will display
location and call activity of all resident in you establishment.
The opening screen is clean and welcoming to the user. Clearly labeled function
buttons provide quick access to the structure of the programme. Information
found below the Alert Window Logo provides feed back of Licence information
and current version information. As enhancements to the programme become
available, this version number will assist any technical support provided during
an upgrade.
1.1 Initial Installation
Place your Alert Community CD in the CD drive and allow Auto Start to open the
CD. The installation will automatically commence. It is recommended that you
select the default prompts during installation. Once the installer has closed,
navigate through Start Programmes and find the Alert Community icon.
Upon initial opening of the programme you will be asked to insert an
Administrators password. Enter this password and keep the password in a safe
place, as it is needed to enter initial data into the database. Communication
ports are also added by the support technician to enable correct operation of
Alert Community in association with the Digital System Driver and Paging
Transmitter.
WARNING: IF YOU ARE UPGRADING TO A LATER VERSION, it is always good
practice to backup the existing database, as you may need to recover to this
database after the upgrade.
1.2 Upgrade Procedure
Follow the details outlined ahead in this manual to back up your current
database. This is of the utmost importance as with most upgrades, it is
necessary to import your current database back after the upgrade. Un-install the
current version of “Alert Community” by using standard Microsoft Procedure in
the Control Panel. Install the new version and follow the “Import Database”
procedure outlined in this manual.
-3-
2.0 File
2.1 Backup
Offers the ability to export or save the Alert Community current database to a
selectable location. The file automatically adds the current date in the backup
file name. This is to avoid the possibility of over writing a database. The files can
be archived for historical reference and thought should be given to the location
of these files as they will accumulate. Also it would be preferred that the backup
files are not located on the same HDD as the current database.
Navigate to a folder location where you wish to save the database and click
“save”.
This is normally defaulted to c:\program Files\Alert community\backup upon
initial install.
2.2 Restore
To restore a damaged data base or to import a database that was previously
configured, locate the backup file and navigate to where the current “Alert
Community” programme file is located and copy the backup file to this location.
This is normally c:\program Files\Alert community.
Once the file is copied to this location, locate and delete the current database
called “Tracker.mdb”. Now rename the copied database file to “Tracker.mdb”.
Note: The imported file will only operate correctly if it was configured on a
machine that used the Licence number allocated to the site.
-4-
3.0 Settings
This tab can only be activated in “Administrator” mode. To do this navigate to
“Settings – Administrator Mode” and left click. Enter the Administrator password
previously assigned by the installation technician and Administration facilities
will now become operational.
Now when you navigate to “Settings” it is no longer greyed out.
3.1 About (Administrator Mode)
Shows the current release version of Alert Community. You will need this
information when obtaining technical help.
3.2 Communications (Administrator Mode)
This location is where the serial RS232c communication ports required for
correct operation of Alert Community are selected.
DSD is the Alert Communications Digital System Driver operating at 4800 baud.
This software was previously configured to operate correctly with the DSD and
there is no need to set comms speed, only the port location that has the system
DSD attached.
Pager Communications Port is the cable going to the paging transmitter.
3.3 Messaging
The messages presented to the computer screen and pager can be pre
programmed in this menu location.
Once again, you must be in “Administrator” mode to gain control of this feature.
The “%” symbol is shown in a list and when set correctly, will help to format
your message.
For Example
You may wish you’re on screen message to look like this:“ Respond to: Bed 1 patient Will Robertson”
Bed 1 would have been the title previously configured to the operating call
point. Will Robertson – would have been a resident previously entered in the
patient database and assigned to the room “Bed 1”
To achieve this the “work station pager message” would look like this.
Respond to %CN: patient %RF %RS
Where %CN is the call point name currently operating, %RF is the residents first
name, and %RS is the residents last name.
Note:
You will be presented with the patient name only if the call point was
Personalised.
Information on this can be found else where in the manual.
-5-
4.0 Developer – Debug Mode
Used by the development team.
5.0 Window
5.1 Residents (F2)
The person entering the facility is required to be entered into the client
database. The First name and Surname are extracted from this location to assist
with reporting and paging on client activities.
To enter a new client click on the “+” symbol located bottom left of window.
Continue to enter the client information and click save before closing. Notice the
client appears in the left window. To find a client quickly, try typing the client
name in the search “ Q “ locater. Once found, full details will be visible to the
operator.
A minimum of 1 resident must be present in the resident register before correct
paging operation can occur.
Points to note if you are Importing a Resident database
This is only available in Administrator Mode
Backup existing Database
Clear the current database and have just one entry in it.
Click export to CSV
This will give an outline of the format your database needs to be in before it is
re imported. Massage your file to import to be in this format.
Click import on your new file, giving the application the complete file.
Note that there are system columns that should not be altered.
5.2 Call Points (F3)
(Non-admin mode).
The call point configuration window displays all locations assigned to call points
previously configured by the installation team. Any call point locations visible in
blue text can have a resident assigned to that call point. This is called
“Personalising” the call point. As clients are moved from bed to bed, or exit the
facility and new come on board, this simple allocation of residents allows
accurate paging and call display.
To add a new client to the assigned room or call point, simply pull down the
Current resident tab and select the client to be associated to that call point. To
remove the resident, simply pull down the Current Resident tab and select blank
from the top of the pull down. All actions require a click on save before closing
the window.
(Admin mode)
Will show the call point ID associated with the Call Point Label and allows the
user to select “Personalised Notification” facilities to a call point.
-6-
5.3 Mass call point labeling
NOTE: Whenever entering new data in the database, it is always suggested you
follow the backup procedure mentioned earlier in this manual.
When starting with an empty database, it may be necessary to label common
groups of labels quickly, avoiding repetition of re entry.
By holding the ctrl and clicking the “ + “ entry tab, a grouping window will
appear asking “Call Point Number Start”. This is the start point for a generic
label to be assigned to call ID’s. e.g. 0001 then OK.
Next select to number of call points you wish to have this macro applied to.
e.g. 20 then OK
Next enter the Generic term to be applied to this Macro.
e.g. Bedroom then OK
Enter the starting number to be applied to this macro.
e.g. 12 then OK.
You will be prompted to over write existing data – click YES
Not the new macro will be built saving repetitious entry.
5.4 Pagers (F4)
The software is shipped with Pager Groups “ Night Pagers ” and “ Day Pagers ”
This can be altered to suit by deleting the group. Highlight the pager group and
Click “ – “. Now select “ + Group ” and add a new group of pagers. To add
pagers to a group, first highlight the group and then click “ + Pager ”. Now enter
the physical number that may be assigned to this pager (not the cap code). The
new pager will now appear. Click on the new pager number and a pager detail
entry window will appear.
Personalise the pager by entering the Current User, and some helpful notes can
also be added for future reference.
Every pager has its own unique “Cap Code” which identifies it during
transmission. Click save and the pager has now been added to the database.
Back on the “Pagers” window, check to activate the group and the associated
pagers within that group and close.
Also note that highlighting a pager group shows a window of number of repages and duration between pages. If set to “0”, only one page will be initiated.
On termination of the call, a confirmation paging indicating the cancellation of
the call will also be sent out.
5.5 Paging (F5)
This allows direct paging to a pager group. Type the message you wish to have
paged and the pull down the selection bar to find the group of pagers. Select the
group of pagers and click “send”.
-7-
6.0 Reports
A comprehensive list of printed reports can be generated from the reports
section. The reports are currently generated from actions sent to pagers or
paging groups. If Alert Community is being operated without paging, a dummy
pager will need to be configured and left in the pager section.
6.1 Paging Activity
There are two options greeting the user in this section. These are “Quick
reports” or “Manual reporting”
Quick reports.
A pull down offers the user a group of past days. By selecting the pull down and
clicking next, a further filtering can be selected to help gather only the
information you are after. By leaving the Radio Button on “All Call Points”, a
comprehensive selection of all activity will be displayed. By clicking on the call
point within the report you wish to further investigate, you will be taken to
another window showing pager groups addressed for that call.
Manual Reporting.
The desired day and time period within this day can be selected to narrow
reporting id desired.
-8-