1
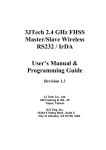
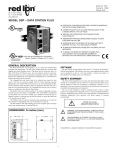
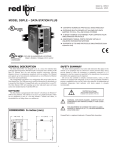
LiquidMetrix ReportGenerator User Manual Version 1.0 LiquidMetrix ReportGenerator Manual LiquidMetrix ReportGenerator User Manual Table of Contents LiquidMetrix ReportGenerator User Manual ......................................................................................................... 1 Table of Contents ................................................................................................................................................... 1 Overview ................................................................................................................................................................. 2 Section 1 - QuickStart Guide –Setting up and Accessing the ReportGenerator For the First Time ........................ 3 A. Installing the LiquidMetrix ReportGenerator ................................................................................................. 3 B. Accessing the LiquidMetrix ReportGenerator screens for the First Time ...................................................... 4 Section 2 - How to configure and schedule reports ............................................................................................... 9 A. Configuring a report template. ....................................................................................................................... 9 1. Setting up a template ................................................................................................................................. 9 2. Data Setup .................................................................................................................................................. 9 3. Running Ad Hoc reports ............................................................................................................................ 13 B. Scheduling pre-configured reports. .............................................................................................................. 14 C. Checking the status of the jobs .................................................................................................................... 15 D. Viewing reports history ................................................................................................................................ 16 Support ................................................................................................................................................................. 16 © Intelligent Financial Systems Limited - All rights reserved LiquidMetrix ReportGenerator Manual – Version 1.0 Page | 1 LiquidMetrix ReportGenerator Manual Overview This manual covers the LiquidMetrix ReportGenerator. For the LiquidMetrix WorkStation Pre Trade Statistics and the Post Trade (Best Execution/TCA) Service please refer to the separate LiquidMetrix WorkStation Manuals. This document is divided into 3 main sections. Section 1 contains a QuickStart guide showing you how to setup and access the ReportGenerator Configuration screens for the first time. Section 2 gives you information about all the configuration screens and how to configure the report scheduler and view reports. © Intelligent Financial Systems Limited - All rights reserved LiquidMetrix ReportGenerator User Manual Page | 2 LiquidMetrix ReportGenerator Manual Section 1 - QuickStart Guide –Setting up and Accessing the ReportGenerator For the First Time A. Installing the LiquidMetrix ReportGenerator Double click on the LMReportGeneratorSetup.exe file which should be part of the ReportGenerator setup package. Follow the setup instructions to install the LiquidMetrix ReportGenerator onto your PC or Server. Step 1: Start Screen -click on Next Step 2: Select the install folder Step3: Confirm installation Step 4: Installation complete After the installation has been successfully completed, you will see a shortcut on your desktop that points to the LMReportGenerator application. Please double click on the icon to start the ReportGenerator and a small tray icon will appear on your bottom toolbar. © Intelligent Financial Systems Limited - All rights reserved LiquidMetrix ReportGenerator User Manual Page | 3 LiquidMetrix ReportGenerator Manual Note, that the LiquidMetrix ReportGenerator will run continuously in the background on your machine and does not need to be started or stopped. The little tray icon indicates that the ReportGenerator is running in the background. If the tray icon is not shown then please double click the LMReportGenerator icon on your desktop to start it again. B. Accessing the LiquidMetrix ReportGenerator screens for the First Time To open the configuration screens of the ReportGenerator right click on the tray icon and select ‘Show/Hide LM ReportGenerator’. The LiquidMetrix ReportGenerator main configuration screen will open. The first time the ReportGenerator configuration screen is opened you will need to configure the default directories that all subsequent reports will use. There are 3 directories that need to be supplied: © Intelligent Financial Systems Limited - All rights reserved LiquidMetrix ReportGenerator User Manual Page | 4 LiquidMetrix ReportGenerator Manual - - The directory where the report template configuration file should be stored. This is an internal file used to save all your configuration options. The directory where all the reports generated by the LiquidMetrix ReportGenerator will be saved. The directory where the LiquidMetrix WorkStation benchmark files are stored. Unless this has been changed via the WorkStation Preference screen, the default location is <My Documents>\IFS\ATASWorkStation\BenchmarkedTrades Once the above directory is selected the 'BIC-Default' dropdown will display the BIC(s) for the user. Please Note: The above directories should be accessible by the user, i.e. the user should have permission to read and write to these directories. Please contact your IT administrator for advice. The above screen is very similar to the Execution Quality Report screen in the LiquidMetrix WorkStation. It is here that the template for the reports is set up. It will be covered in detail in the next section. © Intelligent Financial Systems Limited - All rights reserved LiquidMetrix ReportGenerator User Manual Page | 5 LiquidMetrix ReportGenerator Manual Clicking on the 'Schedule' tab will bring up the above screen where all the scheduled reports are displayed. The functionality will be described in Section 2B. © Intelligent Financial Systems Limited - All rights reserved LiquidMetrix ReportGenerator User Manual Page | 6 LiquidMetrix ReportGenerator Manual The Job Status window above displays the status of scheduled reports and any ad hoc reports which are still running. To be explained in detail in Section 2C. © Intelligent Financial Systems Limited - All rights reserved LiquidMetrix ReportGenerator User Manual Page | 7 LiquidMetrix ReportGenerator Manual The Job History window shows the history of all the reports generated - scheduled and ad hoc. Further details in section 2D. © Intelligent Financial Systems Limited - All rights reserved LiquidMetrix ReportGenerator User Manual Page | 8 LiquidMetrix ReportGenerator Manual Section 2 - How to configure and schedule reports A. Configuring a report template. The Reports screen consists of three sections: 1. Setting up a template Here you can create, delete and rename a template. The dropdown on the left allows you to choose a predefined template. In the below example a template ABCReport has been created. 2. Data Setup The middle section allows you to design the template with the information you want to appear on the report. There are two tabs in this section - Design and Data Filters. The Design tab controls the tables that appear on the report and the contents. The Data Filter tab gives you additional control to exclude data from the report. Design Here the logo, sub-title and notes can be specified; these will appear on the top of the report. The logo size should be 150 x 40 pixels. - The report can be generated in any of three formats: XPS, PDF or CSV. - The second row specifies the benchmark type and whether to use Effective, Touch or Mid price for benchmarking the trades. - The currency dictates the currency that all the trades will be converted to for display. So for the above example, all trade values will be displayed in GBX equivalent. © Intelligent Financial Systems Limited - All rights reserved LiquidMetrix ReportGenerator User Manual Page | 9 LiquidMetrix ReportGenerator Manual These are the main sections that appear just below the header. - Trading Summary and Performance Summary will be displayed by default. Different formats for these summaries can be selected using the dropdowns on the right. - It is possible to include Worst Performing Trades by checking the box and specifying the desired number of trades in the text box. These trades can be ordered by various parameters which can be selected from the Order by dropdown. - There is also an option to print the Glossary which will appear at the end of the report. The above section lists the tables that are available to be displayed on the report. - Checking and un-checking the box enables the particular tables in the report. In the above example three tables: Venue, Counterparty and Trading Day will be printed with maximum 15, 20 and 30 rows respectively. - The Performance Column shows the performance per parameter (venue, country, counterpart, etc) and can be displayed as %Success, %Worse or %At/Better. - The above performance percentage can be shown based on total trade count or the total trade value. - The Improvement column can be shown in BPS only or BPS and values. The above option allows different benchmarks to be used for performance figures and outliers. Trade Time benchmark for performance ensures that performance figures aren't inflated, where as the Hi-Lo band benchmark for Outliers ensures that any discrepancy in timestamps are taken into account. © Intelligent Financial Systems Limited - All rights reserved LiquidMetrix ReportGenerator User Manual Page | 10 LiquidMetrix ReportGenerator Manual Data Filters These are the general filters which are available on the WorkStation preference screen. - Trading Day CutOff allows for auction periods to be excluded. In the above example trades that happen in the first two minutes of the day and the last ten minutes will be excluded. - The three options below are there to ensure that no outliers on the same venue are generated. The venue filters allow for particular venues to be excluded from the report if desired. - The Country Venue selector brings up the following screen where venues and countries can be enabled or disabled. In the following example all Primaries and MTFs have been selected. - The Venue Benchmarks Filter allows for an entire venue to be removed from benchmarks. So in the above example no benchmarks against CHI-X or Turquoise will be displayed. Please Note: '!' denotes exclude © Intelligent Financial Systems Limited - All rights reserved LiquidMetrix ReportGenerator User Manual Page | 11 LiquidMetrix ReportGenerator Manual © Intelligent Financial Systems Limited - All rights reserved LiquidMetrix ReportGenerator User Manual Page | 12 LiquidMetrix ReportGenerator Manual The above Trade Filters provide extra granularity for including or excluding trades. A value by itself means inclusion and a value prefixed with '!' means exclusion. Multiple venues should be separated by commas. So in the above example all trades which pass the following criteria will be included: All trades for Vodafone(ISIN: GB00B16GWD56), not executed on venues POSIT(XPOS) and Cross(XCRS), not executed on venues Sweden(SE) and Finland(FI), has Portfolio Manager ID 123AB, has Trader ID 456DF, has Trading Network NET1, traded against Counterparty CP1, with Currencies GBX or EUR. Please Note: After all the above changes have been made it is necessary to click the 'Save Changes' button on the top right to save this template. 3. Running Ad Hoc reports Once a template has been created an ad hoc report can be run at any time from the bottom section of the Reports tab, using the selected template. In the above example, all data for Last Month (based on the most recent date of the data provided) for the user TCAPOOLBIC will be reported when the 'Run Ad Hoc' button is clicked. © Intelligent Financial Systems Limited - All rights reserved LiquidMetrix ReportGenerator User Manual Page | 13 LiquidMetrix ReportGenerator Manual B. Scheduling pre-configured reports. Once a template has been created it can be scheduled to run Daily, Weekly or Monthly for a pre-defined period. The reports will be generated in the format specified on the Reports tab. These will be stored in the location specified on the Configuration tab (Reports Output Folder). The file name will include the name of the template, schedule, period for which it was run and the date on which it was run. E.g. ABCReportDailyDay_20110812 1. Setting up a new scheduled report A new scheduled report can be set up by selecting options from the above drop downs and clicking on the Add button. The scheduled reports will appear in the scheduled reports list. The first report uses the ABCReport template, runs daily, covering the data for the day before. The second report uses the Test Report template, runs once at the end of the week, covering the data for that week. The third report again uses the ABCReport template, runs on the first of every month, covering the data for the last quarter. Different combinations of frequency and period can be selected from the dropdown lists. 2. Editing a scheduled report A scheduled report can be deleted using the the button next to the delete button. button on the right. A scheduled report can be re-run using Any field in the report can be edited by double-clicking on the field which will display a dropdown of available options. © Intelligent Financial Systems Limited - All rights reserved LiquidMetrix ReportGenerator User Manual Page | 14 LiquidMetrix ReportGenerator Manual A scheduled report can be disabled by double-clicking on the Enabled field and selecting 'No'. C. Checking the status of the jobs The status of all the scheduled jobs can be seen on the 'Job Status' tab. As per the example used above, the status of the reports are displayed as follows: 1. The Weekly Test Report was last run on August, 13 and will next run a week later on August, 20. 2. The Monthly ABCReport has never been run (No LastRun date) and will run for the first time on 1st September. 3. The Daily ABCReport was last run on August, 17 at 9am and will next run a day later on August, 20 at 9am. Please Note: A blank value under BIC signifies the default BIC that was selected in the Configuration tab. The lower section of the page also displays any Ad Hoc reports that were set to run from the Reports tab and are currently running. © Intelligent Financial Systems Limited - All rights reserved LiquidMetrix ReportGenerator User Manual Page | 15 LiquidMetrix ReportGenerator Manual D. Viewing reports history Any job that has been run, scheduled or ad hoc, is displayed on the Job History tab. The period for which the report history needs to be viewed can be selected from the following dropdown. In the above example the last month is selected. This displays the following results. The Type 'S' denotes a scheduled job and 'A' an ad hoc job. Hovering over the notes icon on the left shows the path where the report has been saved. Clicking on that icon also launches the report. Please Note: If the Status field shows an 'Error' please contact the Support team (e-mail below). Please attach the relevant logs to the e-mail. These can be found in your user Documents folder under \IFS\LMReporter\App_Log. Support This manual covers all the areas and functionalities of the ReportGenerator. But if there are any questions regarding this product please send an e-mail to the following address: [email protected] © Intelligent Financial Systems Limited - All rights reserved LiquidMetrix ReportGenerator User Manual Page | 16