1
IP Phone
User Manual
TABLE OF CONTENTS
Copyright, Trademarks, GPL, Legal Disclaimers .......................................................7
Important information ......................................................................................................8
Safety instructions ......................................................................................................................8
SELV (Safety Extra Low Voltage) compliance ................................................................8
Standards conformance ............................................................................................................8
Product specifications ...............................................................................................................9
Disposal of the device ...............................................................................................................9
Cleaning ........................................................................................................................................9
Notational conventions ...................................................................................................10
Setting up the phone ......................................................................................................12
Delivery Content ....................................................................................................................... 12
Detaching and attaching the footstand .............................................................................. 12
Rotating the tab of the handset cradle ............................................................................... 13
Connecting the phone ............................................................................................................ 14
Connecting a headset .............................................................................................................. 14
Initializing and registering the phone ................................................................................... 15
Prerequisites ........................................................................................................................ 15
Initialization ........................................................................................................................... 15
What to do if initialization and registration are unsuccessful ................................... 16
Correcting the clock .......................................................................................................... 17
Getting to know your phone .........................................................................................18
At a glance . ............................................................................................................................... 18
Virtual function keys................................................................................................................... 19
LED indications ........................................................................................................................ 19
Call indicator ....................................................................................................................... 19
Function key LEDs ............................................................................................................. 20
Message LED . .................................................................................................................... 20
Hard keys ................................................................................................................................... 20
Freely programmable function keys with LEDs ........................................................... 20
Context-sensitive, programmable function keys ......................................................... 21
Navigation, confirmation, and cancel keys . .................................................................. 21
Preprogrammed, variably programmable function keys ............................................ 22
Audio Control Keys ............................................................................................................ 22
Alphanumeric Keypad.......................................................................................................... 23
Input modes and navigation .................................................................................. 23
Entering numerals, letters, special characters, and symbols........................... 23
2
Display layout ............................................................................................................................ 24
Idle Mode ............................................................................................................................. 24
When the phone is active ................................................................................................. 26
Settings ...................................................................................................................................... 28
Phone settings .................................................................................................................... 28
Web interface settings......................................................................................................... 29
The phone's web interface ..................................................................................................... 30
Opening the web interface .............................................................................................. 31
How the web interface works .......................................................................................... 31
Web settings overriding manual phone settings ............................................. 32
User mode/administrator mode ............................................................................................ 33
Directories ..........................................................................................................................35
Directory ..................................................................................................................................... 35
Definitions, explanations ................................................................................................... 35
Directory entries ...................................................................................................... 35
Contact Types .......................................................................................................... 36
Outgoing identity ..................................................................................................... 36
Group ......................................................................................................................... 36
Ringtones ............................................................................................................................. 36
Adding/Editing Entries on the Phone ............................................................................ 37
Adding new entry manually ................................................................................... 37
Adding new entry from call list ............................................................................. 37
Adding current caller .............................................................................................. 37
Sorting entries ......................................................................................................... 37
Editing existing entry .............................................................................................. 37
Deleting an entry ..................................................................................................... 38
Adding/editing entries on the web interface ................................................................ 38
Adding new entry .................................................................................................... 39
Editing an entry ........................................................................................................ 40
Deleting entry on web interface ........................................................................... 41
Dialing from phone directory . .......................................................................................... 41
Deleting whole directory ................................................................................................... 41
Importing/Exporting Directory ......................................................................................... 41
External directories .................................................................................................................. 42
LDAP ..................................................................................................................................... 42
Contacts ............................................................................................................................... 42
3
Using the phone
.............................................................................................................43
Making calls ............................................................................................................................... 43
................................................................ 43
Selecting identity for current outgoing call
Using different audio devices .......................................................................................... 43
Handset ..................................................................................................................... 43
Headset ..................................................................................................................... 43
Speakerphone . ........................................................................................................ 43
Speakerphone and handset or headset . ........................................................... 43
Using different dialing methods ...................................................................................... 44
Auto dial .................................................................................................................... 44
Redialing ................................................................................................................... 44
Calling number from call list (missed, received, dialed calls) ....................... 44
Calling number from phone directory ................................................................. 44
Calling monitored extension from virtual keys screen....................................... 44
Speed dialing ........................................................................................................... 44
Calling emergency numbers ................................................................................. 45
Call completion ........................................................................................................ 45
Number guessing (auto completion)..................................................................... 46
Accepting calls ......................................................................................................................... 47
Using different audio devices
.................................................................................... 47
Automatically accepting calls
........................................................................................ 47
Call pick-up from another extension ............................................................................. 47
Call waiting ......................................................................................................................... 49
Active calls . ............................................................................................................................... 49
Hold.......................................................................................................................................... 49
One call on hold ...................................................................................................... 49
Holding multiple calls with or without a connected call................................... 50
Conference .......................................................................................................................... 51
Initiating a conference ............................................................................................ 51
Conference screen navigation ............................................................................ 51
Speaking to one participant in private .............................................................. 52
Putting one participant on hold .......................................................................... 52
Dropping a participant
Adding a participant
...................................................................................... 52
............................................................................................ 52
Putting the conference on hold .......................................................................... 52
Terminating the conference
................................................................................ 53
Transferring calls ................................................................................................................. 53
Attended transfer .................................................................................................... 53
Blind transfer ............................................................................................................ 53
4
Call waiting .......................................................................................................................... 53
Terminating calls ................................................................................................................. 53
Missed calls ............................................................................................................................... 53
Call lists . ................................................................................................................................... 54
Rejecting or redirecting incoming calls . ............................................................................. 54
Manually ................................................................................................................................ 54
Automatically ....................................................................................................................... 54
Rejecting anonymous calls . ............................................................................................. 55
Call forwarding - phone settings .......................................................................................... 55
Making and changing the settings on the phone ........................................................ 56
Turning on call forwarding ................................................................................................ 56
Turning on forwarding of all calls with a programmable function key ......... 57
Turning off call forwarding ................................................................................................ 57
Configuring the function keys........................................................................................58
Function keys on snom phones ........................................................................................... 58
Freely programmable function keys P1 - P12 .............................................................. 58
Context-sensitive, programmable function keys ......................................................... 60
Navigation, confirmation, and cancel keys ..................................................................... 60
Dedicated, customizable function keys .......................................................................... 61
Programming the function keys............................................................................................... 61
Example 1, Extension monitoring and call pick-up .................................................... 62
Example 2, Monitoring calls on-screen ........................................................................ 63
Example 3, Speed dialing . .............................................................................................. 64
Example 4, Turning forwarding of all calls on and off ............................................... 65
Customizing the phone settings ................................................................................66
Identities/accounts ................................................................................................................. 66
Configuring new identity/account
............................................................................ 66
Editing an existing identity/account .............................................................................. 68
Assigning ringtones ................................................................................................................ 68
Adjusting the backlight.............................................................................................................. 69
Date and time formats ........................................................................................................... 70
Date
..................................................................................................................................... 70
Time ...................................................................................................................................... 70
Time zone .................................................................................................................................. 71
Language settings of phone and web interface .............................................................. 72
Phone language ................................................................................................................. 72
Web interface language .................................................................................................. 72
Dial tones
.............................................................................................................................. 72
Emergency numbers .............................................................................................................. 73
5
Call forwarding ........................................................................................................................ 73
Call completion ....................................................................................................................... 75
Call waiting ............................................................................................................................... 76
Hiding my caller ID
.............................................................................................................. 76
Rejecting anonymous calls ................................................................................................... 76
Number guessing . .................................................................................................................. 77
Speed dial ................................................................................................................................ 77
Software update.................................................................................................................78
Manual update ......................................................................................................................... 78
Auto provisioning .................................................................................................................... 78
Troubleshooting..................................................................................................................79
Reboot ....................................................................................................................................... 79
Hard reboot .............................................................................................................................. 79
Reset to factory values .......................................................................................................... 79
TFTP Update ............................................................................................................................ 79
Manual initialization ................................................................................................................. 79
Contacting snom Support .................................................................................................... 80
Traces ........................................................................................................................................ 81
Appendix 1 - Display symbols and icons................................................................................ 82
Symbols found in the function key line . .............................................................................. 82
Display indications ................................................................................................................... 85
Appendix 2 - Status messages................................................................................................. 86
Appendix 3 - Programmable Functions................................................................................... 87
Programmable Functions ...................................................................................................... 87
Key Events ................................................................................................................................ 87
Appendix 4 - GNU General Public License........................................................................... 89
6
snom 821 User Manual
Copyright, Trademarks, GPL, Disclaimers
Copyright, Trademarks, GPL, Legal Disclaimers
© 2012 snom technology Aktiengesellschaft
All Rights Reserved.
snom, the names of snom products, and snom logos are trademarks owned by snom technology AG.
TeamSpirit ® VoiceEngine is Copyright © 1995-2012, SPIRIT. All other product names and names of
enterprises are the property of their respective owners.
Product specifications are subject to change without notice.
snom technology AG reserves the right to revise and change this document at any time, without being
obliged to announce such revisions or changes beforehand or after the fact.
Texts, images, and illustrations and their arrangement in this document are subject to the protection of
copyrights and other legal rights worldwide. Their use, reproduction, and transmittal to third parties
without express written permission may result in legal proceedings in the criminal courts as well as civil
courts.
When this document is made available on snom’s web page, snom technology AG gives its permission
to download and print copies of its content for the intended purpose of using it as a manual. No parts
of this document may be altered, modified or used for commercial purposes without the express written
consent of snom technology AG.
Although due care has been taken in the compilation and presentation of the information in this
document, the data upon which it is based may have changed in the meantime. snom therefore
disclaims all warranties and liability for the accurateness, completeness, and currentness of the
information published, except in the case of intention or gross negligence on the part of snom or where
liability arises due to binding legal provisions.
Our firmware includes some source code that may be used and modified by anyone and everyone
under the GNU Public License (GPL) (enclosed at Appendix 4), provided they, in turn, make it available
to everyone else with the same licensing agreement. Please go to http://www.snom.com/en/support/
download/gpl-quellcode/ for the original GPL license and the source code of components licensed
under GPL and used in snom products.
7
snom 821 User Manual
Safety, Disposal, Cleaning of Product
Important information
Please read the instructions on safety and disposal and on how to set up and use the device before
using it and also give them to other users to read or inform those users of their contents. Save this
manual and do not give the device to third parties without it.
Safety instructions
Follow the instructions in this manual and other applicable documentation of the device.
•
If the phone is not supplied with power via an Ethernet cable, use only the power adapter included
in the package or one expressly recommended by snom technology. Other power supplies may
damage or destroy the phone, affect its behavior, or induce noise.
•
void placing the cables where people may trip over them or where they may be exposed to
A
mechanical pressure as this may damage them.
•
This device is for indoor use only! NOT FOR OUTDOOR USE!
•
o not install the device in rooms with high humidity (for example, in bathrooms, laundry rooms,
D
damp basements). Do not immerse the device in water and do not spill or pour liquids of any kind
onto or into the device.
•
o not install the device in surroundings at risk for explosions (paint shops, for example). Do not
D
use the device if you smell gas or other potentially explosive fumes.
•
o not use the device during thunderstorms. Lightning striking the power grid may cause electric
D
shocks.
•
arning: The handset contains a magnet, and its earpiece may attract small dangerous objects
W
such as needles or pins. Please ensure before each use that no such objects are present.
SELV (Safety Extra Low Voltage) compliance
Safety status of Input/Output connections comply with SELV requirements.
Warning: To avoid electric shock, do not connect safety extra-low voltage (SELV) circuits
to telephone-network voltage (TNV) circuits. LAN ports contain SELV circuits, and
PSTN ports contain TNV circuits. Some LAN and PSTN ports both use RJ-45 (8P8C)
connectors. Use caution when connecting cables.
Standards conformance
This device is CE and FCC-certified and meets European and US health, safety,
and environmental standards.
Unauthorized opening, changing, or modifying the device will cause the warranty to
lapse and may also result in the lapse of the CE and FCC certifications. In case of
malfunction contact authorized service personnel, your seller, or snom.
8
snom 821 User Manual
Safety, Disposal, Cleaning of Product
Product specifications
•
Safety: IEC 60950-1:2001
•
Certifications: FCC Class B, CE Mark
•
Power consumption: 2.5-7 watts (without USB peripherals)
•
Power: 5 V DC
•
1 x LAN, 1 x PC: RJ45
•
Ethernet: 2 x IEEE 802.3/1 Gigabit switch
•
Power over Ethernet: IEEE 802.3af, Class 2
Disposal of the device
This device is subject to European Directive 2002/96/EC and may not be disposed of with
general household garbage.
If you do not know where you may dispose of the device at the end of its lifespan, contact
your municipality, your local waste management provider, or your seller.
Cleaning
To clean the device, use an anti-static cloth. Please avoid cleaning liquids as they might damage the
surface or internal electronics of the device.
9
snom 821 User Manual
Notational Conventions
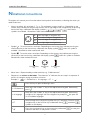
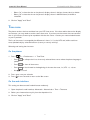
Notational conventions
Throughout this manual you will see the below-listed symbols and notations, indicating the action you
need to take next.
•
rrows up, down, left, and right: . For navigation in menus and lists. Depending on the
A
context, they indicate pressing the top, bottom, left, or right edge of the navigation key or pressing
the function keys underneath the display symbols
,
,
, or
, when these
symbols are available. Somethimes either method will work.
Press top edge of navigation key
Press bottom edge of navigation key
Press left edge of navigation key
Press right edge of navigation key
•
ymbol : To confirm actions and input. Depending on the context, they indicate pressing the
S
confirmation key or the function key underneath the display symbol
, when this symbol is
available. Somethimes either method will work.
•
ymbol : To cancel actions and input. Depending on the context, they indicate pressing the
S
cancel key or the function key underneath the display symbol
, when this symbol is available.
Somethimes either method will work.
Confirmation
key
Navigation
key
Cancellation
key
•
Menu items: Represented by number and title, e.g., "5 Maintenance".
•
equences of actions to be taken. The character ">" indicates the next step in a sequence of
S
actions to change a setting or perform a function.
Example 1:
> 1 Preferences > 4 Language > >
Press the key to open the Settings menu
> 1 Preferences
Next, press the number "1" key on the alphanumeric keypad. Alternatively
press .
> 4 Language
Next, press the number "4" key on the alphanumeric keypad. Alternatively,
navigate to "4 Language" with the navigation key and press
to open the
list of available languages.
>
Scroll through the list by pressing either the up and down arrows on the
navigation key or the function keys underneath the up
and down
symbols on the display.
>
Press the confirmation key or the function key underneath
selection and return to the previous screen.
10
to save your
snom 821 User Manual
Notational Conventions
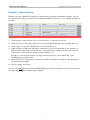
Example 2: W
eb interface > Advanced > Behavior > Phone Behavior > Number Guessing >
"On"
Web interface
Open the phone‘s web interface (see on how to do it)
> Advanced
Click on the item "Advanced" in the menu on the left side of the
window
> Behavior
Next, click on the tab labelled "Behavior". The bold lettering of the
title on a tab indicates that its contents are currently visible.
> Phone Behavior
Find the section titled "Phone Behavior"
> Number Guessing
Find the item "Number Guessing"
> "On"
Click on the radio button
11
snom 821 User Manual
Setting up the Phone
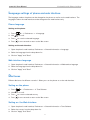
Setting up the phone
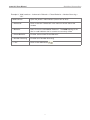
Delivery Content
1
Base phone unit
•
Footstand with bracket and 2 screws (attached to phone unit)
•
Handset
•
Handset cord (attached to phone unit)
•
Ethernet cable
•
Power supply 5 V DC with EU/US connector
2
DEF
4
JKL
5
MNO
7
TUV
8
WXYZ
a
•
ABC
GHI
PQRS
A
0
3
6
9
#
ote: Using the wrong power supply may cause damage to the phone.
N
Use only the power supply included with the phone.
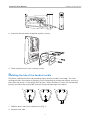
Detaching and attaching the footstand
he footstand can be attached at two different angles: 55° and 33°. The phone is delivered with the
T
handset cord connected to it and the footstand attached at the 55° angle. Whenever you take the
footstand off and reattach it, be sure to leave the handset cord in place in the cable guide. If you need
to attach a new handset cord, follow steps 2 and 3, below.
1. To detach the footstand, unscrew the two screws holding it in place.
2. Leave the handset cord in place in the cable guide.
◦◦
If you need to attach a new handset cord, connect the long end of the handset cord to the
connector labelled "
" on the back of the phone.
◦◦
Connect the short end of the handset cord to the handset.
◦◦
Place the cord in the cable guide in the right lower corner on the back of the phone.
12
snom 821 User Manual
Setting up the Phone
3. Attach the footstand with the bracket and the 2 screws.
4. Place the phone on an even, horizontal surface.
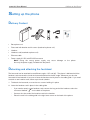
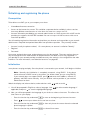
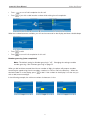
Rotating the tab of the handset cradle
The phone is delivered with the tab protruding slightly above the cradle's inner edge. The small
rectangular hold in the handset fits perfectly over the protruding tip, holding the handset securely in
place when the phone is in the upright (55°) position. When the phone is used in the slanted (33°)
position, the tab can be rotated 180° for easier lifting and replacing of the handset.
1.
2.
3.
1. Slide the plastic tab from the handset rest (Fig. 1)
2. Rotate the tab 180°.
13
1
ABC
2
DEF
3
1
ABC
2
DEF
3
1
ABC
2
DEF
3
snom 821 User Manual
Setting up the Phone
3. S
lide the tab back into the handset rest (Fig. 2). The top of the tab is now level with the inner
edge of the handset rest (Fig. 3).
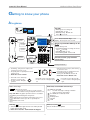
Connecting the phone
Optional
Optionel
Opzionale
Opcional
Optional
Optionel
Opzionale
Opcional
Optional
Optionel
Opzionale
Opcional
If no PoE available
Wenn PoE nicht verfügbar
S'il n'y a pas de PoE
Se non disponibile PoE
Si no se dispone de PoE
he phone can be operated with Power over Ethernet (PoE) provided via the network cable or, if PoE is
T
not avaible in your network, with the 5V DC power adapter.
•
lug the Ethernet (network) cable into the RJ45 connector labeled "NET", and plug the other end
P
into the network side to establish a data link. The second RJ45 connector, labeled "PC", is for
daisy-chaining further Ethernet devices without the need for a second Ethernet connection line.
•
If PoE is not available, insert the plug of the power supply into the connector labeled "DC 5V", and
hook up the plug to the wall outlet.
Connecting a headset
•
If you want to use a wired headset, connect it to the RJ audio jack labeled "
".
•
If you want to use a wireless headset, connect the snom EHS Advanced adapter for wireless
headsets (not included in delivery) to the connector labeled "EHS" and to the base unit of the
headset. See also the Quick Start Guide of the snom EHS Advanced and the user manual of the
headset.
Note: If both a wired and a wireless headset are connected to the phone, incoming calls
will go to the wireless headset.
14
snom 821 User Manual
Setting up the Phone
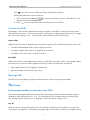
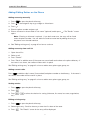
Initializing and registering the phone
Prerequisites
To be able to use VoIP, you or your company must have:
•
A broadband internet connection.
•
ccess to the internet via a router. This could be a separate device available in various versions
A
from many different manufacturers or in the form of a router on a server or a PC.
•
ccount information provided by your network administrator or a VoiP account with a VoIP service
A
provider who supports the VoIP SIP standard. You can use up to 12 VoIP accounts with one or
more VoIP providers.
You will need the registration information received from your Internet service provider or your network
administrator. Required and optional data differ from provider to provider. They normally include:
•
Account (usually the phone number). On snom phones, an account is called an "identity".
•
Registrar
•
Password
User name, authentication name, outbound proxy may also be required. These are settings that can
only be configured on the web interface of the phone after it has been successfully registered. If
your provider or your network provides a mailbox account, that setting is also configured on the web
interface. For more information, see "Identities/accounts" on page 66.
Initialization
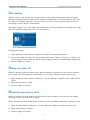
snom phones are plug-and-play. Once the phone is connected to your network, it will begin to initialize.
Note: Normally the initialization is completely automatic, using DHCP. If the phone
cannot discover a DHCP server in the subnet, you will be asked: Are you using DHCP?
If your network does not support DHCP, press and enter the IP address, netmask, IP
gateway, and DNS server manually. Ask your Internet service provider or your network
administrator for them.
Watch the display and, when asked to, make selections with
and save with .
1. Y
ou will be prompted in English to select a language. Use
applicable, and press
to save the highlighted language.
to select another language, if
2. N
ext, you will be prompted in the language of your choice to select a time zone. This affects the
time shown on your display.
◦◦
Press the function key underneath
to move to the beginning of the next time zone.
◦◦
Press
◦◦
Press the function key underneath
phone language is spoken.
to show only those time zones where the selected
◦◦
Press the function key underneath
to show all time zones.
to move up or down the list one item at a time.
15
snom 821 User Manual
◦◦
Press
Setting up the Phone
to save the highlighted time zone.
3. N
ext, you will be prompted to select the tone scheme of a country. This affects the dial tone you
hear when you pick up the receiver. Different countries use different dial tones.
◦◦
Press
◦◦
Press
to move up or down the list one item at a time.
to save the highlighted country's tone scheme.
4. The display shows the "Welcome" screen. Press any key to log on.
5. Enter the account number. Save with .
Note: See "Entering numerals, letters, special characters, and symbols" on page 23 on
how to enter numbers and letters.
6. Enter the registrar. Press .
7. Enter the password received from your Internet service provider or administrator and press .
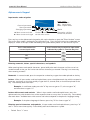
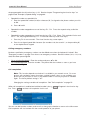
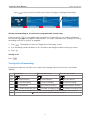
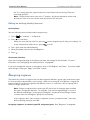
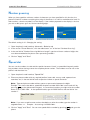
After successful registration you will see the registered account (identity) in the identity line underneath
the date/time bar:
Infobar with date & time
Identity line
Active identity:
Green symbol
Identity not properly registered:
Gray symbol
Note: If you see a gray phone symbol on the display and the phone does not work, the
server may be down, either for servicing or due to a malfunction. The registration and
initialization should be completed as soon as the server is up and running again. You
may want to check with your administrator or your provider if nothing happens within a
reasonable time.
What to do if initialization and registration are unsuccessful
Your network or your VoIP provider may require more login data than requested by the snom phone
during the initialization and registration process. This data is entered on the web interface of the
phone. Contact your network system administrator or your VoIP provider for more information.
1. W
hen you have received all necessary data, open the phone’s web interface. See "Opening the
web interface" on page 31.
2. O
pen Configuration Identity 1 and enter any additional login information you have received from
your provider. See "Identities/accounts" on page 66.
Note: A number of IP telephony service providers and a number of SIP PBXs require
settings that are different from snom’s standard factory settings. snom’s web page lists
numerous providers and PBXs that have been tested for interoperability with our phones
and specific settings that may be required. Do not change the standard configuration
unless you know what you are doing. Expert help may be required.
16
snom 821 User Manual
Setting up the Phone
Correcting the clock
The phone receives the time and date from the NTP time server. If the time and/or date on the display
are incorrect, you may need to set the correct time zone.
Changing the settings: See "Time zone" on page 71.
If the time is still incorrect, there may be a problem with the time server. Contact your network
administrator or your IP provider..
Default formats:
•
Time. 24-hour clock, e.g. 17:35. Changing to AM and PM formats: See "Time" on page 70.
•
ate. US date format MM/DD/YEAR, eg. 11/23/2010. Changing to European format
D
DD.MM.YEAR, e.g. 23.11.2010: See "Date" on page 70.
17
snom 821 User Manual
Getting to Know Your Phone
Getting to know your phone
At a glance
Call LED
• Blinking fast: Incoming call
• Steady light: In call
• Blinking slowly: Missed call.
Press to turn off.
Outgoing
identity:
Handset
speaker
P1
P2
P3
P4
Display idle screen
Handset
rest tab
1
ABC
GHI
4
JKL
PQRS
7
TUV
a
A
2
DEF
5
MNO
8
WXYZ
0
Show virtual function keys on the
display: Press key P1 for 2 seconds
6
Default setting: Line
• Fast-blinking LED: Incoming call. Press
key or to accept
• Steadily lit LED: In call
• Slow-blinking LED: Call on hold
Casing
speaker
Handset
microphone
Alphanumeric
keypad
1
ABC
2
DEF
GHI
4
JKL
5
MNO
6
PQRS
7
TUV
8
WXYZ
9
a
A
0
Freely programmable LED keys P1-P4
3
9
#
3
Context-sensitive, programmable
function keys
#
Casing microphone
• Canceling actions & input, and returning
to previous screen
• Terminating calls on speakerphone and
in headset & handset modes
• Turning off call LED after missed call
• From idle screen: Missed calls
• Confirming, saving actions & input, and
returning to previous screen
• Accepting calls on speakerphone and in
headset mode
• From idle screen: Redial
• From idle screen: Selecting
identity for outgoing calls
• In other contexts: Navigate
up/down
• From idle screen: Received calls
• In other contexts: Navigate/space
left
Dedicated, customizable function keys:
Audio control keys
Adjusting the volume
• of the ringer when the phone is idle or ringing
• of the handset/casing loudspeaker when in a call
MWI key with LED
• Lit when message is waiting on mailbox
• Press to listen to message(s)
Turn DND (do not disturb) on/off
Directory
Settings menu
Transfer
Hold
Keys with LED - key lights up when function is activated:
Muting and unmuting the microphone
Toggling between handsfree and handset mode. Press
to dial number and accept calls on speakerphone.
Headset mode on/off
Pound (hash) key # :
Rescue mode for TFTP update
Star key
• Switching between upper & lower case when pressed
briefly while in letter mode
• Press for 3 seconds: Lock/unlock the keypad
a
• From idle screen: Missed calls
• In other contexts: Navigate/space
right
A
18
snom 821 User Manual
Getting to Know Your Phone
Context-sensitive, programmable
function symbols and function keys
P1
P2
Select outgoing identity, incl. inactive identities
Call lists (missed, received, dialled calls)
P3
Forwarding all calls (on/off)
P4
Show complete list of current status information
Press the function key to activate the function, open the list etc.
depicted by the symbol above the key.
Press key P1 for 2 seconds to open virtual function key screen.
Using the virtual function keys: Press the alphanumeric key
shown in the upper right corner of the respective function key.
1
ABC
2
DEF
GHI
4
JKL
5
MNO
6
PQRS
7
TUV
8
WXYZ
9
a
A
0
3
#
Examples:
• Call pickup (green key):
MNO
• Dial extension:
6
#
Configuring the keys: See "Configuring the Function
Keys"
• Yellow key: Extension busy
Virtual function keys
Virtual function keys can be freely programmed with numerous functions and key events. They are
particularly useful for monitoring other extensions and call pickup, alerting to calls parked on a park
orbit, etc. The virtual function key screen will appear whenever the mapped activity occurs, for example
when a call is ringing on a monitored extension or when a call has been parked on the park orbit.
•
o initiate or execute the function mapped onto the virtual key, press its number or character on the
T
alphanumeric keypad.
•
Press
to return to the idle screen.
For information on how to map functions onto these keys, see "Configuring the function keys" on page
58. The factory default setting is "line".
LED indications
Call indicator
The bright-red LEDs situated around the upper right corner of the phone indicate incoming, ongoing,
held, and missed calls. They will be:
•
Blinking rapidly when a call is coming in
•
Glowing steadily when dialling, when in a call, and when a call is on hold
•
Blinking slowly when there was a missed call
19
snom 821 User Manual
Getting to Know Your Phone
◦◦
Press
if you wish to turn the LEDs off without viewing the call history .
◦◦
Viewing the particulars of the missed call:
1. P
ress function key underneath
top item of the list and highlighted.
2. Press
to show the Call History screen. "Missed calls" is the
to view missed calls and simultaneously turn off the LED.
Function key LEDs
Depending on the function mapped onto the key, the green or red LEDs on the key will be activated
when the key event occurs. For more information, see chapter "Configuring the function keys" on page
58. The factory setting is “line”. Incoming calls will be routed to the first free line key.
Green LEDs
When the "line" function is mapped onto a key, the key's green LED will indicate the activity on the line.
•
The LED will blinkrapidly when a call is ringing on the line.
•
It will glow steadily when there is an ongoing call on the line.
•
It will blink slowly when a all is on hold on the line.
Red LEDs
When other functions are mapped onto the keys, the red LEDs may glow or blink. For example: When
the "extension" function has been mapped onto a key to monitor an extension, the LED will
•
blink rapidly when a call is ringing on the extension;
•
glow red steadily when the extension is busy.
Message LED
The LED on the message key will glow red when there is a new message on the mailbox.
Hard keys
Freely programmable function keys with LEDs
These are freely programmable function keys that can be programmed on the Function Keys page of
the phone's web interface, keys P1 - P4. For information on how to map functions onto these keys,
see "Configuring the function keys" on page 58. The factory default setting is "line".
Key P1
When the phone is idle, pressing key P1 for two seconds will bring the "Virtual Keys" on-screen (see
"At a glance" on page 18). The number in the upper right corner of each virtual key corresponds to the
20
snom 821 User Manual
Getting to Know Your Phone
respective number key 1- 9 and 0 and the character keys * and # on the phone's keypad. When the
virtual key screen is visible, pressing the corresponding key on the alphanumeric keypad will activate/
initiate the function mapped onto the virtual key. For information on how to map functions onto these
keys, see "Configuring the function keys" on page 58. The factory default setting is "line".
Context-sensitive, programmable function keys
A number of key events can be programmed onto these function keys on the "Function Keys" page of
the phone's web interface; these functions will then be available when the phone is in idle mode. For
more information, see "Configuring the function keys" on page 58. For the factory default settings, see "At
a glance" on page 18.
You cannot change the functions that are available when the phone is active, for example when you are
in a call, when the phone is ringing, etc. Depending on the activity, different functions will be available.
Navigation, confirmation, and cancel keys
Can be programmed with the key events available in their drop-down menus - see "Configuring the
function keys" on page 58 for further information. Factory settings:
Navigation key, indicated in this manual by geometric arrow symbols.
rs
v
w
•
On idle screen: Programmable
•
Move lists up and down one item/button at a time
•
In text fields, press to move the cursor to the left one character at a time.
•
On idle screen, press to open list of received calls.
•
In text fields, press to move the cursor to the right one character at a time.
•
On idle screen, press to open the list of missed calls
•
Accept calls on speakerphone and in headset mode.
•
Confirm actions/settings and return to preceding screen.
•
Idle screen: Redial.
•
Terminate calls on speakerphone and in headset and handset modes.
•
Cancel actions and return to preceding screen.
•
Idle screen: Turn off LED indicating missed call(s).
21
snom 821 User Manual
Getting to Know Your Phone
Preprogrammed, variably programmable function keys
Freely programmable. See "Configuring the function keys" on page 58 for further information. Factory
settings:
Message key with LED
•
Lit when new message is waiting on mailbox
•
Press to retrieve
Turn "do not disturb" (DND) mode on and off. In DND mode incoming calls do not ring;
callers hear the busy signal.
Exception: Phone numbers on your directory's VIP list (see Contact Types)
Press key to turn DND on and off. When it is on, you'll see the DND symbol on the
display.
Phone directory. See "Directories" on page 35 for further information
Opens the phone menu. See "Phone settings" on page 28 for further information
Transfer key. See "Transferring calls" on page 53 for further information
Hold key. See "Hold" on page 49 for further information
Audio Control Keys
Press the right or left side of the key to increase or lower the volume
•
of the ringer when the phone is idle or ringing,
•
of microphone/loudspeaker when in call
Keys with LEDs. The key lights up when the function is activated:
Muting and unmuting the microphone
•
Toggling between handsfree and handset mode
•
Dialing numbers on speakerphone
•
Accepting calls on speakersphone
Toggling between headset and handset modes.
Note: Handset mode overrides headset mode. When the handset is picked up, the
LED of the headset key will turn off, indicating that you can now use only the handset
for the call. The phone will return to headset mode when the handset is placed in the
cradle; the LED lights up again.
22
snom 821 User Manual
Getting to Know Your Phone
Alphanumeric Keypad
Input modes and navigation
Input modes:
123: Numerals
abc: Small letters
ABC: Capital letters
Current input mode:
Next input mode:
Changing input mode:
: Move cursor to the left
: Move cursor to the right
Redial
Delete character to
the left of the cursor
Directories, call lists,
contact list, favorites
Press any key on the alphanumeric keypad or pick up the handset to open the "Enter Number" screen.
The current input mode is indicated in the information line. Press the left function key underneath the
display to switch to the input mode indicated by the symbol directly above it in the function key line.
Text in Information Line
= current input mode
Press function key to switch to input mode
indicated by symbol in Function Key Line
123
abc
ABC
Entering numerals, letters, special characters, and symbols
When entering letters and special characters, pause briefly after each character until the cursor has
moved forward so that you won't write over the last character you entered. Pausing is not necessary
when entering numerals.
Numerals. In numeral mode, press the respective number key to type the number printed on the key.
Letters. When in input modes small and capital letters, press the alphanumeric key with the respective
letter one, two, three, or four times quickly to type the first, second, third, or fourth letter printed on the
key. Pause briefly after each letter.
Example: In small letter mode, press the "2" key once to type an "a", twice to type a "b",
and three times to type a "c".
Letters with accents and umlauts. When in input modes small and capital letters, press the
alphanumeric key with the basic form of the respective letter as many times as necessary. Pause briefly
after each letter. Available letters with accents and umlauts depend on the phone's language setting.
Example: If the phone language is German, press key "2" four times to type "ä".
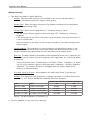
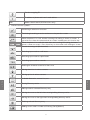
Entering special characters and symbols. In input modes small and capital letters, press keys "0"
and "1" one or more times quickly. Pause briefly after each character or symbol.
•
Period. Press "1" once.
23
snom 821 User Manual
Getting to Know Your Phone
•
Space ("˽"). Press "0" once.
•
Underscore ("_"). Press "0" twice.
•
Special characters listed in the table. Press "1" as many times as indicated.
1x
.
2x
+
3x
@
4x
1
5x
:
6x
,
7x
?
8x
!
9x
-
10x
_
11x
/
12x
\
14x
)
15x
;
16x
&
17x
%
18x
*
19x
#
20x
<
21x
=
22x
>
23x
$
24x
[
25x
]
13x
(
Display layout
In idle mode
When active
Context-sensitive function key symbols
Context area
Infobar
Configured
identities
Information line
Function key line
Idle Mode
In idle mode, the display presents the following information:
Info bar: Date and time.
Context area: Configured identities. For information on configuring new identities or modifying
existing ones, see "Identities/accounts" on page 66.
Outgoing identity
•
he current outgoing identity is indicated by the darker line:
T
When you call someone, this is your identity for the call.
•
Select a different identity for the next call by pressing
24
on the navigation key.
.
snom 821 User Manual
Getting to Know Your Phone
Active identity
•
Active identities are indicated by the green phone symbol:
•
Can be called
•
Can be selected as the outgoing identity for making calls by pressing rs on the
navigation key.
•
Blinking gray phone symbol: The identity is trying to register
•
he phone symbol has stopped blinking, but remains gray: Failed registration, the
T
identity is not properly registered. Check the settings and/or inform your network
administrator or your VoIP provider.
Identities can be unregistered without removing the registration settings by changing their
status to "inactive" on the phone's web interface. Inactive identities are not displayed on
the idle screen. They cannot be called or selected as the outgoing identity. To reregister
the identity, open the phone's web interface > Configuration Identity (1-12).
1. Change the "Identity active" setting to "on".
2. Click on "Re-Register".
3. Click on "Save".
Status bar
Any of numerous messages concerning the current status of the phone might be displayed in this bar,
for example the availability of a firmware update, a reboot being required, etc. If there is more than
one current status message at any one time, the one with the highest priority will be shown. For a
comprehensive list in descending order of priority, see "Appendix 2 - Status messages" on page 86.
Two of the most common status messages you will see in idle mode are:
•
he text "CFwd:" and the phone number calls will be forwarded to when call forwarding (when busy
T
or no answer) is activated. When there are missed calls, this information is replaced by the missed
calls information.
•
he warning "HTTP Password not set"`. It will override both the called forwarding and missed call
T
information. It can be turned off by either setting the password or telling the system to ignore the
warning.
◦◦
Setting the password: Web interface > Advanced > QoS/Security > HTTP Server
◦◦
urning off the warning: Web interface > Advanced > QoS/Security > Security > Ignore
T
security advices: Click "On" and "Apply"
Deleting status messages
•
essages will be deleted automatically when the underlying cause is removed, i.e., call forwarding
M
is turned off, HTTP password is set, etc.
•
Manually: Press
, if the button is available, or
the "Status info" screen. Use
/
> 6 Information > 1 Status info to open
to select an item from the list and press
25
Del
to delete.
snom 821 User Manual
Getting to Know Your Phone
Function key line
The symbols on the buttons in this line depict the functions that can be activated by pressing the
function key underneath the respective symbol. See "Appendix 1 - Display symbols and icons" on
page 82 for a complete list. The factory defaults are:
Outgoing Identity. Shows the URIs of all configured identities.
Call lists (missed, received, and dialed calls). See "Call lists" on page 54.
Forwarding all calls (on/off). See "Call forwarding - phone settings" on
page 55.
Displaying all currently available status messages. This key is available whenever a
status message becomes newly available even when you have mapped a different
function onto the far-right context-sensitive function key underneath the display.
Press the key to display the status messages; press DEL to delete the highlighted
status message. When all messages have been deleted, the symbol will disappear from
the function key line; the message in the status line will also disappear.
If you have mapped (programmed) a different function onto the key, that function is now
available on this key again. The default setting is
. If you have mapped the "Status
messages" function onto the key, the key will remain blank until a new status message
becomes available or until a reboot when all current status messages will be displayed
anew.
Virtual function key screen
When certain functions are mapped onto one or more virtual keys, the virtual keys screen will appear
whenever certain activities outside your phone are taking place, for example when a call is ringing on
a monitored extension. When the virtual keys are not on-screen, pressing key P1 for two seconds will
open the screen (see "At a glance" on page 18).
•
he number in the upper right corner of each virtual key corresponds to the respective number key
T
1- 9 and 0 and the character keys * and # on the phone's keypad. When the virtual key screen is
visible, pressing the corresponding key will activate/initiate the function mapped onto the virtual key.
•
Press
to return to the idle screen.
For information on how to map functions onto these keys, see "Configuring the function keys" on page
58. The factory default setting is "line".
When the phone is active
The display will inform you of any activity the phone is engaged in. This information is presented in the
form of text or symbols or both.
Info bar: Name of current activity and time.
Context area: Depending on the activity, this area will contain symbols (incoming call ringing,
outgoing call ringing, etc.) and text like the phone number calling, the extension number being called,
conference partners, etc. See Appendix 1 - "Display indications" on page 85.
26
snom 821 User Manual
Getting to Know Your Phone
Status bar
In editing modes (i.e., when dialing or editing directory entries), the current editing mode (i.e., numerals,
small letters, or capital letters) is shown preceding the status message, if any.
Current input mode (numerals),
followed by status message:
Function key line
Depending on the current activity of the phone, the key function key line will present various functions
that can be activated by pressing the function key underneath the respective symbol. See Appendix 1
- "Symbols found in the function key line" on page 82.
Virtual function key screen
The virtual function key screen will appear whenever the phone detects activity on a monitored
extension. The number in the upper right corner of each virtual key corresponds to the respective
number key 1- 9 and 0 and the character keys * and # on the phone's keypad. When the virtual key
screen is visible, pressing the corresponding key will activate/initiate the function mapped onto the
virtual key.
For information on how to map functions onto these keys, see "Configuring the function keys" on page
58. The factory default setting is "line".
27
snom 821 User Manual
Getting to Know Your Phone
Settings
A comparatively small number of settings can be adjusted on the phone; many more are available
on the phone's web interface. For further information on the web interface, see "The phone's web
interface" on page 30; see "Customizing the phone settings" on page 66 for information on the settings
users are most likely to wish to customize.
Phone settings
Press
to open the settings menu on the display. To open a submenu and subsequent submenus,
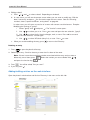
press its number on the alphanumeric keypad.
In administrator mode
1
Preferences
2
Call Features
3
Identity
4
Network
5
Maintenance
6
Information
1
Time Zone
1
Call Forwarding
1 Outgoing
Identity
1
IP Setting
1
System Info
1
Status Info
2
Tone Scheme
1
Forward all
2
Reregister
2
Webserver
2
User Mode
2
System Info
3
Ringer
2 Forward
when busy
3
Edit
1
Webserver Type
3
Reboot
3
Help
4
Language
3
Fwd after timeout
4
Logoff
2
HTTP Admin
4
Reset Values
5
Display
2
Outgoing Calls
5
Logoff all
3
HTTP Password
5
Change PIN
1 Backlight
on activity
1
Auto Dial
3
VLAN
2 Backlight
when idle
2 Number
Guessing
1
VLAN ID (0-4095)
3
Call Completion
2 VLAN Priority
(0-7)
4 Hide own
outgoing ID
3
Reset VLAN
3
Maintenance
4
Information
3
Incoming Calls
4
WLAN
1
System Info
1
Status Info
1
Reject anonymous
1 Scan WLAN
networks
2 Administrator
Mode
2
System Info
2
Call Waiting
2
Enter SSID
3
Reboot
3
Help
3 Auto Answer
Indication
3
Switch off WLAN
Change PIN
In user mode
4
4
Auto Answer Type
The submenus and the settings shaded black and gray are not available when the phone is running
in user mode. The factory setting is administrator mode. For more information on user/administrator
modes, see "User mode/administrator mode" on page 33.
Note: When the phone is in administrator mode and the Maintenance menu is on the
display, pressing key 2 ABC 2 will switch the phone to user mode.
28
snom 821 User Manual
Getting to Know Your Phone
When the phone is in user mode and the Maintenance menu is on the display, press key 2
ABC 2 to switch the phone to administrator mode. You will be asked for the administrator
password. The default administrator password is 0000 (4 x zero).
For further information on these settings and functions, see the chapters "Customizing the phone
settings" on page 66 and "Using the phone" on page 43.
Web interface settings
See "The phone's web interface" on page 30, "Customizing the phone settings" on page 66, and
"Configuring the function keys" on page 58.
29
snom 821 User Manual
Getting to Know Your Phone
The phone's web interface
Opening the web interface: See "Opening the web interface" on page 31.
Firmware versions below 8.7.4
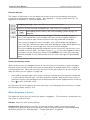
When the web interface is opened for the first time upon initialization, you will see the Security page.
We urge you to set administrator and HTTP passwords to protect your phone from remote attacks.
The default administrator password is 0000 (4 zeros); there is no default HTTP password. Please
note:
-- If you do not replace the default administrator password by an individual one, an
unauthorized third party with access to the phone could set an administrator password
unknown to you. In such a case, you would no longer be able to switch from user mode to
administrator mode.
-- If you do not set an HTTP password, you make it easier for experienced hackers to break
into your system.
-- If you set your own passwords, be sure to write them down and store them in a secure
place.
ithout the administrator password, you will not be able to return the phone and the web
W
interface from user mode to administrator mode; many settings will be inaccessible.
Without HTTP password you cannot open the phone's web interface.
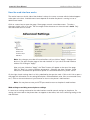
If you do not wish to set an HTTP password, you can turn off the reminder on the phone’s display
until the next reboot or forever by clicking on the respective button. If you change your mind later, you
can set the password on the phone’s web interface, "Advanced"page > "QoS Security" tab > "HTTP
Server" (see ) or turn off the warning later at Advanced > QoS Security > Security > Ignore security
advices.
30
snom 821 User Manual
Getting to Know Your Phone
Firmware versions 8.7.4 and higher
When you register the first account during the initialization of the phone, your SIP user name and
password will be registered as the HTTP user name and password. If you wish to change them later,
you can do so on the phone's web interface > Advanced > QoS Security > HTTP Server.
When you register the first account during the initialization of the phone, your SIP user name and
password will be registered as the HTTP user name and password. If you wish to change them later,
you can do so on the phone's web interface > Advanced > QoS Security > HTTP Server.
Note:
-- If you do not replace the default administrator password by an individual one, an
unauthorized third party with access to the phone could set an administrator password
unknown to you. In such a case, you would no longer be able to switch from user mode to
administrator mode.
-- If you set your own passwords, be sure to write them down and store them in a secure
place.
ithout the administrator password, you will not be able to return the phone and the web
W
interface from user mode to administrator mode; many settings will be inaccessible.
Without HTTP password you cannot open the phone's web interface.
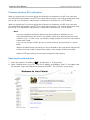
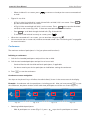
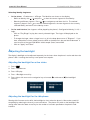
Opening the web interface
1. Look up the phone's IP address:
> 6 Information > 2 System Info.
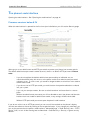
2. O
pen a web browser on your PC. Enter the IP address, preceded by "http://" in the address bar
(for example: http://192.168.10.115) and press ENTER. The "welcome" screen opens.
31
snom 821 User Manual
Getting to Know Your Phone
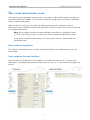
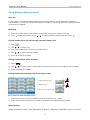
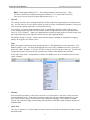
How the web interface works
The vertical menu on the left side of the window is always the same, no matter which window happens
to be open at the time. Available menu items depend on whether the phone is running in user or
administrator mode.
Click on a menu item to open that page. Some pages contain several documents. To make a
document visible, click on its tab. The font weight of the characters on the active tab is bold. Only
one tab can be active at a time.
Note: Any changes you make will not take effect until you click on "Apply". Changes will
be lost if you open another page of the web interface or if you close the web interface
without first clicking on "Apply".
After you have clicked on "Apply", the "Save" button will appear at the top of the page.
Click on "Save" to save the changes permanently. Changes that have not been saved
will be lost if and when the phone loses power or is disconnected from its power source.
On the right of each setting, there is a link symbolized by the question mark. Click on this link to open a
wiki page with information on the setting (description, valid and default value, links to connected issues,
etc.). Click on the return button of your browser to return to the phone's web interface.
Note: You may have to enter your HTTP password to return to the phone's web interface.
Web settings overriding manual phone settings
In some cases settings activated on the web interface override manual settings on the phone. If a
setting you have made on the phone does not appear to take effect, look for a conflicting setting on the
web interface.
32
snom 821 User Manual
Getting to Know Your Phone
User mode/administrator mode
snom phones can be operated in administrator or user mode. In administrator mode, all settings are
accessible and can be modified; in user mode, a number of settings are not accessible. The factory
default is administrator mode.
When the phone is running in user mode, the administrator password is required to revert to
administrator mode. The default administrator password is 0000 (4 x zero). We can recommend that
you change the password.
Note: Do not forget to write the new password down and store it in a safe place; without
it, a TFTP reset to factory values is necessary to return the phone to administrator mode.
If your phone is administered centrally, user mode may be the rule. Please check with
your administrator.
User mode on the phone
The "Identity" and "Network" menus and the setting "Reset Values" in the "Maintenance" menu are
inaccessible.
User mode on the web interface
Some windows like "Preferences" are available in user mode while many are not. The menu item
"Advanced" is available but the settings normally found on it are not. In user mode the two pages look
like this:
33
snom 821 User Manual
Getting to Know Your Phone
To return the phone and its web interface to administrator mode, enter the administrator password in
Administrator Login and click on "Apply". The default password is 0000 (4 x zero). The two pages in
administrator mode look like this:
•
If a window contains several pages, click on the tab at the top to open the page. The font weight of
the characters on the tab of the visible page is bold.
•
ny changes you make will not take effect until you click on "Apply". Changes will be lost if you
A
open another page of the web interface or if you close the web interface without first clicking on
"Apply".
ote: Whenever you click on "Apply", the "Save" button will appear at the top of the
N
page. Click on "Save" to save the changes permanently. Changes that have not been
saved will be lost if and when the phone loses power or is disconnected from its power
source.
34
snom 821 User Manual
Directories
Directories
Directory
The directory is the built-in directory of the phone. It can hold 1000 entries. Entries can be added and
edited on the phone and on the web interface.
Any changes you make on the web interface will not take effect until you click on "Save" or on "Apply"
and "Save", depending on your firmware version. Changes will be lost if you open another page of the
web interface without first clicking on "Apply"/"Save".
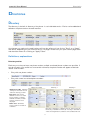
Definitions, explanations
Directory entries
Each entry must have at least one phone number; multiple associated phone numbers are possible. If
you do not enter a first and/or last name and/or nickname, the phone number will appear under both
"Name" and "Number".
•
Entry with one phone number:
•
Entry with several associated phone numbers:
Number area (N): Individual
settings for the master record
and each subentry possible.
Master record (M)
Subentry 1
Subentry 2
N
N
N
Blue area. Data can be
different for each associated
phone number. If subentry
textfields are blank, the data
from the master record is
displayed.
M
M
Name area. Same data
for the master record and all
subentries.
M
M
S
M
M
S
M
Blue area of Subentry 2: Different "Group" selection (S), different entry in textfield of "Email" (S). No entry in text fields of
"Title" and "Organization", therefore same as Master Record.
35
snom 821 User Manual
Directories
Contact Types
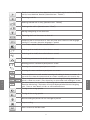
VIP: Calls from numbers with this contact type will ring on your phone even when DND mode is active.
You can assign a ringtone to this contact type. If your VIP is also assigned to a group (see below) and
if that group has a distinct ringtone, the ringtone assigned to the group will be played.
Deny List: Calls from phone numbers with this contact type will not ring on your phone. The caller
hears the "Busy" signal.
Outgoing identity
The default setting is "Active" which means that the phone will use the current outgoing identity
whenever you dial the number of the phone book entry.
You can also select a specific identity to be used as the outgoing identity whenever the number is
dialed, for example, if you want to use a specific VoIP provider for these calls.
Note: To use an outgoing identity specified in the directory, you must dial the number
from the directory. If you simply type it on the keypad, the current outgoing identity, as
indicated on the display, will be used.
Group
The available group types are Friends, Family, Work, Colleagues. You can assign a distinct ringtone to
each group type.
Ringtones
The phone has 10 built-in ringtones that can be assigned to group and contact types. It is also
possible to download a custom melody.
Assigning ringtones to identities: See "Assigning ringtones" on page 68.
Assigning ringtones to contact type VIP and group types
Preferences > Directory Ringtones.
Select a ringtone from the respective drop-down menu and click on "Apply". If you choose "Custom
Melody URL", enter the URL to the data file in the text field. It must be a file of the type PCM 8 kHz 16
bit/sample (linear) mono WAV.
Note: Ringers assigned to contact type VIP and to any of the group types override the
ringers assigned to the identities. For example, if you have assigned ringer 1 to one of
the identities and ringer 2 to the group "Colleagues", the phone will play ringer 2 when a
contact from the "Colleagues" group calls that identity.
36
snom 821 User Manual
Directories
Adding/Editing Entries on the Phone
Adding new entry manually
1. Press
to open the phone's directory.
2. Press
on the navigation key to go straight to <New Item>.
3. Press
.
4. Enter the phone number and press
.
5. E
nter a nickname in the text field of "nick name" (optional) and/or press
opens.
. The "Details" screen
Note: Entering a nickname is optional. If you don't enter one, the entry will be listed
under the phone number. You can add a first and last name later by editing the entry on
the phone or on the web interface.
6. See "Editing existing entry" on page 37 on how to continue.
Adding new entry from call list
1. Open the call list.
2. Select a call.
3. Press "Details".
4. P
ress "Save" to add the name (if the name was transmitted) and number to the phone directory. If
the name is not shown, the number will be used in its place.
See "Editing existing entry" on page 37 on how to add a name, phone type, group, etc.
Adding current caller
Press
to add the caller's name (if transmitted) and phone number to the directory. If the name is
not shown, the number will be used in its place.
See "Editing existing entry" on page 37 on how to add a name, phone type, group, etc.
Sorting entries
1. Press
2. Press
3. P
ress
etc.).
to open the phone's directory.
.
/
to select the criterion for sorting (nickname, first name, last name, organization,
Editing existing entry
1. Press
to open the phone's directory.
2. Selecting an entry: Scroll to the entry or enter the first letter of the name.
3. Press
. The "Details" screen for the entry will be displayed.
37
snom 821 User Manual
Directories
4. Editing a detail.
a. Press
/
and
to select a detail. Depending on the detail,
b. In
some cases, you will see the prompt screen where you can enter or modify text. Edit the
data, if necessary, and press
to save and to open the next screen. See also "Entering
numerals, letters, special characters, and symbols" on page 23.
In other cases, you will see a succession of screens with context-sensitive buttons. Example:
Modifying the settings of "group".
i.
Select "group" with
ii. Use
/
and press
. The "favorite" screen opens.
to select yes or no. Press
to save and open the next selection, "group".
iii. Use
/
to select family, friend, colleague, work, or none. Press
open the next selection, "contact type".
iv. Use
/
to select VIP, block (deny list), or none. Press
c. When you are done editing the entry, press
to save and
to save.
to return to the Directory.
Deleting an entry
1. Press
to open the phone's directory.
2. Selecting an entry: Scroll to the entry or enter the first letter of the name.
Note: If there is more than one phone number associated with the entry and you want to
delete only one of them, press
and press the function key
3. Press
. Select the number you want to delete with
.
. You will be asked, "Are you sure?".
4. If you are, press
.
Adding/editing entries on the web interface
Open the phone's web interface and click on Directory in the menu on the left side.
38
/
snom 821 User Manual
Directories
Adding new entry
1. Type data in text fields of "Add or Edit Entry“.
◦◦
umber: Type the number exactly as you would dial it, with country and area codes, if
N
necessary, and without parentheses, hyphens, blank spaces.
◦◦
umber Type: Select the type of connection (sip, cellphone, landline) from the drop-down
N
menu. The default setting is SIP.
◦◦
Contact Type: Select from the drop-down list. The default setting is "None".
-- Y
ou can assign a distinct ringtone to the contact type "VIP": Preferences > Directory
Ringtones.
-- C
alls from entries on the "VIP" list will always ring on the phone, even when the phone is in
a call or in DND mode.
-- C
alls from entries on the "Deny" list will not ring on the phone. The caller will always hear
the busy signal.
◦◦
utgoing Identity: The drop-down list shows all identities configured on the phone. If you
O
select one of the identities for one of the numbers listed in the phone book, all calls to that
number initiated from the phone book will show that identity on the callee’s phone.
◦◦
lue area: The data entered in the textfields will be displayed when the entry is opened on the
B
phone. They can be used to sort entries by group, name, organization, etc., and can be edited
on the phone.
-- " Group" drop-down menu: Available types are "Friends“, "Family“, "Colleagues“, or "Work".
You can assign a distinct ringtone to each group type: Preferences > Directory Ringtones.
-- " Nickname": If you enter a nickname, it will appear under the "Name" header of the
Directory on the web interface.
◦◦
First name, family (last) name: Will be added in this order under "Name" in the directory.
◦◦
irthday. Uses the format set at Preferences > General information > U.S. Date Format (mm/
B
dd): "On" or "Off". Enter in DD.MM.YR or MM/DD/YR format. Examples:
Date
March 5, 1980
March 12, 1980
October 5, 1980
October 12, 1980
◦◦
Input
5.3.80 or 3/5/1980
12.3.80 or 3/12/1980
5.10.80 or 10/5/1980
12.10.80 or 10/12/1980
Favorite: Tick box to add entry to "Favorites" list.
2. Click on "Add/Edit" to save new entry to directory.
39
Output when US Date Format setting is
On
Off
3/5/80
5.3.80
3/12/80
12.3.80
10/5/80
5.10.80
10/12/80
12.10.80
snom 821 User Manual
Directories
Editing an entry
When you open an existing entry, the current information is displayed in the text fields of "Add or Edit
Entry" and two additional buttons, "Add Sub" and "Change", are available.
•
Editing
◦◦
If single entry, click on
in the entry's line.
◦◦
If there is more than one number associated with a name:
-- C
lick on
in the name's line if you wish to edit/add the first or last name of the date of
birth and the data in the blue area applicable to the master record.
-- C
lick on
in a phone number's line if you wish to edit the subentry`s data (phone number,
number & contact type, outgoing identity, and any blue area data applicable to this subentry
only).
Make changes as necessary and click on "Change".
•
Adding additional phone number (subentry) for a name
◦◦
J ane Smith's entry has only one phone number, her SIP phone number. In this example, the
phone number of Jane Smith's landline will be added to the directory.
-- Click on
in Jane Smith's line. The data is shown in "Add or Edit" area (Fig. 1).
Fig. 1
Fig. 2
-- Enter the phone number in the text field of "Number" (Fig. 2).
-- Select "fixed" from the drop-down menu of "Number type" (Fig. 2).
-- If you wish, select a contact type and an outgoing identity from drop-down lists.
-- Click on "Add Sub" (Fig. 2).
◦◦
J ohn Miller's entry has a SIP number and a private number. In this example, his cell phone
number will be added as a third number.
40
snom 821 User Manual
-- C
lick on
area.
Directories
in the line containing John Miller's name. The data is shown in "Add or Edit"
-- Enter the phone number in the text field of "Number".
-- Select the number type.
-- If you wish, select a contact type and an outgoing identity from the respective drop-down
list.
-- Click on "Add Sub".
The directory now contains Jane Smith's landline number and John Miller's mobile phone number.
Deleting entry on web interface
•
Click on
in the line of the master record to delete the name and all associated phone numbers.
•
lick on
C
in the line of a phone number subentry to delete that subentry, but keeping the master
record and the other subentries.
Dialing from phone directory
To dial, click on
in the line of the phone number.
Deleting whole directory
Deletes entire directory irretrievably!
Importing/Exporting Directory
See our Wiki at http://wiki.snom.com/Web_Interface/V7/Directory.
41
snom 821 User Manual
Directories
External directories
Provided by your network, your VoIP provider, or another external source.
LDAP
Enter the necessary data received from your administrator, VoIP provider or other external source in the
text fields of the phone‘s web interface > Advanced > Network > LDAP and click on "Save".
Enter the first letter of the name you are searching for. Type more letters if the name shown isn't the
right one or scroll through the list. Press
to dial.
Contacts
On the phone's web interface > Configuration Identity # > "SIP" tab > "Contact list" click on the radio
button "on". Enter the URI received from your administrator, VoIP provider or other external source in
the text field of "Contact list URI" and click on "Save".
Enter the first letter of the name you are searching for. Type more letters if the name shown isn‘t the
right one, or scroll through the list. Press
to dial.
42
snom 821 User Manual
Using the Phone
Using the phone
This section describes the functions of the phone with the factory default settings. If your phone was
installed and/or set up by someone else, the default settings may have been changed. Please check
with that person or company if the phone does not react as described here.
The caller information displayed on the screen is controlled by the setting on the phone‘s web interface
> Preferences > General Information > Number Display Style > drop-down list (full contact, name,
number, name and numbe,number and name). The default setting is "Name".
Making calls
See "Entering numerals, letters, special characters, and symbols" on page 23 for input modes and
entering letters, numerals, and special characters.
Selecting identity for current outgoing call
See "Identities/accounts" on page 66 on how to configure identities.
If more than one identity is shown on the display, the one on the dark bar is the outgoing identity for the
call and the number/name that will show on the callee’s phone. Use or to select another identity.
Using different audio devices
Handset
•
Pick up the handset, enter the phone number, and press
•
Enter the phone number and pick up the handset.
Headset
Enter the phone number and press
or headset key.
Speakerphone
Enter the phone number and press the speaker key.
Speakerphone and handset or headset
1. Use the method for handset or headset use to dial.
2. Press
to add speakerphone.
43
. OR
snom 821 User Manual
Using the Phone
Using different dialing methods
Auto dial
If a time span in seconds has been selected from the drop-down menu at Advanced > Behavior >
Phone Behavior > Auto Dial, the phone will dial the number on the display when the specified number
of seconds has elapsed.
Redialing
1. Press
to show the last 100 numbers dialed, with the very last number at the top.
2. Press
to dial that number or use
/
to select a different number and then press
.
Calling number from call list (missed, received, dialed calls)
1. Press
2. Use
.
/
to select a list.
3. Press the number of one of the lists to open that list.
4. Use
/
5. Press
to select a phone number.
to dial the number.
Calling number from phone directory
1. Press
2. Use
3. Press
.
/
to select a name or enter the first letter(s) of the name on the alphanumeric keypad.
to dial the number.
Calling monitored extension from virtual keys screen
• Call pickup (green key):
MNO
• Dial extension:
6
#
• Extension busy (yellow key):
1. Press function key P1 for two sedonds to put the virtual keys on- screen.
2. Press the key with the extension's number or character on the alphanumeric keypad.
Speed dialing
Setting speed dial numbers: See "Speed dial" on page 77. Mapping a speed dial number onto one of
44
snom 821 User Manual
Using the Phone
the programmable virtual function keys 1-15: See the chapter "Programming the function keys" on
page 61and "Example 3, Speed dialing" on page 64.
•
Speed dial number on speed dial list
1. E
nter the speed dial number (0-30) or character (#, *) assigned to the phone number you wish
to dial.
2. Press
to dial.
•
peed dial number mapped onto one of the keys P1 - P4: Press the respective key to dial the
S
number.
•
peed dial number mapped onto virtual function keys P5 - P12. (Note: This method will also work
S
for P1 - P4; the programmable keys P1 - P4 are both hard keys and virtual keys.)
1. Press key P1 for two seconds. The virtual function key screen opens.
2. P
ress the assigned speed dial character (the numbers 0-9, the asterisk *, or the pound key #)
on the alphanumeric keypad.
Calling emergency numbers
Numbers specified as emergency numbers can be dialled even when the keyboard is locked! See
"Emergency numbers" on page 73 on how to set emergency numbers. Several numbers (911, 112, 110,
999) have been preconfigured.
•
On an unlocked keyboard: Enter the number and press
to dial.
•
n a locked keyboard: Enter the number. The phone dials the number as soon as you have
O
entered all the digits.
Call completion
Note: This function depends on whether it is available in your network or not. On snom
phones call completion means that when a called number is busy or not available, your
phone will call you back as soon as the dialed number is not busy anymore or available
again. The factory default setting is "off".
Changing the setting to enable call completion: See "Call completion" on page 75.
When call completion is enabled and a dialed number is busy,
line. Press CC to activate call completion for this call.
CC
will appear in the function key
You can now dial another number, receive calls, or hang up the handset to return to the idle screen.
Call completion will not interfere with the normal operation of your phone.
45
snom 821 User Manual
Using the Phone
•
Press
to turn off call completion for this call.
•
Press
if you wish to dial another number while waiting for call completion.
When the number becomes available, you will see it announced on the display and hear a double beep.
•
Press
to dial.
•
Press
to turn off call completion for this call.
Number guessing (auto completion)
Note: The default setting for Number guessing is "off". Changing the setting to enable
number guessing: See "Number guessing" on page 77.
When you dial and have entered the minimum number of digits, the phone will propose numbers
containing the typed string from the numbers saved on its call lists and in the directory. When the
desired number is on the display, press
to dial. If the number on the display is not the one you
wish to dial, enter more digits.
In the following example, the minimum number of characters is four:
Fig. 1
Fig. 2
46
Fig. 3
snom 821 User Manual
Using the Phone
Accepting calls
Using different audio devices
Handset: Pick up the handset.
Headset: Press
or the blinking line key.
Speakerphone: Press
.
Automatically accepting calls
The default is "off". Turning the function on: On the phone's web interface > Configuration Identity #
> SIP tab > Auto answer: Click on the radio button "On".
With this setting, your phone will automatically accept incoming calls when the phone is idle:
•
If your are using Firmware version 8.7.2 and higher, calls will be accepted on speakerphone; press
the headset key
if you want them to go to the headset.
•
Firmware version 8.7.1 and lower: Open the phone's web interface to the page Preferences >
Auto Answer > Type of Answering and select "Handsfree" (speakerphone) or "Headset" from the
drop-down menu.
If you want to be alerted acoustically by a single long beep whenever the phone accepts an incoming
call, you need to change another default setting on the phones's web interface from "Off" to "On":
Preferences > Auto Answer > Auto Answer Indication.
Call pick-up from another extension
The prerequisites for this function are:
◦◦
It must be supported by your PBX.
◦◦
he extension whose calls you wish to pick up on your own extension must permit this function
T
and you must both be using the same ID for this function. Settings:
-- P
hone's web interface > Configuration Identity > SIP > Allow incoming extension
monitoring: "on"
-- P
hone's web interface > Configuration Identity > SIP > Extension monitoring group ID:
Enter the ID into the textfield. Please note: The first character of the ID must not be a '{'
bracket.
◦◦
ach extension to be monitored must be programmed onto one of the freely programmable
E
function keys P2 - P12. See chapter "Programming the function keys" on page 61 and "Example
1, Extension monitoring and call pick-up" on page 62.
When these prerequisites are met, you can use two methods to pick up calls ringing on another
extension, for example when the other extension is busy or when the user is absent: Using the virtual
key screen or using the call monitoring screen.
47
snom 821 User Manual
Using the Phone
Using the virtual key screen
hen a call is ringing on a monitored extension, the virtual key screen appears. Calls ringing
W
on monitored extensions are indicated by a green key. They can be picked up by pressing the
alphanumeric key indicated by the number or character in the upper right corner of the virtual key.
• Call pickup (green key):
MNO
• Dial extension:
6
#
• Extension busy (yellow key):
Using the call monitoring screen
If you wish to see more information on the current activities of all monitored extensions (who is talking
to or calling whom), you can program the function "Monitor Calls" onto one of the freely programmable
function keys P2-P12 or onto one of the programmable keys underneath the display. For more
information, see "Programming the function keys" on page 61 and "Example 2, Monitoring calls onscreen" on page 63.
When a call is ringing on a monitored extension, the virtual key screen appears. Calls ringing on
monitored extensions are indicated by a green key.
•
If call monitoring is mapped onto one of the keys P2-P12, press the corresponding alphanumeric
key to open the call monitoring screen.
•
If call monitoring is mapped onto one of the keys underneath the display, press
idle screen, then press
to open the call monitoring screen.
to return to the
The call monitoring screen shows any ongoing activity on monitored extensions or lines. In the below
example, "156 > 157" indicates that extension 156 is calling extension 157; "156 x 157" indicates that
156 is connected to 157 and that 156 is the caller, 157 the callee.
Monitored extension ringing Monitored extension busy
Simultaneous calls
◦◦
If a ringing call is not answered, you can pick it up on your phone by pressing
◦◦
Press
to close the details screen and return to the idle screen.
48
.
snom 821 User Manual
Using the Phone
Call waiting
When you are in a call, another call coming in will be announced visually by the symbol of a phone
ringing and acoustically by the sound of a double beep; you will also see caller ID on-screen if it is
being transmitted.
Switching to visual or acoustic announcement only or turning call waiting off: See "Call waiting" on
page 76.
Fig. 1
Fig. 2
Fig. 3
Fig. 4
When a call is waiting (Fig. 1), you have the following options:
•
Press
•
ress
P
to switch to the screen showing your current connection (Fig. 2). The
been added to the function key line.
•
to accept the second call and put your current call on hold.
◦◦
Press
◦◦
Press
◦◦
If there is more than one call waiting (Fig. 3 and 4), press
to view the previous one.
to end the current connection and connect to the waiting call.
to switch back to the call-waiting screen.
to view the next one, press
If you do not wish to accept the waiting call, you can:
◦◦
ignore the announcement. If you have set call forwarding when busy, the call will be transferred
to that phone.
◦◦
r eject the incoming call by pressing . The caller hears the busy signal. Pressing
for three
seconds will also put the caller on the Deny list of the phone's directory. Future calls from this
number will not ring on the phone; the caller hears the busy signal.
Active calls
Hold
One call on hold
•
symbol has
Press
to put the ongoing call on hold. Held calls are indicated threefold:
◦◦
By the slowly blinking line key (green LED)
◦◦
By the glowing call indication LED (red LEDs)
◦◦
By the text on the display
49
snom 821 User Manual
Using the Phone
You can now:
•
◦◦
transfer the held call blindly or with prior announcement - see "Transferring calls" on page 53.
◦◦
receive and make calls and put other calls on hold.
ick up the held call by pressing its line key or by pressing
P
again. If the other party hangs up
while on hold the call terminates on your phone as well and the indicators are turned off.
Holding multiple calls with or without a connected call
If you are in a call with one party and have one or more calls on hold or if there is more than one call on
hold, you can switch back and forth between the active call and any call on hold, transfer calls, etc. The
info bar and the status line will tell you how many total calls there are and which one you are connected
to. Your input on the phone's keys will affect the call on-screen at the time, i.e., the call shown in the
contact area of the display. Up to 12 simultaneous calls are possible.
Figures H-1 to H-3 show the phone connected to one call with two calls on hold; Figures H-4 to H-6
show the phone with three calls on hold and no connected call.
•
Fig. H-1
Fig. H-2
Fig. H-3
Fig. H-4
Fig. H-5
Fig. H-6
Figures H-1 to H-3:
◦◦
In Fig. H-1 the connected call is on-screen. Press
to put the first held call on the screen.
◦◦
In Fig. H-2 the first held call of a total of two (1/2) is on the screen. Press
again to put
the second held call (2/2) on the screen (Fig. H-3). If there are more held calls, continue
likewise.
◦◦
Press
to scroll back through the held calls (Fig. H-2 and H-3).
50
snom 821 User Manual
◦◦
•
Using the Phone
hen a held call is on-screen, press
W
on hold.
to connect to it and put the current connected call
Figures H-4 to H-6:
◦◦
In Fig. H-4 the first held call of a total of three Calls on Hold (1/3) is on-screen. Press
put the second held call on the screen.
to
◦◦
In Fig. H-5 the second held call (2/3) is on the screen. Press
again to put the third held
call (3/3) on the screen (Fig. H-6). If there are more held calls, continue likewise.
◦◦
Press
◦◦
To connect tothe held call currently on-screen, press
to scroll back through the held calls (Fig. H-6 and H-5).
.
•
When the connected call is on-screen, you can terminate it by pressing
.
•
ou can transfer the on-screen call, whether connected or held. See "Transferring calls" on page 53
Y
for more information.
Conference
The maximum number of participants is five (your phone and four others).
Initiating a conference
1. Call the first intended participants and put him or her on hold.
2. Call the next intended participant and put him or her on hold.
◦◦
Continue likewise with the third and fourth participants, if applicable.
◦◦
You do not need to put the last participant on hold before starting the conference.
3. Press
to start the conference.
Conference screen navigation
Your input on the phone's keys will affect the caller/callee(s) shown in the contact area of the display.
Example: A conference with four participants, including yourself. After you have pressed
to start
the conference, the phone numbers of the other three participants are shown on-screen (Fig. C-1).
Fig. C-1
•
Fig. C-2
Fig. C-3
Fig. C-4
Selecting individual participants:
◦◦
With all participants on-screen (Fig. C-1), press
51
to put the first participant on-screen
snom 821 User Manual
Using the Phone
(Fig. C-2); press
again to put the next participant on-screen (Fig. C-3), until you have
reached the last participant (Fig. C-4).
◦◦
•
Scroll back through the participants by pressing
.
ringing the entire conference back on-screen: Scroll to the first participant's screen (Fig. C-2),
B
then press
.
Speaking to one participant in private
1. Put the participant on-screen, as shown in Conference screen navigation, above.
2. P
ress
to put the other participants on hold and talk in private to the participant whose number is
shown on the display.
3. To return to the conference, press
and
.
Putting one participant on hold
1. Put the participant on-screen, as shown in Conference screen navigation, above.
2. Press
.
3. Press
to return held participant to conference.
Dropping a participant
1. Put the participant on-screen, as shown in Conference screen navigation, above..
2. Press
to terminate the connection to this participant.
Adding a participant
•
Adding an incoming call:
1. Press
2. Press
•
or the blinking line key to accept the call. The conference is put on hold.
to restart the conference with the additional participant.
Calling a new participant:
1. Press
to put the conference on hold.
2. Dial the number of the new participant.
3. With the new participant on the line, press
.
Putting the conference on hold
•
If one of the participants is on-screen (Figures C-2, C-3, C-4), you must first return to the screen
with all participants. See Conference screen navigation.
•
ith all participants on-screen (Fig. C-1), press
W
. Technically, you are ending the
conference; you will see the "Calls on Hold" screen (see Holding multiple calls, Fig. H-4).
•
To restart the conference, press
.
52
snom 821 User Manual
Using the Phone
Terminating the conference
1. Press
to put all participants on hold.
2. Select each participant in turn and press
.
Transferring calls
You can transfer connected calls as well as calls ringing on your phone.
•
•
When you have a call on the line, there are two ways to transfer it to a third party:
◦◦
nnouncing the call to the third party first, to make sure the call is welcome and will be
A
accepted: Attended transfer;
◦◦
ransferring the call unannounced: Blind transfer. There will be no feedback on whether the
T
third party is available and/or picking up the call.
hen a call is ringing on your phone, you can transfer it to a third party without answering it first
W
(blind transfer only).
Attended transfer
1. Put the call on hold.
2. Dial the number you wish to transfer the call to and announce the call.
3. If the third party wishes to accept the call, press
and
.
Blind transfer
1. With a call ringing or on the line, press
.
2. Dial the number of third party you intend to transfer the call to.
3. Press
.
Call waiting
See "Call waiting" on page 49.
Terminating calls
•
When using the handset: Place the handset in the cradle or press
•
When using speakerphone or a headset: Pess
.
.
Missed calls
Missed calls are indicated by the lit call LED. Press
to view details.
53
to turn it off. See next item "Call lists" on how
snom 821 User Manual
Using the Phone
Call lists
1. Press
to open "Call history".
2. To view the list of missed, received, or dialed calls, press its number.
3. Scroll through the list with
/ .
◦◦
Press
to dial the number of the selected call.
◦◦
Press
Del
/
to delete the selected call.
◦◦
Press
Clear
/
to delete the entire list.
◦◦
Press Details /
/
to show the call details of the selected call. From the Details
Save
/
to add the phone number to your phone's directory. See
screen, press
"Editing existing entry" on page 53 for information on adding a name and other data to the new
directory entry.
Rejecting or redirecting incoming calls
This includes manual and automatic rejection and redirection and rejection of anonymous calls.
Manually
If you do not wish to pick up a ringing call, you can do one of the following things:
•
Let it ring.
•
Reject it.
◦◦
Press
. The caller will hear a busy signal.
◦◦
ress
P
for two seconds. The caller will hear a busy signal and the number will be placed on
the Deny list so that incoming calls from that number will always be rejected.
Open the phone's web interface > Directory to edit the entry, to save it permanently, or to
delete it from the Deny List.
•
Do a blind transfer to another phone.
1. Press
.
2. Enter the number you wish to transfer the incoming call to.
3. Press
to complete the transfer. The incoming call will continue ringing at that number.
Automatically
There are three options for rejecting incoming calls automatically or automatically or to have them
forwarded automatically, either always or under certain conditions:
•
eny List. Calls from phone numbers on this list will not ring on your phone; callers will hear the
D
busy signal. For further information on placing phone numbers on the Deny List, see "Adding/
editing entries on the web interface" on page 38, "Adding new entry manually" on page 37, and "Editing
existing entry" on page 37 in the chapter "Directories".
54
snom 821 User Manual
•
Using the Phone
ND - do not disturb mode. All incoming calls will be forwarded to the number set in call
D
forwarding when busy; if there is not setting for call forwarding, callers will hear the busy signal.
Exception: Phone numbers designated VIP in your phone's directory will ring on your phone even
when DND is on.
•
1. Press
to activate DND.
2. Press
again to deactive DND.
Call forwarding. For further information, see .
Rejecting anonymous calls
With this setting you can make your phone reject calls from phones that are blocking or not transmitting
their numbers.
Please note: Calls from analog phone connections without caller ID will, most likely, be
received as anonymous calls. They will be rejected if you turn this function on.
Activating rejection of anonymous calls:
1. Press
.
2. Press 2 Call Features.
3. Press 3 Incoming Calls.
4. Select 1 Reject anonymous [No], if not already marked.
5. Press 1 or
6. Press
to change [No] to [Yes].
for two seconds to return to the idle screen.
Deactivating rejection of anonymous calls:
1. Press
.
2. Press 2 Call Features.
3. Press 3 Incoming Calls.
4. Select 1 Reject anonymous [Yes], if not already marked.
5. Press 1 or
6. Press
to change [Yes] to [No].
for two seconds to return to the idle screen.
Call forwarding - phone settings
The phone can be set to forward incoming calls, either always or under certain conditions. The settings
can be done on the phone and on the web interface. For further information on using the web interface
for these settings, see "Call forwarding" on page 73.
Forward All: Forwarding all incoming calls to the number of the phone, extension, or mailbox
specified as this function’s target.
55
snom 821 User Manual
Using the Phone
Forward when Busy: Forwarding calls ringing while phone is busy to the number of the phone,
extension, or mailbox specified as this function’s target.
Forward after Timeout: When a call starts ringing, the phone will wait for the number of seconds
specified in the setting "Call forwarding time". If the call is not accepted by the end of this time period,
it is forwarded to the number of the phone, extension, or mailbox specified as this function’s target.
Making and changing the settings on the phone
Forward all
Forward when busy
Forward after timeout
Press
Press
ABC
2 2 Call Features
Press
1 1 Call Forwarding
Press
1 1 Forward All
Press
ABC
ABC
2 2 Call Features
ABC
1 1 Call Forwarding
ABC
2 2 Target when forwarding
Type phone number
Press
ABC
2 2 Forward when Busy
2 2 Target when forwarding
phone number
2 2 Call Features
1 1 Call Forwarding
DEF
ABC
3 3 Forward after Timeout
2 2 Target when forwarding
phone number
3 3 Call Forwarding time
number of seconds
DEF
Type
Press
Press
for two seconds to return to the idle screen
Turning on call forwarding
If the phone number has not been set or needs to be changed, follow the instructions in the table
"Making".
Forward all
Forward when busy
Forward after timeout
Press
Press
ABC
2 2 Call Features
ABC
Press
1 1 Call Forwarding
Press
1 1 Forward All
Press
1 1 Enable forwarding [No]
2 2 Call Features
ABC
1 1 Call Forwarding
ABC
2 2 Forward when Busy
1 1 Enable forwarding [No]
2 2 Call Features
1 1 Call Forwarding
DEF
3 3 Forward after Timeout
1 1 Enable forwarding [No]
Menu item changes to: 1 Enable forwarding [Yes]. Call forwarding is now active.
Press
for two seconds to return to the idle screen
The display will indicate that call forwarding is turned on and which number calls will be forwarded to.
Note: Forwarding when busy and after timeout are indicated in the status line, which can
display only one message at a time. When both are active at the same time, only "Forward
when busy" will be displayed. If there are other status messages with a higher priority
than "Forward when Busy" (e.g., firmware update available, reboot required, waiting for
call completion, etc.), they will take precedence over the call forwarding indication.
56
snom 821 User Manual
Press
Using the Phone
to show status info with all current status messages, including call forwarding.
Forwarding all calls
Forwarding when busy
Forwarding after timeout
All status messages on-screen
Turning on forwarding of all calls with a programmable function key
is not available when the display is in idle mode, you can make it available on
If the function key
the Function Keys page of the phone's web interface. For further information see "Example 4, Turning
forwarding of all calls on and off" on page 65.
. The display will show the "Target when Forwarding" screen.
1. Press
2. If no forwarding number has been set or if it needs to be changed, make the necessary entries.
3. Press
.
Turning it off
.
Press
Turning off call forwarding
If the phone number has not been set or needs to be changed, follow the instructions in the table
"Making".
Forward all
Forward when busy
Forward after timeout
Press
Press
ABC
2 2 Call Features
ABC
Press
1 1 Call Forwarding
Press
1 1 Forward All
Press
1 1 Enable forwarding [Yes]
2 2 Call Features
ABC
1 1 Call Forwarding
ABC
2 2 Forward when Busy
1 1 Enable forwarding [Yes]
2 2 Call Features
1 1 Call Forwarding
DEF
3 3 Forward after Timeout
1 1 Enable forwarding [Yes]
Menu item changes to: 1 Enable forwarding [No]. Call forwarding is now inactive.
Press
for two seconds to return to the idle screen
57
snom 821 User Manual
Configuring the Function Keys
Configuring the function keys
See "Opening the web interface" on page 31 on how to open the phone’s web interface. See "User
mode/administrator mode" on page 33 for an explanation of administrator and user mode. See "How
the web interface works" on page 31 on the mechanics of navigating in the windows and changing the
settings.
Any changes you make will not take effect until you press "Apply" and "Save". For more information,
see "How the web interface works" on page 31.
Function keys on snom phones
Every phone has a limited number of hard keys. Phone users, however, have a myriad of different
priorities and preferences when asked which functions they use most often and which functionalities
they would like to access quickly. snom has therefore designed the function keys to be programmable,
even the preprogrammed "hard keys" whose default function is printed on the casing.
There are four types of programmable function keys:
Freely programmable function keys P1 - P12
All available functionalities, including key events, can be programmed onto the freely programmable
function keys. These are the four keys with LEDs P1 - P4 to the right of the display plus eight virtual
function keys P5 - P12 that are accessed by pressing key P1 for two seconds.
P1
P2
P3
Show virtual function keys on the
display:
Press key P1 for two seconds
When the virtual function keys are
on-screen, pressing a key‘s number
(1-0) or character (* and #) will
activate/execute its function.
P4
P4
58
snom 821 User Manual
Configuring the Function Keys
Note: The programmable keys P1 - P4 are both hard keys and virtual keys. Their
functions can be accessed by pressing the hard keys P1 - P4 and, when the virtual
keys are on-screen, by pressing the alphanumeric keys 1 - 4.
•
Context
This setting specifies which configured identity will be used when executing the functionality of the
key. You may want to use this feature when you have accounts with different providers or when you
wish to present different identities to certain destinations.
For example: If you have programmed key P12 to speed dial a specific number and you want
to use configured identity 2 to call that number, select configured identity 2 from the drop-down
menu of P12's "Context". When you speed dial the number by opening the virtual key screen and
pressing the pound key (#), identity 2 will be used as the outgoing identity.
The default setting is "Active", which means that the identity selected as the phone's outgoing
identity at any given time will be used.
•
Type
Select the type of functionality from the drop-down list. See appendix for more information. The
default setting is "line". Incoming and outgoing calls will use any available line unless you enter a
phone line under "Number". If you do, all calls arriving on that line will go to that key. To make calls
using that line, press the function key and enter the number to be dialed in the text field.
If you select "Key Event", a drop-down list with the available key events will replace the text field
under "Number".
•
Number Enter one phone number or value for the function or, if the function is key event, select an event
from the drop-down list. Enter phone numbers exactly the way they need to be dialed, i.e, type
the number without spaces or punctuation marks between the digits. For example, a number
with an area code that might conventionally be notated as (916) 555-1234 should be entered as
9165551234.
•
Short Text
This entry is optional. It can be used to enter the name associated with the phone number or other
descriptive text.
59
snom 821 User Manual
Configuring the Function Keys
Context-sensitive, programmable function keys
For the default settings , see "At a glance" on page 18. You can select a different key event to be
available on each respective key when the phone is in idle mode.
Note: You cannot change the functions that are available when the phone is active, for
example when you are in a call, when the phone is ringing, etc. Depending on the activity,
different functions will be available.
See "Appendix 1 - Display symbols and icons" on page 82 for the lists of symbols and their
description.
Navigation, confirmation, and cancel keys
For the default settings, see "At a glance" on page 18. You can select a different key event to be
available on each respective key when the phone is in idle mode.
Note: You cannot change the functions that are available when the phone is active, for
example when you are in a call, when the phone is ringing, etc.
60
snom 821 User Manual
Configuring the Function Keys
Dedicated, customizable function keys
The default setting is the respective key event printed onto the casing. Other key events and a
selected number of other functionalities can be programmed onto them.
1
ABC
2
DEF
3
GHI
4
JKL
5
MNO
6
PQRS
7
TUV
8
WXYZ
9
a
A
0
#
Programming the function keys
This chapter will show you a few examples for customizing function key settings to your needs and
preferences:
•
irst example: Extension monitoring and call pickup via a freely programmable function key with
F
LED
•
Second example: Monitoring calls on-screen
•
Third example: Speed dialing with a freely programmable function key with LED
•
ourth example: Turning forwarding of all calls on and off with a context-sensitive, programmable
F
function key
61
snom 821 User Manual
Configuring the Function Keys
Example 1, Extension monitoring and call pick-up
This feature makes it possible to pick up a call ringing on another extension, for example when the other
extension is busy or when the user is absent. The prerequisites for this function are:
◦◦
It must be supported by the PBX.
◦◦
he extension whose calls you wish to pick up on your own extension must permit this function
T
and you must both be using the same ID for this function. Settings:
-- P
hone's web interface > Configuration Identity > SIP > Allow incoming extension
monitoring: "on"
-- P
hone's web interface > Configuration Identity > SIP > Extension monitoring group ID:
Enter the ID into the textfield. Please note: The first character of the ID must not be a '{'
bracket.
◦◦
he extension to be monitored must be programmed onto one of the freely programmable
T
function keys. In our example we are monitoring the number of the Sales Hotline on virtual
function key P5.
1. On the phone's web interface, click on "Function Keys" in the menu on the left.
2. Under "Context" of P5, select Active or one of the configured identities from the drop-down list.
3. Under "Type" of P5, select "Extension" from the drop-down list.
4. U
nder "Number" of P5, enter the phone number whose calls you wish to pick up. In our example it
is 157.
5. Under "Short Text" of P5, enter "Sales Hotline" in the text field (optional, but helpful).
6. Click on "Apply" and "Save".
When a call is ringing on 157, the virtual keys screen will appear on the display, and the virtual key "5"
will be green and say "ringing". If the call is not answered, you can pick it up by pressing JKL 5 on the
alphanumeric keypad. When 157 is engaged in a call, virtual key "5" will be yellow and say "talking".
When the virtual key shows no activity on the extension, you can dial it by pressing JKL 5 .
62
snom 821 User Manual
Configuring the Function Keys
Example 2, Monitoring calls on-screen
When you are monitoring another extension or phone line, you may want to see more information on the
display, for example the number of an incoming call to that extension or line. In our example, key P3
will be programmed to show ongoing activity on monitored extensions or lines on the display.
1. On the phone's web interface, click on "Function Keys" in the menu on the left.
2. Under "Context" of P3, select Active or one of the configured identities from the drop-down list.
3. Under "Type" of P3, select "Key Event" from the drop-down list.
4. Under "Number" of P3, select "Monitor Calls" from the drop-down list.
5. Click on "Apply" and "Save".
Press key P3 on the phone to show any ongoing activity on monitored extensions or lines on the
display. For example: "156 > 157" indicates that extension 156 is calling extension 157; "156 x 157"
indicates that 156 is connected to 157 and that 156 is the caller, 157 the callee.
Note: Alternatively, if the virtual keys are on-screen because of activity on one of the
monitored extensions etc., pressing DEF 3 on the alphanumeric keypad will also open
the call monitoring screen.
Monitored extension ringing Monitored extension busy
63
Simultaneous calls
snom 821 User Manual
Configuring the Function Keys
Example 3, Speed dialing
Besides using the "Speed Dial" page on the web interface to program speed dial numbers, you can
also put the functionality on one of the freely programmable function keys. In our example, key P6 will
be used.
1. On the phone's web interface, click on "Function Keys" in the menu on the left.
2. Under "Context" of P6, select Active or one of the configured identities from the drop-down list.
3. Under "Type" of P6, select "Speed Dial" from the drop-down list.
4. U
nder "Number" of P6, enter the phone number that you wish to speed dial. In our example it is
phone number 555-1784 in area code 917. Type each phone number with any necessary area
code and/or country code etc. without spaces, hyphens, etc.
Example: In conventional notation you might write the number as (917) 555-1784. Type
9175551784 into the text field.
5. U
nder "Short Text" of P6, enter the name associated with the phone number or other descriptive
text (optional, but helpful).
6. Click on "Apply" and "Save".
You can now speed dial the number 9175551784 by pressing P1 to open the virtual keys screen and
then pressing MNO 6 on the alphanumeric keypad.
64
snom 821 User Manual
Configuring the Function Keys
Example 4, Turning forwarding of all calls on and off
The functionality "Forward all" redirects all incoming calls to another phone or a mailbox. It is possible
to configure the settings on the phone and on the web interface. If you need to turn this function on
and off frequently and/or regularly, you may want to be able to do so with the touch of just one key
instead of going through the menu every time.
1. On the phone's web interface, click on "Function Keys" in the menu on the left.
2. C
lick on the drop-down list of one of the context-sensitive, programmable function keys. In our
example, it is the second key from the right.
3. Select "Forward all" from the drop-down list.
4. Click on "Apply" and "Save".
Using the configured context-sensitive function key on the phone to turn forwarding of all calls on and
off:
1. Press the key (Fig. 1).
2. T
he display will prompt you to enter a forwarding target (Fig. 2). If one has already been set,
the display will propose that number; you can accept it with
or change it and then press .
Forwarding of all calls is now activated (Fig. 3)
3. To turn off forwarding of all calls, press the key again (Fig. 3).
Fig. 1
Fig. 2
Fig. 3
65
snom 821 User Manual
Customizing the Phone Settings
Customizing the phone settings
See "Opening the web interface" on page 31 on how to open the phone’s web interface. See "How
the web interface works" on page 31 on the mechanics of navigating in the windows and changing the
settings. See "User mode/administrator mode" on page 33 on the difference between administrator and
user mode.
Note: If you have access to administrator mode, but do not consider yourself to be
an expert on SIP and SIP phones, we recommend that you do not change any of the
technical settings since this may adversely affect the phone’s performance or put it out
of order altogether.
If you want more information on a web interface setting, click on the radio button with the question mark
that you see to the right of each item. It links to a page on snom’s Wiki with detailed information about
that particular item.
For more information on customizing function key settings, see the chapter "Configuring the function
keys" on page 58.
Note: Any changes you make will not take effect until you click on "Apply". Changes will
be lost if you open another page of the web interface or if you close the web interface
without first clicking on "Apply".
After you have clicked on "Apply", the "Save" button will appear at the top of the page.
Click on "Save" to save the changes permanently. Changes that have not been saved
will be lost if and when the phone loses power or is disconnected from its power source.
Identities/accounts
The phone supports up to twelve accounts or "phone numbers" with one or more providers or within
an office or organization network. On snom phones these accounts or phone numbers are called
"identities".
If your phone is part of an office network, you may need to contact your administrator to configure new
or change existing identities, as this can only be done when the phone is running in administrator mode
and when the PBX settings allow it.
See "Initializing and registering the phone" on page 15 for information on required input data.
Configuring new identity/account
On the phone
You can do the basic setup (account/number & registrar):
1. Press
> 3 Identity > 3 Edit User.
66
snom 821 User Manual
2. Press
Customizing the Phone Settings
to scroll down.
◦◦
When you are at the top of the list, pressing
will take you to identity 12.
◦◦
At any other position within the list, press
to scroll.
3. When you have reached the identity you wish to edit, press
to select it.
4. When prompted, enter Account and Registrar.
5. Press
.
On the web interface
pen the web interface and click on an identity in the menu on the left. The configuration window for
O
that identity will open; it contains four tabs, with the left one, Login, visible in the front. To view SIP,
NAT, and RTP pages, click on the respective tab; the font weight of the tab on the active page is bold.
1. L
ogin tab. Enter the information received from your provider or your administrator in the
appropriate fields.
◦◦
Display name
The display name is optional and freely selectable. It will be sent to any parties you call unless
you hide your identity (see "Hiding my caller ID" on page 64). If you do not enter a display
name, the data in the "Account" text field will be shown on your display and sent to any parties
you call unless you hide your identity.
◦◦
Display text for idle screen
Any text you enter in in this text field will be shown - instead of your display name or account on your display only. It will not be sent to any parties you call.
◦◦
Ringtones
The phone has 10 built-in ringtones that can be assigned to identities, group types, and contact
types. It is also possible to download a custom melody and to turn off the ringer by selecting
"Silent".
Assigning ringtones to identities: See "Assigning ringtones" on page 68.
2. S
IP settings. Click on the SIP tab to bring the page to the front. It contains a number of technical
settings and textfields for entering URIs/URLs to various servers (for music-on-hold, for example),
as well as some behavior settings. These are:
◦◦
utomatic acceptance of incoming calls: Identity # > SIP tab > Auto Answer. The default
A
setting is "off".
Acoustic alert (one short beep) when the phone accepts a call automatically: Preferences >
Auto Answer > Auto Answer Indication. The default setting is "off".
◦◦
ontact List. A contact list must be available on a server. Click "on" and enter the Contact List
C
URI .
◦◦
Identity can receive calls. The default setting is "on". The default setting is "on". If you want to
be able to use the identity for outgoing calls but do not wish other phones to be able to call the
identity, turn the setting off.
◦◦
llow incoming extension monitoring. If you do not wish other phones to be able to monitor the
A
activity on your phone, turn the setting off.
You can also allow only certain phones to monitor and pick up your calls. In this case, select
67
snom 821 User Manual
Customizing the Phone Settings
the "On" setting and enter a password into the next field of the next setting, "Extension
monitoring group ID" .
Note: The password cannot start with a "{" bracket. Any phone allowed to monitor and
pick up your calls must also use the same password in this text field.
Editing an existing identity/account
On the phone
You can edit the account/number and the registrar only:
1. Press
2. Press
> 3 Identity > 3 Edit User.
to scroll down.
◦◦
When you are at the top of the list, pressing
on the navigation key will take you to identity 12.
◦◦
At any other position within the list, press
to scroll.
3. Press
to open the selected identity.
4. When prompted, enter Account and Registrar.
5. Press
.
On the web interface
Open the Configuration page of the identity and make the changes in the text fields. For more
information, see "Configuring new identity/account" on page 66.
If you have changed the account or the registrar, click on "Re-Register" and "Save". If you have made
other changes, clicking on "Apply" and "Save" suffices.
Assigning ringtones
The phone has 10 built-in ringtones that can be assigned to identities, group types, and contact types.
It is also possible to download a custom melody. When an incoming call to an identity is ringing, the
phone will play the ringtone assigned to that identity, unless it is a call from a VIP or a group with a
distinctive ringer of their own.
Note: Ringers assigned to the contact type VIP and to any of the group types override
the ringers assigned to identities. For example, if you have assigned Ringer 1 to one of
the identities and Ringer 2 to the group "Colleagues", the phone will play Ringer 2 when
a contact from the "Colleagues" group calls that identity.
If your ringtones don’t seem to work as expected, contact your administrator. There may
be an overriding setting on the PBX.
Assigning ringtones to contact type VIP and group types: See "Ringtones" on page 36.
68
snom 821 User Manual
Customizing the Phone Settings
Selecting identity ringtones:
•
•
On the phone: 1 Preferences > 3 Ringer. The identities are shown on the display.
◦◦
Select an identity with
/
and press
to hear the current ringtone for that identity.
◦◦
electing a different ringtone: Press /
S
to navigate up and down the list. The marked
ringtone is played. Press
to save the marked ringtone as the new ringtone for the currently
selected identity and return to the identity screen.
n the web interface (the ringtones will be played by the phone): Configuration Identity (1-12) >
O
Login.
◦◦
lick on "Play Ringer" to play the currently selected ringer. The ringer will be played on the
C
phone.
◦◦
o change the ringer, select a ringer from 1 to 10 in the drop-down menu of "Ringtone". If you
T
have selected the custom melody, enter the URL to the data file in the text field underneath. It
must be a file of the type PCM 8 kHz 16 bit/sample (linear) mono WAV.
◦◦
Click on "Apply" and "Save".
Adjusting the backlight
The display's backlight can be adjusted separately for the times when the phone is active and when the
phone is idle. Lowering the intensity saves power consumption.
Adjusting the backlight for active states
1. Press
.
2. Press 1 Preferences.
3. Press 5 Display.
4. Press 1 Backlight on activity.
5. P
ress right or left arrow on the navigation key to increase ( ) or decrease ( ) the backlight's
intensity.
Adjusting the backlight for the idle phone
Starting with firmware version 8.7.3, the backlight for times when the phone is idle can be turned off
completely by reducing the intensity to one vertical bar. The phone will switch to the backlight's idle
setting when there has been no activity for the number of seconds specified on the phone's web
interface.
69
snom 821 User Manual
Customizing the Phone Settings
Adjusting the intensity:
1. Press
.
2. Press 1 Preferences.
3. Press 5 Display.
4. Press 2 Backlight when idle.
5. P
ress right or left arrow on the navigation key to increase ( ) or decrease ( ) the backlight's
intensity.
Setting the number of seconds after which the phone will switch to idle backlight:
1. Open the phone's web interface and click on "Preferences".
2. E
nter the number of seconds in the text field of "Dim after (in seconds)" in the section "General
Information".
3. Click on "Apply" and "Save".
Date and time formats
The date and time formats can be set and changed on the web interface only.
Date
1. O
pen the phone's web interface, Preferences > General Information > US Date Format. The
default is "on".
◦◦
elect "on" to have the date shown on the phone's display in "m/d/yyyy" or "mm/dd/yyyy"
S
format. Examples: May 6 will be displayed as 5/6; December 10 will be displayed as 12/10.
◦◦
elect "off" to have the date shown on the phone's display in "d.m.yyyy" or "dd.mm.yyyy" format.
S
Examples: May 6 will be displayed as 6.5; December 10 will be displayed as 10.12.
Date
March 5, 2012
March 12, 2012
December 5, 2011
December 10, 2011
US Date Format
Setting "On"
Setting "Off"
3/5/2012
5.3.2012
3/12/2012
12.3.2012
12/5/2011
5.12.2011
12/10/2011
10.12.2011
2. Click on "Apply" and "Save".
Time
The time setting affects phones and/or firmware versions with a digital clock only. If the phone has a
clock face, changing the setting will not affect it.
1. O
pen the phone's web interface, Preferences > General Information > 24 Hour Clock. The default
is "on".
70
snom 821 User Manual
Customizing the Phone Settings
◦◦
Select "on" to have the time on the phone's display shown in 24-hour format, 00:01 to 24:00 .
◦◦
elect "off" to have the time on the phone's display shown in AM/PM format, 0:01AM to
S
12:00PM.
2. Click on "Apply" and "Save".
Time zone
The phone receives the time and date from your NTP time server. If the time and/or date on the display
are incorrect, you may need to set the correct time zone. If you have set the correct time zone and the
time is still incorrect, there may be a problem with the time server. Contact your network administrator
or your IP provider.
The list of time zones is arranged by the difference in hours (+/-) to the UTC and, within each time
zone, alphabetically by selected locations (country or country and city).
Selecting and setting the time zone:
On the phone
1. Press
> 1 Preferences > 1 Time Zone.
◦◦
ress
P
spoken.
to collapse the list to show only selected times zones where the phone language is
◦◦
Press
to show all time zones.
◦◦
Press
to fast-forward to the beginning of the next time zone, i.e., UTC +1, +2, etc.
◦◦
Use
to scroll.
2. Press
to save your selection
3. Press
for two seconds to return to the idle screen.
On the web interface
This setting can be accessed in administrator mode only.
1. Open the phone's web interface, Advanced > Network tab > Time > Timezone.
2. Select your timezone/country/city from the drop-down list.
3. Click on "Apply" and "Save".
71
snom 821 User Manual
Customizing the Phone Settings
Language settings of phone and web interface
The language used on the phone can be changed on the phone as well as on the web interface. The
language used on the web interface can be changed on the web interface only.
Phone language
Setting on the phone
1. Press
2. Use
> 1 Preferences > 4 Language.
to scroll.
3. Press
to save the selected language.
4. Press
for two seconds to return to the idle screen.
Setting on the web interface
1. Open the phone's web interface, Preferences > General Information > Language.
2. Select the language from the drop-down list.
3. Click on "Apply" and "Save".
Web interface language
1. Open the phone's web interface, Preferences > General Information > Webinterface language.
2. Select the language from the drop-down list.
3. Click on "Apply" and "Save".
Dial tones
Different dial tones for different countries! Select yours on the phone or on the web interface.
Setting on the phone
1. Press
2. Use
> 1 Preferences > 2 Tone Scheme.
to scroll.
3. Press
to save the selected country.
4. Press
for two seconds to return to the idle screen.
Setting on the Web Interface
1. Open the phone's web interface, Preferences > General Information > Tone Scheme.
2. Select the country from the drop-down list.
3. Click on "Apply" and "Save".
72
snom 821 User Manual
Customizing the Phone Settings
Emergency numbers
These are numbers that can be dialed even when the keyboard is locked. They must be set beforehand
on the web interface.
1. O
pen the phone's web interface, Preferences > Lock Keyboard > Emergency Numbers (space
separated).
2. E
nter the emergency numbers in the text field. Type each number without spaces between the
digits, separate the individual numbers with one empty space between them.
Example: If you want to set the emergency phone number 911 and the phone numbers of your
doctor (986543) and a friend (234578), the entry would look this: 911 986543 234578.
3. Click on "Apply" and "Save".
Call forwarding
This feature automatically redirects all or certain incoming calls to another phone or a mailbox. It is
possible to configure the settings on the phone and on the web interface.
Always
All incoming calls are forwarded to the number of the phone, extension, or mailbox specified as this
function’s target.
When busy
Calls ringing while the phone is busy are forwarded to the number of the phone, extension, or mailbox
specified as this function’s target.
After timeout
When a call starts ringing, the phone will wait for the number of seconds specified as "call forwarding
time". If the call has not been accepted by the end of this time period, it is forwarded to the number of
the phone, extension, or mailbox specified as this function’s target.
Configurating the settings on the phone
See "Call forwarding - phone settings" on page 55.
Configurating the settings on the web interface
If your internet telephony provider or your PBX uses codes to turn functions on and off, refer to their
manuals for the codes to enter in "On Code"/"Off Code" text fields or ask your administrator.
73
snom 821 User Manual
Customizing the Phone Settings
Setting forwarding numbers
•
Forwarding all incoming calls:
1. Open the phone's web interface, Preferences > Call Forwarding > Always.
2. T
ype the phone number in the "Target" text field. Type each number the way it needs to be
dialed by the phone, without spaces or punctuation between the digits.
3. Click on "Apply" and "Save".
•
Forwarding incoming calls when the phone is busy:
1. Open the phone's web interface, Preferences > Call Forwarding > Busy
2. T
ype the phone number in the "Target" text field. Type each number the way it needs to be
dialed by the phone, without spaces or punctuation between the digits.
3. Click on "Apply" and "Save".
•
Forwarding incoming calls when they are not answered:
1. Open the phone's web interface, Preferences > Call Forwarding > Timeout.
2. T
ype the phone number in the "Target" text field. Type each number the way it needs to be
dialed by the phone, without spaces or punctuation between the digits.
3. Click on "Apply" and "Save".
Turning call forwarding on
1. Open the phone's web interface, Preferences > Call Forwarding.
2. Click "On" after the forwarding event ("Always", "Busy", "Timeout").
3. Click on "Apply" and "Save".
Turning call forwarding off
1. Open the phone's web interface, Preferences > Call Forwarding.
2. Click "Off" after the forwarding event ("Always", "Busy", "Timeout").
3. Click on "Apply" and "Save".
74
snom 821 User Manual
Customizing the Phone Settings
Call completion
On snom phones call completion means that when a called number is busy or not available, your phone
will call you back as soon as the dialed number is not busy anymore or available again. The factory
default setting is "off".
Note: This function depends on whether it is available in your network or not.
Changing the setting to turn it on:
On the phone
1. Press
.
2. Press 2 Call Features
3. Press 2 Outgoing Calls.
4. P
ress 3 Call Completion [Off]. The setting changes to 3 Call Completion [On], indicating that call
completion is now active.
5. Press
for two seconds to return to the idle screen.
On the web interface
1. Open the phone's web interface, Advanced > Behavior.
2. Under "Phone Behavior", click "Off" after "Call Completion".
3. Click on "Apply" and "Save".
75
snom 821 User Manual
Customizing the Phone Settings
Call waiting
When you are in a call, another call coming in will be announced visually by the symbol of a ringing
phoneon the display and acoustically by the sound of a double beep; you will also see the caller`s ID
on-screen if it is being transmitted. You can switch to visual or acoustic announcement only or turn
call waiting off on the phone’s web interface.
The default setting is "on", which means that waiting calls are announced both acoustically and visually.
See "Call waiting" on page 49 on how to use this feature.
Changing the setting:
1. Open the phone's web interface, Advanced > Audio > Call Waiting Indication.
2. T
o turn call waiting off, select "off" from the drop-down menu. Select "visual only" or "ringer" if you
want waiting calls announced only by the "phone ringing" symbol or the double beep, respectively.
3. Click on "Apply" and "Save".
Hiding my caller ID
With this setting your phone number will not be transmitted to any phones you call. Please note that
your call may not be accepted if the other phone is set to reject anonymous calls (see next item).
1. O
pen the phone's web interface, Preferences > Privacy Settings > Suppress own number (CLIP/
CLIR).
2. Select the radio button "Hide" .
3. Click on "Apply" and "Save".
Rejecting anonymous calls
With this setting you will not receive calls from phones whose number is not shown on your display.
Anonymous callers will hear the busy signal.
Please note that calls from analog phone connections will, most likely, be received as anonymous calls.
1. Open the web interface, Preferences > Privacy Settings > Reject incoming anonymous calls.
2. Select the radio button "Reject".
3. Click on "Apply" and "Save".
76
snom 821 User Manual
Customizing the Phone Settings
Number guessing
When you have typed the minimum number of characters you have specified for this function, the
phone will look for numbers containing that string of characters in its call lists and directories and, if it
finds matches, show the number(s) on the display. If the number proposed on the display is the one
you wish to dial, press ; if not, continue entering digits.
Fig. 1
Fig. 2
Fig. 3
The default setting is off. Changing the setting:
1. Open the phone's web interface, Advanced > Behavior tab.
2. In the section "Phone Behavior", click the radio button "on" of the item "Number Guessing".
3. In the text field of "Number Guessing Minimum Length", type the minimum number of digits that
must be entered before the phone starts presenting numbers.
4. Click on "Apply" and "Save".
Speed dial
You can use the numbers 0 to 30 and the special characters # and * to speed dial frequently and/or
long numbers without having to enter the complete phone number. The numbers must be set on the
phone's web interface first:
1. Open the phone's web interface, "Speed Dial".
2. E
nter one phone number with any required prefixes (area code, country code, operator/auto
attendant, etc.) in the text field for each respective number or special character.
Note: Type each phone number without spaces or punctuation between the digits.
Example: You want to be able to speed dial the phone number 555-1784 in area code 917 by
1 on the alphanumeric keypad. In conventional notation you might write the number
pressing
down as (917) 555-1784. In the speed dial table, type 9175551784 into the text field of the
number 1.
ote: If you want to add a name or other data before or after the number, type the number in
N
angled brackets <>. Example: Accounting <9175551784>.
3. C
lick on "Apply" and "Save". You can now speed dial the number by pressing
phone.
77
1 and
on the
snom 821 User Manual
Software Update
Software update
Manual update
1. Open snom’s web page at www.snom.com.
2. Click on Support > Download > Firmware.
3. Click on the phone to be updated.
4. Click on the firmware version currently running on your phone.
5. Click on the firmware version you want to update to.
6. Right-click on the version’s link and copy it.
7. Open the phone’s web interface > Setup > Software Update.
8. In the Manual Software Update area, paste the link into the text field behind Firmware.
9. Click on Load. The phone begins to reboot.
10.If the phone asks “Reboot?”, press
.
11.DO NOT DISCONNECT THE POWER WHILE THE PHONE IS REBOOTING!
Auto provisioning
See our web page http://wiki.snom.com/Features/Mass_Deployment for information.
1. Open the phone’s web interface > Setup > Advanced > Update tab.
2. Please read the instructions at “?” of each line carefully.
78
snom 821 User Manual
Troubleshooting
Troubleshooting
Reboot
1. Press
.
2. Press 5 Maintenance.
3. Press 3 Reboot.
4. When asked whether to "Reboot?", press
.
5. Wait for the idle screen to reappear.
Hard reboot
Disconnect the power, wait for a few seconds, and reconnect. Wait for the idle screen to reappear.
Warning: Never disconnect the power during a firmware update!
Reset to factory values
1. Press
.
2. Press 5 Maintenance.
3. Press 4 Reset values.
4. Enter the administrator password and press
.
5. Wait for the idle screen to reappear.
6. See “Initialization” on page ... to continue.
Warning: All customized settings will be lost!
TFTP Update
When there is no other way to get the phone to work (administrator password lost, etc.). How it is
done: See http://wiki.snom.com/Firmware/Update/TFTP_Update/en.
Warning: All customized settings will be lost!
Manual initialization
When automatic initialization via DHCP fails, enter the values for netmask, IP gateway, and DNS server
manually after each prompt on the display.
79
snom 821 User Manual
Troubleshooting
Contacting snom Support
Please visit our knowledge base and our forum first. You may find the answer to your question in one
of the topics there. If you haven't found an answer or a solution to your problem, please post your
question or problem on the forum (http://forum.snom.com).
Note: The forum is accessible to the general public. Do not post any private and/or
security-relevant information there. This includes MAC addresses, SIP headers, etc. that
may allow others to hack into your system or use your identity for nefarious purposes.
If you haven't received an answer or solution within a reasonable amount of time (generally two work
days), send the link to your posting to Support. You need to create a support account first, if you don't
already have one.
Creating a support account
1. Open snom’s web page at www.snom.com.
2. Click on the Support tab to open the Support window.
3. Click on End Customer Support.
4. On the Support Center page, click on Register new account. (Neu anmelden)
5. Fill out the form and click Register. (Anmelden)
6. You will receive an automatic email. Click on the link to activate your account.
7. You will receive a second email containing your account name, email address, and password.
You can now submit tickets requesting support to snom Support.
Submitting a ticket
1. Open snom’s web page at www.snom.com.
2. Click on the Support tab to open the Support window.
3. Click on End Customer Support.
4. On the Support Center page, enter your email address and password and click on Login.
5. Click on "Ask for support". (Eine neue Anfrage/Frage stellen)
6. Follow the instructions on the screen.
Submitting system and settings information
System information
1. Open the phone’s web interface > Status > System Information.
2. C
opy the text under System Information into your forum posting or into the email, if Support has
asked you to contact them by email.
Make sure to delete the MAC address and the IP address, if it is a public one.
80
snom 821 User Manual
Troubleshooting
System information
Open the phone’s web interface > Status > Settings. Make sure to delete private and/or securityrelevant information like the MAC address, public IP address, etc.
Traces
snom Support may ask you to submit a SIP Trace and/or a PCAP Trace to help them analyze your
problem.
Performing a SIP Trace
1. Open the phone’s web interface > Status > SIP Trace.
2. Click on "Clear" to clear the page.
3. Recreate the error to be documented in the trace.
4. Click on "Reload".
5. Copy the text and submit to Support in whatever form they requested you to use.
Performing a PCAP Trace
1. Open the phone’s web interface > Status > PCAP Trace.
2. Click on "Start" to start recording network traffic.
3. Click on Stop to end recording.
4. Click on the “here” link to open the file download window and save the file.
5. Submit the file to Support in whatever way they requested you to use.
81
Appendix 1 - Display symbols and icons
Symbols found in the function key line
The buttons symbolize the functions that are currently available for activation. Press the function key
underneath the symbol to activate the function.
1. Symbols of functions that can be mapped onto the four function keys underneath the display:
Displaying SIP URLs of all active identities; selecting outgoing identity
Call list menu (missed, received, and dialed calls)
Available status messages
Turning DND on an off
Contacts list
Forwarding all calls (turning on/turning off)
/
Presence signaling on/off
Retrieving messages from mailbox
Settings menu
Directory
Monitoring calls on other extensions (see Extension Monitoring). The button will
only be displayed when there are ongoing calls.
Virtual key screen
A
P
P
1
Redial (dialed calls)
A
P
P
Received calls
1
Missed calls
Favorites
LDAP Directory
Next outgoing ID
82
Previous outgoing ID
IP address of phone and snom's web address
ABS
Address book search (OCS accounts only)
2. Context-sensitive symbols:
Confirming a selection or an action
Terminating/canceling an action and return to the previous screen
When the phone is in a call, another incoming call waiting is shown on-screen. If
you wish to to show the connected call on-screen instead, press this function key.
When the phone is in a call with more than one incoming call waiting, the latest
arrival is shown on-screen. Press these keys to show other calls waiting on-screen.
Transfer incoming call (blind transfer)
Switching input mode to small letters
Switching input mode to capital letters
Switching input mode to numerals
Deleting the character to the left of the cursor
Moving down lists in various contexts
Moving up lists in various contexts
Available directories, contact lists, etc.
A
P
P
1
A
P
P
Sorting Directory entries
Editing mode for selected Directory entry
Moving the cursor to the left when entering/editing directory entries
Moving the cursor to the right when entering/editing directory entries
Deleting selected directory entry
Adding current caller's number to Directory [Save] [Merken]
83
1
Details of missed call (to, from, date/time, total number) and of received and dialled
call (to, from, date/time, duration) [alternative text: "Details"]
Returning to call list
Deleting selected call list entry [alternative text: "Delete"]
Deleting entire call list [alternative text: "Clear"]
Moving to beginning of next time zone
Expanding the list of time zones to show all
Collapsing the list of time zones to show only time zones relevant to the language
setting (i.e., countries where the language is spoken)
Last numbers dialed. Redial selected number
Selecting call on hold (show caller/callee on-screen)
Selecting call on hold (show caller/callee on-screen)
Establishing conference with all calls on hold
Showing previous conference participant on-screen
Showing next conference participant on-screen
Showing all current conference participants on-screen
When the phone is in a call, another incoming call waiting is shown on-screen. If
you wish to to show the connected call on-screen instead, press this function key.
When the phone is in a call with more than one incoming call waiting, the latest
arrival is shown on-screen. Press these keys to show other calls waiting on-screen.
On active screen (i.e., in call etc.): Monitoring calls on other extensions (see
Extension Monitoring). The button will only be displayed when there are ongoing
calls. Press to show details of calls on monitored extensions.
Turning on the casing speaker
A
P
P
1
Turning off the casing speaker
Start recording the phone call or a message to yourself
Stop recording
ESC
Press to return to the idle screen
84
A
P
P
1
Press to show available status messages like firmware update available, reboot
required, call completion pending, call forward activated, etc.
Display indications
Incoming call ringing
•
Connected call (in call)
•
Outgoing call ringing
Active identity available for incoming and outgoing calls
•
Blinking gray phone symbol: The identity is trying to register
•
he phone symbol has stopped blinking, but remains gray: Failed registration,
T
the identity is not properly registered. Check the settings and/or inform your
network administrator or your VoIP provider.
A
P
P
A
P
P
1
1
85
Appendix 2 - Status messages
Whenever there is a current message concerning the status of the phone, the function key
will
be available. Press the function key (or
> 6 Information > 1 Status Info) to open the "Status
info" screen. Additionally, some status messages will also be displayed in the status bar; if there is
more than one current message, the one with the highest priority will be shown. The messages in
descending order of priority:
Status message
SW 1
Reboot required 1
Definition
A firmware update is available
Reboot required, for example to have settings changes
take effect
The phone cannot make calls due to license problems
An error occurred
Disk space full
The remote directory is too big to be imported
SIP disabled 1,²
Error 1
Low memory 1
Remote directory is too big 1
Not Registered: <account> 1,²
Waiting for <name/number> to be
available ²
<account> is now available ²
Forward when Busy: <name/number>
Forward after Timeout: <name/number>
Forward all: <name/number> ²
Contacting NTP server
NTP server unreachable 1
HTTP Password not set 1
Admin Password not set 1
Keyboard locked ²
A
P
P
DND active ²
You have messages
You have new messages
Old messages
Missed: <number>
2
1 The function key symbol
The specified identity/account is not registered
Waiting for call completion to busy or currently unavailable
number
The dialed number is not busy anymore or is now available
Call forwarding is on. When your phone is busy, incoming
calls will be forwarded to the phone number indicated
Call forwarding is on. When an incoming call is not picked
up within the set number of seconds, the call will be
forwarded to the phone number indicated
Forwarding of all incoming calls is on. All incoming calls
will be forwarded to the phone number indicated.
Network Time Protocol (NTP) is a protocol for
synchronizing clocks over data network. If the connection
is interrupted, the phone will not be able to display the
correct time.
No HTTP password has been set
No Admin password has been set
Only numbers designated as emergency numbers can be
dialled
Do not Disturb mode is activated
There are spoken messages on the mailbox
New (messages on the mailbox)
Old (messages on the mailbox)
The number of calls you missed since the last time you
checked the list of missed calls or turned off the missed
call indication
will be blinking
² The message cannot be deleted from the "Status Info" screen
86
A
P
P
2
Appendix 3 - Programmable Functions
Programmable Functions
Action URL
Auto Answer
BLF
Button
Call Agent
Conference Server
DTMF
Extension
Forward to
Intercom
IVR
Key Event
Line
Multicast Page
Park Orbit
Presence
Push 2Talk
Shared Line
Speed Dial
Transfer to
Voice Recorder
Xml Definition
Key Events
A
P
P
3
ABS
Accepted Calls
Call Lists
Change active ID
Conference
Contacts
Directory
DND
Favorites
Forward all
Help
Hold
LDAP Directory
Logoff Identities
A
P
P
3
87
Menu
Missed Calls
Monitor Calls
Mute
Next Outgoing ID
Presence State
Prev. Outgoing ID
Reboot
Record
Redial
Retrieve
Status Messages
Transfer
A
P
P
A
P
P
3
3
88
Appendix 4 - GNU General Public License
COPYRIGHT NOTICE AND WARRANTY
DISCLAIMER
We protect your rights with two steps: (1) copyright the software, and
(2) offer you this license which gives you legal permission to copy,
distribute and/or modify the software.
Das Produkt enthält Software, die unter der GNU General Public
License, Version 2, frei genutzt werden darf.
Also, for each author‘s protection and ours, we want to make certain that
everyone understands that there is no warranty for this free software. If
the software is modified by someone else and passed on, we want its
recipients to know that what they have is not the original, so that any
problems introduced by others will not reflect on the original authors‘
reputations.
I.
This Product contains Software applicable to GNU General Public
License, Version 2 which can be used freely.
Finally, any free program is threatened constantly by software patents.
We wish to avoid the danger that redistributors of a free program
will individually obtain patent licenses, in effect making the program
proprietary. To prevent this, we have made it clear that any patent must
be licensed for everyone‘s free use or not licensed at all.
II.
Im Verhältnis zu den Lizenzgebern der Software gilt der folgende
Haftungsausschluss:
The precise terms and conditions for copying, distribution and
modification follow.
Towards the licensor of this Software the following liability is disclaimed:
GNU GENERAL PUBLIC LICENSE
This program is distributed in the hope that it will be useful, but
WITHOUT ANY WARRANTY; without even the implied warranty of
MERCHANTABILITY or FITNESS FOR A PARTICULAR PURPOSE.
See the GNU General Public License for more details.
TERMS AND CONDITIONS FOR COPYING, DISTRIBUTION
AND MODIFICATION
III.
0. This License applies to any program or other work which contains
a notice placed by the copyright holder saying it may be distributed
under the terms of this General Public License. The „Program“, below,
refers to any such program or work, and a „work based on the Program“
means either the Program or any derivative work under copyright
law: that is to say, a work containing the Program or a portion of it,
either verbatim or with modifications and/or translated into another
language. (Hereinafter, translation is included without limitation
in the term „modification“.) Each licensee is addressed as „you“.
Der Lizenztext der GPL lautet wie folgt:
The GNU General Public License is as follows:
GNU GENERAL PUBLIC LICENSE
Version 2, June 1991
Activities other than copying, distribution and modification are not
covered by this License; they are outside its scope. The act of running
the Program is not restricted, and the output from the Program is
covered only if its contents constitute a work based on the Program
(independent of having been made by running the Program). Whether
that is true depends on what the Program does.
Copyright (C) 1989, 1991
Free Software Foundation, Inc.
59 Temple Place, Suite 330
Boston, MA 02111-1307, USA
1.You may copy and distribute verbatim copies of the Program‘s source
code as you receive it, in any medium, provided that you conspicuously
and appropriately publish on each copy an appropriate copyright notice
and disclaimer of warranty; keep intact all the notices that refer to
this License and to the absence of any warranty; and give any other
recipients of the Program a copy of this License along with the Program.
Everyone is permitted to copy and distribute verbatim copies of this
license document, but changing it is not allowed.
Preamble
The licenses for most software are designed to take away your freedom
to share and change it. By contrast, the GNU General Public License is
intended to guarantee your freedom to share and change free software-to make sure the software is free for all its users. This General Public
License applies to most of the Free Software Foundation‘s software and
to any other program whose authors commit to using it. (Some other
Free Software Foundation software is covered by the GNU Library
General Public License instead.) You can apply it to your programs, too.
You may charge a fee for the physical act of transferring a copy, and you
may at your option offer warranty protection in exchange for a fee.
2. You may modify your copy or copies of the Program or any portion
of it, thus forming a work based on the Program, and copy and
distribute such modifications or work under the terms of Section
1 above, provided that you also meet all of these conditions:
When we speak of free software, we are referring to freedom, not price.
Our General Public Licenses are designed to make sure that you have
the freedom to distribute copies of free software (and charge for this
service if you wish), that you receive source code or can get it if you
want it, that you can change the software or use pieces of it in new free
programs; and that you know you can do these things.
a)
You must cause the modified files to carry prominent notices
stating that you changed the files and the date of any change.
b)
You must cause any work that you distribute or publish, that
in whole or in part contains or is derived from the Program or any part
thereof, to be licensed as a whole at no charge to all third parties under
the terms of this License.
To protect your rights, we need to make restrictions that forbid anyone
to deny you these rights or to ask you to surrender the rights. These
restrictions translate to certain responsibilities for you if you distribute
copies of the software, or if you modify it. For example, if you distribute
copies of such a program, whether gratis or for a fee, you must give the
recipients all the rights that you have. You must make sure that they, too,
receive or can get the source code. And you must show them these
terms so they know their rights.
A
P
P
4
c)
If the modified program normally reads commands
interactively when run, you must cause it, when started running for
such interactive use in the most ordinary way, to print or display an
announcement including an appropriate copyright notice and a notice
that there is no warranty (or else, saying that you provide a warranty)
and that users may redistribute the program under these conditions,
and telling the user how to view a copy of this License. (Exception:
89
A
P
P
4
if the Program itself is interactive but does not normally print such an
announcement, your work based on the Program is not required to print
an announcement.)
are prohibited by law if you do not accept this License. Therefore,
by modifying or distributing the Program (or any work based on the
Program), you indicate your acceptance of this License to do so, and
all its terms and conditions for copying, distributing or modifying the
Program or works based on it.
These requirements apply to the modified work as a whole. If identifiable
sections of that work are not derived from the Program, and can be
reasonably considered independent and separate works in themselves,
then this License, and its terms, do not apply to those sections when
you distribute them as separate works. But when you distribute
the same sections as part of a whole which is a work based on the
Program, the distribution of the whole must be on the terms of this
License, whose permissions for other licensees extend to the entire
whole, and thus to each and every part regardless of who wrote it.
6.
Each time you redistribute the Program (or any work based
on the Program), the recipient automatically receives a license from the
original licensor to copy, distribute or modify the Program subject to
these terms and conditions. You may not impose any further restrictions
on the recipients‘ exercise of the rights granted herein. You are not
responsible for enforcing compliance by third parties to this License.
7.
If, as a consequence of a court judgment or allegation of
patent infringement or for any other reason (not limited to patent issues),
conditions are imposed on you (whether by court order, agreement or
otherwise) that contradict the conditions of this License, they do not
excuse you from the conditions of this License. If you cannot distribute
so as to satisfy simultaneously your obligations under this License and
any other pertinent obligations, then as a consequence you may not
distribute the Program at all. For example, if a patent license would
not permit royalty-free redistribution of the Program by all those who
receive copies directly or indirectly through you, then the only way you
could satisfy both it and this License would be to refrain entirely from
distribution of the Program.
Thus, it is not the intent of this section to claim rights or contest your rights to
work written entirely by you; rather, the intent is to exercise the right to control
the distribution of derivative or collective works based on the Program.
In addition, mere aggregation of another work not based on the Program
with the Program (or with a work based on the Program) on a volume
of a storage or distribution medium does not bring the other work under
the scope of this License.
3.
You may copy and distribute the Program (or a work based
on it, under Section 2) in object code or executable form under the
terms of Sections 1 and 2 above provided that you also do one of the
following:
If any portion of this section is held invalid or unenforceable under any
particular circumstance, the balance of the section is intended to apply
and the section as a whole is intended to apply in other circumstances.
a)
Accompany it with the complete corresponding machinereadable source code, which must be distributed under the terms of
Sections 1 and 2 above on a medium customarily used for software
interchange; or,
It is not the purpose of this section to induce you to infringe any
patents or other property right claims or to contest validity of any such
claims; this section has the sole purpose of protecting the integrity of
the free software distribution system, which is implemented by public
license practices. Many people have made generous contributions
to the wide range of software distributed through that system in
reliance on consistent application of that system; it is up to the
author/donor to decide if he or she is willing to distribute software
through any other system and a licensee cannot impose that choice.
This section is intended to make thoroughly clear what is believed to be
a consequence of the rest of this License.
b)
Accompany it with a written offer, valid for at least three years,
to give any third party, for a charge no more than your cost of physically
performing source distribution, a complete
machine-readable copy
of the corresponding source code, to be distributed under the terms
of Sections 1 and 2 above on a medium customarily used for software
interchange; or,
c)
Accompany it with the information you received as to the
offer to distribute corresponding source code. (This alternative is
allowed only for noncommercial distribution and only if you received the
program in object code or executable form with such an offer, in accord
with Subsection b above.)
8.
If the distribution and/or use of the Program is restricted
in certain countries either by patents or by copyrighted interfaces, the
original copyright holder who places the Program under this License
may add an explicit geographical distribution limitation excluding those
countries, so that distribution is permitted only in or among countries not
thus excluded. In such case, this License incorporates the limitation as
if written in the body of this License.
The source code for a work means the preferred form of the work for
making modifications to it. For an executable work, complete source
code means all the source code for all modules it contains, plus any
associated interface definition files, plus the scripts used to control
compilation and installation of the executable. However, as a special
exception, the source code distributed need not include anything that
is normally distributed (in either source or binary form) with the major
components (compiler, kernel, and so on) of the operating system on
which the executable runs, unless that component itself accompanies
the executable.
9.
The Free Software Foundation may publish revised and/
or new versions of the General Public License from time to time.
Such new versions will be similar in spirit to the present version,
but may differ in detail to address new problems or concerns.
Each version is given a distinguishing version number. If the Program
specifies a version number of this License which applies to it and „any
later version“, you have the option of following the terms and conditions
either of that version or of any later version published by the Free
Software Foundation. If the Program does not specify a version number
of this License, you may choose any version ever published by the Free
Software Foundation.
If distribution of executable or object code is made by offering access
to copy from a designated place, then offering equivalent access to
copy the source code from the same place counts as distribution of the
source code, even though third parties are not compelled to copy the
source along with the object code.
10. If you wish to incorporate parts of the Program into other free
programs whose distribution conditions are different, write to the
author to ask for permission. For software which is copyrighted by the
Free Software Foundation, write to the Free Software Foundation; we
sometimes make exceptions for this. Our decision will be guided by
the two goals of preserving the free status of all derivatives of our free
software and of promoting the sharing and reuse of software generally.
4.
You may not copy, modify, sublicense, or distribute the
Program except as expressly provided under this License. Any attempt
otherwise to copy, modify, sublicense or distribute the Program is void,
and will automatically terminate your rights under this License. However,
parties who have received copies, or rights, from you under this License
will not have their licenses terminated so long as such parties remain in
full compliance.
A
P
P
4
NO WARRANTY
5.
You are not required to accept this License, since you
have not signed it. However, nothing else grants you permission to
modify or distribute the Program or its derivative works. These actions
11. BECAUSE THE PROGRAM IS LICENSED FREE OF CHARGE,
THERE IS NO WARRANTY FOR THE PROGRAM, TO THE EXTENT
90
A
P
P
4
PERMITTED BY APPLICABLE LAW. EXCEPT WHEN OTHERWISE
STATED IN WRITING THE COPYRIGHT HOLDERS AND/OR
OTHER PARTIES PROVIDE THE PROGRAM „AS IS“ WITHOUT
WARRANTY OF ANY KIND, EITHER EXPRESSED OR IMPLIED,
INCLUDING, BUT NOT LIMITED TO, THE IMPLIED WARRANTIES
OF MERCHANTABILITY AND FITNESS FOR A PARTICULAR
PURPOSE.
THE ENTIRE RISK AS TO THE QUALITY AND
PERFORMANCE OF THE PROGRAM IS WITH YOU. SHOULD THE
PROGRAM PROVE DEFECTIVE, YOU ASSUME THE COST OF ALL
NECESSARY SERVICING, REPAIR OR CORRECTION.
If requested by you, the complete corresponding source code of the Software
can be sent by snom technology AG on a standard data storage medium
against the reimbursement of the manufacturing costs of EUR 5.- per unit.
The complete corresponding source code of the Software can also be
downloaded from our web site http://www.snom.com/gpl_.html?&L=0.
V..
Weitere Informationen finden Sie auch unter
http://www.snom.com.
12. IN NO EVENT UNLESS REQUIRED BY APPLICABLE LAW OR
AGREED TO IN WRITING WILL ANY COPYRIGHT HOLDER, OR
ANY OTHER PARTY WHO MAY MODIFY AND/OR REDISTRIBUTE
THE PROGRAM AS PERMITTED ABOVE, BE LIABLE TO YOU FOR
DAMAGES, INCLUDING ANY GENERAL, SPECIAL, INCIDENTAL
OR CONSEQUENTIAL DAMAGES ARISING OUT OF THE USE OR
INABILITY TO USE THE PROGRAM (INCLUDING BUT NOT LIMITED
TO LOSS OF DATA OR DATA BEING RENDERED INACCURATE OR
LOSSES SUSTAINED BY YOU OR THIRD PARTIES OR A FAILURE
OF THE PROGRAM TO OPERATE WITH ANY OTHER PROGRAMS),
EVEN IF SUCH HOLDER OR OTHER PARTY HAS BEEN ADVISED
OF THE POSSIBILITY OF SUCH DAMAGES.
For further information see http://www.snom.com.
END OF TERMS AND CONDITIONS
How to Apply These Terms
to Your New Programs
If you develop a new program, and you want it to be of the greatest
possible use to the public, the best way to achieve this is to make it
free software which everyone can redistribute and change under these
terms.
To do so, attach the following notices to the program. It is safest to
attach them to the start of each source file to most effectively convey
the exclusion of warranty; and each file should have at least the
„copyright“ line and a pointer to where the full notice is found.
<one line to give the program‘s name and a brief idea of what it
does>Copyright (C) <year> <name of author>
This program is free software; you can redistribute it and/or modify it
under the terms of the GNU General Public License as published by
the Free Software Foundation; either version 2 of the License, or (at
your option) any later version.
This program is distributed in the hope that it will be useful, but
WITHOUT ANY WARRANTY; without even the implied warranty of
MERCHANTABILITY or FITNESS FOR A PARTICULAR PURPOSE.
See the GNU General Public License for more details.
You should have received a copy of the GNU General Public License
along with this program; if not, write to the Free Software Foundation,
Inc., 59 Temple Place, Suite 330, Boston, MA 02111-1307 USA
IV.
Den
vollständigen
korrespondierenden
Sourcecode
der
Software schickt Ihnen die snom technology AG auf
Nachfrage gerne auf einem üblichen Datenträger gegen
Erstattung der Herstellungskosten in Höhe von EUR 5,- zu.
Der vollständige korrespondierende Sourcecode kann auch über
unsere Website unter http://www.snom.com/gpl_.html?&L=0 herunter
geladen werden.
A
P
P
4
91
A
P
P
4
snom technology AG
Charlottenstr. 68-71
10117 Berlin, Deutschland
Tel. +49 30 39 83 3-0
Fax +49 30 39 83 31 11
[email protected], [email protected]
snom France SARL
snom technology, Inc.
18 Commerce Way, Suite 6000
Woburn, MA 01801, USA
Tel. 781-569-2044
Fax 978-998-7883
[email protected]
snom technology SRL
Via A. Lusardi 10
20122 Milano, Italia
Tel +39 02 00611212
Fax +39 02 93661864
[email protected], [email protected]
snom UK Ltd
Aspect Court
47 Park Square East
Leeds, LS12NL, UK
Tel. +44 1133 503 111
Fax +44 1133 503 110
[email protected], [email protected]
snom technology Ltd.
Rm. A2, 3F, No. 37, Ln. 258
Ruiguang Rd., Neihu Dist.
Taipei City 114, Taiwan
Tel +886-2-8751-1120
Fax +886-2-8751-1130
[email protected]
6 Parc des fontenelles
78870 Bailly, France
Tel. +33 1 80 87 62 87
Fax +33 1 80 87 62 88
[email protected], [email protected]
Your specialist retailer - Ihr Fachhändler Votre distributeur - Su distribuidor - Il tuo rivenditore:
© 2012 snom technology AG
V2.00