1
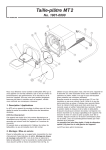
OPERATING
INSTRUCTION
HSS-88
Model Trimmer
with solenoid valve
Fig 1: HSS-88
WASSERMANN DENTAL-MASCHINEN GMBH
-1-
Dear customer,
Thank you for choosing a Wassermann product. Wassermann Dental-Maschinen bring
you the highest quality and the latest technology. Before you start this unit, please read
the User's Manual carefully and operate the unit accordingly. In that way, you'll
maximise its output and can look forward to many years of trouble-free operation.
Also, please make sure that all personnel who operate the unit have read and
understood the User's Manual.
Keep this User's Manual in a safe place so that it can be referred to at any time.
Company address:
Wassermann Dental-Maschinen GmbH
Rudorffweg 15-17
D-21031 Hamburg
Germany
Tel: (49 40) 730 9260 Fax: (49 40) 730 3724
e-mail: [email protected]
URL: http:// www.wassermann-dental.com
Erstellt: 27.05.2008/ms
Version: 1
Auftrag: 168997/100
-2-
Contents
Contents.................................................................................................................................... 2
1
2
Safety instructions ............................................................................................................ 4
1.1
PROPER USE OF THE PRODUCT ...................................................................................... 4
1.2
SAFETY SYMBOLS USED IN THIS MANUAL ...................................................................... 4
1.3
SAFETY INSTRUCTIONS................................................................................................. 5
1.4
DANGEROUS SITUATIONS ............................................................................................. 6
1.5
FOLLOW THE USER'S MANUAL ..................................................................................... 6
1.6
RESPONSIBILITY FOR OPERATION AND DAMAGE ............................................................ 6
1.7
AUTHORISED USERS ..................................................................................................... 7
Servicing and care ............................................................................................................ 7
2.1
SERVICING................................................................................................................... 7
2.2
CARE........................................................................................................................... 8
3
Use/Applicability............................................................................................................... 8
4
Before starting the unit..................................................................................................... 8
5
6
7
4.1
UNPACKING AND TRANSPORTING THE UNIT ................................................................... 8
4.2
UNIT AND ACCESSORIES ............................................................................................... 9
4.3
SET-UP AND STORAGE ................................................................................................ 10
Operation ........................................................................................................................ 11
5.1
TECHNICAL SPECIFICATIONS....................................................................................... 11
5.2
WATER REGULATION ................................................................................................. 12
Installation ...................................................................................................................... 12
6.1
LOCATION ................................................................................................................. 12
6.2
FLUSHING-WATER CONNECTOR .................................................................................. 12
6.3
DRAIN HOSE .............................................................................................................. 13
Assembly ......................................................................................................................... 14
7.1
INSTALLING THE ANGLED MOUNT ............................................................................... 14
8
Supports .......................................................................................................................... 15
9
Maintenance.................................................................................................................... 15
9.1
SERVICING................................................................................................................. 15
9.2
BREAKDOWNS AND TROUBLESHOOTING...................................................................... 15
9.3
GRINDING WHEEL OVERHAUL..................................................................................... 16
-3-
9.4
REPLACEMENT WHEELS ............................................................................................. 16
9.5
GRINDING DISCS ........................................................................................................ 17
10
Warranty..................................................................................................................... 17
11
EC Conformity certificate .......................................................................................... 18
-4-
1 Safety instructions
1.1
Proper use of the product
The HSS-88 plaster-cast grinder is used in dental laboratories exclusively for grinding
(trimming) plaster models.
To avoid damaging the unit and/or its grinding wheel, it should be used only with
plaster. Using it with other materials could fracture the wheel.
1.2
Safety symbols used in this manual
Warning!
!
This symbol indicates a risky or dangerous situation.
Ignoring this symbol could lead be life-threatening.
Do not ignore this symbol!
i
Information
This symbol indicates features which must be observed.
-5-
1.3
Safety instructions
-
!
Servicing and repairs to your unit must be carried out by qualified
personnel.
-
Always disconnect the unit from mains power before carrying out
cleaning or maintenance. Keep well away from water.
-
Always wear protective goggles before working on the grinding
wheel.
-
Electric motors have dangerous, high-voltage rotating parts.
Incorrect usage or inadequate maintenance could endanger
personnel and equipment.
-
Any work on the motor should be carried out only by qualified
service personnel.
-
Allow the condensors time to discharge before opening the unit.
-
When working on the unit, wear close-fitting clothing and roll
sleeves inward only. Do not wear gloves.
-
Wear a hair net (or similar) if you have long hair.
-
Do not wear rings, chains, bangles or similar jewelry when working
with the HSS-88.
i
-
Turn off the tap overnight and at weekends.
-6-
1.4
Dangerous situations
-
Danger of injury from rotating parts and wheel.
!
1.5
Follow the User's Manual
This User's Manual sets out the information and procedures to be observed when the
unit is turned on and operated. The unit must be used only for its intended purpose.
1.6
Responsibility for operation and damage
The owner or operator are in all cases responsible for the operation of this unit if it is
used by persons not employed by an approved laboratory, is wrongly serviced,
maintained or altered, or if it is operated for purposes other than its intended use.
The unit must be maintained and operated in accordance with this User's Manual. Any
damage resulting from non-observance of these instructions is not the responsibility of
Wassermann Dental-Maschinen GmbH.
Warranty and responsibility terms covered by the sales and supply conditions of
Wassermann Dental-Maschinen GmbH do not extend beyond those stated here.
-
Responsibility for the product becomes void if alterations are
made to it by third parties or if non-approved parts are installed.
!
Only original WASSERMANN parts should be used. If any damage
results from the installation of a non-approved wheel,
responsiblity lies with the person installing that replacement
wheel.
-
If diamond grinding wheels are used, serious wear will result from
grinding embedded materials and metals. We will be in no way
responsible in this case.
-7-
1.7
Authorised users
The owner of the unit must provide the operator with the User's Manual and ensure that
the operator has first read and understood it. Only then should the operator use the unit.
i
Make sure that the User's Manual is always accessible, and has been
read and understood.
2 Servicing and care
2.1
Servicing
-
!
Before cleaning or servicing the unit, ensure that it is disconnected
from the mains power and cannot be switched on again
accidentally.
-
Keep the unit well away from water.
-
Open the unit only after the wheel has come to a complete stop.
The HSS-88 plaster-cast grinder is a low-maintenance unit. However, when opening the
wheel chamber for cleaning or to change the wheel, be sure to clean the sealing
surfaces and re-coat them with water-insoluble grease.
As a safety measure, check regularly that the hose retainers and water-supply hoses
are firmly anchored.
-8-
2.2
Care
i
We recommend occasional use of a cloth moistened with an alkaline
solution to remove plaster waste on the outside of the unit. Other than
that, the HSS-88 does not require any special care.
3 Use/Applicability
The HSS-88 plaster-cast grinder is intended for the grinding (trimming) of plaster casts.
*** Use the unit only for the intended purpose! ***
4 Before starting the unit
4.1
-
Unpacking and transporting the unit
Open the carton, remove the packing material and carefully lift out the unit and
accessories. Check that all acessories are present.
-
Use appropriate packing when transporting the unit in order to avoid damaging it.
i
Take out the User's Manual and read it carefully.
It is important to record any transport damage when you unpack the unit. If
necessary, fill out a condition report immediately.
-9-
4.2
Unit and accessories
HSS-88
including grinding disc
Item no.:
including diamond grinding disc
168998
including Dia-Quick grinding disc, 168996
partly diamonded
including corundum grinding disc
168999
including foil grinding disc
168991
Included in delivery
Item no.:
Inclined support
168037
Supply hose 1 m
320006
Discharge hose 1 m
320017
Accessories
Item no.:
Conversion kit for HSS-88,
Dia-Quick- and foil grinding disc
168071
Grinding device KMS according to 168080
B. E. G. G.
Directional light GTE
168081
Template for upper jaw to trim the 168082
lower jaw tube level
Wall console
168056
Sealing grease for trimmer , 25 ml
629002
Truing
apparatus
to
corundum grinding disc
roughen 710001
- 10 -
4.3
-
Set-up and storage
When setting up the unit, ensure that the grinding wheel is readily accessible and
that the unit is located near a sink.
-
To install the flushing water connector, you'll need a pressure hose with woven liner
measuring 0.5 inch (13 mm) in diameter, and for the drain, a plastic hose 1 inch (25
mm) in diameter.
-
If the unit is to be stored, even for a short time, its location can have a significant
effect on its operation. The location should be dry, well-ventilated and free of
vibrations. It is important for the unit to be seated on a wooden base and to be kept
at a constant temperature. The unit must not be stored or set up in the open air.
i
Warning! Before turning on the unit, ensure that it has come to room
temperature.
- 11 -
5 Operation
5.1
Technical specifications
Voltage*
220–240 V / 50/60 Hz
Power consumption
4.6 A
Output
1000 W
WxHxD
330 x 335 x 410 mm
Weight
19.8 kg
Sound level
≤ 70 dB(A)
Speed
3000 min-1
Duty
S6 - 40 %
Table dimensions projecting
120 mm
*Other voltages upon enquiry.
i
Subject to modification
Noise transmission measured within a circumference of 1 metre around and 1.6 metres
above the unit was 69 db (A), averaged over 50% idling, 30% mid-load and 20% full
load. This level was determined in accordance with DIN 45635 Part 1.
i
After switching on the unit, wait a few seconds for the motor to come
up to speed. The full power of the motor can then be used. Never work
the units to the point that the motor labours to keep turning. This
could result in overloading and motor damage.
- 12 -
5.2
Water regulation
The water supply is regulated at the tap. The amount of water is sufficient when the
wheel remains more or less its original colour during grinding.
Grinding requires only light pressure and slight left and right movement of the cast.
i
It goes without saying that only completely set plaster casts should be
ground. Soft plaster could lead to blockages, especially in the hoses.
6 Installation
6.1
Location
As the unit can only be operated using water, it is recommended that it be set up close
to a tap, and preferably with access to a sink. Alternatively, it could be mounted on a
wall console above the sink.
6.2
Flushing-water connector
Install the flushing-water connector (pressure hose with woven liner) between the tap
and the hose connector on the unit. This connector is located at the rear, underneath
the motor. Use the clamps already mounted on the hose and tighten them firmly.
The tap must have a cut-off valve so that the feeder hose does not remain under
constant pressure when the unit is not being used.
i
-
Retighten the hose clamps about 2 days after installation.
-
Be sure to turn off the tap overnight and at the weekend.
- 13 -
6.3
Drain hose
The drain hose must be installed in such a way that blockages cannot occur. Arrange it
in a continuous arc (no kinks) and with a permanent fall of at least 1 cm per metre.
i
-
The end of the drain hose must be above the level of the plastercast mounting position.
-
The end of the hose must not be under water.
As supplied, the mount for the drain hose is angled to the right. However, it can altered
to be front on. This position is recommended under awkward draining conditions.
If that is the case, simply swap the lock cap and drain mounts.
- 14 -
7 Assembly
7.1
Installing the angled mount
If required, the angled mount is just clamped in position on the HSS-88. Please observe
the following instructions.
i
Ensure that the mount is placed correctly in position. It should be
installed in accordance with the following diagram.
When installing the angled mount,
ensure that positions 1 and 2 are
correctly located on the base.
Schrägauflage – angled mount
Auflageblech – base
Frontplatte – front plate
Gipstrimmer – plaster trimmer
- 15 -
8 Supports
Aside from the item described in 7.1, Installing the angled mount, the HSS-88 plaster
trimmer does not required any other support mechanisms.
9 Maintenance
9.1
Servicing
See 2.1, Servicing for details of servicing procedures. No other servicing work is
required.
9.2
Breakdowns and troubleshooting
Breakdown/Fault
Water spurting
from work area
Likely causes
Water pressure too high
Drain hose extended with a
smaller diameter hose
Drain hose kinked
End of drain hose located
below level of plaster cast
mount
Angle of drain hose too
shallow
Radius (bend) of drain hose
too small
Pipe bend (causing water
back-up) where it meets
drain hose)
Recommended solutions
Adjust water pressure at tap
(see 5.2 Water regulation)
Ensure that the drain hose
diameter is 1 inch (25.4 mm)
Ensure that the drain hose does
not have any kinks in it
Ensure that the hose end is
located above mount level
Ensure that there is a fall of at
least 1 cm per metre
Ensure that the drain hose
radius is as even as possible
The bend must be enlarged to
at least 40 mm diameter
- 16 -
9.3
Grinding wheel overhaul
If, after some time, the surface of the corundum grinding wheel becomes smooth or has
developed grooves, the wheel may need to be ground back or roughened using a
surface grinder. If necessary, used corundum wheels can be returned to the factory for
refurbishing.
If a surface grinder is used, be sure to follow its User's Manual and
!
9.4
safety instructions.
Replacement wheels
Replacement wheels are always supplied with an extractor for the old wheel and a tube
of grease for sealing the wheel chamber.
i
Installing a replacement wheel on an existing wheel mounted in the
unit, regardless of its origin or model type, is strictly prohibited by
Wassermann.
i
Warning!
The use of diamond grinding wheels to grind embedded material and
metals will result in excessive wear on the blade. We assume no
responsibility if this occurs.
When using replacement wheels, be sure to follow the instructions
!
supplied when changing wheels.
- 17 -
9.5
Grinding discs
Spare diamond grinding disc
including puller and grease
168063
Spare Dia-Quick grinding disc, partly diamonded, including grease
162063
Spare corundum grinding disc
168024
including puller and grease
Spare foil grinding disc,
1 set = 4 pieces,
including grease
162013
Spare foil grinding disc, fine,
1 set = 4 pieces,
including grease
162023
10 Warranty
The warranty period for our equipment is 12 months. If faults occur within the warranty
period, contact your dental depot or get in touch directly with our Service department.
Your plaster model trimmer should only be operated in perfect condition. If faults occur
which could harm operators or third parties, the unit should not be used until it has been
fixed.
This warranty does not cover damage caused by improper use, external mechanical
causes, transport damage or interference with the unit by unauthorized persons.
- 18 -
11 EC Conformity certificate
in accordance with 2006/95/EG (low-voltage guidelines) and 2004/108/EG (EMV
guidelines) and 98/37/EG (machinery guidelines)
Manufacturer :
WASSERMANN
Dental-Maschinen GmbH
Rudorffweg 15 - 17
D-21031 Hamburg, Germany
Product description :
Maschine model : HSS-88 model trimmer
Applicable
standards:
Plaster-cast grinder
for dental
applications
(168 997)
DIN EN 61010-1:2004
DIN EN 61000-6-3:2005
DIN EN 61000-6-1:2002
DIN 45635-1:1984
DIN EN 60335-1:2007
Hiermit wird bestätigt, dass die oben bezeichnete Maschine den genannten EG-Richtlinien
entspricht. Diese Erklärung wird ungültig, falls die Maschine ohne unsere Zustimmung
verändert wird.
This is to confirm that the above-mentioned machine complies with the described EC rules. This
declaration becomes invalid if the machine is modified without our approval.
Cette machine est conforme aux normes en vigueur de la Communité Européene. Cet avis est
nul et non avenant si cette machine est modifiée sans notre accord.
Esta máquina, anteriormente mencionada, cumple con los limites requeridos por el reglamento
EC. Ahora bien, esta declaración quedará invalidada en caso de realizar modificaciones al
aparato sin nuestra aprobación.
Hiermee wordt bevestigd dat bovengenoemde machine voldoet aan de voorgeschreven EU
normen. Deze verklaring verliest geldigheid als er zonder onze uitdrukkelijke toestemming
wijzigen aan de machine worden aangebracht.
Place, date: Hamburg, 20.07.2007
Signed: ________________________
Wilfried Wassermann
(Managing Director)
Company stamp :
WASSERMANN Dental-Maschinen GmbH
Rudorffweg 15 – 17,
D-21031 Hamburg
Tel.: + 49 (0)40 / 730 926 – 0
Fax: +49 (0)40 / 730 37 24
e-mail: [email protected]
Internet: http://www.wassermann-dental.com