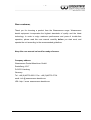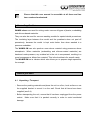
1
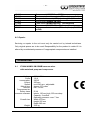
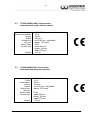
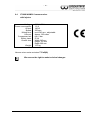
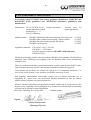
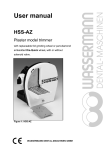
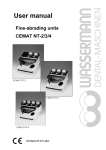
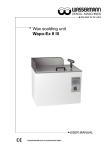
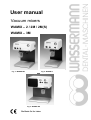
User manual
Vacuum mixers
WAMIX – 2 / 2M / 2M(S)
WAMIX – 3M
Fig. 2: WAMIX-2
Fig. 1: WAMIX-2M
Fig. 3: WAMIX-3M
Die Basis für Ihr Labor
- 1-
Dear customer,
Thank you for choosing a product from the Wassermann range. Wassermann
dental equipment incorporates the highest standards of quality and the latest
technology. In order to enjoy maximum performance and years of trouble-free
operation, please read this user manual carefully before you start work, and
operate the unit according to the recommended guidelines.
Keep this user manual on hand for ready reference.
Company address:
Wassermann Dental-Maschinen GmbH
Rudorffweg 15-17
D-21031 Hamburg
Germany
Tel.: +49 (0)40/730 926-0 Fax.: +49 (0)40/730 37 24
email: info @ wassermann-dental.com
URL: http: // www. wassermann-dental.com
- 2-
Contents
CONTENTS.......................................................................................................................2
1
FEATURES................................................................................................................3
2
FOR YOUR SAFETY .................................................................................................3
2.1
2.2
2.3
YOUR USER MANUAL ............................................................................................3
SAFETY GUIDELINES .............................................................................................4
RESPONSIBILITY FOR OPERATION OR DAMAGE.......................................................4
3
AREA OF APPLICATION..........................................................................................5
4
BEFORE YOU START ..............................................................................................5
4.1
4.2
UNPACKING / TRANSPORT ....................................................................................5
LOCATION / STORAGE ...........................................................................................6
5
START-UP.................................................................................................................7
6
OPERATION..............................................................................................................8
6.1
6.2
6.3
VACUUM MIXING (ALL WAMIX MODELS)............................................................8
PRESSURE EMBEDDING (WAMIX-3M ONLY) .................................................9
VIBRATOR (WAMIX-2M ONLY)...........................................................................9
7
TROUBLESHOOTING.............................................................................................10
8
MAINTENANCE ......................................................................................................11
8.1
8.2
8.3
8.4
8.5
9
CLEANING..........................................................................................................11
SERVICING.........................................................................................................11
WARRANTY ........................................................................................................11
SPARE PARTS AND ACCESSORIES ........................................................................12
REPAIRS ............................................................................................................13
TECHNICAL DATA .................................................................................................13
9.1
9.2
9.3
9.4
171994 WAMIX-3M KOMBI VACUUM MIXER ......................................................13
171995 WAMIX-2M(S) VACUUM MIXER ..............................................................14
171996 WAMIX-2M VACUUM MIXER ...................................................................14
171998 WAMIX-2 VACUUM MIXER......................................................................15
10
EC CONFORMITY CERTIFICATE.......................................................................16
- 3-
1 Features
The WAMIX range of vacuum mixers range can be used for mixing all types of
plaster, embedding and silicone-based materials, and vacuum-washing of models
for special dental procedures.
There are separate power units for vacuum generation and mixing. A timer is used
to switch the mixers on and off without breaking the vacuum.
Until changed, the set mixing time (up to 240 seconds) becomes the default. An
audible signal indicates the end of the mixing process.
The mixing beakers on these units are held to the flange only by vacuum,
guaranteeing air is excluded.
The mixers are supplied for wall-mounting but can readily be converted for tabletop operation at any time (for accessories, see 8.4).
The WAMIX-3M also features a pressure chamber, allowing you to achieve a
more homogeneous, blister-free texture by hardening materials under pressures
above atmospheric.
The WAMIX-2M also has a vibrator for preparing single spoonfuls, for example.
2 For your safety
2.1 Your user manual
You should read and follow carefully the instructions in this user manual for setting
up and operating the unit. The unit is intended only for the specified purpose.
Especially important points are highlighted as follows:
Warning!
This is a warning of risk situations and dangers. Failure to observe
!
this warning could be life-threatening. These warnings must be
observed.
- 4-
Information
This symbol draws your attention to specific features which must be
i
observed.
2.2 Safety guidelines
•
!
This equipment is designed to operate at 230V / 50Hz. Make sure
it is always connected to the appropriate power supply.
•
Always remove the plug from the power socket before
undertaking maintenance or cleaning work.
•
A locking plate underneath each unit prevents it coming loose
once it has been mounted in the bracket.
•
Allow the condensors to discharge before opening the unit.
•
A valve on the pressure chamber opens automatically if the
pressure exceeds 7 bar (WAMIX-3M only).
2.3
Responsibility for operation or damage
The responsibility for operating the unit lies exclusively with the owner or user if
said unit is incorrectly serviced, maintained or altered by persons not employed by
an authorised dealer or if the unit is used in a manner contrary to its specified
purpose.
The unit must be maintained and operated in accordance with this user manual.
Wassermann Dental-Maschinen GmbH is not responsible for damage arising from
the non-observance of these instructions.
Guarantee and responsibility provisions contained in the sales and supply
conditions of Wassermann Dental-Maschinen GmbH are not extended by these
instructions.
- 5-
i
Ensure that this user manual is accessible at all times and has
been read and understood.
3 Area of application
WAMIX mixers are used for mixing under vacuum all types of plaster, embedding
and silicone-based materials.
They can also be used for vacuum-washing models for special dental procedures.
The insulating layer between the model and the prosthesis does not peel off
prematurely, because the model is kept moist better than when washed in a
pressure embedder.
The WAMIX-3M can also produce more dense material using pressures above
atmospheric. When materials (embedding and silicone-coated materials) are
hardened under pressure, any residual air in the mix is compressed, resulting in a
more homogeneous, blister-free material. This is the best basis for smooth casts.
The WAMIX-2M has a vibrator which also allows you to prepare single spoonfuls,
for example.
4 Before you start
4.1 Unpacking / Transport
− Remove the packing materials and place the unit on a firm, level surface or use
the supplied bracket to mount it on the wall. Check that all items have been
supplied (see 8.4).
− Before transporting the unit, ensure that it has been unplugged from the power
socket.
damage.
Make sure that it is packed correctly in order to avoid accidental
- 6-
4.2 Location / storage
− Set the unit up on a level surface or mount it on the wall.
− If mounting it on the wall, check first that the wall can take the weight. Mark out
the hole template by removing the bracket from the unit and using it as a guide
for drilling the 8 mm ∅ wall plugs. Leave a free area of at least 25 - 30 cm
under the unit.
− Always ensure that the work area is large enough for easy operation (allow for
the unit’s size) – do not set the unit up out of doors!
− If the unit is to be stored for an extended period, protect it from moisture and
dust.
− Connect the following before you turn the unit on:
1. Plug the power cord into the socket, making sure that the mains voltage
matches the mixer.
2. WAMIX-2 and WAMIX-3M only:
Connect a compressed-air hose in accordance with the technical
specifications. In the case of long hoses, make sure that the hose ID is at
least 6 mm. Provide a monitoring unit for each air hose and use a
pressure gauge to keep the pressure constant.
i
Accidental mixing is not possible because the motor starts only
after the beaker is held by vacuum to the flange, even if a mixing
time has been set.
Before you use the vacuum mixer, check that the lock plate (under
!
the unit) has been turned through 90° (it should protrude beyond
the housing). Tighten the screw on the plate to prevent the unit
coming loose accidentally.
- 7-
5 Start-up
− Turn on the green switch (vacuum mix) ( all WAMIX models)
− Open the compressed-air supply (WAMIX-2 and WAMIX-3M only)
− WAMIX-2 only:
When you use the unit for the first time, you will have to adjust the vacuum
using the regulator knob. A pressure of at least 5 bar is recommended. The
regulator knob is located under the pressure gauge. Open the valve slowly, until
the arrow moves from zero into the green range. The best vacuum is obtained
in the middle of the range, not when the valve is fully open. Re-adjustment is
only necessary if the compressed-air supply changes in some way.
− WAMIX-3M only:
Use the regulator (black knob to the left of the vacuum flange) to set the
pressure for embedding – max. 7 bar (safety valve). Pull and turn the knob to
set the desired pressure. The initial pressure will be the maximum sealing
pressure. Push the knob in again.
NOTE: If you want to set a lower pressure, first turn the unit off (vent the unit),
because the tank pressure is kept constant by a non-return valve. Then set the
desired pressure on the gauge by turning up the regulator.
i
WAMIX-2: If, when you are setting the pressure, the arrow on the
pressure gauge does not enter the green range, there is too little
flow to the unit. Check the compressed-air supply (see also 4.2).
i
If the unit is not to be used for an extended period, disconnect the
compressed-air supply and turn the mixer off.
- 8-
6 Operation
i
All instructions for using the unit, whether verbal, written or in the
form of practical guidance, are based on individual experience and
experimentation and can only be regarded as guidelines.
6.1 VACUUM MIXING (all WAMIX models)
1. Set the mixing time (up to 240 seconds) (automatic operation). This time is
used until a new time is set. For manual operation, turn the timer to 0, but set
the desired mixing time only after a vacuum has been obtained.
2. Add the material to be mixed to the beaker.
3. Add the liquid and mix manually until the powder and the liquid are well
combined.
4. Seal the beaker with the lid.
5. Insert the beaker into the mixer from below. This will start the vacuum suction.
Hold the beaker until a vacuum is obtained.
6. The mixer will switch on automatically for the set time. An audible signal will
indicate when mixing has finished.
7. Hold the beaker firmly before turning off the switch (vacuum). The beaker will be
released from the mixer as the vacuum drops.
i
The sealing surfaces between the beaker and the cover must be
clean – likewise the rotor mounting spigot and the top of the
beaker cover – to ensure trouble-free operation.
i
Fill the beaker only to the Max. mark. Otherwise, too much material
will be drawn into the system by the vacuum.
- 9-
i
After the vacuum has dropped, the beaker will come away by
itself. To avoid damaging the seal, never pull on the beaker.
6.2 PRESSURE EMBEDDING (WAMIX-3M ONLY)
1. Set the time on the timer (up to 60 minutes).
2. Open the black latched door (turn in the opposite direction to the arrow) –
do not try to pull it open!
3. Insert the items - max. 3 large muffle rings.
4. Close the pressure chamber and activate the green switch (embedding).
5. The pressure will rise to the set level (pressure gauge).
6. When the set time expires, the pressure chamber will vent automatically, and
the items can be removed. The pressure-embedding process can be
interrupted at any time by turning off the switch (embedding), that is, the
pressure chamber will be vented.
i
If the pressure drops in the compressed-air supply hose while the
mixer is running, the non-return valve will keep the pressure at the
level already reached.
Open the pressure chamber only when the pressure has fallen to
i
zero. Opening the chamber prematurely can tear the rubber ring
from its groove and damage it.
6.3 VIBRATOR (WAMIX-2M only)
1. Press the white switch (vibrator).
2. The vibrator rod and rubber ball vibrate.
3. Hold single spoons (or small moulds) against the rubber ball and add the mixed
material (plaster and similar) in small amounts. This allows you to use the one
mixer for smaller jobs.
- 10 -
7 Troubleshooting
Problem
Mixer will not start
Vacuum too low
No vacuum
Pressure does not
increase in pressure
chamber (WAMIX-3M)
Likely cause
Blown fuse
Likely solution
Replace fuse and
determine cause. If
necessary, contact Service.
Timer on 0
Set mixing time
Filter (vacuum) blocked
Check filter – clean and/or
change (see 8.2)
Faulty seal on vacuum
flange for mixing beaker
Replace seal
Beaker filled beyond Max. Clean system, ie, contact
Service
mark, so mixing material
in system
Faulty vacuum pump
Contact Service
Faulty cover seal O-ring
Check and/or replace Oring
Pressure regulator set to 0 Check and/or set pressure
(pressure gauge)
Vacuum set with
regulator too low
(WAMIX-2)
i
Timer on 0
Set time
Pressure too low in air
hose
Check compressed-air
supply (min. 5 bar)
If the above recommendations do not solve the problem, contact
your dental depot or our Service department.
- 11 -
8 Maintenance
8.1 Cleaning
The unit should be cleaned at regular intervals to ensure problem-free operation.
It requires only normal cleaning (sponge, damp cloth, mild detergent). Do not use
chemical additives.
Solvents must not be used to clean the mounting plate!
Keep the beaker clean. When not in use, fill with water to just below the stirrer.
The model plate must always be legible and should not be removed.
8.2 Servicing
i
Allow the condensors to discharge before you open the mixer.
Our vacuum mixers do not require servicing. Just make sure that the unit is kept
clean and that the flange seal is not damaged.
Changing the filter:
Undo the knurled screw (on the right, near the mixer on the vacuum flange on the
underside of the unit). The filter swings loose at the forward end of the screw. After
changing the filter, do up the screw finger-tight (do not forget the O-ring).
8.3 Warranty
The warranty period for our instruments is 6 months. If faults occur within the
warranty period, contact your dental depot or get in touch directly with our Service
department.
Vacuum mixers should only be operated in perfect condition. If faults occur which
- 12 -
could harm operators or third parties, the unit should not be used until it has been
fixed.
The warranty does not cover damage caused by improper use, external
mechanical causes, transport damage or interference with the unit by
unauthorised persons.
8.4 Spare parts and accessories
Spare parts
Item number
171219
171226
171411
171416
180005
291008
380018
380023
380026
380032
392026
560107
560108
560111
560112
582029
610025
610028
Description
Filter screw
Locating plate
Vibrator rod (WAMIX-2M only)
Vibrator ball, complete (WAMIX-2M only)
Muffle mount (WAMIX-3M only)
Conical knob (WAMIX-3M only)
O-ring 9.75 x 1.78
O-ring 8 x 1.9
Seal D56 x D48 x 3, black, self-sealing one side
O-ring 166.4 x 3.8 (WAMIX-3M only)
Flexible pad D8 - H1.6 (WAMIX-3M only)
Knob, black (WAMIX-2 only)
Cover for knob, black (WAMIX-2 only)
Cover for knob, black with stripe, white
Knob, black with stripe, white
Fuse 3.15 A T 250V - D5x20
Sinter filter (vacuum unit)
Sound absorber (WAMIX-2 only)
Accessories
Item number
171106
171112
171126
171210
171212
171230
171237
171269
171275
171283
Description
Wall bracket ( WAMIX-2M or 2M(S)
Table stand ( WAMIX-2M or 2M(S) (not supplied)
Fastener set (WAMIX-2M only)
Wall bracket (WAMIX-2 only)
Table stand (WAMIX-2 only) (not supplied)
Beaker, small, complete, 200 ml (not supplied)
Beaker, large, complete, 600 ml (not supplied)
Beaker, extra large, complete, 1000 ml (not supplied)
Vacuum washing beaker, 600 ml (not supplied)
Beaker, medium, complete, 350 ml
- 13 -
171290
171295
171299
171412
171424
171427
320026
Fastener set ( WAMIX-2 or 2M(S))
Beaker, extra small, complete, 75 ml (not supplied)
Adapter for “Inceram“ (VITA) (not supplied)
Wall bracket (WAMIX-3M only)
Table stand (WAMIX-3M only) (not supplied)
Fastener set (WAMIX-3M only)
High-pressure air hose, blue, D8 x 6 ( 2 m) (WAMIX-2
or 3M)
8.5 Repairs
Servicing or repairs to the unit must only be carried out by trained technicians.
Only original spares are to be used. Responsibility for the product is voided if it is
altered by unauthorised persons or if inappropriate components are installed.
9 Technical data
9.1
171994 WAMIX-3M KOMBI vacuum mixer
with motorised pump and compressor
Voltage:
Power
consumption:
Output:
Speed:
Mixing time:
Vacuum:
Compressed air:
Safety class:
Pressure chamber:
Overall size:
Weight:
230 V / 50 Hz
1.8 A
230 W
350 rpm
up to 240 sec., adjustable
approx. 970 mbar
min. 3.5 bar
IP 44
interior 130 mm high, 250 mm deep
Capacity: 3 muffles
Operating pressure: max. 7 bar
Width 475 mm
Height 255 mm
Depth 395 mm
29.4 kg
- 14 -
9.2
171995 WAMIX-2M(S) vacuum mixer
with motorised pump, without vibrator
Voltage:
Power consumption:
Output:
Speed:
Mixing time:
Vacuum:
Safety class:
Overall size:
Weight:
9.3
230 V / 50 Hz
1.8 A
230 W
350 rpm
up to 240 sec., adjustable
approx. 970 mbar
IP 44
Width 350 mm
Height 190 mm
Depth 370 mm
16.1 kg
171996 WAMIX-2M vacuum mixer
with motorised pump and vibrator
Voltage:
Power
consumption:
Output:
Speed:
Mixing time:
Vacuum:
Safety class:
Overall size:
Weight:
230 V / 50 Hz
2.2 A
300 W
350 rpm
up to 240 sec., adjustable
approx. 970 mbar,
IP 44
Width 350 mm
Height 190 mm
Depth 370 mm
17.5 kg
- 15 -
9.4
171998 WAMIX-2 vacuum mixer
with injector
Voltage:
Power consumption:
Output:
Speed:
Mixing time:
Vacuum:
Compressed air:
Safety class:
Overall size:
Weight:
230 V / 50 Hz
1.6 A
190 W
350 rpm
up to 240 sec., adjustable
approx. 950 mbar
min. 5 bar
IP 44
Width 245 mm
Height 155 mm
Depth 300 mm
12.5 kg
Vacuum mixer noise emission ≤70 dB(A)
i
We reserve the right to make technical changes.
- 16 -
10 EC CONFORMITY CERTIFICATE
in accordance with 73/23/EWG (low-voltage guidelines) modified by 93/68/EWG and
89/336/EWG (EMV guidelines) and 89/392/EWG (Machinery guidelines), with
modifications
Product description :
Manufacturer W A S S E R M A N N
:
Dental-Maschinen GmbH
Rudorffweg 15 - 17
D-21031 Hamburg
Machine model:
Vacuum mixer for
dental applications
WAMIX-3M Kombi with motorised pump and compressor
WAMIX-2M(S) with motorised pump, without vibrator
WAMIX-2M with motorised pump and vibrator
WAMIX-2 with injector
Applicable standards:
(171994)
(171995)
(171996)
(171998)
EN 61010-1:1993 + A2:1995
EN 50081-1 + EN 50082-1
Pressure container ordinance (WAMIX-3M Kombi only)
DIN 45635 Part 1
Hiermit wird bestätigt, daß die oben bezeichnete Maschine den genannten EG-Richtlinien
entspricht. Diese Erklärung wird ungültig, falls die Maschine ohne unsere Zustimmung
verändert wird.
This is to confirm that the above-mentioned machine complies with the described EC rules.
This declaration becomes invalid if the machine is modified without our approval.
Cette machine est conforme aux normes en vigueur de la Communauté Européene. Cet
avis est nul et non avenant si cette machine est modifiée sans notre accord.
Esta máquina, anteriormente mencionada, cumple con los limites requeridos por el
reglamento EC. Ahora bien, esta declaración quedará invalidada en caso de realizar
modificaciones al aparato sin nuestra aprobación.
Hiermee wordt bevestigd dat bovengenoemde machine voldoet aan de voorgeschreven EU
normen. Deze verklaring verliest geldigheid als er zonder onze uitdrukkelijke toestemming
wijzigen aan de machine worden aangebracht.
Company stamp :
Place, date: Hamburg, den 10.Apr.2003
Signed: ________________________
Wilfried Wassermann
(Managing Director)
- 17 -
- 18 -
WASSERMANN Dental-Maschinen GmbH
Rudorffweg 15 – 17,
D-21031 Hamburg
Tel.: + 49 (0)40 / 730 926 – 0
Fax: +49 (0)40 / 730 37 24
e-mail: [email protected]
Internet: http://www.wassermann-dental.com