1
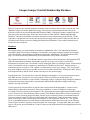
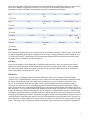
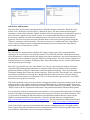
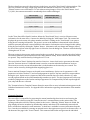
CAMPUS COMPACT CENTRAL MEMBERSHIP DATABASE User Information June 2011 Introduction to the Central Membership Database Welcome to Campus Compact’s Central Membership Database! The Central Membership Database (CMD) is a custom-designed program for storing and using information about your state’s member institutions. Each state office is responsible for keeping its state office and membership information current. This database program offers a number of tools and reports that are designed to help maximize your ability to use this information now and develop plans for the future. The access link to the database is http://members.compact.org/admin/login.php. Each office has at least one “power user” who has administrative privileges and can grant access to other people. The Executive Director is normally set as a power user. A power user in your office will set up any new persons as authorized users in the database and designate other power users. After logging in to the CMD, the area for adding a person to your state information page is found by clicking the “State Offices” command button at the top of the opening page. Click on the “View Details” icon (paper and pencil graphic) to open the “View State Office Details” page. Scroll down until you see the green button labeled “Add Contact.” Click on the words to open a dialog box. Your email address is your login ID. Fill in the fields with the new person’s information and password, select the user’s permission level, and then click the “Add” button. You can change your password by editing your contact information on the “State Offices Detail Page.” If you are not a power user, you will need to ask someone who has administrative privileges to log into the database and go to your contact information to allow you to enter a new password. If you forget your password, you can ask a power user to look it up in your contact information. There is a “Forgot Password” link on the database login page. When you click this link, you are prompted to enter the power user/administrator’s email address and click the “Send Password” button. Your password is sent to that email address. The information in this document is organized so that you will start with what you see and have available on the opening page. When you log in to the database, the default home page displayed is the “Members” page. The toolbar at the top of the page has icon command buttons that take you to various areas and actions available within the Central Membership Database. These areas are the main section headers with an explanation of what is seen when you go to that page. Proceeding mainly left-to-right and top-to-bottom, descriptions of the type of information available and how to enter information are provided. Embedded hyperlinks to subsections are noted with further information and instructions. Most of the information for your state’s Campus Compact office is already entered in the database. This user manual was developed to help guide you through the basics and provide instructions for entering and using the membership information. Periodically, live online training sessions are provided by the national office. Your individual office may have additional policies and procedures for invoicing and creating reports. At the end of the instructions, a page is provided to make notes regarding your office procedures and your personal user preferences. The appendices at the end of this document are replicas of documents sent out by the national office with information about using certain aspects of the database. This database was specifically designed for Campus Compact. We continue to make improvements and add features, and your feedback is valuable. If you find ways to improve what you are doing with the database or if you have suggestions for additional features you would like to have available, please share! When you need help beyond what is available in this user information document, please contact Betty Johnson, the Administrative/Membership Coordinator in the national Campus Compact office. You can reach her by email at [email protected] or by phone at 617-357-1881 x204. It is my hope that the information in this user information guide will aid your ability to successfully navigate the CMD and maximize the database tools provided. If and when changes are made with the database, please use the most current information available. Many thanks to Andrew Dean and Betty Johnson for helping me get it right! Dee Armstrong Missouri Campus Compact 1 Campus Compact Central Membership Database When you log on to the national database, the home window will have this tool bar across the top. The “Members” page is set as the default home page. The icons are command buttons that take you to different sections of the Central Membership Database (CMD). Clicking the Campus Compact logo will take you back to the home page. Below the main tool bar is a blue title bar, “Membership Manager Members,” with the total number of member institutions (active and inactive) on the left side. On the right side is a dropdown box to select how many items per page can be viewed. Below the blue bar is a search box with various criteria for finding information in the database. The member institutions are listed below the search box. Members This page displays your state member institutions in alphabetical order. The individual institution’s information page is accessed by clicking the “View details” icon (paper and pencil graphic) at the right side of the window. New members are added by clicking the “Add Member” link at the bottom of this page. If a school should drop membership, do not delete the record; mark it as inactive. The individual institution’s “View Member Details” page shows contact information, undergraduate FTE (full-time equivalent) enrollment, and member type (two year, four year, tribal, or university). Information is entered in the “Core Details” box by clicking the “Edit Core Settings” button. At the bottom of the “Core Details” box, the institution is marked yes for “Include on Email List.” Member status is indicated as active or inactive. Click “Update Core Information” to save any changes. The “Core Details” box can be hidden to allow more viewable area for the rest of the information. Clicking the “Hide” button will collapse this box, and the “Back” button returns you to the previous page. Directly below the “Core Details” box is the link “Manage Demographics.” A list of characteristics opens and “Yes” answers are entered. It is not necessary to enter no; the box can be left blank. The characteristics are as follows: Private; Public; Community College; Technical College, Religious; Women’s; Graduate/Professional; System Office; International; HBCU (historically black college/university); Hispanic-Serving; and Tribal. Contact persons for the institution are listed in the section below the demographics. Contacts can be added, edited or deleted in this section. Each person added as a contact is assigned a contact type according to his/her position in the institution. The eight important contact types that should be listed to receive resources are: Chief Academic Officer Contact, Chief Student Affairs Officer Contact, Community Service or Service-Learning Program Contact, Faculty Service-Learning Contact, Government Relations Contact, President Contact, President’s Staff Contact and Press Contact. Please do not alter or delete these contact types. Other contact types can be added, i.e., VISTA Member, Student, etc. The “System Tools” command button gives you the ability to add and define additional contact types in the “Manage Contact Types” window. A person can be more than one contact type. To assign more than one contact type to one person, press and hold the “Control” button on the keyboard while selecting multiple titles for that person. 2 The following graphic shows the information sections available in an individual institution’s page. These sections are uniform in appearance and are seen in all areas of the database where this type of information is added and edited, including the state office information details page. Add Contact: The contact box displays the person’s name, title, phone number and email. Clicking on the “View Details” icon (blue magnifying glass) opens a dialog box for entering or editing information, and clicking the red “X” deletes the contact. Information will not change and changes will not be saved if the exit box at the top right corner is clicked to close the dialog box. Add Note: A note can be added as a brief highlight or explanation when desired. Notes are entered with a short subject line and the database system marks them with a time and date stamp. Notes cannot be edited after they are posted. A new note with more detail can be created and then the previous one deleted. Notes are deleted by clicking the red “X” icon. Add Action: “Actions” refer to a management tool within the database. Actions are created and edited with the “System Tools” command button. An Action can be used to associate different member institutions with an activity and enable the system to apply search parameters to view information connected to the Action. As an example, an Action for a grant can be created with the grant title as the action name. “Spring Grant” recipients can be noted by going into the member details page and adding the “Spring Grant” Action with notes in the detail box about who received the grant and other information specific to that institution. A search of the membership database using the name “Spring Grant” as a filter option will display all institutions linked with that grant. In the “Reports” command button section, a “Membership List Report” generated with the same filter pulls out a report that can be exported as an Excel workbook, listing the participating institutions. If you want a single list that shows the individual recipients, create a “General Contact” using the grant name for the title, with individual recipients listed in the “Contact” box. In the “Reports” section, generate a “General Contact List Report” for the General Contact named “Spring Grant.” The report can be exported as an Excel workbook. More information is available in Appendix A. 3 Add Invoice, Add Payment: The state office can edit invoices and payments for individual member institutions. When the “View Details” icon is clicked for a specific invoice, a dialog box opens. The date, amount and description information can be edited, and if the “Update” button is clicked, the information is saved and the option to delete the invoice appears in the “Action” section. It is recommended that invoices not be deleted, because they cannot be retrieved in the database system. The same activity can be done with the payments. An invoice list report associated with the dates on the invoices can be generated using the “Reports” command on the main toolbar. The state-level invoice is viewable only in the “State Offices” section. More information about creating and customizing an invoice is found in the “State Offices” section and in the “Create Invoices” section. State Offices The “State Offices” command button displays the Campus Compact state office using the database. Clicking on the “View Details” icon opens the window “View State Office Details,” which shows the state office information in a similar format as the display for member institutions. Any contact information for the state office can be edited here using the “Edit Core Settings” button. You must click the “Update Core Settings” button to save changes. Clicking the “Hide” button will collapse this box, and the “Back” button returns you to the previous page. Below the “Core Details” box is the “Dues Details” box. Dues are assessed by the number of full-time equivalent (FTE) undergraduate students at an institution (dues for an institution that is primarily a graduate institution are based on the number of full-time graduate students). This area is edited by clicking the “Manage Dues” link at the bottom of the box. At the top of the “Dues Details” box, a dropdown box has three selections for assessing dues. Membership dues can be assessed as a flat rate charge, a system of tiered dues based on an institution’s FTE, or at a base rate plus a per student fee. Your office determines the way dues are assessed. FTE can be calculated using one of two methods: multiply the number of part-time students by 0.39, then add that number to the number of full-time students (IPEDS method); or divide the number of part-time students by three, then add that number to the number of full-time students (⅓rd method). The acronym “IPEDS” refers to the U.S. Department of Education’s Integrated Postsecondary Education Data System. If your state does not have an institutional research office or a state system office that reports enrollment numbers, The Higher Learning Commission has a directory section for their accredited institutions. This is a good source for finding the full-time and part-time enrollment numbers that are reported to the Higher Learning Commission by the institutions. The link to the HLC directory of institutions is http://www.ncahlc.org/component/option,com_directory. The U.S. Department of Education also has a web site for looking up information, called “College Navigator” at http://nces.ed.gov/collegenavigator/. In the “Dues Details” top section, the maximum dues amount is deliberately set at a very high number. Some Campus Compacts have different rates for institutions classified as a University rather than a fouryear institution, with another rate for the two-year institutions. 4 The dues details are entered in the text boxes in the lower part of the “Dues Details” editing window. The tiers are set with a low range, a high range and the dues amount for that level. You must click the “Submit” button to save information. To exit without saving changes, click on the “Back” button. As of 7/1/2011, the amounts assessed for membership dues remain unchanged. Full-Time (FTE) Undergraduate Students Up to 3,000 3,001 – 7,000 7,001 – 13,000 13,001 – 20,000 20,001 – 30,000 30,001 – 40,000 40,001 + Campus Compact Dues 2011-2012 (full year) $338 $630 $928 $1,221 $1,519 $2,053 $2,621 On the “View State Office Details” window, below the “Dues Details” box, is a series of boxes to enter information for the state office. Contacts are added by clicking the “Add Contact” link. The contact box displays the person’s name, title, phone number and email. Clicking on the “View Details” icon opens a dialog box for entering information. The person’s access to the database is determined in this window, and their personal password is stored with their information. Information can be changed in this editing dialog box and saved by clicking the “Update” button. Information will not change and changes will not be saved if the exit box at the top right corner is clicked to close the dialog box. Contacts can be deleted by clicking the red “X” icon. The next section is where notes can be entered as they are needed. Notes are entered with a brief subject line and the database system marks them with a time and date stamp. Notes cannot be edited after they are posted. They can be deleted by clicking the red “X” icon. The section below “Notes” displays the state-level invoices. A state-level invoice generates at the same time the “Generate Invoices” command button is used to create the individual institutions’ invoices. These invoices use the current information that is in the database at the time they are created. The invoice can be viewed by clicking the blue magnifying glass icon. Dues to national Campus Compact can be paid in two installments. Option one for payments is a full payment on or before October 15, and a second payment in April for any late renewals or new members during the year. Option two is a payment of half of the assessed dues on or before October 15, and a second payment based on the actual membership numbers on April 1. The April payment will reflect any members joining between the October and April payments. For campuses that join half way through the year, only half dues are collected. The “Customize Invoice Template” button allows the state office to enter information that appears on the individual institution’s invoices. See Appendix B for information regarding customization of the member invoices. Generate Invoices The state office is responsible for generating the annual membership dues invoices and entering the payments. This is done by using the “Generate Invoices” command button on the main toolbar. The opening window has a box for selecting a date for the invoice. When the “Submit” button is clicked, the page displays all active members by membership number and shows FTE, membership start and end dates, and the dues amount for each institution. A check box is available to remove institutions from the list. A text box is available for entering an optional invoice description more specific to the state office. At the bottom of the page is the “Create” button. This command will finalize and generate the individual 5 institution invoices and a state level invoice. The state-level invoice body cannot be edited after it is generated. It does not update with new information when a new member joins. The state office cannot delete state invoices. When a second invoice is created for the second installment payment, institutions that have already paid can be removed from the list. Your office will determine your policies for handling multiple invoice runs. It is recommended that if and when a state-level invoice should be deleted, an email is sent by the state’s Campus Compact Executive Director to the national office’s Administrative/Membership Coordinator (currently Betty Johnson) requesting her to delete the specified invoice number with its date. Deleting the state-level invoice does not affect the individual invoices. The “Invoice List Report” will only use the date(s) associated with the individual invoices. The state-level invoice is only viewable as an Adobe document. Downloading and saving documents and reports provides backup information for your records. Should questions arise, a saved copy can be referred to after the original is deleted out of the database. General Contacts Persons who may be associated with a Campus Compact office may not be associated with a specific member institution. People added in the “General Contacts” section might include other Campus Compact directors, contacts in the national office, people associated with specific Actions, etc. Reports concerning General Contact information can be accessed and printed by using the “Reports” command button on the main toolbar. You can create a general category for contacts and add individuals within that group in a similar manner that is used for listing contacts under a member institution. General contacts can also be linked to a specific action that is created in the “System Tools” section. System Tools “Actions” and “Contact Types” are created and edited using the “System Tools” command button. Clicking “Manage Actions” opens the window titled “Membership Manager Actions.” Clicking “Manage Contact Types” opens the window titled “Membership Manager Contact Types.” Items are viewed, edited or deleted in the same manner as in other areas of the CMD. The Campus Compact office requests that you do not delete or alter any of the default contact types, as they are associated with reports or mailings utilized at the national level. Reports The database can generate a number of automated reports. When you click on the name of a report, a new window with a search criteria box is opened. The search and filter options offered vary with different reports and assist with customizing what information you want to see. The “Search” button executes the command and displays the results. The search parameters can be quickly reset by using the “Clear Search” button. A report can be exported as an Excel workbook (.xls) or as an Adobe document (.pdf). The report options available are: Membership List Report Contact List Report Campus Contacts Report Master Membership List Collections Report-State Office Level General Contact Organization Report General Contact List Report Invoice List Report The Membership List, Campus Contacts, Master Membership List, Collections Report-State Office Level, and Invoice List reports can be exported as Excel workbooks or as Adobe documents. The Contact List, General Contact Organization and General Contact List reports can be exported only as Excel workbooks. The Invoice List Report is selected by date, and lists only the invoices that have that date. 6 Reminder Note: Remember to log out when you are finished. The database automatically logs you off when it sets idle for 60 minutes. The page may still display as you left it, appearing to “freeze.” Clicking the refresh button on the browser will bring up the login page again. NOTES FOR YOUR INDIVIDUAL OFFICE: 7 Appendix A www.openprofessionalgroup.com [email protected] p. 800.897.5709 po box 1295 westminster, maryland 21158 Overview of Actions and Purpose in the Central Membership Database Campus Compact Actions within the Central Membership Database are a wonderful tool to allow each state to develop and manage their own unique way of classifying members and general contacts and then later having the opportunity to pull lists by these classifications. Actions are assigned to either the member institution or to the general contact organization, not to individual contacts at these entities. Each state may define their own unique list of “actions” to be used in these two areas. This is accomplished by the “power user” at the state office accessing the “system tools” icon at the top of the screen and then selecting “Manage Actions.” If you do not see the system tools icon, you are not the “power” user for the given state office. Once you make this selection, you will see a list of all current actions. You may add a new action or edit/delete the action listed. You may create an unlimited number of actions in the system for your state. Once you have defined a list of actions, you will visit either an institution or a general contact. Beneath the form with the entity’s core details, you will see a child list with any existing actions as well as a control option to “Add Action.” If you select this option, a form will display to select the action you are assigning to the entity along with any description or note about that action for that entity. For example, let’s say you created an action for “2010 Spring Golf Tournament.” You could select this action and then, in the notes area, describe any details (e.g. won first place, made added donation of $1,000, etc). Simply click on the “add” button and the listing will refresh. You can assign unlimited actions to each entity. Once you assign a number of actions to the entities desired, you may then pull specific lists or search based upon these assigned actions. For example, if you assigned 10 members to the above example golf tournament, you could either run a search to find just those members who participated or run a report (such as a member list) of only members who participated. In the search forms and many of the reports you will notice a dropdown list with the label “Action.” In this list you will see any actions for your state and can choose this as a condition for the search or report. The examples and overview provided here are rather simple, but the action concept is limitless. If you wanted to create an action for “loves chocolate” you can do so and then find any of your members or contacts who love chocolate! You could create actions for things like “renewed early” or “do not contact by email” or most any other item you wish to define. If you think of this tool as a “classification” engine, for nearly any purpose, you will find lots and lots of uses. 8 (blank) 9 Appendix B www.openprofessionalgroup.com [email protected] p. 800.897.5709 po box 1295 westminster, maryland 21158 Overview of Custom Invoice Tools and Options Revision 1.0 August 30, 2010 As part of a recent upgrade to the Campus Compact membership database, two new tools are now available to those states who which to take more control over the invoice layout and formatting produced from the system. Previously, only one standard template was available and those states who chose to do something more unique were forced to manually create invoices outside of the system. Campus Compact has upgraded the system to provide two brand new and powerful tools t help states take control of this, all within the central database. The two new tools are: 1. Exportable Invoice List Report 2. Custom Invoice Template Designer Let’s review the details and value of each of these methods. Exportable Invoice List Report This new tool is both simple and powerful. As with the Invoice List Report that has always been present, this will provide you with a detailed list of every invoice for your state office on the date you select. But, since we now have an option to “Export to Excel” you can now use a data file to create your own mail merges, labels or most anything else you choose. To make use of this function, simply go to “Reports” and then select “Invoice List Report.” Next, you will either be asked to open or save the file, or the file will simply open in your browser. Just save the file, if not already open, open it in Excel or a similar program and you can then use the data any way you choose. In this format, every piece of data is in a separate column, so you can easily use it to create mail merges, import the data into other systems, run reports or otherwise use the data in any way you see fit. Every item of data found on the invoice itself, including the FTE is found in this report. Many of the states have asked for this option and it is now available to all states! Custom Invoice Template Designer This new tool is an advanced tool to allow more technical users to create and format their own invoices from within the membership database. This is similar to a “mail merge” tool that you might find in popular word processors. The difference is this tool allows you to fully format and modify the presentation of your invoices that are produced through the central membership database. And, since every state can make its own unique invoice, you have the ability to truly take control. If you want to add a notice to every invoice you send, you can to that with this engine. If you want to change the layout of the invoice, you can do that. If you want to format the invoice to fit on your letterhead, you can do it! This tool is powerful and we have even made it easier to use by setting up a “default” template that matches what is in the central system already. This way, you don’t have t o start from scratch. You can simply take the default and tweak it to fit your needs. Accessing this tool requires a few steps, so please follow the instructions below. PLEASE NOTE: YOU MUST BE A STATE OFFICE POWER USER TO ACCESS THSES FUNCTIONS. 10 First, after logging into the database, you will visit the “state office” section of the system. Select your state and choose the edit icon. At the top of the screen is the “core details” section. Toward the bottom of this form, you will see a new option with the label of “Use template for invoices.” You will notice that by default, this will be set to the option for “standard.” The “standard” option simply means that the system will use the same template is has always used. For now, just leave this as is. We’ll change the option to “special” once we have completed any modifications to the template below. If you continue to scroll down the state office details screen, underneath the invoice list for the state office, you will find a button labeled “Customize Invoice Template.” If you click on this button, you will see a new window open with a word processor-like editor display, and in the edit region the “default” template will be loaded. In addition to all of the formatting controls (bold, font, color, etc.), below the detail area to the right is a small set of diagonal lines. You can click on this to “drag” the editor window and make it larger if you would like to see more of the template at one time. This is a handy option to make visibility a bit easier. Now that you have the invoice open, you can make any updates or changes that you see fit. You can move some of the merge codes around, change from bold to normal or otherwise change the content. As you can tell, this system is based on a set of “merge codes” similar to a mail merge. Each merge code in this system is prefixed and suffixed by a double percent sign (e.g. %%). If you do not use the merge codes exactly as provided, the data from the database cannot be merged in. For a complete list of the merge codes and their common named, you will find a blue “View Merge Codes” link that opens up the listing. Any code listed can be used in the invoice. We highly recommend that you copy the code (on the right side) from the list and paste it into the editor just to be sure that a misspelling does not cause an issue. Within the merge codes, and in the default template, you will notice on unique grouping for the “payments” listing. This is an advanced tool and we recommend that you either use what is presented in the default or stick to simply cosmetic changes. If you need more in depth modifications to this section, just let us know and we’ll gladly offer assistance. Of course, you can add any text or link to any images that you have already uploaded to your website and include those items in this template. You can add your standard pricing ranges, notes to the customers of just about anything else that you wish to communicate to your membership. Once you have made the modifications that you wish to make, simply click the “save” icon in the upper left corner of the editor (picture of a disk) or click on the “submit” button below the editor. You will see a confirmation message and an “ok” button to continue. Since you have just modified the underlying template, if you wish to use this new template for your state’s invoices, you will now scroll back up to the “core details” form discussed above. Click on the “edit core settings” button and change the option for the field with the label “Use template for invoices” from “standard” to “special.” Save the form. Now, go to one of your members who already has an invoice and click on the “view” icon. You will now see the invoice that you have just created or modified. Of course, if changes are needed, you can go back to your state office screen, click on the “customize invoice template” and repeat the steps discussed above. The real power of this custom invoice editor is in the hands of the person working with the tool. If you just need simple changes, stick to the things you need. If you want to be more creative, feel free to play until your heart is content. Remember, you can always switch the system setting for your state back to “standard” and you can use the template that has been there for over a year. We encourage you to check this tool out if you have a need for it. If you do not, don’t worry yourself with trying to figure it out! These are additions provided to help more states get more out of the central membership system! 11 Campus Compact Database Directions for adding the state logo to the standard template: Click on the “State Offices” tab. Select the “view” icon for your state office. At the top of the page, in the core details, scroll down a bit until you are at the bottom of the form. Click on “Edit Core Settings” to activate the form. Be sure that the option is selected for “Standard” for the template to use. This logo will NOT work with the custom template; that is handled elsewhere. Below the template options next to “Logo” click browse. This will open a file dialogue for your computer. Browse to the desired location and select the image you wish to use for your logo. Once you find it, click open to select it. Please note: the size is fixed so that the maximum dimensions are 200x200 pixels. It can be smaller but that is the max. Now, click on “Upload” and the logo will appear in the form when completed. Next, click on the button reading “Update Core Settings” to save your changes. To test how the logo appears, go to the “Members” icon at the top of the page. Select a member and view one of their invoices to see how it appears. All of the standard invoice templates in all locations will now use the logo if supplied. Directions for using the custom invoice template and adding the state logo: Click on the “State Offices” tab. Select the “view” icon for your state office. Scroll to the bottom of the page. Click on the “Customize Invoice Template” button. This will open a new window with an advanced editor to modify your invoice template as you see fit. You can modify the body of the invoice as you see fit. When ready to upload your image, place your cursor in the editor where you wish for the logo to appear. To upload images into your template, look in the second row if icons. Just below the “paragraph” dropdown in the first row is an icon of a tree (next to the anchor). Click on this to open the image manager. When the new window opens, next to the “image URL” box, click on the icon. This will open the image library. If you have uploaded any images, they will be listed. To upload a new one, in the upper right is a link to “upload.” When the new box opens, click on the “browse” button to browse your computer for the desired image. Once selected, click on the “upload” button. When it complete, close this section (assuming you don’t want to upload another image). Your new image will now be in the list of images. Check the box next to your image. On the left, click on “select.” The library window will close. Now, click on “insert.” The logo will now display where you selected above. You may then save the template changes you have made. Once you have the template as you desire, on the State office details page, scroll to the top and click on “Edit Core Settings” to activate the form. Be sure that the option is selected for “Special” for the template to use. This enables the custom template you just created. Next, click on the button reading “Update Core Settings” to save your changes. To test how the logo appears, go to the “Members” icon at the top of the page. Select a member and view one of their invoices to see how it appears. All of the standard invoice templates in all locations will now use the logo if supplied. 5/25/2011 12