1
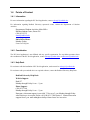
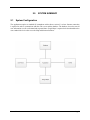
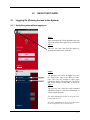
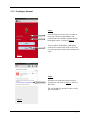
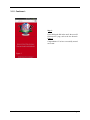
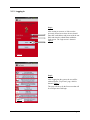
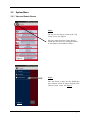
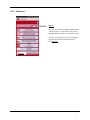
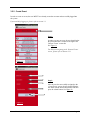
User’s Manual
Document
TEAM MEMBERS
William H Shorter, III
Andrew K. Wilson
Brock Canevari
Kris Kostadinov
Colin Doughty
www.radford.edu/softeng13
4/17/2014
USER'S MANUAL
TABLE OF CONTENTS
Page #
1.0
GENERAL INFORMATION...............................................................................................................................3
1.1
SYSTEM OVERVIEW ............................................................................................................................................ 3
1.2
PROJECT REFERENCES ....................................................................................................................................... 5
1.3
AUTHORIZED USE PERMISSION ......................................................................................................................... 5
1.4
POINTS OF CONTACT .......................................................................................................................................... 6
1.4.1 Information .................................................................................................................................................. 6
1.4.2 Coordination ................................................................................................................................................ 6
1.4.3 Help Desk ...................................................................................................................................................... 6
2.0
SYSTEM SUMMARY ...........................................................................................................................................7
2.1
SYSTEM CONFIGURATION .................................................................................................................................. 7
2.2
DATA FLOWS....................................................................................................................................................... 8
2.3
USER ACCESS LEVELS ......................................................................................................................................... 8
3.0
QUICK START GUIDE .......................................................................................................................................9
3.1
LOGGING ON (GAINING ACCESS TO THE SYSTEM)............................................................................................ 9
3.1.1 Using the system without logging on ..................................................................................................... 9
3.1.2 Creating an Account ............................................................................................................................... 10
3.1.3 Logging In.................................................................................................................................................. 12
3.2
SYSTEM MENU ................................................................................................................................................. 13
3.2.1 View and Search Events.......................................................................................................................... 13
3.2.2 Create Event .............................................................................................................................................. 15
3.2.3 Attending Event........................................................................................................................................ 16
3.2.4 Edit Event................................................................................................................................................... 18
3.2.5 Getting Directions.................................................................................................................................... 20
3.3
EXITING THE SYSTEM ...................................................................................................................................... 22
3.4
SPECIAL INSTRUCTIONS FOR ERROR CORRECTION ....................................................................................... 24
3.5
CAVEATS AND EXCEPTIONS............................................................................................................................. 24
4.0
FUTURE ENHANCEMENTS........................................................................................................................... 25
4.1
FUTURE FUNCTIONALITY ............................................................................................................................... 25
4.2
SIMILAR SYSTEMS – ADDITIONAL FUNCTIONALITY ...................................................................................... 25
4.3
MAINTENANCE CAPABILITIES ........................................................................................................................ 25
User’s Manual
Page ii
1.0
1.1
GENERAL INFORMATION
System Overview
System Name:
The name of the system is RU Social.
System Code:
QR Code for RU Social Download
System Category:
RU Social is considered a Major Application.
Operational Status:
RU Social is under development.
System Architecture:
The RU Social application is a client/server application. The user must have an internet connection in order
to send and retrieve the necessary information for the use of the application.
User Access Mode:
The user will interact with the RU Social application by use of the graphical user interfaces. The RU Social
interfaces are menu-driven, direct manipulation, and form fill-in.
Responsible Organization:
The organizations and parties responsible for RU Social are True Technology and Mr. Matthew Thomas.
User’s Manual
Page 3
General Description:
The RU Social android application is a social media application that can be used to raise awareness and
maintain information regarding social events on and off campus. Upon download of the RU Social
application, users will be able to view current and future events that have been created by the Radford
University student body. Furthermore, users can create a username and password in order to log into the
system. Upon log in the user can then, and only then, create events, RSVP to an event by pressing a
thumbs up button, edit the events that they have created. Users of the software will also be able to view a
map with pin-points of current and future events, as well as get directions from their current location to the
event location.
System Environment:
RU Social will run on Android OS smartphones with software update 2.2 or higher. This application will
require internet connectivity. Google Maps must be installed for the Map and directions to function.
Major System Functions:
View Events: The View Events portion of the RU Social software will allow users to view a list of top
upcoming events. The user may also select an event to see more information about the event such as time,
location, and event summary. From the view events page, the user may also search for an event by entering
a keyword or multiple keywords into the search bar.
Get Directions: The user may get directions to a specific event by selecting the event from either the ‘Top
Events’ page or the ‘Browse Events’ page, and then selecting the directions button at the bottom of the
page.
Create Account: The user has the option to create an account within the application. The user will be sent
an email after registering in order to confirm their email address.
NOTE: A user MUST create an account in order to create events, edit events, and RSVP to an
event.
Login: The user may login with the account they have created by entering their username, which is their
registered email address, and their created password.
Create Events: A user that has logged into their account may create and event by entering the necessary
information into the text fields on the ‘create an event’ page of the application.
Edit Events: A user that has logged into their account may edit an event that they have created.
Attending: A user that has logged into their account may navigate to a specific event and click a button in
order to confirm that they will be attending the event.
Logout: A user that has logged into their account will be able to logout from their user profile.
User’s Manual
Page 4
1.2
Project References
Applications:
RU Social
Eclipse
Microsoft Word
Microsoft Visio
GIMP
Web Resources:
www.radford.edu/softeng17
www.w3schools.com
www.radford.edu/softeng13
www.google.com/drive
People:
Dr. Tracy Lewis
Mr. Matthew Thomas
True Technology team members
Meetings:
Team conference meetings throughout the planning, requirements, design, and development processes were
all used in the development of this document.
1.3
Authorized Use Permission
In order to protect the safety and well-being of our clients, the student body, faculty, and others affiliated
with Radford University, you hereby agree to the authorized, responsible, ethical, and legal use of the RU
Social software. Unauthorized usage of this system will result in legal action on behalf of True Technology,
Mr. Matthew Thomas, and Radford University.
You hereby agree NOT to copy data provided by this application and claiming it as your own.
You hereby agree NOT to use this application for financial profit without obtaining permission.
You hereby agree NOT to use this application for anything other than its intended purpose.
You hereby agree NOT to use this application to engage in any activity that is not permitted by law.
You hereby recognize that any information posted on RU Social becomes public information.
User’s Manual
Page 5
1.4
Points of Contact
1.4.1 Information
For more information regarding the RU Social application, contact [email protected].
For information regarding Radford University sponsored events, contact the Department of Student
Activities:
Department of Student Activities Main Office
Hurlburt Student Center, Room 226
(540) 831-5332
[email protected]
Main Office Hours:
Monday-Friday
8 a.m. to 5:00 p.m.
1.4.2 Coordination
The RU Social application is not affiliated with any specific organization. For any further questions about
the coordination of the RU Social application, contact [email protected] or [email protected].
1.4.3 Help Desk
For assistance with the installation of RU Social application, send an email to [email protected].
For assistance with your android device or required software, contact the Radford University Help Desk.
Radford University Help Desk:
Walk-in Support:
Heth 157
Monday through Friday 8 a.m. – 5 p.m.
Phone Support:
(540) 831-7500
Monday through Friday 8 a.m. – 5 p.m.
Emergency classroom support is provided 7:30 a.m. to 5 p.m. Monday through Friday
when classes are in session. Please call (540) 831-7500 Option 2. Limited classroom
support from 5 p.m. until midnight weekdays when classes are in session.
User’s Manual
Page 6
2.0
2.1
SYSTEM SUMMARY
System Configuration
The Application requires an Android OS smartphone with software version 2.2 or later. Internet connection
is required in order to communicate with the web servers and the database. The database is used to store all
user information as well as submitted and requested data. Google Maps is required to be downloaded on the
users Android device in order to use the Map and direction functions.
User’s Manual
Page 7
2.2
Data Flows
All data that the user uploads and retrieves is stored in a database on the Radford University servers. The
data that is changed will be updated within the database.
2.3
User Access Levels
User access levels are dependent on several different aspects within the system. All users are able to view
the list of events, the map and get directions to events directly upon the download and installation of the
software. In order to post events and RSVP to an event, the user must have created an account which they
verified, via email. Upon the creation of an event, the user that has created the event gains the privilege of
editing or removing that particular event. Lastly, the system administrator has the ability to edit events,
remove events, remove pictures, and remove user accounts.
User’s Manual
Page 8
3.0
3.1
QUICK START GUIDE
Logging On (Gaining Access to the System)
3.1.1 Using the system without logging on
Step 1:
Upon opening the RU Social application, the user
will be directed to the Login screen, as shown in
Figure 1.
The user may open and close the drawer by
pressing the button on the action bar.
Figure 1
Step 2:
The user does not need to be logged in to view
the ‘Top Events’ page or the ‘Browse Events’
page. The user may navigate to these pages
opening the drawer, and selecting the Top Events
link or the Browse Events link, as shown in
Figure 2.
The user may also select the events contained
within these pages to view more information, as
well as request directions.
For more information on how to select an event,
please refer to 3.2.1
Figure 2
User’s Manual
For more information on how to get directions
to an event please refer to section 3.2.5
Page 9
3.1.2 Creating an Account
Step 1:
From the Login screen, the user can create an
account by entering an email address and
password into the text fields, and then clicking
the Register button, as shown in Figure 3.
The user will be notified that a confirmation
email has been sent to their email account. The
user must open their email account and open the
email.
Figure 3
Step 2:
When the user opens their email account an
email like the one shown in Figure 4, will be in
their inbox.
The user should click the link in order to verify
their email address.
Figure 4
User’s Manual
Page 10
3.1.2 Continued…
Step 3:
Upon clicking the link in the email, the user will
be directed to a page, such as the one shown in
Figure 5.
Congratulations! You have successfully created
an account.
Figure 5
User’s Manual
Page 11
3.1.3 Logging In
Step 1:
After creating an account, or if the user has
previously created an account, the user should
enter their email address and password in the text
fields and select the submit button within the
Login screen. The Login screen is shown in
Figure 6.
Figure 6
Step 2:
After Logging into the system, the user will be
redirected to the ‘Top Events’ page, which is
shown in Figure 7.
This page will always be the first screen that will
be seen upon successful login.
Figure 7
User’s Manual
Page 12
3.2
System Menu
3.2.1 View and Search Events
Step 1:
The user can view the top events on the ‘Top
Events’ screen. See Figure 8.
If the user wants to browse events, the user
should open the drawer by selecting the button
on the action bar and continue to Step 2.
Figure 8
Step 2:
Once the drawer is open, the user should then
select ‘Browse Events’ in order to navigate to the
‘Browse Events’ screen. See Figure 9.
Figure 9
User’s Manual
Page 13
3.2.1 Continued…
Step 3:
Once the user has successfully navigated to the
‘Browse Events’ screen, the user may scroll
through the list of events or search for an event.
The user can search for an event by entering a
keyword or keywords into the search bar.
See Figure 10.
Figure 10
User’s Manual
Page 14
3.2.2 Create Event
In order to create an event, the user MUST have already created an account and successfully logged into
the system.
If you need help logging in, please refer to section 3.1.
Step 1:
In order to create an event, the user should select
the plus button that is located to the right of the
‘Browse Events’ screen title.
See Figure 11.
For Help on navigating to the ‘Browse Events’
screen, please refer to Section 3.2.1
Figure 11
Step 2:
Once the user has successfully navigated to the
‘Create Event’ screen, the user should fill in the
text fields with the desired information and then
press the submit button. See Figure 12.
Figure 12
User’s Manual
Page 15
3.2.3 Attending Event
Step 1:
Starting from the ‘Browse Events’ screen, the
user should select an event that they want to
attend from the list of events. See Figure 13.
Figure 13
For Help on navigating to the ‘Browse Events’
screen, please refer to Section 3.2.1
The user may also select an event that they are
interested in attending from the list of events on
the ‘Top Events’ screen. See Figure 14.
This screen is the first screen that the user sees
after they Log into the system.
Figure 14
User’s Manual
Page 16
3.2.3 Continued…
Step 2:
Upon selecting the desired event, the user will be
redirected to the event page where they can view
more information about the event.
In order to ‘RSVP’ to the event, the user should
select the ‘Thumbs up’ button that is displayed
to the right of the event title.
If the user is not attending the ‘Thumbs up’
button will be white. See Figure 15.
Figure 15
If the user is already attending the event, the
‘Thumbs up’ button will be yellow.
See Figure 16.
Figure 16
User’s Manual
Page 17
3.2.4 Edit Event
Step 1:
The user may do this from any screen within the
application. In this example, the user starts from
the ‘Top Events’ screen.
The user must open the drawer by selecting the
button on the action bar. See Figure 17.
Figure 17
Step 2:
Once the drawer is opened, the user should
navigate to their user profile by selecting their
username within the drawer. See Figure 18.
Figure 18
User’s Manual
Page 18
3.2.4 Continued…
Step 3:
After the user navigates to their user profile, the
user will see that the events they have created
will be listed on the screen. See Figure 19.
Only the user that has created the event is able
to edit the event. If the user has not created any
events, there will be no events listed.
The user should select the event that they want
to edit from the list of events on their user profile
page.
Figure 19
Step 4:
After the user has selected the desired event,
they will be directed to a screen where they can
edit the desired information.
When the user has updated the information in the
text fields, they should select the submit button at
the bottom of the screen.
See Figure 20.
Figure 20
User’s Manual
Page 19
3.2.5 Getting Directions
Step 1:
Starting from the ‘Browse Events’ screen, the
user should select an event that they want to get
directions to from the list of events.
See Figure 21.
For Help on navigating to the ‘Browse Events’
screen, please refer to Section 3.2.1
Figure 21
The user may also select an event that they are
interested in getting directions to from the list of
events on the ‘Top Events’ screen.
See Figure 22.
This screen is the first screen that the user sees
after they Log into the system.
Figure 22
User’s Manual
Page 20
3.2.5 Continued…
Step 2:
Upon selecting the desired event, the user will be
redirected to the event page where they can view
more information about the event.
The user should select the ‘Get Directions’
button at the bottom of the screen.
See Figure 23.
Figure 23
Step 3:
The Google Maps application will be launched
and will contain a map with walking directions
form the user’s current location to the location
that is specified in the description of the event.
See Figure 24.
Reminder: In order for the user to get directions
via RU Social, they must have the Google Maps
application downloaded on their Android
device.
Figure 24
User’s Manual
Page 21
3.3
Exiting the System
Step 1:
The user may start the Logout process from and
screen within the application. In this case, we will
begin from the ‘Browse Events’ screen.
The user should select the button on the action
bar in order to open the drawer. See Figure 25.
Figure 25
Step 2:
After the drawer has been opened, the user
should navigate to their user profile by selecting
their username within the drawer.
See Figure 26.
Figure 26
User’s Manual
Page 22
3.3
Continued…
Step 3:
After selecting their username, the user is
redirected to their user profile.
To Logout, the user should select the ‘Logout’
button at the bottom of the page.
See Figure 27.
Figure 27
Step 4:
After the user has selected the Logout button,
they will be logged out of their account and then
redirected to the Login page.
See Figure 28.
The user may log in again, or they may exit the
application by pressing the home button on their
Android device.
Figure 28
User’s Manual
Page 23
3.4
Special Instructions for Error Correction
If an error occurs during the use of the application, the user should Logout of their account and close the
application by selecting the home button on their Android device. If a Logout cannot be achieved because
the error, the user should take the necessary steps to force close the application. If the error persists, the
user should report the error to [email protected].
3.5
Caveats and Exceptions
To ensure that all data input is saved, the user must ensure that they follow all of the steps listed in Sections
3.2, 3.3, and 3.4. The user should ensure that all text fields are filled in with the correct information and the
correct buttons are pressed.
The user must be running Android OS software version 2.2 or higher.
The user must have Google Maps downloaded on their Android Device.
User’s Manual
Page 24
4.0
4.1
FUTURE ENHANCEMENTS
Future Functionality
The software should eventually provide the user with the ability to search for events based on relevancy to
key words entered into a search bar.
The software should eventually provide the user with the ability to view all of their created events for easy
access and editing.
The software should eventually provide the user with the ability to view all of the events that they have
committed to attending.
The software should eventually incorporate a comments section to go along with each event, where users
can submit comments and view other user’s comments on a particular event.
The software should eventually allow users to connect with their friends, share events, and view what
events their friends are attending.
4.2
Similar Systems – Additional Functionality
Facebook Groups: Facebook groups allow users to view all of the events that they are attending, as well as
all of the events that they have created, on one single page.
BuzzMob: BuzzMob allows users to view comments and submit comments about certain events.
Hangtime: Hangtime allows users to connect with friends and view which events their friends are attending.
4.3
Maintenance Capabilities
Future maintenance of the system will be the responsibility of the client.
User’s Manual
Page 25